


This article is written by Daria Orlova.
Code review is a widely adopted approach in the world of software development. Having fellow developers check your code (and checking theirs in turn) helps eliminate mistakes, clean the codebase, and share knowledge across the team. But as helpful as it is, code review can still be quite stressful and time consuming. In this article, I would like to share some tips and ideas on how to make the code review process as simple and painless as it can be — both for those reviewing and those preparing the code for review.
Why do you need code review?
There are debates going around about the need for pull requests and code reviews, with some developers suggesting pair programming and mob programming as alternatives. (Wikipedia: Mob programming is a software development approach in which the whole team works on the same thing, at the same time, in the same space, and on the same computer).
While the goal of this article is not to compare these approaches, I still want to highlight some benefits of the code review process.
- Codebase knowledge sharing: In case mob programming isn’t your preferred approach, code reviews can help to keep your knowledge of the codebase up to date.
- Code maintainability: Code reviewers are the people closest to those who will maintain the codebase in the future, i.e., without memory of a given feature’s implementation. Their review can give insights into the code’s maintainability and how it can be improved.
- Second pair of eyes: We humans are the ones responsible for writing code (for now). We can get tired, and our eyes can get blurry, especially when we work on something for a long time. A second pair of eyes can catch things that we missed due to human error. It can also help to have someone else look over our work if they have more knowledge of or experience with a specific feature or piece of code.
- Programming knowledge sharing: Code reviews are a great way for more senior developers to pass their knowledge and best practices to less experienced developers. You can’t supervise the whole process of feature implementation, nor can you plan out all of the details in advance. This is why retrospectives of developers’ code can greatly contribute to their growth. It gives them an opportunity get to get their hands dirty with the implementation and learn better practices via code review.
- Documentation: Though more of an implicit consequence than a direct cause, if done right, the history of pull requests can serve as extra documentation for the codebase.

Code review approaches
I have encountered different approaches to code review, depending on the pull request, reviewer preference, time available, etc.
- Review per commit: This can only be done if the commit history is available and if it is clear enough.
- Review per file: This is easier to do if the pull request isn’t very big.
- Check out the code locally: This approach consumes the most time and effort, but it’s sometimes the only way to actually understand what’s going on.
Empathy as the guideline
Code review is a purely human communication process. And a good way to approach humans (especially the ones you need to work with) is with empathy. This includes the obvious: politeness, kindness, and respect. But you can go a step further and remember that when you’re assigning reviewers to look through your code, you’re requesting another person’s time and energy. Therefore, it’s nice to make the process easier for them, and doing so will probably result in a more efficient code review. So, keeping empathy in mind, let’s discuss some practical tips that can make your code reviewers happier.
Expectations
In general, all of these tips can be applied to almost any type of development and version control system (VCS). This article will consist of two parts: the theory and the practice. For the practical example, I will be creating a Flutter application using GitHub as the Git client and Codemagic as the CI/CD tool.

Part 1: Before and during coding
1. Branch naming strategy
So you have opened your task manager, selected a ticket, and moved it to “Progress”. What’s next?
Create a branch in which you will be working. And call that branch… what?
The branch name is your first opportunity to give your task context. In case your reviewer decides to check the code out locally, they will need to find that branch among many others.
There are several good approaches you can choose from, depending on how you manage work.
Approach 1:
If you’re using a task management tool that gives your tasks a prefix or number (e.g., Jira), then you can use that prefix too — especially to set up some hooks, such as to move the ticket to “Code review” when a PR is opened or “To test” when the PR is merged. For example, if the task name is ABC-57: Add list with purchases, then a good name for a branch would be ABC-57_purchases_list.
But why not just ABC-57?
Well, let’s compare these two options.
| List of branches A: | List of branches B: |
|---|---|
ABC-57 | ABC-57_purchases_list |
ABC-64 | ABC-64_fix_cart_npe |
ABC-73 | ABC-73_migrate_2.8 |
In which of these lists will you find the required branch faster? Using a naming convention that includes a description also helps when switching your own branches regularly, as you don’t need to remember or look up the ticket number.
Approach 2:
Use the same prefix + description approach, but instead of prefixing the name with the ticket number, prefix it with what it is: feature, bug_fix, refactor, etc. It’s best to use this approach only if there are no ticket names available. Here are a couple of examples:
feature_purchases_list or bug_fix_cart_npe
Approach 3:
Any other branch naming strategy is fine, as long as it is consistent and has a logical structure. Randomly naming branches can eventually lead to chaos. Not only is it harder to navigate between them but also more difficult to maintain. Which branches are stale? Can you delete them? Is there unmerged work? Is it still relevant?
2. Commit history
One code review strategy you can use is per-commit review — but only if the commit history makes it possible. Here is a really great and detailed article about how to correctly name your commits.
In short, here are some guidelines:
- Keep commit messages concise. It’s best to keep them around 50 characters, and 72 is the hard limit. Anything more than 72 is wrapped in GitHub.
- Use an imperative approach for your commit messages. Phrase it as what will happen when you apply this commit, e.g.,
Update headline text colororRemove unused imports. - This naming strategy is tightly coupled with an even more important notion for managing history: atomic commits. You can’t give a concise name to a commit unless it introduces a single logical change, i.e., it is atomic.
- If you have ticket names, as mentioned in the branch naming strategies, prefix every commit with the name of the ticket. This can make it easier to navigate the commit history by task and allow integrations with project management tools. For example, you can integrate Jira with GitHub so that the ticket descriptions also keep track of the commit history.
By just reading the commit history of the pull request, the reviewer can already gain some understanding of what they will be reviewing, even before seeing a single line of code.
If you want to go a step further, I’ve recently encountered an interesting approach to commits. The context of this approach is broader than just commit naming. You can read all about it here.
But the general idea is to write a commit name before you start coding. This will help you stay focused on one step at a time, provide more clarity on what you need to do, and implicitly make your commits atomic. I think this is a very interesting take and plan to try it myself.
Part 2: Before assigning the reviewers
The first thing to keep in mind is that you, unlike the reviewer, are currently immersed in the context of your task and your solution. But when the reviewer opens your pull request, all they have is what you give them. They didn’t write the code, and they didn’t spend X hours or days working on the problem. Therefore, it’s important to give as much context as possible in order to make the review more useful.
3. Provide context: Description and images
Description
When I talk about creating a description, I don’t mean to just link the Jira ticket to the PR and be done with it. This would require the reviewer to switch to Jira and read the description, which might have more information than necessary for code review… and yet give no clue about how the solution is implemented.
You can avoid this by providing a brief description and answering three questions:
- What? What is the task that is accomplished by this pull request?
- How? How is it implemented (an overview of your solution)?
- Why? If applicable (e.g., if several valid approaches exist), why did you choose this approach, or what are the impediments of the other approaches?
Thanks to this description, the reviewer will know what to look for in the code and why it was written the way it was. This enables them to provide more relevant comments.
You can ensure this by adding a pull request template in GitHub.
Images and videos
Evaluating the code while knowing what the actual result looks like is much easier than trying to imagine it. If your task is related to changes in the UI, adding an image of the end result (or a video, if it’s a flow) will greatly benefit the reviewer’s comprehension of the code. Or, if your task involves complicated logic, you can attach a sequence diagram that explains the algorithm.
4. Keep it small
The bigger the pull request, the poorer the code review will be. Code review is a tough process mentally — you need to read code, figure out what it’s doing, understand how it’s doing it, and look for potential problems. The more lines of code you need to keep in mind, the higher the chance that you’ll overlook something. Although there isn’t really a “golden” number of lines, I’d recommend sticking to under 500. If there are more, split them into multiple pull requests.
5. Keep it clean
No, I’m not talking about the architecture here. During development, we use all kinds of tricks: generating print logs, hard-coding specific values, leaving TODOs, and so on. To save some time and keep the reviewer’s focus on the feature at hand, make it a habit to ensure your pull request is clean before assigning reviewers. What do I mean by keeping it clean?
- Find and remove all of the debug logs and unused or commented-out code.
- Decide what to do with the
TODO:- Implement it.
- If you can’t implement it right away, create a task or leave at least some kind of estimation on when it will be done.
- Delete it if it’s either done or not relevant anymore.
- Regarding hardcoded strings (albeit not all of the possible hardcoded values), I’ve recently stumbled upon a tip from Vandad Nahavandipoor about suffixing all of your hardcoded strings with an emoji (with the help of an extension function, for example).
Pro tip: Most of those issues can be resolved with static code analysis tools, although some of them require custom rules implementation, depending on how you want to handle them.
6. Resolve all of the merge conflicts
This may seem like a minor thing because the feature is done, the code is final, and you can leave merge conflicts for later… But that isn’t always true. Your branch may have diverged a lot from the base branch, or some changes might clash with your code in a way that makes it impossible to merge without refactoring. And this will either require another review or get merged with possibly overlooked issues.
7. Exclude code-gen files
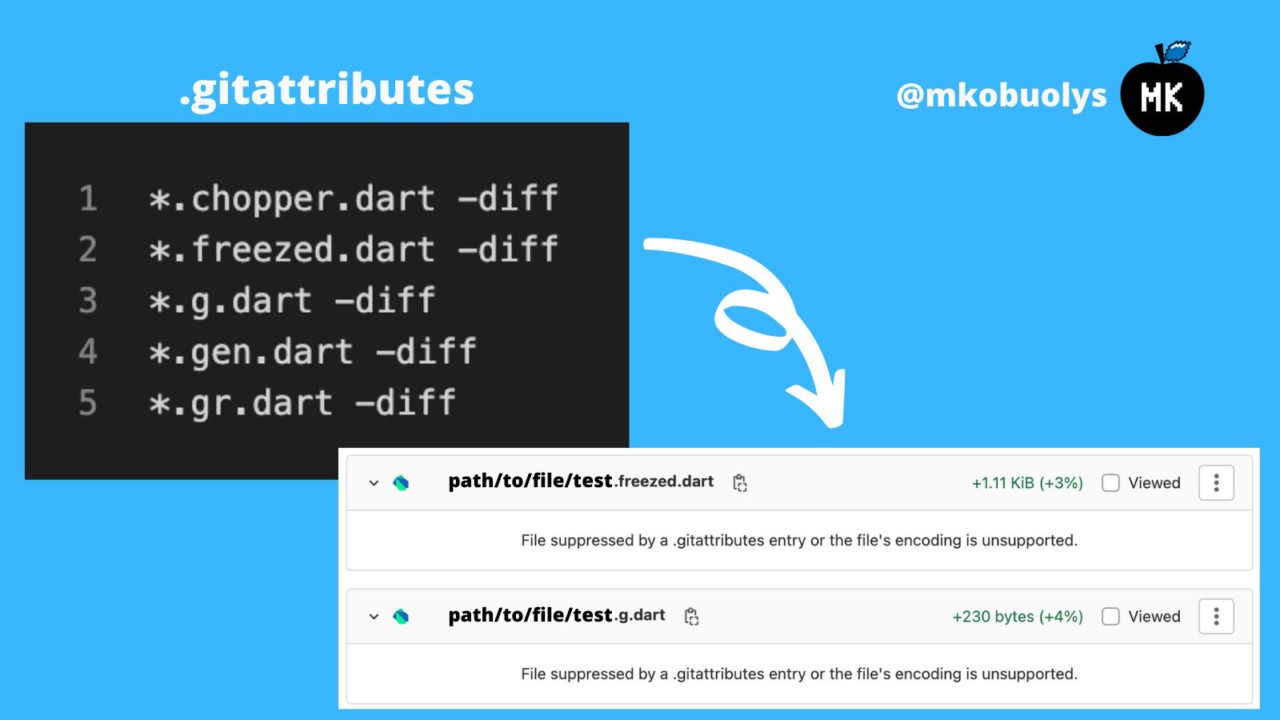
Code-generated files, such as JSON models or unit test mocks, don’t need to be reviewed. So seeing them explicitly in a diff doesn’t add any benefit and is just annoying. Different Git clients have different approaches to excluding such files from review. For example, in GitHub, you can add the patterns to .gitattributes, and they will be collapsed in the final diff.
8. Static code analysis
It’s a good practice to have static code analysis enabled. The Dart docs describe its perks very concisely:
Static analysis allows you to find problems before executing a single line of code. It’s a powerful tool used to prevent bugs and ensure that code conforms to style guidelines.
New Dart and Flutter projects have lint rules enabled by default. You can read how to enable them in existing projects here. Check out the rules for Dart here and for Flutter here. You can create your own rules or disable some existing ones.
Before assigning reviewers, make sure that your code doesn’t violate any lint rules. You can make sure of this with CI: Block the possibility of merging until there are no lint warnings.
Pro tip: You can go further with tools such as Dart Code Metrics.
9. Unit tests
Unit tests help identify problems and catch bugs in the early stages of development before anyone else even sees the code, let alone tests it. Additionally, they ensure that code behavior stays the same in case of code changes. As a bonus, they also cause you to write cleaner and more decoupled code, contributing to the overall code quality.
You can set up CI to run unit tests on every pull request and block merging in case anything fails. And you should fix any failing tests before marking the pull request as ready for review.
Pro tip: Enable code coverage reports with tools like Codecov.
10. Other markers, such as milestones and labels
Using markers such as milestones and labels is more of a nice-to-have tip, and depending on the size of the project, it can be omitted. But in larger projects, it can help to organize pull requests. For example, if there are a lot of pull requests to review, they can be filtered by milestone so that the PRs for the upcoming release are reviewed sooner. And labels can provide more context by indicating bugs, features, enhancements, etc.
Bonus tip
Review your own code before assigning other reviewers. Yes, you have just written this code and still remember everything. But giving it a fresh look, especially in the GUI of the Git client, can help you find some things that you may have previously overlooked.
Part 3: After review
Address and resolve all comments before merging. This way, you won’t leave anyone guessing what was implemented and what wasn’t. And by addressing, I don’t mean that you have to implement every single comment, but at least leave a reply or react with an emoji to indicate that it was handled or won’t be handled. Then the reviewer can resolve the conversation. GitHub even has a setting you can enable that blocks merging unless all conversations have been resolved.
Miscellaneous tips
Below, you can find a very small list of other things that you can do to improve code review and quality.
When writing code, try to read it. If you have to compute a lot as you read, then consider refactoring it. Computing code on the go means keeping a lot of things in memory, and human working memory is very limited. This means that the more computations you need to perform, the higher the chance you’ll miss something from the bigger picture, making the code review less effective. As a reviewer, if I find it hard to keep in memory everything that is going on, I ask to refactor the code. (Some examples of code that needs refactoring are complex boolean checks or long method bodies.)
Have a checklist of things to review and test before opening a pull request. For a mobile app, this can include configurations such as portrait and landscape, minimum and maximum API levels of the OS, flavors, and themes. I have a post about my own checklist, which is very old but still relevant.
GitHub has a feature called draft pull requests. If you want an early review, perhaps on a complicated feature, but the code isn’t ready for review yet, you can mark the pull request as a draft. I think that this is a neater solution than prefixing PRs with titles such as
WIP.Integrate other tools for controlling code quality. For Flutter devs, these might be Dart Code Metrics, Spec from Invertase, or various tools from Very Good Ventures.

Part 4: A sample project to showcase good pull request practices
Now let’s set up a sample project that will showcase some of these tips:
- Require that the static code analysis and unit test pass before merging with the help of Codemagic.
- Automatically run the checks on every pull request change via webhooks.
- Use a pull request template on every new pull request.
- And see some examples of pull requests.
Step 1: Create a repository with a Flutter project on GitHub
https://github.com/darjaorlova/codemagic_pr_todo
Step 2: Add the project to Codemagic
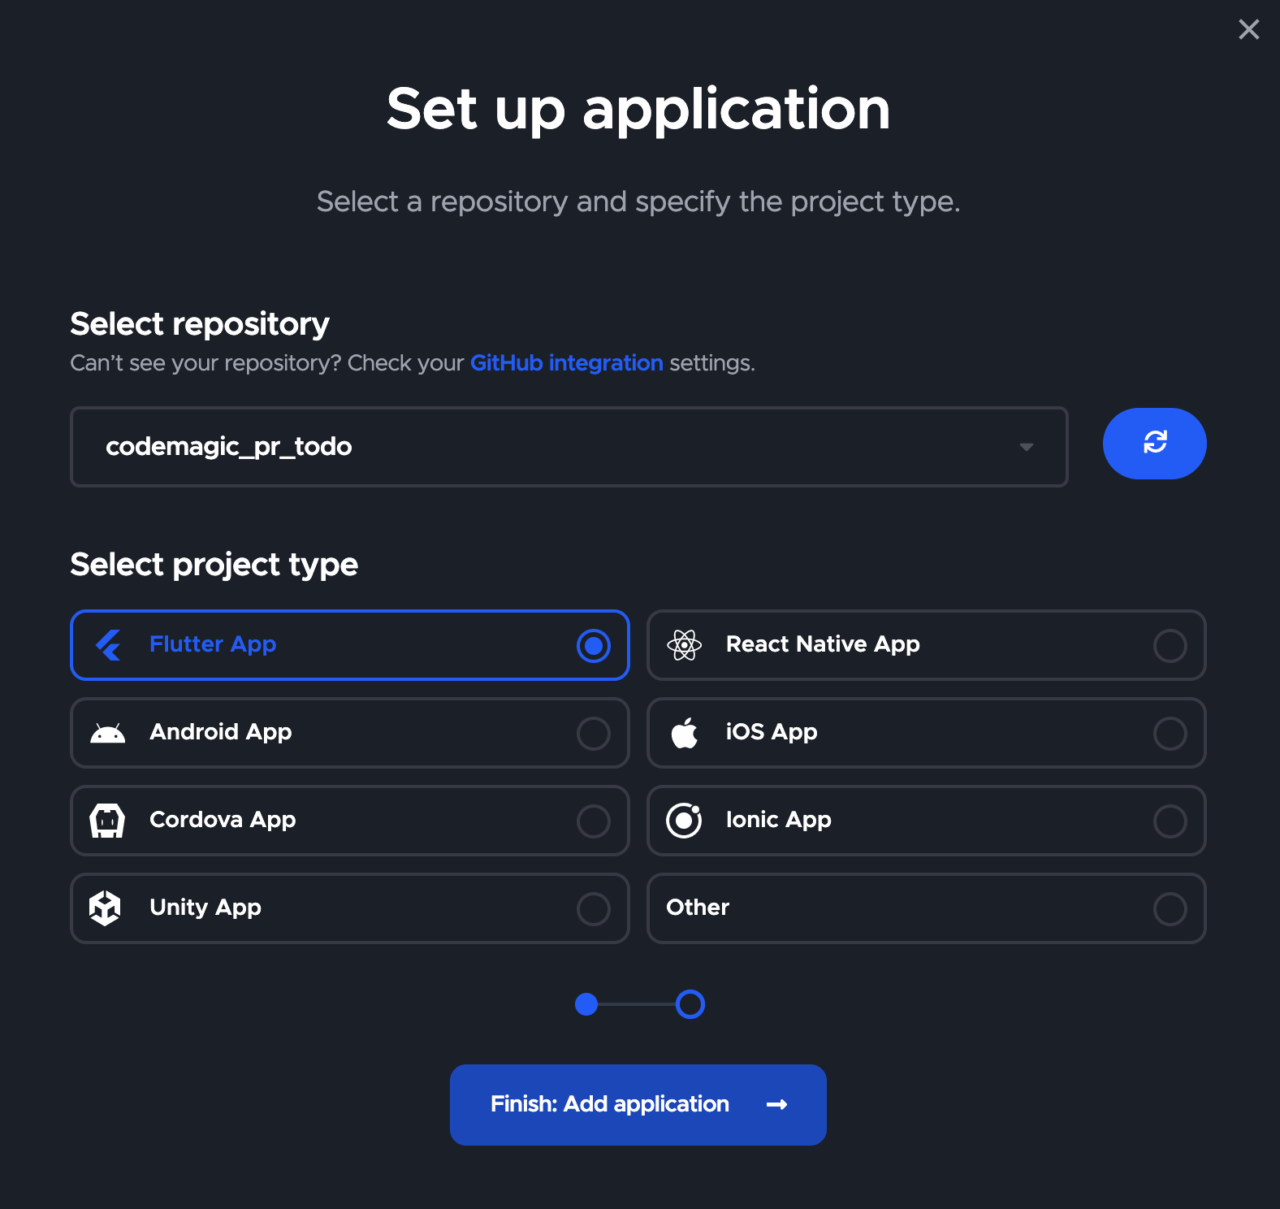
Codemagic has a Workflow Editor option for Flutter, which makes it super easy to set up a full-fledged CI/CD pipeline for Flutter projects using a rather intuitive GUI. So, for the sake of simplicity, we’ll use Codemagic’s Workflow Editor here.
Step 3: Create a workflow for pull requests
In Codemagic, click Duplicate workflow.

Click on the Workflow name and change it to
Pull request.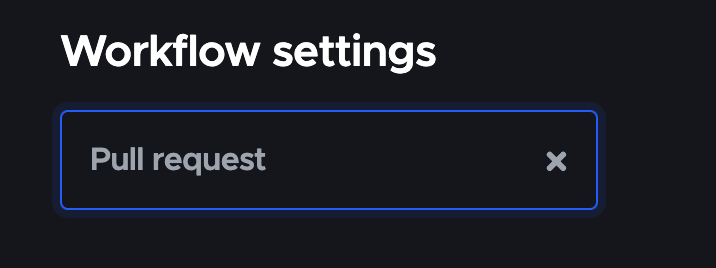
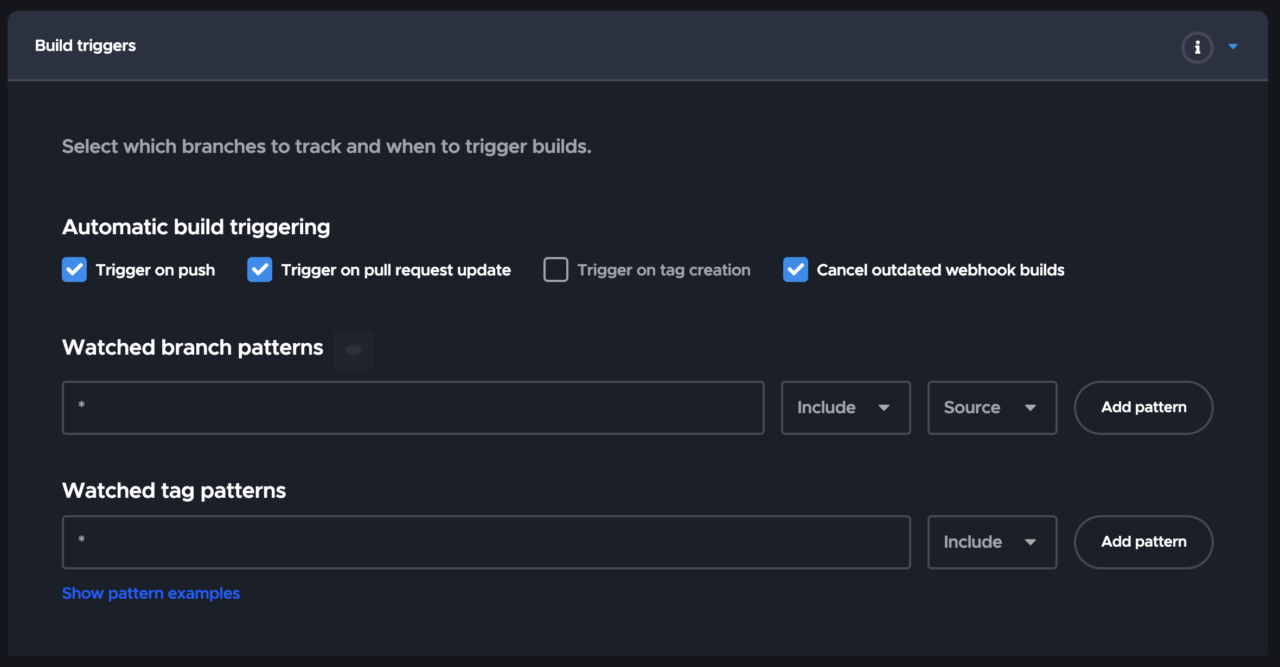
Step 4: Configure the workflow to run only tests
In Codemagic’s Workflow editor, select the Run tests only checkbox.

Expand the Build triggers tab, and check the following checkboxes:
- Trigger on push
- Trigger on pull request update
- Cancel outdated webhook builds
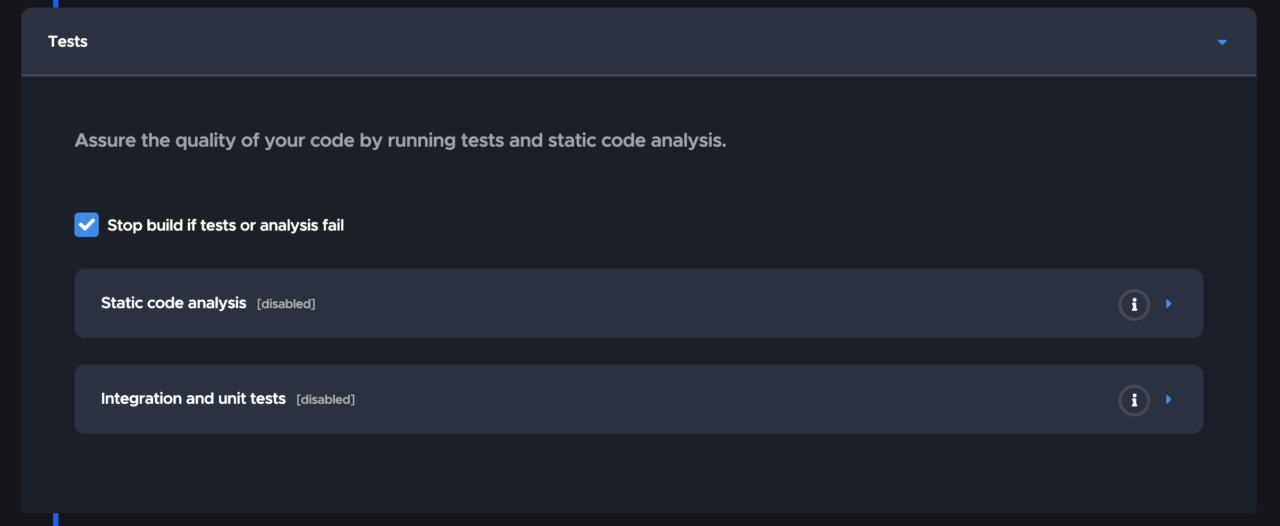
Expand the Tests tab and make sure Stop build if tests or analysis fail is checked.
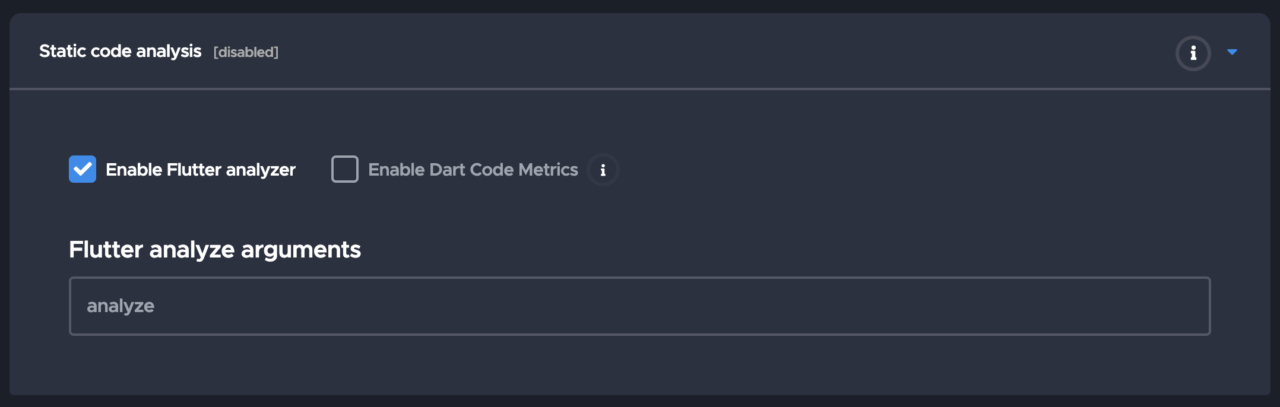
Check the Enable Flutter analyzer checkbox in the Static code analysis tab.
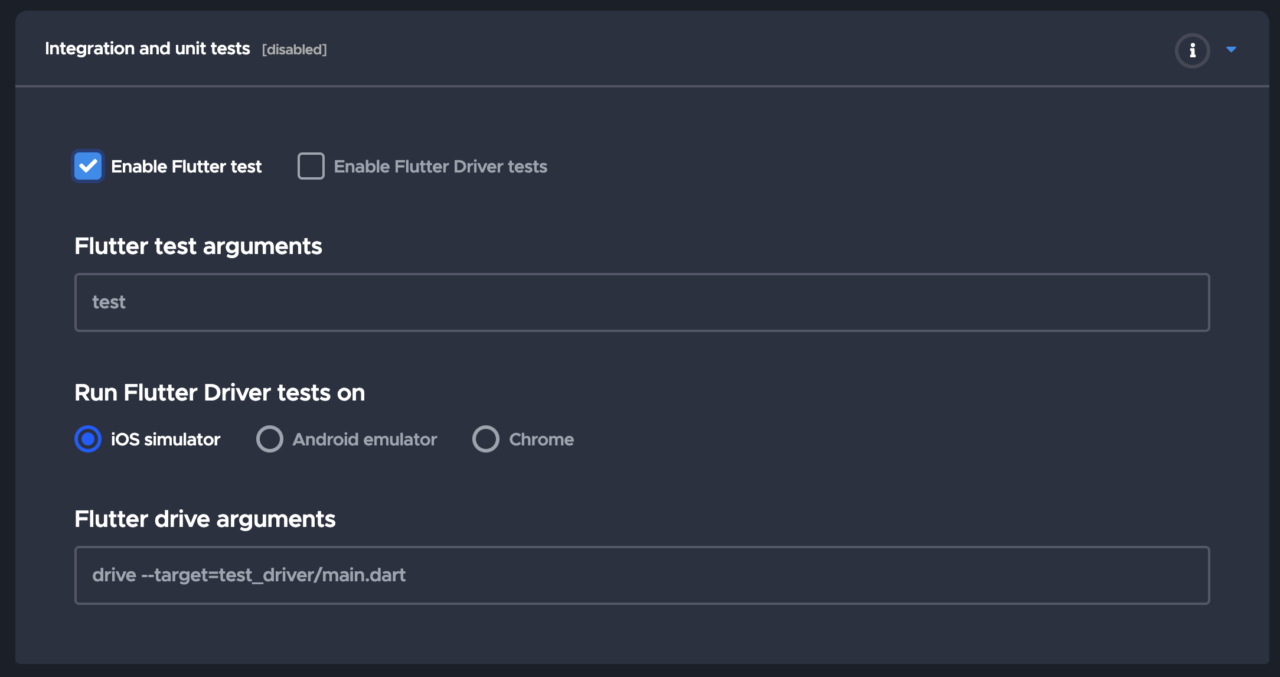
Check the Enable Flutter test checkbox in the Integration and unit tests tab.
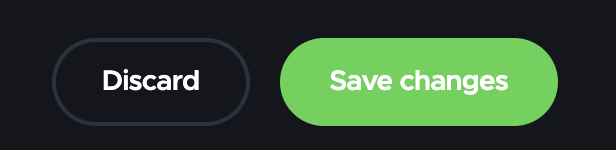
And that’s it for the workflow setup. Don’t forget to save the changes!
Let’s start our first build to make sure it works.
Step 5: Configure branch rules in GitHub
Important: Branch protection rules can only be set if you have a GitHub Pro or Teams account.
Open Settings → Branches → Add rule.
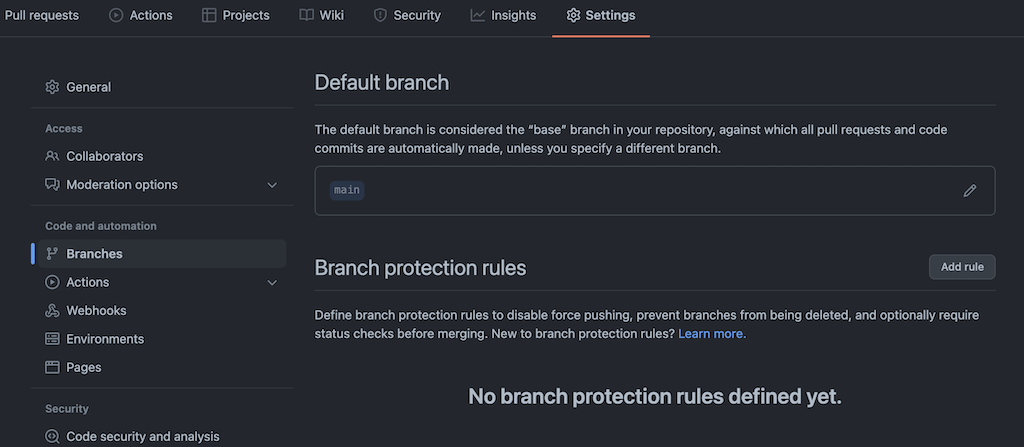
Check all the boxes that you need. In our case, they are:
- Require a pull request before merging
- Require approvals: 1
- Require status checks to pass before merging
- Require branches to be up to date before merging
- Require conversation resolution before merging

Fill in the branch name and save.

At this point, our codebase consists of the basic Flutter counter app example. Let’s test the integration:
- Create a branch with the prefix
test_codemagic_integration. (Here,testis a prefix I’ll use for branches that are testing something without introducing features.) - Add an unused import or anything else that will raise a lint warning and push it.
- Create a pull request. We should see that the check has failed.
- Create a branch with the prefix
This is the PR: https://github.com/darjaorlova/codemagic_pr_todo/pull/1
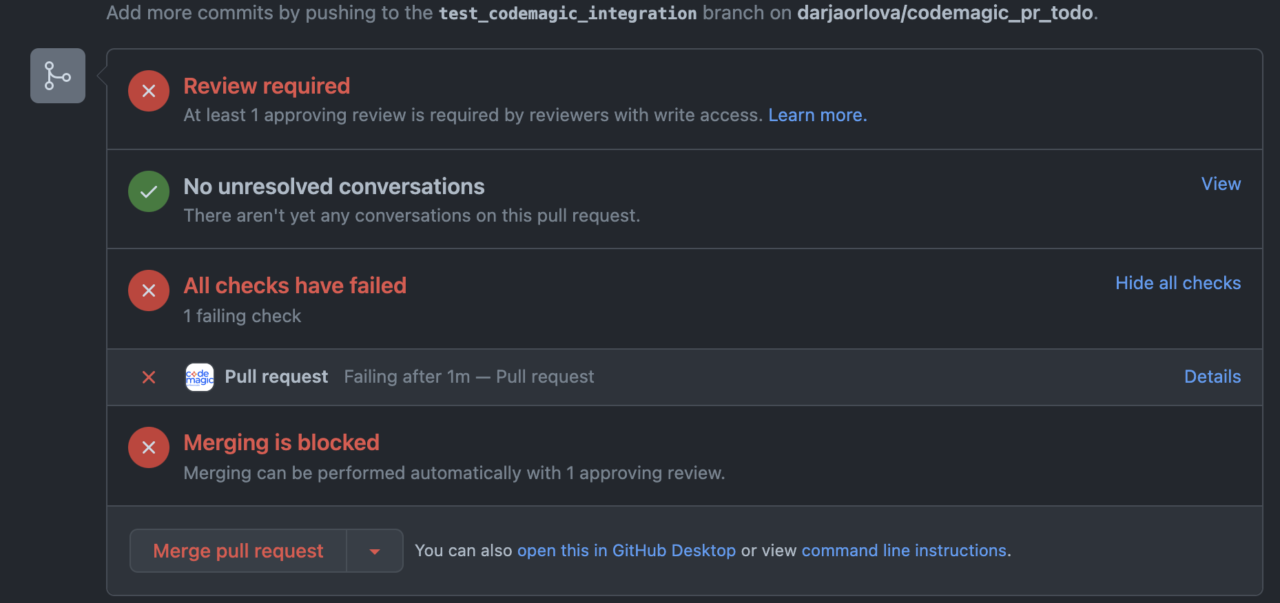
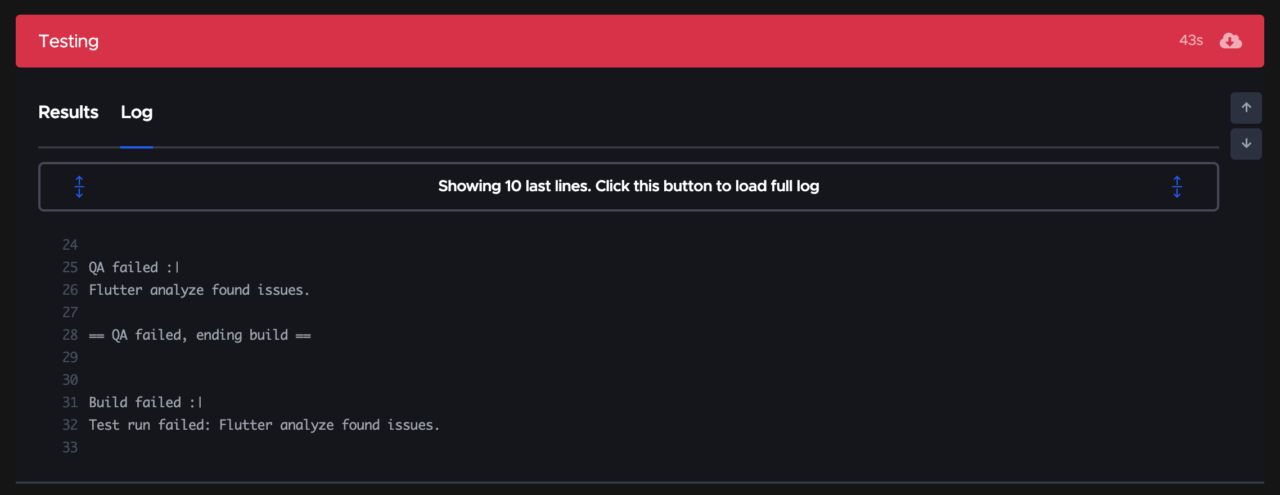
And if we check it in the Codemagic console, we will see that the build failed:
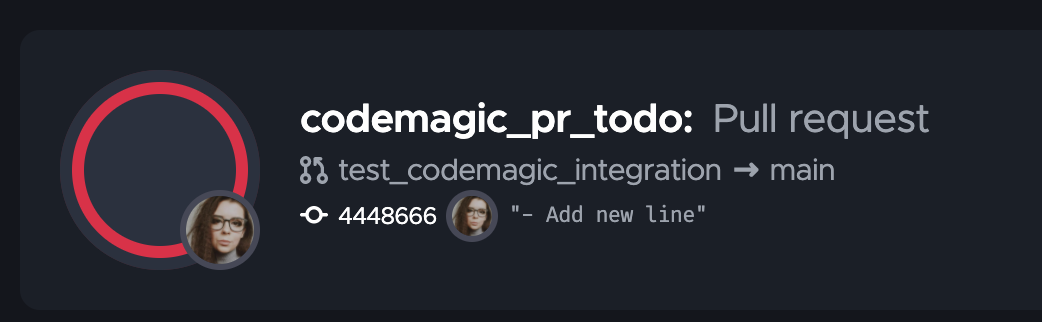
In the build details, we can see that Flutter analyze has found issues.
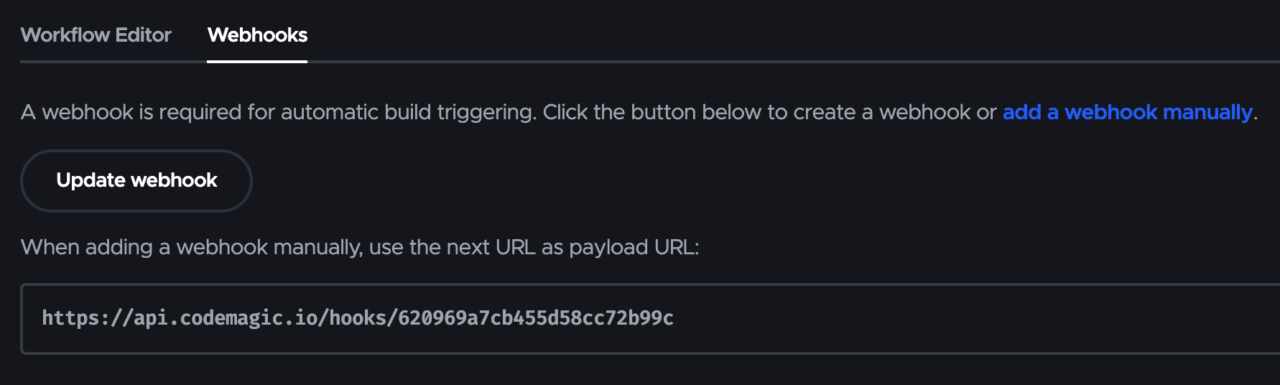
At this moment, you might have a couple of questions: How did Codemagic know when to run the workflow, and how did it report to GitHub? The answer is via webhooks. A webhook was added automatically when we connected our project to GitHub, and in the first steps, we set the triggers for that webhook.
You can check it in the Codemagic project settings:
And in GitHub: Settings → Webhooks
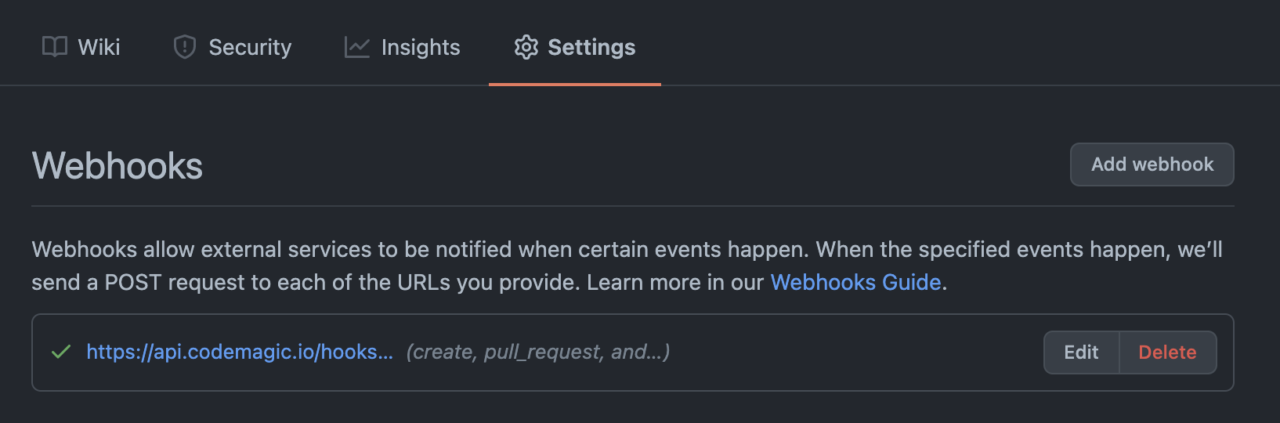
This is a status check that we set as required in the branch protection rules.
Step 6: Add GitHub PR template
- In the root folder of our project, we need to add a file called
pull_request_template.md. - Fill it in (commit, push, and merge into
main).
## Description

1. What type of code this is (e.g., bug fix, new feature)
2. What it does and how it does it
3. Why it is done that way (if required)
4. Nice to have: images/videos (if it involves the UI)

## Checklist

- [ ] Has unit tests
- [ ] Coverage is at least 90%
- [ ] Has documentation
- [ ] Has release milestone
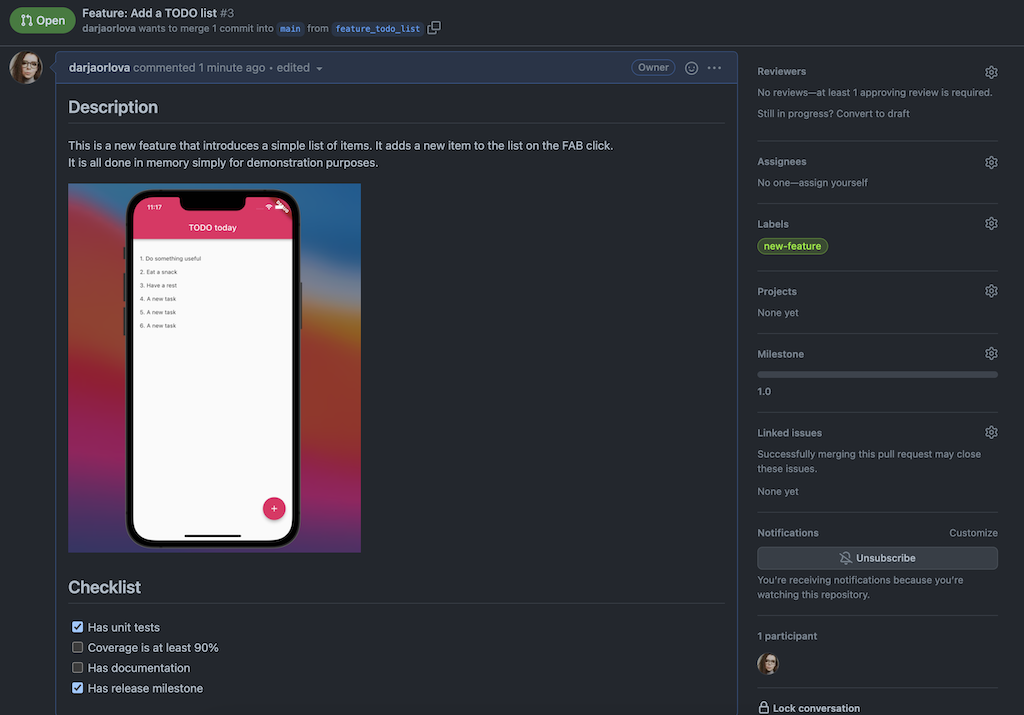
The next time we open a pull request, it will already be prefilled for us:
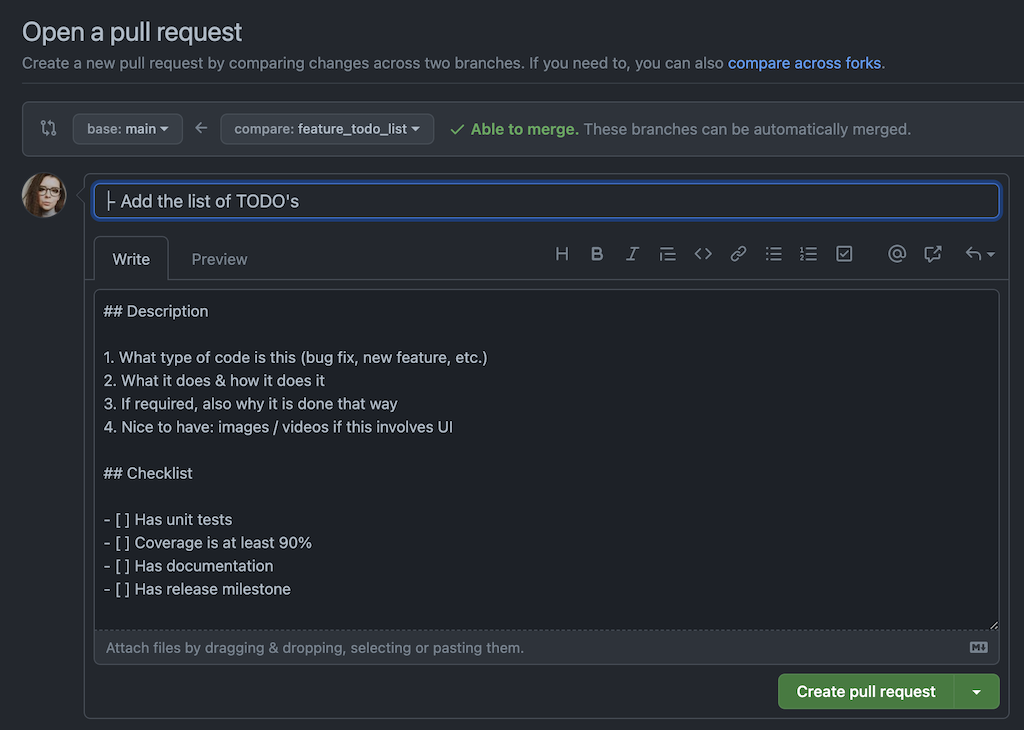
And the result looks like this: https://github.com/darjaorlova/codemagic_pr_todo/pull/3
Conclusion
We have now finished with the integration. I hope you’ve learned something new. These tips on making pull requests clearer and easier to review will help simplify your life as a developer. Happy pull-requesting!
If you want to replicate this project and check out examples, the GitHub repo with the codemagic.yaml file is available here.
Daria 💙
Daria Orlova is a Flutter enthusiast and Senior Flutter Developer at Chili Labs, as well as a co-creator of the Bunny Search app, which allows you to find cruelty-free brands. If she’s not writing code or participating in some Flutter meetup, you can usually find her reading a book or posting something to her Twitter or Medium blog.


