


This article is written by Nihal Agazade
UI testing in mobile app development is a challenging task due to multiple factors such as flaky tests, saving screenshots, printing useful logs and readability of test codes. We will be talking about a new UI testing framework Kaspresso for Android apps and how it is different from other frameworks when it comes down to solving these challenges.
What is Kaspresso and why should it be chosen?
Kaspresso is based on Espresso and Kakao DSL which helps it have a great readability of test codes and comes with many built-in features:
- Kakao DSL based test code readability. For our better understanding, let’s quickly check how Kaspresso Kakao DSL wrappers differ from Espresso:
Espresso
@Test
fun LoginActivity() {
    onView(withId(R.id.login_button))
        .check(ViewAssertions.matches(
               ViewMatchers.withEffectiveVisibility(
                       ViewMatchers.Visibility.VISIBLE)))
    onView(withId(R.id.login_button)).perform(click())
}
Kaspresso
@Test
fun LoginActivity() {
    MainScreen {
        LoginButton {
            isVisible()
            click()
        }
    }
}
- 100% flaky test protection, thanks to its built-in protection rules.
- Allure Testops support
To learn more about what else Kasspresso offers, feel free to check the official documentation.
How to get started with Kaspresso?
- First and foremost,
mavenCentral()needs to be declared inside the rootbuild.gradle. Make sure thatjcenter()is removed from the project along with the dependencies that requirejcenter().
Note: Recent native android projects have it defined inside settings.gradle instead:
pluginManagement {
    repositories {
        gradlePluginPortal()
        google()
        mavenCentral()
    }
}
- Open
app/build.gradleand integrate Kaspresso into your project by adding the following line:
dependencies {
    androidTestImplementation("com.kaspersky.android-components:kaspresso:1.5.3")
}
By this, we are good to go with Kaspresso unless Allure Testops needs to be integrated which requires additional steps to be followed, and we will be talking about it in the next section.
We briefly talked about what features Kaspresso introduces and what makes Kaspresso different from other frameworks. Let’s go through some of the key features for further clarification.
Painful flaky tests
Test flakiness is something we can hardly avoid considering that our code constantly changes, adding new screens, new functionalities etc. There are multiple reasons that could be the actual cause of flaky tests, such as:
- Real devices or emulators
- Test code
- Production code
- General infrastructure
- Or even instability with the testing framework you are using
Kaspresso has it reduced to the very minimum with its DSL wrappers and Interceptors. Interceptors are built-in and help achieve many useful things, e.g:
- add custom actions to each framework operation like writing a log or taking a screenshot;
- overcome flaky operations by re-running failed actions, scrolling the parent layout or closing the android system dialog;
For an example, ScreenshotStepWatcherInterceptor is utilised to take pictures whether tests fail or pass and it is part of TestCase() constructor:
class SimpleLoginActivity : TestCase(
    kaspressoBuilder = Kaspresso.Builder.simple().apply {
        stepWatcherInterceptors.add(ScreenshotStepWatcherInterceptor(screenshots))
    }
)
TestCase() is a class inherited from com.kaspersky.kaspresso.testcases.api.testcase.TestCase which is out of the box ready for use.
Screenshots
Kaspresso has made the process of taking screenshots much easier via its interceptors. It is possible to take snapshots of every screen while tests are executed and save these screenshots under a desired file name through the device.screenshots.take("desired_file_name") method:
   @Before
   @Test
   fun test() {
       run {
           step ("Products dropdown is available") {
           device.screenshots.take("screenshot_file_name")
           ProductsScreen {
               testActivityButton {
                   isVisible()
                   isClickable()
               }
             }
           }
       }
   }
Permissions must be granted for screenshots to be taken by importing androidx.test.rule.GrantPermissionRule, otherwise there will be no READ_EXTERNAL_STORAGE nor WRITE_EXTERNAL_STORAGE in place. So, at the top of the Kotlin Class/File where the kotlin test code is stored, GrantPermissionRuleneeds needs to be imported:
import androidx.test.rule.GrantPermissionRule
and then, within the same file, @Rule must be declared which is inherited from org.junit.Rule:
@get:Rule
    val grantPermissionRule: GrantPermissionRule = GrantPermissionRule.grant(
        android.Manifest.permission.READ_EXTERNAL_STORAGE,
        android.Manifest.permission.WRITE_EXTERNAL_STORAGE
    )
Besides these changes, AndroidManifest.xml needs to be configured for a complete permission cycle:
<manifest>
    <uses-permission android:name="android.permission.WRITE_EXTERNAL_STORAGE" />
    <uses-permission android:name="android.permission.READ_EXTERNAL_STORAGE" />
    <application>
    </application>
</manifest>
Kaspresso device.screenshots.take object is similar to device.uiDevice.takeScreenshotfrom the uiautomator library, however the key difference would be custom file names that can be easily managed through device.screenshots.take, especially when there are lots of snapshots and it can be tricky to find the appropriate ones.
Note: A video mp4 file is saved to sdcard/Documents along with screenshots and you can find an exact file path in the logs which is explained in the following section.
Logging
Custom notes can be added to the logs, and for that purpose testLoggerobject can be used with the i method:
fun test() {
       run {
           testLogger.i("Either hardcoded or dynamic values through env vars $VALUE")
           MainScreen {}
However, there is another challenge at this point and it is about splitting test internals into different steps, so that which tests fail and which ones pass can be observed easier.
What we can do is to wrap our code in try catch block along with adding manual logs to the output. Something like:
@Test
    fun sampleTest() {
        try {
            Log.i("Step 1:")
            MainScreen {
                loginActivityButton {
                    isVisible()
                }
            }
            Log.i("Step 1: Succeeded")
        } catch (e: Throwable) {
            Log.i("Step 1: Failed")
            throw e
        }
     anotherTest(){
      try {
       ...
       Log.i("Step 1:")
     } catch(e: Throwable){
      Log.i("Step 2: Failed")
    }
}
Works! Though with all the try catch blocks, the code will lose its readability and potentially, lead to flakiness.
In the Kaspresso world, Steps can be added in order to simplify code readability and more importantly, by keeping its flaky reduction rules. Steps can be used by declaring the run{} method:
fun test() {
       run {
           step ("Testing user registration auth") { ... }
           step ("Testing user login auth") { ... }
           ...
       }
   }
and then we can observe our crafted logs:
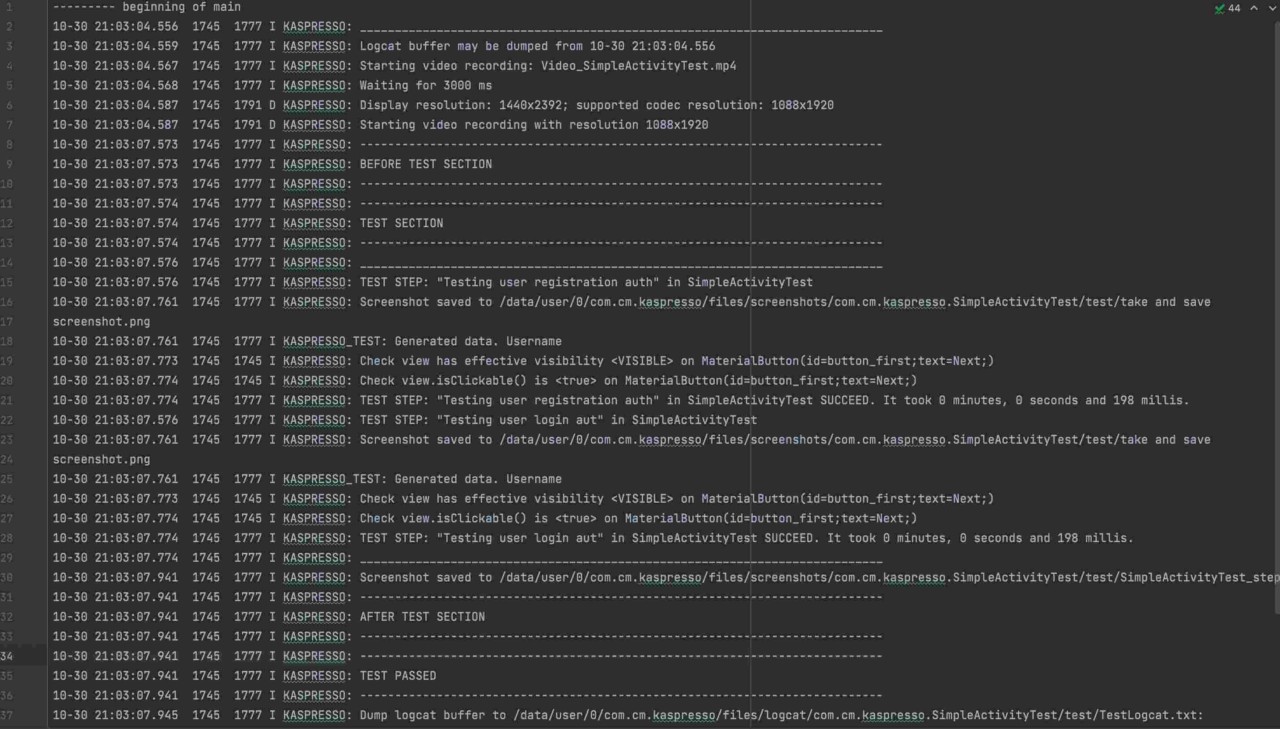
Complete automation with Codemagic CI/CD and uploading results to Allure Testops
We can further automate the process and upload test results to Allure Testops.
Thanks to Codemagic, we can automatically run UI tests, collect logs, and deploy results to Allure Testops on every change or daily.
Allure Testops is a DevOps ready test reporting platform where we can analyse test results through graphical reports and gathering results from servers in real-time while the build job is being executed. In order to achieve it with Codemagic, we will be utilising allurectl which is a command line wrapper of Allure Testops API. Allure Testops functions in two modes:
- CI mode
- Non-CI mode
allurectldetects automatically which one is in use through finding the required environment variables specified in Codemagic as explained below. So, let’s get the steps together for an easy flow of the process:
- Sign up with Allure Testops.
- Go to your profile, and create a secret token

- As soon as your request for registration is approved by the Allure Testops team, you will receive an active endpoint to your work environment.
- Create a project and fetch its ID.
The very vital step not to miss is to enable Allure support in our test code via withForcedAllureSupport. In order to enable it, we need to go through a couple of steps in our code:
- Import
com.kaspersky.components.alluresupport.withForcedAllureSupport - Add
withForcedAllureSupporttoTestCase()constructor which will look like:
class YOUR_ACTIVITY_TEST : TestCase(
    kaspressoBuilder = Kaspresso.Builder.withForcedAllureSupport()
)
After this, as soon as our tests are executed, there will be a directory created (sdcard/Documents/allure-results) and they will be pulled out of the device and uploaded to Allure Testops by Codemagic.
If you have not signed up with Codemagic and yet added your repo, you can follow the steps as explained in the Codemagic documentation here.
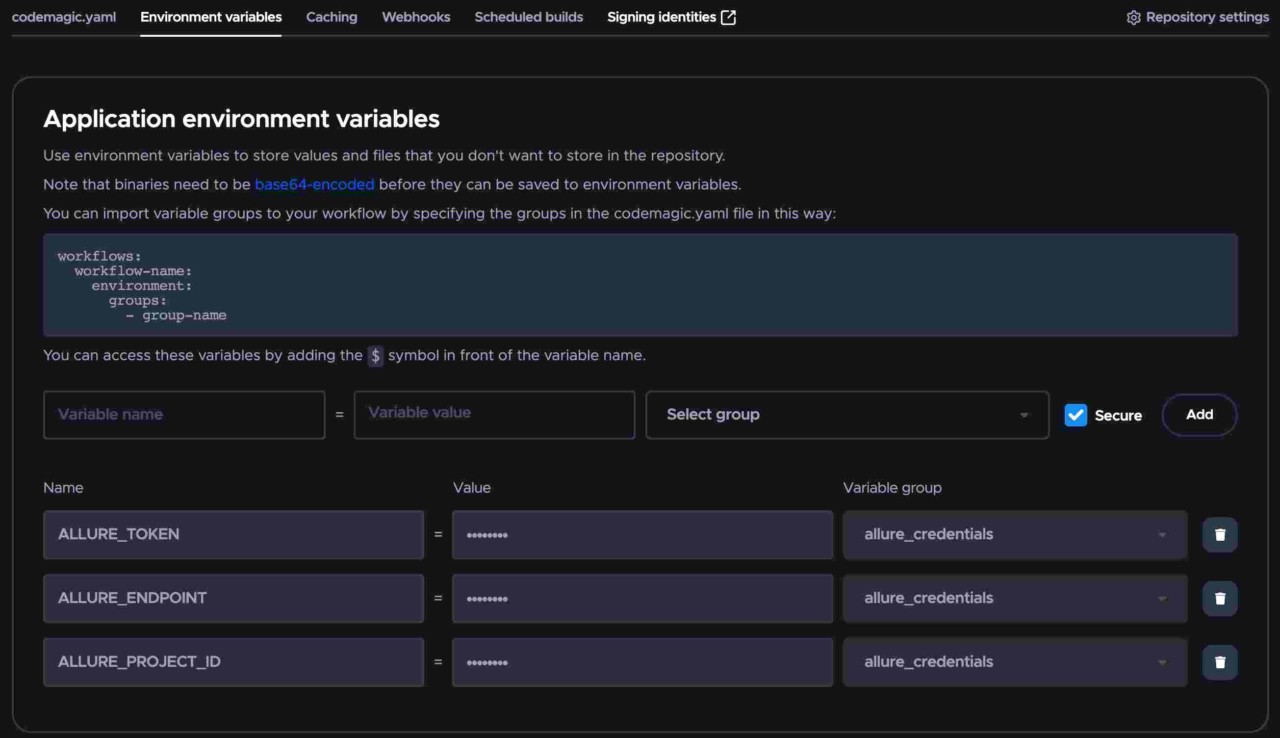
- Go to your repo settings in the UI and you will find the Environment variables tab right next to codemagic.yaml and add your Allure secrets that we went through how to create them above.
- Add the following lines in codemagic.yaml:
workflows:
  run-android-ui-test:
    name: Upload test results to Allue Testops
    instance_type: linux
    environment:
      groups:
        - allure_credentials
    scripts:
      - name: Set Android SDK location
        script: |
            echo "sdk.dir=$ANDROID_SDK_ROOT" > "$CM_BUILD_DIR/local.properties"
      - name: Launch Emulator
        script: |
            cd $ANDROID_HOME/tools
            emulator -avd emulator &
            adb wait-for-device
      - name: Install Allure CLI
        script: |
            set -e
       wget https://github.com/allure-framework/allurectl/releases/download/2.2.1/allurectl_linux_amd64 -O ./allurectl
            chmod +x ./allurectl
      - name: Execute tests
        script: |
            ./gradlew :app:connectedDebugAndroidTest
      - name: Pull test files from the device and upload to Allure Testops
        script: |
            set -e
            adb pull sdcard/Documents/allure-results
            ./allurectl upload allure-results
Note: When installing Allure CLI and building with a Mac machine, the platform must be changed in the command line to allurectl_darwin_amd64 for Mac Pro machines. In order to switch the machine type from Linux to Mac Pro in codemagic.yaml, changing instance_type value to mac_pro suffices.
Note: As the Apple Virtualization Framework does not support nested virtualization, Android emulators are not available with Apple silicon (M1 or M2) machines.
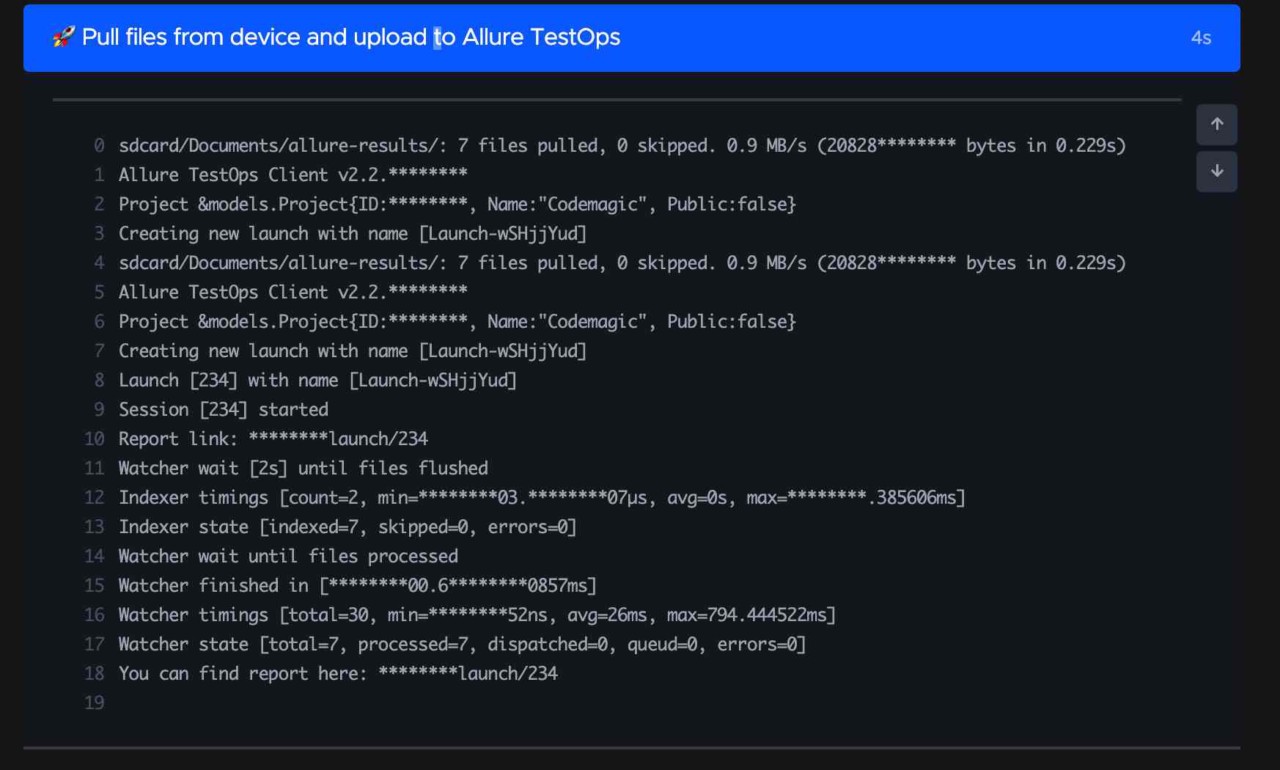
From this point on, Codemagic will start its automation process and print out the build/test logs:

A link to the Allure Testops environment where the test results can be accessed will be printed in the logs:
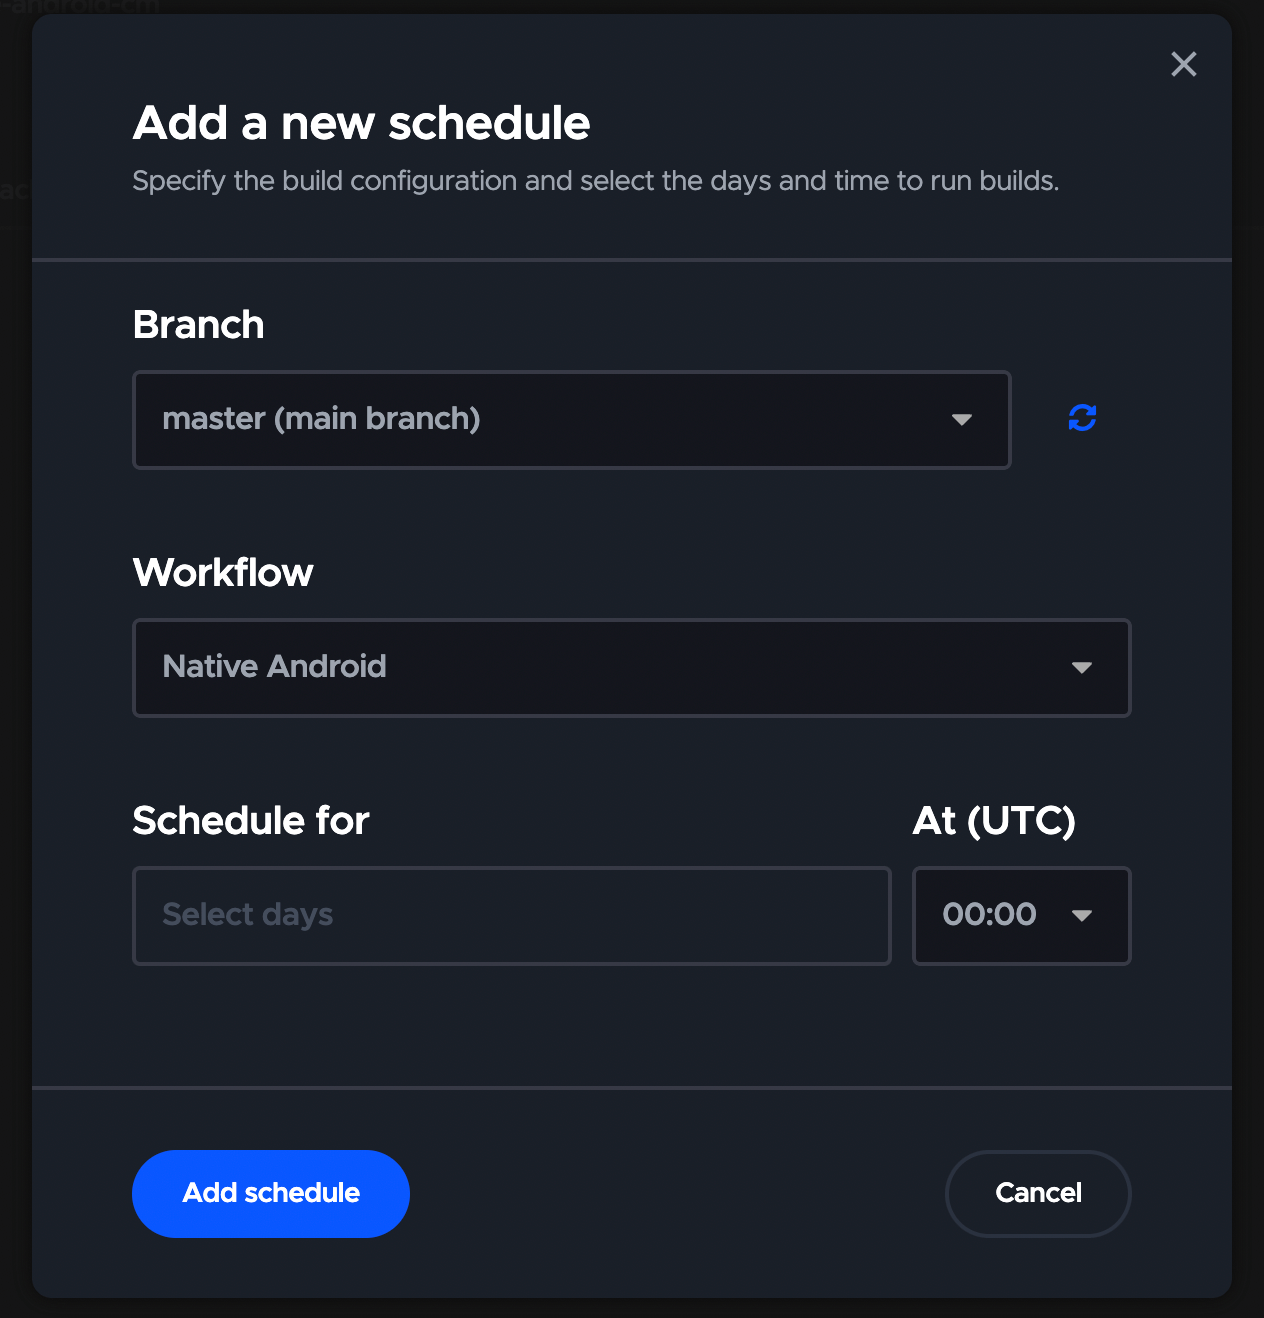
Worth pointing out that Codemagic has a possibility to schedule builds. It means that your tests will be run at a certain time you set up and you will already have had the test results in hand, and ready for review in Allue Testops. Let’s see how we can schedule a build:
- Open your application in Codemagic.
- Switch to the Scheduled builds tab and click the Add new schedule button.
- Select the Branch and the Workflow to run.
- In the Schedule for field, select the days you want to run the build.
- Specify the start time (UTC) of the build by selecting a value from the At field. Note that the build may be delayed up to 15 minutes during peak hours.
- Click Add schedule to save the schedule.
Checking test results in Allure Testops
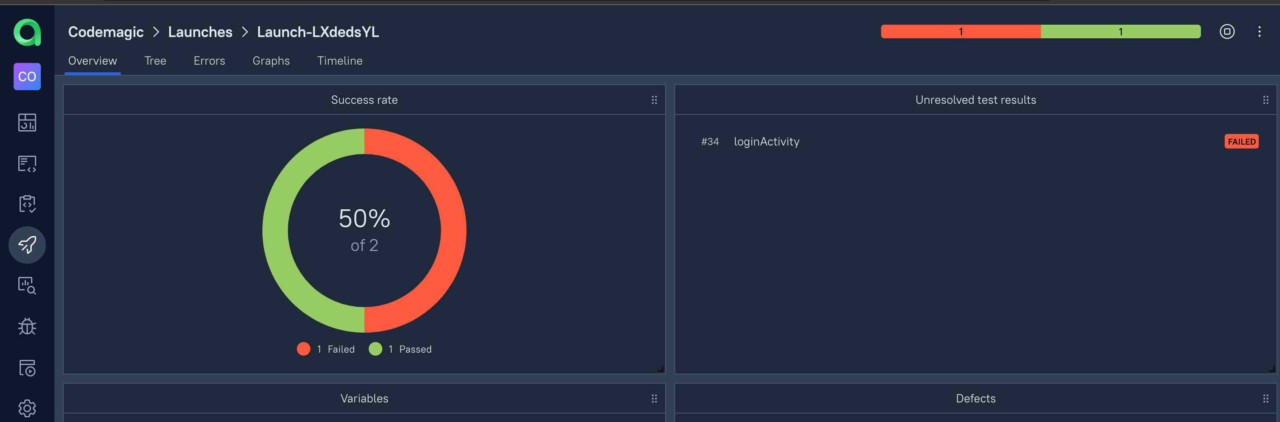
Now, we can observe screenshots, videos, and customised test logs in the Allure Testops UI along with a graphical report of the test results.
Here Allure UI indicates how many tests passed, which ones failed:
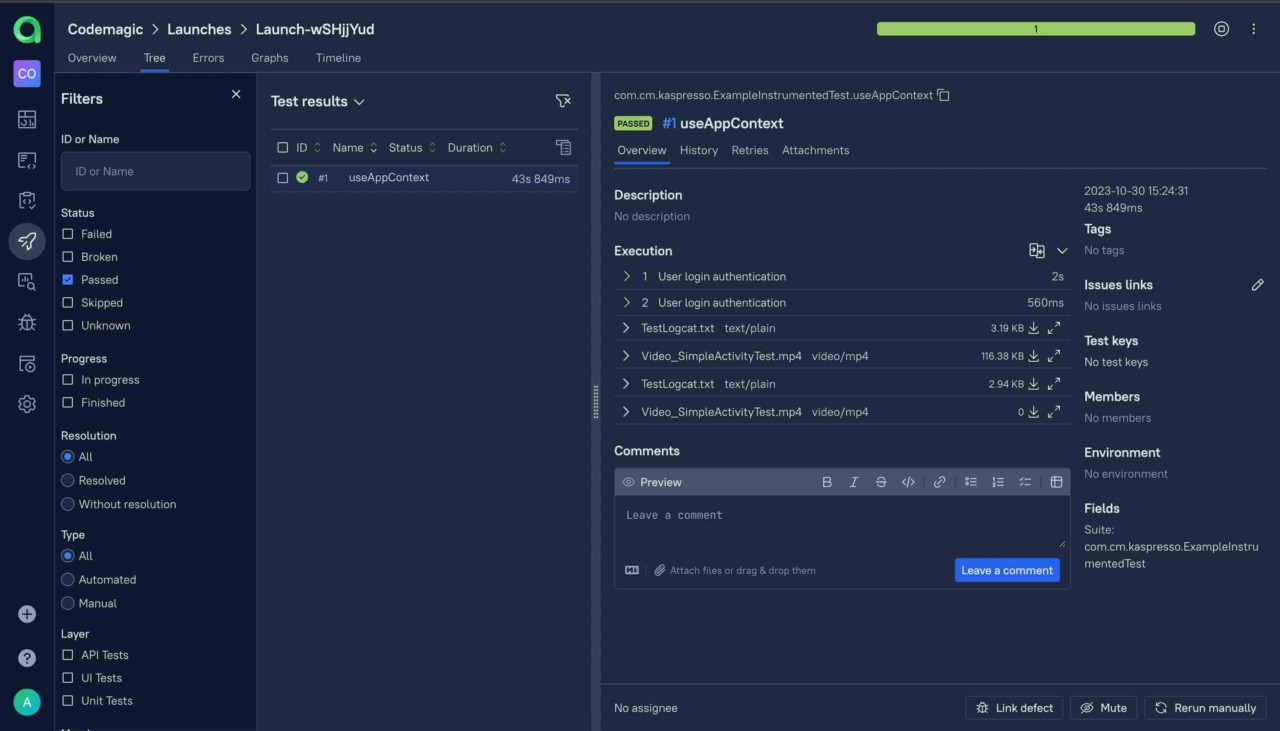
In the screenshot below, we will find our passing tests along with the test logs, screenshots and videos:
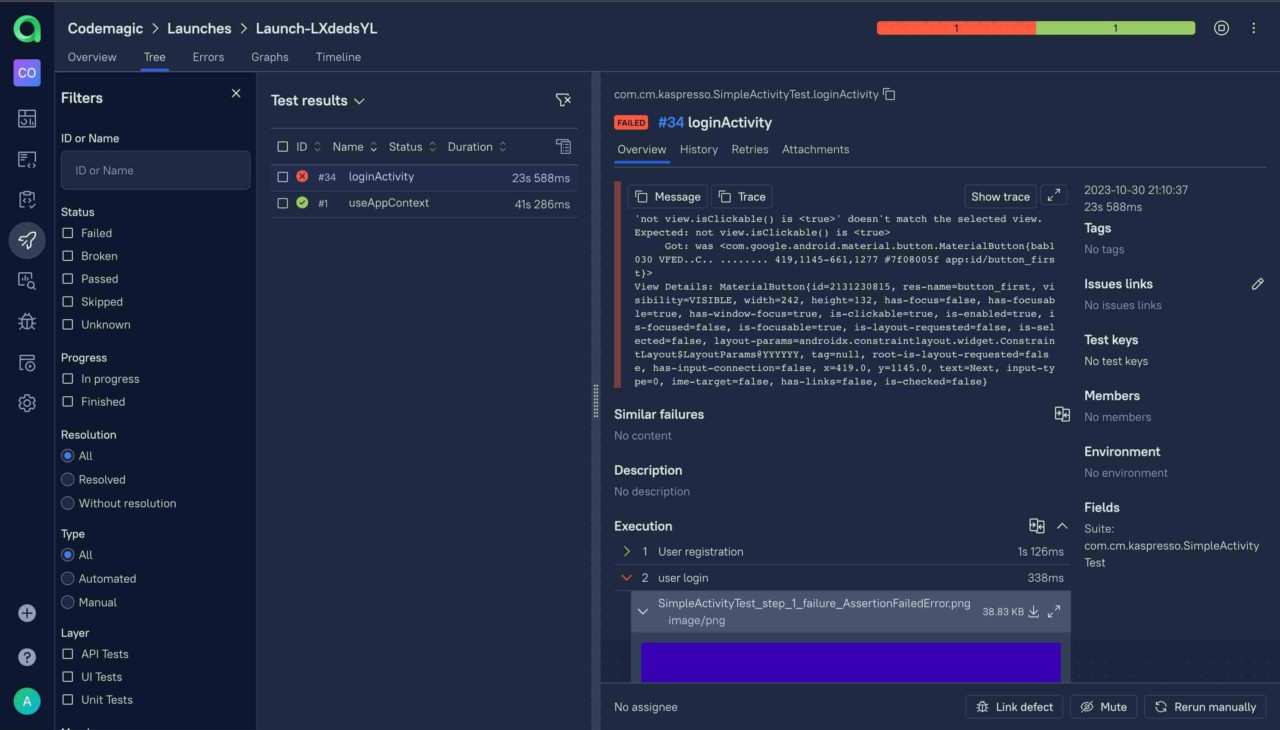
You will also have a chance to check failing test logs and which steps the issues occurred with:
Summary
We have gone through the steps regarding how Kaspresso manages to overcome the key issues of UI testing environments by allowing us to automate Android UI tests with flakiness protection and providing test results to Allure Testops platform to better control our manual, and automated testing through graphical analysis of test results including screenshots, videos, and all the logs. Codemagic took the code over, added an extra layer of automation, and completed the whole cycle of the automation process.


