


This article is written by Daria Orlova
Intro
As a senior Flutter developer, a big part of my daily job consists of reviewing code, mentoring other developers, and helping them with their problems. One mistake that I noticed developers repeating on many occasions is misusing BuildContext. I analyzed why this happens and came to the conclusion that it is because of an incomplete understanding of what BuildContext is, how it works, and its scope and lifecycle.
In this article, I hope to help to close the gap in this knowledge and enable you to tackle BuildContext problems much faster and easier — or better yet, avoid them in the first place. In order to do that, we will dive a little bit deeper into the Flutter framework because I believe it is essential to understand its inner workings to truly feel comfortable using BuildContext.
We will review how Flutter builds and maintains the UI and BuildContext’s role in this. We’ll focus on the main aspects that you will need to understand in your daily developer life. If you want to dive even deeper into some of them, you can find a list of links with a lot of additional material on the topic at the end.
So, let’s dive into BuildContext!
How does Flutter work?
We all know that Flutter is a cross-platform framework that allows developers to build apps from the same codebase to various platforms. But this fact alone doesn’t tell us anything about HOW this framework actually turns the code we’ve written into native applications. There are several approaches, such as:
- Showing everything inside a WebView
- Translating framework-specific code into native code and using native components
- Rendering custom components
There are pros and cons to all of these approaches, but let’s look at the one Flutter uses.
For the sake of understanding today’s topic, let’s omit the details of how Flutter compiles your code for native platforms and so on. We’ll only focus on one thing: what we see on the screen and how we create it.
One thing you need to know is that Flutter doesn’t “translate” the UI to native components. So, your Flutter Button won’t be translated into an Android Button or iOS Button. Flutter draws straight on the canvas using the Skia Graphics Engine (although soon it will be the Impeller Graphics Engine), bypassing native components. This allows Flutter widgets to remain independent of the platform and its UI APIs (kind of, at least, since you can use PlatformViews and underlying platform limitations of rendering still persist in this case), giving more freedom to Flutter developers in creating their UIs. This also has many performance benefits, some of which we will discuss in greater detail in this post.
So, as the Flutter docs nicely put it, the key takeaway is:
Rather than being translated into the equivalent OS widgets, Flutter user interfaces are built, laid out, composited, and painted by Flutter itself.
With this freedom of choice, Flutter needs to come up with its own system of building the UI: a widget tree. This means that a developer needs to use widgets to tell Flutter what to draw on the canvas. But what is a widget?
Everything is a widget (c)
Before we answer this question, let’s take a look at the Flutter code.
If you create an app — for example, via flutter create context_sample — and open main.dart, the first lines of code we see are the following:
void main() {
  runApp(const MyApp());
}
From this snippet, we can understand that:
- The
mainfunction is the entry point of our Dart code - From the name
runApp, we can guess that it does something that sets up the Flutter runtime to run your app - And lastly, we see that we pass an object
MyAppto therunAppfunction
This is the first time we have encountered a widget. A widget is a basic building block of UI in Flutter. When developing a Flutter app, you will create many, many widgets. You will compose them to create various combinations. And all of these widgets together form what is called “a widget tree.”
In computer science, a tree is a data structure inspired by, well, a real-life tree.
Trees are used in A LOT of places, and it’s helpful to know how they work. But to understand today’s topic, we’ll only look at what is important to us.
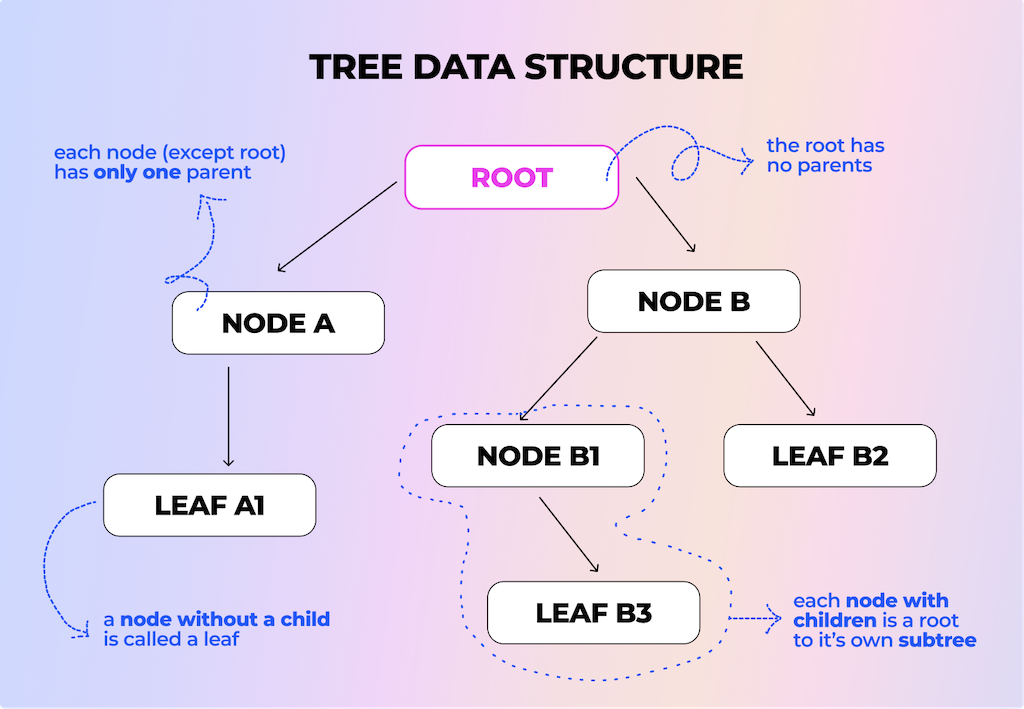
- First of all, a tree can only have one root. [“Root”]
- A single element in the tree is called a node. A node without children is called a leaf. [“Node A” has a child “Leaf A1,” which doesn’t have children]
- Each node can have only one parent. The exception is the root, which has no parents. [Parent of “Node B1” is only “Node B”]
- The tree has a hierarchy such that each child can be considered the root of its own children and, hence, a subtree. [Subtree, where “Node B1” is the root with only one child, “Leaf B3”]
- “Walking a tree,” also known as tree traversal, is a technique for visiting all of the tree’s children only once.
Basically, your whole Flutter app is represented as a tree of widgets. And whatever you pass to the runApp function will be the root of your Flutter app widget tree.
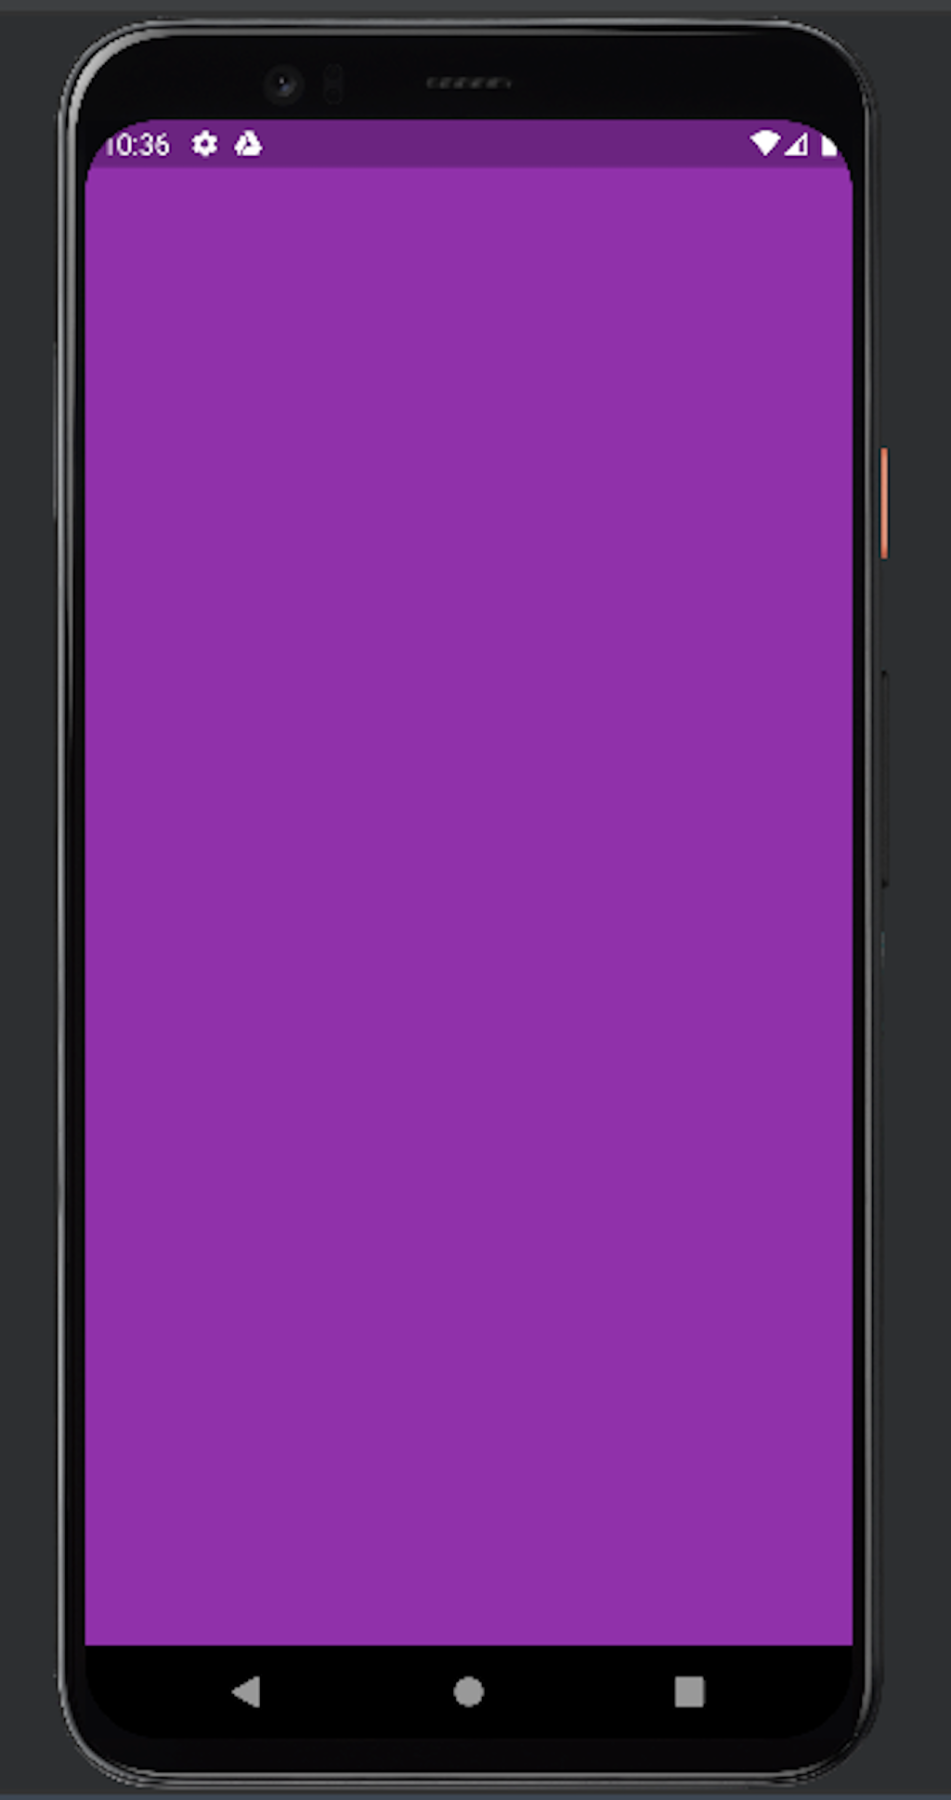
For example, let’s remove what’s written in the counter app and pass ColoredBox(color: Colors.purple) to the runApp function. When we run the app, we can see that the entire screen is just a purple color.
void main() {
  runApp(ColoredBox(color: Colors.purple));
}
Now, you probably wouldn’t want this in a real app. You’d want to work with themes, navigation, app bars, and so on. The Flutter framework already has a big library of widgets for you, including some that we usually use as roots for our apps: MaterialApp, CupertinoApp, or the more generic WidgetApp. Without diving into the details of these widgets, we can simply agree that it will be convenient to make such a widget our root and move on from there. So instead of passing our ColoredBox to the runApp function, let’s give it a MaterialApp with that same ColoredBox as a home parameter.
void main() {
  runApp(
    MaterialApp( // This will be the root of the widget tree
      home: ColoredBox(
        color: Colors.purple,
      ),
    ),
  );
}
This doesn’t change the output of your app, which is still just a full-screen purple color. Let’s make our app more exciting. Most of the time during development, you will be creating widgets that extend either StatelessWidget or StatefulWidget.
StatelessWidget
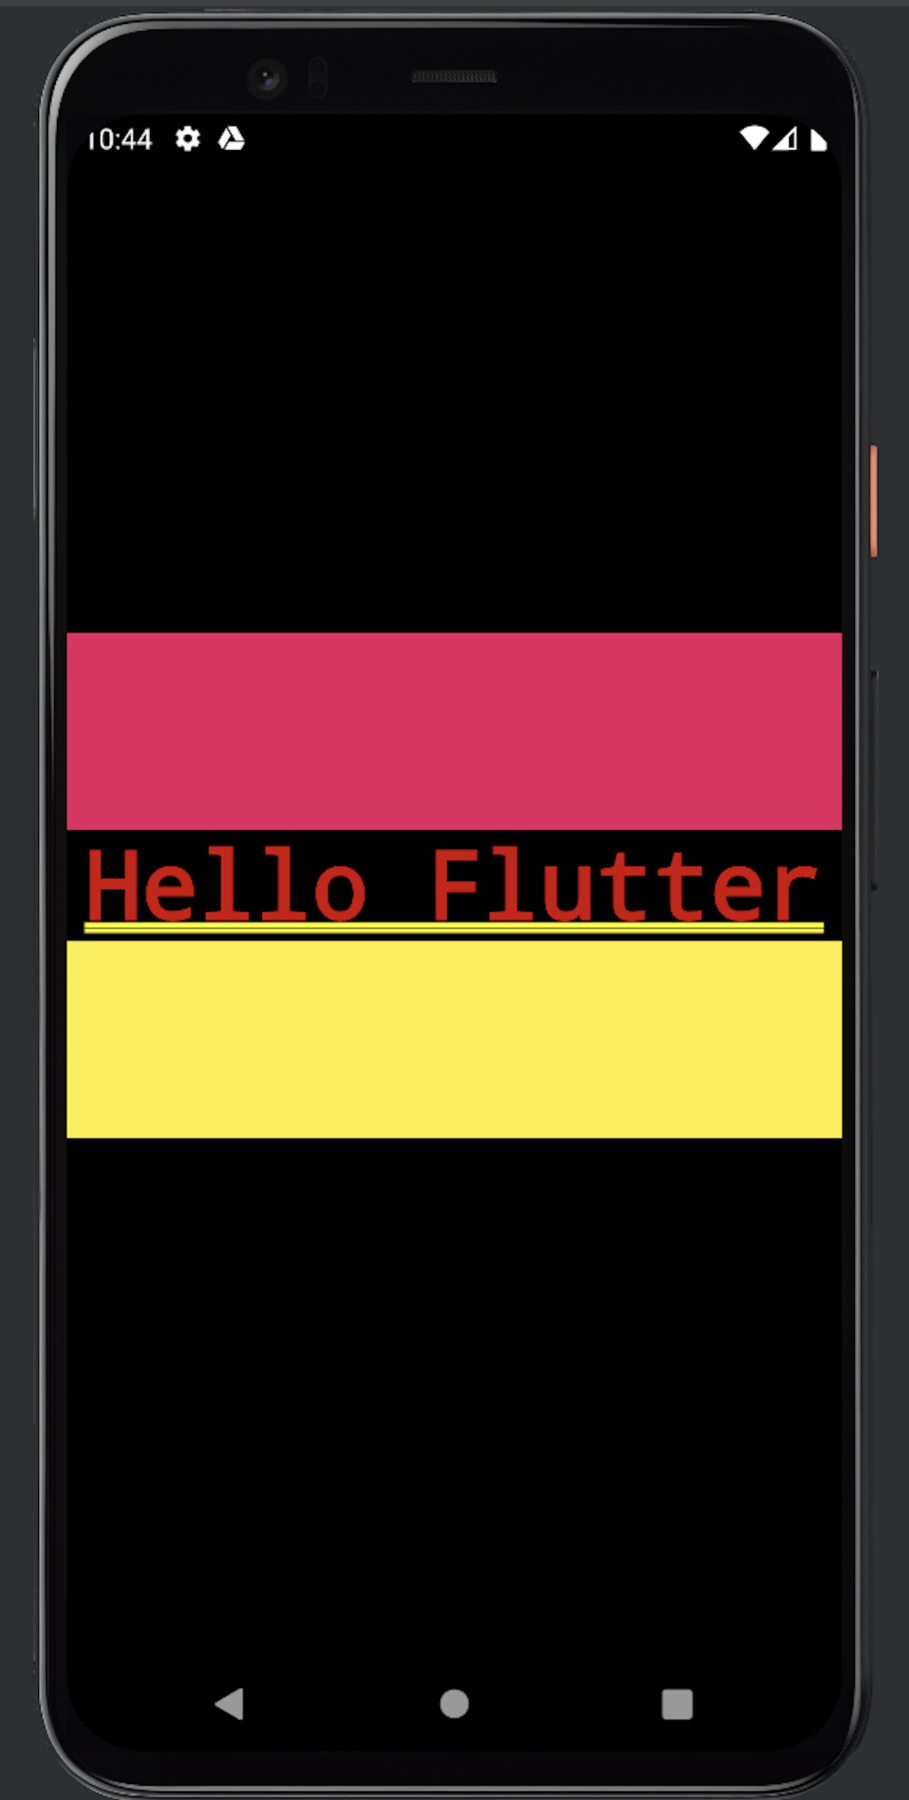
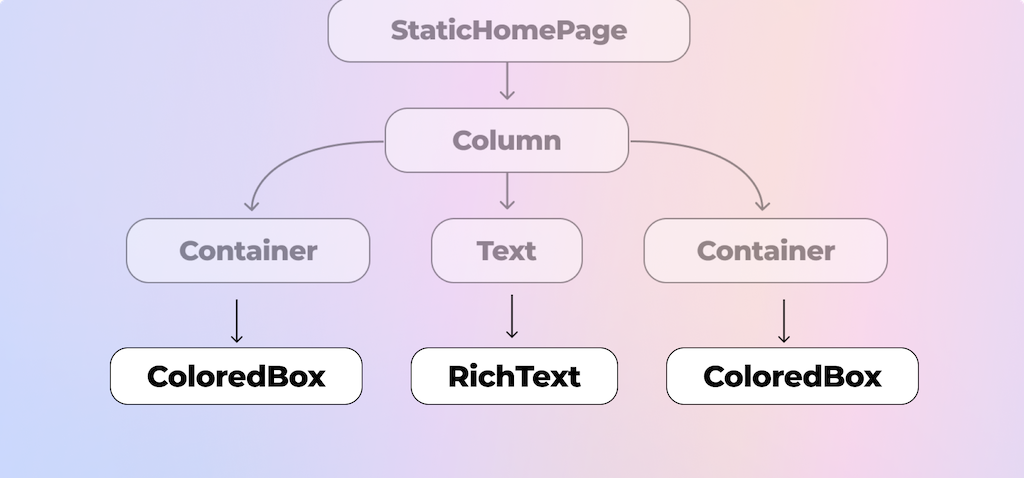
Let’s create a stateless widget called StaticHomePage. If we run it, we see this weird-looking UI. But hey — it’s more fun than it used to be.
void main() {
  runApp(
    MaterialApp(
      home: StaticHomePage(),
    ),
  );
}

class StaticHomePage extends StatelessWidget {
  @override
  Widget build(BuildContext context) {
    return Column(
      mainAxisAlignment: MainAxisAlignment.center,
      children: [
        Container(color: Colors.pink, height: 100, width: 500),
        Text('Hello Flutter'),
        Container(color: Colors.yellow, height: 100, width: 500),
      ],
    );
  }
}
Let’s inspect what’s happened here.
- We have created a class
StaticHomePagethat extendsStatelessWidget - In order to conform to the
StatelessWidgetinterface, we need to override only one method:Widget build(BuildContext context)
Let’s look closer at that build method.
First of all, its return type is Widget. So whatever we do in this method, we have to return a Widget in the end. This Widget will then be inserted into our widget tree at the place where it is created. But what is a Widget class?
Widget is actually an abstract class, and it’s the base class for every type of widget in Flutter. Stateless, Stateful, Inherited, and any other type of widget all extend the base class Widget.
// framework.dart
// Some code removed for demo purposes

@immutable
abstract class Widget {
  const Widget({ this.key });
}

...
abstract class StatelessWidget extends Widget {
  const StatelessWidget({ super.key });
}
...
// and so on
So the build method doesn’t limit you in terms of the type of widget you can return. It just wants a widget.
All right, so we return a Widget.
But what exactly is this build method? Why do we need to override it? Who calls it, and when?
This method is called by the Flutter framework itself. It can be called under several conditions, such as the following:
- You have just inserted this widget into a widget tree for the first time
- An
InheritedWidgetthat it depends on has changed its parameters (we will get toInheritedWidgetslater on)
It can potentially be called in every frame, which means up to 120 times a second (depending on the refresh rate of the device and its settings). The refresh rate is a metric measured in hertz that determines how many times per second your device can draw a new image on the screen.
So if it’s called 120 times per second, you only have 8 ms to run ALL of the build methods that requested it (1000 ms / 120 =~ 8 ms).
That’s why it’s crucial to keep this method as efficient as possible. It should have no side effects (e.g., network calls, database reads, JSON serialization), and you should always pay attention to how frictionless the method is. Failing to return a result in a given timeframe can lead to frame drops and, in turn, UI stuttering, resulting in a bad user experience.
The last piece is the host of this whole party, the notorious BuildContext context as a parameter to the build method of a StatelessWidget. But before we dive into it, let’s take a couple of steps back.
First of all, let’s take a look at our code one more time. Everything we have written up to this point has answered the question “What?”
For example, “What do we want to see on the screen?” We want a purple-colored box. Or we want text that says, “Hello Flutter.” Or we want colored boxes and text in a column. We just write it as is, and then it shows up on the screen just like magic.
Unfortunately, magic only exists in the Harry Potter universe (and maybe a few other fantasy worlds, but not the one we live in). Luckily, we have logical yet beautiful technology. Technically, the saying “Everything is a widget” is kind of a lie. It’s true that you mostly deal with widgets in development, but they’re just one part of the story. There are at least two more parts to consider.

Very accurate meme by Cagatay [https://twitter.com/ulusoyapps]
RenderObjects: How things actually get painted in Flutter
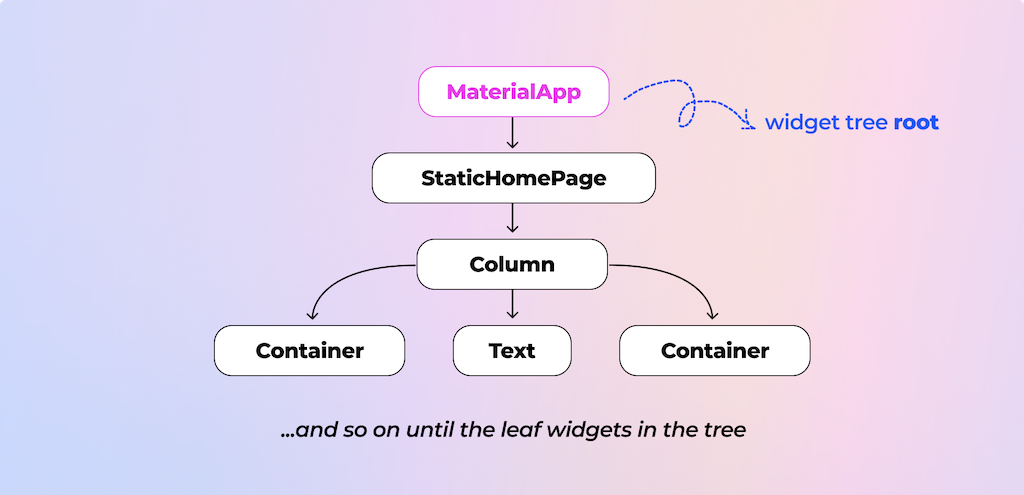
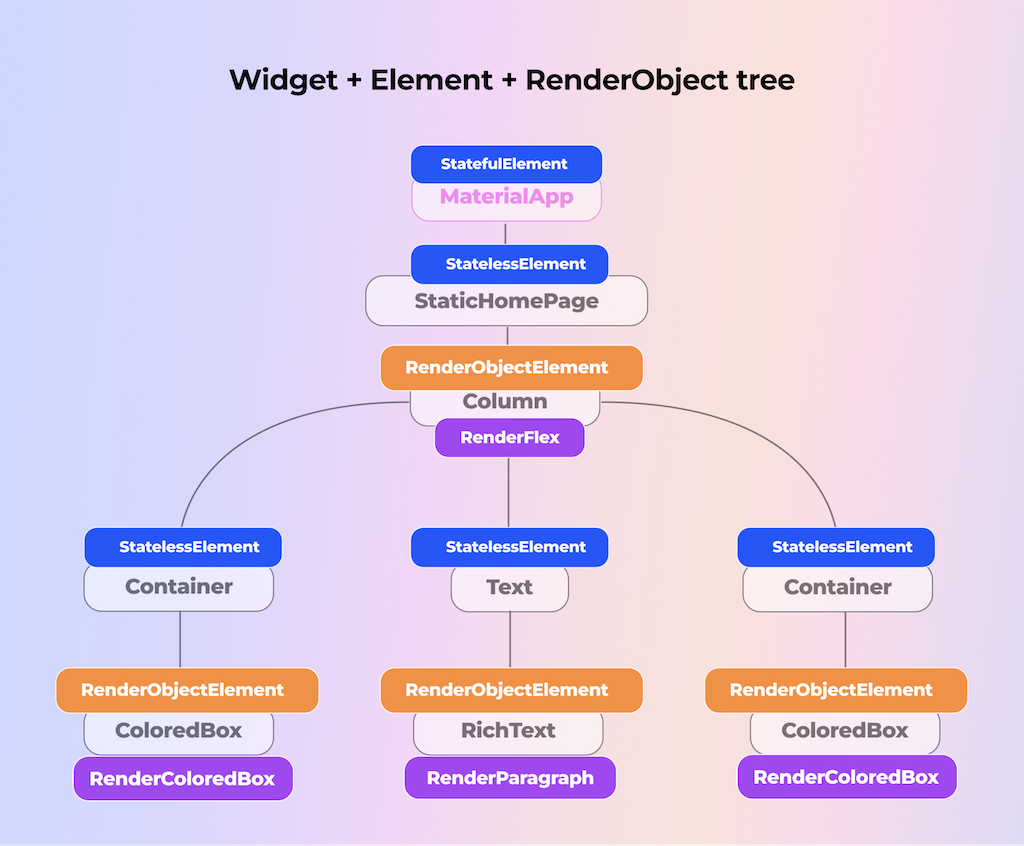
First of all, let’s visualize the UI that we have drawn as a widget tree. Note: This isn’t a one-to-one representation of the actual tree — a lot of things are omitted for clarity, but that doesn’t change the idea behind the explanation.
So, our widget tree looks something like this:
Second, we’ll need to handle the actual drawing part. All hierarchy aside, let’s forget for a minute that we have a myriad of widgets in different places and think about one widget: Text. How does Flutter know how to draw text? Let’s look inside the Text widget!
// text.dart
// Some code removed for demo purposes

class Text extends StatelessWidget {

	Widget build(BuildContext context) {
		...
		return RichText(...);
	}
}
First of all, we see that just like our very own StaticHomePage, it extends a StatelessWidget and has an already familiar build method.
That’s nice. What’s inside of it? Here’s an interesting part. Inside the method, we basically delegate everything text related to another widget: RichText. Let’s peek at its source code.
// basic.dart
// Some code removed for demo purposes

class RichText extends MultiChildRenderObjectWidget {

	@override
	RenderParagraph createRenderObject(BuildContext context) { }

	@override
  void updateRenderObject(BuildContext context, RenderParagraph renderObject) { }
}
The first notable thing is that it extends a widget we haven’t previously discussed called MultiChildRenderObjectWidget (which, in turn, extends just RenderObjectWidget, which finally extends the base Widget). Second, there is no build method, only createRenderObject and updateRenderObject. So what is this RenderObject that keeps popping up in this widget?
By the way, if you take a look at the Container, you will see that the same algorithm is there. However, it returns a ColoredBox, and instead of Multi, it extends a Single: SingleChildRenderObjectWidget.
Let’s recap what we’re trying to figure out:
- Up to this point, we have only extended
StatelessWidgetand used the widgets that are already given to us by the framework, such asColoredBox,Text,Column, andContainer. - We have composited them into multipart widgets but have used only predesigned framework widgets. We haven’t done anything related to actually drawing the widgets — just specified what we wanted to see.
Now we’re trying to understand how Flutter actually knows what to paint.
The next sentence is important: Every widget that can actually be painted and not just composited has to extend a RenderObjectWidget, which, in turn, deals with RenderObjects.
And RenderObject is a second pillar of the Flutter framework after widgets. It’s responsible for all of the drawing logic, including calculating sizes, translates, colors, and so on. It does all of the heavy lifting — as its name suggests, it renders.
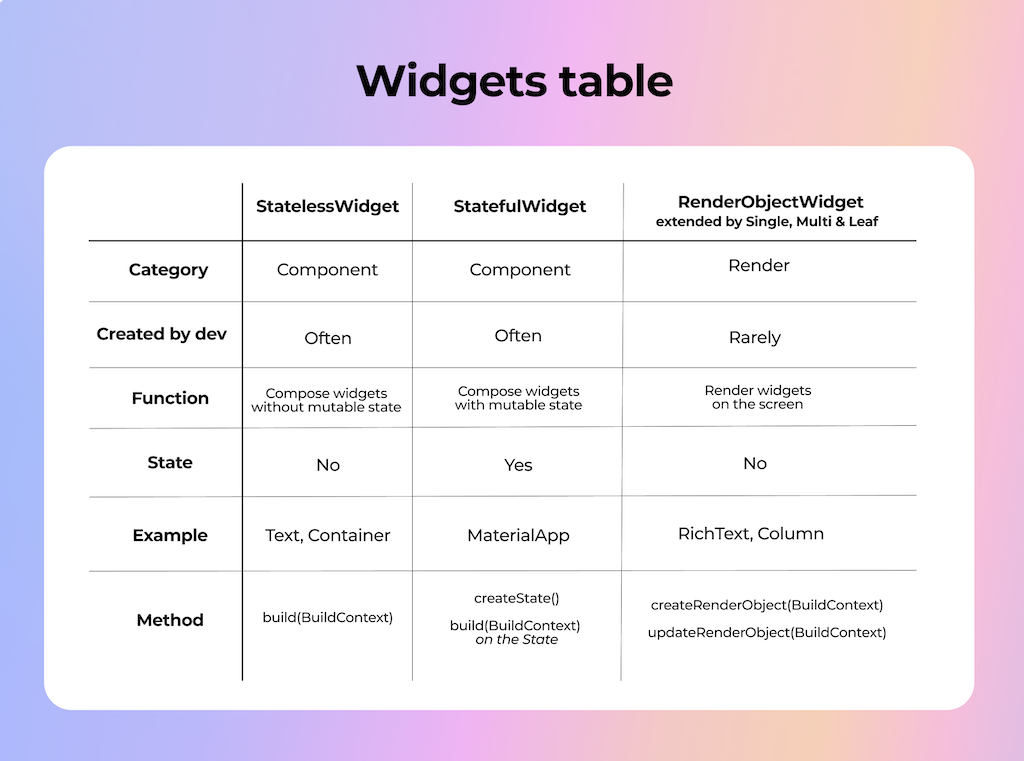
So now we know about two categories of widgets:
-
Composing widgets. These extend either
StatelessWidgetorStatefulWidget. They don’t do anything related to rendering but just compose more complex views out of other widgets. They override thebuildmethod. -
Rendering widgets. These ultimately extend
RenderObjectWidgetbut typically through one of the following subclasses:SingleChildRenderObjectWidgetfor widgets that paint only one child, likeColoredBoxMultiChildRenderObjectWidgetfor widgets that paint multiple children, likeColumnLeafChildRenderObjectWidgetfor widgets that don’t paint any children, only themselves, likeErrorWidget
Those widgets do the actual lower-level rendering via the
RenderObjectclass. They don’t override thebuildmethod but rathercreateRenderObjectandupdateRenderObject.
During the development of your Flutter apps, you will usually extend the Stateless and Stateful widgets. But it’s important to understand that no matter how aggressively you compose your widget tree, it will always end up with some kind of RenderObjectWidgets.
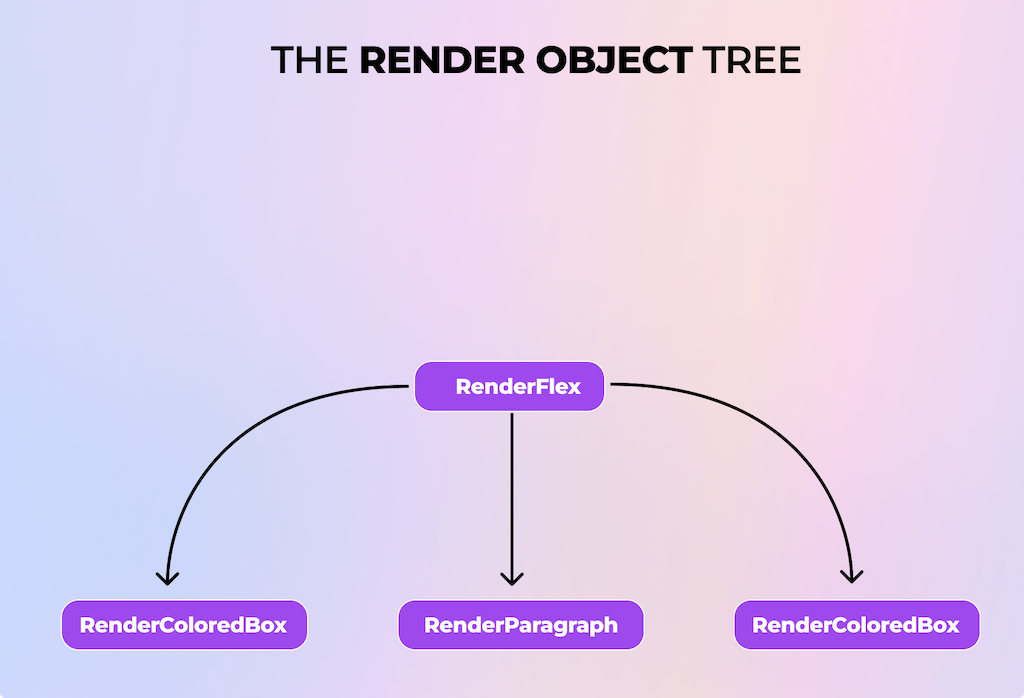
Here is how our widget tree would look from the perspective of the parent widgets:

For the purposes of this article, we don’t need to know any more about RenderObject. We just need to remember that no matter how much we compose our widgets, in the end, they all get translated to a different tree, a render object tree. That tree is the one actually doing the painting and hiding all the hard work from us. It allows us to simply tell the Flutter framework what we want to see and then paints it under the hood.
OK, but how is this all connected to the BuildContext?
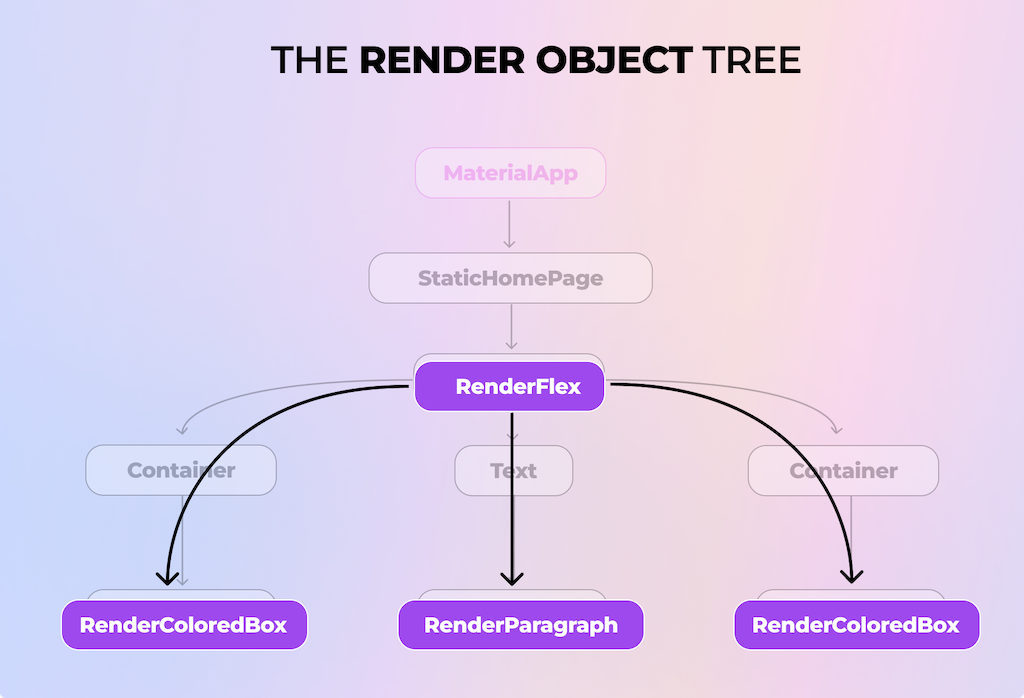
Now we know that Flutter doesn’t actually draw widgets but rather renders objects that were created by some of the widgets. We also know that the build method can potentially be called 60 to 120 times per second. So, wouldn’t it be inefficient if, for every such call, we drew the entire widget tree of our whole app? And if we take a look at a potential build method, we see that on every call, we return a tree of new objects. We literally create new objects. Yet, if you have worked with Flutter, you surely know that it’s performant even without you thinking much about it. So there must be something else, right?
And if we compare our two trees, the widget tree and the render object tree, we’ll notice that at least half of the widgets just vanish from the render object tree with no connection…
Immutable widgets
If you’re not aware already, the widgets are immutable. You can verify this by looking at the Widget class signature, which is marked with the immutable annotation. But what does it mean to be immutable? From a technical point of view, it means that all of the widget’s fields should be final. (Technically, you can still mutate the items in a final collection… but let’s not go there.) From a practical point of view, it means that you can’t change anything in this widget after its creation. You can’t mutate it, its fields, or its behavior.
So, let’s sum all these points up: The widgets are immutable, the build method gets called hundreds of times a second, creating hundreds of widgets, and the actual things on the screen get drawn by RenderObjects. Therefore, there must be something else that glues it all together, right? And there is indeed.
Elements
The third pillar of the Flutter rendering tree is the Element. This is the secret element (pun intended) and the main character of the Flutter tree system. Understanding what it is and its role and lifecycle is crucial to grasping BuildContext. Very soon, we will see why and it will all make sense — stay with me here.
So, what is an Element?
Elements are what glue together the immutable widgets and mutable render objects. The elements are mutable themselves, meaning that their lifecycle is much longer than a widget’s. We’ll cover this more in a bit. Side note: We will be simplifying and skipping a few things on purpose because not all the implementation details are necessary to understand this article.
In order to understand how elements work, let’s get back to our StatelessWidget for a second.
If we check out its source code, we see that it only has two methods.
// framework.dart
// Some code removed for demo purposes

abstract class StatelessWidget extends Widget {
  const StatelessWidget({ super.key });

  /// Creates a [StatelessElement] to manage this widget's location in the tree.
  ///
  /// It is uncommon for subclasses to override this method.
  @override
  StatelessElement createElement() => StatelessElement(this);

  @override
	Widget build(BuildContext context);
}

...

@immutable
abstract class Widget {
  const Widget({ this.key });

	Element createElement();
}
We already know about the build method.
The second method is createElement, which returns the StatelessElement object. You can also go higher up the class hierarchy all the way to the original Widget and see that it, too, has a method called createElement, which just returns an Element. Since even the base Widget has it, it must be something fundamental.
If we then open the StatelessElement source code, we see a comment that says An [Element] that uses a [StatelessWidget] as its configuration.
Do you see the word “configuration”? It’s such an accurate description of what a widget actually is. A widget is just a configuration. It’s a lightweight object with final properties. It’s cheap to create them and to throw them away.
But it’s not that cheap to compose a huge tree and then draw it. So, to tackle this problem, we have elements.
The very first time that your Widget gets created and inserted into the widget tree, it also creates an Element via its createElement method. But the next time the tree gets rebuilt, the framework checks if the widget that gets returned from the build method can update the element in that place in the tree.
How does it check it?
// framework.dart
// Some code removed for demo purposes

@immutable
abstract class Widget {
  const Widget({ this.key });

	Element createElement();

	/// Whether the `newWidget` can be used to update an [Element] that currently
  /// has the `oldWidget` as its configuration.
  ///
  /// An element that uses a given widget as its configuration can be updated to
  /// use another widget as its configuration if, and only if, the two widgets
  /// have [runtimeType] and [key] properties that are [operator==].
  ///
  /// If the widgets have no key (their key is null), then they are considered a
  /// match if they have the same type, even if their children are completely
  /// different.
  static bool canUpdate(Widget oldWidget, Widget newWidget) {
    return oldWidget.runtimeType == newWidget.runtimeType
        && oldWidget.key == newWidget.key;
  }
}
We see that the Widget has a method canUpdate, which compares two things. If they’re equal, then it returns true. The first thing is its runtimeType, e.g., if Text == Text. The second thing is the Key. If you haven’t passed any keys to your widget’s constructor, then they’re null, meaning they’re equal. We will talk more about keys later on, but for now, you only need to remember that they’re the second thing Flutter takes into account when comparing widgets.
// framework.dart
// Some code removed for demo purposes

abstract class Element {

/// Typically called by an override of [Widget.createElement].
  Element(Widget widget)
    : assert(widget != null),
      _widget = widget;

	@override
  Widget get widget => _widget!;
  Widget? _widget;

	@mustCallSuper
  void update(covariant Widget newWidget) {
    _widget = newWidget;
  }
}
To understand what happens next, let’s take a look at the source code of Element.
If canUpdate returns false, then the whole subtree with Elements gets discarded. But if it returns true, then the Element updates the link to its widget via Element.update(newWidget). It literally just changes its variable widget. Essentially, the Element is the manager that controls everything — the widget’s location in the tree, the connection and updating of the render objects with their widgets, the lifecycle of both, and much more.
If all of this sounds confusing, don’t worry. We will return to this lifecycle in more detail very soon.
Now, let’s switch our focus back to our RenderObjectWidget for a moment. In the same way the StatelessWidget gets inflated into a StatelessElement, the RenderObjectWidget gets inflated into a RenderObjectElement. But besides updating the link to its widget, it also updates its renderObject. But the RenderObjects are also smart, as they check if there were any changes in the configuration. If there weren’t, then they don’t repaint. If there were, then they repaint those parts. Usually, when the build is called, not many things get changed. This means that those things don’t get repainted, saving performance costs. This is one of the ways Flutter maintains its great performance.
Let’s quickly recap with a visualization of the Element tree. We will notice that this time, every widget has an associated element that helps it to sync with the RenderObject.
Ok, Daria, this is all amazing, but what about BuildContext?
Ah, right! The best part. Now you’ll understand all of this prep talk.
BuildContext in Flutter
I truly believe that you won’t be able to completely understand BuildContext without first wrapping your head around the whole process of Flutter widget tree building. There are no shortcuts — it’s essential to spend some time on this topic to grasp how elegant it is. This knowledge can help you not only understand and debug issues but avoid them in the first place.
So, let’s take a look at the Element class signature once again. The first time I showed it to you, I left out one important part on purpose. Can you spot it now?
// framework.dart
// Some code removed for demo purposes

abstract class Element implements BuildContext {
	...
}
As you can see, our base Element actually implements the BuildContext.
And BuildContext is just that. It’s your widget’s Element. In other words, it’s what gives context to your widget — where in the tree it is located, what it can and can’t access, and how it can update.
So why not just pass around the Element itself? Well, mostly to avoid direct manipulation of the Element and limit the API to those methods that the developer might actually need.
// framework.dart
// Some code removed for demo purposes

abstract class BuildContext {

  /// The current configuration of the [Element] that is this [BuildContext].
	Widget get widget;

  RenderObject? findRenderObject();

  T? dependOnInheritedWidgetOfExactType<T extends InheritedWidget>(...);
  InheritedElement? getElementForInheritedWidgetOfExactType<T extends InheritedWidget>();
  T? findAncestorWidgetOfExactType<T extends Widget>();
  T? findRootAncestorStateOfType<T extends State>();
  // ...and so on
}
If we take a look inside BuildContext, we will see that it has a widget field and a bunch of methods involving ancestors, widgets, elements, and so on. The main reason you will be using BuildContext in your code is to locate other widgets. We’ll discuss why and how in the next parts.
To wrap this up, let’s return to our StatelessElement for a second.
// framework.dart
// Some code removed for demo purposes

/// An [Element] that uses a [StatelessWidget] as its configuration.
class StatelessElement extends ComponentElement {
  /// Creates an element that uses the given widget as its configuration.
  StatelessElement(StatelessWidget super.widget);

  @override
  Widget build() => (widget as StatelessWidget).build(this);

  @override
  void update(StatelessWidget newWidget) { ... }
}
We see that it has a build method, which does the following:
Widget build() => (widget as StatelessWidget).build(this);
The element passes itself as this to the widget build method. Remember that for the widget, it’s the BuildContext context param: Widget build(BuildContext context).
We have already covered so much, but we’re just getting to the most important part. Most of the problems with BuildContext arise when you use it too early or too late. Another chunk of problems is caused by using it in the wrong place. So let’s review the lifecycle in order to understand what we should or shouldn’t do with the BuildContext and when.
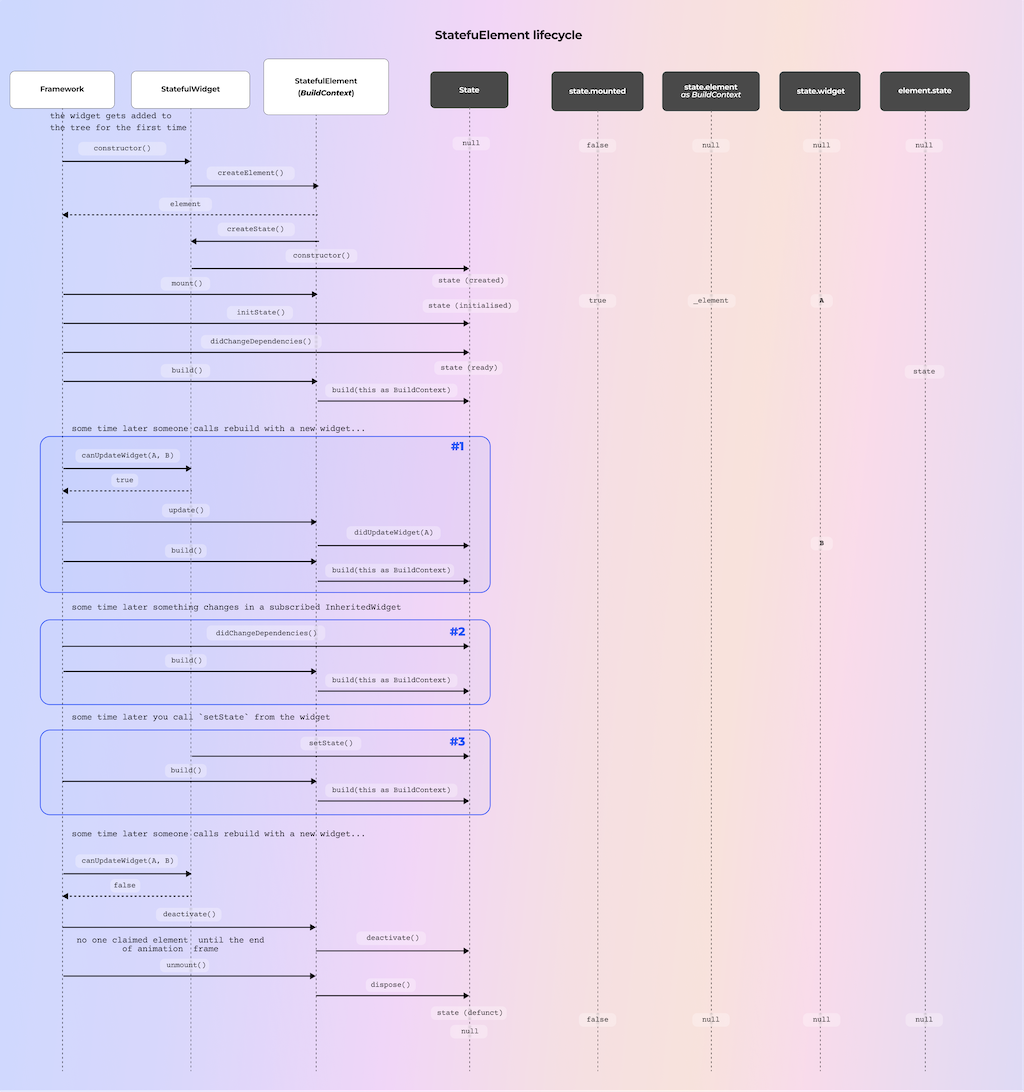
StatelessElement lifecycle
I suggest looking at the following sequence diagram and the explanatory text after it side by side:
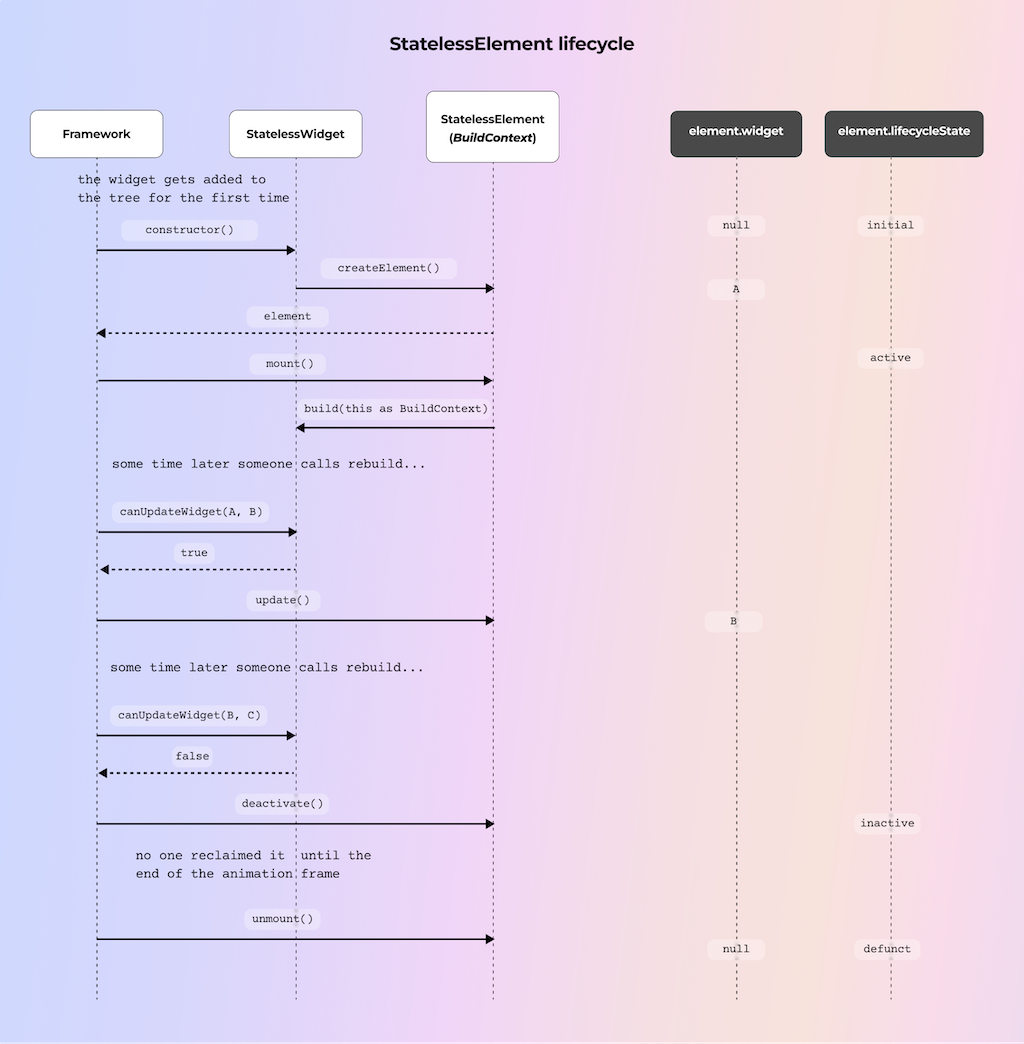
Let’s review the StatelessElement lifecycle.
-
You, as a developer, run your app, which shows the
StaticHomePagewidget that extendsStatelessWidget. -
When Flutter renders this widget for the first time (hence, it just gets added to the widget tree), the framework calls the
createElementmethod ofStatelessWidget, which returns aStatelessElement. It extendsElement, which, in turn, implementsBuildContext(so element = context). TheElementhas a lifecycle state, and at this point, it isinitial. The widget (A) is passed as the param to theElementconstructor and saved as a local field. -
The framework calls the
mountmethod of theElement. Some setup is done at this point, and the lifecycle state is nowactive. This is the first time ourbuildmethod gets called, and our element is passed to it as aBuildContextparam. Then we can see this widget on the screen. -
At some point, something may cause our widget to rebuild. (We will talk about some possible reasons for this soon.) Via
Widget.canUpdate(oldWidget, newWidget), the framework checks if our current element can be updated with a new widget. The check compares theruntimeTypeandkeyproperties of the widget. If they’re the same (even if the key is null), then the element gets updated via itsupdatemethod. It then gets rebuilt, and the whole cycle can start again. We see that thewidgetfield of theElementhas successfully changed toB. The old one simply got thrown away, yet the element remained the same. Remember that widgets are immutable, but elements are mutable. -
Then, at some point, another rebuild is triggered. If
canUpdatereturns false, then the current element becomes inactive, and a new element gets created and repeats the cycle from the top, this time with a new element. The old element’s lifecycle state becomesinactivevia thedeactivatemethod. Soon enough, if no one reclaimed the element (how someone can do this is out of the scope of this article, but we will talk about GlobalKey later on, which is one way), then its lifecycle state becomesdefunctand it gets unmounted, never to be reached and used again.
And since we have learned that BuildContext is, in fact, an element, this is its lifecycle in the scope of a StatelessWidget. Now that we’ve learned about different lifecycle states, we will soon understand what those states mean for us as developers.
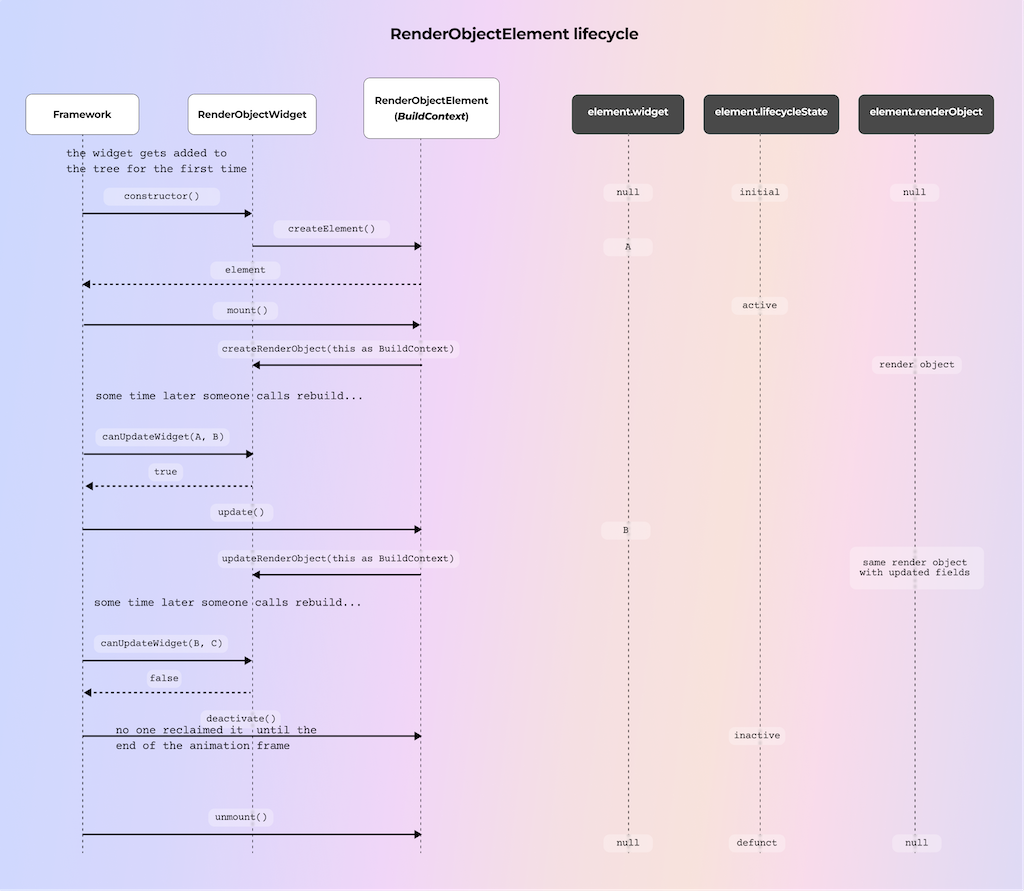
I’d like to make a quick note about the RenderObjectElement lifecycle. I won’t be diving into its details, but it’s very similar to what we have seen with the StatelessElement. The main difference has to do with the createRenderObject and updateRenderObject methods. You can check it out yourself in the sequence diagram below.
The .of(context) methods
Chances are that if you’ve used Flutter at least a little, you have already called some kind of .of(context) method. The most popular ones are MediaQuery, Theme, Navigator, and Scaffold.
Ancestors
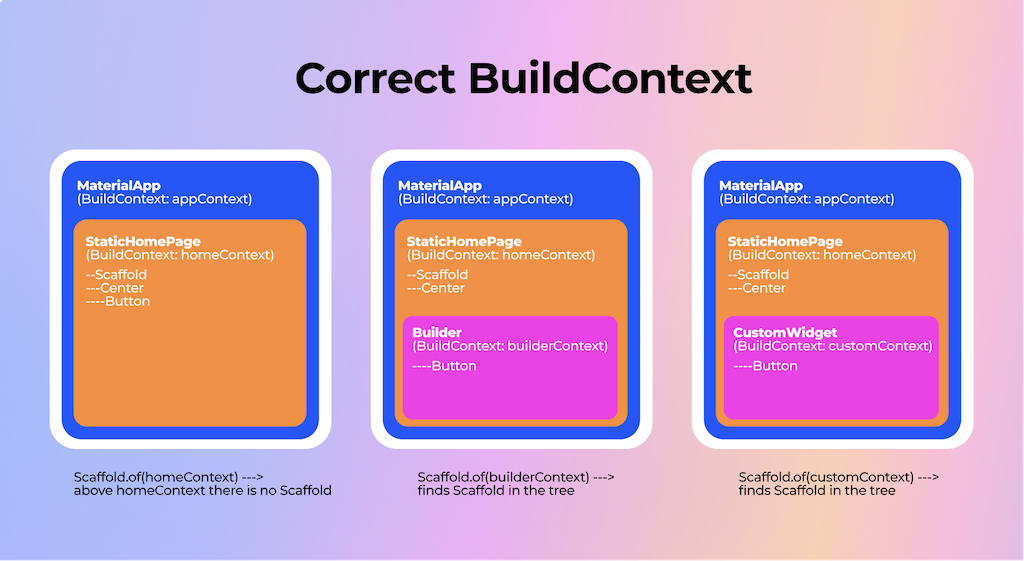
Let’s review one of the most common cases: You want to show a bottom sheet. In order to show a bottom sheet, you need to call Scaffold.of(context).showBottomSheet(bottomSheet).
class StaticHomePage extends StatelessWidget {
  @override
  Widget build(BuildContext context) {
    return Center(
      child: TextButton(
        onPressed: () {
          Scaffold.of(context).showBottomSheet(
            (context) => Container(
              height: 200,
              color: Colors.red,
            ),
          );
        },
        child: Text('Click Me'),
      ),
    );
  }
}
If we run the app and click the button, we will see… an error:
Scaffold.of() called with a context that does not contain a Scaffold.
No Scaffold ancestor could be found starting from the context that was passed to Scaffold.of().
This usually happens when the context provided is from the same StatefulWidget as that whose build function actually creates the Scaffold widget being sought.
OK, this makes sense. Let’s wrap our widget into a Scaffold to solve this problem so that the context will be able to find it:
class StaticHomePage extends StatelessWidget {
  @override
  Widget build(BuildContext context) {
    return Scaffold(
      body: Center(
        child: TextButton(
          onPressed: () {
            Scaffold.of(context).showBottomSheet(
              (context) => Container(
                height: 200,
                color: Colors.red,
              ),
            );
          },
          child: Text('Click Me'),
        ),
      ),
    );
  }
}
But we still get the same error! Why is this happening when we can see that we have a Scaffold wrapping our widget?
Let’s take a look at what’s going on when we call Scaffold.of(context):
static ScaffoldState of(BuildContext context) {
    final ScaffoldState? result = context.findAncestorStateOfType<ScaffoldState>();
}
We see that we try to find the ancestor in the context by calling its findAncestorStateOfType method. The problem is that even though we see that the Scaffold is above our TextButton, we technically use the context where they’re at the same level:
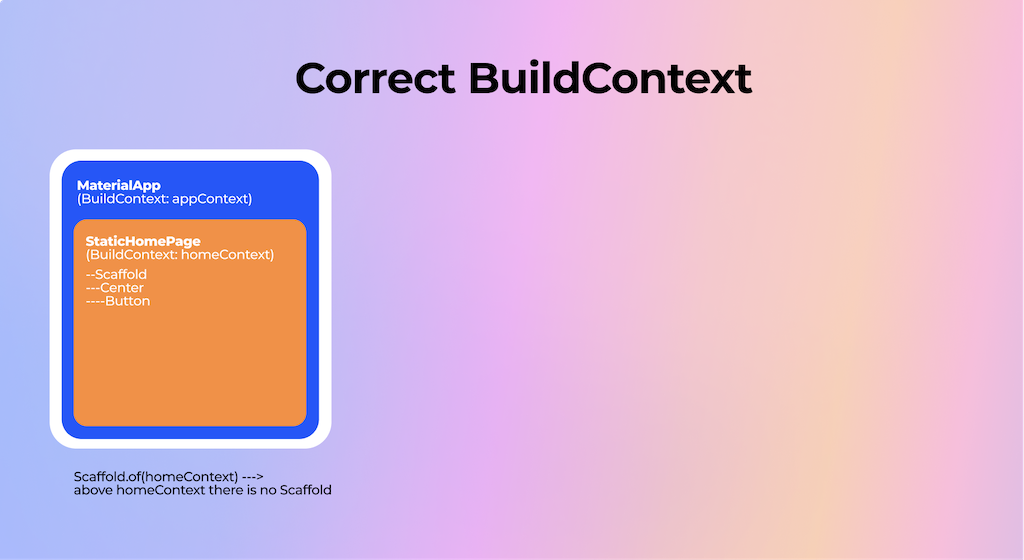
Above our homeContext, we can only find MaterialApp. So that’s the reason for the error. Now let’s consider two potential solutions:
- Wrap the button into a special
Builderclass that will give us acontextbelow our current one. This is a utility widget meant exactly for such a case: to introduce a context on another level so that the ancestor lookup will succeed. It doesn’t perform any magic but simply delegates the building to a builder method and adds another node to the hierarchy. - Do the same thing not via a special
Builderclass but with our own child widget.
The last option is to use GlobalKey, but because even Flutter itself calls this a less elegant but more expedient solution, I’d avoid using it. However, we will return to keys later on, so let’s not dive into this right now.
InheritedWidgets
Let’s take a look at another widget that we often access via the of method, MediaQuery.of(context), in order to find anything related to sizes (for example, to give padding to a button depending on the keyboard size). We can do it by accessing MediaQuery.of(context).viewInsets.bottom. If we do this, we also notice that without any other work on our part, the screen gets automatically updated when the keyboard is shown or hidden. How does this work?
Let’s get back to the source code and see what MediaQuery is.
class MediaQuery extends InheritedWidget { }

...

class InheritedWidget {
	@override
  InheritedElement createElement() => InheritedElement(this);

	bool updateShouldNotify(covariant InheritedWidget oldWidget);
}
We see that it extends a widget that we haven’t seen before: an InheritedWidget. We won’t be diving too deep into its implementation details, but we will learn just enough to understand its role and relationship with BuildContext.
If we open the source code of the InheritedWidget, we can see that it doesn’t have a build method or any render-related methods. Like all of the other framework types of widgets we’ve seen, it just has createElement, which returns an InheritedElement. It also has a new method that we haven’t seen before: updateShouldNotify.
What is the purpose of this method? It doesn’t draw or compose anything. Its purpose is to pass the data changes down the tree. Shared data. So, if you want to share the data across your widget tree, you can do it via an InheritedWidget. Take Theme, for example. You set it up at the top of your app, and then you can access it anywhere in your widget tree to read the values that you need. And if anything in this Theme changes, your widgets will “magically” rebuild as a reaction to these changes.
But how does this work?
Dependents
Let’s take a look inside our MediaQuery.of(context):
static MediaQueryData of(BuildContext context) {
    return context.dependOnInheritedWidgetOfExactType<MediaQuery>()!.data;
}
We see the scary dependOnInheritedWidgetOfExactType method called on the context. Well, this method does the exact magic we discussed:
- It looks up the
MediaQueryin the widget tree. If it exists, it will return it to you. Otherwise, an error will be thrown, the same as we have seen withScaffold. - Besides just looking up the widget, it adds the caller of this method to its internal list of dependents. Then, whenever something in this widget changes, it notifies all of the dependents of those changes so that they can adapt. It’s important to note that in order to be notified about the changes, you need to subscribe (call
.of(context)) in those methods that can be called many times. For example, thebuildmethod can be called many times, so it’s safe to subscribe there. But if you call this method in a constructor, aninitStateof aStatefulWidget(we will return to this), or any other methods that get called only once in their lifetime, then you won’t get the updates. Now we’re starting to notice the importance of the lifecycle.
A tip regarding performance:
Every time there are changes in your InheritedWidget, the build method in which you have subscribed to it will be called. This means the whole tree will be rebuilt. (Even if there are no other changes, it won’t get repainted, but it will still be rebuilt, which takes some time.) You can push the subscription down the tree so that only smaller parts that actually need to depend on the InheritedWidget change.
Example:
// Before. The whole StaticHomePage will be rebuilt if Theme changes.
class StaticHomePage extends StatelessWidget {
  @override
  Widget build(BuildContext context) {
    final style = Theme.of(context).textTheme.headline1;
    return Scaffold(
      body: Center(
        child: Builder(builder: (context) {
          return TextButton(
            onPressed: () {
              Scaffold.of(context).showBottomSheet(
                (context) => Container(
                  height: 200,
                  color: Colors.red,
                ),
              );
            },
            child: Text('Click Me', style: style),
          );
        }),
      ),
    );
  }
}

// After. Only ClickMeButton will be rebuilt.
class StaticHomePage extends StatelessWidget {
  @override
  Widget build(BuildContext context) {
    return Scaffold(
      body: Center(
        child: Builder(builder: (context) {
          return TextButton(
            onPressed: () {
              Scaffold.of(context).showBottomSheet(
                (context) => Container(
                  height: 200,
                  color: Colors.red,
                ),
              );
            },
            child: ClickMeText(),
          );
        }),
      ),
    );
  }
}

class ClickMeText extends StatelessWidget {
  const ClickMeText({Key? key}) : super(key: key);

  @override
  Widget build(BuildContext context) {
    final style = Theme.of(context).textTheme.headline1;
    return Text('Click Me', style: style);
  }
}
The last thing you need to remember about the InheritedWidget lookup is that if you have several widgets of the same type included in the tree, the lookup will return the closest one to you. This can be helpful, for example, when you want to override a Theme just for a specific portion of the tree without changing the base app-level Theme. Also, remember this point when working with nested Navigator.
Let’s recap what we’ve learned about BuildContext:
It’s a special element (figuratively and literally) in your widget tree that serves as your guide when you need to reach other widgets in your tree. This usually happens with the help of an InheritedWidget, a special type of widget that can register other dependent widgets and propagate changes to them when something changes in their own configuration.
Now let’s take a look at one of the gotchas related to widget lookup via BuildContext and its lifecycle state.
BuildContext and async gaps
We have learned that at some point, the BuildContext (element) lifecycle state can become defunct, which means it has been unmounted from the widget tree. At this point, it’s considered an error if any manipulations are performed on it.
So, there can be a dangerous situation:
- You have retained a reference to the context in order to look a widget up
- But when you have accessed the context, it has already become unmounted!
How could this happen? Well, one of the ways would be to use an async function, like in this example:
class CounterText extends StatelessWidget {
  final int count;

  const CounterText({Key? key, required this.count}) : super(key: key);

  @override
  Widget build(BuildContext context) {
    return GestureDetector(
      onTap: () async {
        await Future.delayed(const Duration(seconds: 5));
				// accessing context after an async gap here
        ScaffoldMessenger.of(context).showSnackBar(
          SnackBar(
            content: Text(
              'Count: $count',
            ),
          ),
        );
      },
      child: Text(
        '$count',
      ),
    );
  }
}
If you have Flutter lints enabled, this will raise a warning regarding the use_build_context_synchronously lint. If you don’t have this lint enabled, then I encourage you to do so.
There is a great “Decoding Flutter” episode that explains this:
This is because your Future captures the pointer to your BuildContext. During that time, it could have already been unmounted if something caused the StatelessWidget to be rebuilt with a different key or just removed altogether, and trying to perform the InheritedWidget lookup via that context will throw an Exception:
Unhandled Exception: Looking up a deactivated widget's ancestor is unsafe.
At this point the state of the widget's element tree is no longer stable.
So, how do we fix this? Starting from the Flutter version 3.7, you can check the mounted property of the BuildContext. If mounted, do whatever you need to do with it. If not, don’t. Here is a working (well, throwing) example of this error. It includes a UniqueKey approach, which we will discuss soon enough.
void main() {
  runApp(
    const MaterialApp(
      home: MyHomePage(
        title: 'Home',
      ),
    ),
  );
}

class MyHomePage extends StatefulWidget {
  const MyHomePage({super.key, required this.title});

  final String title;

  @override
  State<MyHomePage> createState() => _MyHomePageState();
}

class _MyHomePageState extends State<MyHomePage> {
  int _counter = 0;

  void _incrementCounter() {
    setState(() {
      _counter++;
    });
  }

  @override
  Widget build(BuildContext context) {
    return Scaffold(
      appBar: AppBar(
        title: Text(widget.title),
      ),
      body: Center(
        child: Column(
          mainAxisAlignment: MainAxisAlignment.center,
          children: <Widget>[
            const Text(
              'You have pushed the button this many times:',
            ),
            CounterText(
              count: _counter,
              key: UniqueKey(),
            ),
          ],
        ),
      ),
      floatingActionButton: FloatingActionButton(
        onPressed: _incrementCounter,
        tooltip: 'Increment',
        child: const Icon(Icons.add),
      ),
    );
  }
}

class CounterText extends StatelessWidget {
  final int count;

  const CounterText({Key? key, required this.count}) : super(key: key);

  @override
  Widget build(BuildContext context) {
    return TextButton(
      onPressed: () async {
        // Press this button before incrementing the counter
        await Future.delayed(const Duration(seconds: 5));
        ScaffoldMessenger.of(context).showSnackBar(
          SnackBar(
            content: Text(
              'Count: $count',
            ),
          ),
        );
      },
      child: Text(
        '$count',
      ),
    );
  }
}
If you haven’t migrated to Flutter 3.7, there are several things you can do to fix this, depending on the nature of your async operation. You can save the InheritedWidget into a variable before your async operation, or you can move it to a StatefulWidget and check if its state is mounted. Either way, be mindful of this nasty possibility, and if you haven’t yet, enable that lint.
And since we have mentioned the state so much lately, let’s take a look at the last piece of the widget puzzle, the StatefulWidget, and its relationship with BuildContext.
StatefulWidget
So far, we have only used StatelessWidget to create our UI. We have also learned that widgets are immutable, meaning they’re bound to the fields that were passed to them at the time of their creation. Additionally, we found out about InheritedWidget, which can notify its subscribers that something in their configuration has changed. But how do you make the actual changes?
Flutter has a widget for that called StatefulWidget. Its main feature, besides having Stateful instead of Stateless in its name, is the fact that it has a state. And by that, I mean a literal state because in order to create a StatefulWidget, we need to give it a State object. Let’s look at its signature:
// framework.dart
// Some code removed for demo purposes

abstract class StatefulWidget extends Widget {
  const StatefulWidget({ super.key });

  @override
  StatefulElement createElement() => StatefulElement(this);

  State createState();
}
We see that it has an already familiar method, createElement, which expectedly returns a StatefulElement. We also see that it has no build method, but it does have a createState method that should return an object of type State.
So, from the code’s point of view, we would need to create not one entity but two: something that extends StatefulWidget and a State object for that widget:
class MyHomePage extends StatefulWidget {
  const MyHomePage({super.key, required this.title});

  final String title;

  @override
  State<MyHomePage> createState() => _MyHomePageState();
}

class _MyHomePageState extends State<MyHomePage> {

  @override
  Widget build(BuildContext context) {
    return Scaffold(
      appBar: AppBar(
        title: Text(widget.title),
      )
    );
  }
}
Now that we understand how the Flutter element tree works, it shouldn’t be that hard to understand what’s going on with a StatefulWidget. Let’s take a look at its methods and lifecycle step by step.
I suggest looking at the following sequence diagram and the explanatory text after it side by side:
-
First of all, when our
StatefulWidgetis created for the first time, the Flutter framework calls itscreateElement, just like with other widgets. -
Now, in the constructor of our
StatefulElement, we can see that we have an internal field_stateand that it gets assigned the result from the methodcreateStateof the widget that was passed in its constructor (our widget). We can also see that we assign ourselves (the element) to the_state.elementfield. This is an important point because it means that our state and our element, meaning our BuildContext, are bound for life — until the end of their days. Or seconds.// framework.dart // Some code removed for demo purposes class StatefulElement extends ComponentElement { StatefulElement(StatefulWidget widget) : _state = widget.createState(), super(widget) { state._element = this; state._widget = widget; }
Remember that widgets are immutable. This means that once you create one, you can’t mutate its fields, as they’re final. And the StatefulWidget is no exception. It is also immutable because it inherits from the Widget, as all widgets do. And when Flutter builds this widget again, it similarly checks whether the widget can be updated based on its runtimeType and key. If so, it just updates the pointer to the widget in your state and element. So it’s literally the same familiar thing for us.
By now, we understand that the StatefulElement (which is also our BuildContext) and the State object are very tightly coupled. Now let’s take a look at the rest of the lifecycle of our StatefulWidget or, more accurately, our State.
-
We have already seen that it gets created via
createState, which is called by theStatefulElementcreated by theStatefulWidgetthe very first time it is inserted into the widget tree. Then the pointers to each other are set up (widget, element, and state). At this point, theStatecan be consideredmounted. We have already met with this property inStatefulWidget. It’s similar to theStatelessWidget, although its implementation details aren’t exactly the same. But from a practical point of view, it means the same thing. If the state ismounted, we can use it to, well, do stuff. If not, then not. From the point of view of the code, this is a boolean check that determines if the associated element of the state is not null. If it’s true, then it’s mounted. Easy. Remember that I told you that theStatefulElement(BuildContext) andStateare bound for life? Well, here is the manifestation of that. -
At this point, the framework calls another
Statemethod:initState. Important: This method is called only once perStatelifecycle. This is where you perform any initializations of controllers or local fields that you need. Although they should not rely on theInheritedWidgets (read it as anyofway obtained widgets) at this point, there is another place for that. TheBuildContextis already available here as thecontextfield, but as I said, you can’t yet rely on looking upInheritedWidgetsat this point. You need to remember this. -
For this, we have the next method
didChangeDependencies, which always gets called a) afterinitStateand b) every time theInheritedWidgetthat you’ve subscribed to either in this method itself or in thebuildmethod has changed. So you can handle any internal field’s manipulations based on thisInheritedWidget. Important: Thebuildmethod ALWAYS gets called after this method, so you don’t need to invoke it yourself viasetState(which we will get to soon). You can useBuildContexthere to read what you need from theInheritedWidget. [#2 flow in the sequence diagram] -
Remember that we talked about immutable widgets and that they can be swapped many times without a state and element being recreated? When that happens, the
didUpdateWidgetcallback of theStateis called and gets theoldWidgetas a param, so you can, for example, perform any checks and maybe calculate a diff to decide if you need to update your internal fields based on that in here. As withdidChangeDependencies, thebuildmethod always gets called after it, so you don’t need to invoke it yourself in any way. [#1 flow in the sequence diagram] -
In the state, you also have access to a method called
dispose, which gets called when your element gets unmounted, and it is your responsibility to dispose of any resources you’ve obtained during your lifecycle, such as animation, scroll and text editing controllers, and any subscriptions, so that you don’t cause any memory leaks. The element and context become null, so themountedfield becomes false, and you can’t make any manipulations to thisState(so use theBuildContext, too) after this point. -
The last method worth talking about is, of course,
setState. Its logic is quite simple: It just marks yourStateas needing a rebuild, and on the next frame, Flutter simply calls yourbuildmethod. Because you usually change some internal fields inside ofsetStatethat are used in forming your UI, you will see your changes. Fun fact — you can set those fields even outside of thesetStatecallback and then callsetStatewith an empty callback, and the result will be the same since it just marks your state for rebuilding. That callback is there for your convenience. [#3 flow on the sequence diagram]
Now, because the setState causes the whole widget to rebuild, it’s a good performance practice to push the changeable state down the tree so that you call setState only on small, rebuildable portions in a similar fashion to how we pushed down the InheritedWidget.
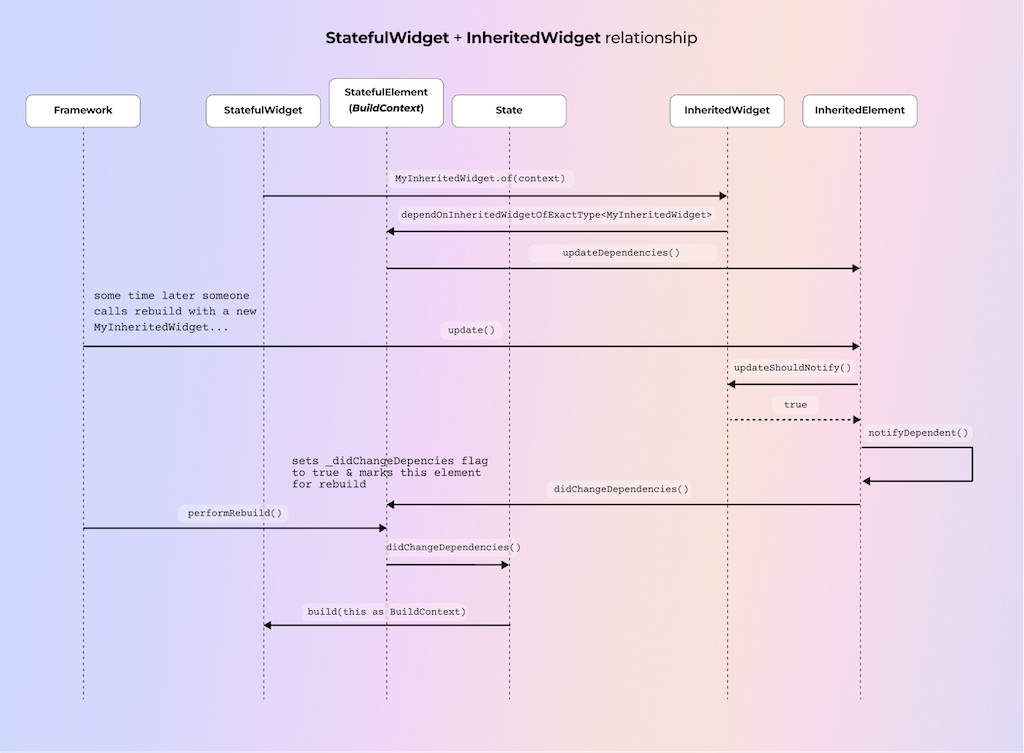
Here is a recap of how InheritedWidget propagates its changes to a State of the StatefulWidget:
Here are a couple of more things to know about State and BuildContext
The same lint use_build_context_synchronously applies to accessing context in the async methods of the State. Because your state could’ve become unmounted during the time you were waiting, using its context to look up some widget will result in an unhandled exception. To fix this, you can check the mounted property before accessing the context because it literally checks the context for null. The scenario is the same as the one we discussed when we talked about the StatelessWidget context being used in async gaps.
You may have also noticed that you have access to two contexts in your state: one via the BuildContext param in your build method and another just as the field of the state. Is there any difference? Nope, none. They’re literally the same, and the BuildContext could’ve been removed from the build method without any changes, but I think it’s there for consistency with the StatelessWidget build method. If you look at the signature of StatefulElement, you can see that in Widget build() => state.build(this);, we pass ourselves to the build method of the state. And if we look at the context field of the State class, we can see that it just wraps our _element, which we know is always the same one for the lifecycle of the State.
// framework.dart
// Some code removed for demo purposes

class StatefulElement extends ComponentElement {

	@override
  Widget build() => state.build(this);
}

abstract class State<T extends StatefulWidget> {

	BuildContext get context {
    assert(() {
      if (_element == null) {
        throw FlutterError(
          'This widget has been unmounted, so the State no longer has a context (and should be considered defunct). \n'
          'Consider canceling any active work during "dispose" or using the "mounted" getter to determine if the State is still active.',
        );
      }
      return true;
    }());
    return _element!;
  }
  StatefulElement? _element;
}
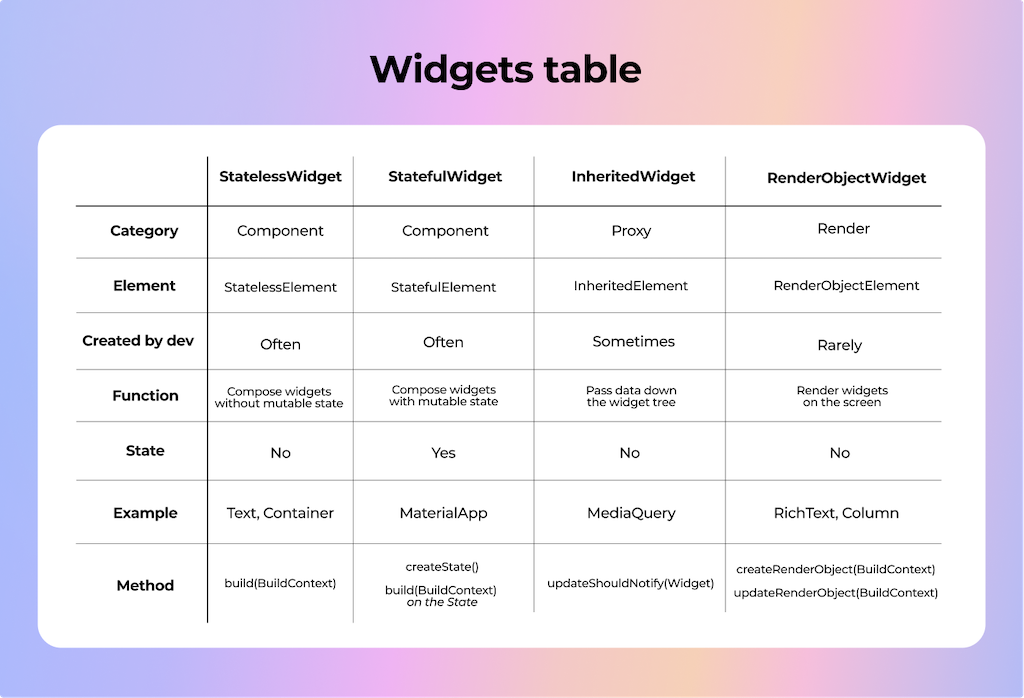
All right, we’ve covered a looooot regarding the role of BuildContext in various widgets that you’ll be using in your Flutter development. Most of the time, these will be StatelessWidget and StatefulWidget, occasionally InheritedWidget, and rarely (if ever) RenderObjectWidget.
Here’s a summary of what we learned about widgets:
We’re almost done here! I just want to quickly take a look at another notion that we’ve mentioned several times during this article: keys.
Keys
We have discussed how any time the Flutter framework wants to understand if it can reuse the element for a new widget, it compares the widget runtimeType and key params. In a lot of cases, the key will be null, so it will rely on the runtimeType only. But in case that isn’t sufficient for you, you can manipulate this behavior by passing keys to your widgets’ constructors.
Let’s take a look at some different types of keys. We won’t be diving into too much detail since it’s not within the scope of this already huge article. Here, I’ll just give you a high-level overview and point you to some resources with more detailed explanations.
First of all, there are two categories of keys: local and global.
- A GlobalKey is unique across the entire app. Widgets with GlobalKeys can move around the widget tree and persist in their identity. They’re somewhat expensive, so you should use them with caution.
There are several different types of local keys:
- UniqueKey — a type of key that ensures that two keys will never be the same. If you have several widgets of the same type in a list that you need to distinguish between, you might want to take a look at this type of key. No two instances of UniqueKey are the same. Use these keys with caution since you can cause unnecessary recreation of elements.
- ValueKey and ObjectKey — keys that delegate the comparison either to the equality operator of the object passed to it (ValueKey) or the identity check of the object passed to it (ObjectKey). They are useful when you need to distinguish items by their values, like list items.
Errors to avoid
Since my motivation to write this article comes from my experience in reviewing code, I’ve seen various errors happen due to an incomplete understanding of how BuildContext works.
Most of the problems occur because:
- The context is used too early or too late — for example, in a
StatefulWidgetmethodinitStateor across an async gap - The wrong context is used, such as the same context in which a
Scaffoldis created, or if anInheritedWidgetis overridden lower in the tree
Here are a couple of more examples of problems that occur for the same reasons but might not be so obvious at first glance:
-
Using context in
latevariables. Thelatekeyword in Dart does two things:-
It promises to the compiler that even if the variable is not initialized at the time of declaration, it will be by the time it’s accessed. (Otherwise, it will throw a runtime error.)
-
It takes a “lazy” initialization approach. Even if you initialize the variable at the time of declaration, its actual creation will only happen when you first access it. And this is where you can shoot yourself in the leg: If you access this variable in a place where the context is either not mounted (yet or already) or not ready for specific manipulations (registering to get
InheritedWidgetupdates), you will encounter errors. And you will encounter them only during runtime, which is too late (pun not intended). So be careful with thelateinitializations and understand what you’re doing. Also, if you’re assigning it to afinalinstance variable, you won’t subscribe to its changes and only get the initial value at the time of reading.
-
-
The context passed in the param of some builder method — for example, via dependency injection when reading from the RepositoryProvider context. You need to understand where this context is coming from, and if you try to look up an
InheritedWidgetvia that context, you may find out that it’s not there because that context is way above it.
And with that, I want to conclude that understanding the lifecycle and workings of the BuildContext will help you immensely with understanding topics like dependency injection and state management because, in one way or another, they’re often related to BuildContext in Flutter. BuildContext is a cornerstone of the Flutter framework, and it’s crucial to understand how it works in order to avoid bugs, debug if they still occur, and develop efficient Flutter apps. There is no hiding from it — otherwise, it will eventually come back to bite you. So I suggest becoming friends with it as soon as possible!
Outro
And that’s a wrap!
Did we really need to learn all about the different types of widgets, a bit about the render objects, lifecycles, and all of that stuff to understand BuildContext? Honestly, I think so. I could have just told you that BuildContext is a way to understand where your widget is in the widget tree and a way to look up other widgets. This is technically true, but in practice, these concepts only stick when you practice using them and dive a little bit deeper to develop a more solid understanding.
I hope that after reading this article (maybe several times), the whole concept of BuildContext and its role in the Flutter Widget Tree system has become much clearer. Now you can be friends with BuildContext instead of being scared of it and use that friendship to your advantage. I also highly recommend checking out the source code itself and reading its fantastic documentation. I’ve also assembled a list of amazing resources on this and related topics below.
I understand that all of this information can be overwhelming, especially when you encounter it for the first time. I needed to watch a lot of videos and read a lot of articles and source code (again, and again, and again…) to really grasp the concept. So I suggest taking a look at various resources. Then take a look again another day. Let it sink in. But developing this understanding has helped me so many times that I believe the time spent on it is really, really worth it.
—Daria 💙
Daria Orlova is a Flutter enthusiast and Senior Flutter Developer at Chili Labs, as well as a co-creator of the Bunny Search app, which allows you to find cruelty-free brands. If she’s not writing code or participating in some Flutter meetup, you can usually find her reading a book or posting something to her Twitter or Medium blog.
Resources
Docs:
- Flutter architectural overview https://docs.flutter.dev/resources/architectural-overview
- Inside Flutter https://docs.flutter.dev/resources/inside-flutter
Videos:
- “The Mahogany Staircase - Flutter’s Layered Design” by Ian Hickson is an amazing talk, and I suggest starting with it https://youtu.be/dkyY9WCGMi0
- “Flutter’s Rendering Pipeline” by Adam Barth https://youtu.be/UUfXWzp0-DU
- “Flutter framework code review: BuildContext & Element” by creativecreatorormaybenot https://youtu.be/9I8xwZXs4h0
- “A definitive guide to RenderObjects in Flutter” by creativecreatorormaybenot https://youtu.be/HqXNGawzSbY
- “How Flutter renders widgets” by Andrew Fitz Gibbon and Matt Sullivan https://youtu.be/996ZgFRENMs
- “Flutter, what are Widgets, RenderObjects and Elements?” by Norbert Kozsir https://youtu.be/PnWxW21vDak
- “Render Objects demystified” by Neevash Ramdial https://youtu.be/kg60JQJ-tBE?t=30643
- “How Flutter works under the hood” by Muhammed Salih Güler https://www.youtube.com/watch?v=3xcp_U_CoTI
- “Rendering - Flutter Deep Dive” by Tadas Petra https://youtu.be/3k70-1T_LPM
- [RU] “Flutter под капотом — Михаил Зотьев, Артём Зайцев” https://www.youtube.com/watch?v=KdCAzsTXdV8
- “Lifecycle of a Widget” by Craig Labenz - https://www.youtube.com/watch?v=_gIbneld-bw
- “How Flutter works under the hood” by Muhammed Salih Güler https://www.youtube.com/watch?v=3xcp_U_CoTI
- “.of(context), the Secret Weapon everyone’s afraid .of” by Scott Stoll https://www.youtube.com/watch?v=0yq_zlRelWY&t=22804s
- “Knowing the Flutter Forest” by Argel Bejarano https://www.youtube.com/watch?v=0yq_zlRelWY&t=22804s
Articles:
- “The Layer Cake” by Frederik Schweiger https://medium.com/flutter-community/the-layer-cake-widgets-elements-renderobjects-7644c3142401
- “Flutter internals” by Didier Boelens https://www.didierboelens.com/2019/09/flutter-internals/
- “Why is Flutter fast?” by Cagatay Ulusoy https://medium.com/flutter-community/why-is-flutter-fast-part-1-sublinear-building-317572cd6b47
- “Why Every Flutter Dev Should Care About BuildContext” by Neevash Ramdial https://getstream.io/blog/flutter-buildcontext/
- “Widget - State - Context - InheritedWidget” by Didier Boelens https://www.didierboelens.com/2018/06/widget-state-context-inheritedwidget/
- “Exploration of the Flutter Rendering Mechanism from Architecture to Source Code” from the Alibaba Cloud blog ****https://www.alibabacloud.com/blog/exploration-of-the-flutter-rendering-mechanism-from-architecture-to-source-code_597285


