


In this article we share some tips and tools on how to optimize Android apps. We focus on 3 main areas:
Written by Sneh Pandya
Android app optimization: Gradle and YAML
With millions of Android developers who develop over a million apps every year, it has become crucial for these mobile app developers to make the apps feature-rich, small in size, and robust all at the same time. But there are endless variations and combinations between devices, operating system versions, compatibility features, and more.
How do you make sure your apps are built for your diverse audience, are fast, and give you the power to cater only the resources that are needed to each specific user, all while keeping the app size as small as possible? The answer: Gradle. Let’s find out how!


What is Gradle, actually?
Gradle is a flexible general-purpose build automation tool made for building almost any type of programming-language-based software development. Gradle runs multiple tasks based on the development or deployment required. The tasks compile the code for packaging, testing, deployment, and publishing.
The Gradle build system is based on Groovy, which is an object-oriented programming language. Gradle avoids unnecessary work by only running the tasks that need to run based on changes in their inputs or outputs. A build cache can also be used to enable the reuse of task outputs from previous runs or even from a different machine (with a shared build cache). Constant improvements and various optimizations make Gradle a high-performance and versatile tool.
API levels and backward compatibility
Choosing the right SDK version is very crucial for Android applications, as certain APIs are allowed and restricted based on the supported SDK versions. Hence, choosing the right SDK version also depends on the specific use case that you want to achieve.
The Android Studio team has included this smart guide, which outlines all the necessary API-specific details for each version. This will help you pick the right minimum API version to support for your end users. The API level distribution chart is available in Android Studio → Start a new Android Studio Project → Select a Project Template → Configure Your Project → click on Help me choose below Minimum SDK.
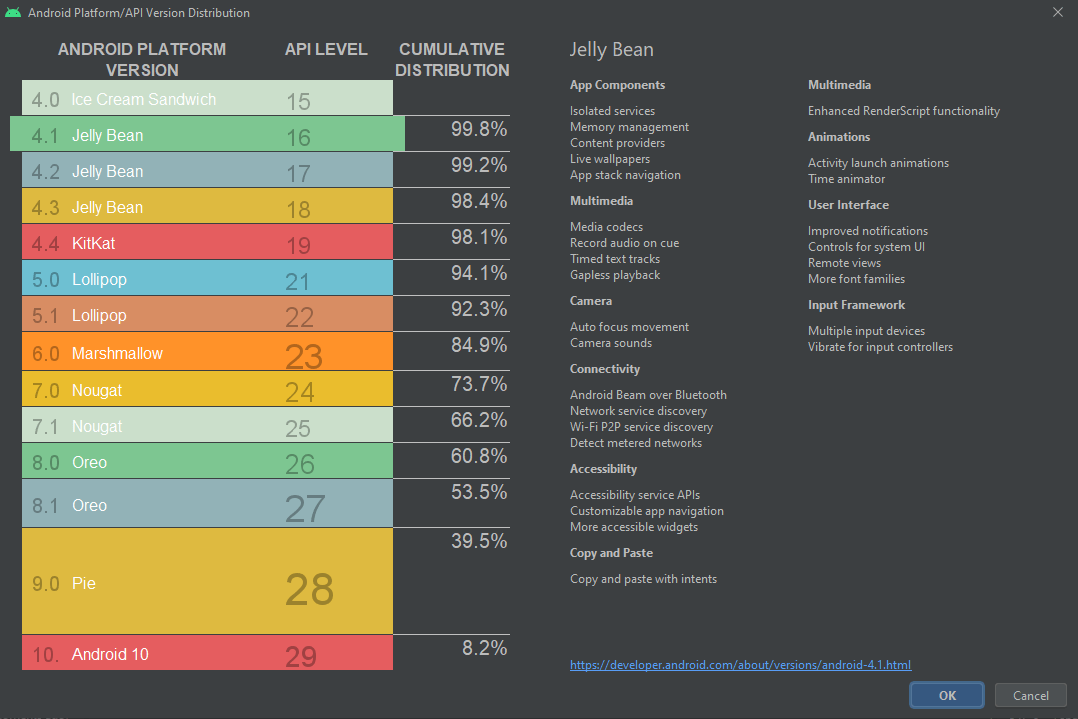
Ideally, developers keep the minimum API level at 21, supporting devices running Android OS 5.0 (Lollipop), which supports approximately 94% of Android smartphones in the market today. You should also consider when choosing the lower API versions that they also have their trade-offs for compatibility. For the same reason, when developing for newer versions of Android, a best practice is to use backward-compatible APIs and libraries. The AndroidX packaging, which comes under the newly announced Android Jetpack libraries, provides feature parity, new libraries, and full backward compatibility across Android releases.
We will keep the minSdkVersion 16 in our project to showcase the best practices and improvements applied and discussed throughout this article.
Data binding vs. view binding: What to choose?
The Data Binding Library for Android was introduced back in 2015, and since then, there have been multiple successive improvements. View binding is a successor to data binding that was released in 2019. Both of the libraries do their work pretty neatly. But which one should you choose? Let’s find out!
The Data Binding Library allows you to bind code to the views and vice versa to pass the data between them, whereas view binding binds only views to the code. In simpler terms, you cannot use view binding to bind layouts with data in XML. This means you cannot use binding expressions in your layout files or even two-way binding with the View Binding Library.
The advantage of the Data Binding Library is that it includes all the features from the View Binding Library and more, but it comes with the cost of longer build times and generated multiple classes. Also, the View Binding Library removes the declarations of binding classes in your code and the <data> tag in view files. You should choose view binding if you only want to reference your views in your code. Avoid NullPointerException and findViewById. If you want to receive updates in your code when the data changes in the views or in other cases, like when you want to bind adapters, for example, then you should choose data binding.
Data binding and view binding are enabled in the app-level build.gradle file. However, they cannot be specified together at once. You can either declare DataBinding or ViewBinding in your build.gradle file.
Data binding or view binding can be enabled by specifying the blocks below:
// DataBinding
android {
    ...
    buildFeatures {
        dataBinding {
            enabled true
        }
    }
    ....
}

// ViewBinding
android {
    ...
    buildFeatures {
        viewBinding {
            enabled true
        }
    }
    ....
}
minifyEnabled, shrinkResources, ProGuard, and R8: What’s the difference?
minifyEnabled enables code shrinking, obfuscation, and optimization for only the project’s release build type. Code shrinking with R8 is enabled by default when you set the minifyEnabled property to true.
For Android Studio 3.4 or Android Gradle plugin 3.4.0 and higher, R8 is the default compiler that converts the project’s Java bytecode into the DEX format that runs on the Android platform.
When the minifyEnabled property is set to true, R8 combines rules from all the available sources, including ProGuard, library dependencies, custom configuration files, AAPT2, and the Android Gradle plugin.
shrinkResources enables resource shrinking, which is performed by the Android Gradle plugin. In the newer versions of Android Studio and the Android Gradle plugin, crunchPngs can also be set to true to shrink the PNG image resources for your Android project.
proguard is used to apply the ProGuard rules files that are packaged with the Android Gradle plugin. When a new project or module is created using Android Studio, the IDE creates a proguard-rules.pro file for each module directory to include your own rules. Also, additional rules can be included from other files by adding them to the proguardFiles property in the module’s build.gradle file.
IMPORTANT: It is highly recommended that you thoroughly test your app before publishing since ProGuard tends to remove code that might be used by the application. To specify and include the classes in build generation, please refer to the official ProGuard documentation to learn how to use -keep rules.
After R8 obfuscates your code, understanding a stack trace is extremely difficult because the class and method names and even the line numbers are changed. R8 creates a mapping.txt file each time it runs, which contains the obfuscated class, method, and field names mapped to the original names. The file is stored in the <module- name>/build/outputs/mapping/<build-type>/ directory.
R8 generates the mapping.txt file every time the project is built, so each time a new release is published, you also need to publish the latest version of the mapping.txt file. That way, you’ll be able to debug a problem if an obfuscated stack trace of the crash or error from an older version of the app is submitted.
The app shrinking can be enabled by specifying the block below:
android {
    …
    buildTypes {
        release {
            crunchPngs true
            minifyEnabled true
            shrinkResources true
            proguardFile getDefaultProguardFile('proguard-android.txt'), 'proguard-rules.pro'
            signingConfig signingConfigs.release
        }
    }
    …
}
Learn target-specific APK generation
Usually, while publishing the app for the end users, we tend to build the APK via a standard method, but even after applying proguard, minification, and shrinking, the app that is generated has a lot of bloatware resources that are not useful for the targeted devices specifically.
These resources are commonly screen-density-specific layouts, device-architecture-specific modules, and more. Not every end user needs them. It is a best practice to split them into various target-specific or device-specific APKs and publish them.
The abi filter splits and generates APKs specific to the device architectures. Per-architecture-based APKs are smaller in size since the native code included for the device architecture is compiled in the specific output APK only.
android {
  ...
    splits {

      // Configures multiple APKs based on ABI.
        abi {

            // Enables building multiple APKs per ABI.
            enable true

            // By default, all ABIs are included, so use reset() and include to specify that we only want
            // Resets the list of ABIs that Gradle should create APKs for to none.
            reset()

            // Specifies a list of ABIs that Gradle should create APKs for.
            include "x86", "x86_64"

            // Specifies that we do not want to also generate a universal APK that includes all ABIs.
            universalApk false
        }
    }
    ...
}
The density filter splits and generates APKs based on specific device densities and screen sizes. In the density block, provide a list of desired screen densities and compatible screen sizes that you want to include in the APK generation.
android {
    ...
    splits {

        // Configures multiple APKs based on screen density.
        density {

            // Configures multiple APKs based on screen density.
            enable true

            // Specifies a list of screen densities Gradle should not create multiple APKs for.
            exclude "xxxhdpi"

            // Specifies a list of compatible screen size settings for the manifest.
            compatibleScreens 'small', 'normal', 'large', 'xlarge'
        }
    }
    ...
}
Make your machine build faster!
Android uses the Dalvik Virtual Machine (DVM) instead of the Java Virtual Machine to generate the bytecode. Hence, the DVM generates output files known as DEX: Dalvik EXecutables. Essentially, Android apps are compiled into .dex (Dalvik EXecutable) files, which are in turn zipped into a single APK file on the device.
Gradle gives you the power to boost the APK generation process, even at the DEX level! Gradle allows you to declare dexOptions where you can specify preDexLibraries to choose whether you want to use the pre-compiled or previously generated DEX output libraries for unchanged code. Moreover, it also allows you to specify the maximum process count and the size of memory allocated to the virtual machine for code compilation.
android {
    …
    dexOptions {
        preDexLibraries true
        maxProcessCount 8         //default is 4
        javaMaxHeapSize "4g"      //ideally half the size of your memory
    }
    …
}
Similarly, there are a few other declarations that would make your Gradle execute even faster! Gradle runs in a separate process, enabling the Gradle daemon to make the startup and execution triggers faster for your Android project. Similar to the previously described preDexLibraries, Gradle also provides its own caching mechanism, which can be enabled. To invoke tasks based on the project changes and to execute only the tasks again when there are project changes, you can enable the configure-on-demand feature.
Most importantly, in a lot of Android projects, there is more than one module, apart from just the app module. These modules add a lot of weight to the project and execution of tasks since Gradle has to compile each of them individually. You can specify parallel execution to enable multi-module mode for Gradle, which will run tasks in parallel for each module and result in the project being built faster.
Make sure to specify these arguments in the gradle.properties file:
org.gradle.daemon=true
org.gradle.parallel=true
org.gradle.caching=true
org.gradle.configureondemand=true
Harness the power of YAML with Codemagic
YAML is a human-friendly data representation format built for simplicity and readability. Codemagic has built-in support for YAML, which allows you to specify a lot of details, parameters, and custom configuration for your project!
Codemagic supports environment variables via YAML declarations before, during, and after the build process. You can trigger a lot of common procedures or actions by specifying environment variables using YAML for Codemagic’s environment. Going further, you can specify custom variables specific to your project, like build numbers, temporary variables, and more.
With the help of YAML, you can also encrypt sensitive data for your build process or make use of webhooks to trigger builds automatically and run tests. You can set up code signing and automated publishing and forget about the hassle of manually publishing your apps for your end users.
Finally, if you are aiming to achieve seamless environment compatibility, Codemagic CLI tools will help you replicate this on your local machines!

YAML best practices:
Only use
WHITESPACEcharacters for indentation and notTABwhile writing a YAML file. Most decent editors handle this natively and can be configured even further.It is recommended to use a monospaced font to view and edit YAML so that it’s easy to spot indentation errors.
Save your YAML files in the
UTF-8encoding. This is handled automatically by most of the popular editors, like Visual Studio Code.
Final words about Gradle and YAML
Our final app-level build.gradle file looks like this:
apply plugin: 'com.android.application'
apply plugin: 'kotlin-android'
apply plugin: 'kotlin-android-extensions'

android {
    compileSdkVersion 30
    defaultConfig {
        applicationId "com.androidapp.myapp"
        minSdkVersion 16
        targetSdkVersion 30
        versionCode 1
        versionName "1.0"
        multiDexEnabled true
    }

    buildFeatures {
        viewBinding {
            enabled true
        }
    }

    splits {
        density {
            enable true
            exclude "small", "xxxhdpi"
            compatibleScreens 'normal', 'large', 'xlarge'
        }
        abi {
            enable true
            reset()
            include "x86", "x86_64"
            universalApk false
        }
    }

    sourceSets {
        main.java.srcDirs += 'src/main/kotlin'
    }

    dexOptions {
        preDexLibraries true
        maxProcessCount 8
        javaMaxHeapSize "4g"
    }

    compileOptions {
        sourceCompatibility = 1.8
        targetCompatibility = 1.8
    }

    signingConfigs {
        release {
            storeFile file("../myappkeystore.jks")
            storePassword "myapppassword"
            keyPassword "myappkeypassword"
            keyAlias "myappalias"
        }
    }

    def proguard_list = [
            "$project.rootDir/buildsettings/proguard/proguard-constraintlayout.pro",
            "$project.rootDir/buildsettings/proguard/proguard-google-play-services.pro",
            "$project.rootDir/buildsettings/proguard/proguard-project.pro"
    ]

    buildTypes {
        release {
            debuggable false
            crunchPngs true
            minifyEnabled true
            shrinkResources true
            proguard_list.each {
                pro_guard -> proguardFile pro_guard
            }
            signingConfig signingConfigs.release
        }
        debug {
            debuggable true
            crunchPngs false
            minifyEnabled false
            shrinkResources false
        }
    }
}

dependencies {
    implementation fileTree(dir: 'libs', include: ['*.jar'])

    implementation "androidx.core:core-ktx:1.3.2"
    implementation "org.jetbrains.kotlin:kotlin-stdlib-jdk8:1.4.10"

    implementation 'androidx.appcompat:appcompat:1.2.0'
    implementation 'androidx.constraintlayout:constraintlayout:2.0.2'
    implementation 'androidx.multidex:multidex:2.0.1'
    implementation 'com.google.android.material:material:1.2.1'
}

apply plugin: 'com.google.gms.google-services'
Gradle and YAML are powerful tools if used wisely. Using them the right way will help you build apps in a faster, smarter way—saving a lot of effort and time. With every new release, the Gradle build system is improving and giving you new opportunities to take your app development and publishing to the next level.
Android app optimization: Animation and Media
uman brains are naturally wired to process visual information faster and more precisely than text-based information. In the previous article, we talked about the app size and Gradle/YAML optimizations for Android apps. In this article, we will see how to improve performance and optimize your apps for animations and media playback.
Animations
Animations improve the visual appearance and experience for your end-users. Animations become useful when you want to display UI changes, transitions, or a specific state of your app.
Types of Animations on Android
Transition animations
The Transitions API framework allows layout changes within an activity. Introduced in Android 4.0, they animate transitions of a view, an Activity, or a Fragment.
Property animations
This is the most popular type of animation, introduced in Android 3.0. It is used to change the properties of an object. Property Animations can change the state as well as behavior.
View animations
These are used to perform simple animations, like changing the size, position, and rotation of the view. They are easy to build but are slower and less flexible than Property Animations. The problem with View Animations is that though the View state changes, its property still remains in the original position.
Best Practices for Animations on Android
1. Avoid the use of multiple independent animations
We can perform multiple animations on a single view using the animator set, but this comes with performance overhead, including the processing overhead of setting up the AnimatorSet and running two Animators in parallel. A better approach is to use ViewPropertyAnimator.
2. Make use of new Motion System Guidelines
The container transform pattern is used when the transition includes a persistent container (buttons, lists, or cards) that transitions into a detailed view. Similarly, fade through, fade, shared axis, and other patterns that are included in the new Motion System Guidelines will make your life easier!
3. Retain item position for SharedElementTransition
When working with RecyclerView, it’s not enough to simply add a listener for images. An item position of RecyclerView where the transition starts from is also needed. When the user goes back to the previous screen, compare the loaded image position with the retained position at the listener, and start the transition only when they are matched.
4. Understand image loading properly
When working with SharedElementTransitions, Glide tries to optimize image loading and resizes and trims images to match the target view. This introduces a glitch while the transition is in progress. To remove this glitch, apply dontTransform() like this:
Glide.with(target).load(url).apply(RequestOptions().dontTransform())
5. Use fragments appropriately
When using SharedElementTransition, always specify a parent fragment that will call the transition methods for all the rest of the fragments. If you directly use the fragment specified in the container and specify postponeEnterTransition() or startPostponedEnterTransition(), it may not work.
6. Design your own animations
Created by Alex Lockwood, ShapeShifter is a great tool for designing your own animations and using them in Android. The basics are easy, and you can find them here.
7. Strike a balance between text and animations
Do not go overkill on your app by adding too many animations or a particular screen. This distracts users and might not be suitable for a seamless user flow. Strike a balance between hints, animation, and text wherever needed. Users need to understand which actions they can perform by looking at the animations.
8. Create a design system
It is always a best practice to define the visual hierarchy for your entire app. Users will have an unpleasant experience if every other screen has different animations or transitions. Ideally, the transitions should be kept the same throughout the app for the same components, i.e., all the activity transitions should provide the same transition experience throughout the app.
9. Use the latest image formats
Using the latest image formats, like WebP, for static images and drawables converted from SVG for vector animations, etc., will save a lot of space and resources, as they are smaller in size, adaptable, backward compatible, and optimized.
10. Test your apps thoroughly
Android devices vary a lot in screen size, resolution, screen ratio, pixel density, frame rate, and so on. It is important to test your animations, transitions, and other visual components across devices and API versions supported by your app to identify pitfalls, glitches, ANRs, and any other unpleasant experiences before you publish your app for your end-users with a bunch of animations and transitions. Remember, seamless experience becomes crucial when working with visual animations and transitions.
11. Learn from the best
The Android Framework Team makes consistent efforts to update the developer documentation and samples on their GitHub repository, which you can take a look at and learn from. They implement the projects with best practices, specifying methods and implementations that make the animations robust and beautiful at the same time. You can explore the repository here, which includes multiple samples for all types of animations.
Media
Providing a seamless media playback experience for your users is crucial. Media playback on Android consumes system resources, such as memory, audio/media controls, codecs, and more. This can degrade the performance of your app and possibly the entire device if not handled correctly. Below are the performance strategies and steps that will help you build robust and more beautiful experiences for your users.
The 4-Step Process to Show Media Control Notifications
- Create a media session for your service.
val mediaSession = MediaSessionCompat(this, “MyAppMediaPlayerService”);
- Declare a media style for your media notification.
val mediaStyle = Notification.MediaStyle().setMediaSession(mediaSession.sessionToken)
- Build a notification and display your media player controls.
val notification = Notification.Builder(this@MyAppMediaPlayerService, YOUR_CHANNEL_ID).setStyle(mediaStyle).build()
- Add user actions for your media player notification.
val pauseAction: Notification.Action = Notification.Action.Builder(pauseIcon, “Pause”, pauseIntent).Build()

notification.addAction(pauseAction)
Manage Audio Focus Automatically
More than one Android app can play audio to the same output stream simultaneously. In this case, the Android framework mixes everything together—giving users an unpleasant experience.
When your app needs to play audio, it should request audio focus. However, after the app acquires audio focus, it may not be able to keep the audio focus until it is done playing the audio. Another app can request focus, which preempts your hold on the audio focus. If that happens, your app should pause playing or lower its volume to let users hear the new audio source more easily.
Making use of this new feature is very simple with SimpleExoPlayer and can be done in just three steps!
- First, create an instance of
AudioAttributesfor your use case. For example, if you’re playing a movie:
// class com.google.android.exoplayer2.audio.AudioAttributes

AudioAttributes audioAttributes = new AudioAttributes.Builder()
 .setUsage(C.USAGE_MEDIA)
 .setContentType(C.CONTENT_TYPE_MOVIE)
 .build();
- Call
setAudioAttributeswith the second parameter set totrue.
simpleExoPlayer.setAudioAttributes(audioAttributes, /* handleAudioFocus= */ true);
SimpleExoPlayerwill automatically manage audio focus for you. Your app does not need to include any code for requesting or responding to audio focus changes!
If your app is playing a podcast or an audiobook, it would be better to pause it than to continue playing it more softly, which could be distracting. For that, setContentType to CONTENT_TYPE_SPEECH, and SimpleExoPlayer will pause while the notification is playing and will automatically resume afterwards.
Best Practices for Media Playback on Android
Here’s a summary of key learnings and best practices for building products and apps that focus heavily on media streaming and media playback:
1. Keep screen on
It might sound obvious that notifying the Android system about media playback, especially video playback, is a vital step. When the video playback begins, specify setKeepScreenOn(true), and specify setKeepScreenOn(false) either when the user leaves the screen or when the playback has completed.
2. Add picture-in-picture mode
Android Oreo (8.0) and above support picture-in-picture mode, where two apps can run side by side or one over the other when video playback is in progress. It lets the user watch a video in a small window pinned to a corner of the screen while navigating between apps or browsing content on the main screen.
3. Sense and switch orientation
If your app allows the user to switch between landscape and portrait modes, make sure you use sensor orientation instead of the hardcoded regular orientation. For example, in SCREEN_ORIENTATION_SENSOR_LANDSCAPE mode, the screen will rotate to adjust the orientation according to how the users are holding the device. This is extremely useful and seamless for users watching videos or charging their device or who just prefer to hold the phone in a certain manner.
4. Pause on headphones removal
When headphones are unplugged, the Android framework publishes an ACTION_AUDIO_BECOMING_NOISY broadcast. Make your app listen to this broadcast when your audio/video playback is ongoing, and take appropriate action, like pausing the playback, so as not to surprise the user with audio from the speaker.
5. Support device, peripheral, or system volume keys
Users are habituated to using the volume keys provided by the device manufacturer and Android framework to control the volume of audio/video playback. Don’t swim the wave and create your own volume controls. Most headphones/earphones have volume and media control keys. Users naturally interact with these keys, and they expect the keys and peripherals to work seamlessly with your app. Create a MediaSession to export your media information and media state, like play, pause, skip, volume controls, etc., which then can be consumed by not only headphones but also devices like Google Assistant, Google Home, Android Auto, Android Wear, external Bluetooth speakers, etc.
6. Support adaptive streaming and playback
If you are providing functionalities like media streaming over the network and/or offline downloads, the best thing you can ever do is provide an adaptive stream of your audio/video, with which your end-users can switch the quality or resolution of playback. Ideally, low-, medium-, and high- or HD-quality options for playback or offline downloads are a good feature, especially for mobile devices. Remember, not everyone has stable or high-speed connectivity. Your user retention will grow, and your users will thank you for this!
Animation and Media Conclusion
Building media-rich experiences has become one of the core elements of mobile app development. Animation and media are both powerful and provide excellent user experiences when implemented properly. The information in this article should help you build such experiences for your end-users, ultimately growing your retention and ratings.
Android app optimization: Modular Architectures and Reusable Code
Gathered while building multiple apps consisting of a vast variety of features and modules, this article is a summary of key learnings and best practices for modular application architecture. It is highly relevant for Android app development if you are aiming to achieve modularization or even white-label solutions.
Application Architecture
Based on your requirements, choose feature-based modules or functionality-based modules. Each module will have its own subdirectory and configuration.
Feature-Based Modules
If your app has features that are relatively independent of each other, then feature-based modules or folder structure will be the most suitable. In this case, it will also be helpful to ship individual features as modules only when the user wants to use them.
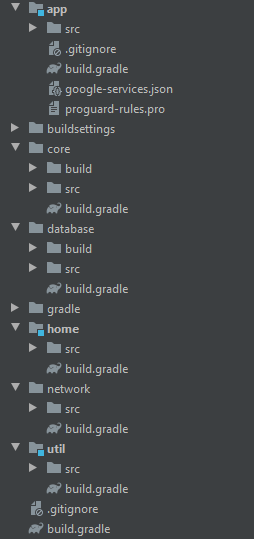
As shown in the image above, all the features have their own individual subdirectories. These subdirectories include complete configurations for each module or feature. Each of these modules can run independently as a mini-app.
To deliver a fully featured app, these modules are then injected into the base module, and their functionalities work seamlessly with each other while still maintaining separation internally.
In this project, here’s how the modules are injected in flow:
util → repository → recipeplayer -> home → app
util holds the utility code used across the project. It is injected into repository, which maintains network communication between data sources. repository is then injected into recipeplayer, which is a video playback module consisting of ExoPlayer. recipeplayer is injected into the home module, which holds views like the home screen, splash screen, and other navigational views for the app. home is injected into the app module, which includes Gradle-related configurations and scripts for app shrinking and performance.
// Dependencies for util
dependencies {
    // Kotlin
    implementation deps.kotlinplugin.ktx
    implementation deps.kotlinplugin.stdlib
}


// Dependencies for repository
dependencies {
    // Retrofit and OkHttp
    implementation deps.retrofit2.runtime
    implementation deps.retrofit2.gson
    implementation deps.okhttp3.core
    implementation deps.okhttp3.logginginterceptor

    // Firebase
    implementation deps.firebase.crash
    implementation deps.fabricplugin.crashlytics

    api project(':util')
}


// Dependencies for recipeplayer
dependencies {
    // ExoPlayer
    implementation deps.exoplayer2.exoplayer2

    // Both repository and util will be auto-injected
    api project(':repository')
}


// Dependencies for home
dependencies {
    // AndroidX
    implementation deps.androidx.appcompat
    implementation deps.androidx.material

    // Android Layouts
    implementation deps.constraintlayout.core

    api project(':recipeplayer')
}


// Dependencies for app
dependencies {
    api project(':home')
}
If we run only recipeplayer, all the resources injected so far will be initialized and ready to use, meaning the video player will run even without the home and app modules in debug mode.
To extend the use case, think of a situation where there are completely independent features named profile, cloudalbums, and chat. In this case, all three of the modules will be on the same hierarchy as recipeplayer since they do not directly depend upon recipeplayer. Simply inject repository into each one of them to make network logic and utility code accessible. Each of these modules will then be directly injected into home, making it seamless. This will allow you to push individual features independently of each other without affecting any other modules!
The configuration will then look like this:
// Dependencies for profile
dependencies {
    ...
    api project(':repository')
}


// Dependencies for cloudalbums
dependencies {
    ...
    api project(':repository')
}


// Dependencies for chat
dependencies {
    ...
    api project(':repository')
}


// Dependencies for home
dependencies {
    // AndroidX
    implementation deps.androidx.appcompat
    implementation deps.androidx.material

    // Android Layouts
    implementation deps.constraintlayout.core

    api project(':profile')
    api project(':cloudalbums')
    api project(':recipeplayer')

    // Enable when feature is completed and ready to ship
    // api project(':chat')
}
All the resource files are included in their respective modules and scoped to limited usage. This prevents the inclusion of unnecessary resources in the project. This approach maintains structural integrity for seamless API migrations, dependency management, functionality changes, or even obsoleting/removing features from the app.
Functionality-Based Modules
On the other hand, if your app has functional or business logic that is complex and is associated with a larger part of your features, then functionality-based modules will be the most suitable. In this case, your individual functionalities will be injected into one or more of your final modules.
In this project, here’s how the modules are injected in flow:
util → database → network -> core -> home → app
util holds the utility code used across the project and is injected into database, which maintains the database configuration. database is then injected into network, which provides network connection and data sources mapping. Next, network is injected into core, which is a video playback module consisting of ExoPlayer. core is injected into the home module, which holds views like the home screen, splash screen, and other navigational views for the app. home is injected into the app module, which includes Gradle-related configurations and scripts for app shrinking and performance.
// Dependencies for util
dependencies {
    // Kotlin
    implementation deps.kotlinplugin.ktx
    implementation deps.kotlinplugin.stdlib
}


// Dependencies for database
dependencies {
    // Room
    implementation deps.room.ktx

    api project(':util')
}


// Dependencies for network
dependencies {
    // Retrofit and OkHttp
    implementation deps.retrofit2.runtime
    implementation deps.retrofit2.gson
    implementation deps.okhttp3.core
    implementation deps.okhttp3.logginginterceptor

    // Firebase
    implementation deps.firebase.crash
    implementation deps.fabricplugin.crashlytics

    api project(':database')
}


// Dependencies for core
dependencies {
    // ExoPlayer
    implementation deps.exoplayer2.exoplayer2

    api project(':network')
}


// Dependencies for home
dependencies {
    // AndroidX
    implementation deps.androidx.appcompat
    implementation deps.androidx.material

    // Android Layouts
    implementation deps.constraintlayout.core

    api project(':core')
}


// Dependencies for app
dependencies {
    api project(':home')
}
The important thing to understand here is that all the features that you wish to add to your app will be added inside the single core module. The advantage of this approach is that you can keep your functionalities flexible—you can upgrade your network and database in a single place, and all the features will use the same code. Your features will remain lean and minimal and can be referenced inside a single module.
This approach helps when the code needs to be tightly coupled for the features to work closely with each other or when the features are partially or fully dependent on each other.
Reusable Utility Code
Some of the most commonly used code snippets are generalized and converted into utility code to increase reusability across the project.
Glide + Data Binding
Almost every application requires image loading, and loading images in reusable views is a little tricky with data binding. This code snippet shows how to use Glide for image loading with data binding. This is especially helpful in scenarios like loading images in RecyclerView items.
object BindingUtils {
    @JvmStatic
    @BindingAdapter("app:imageUrl", "app:gender")
    fun loadImage(view: AppCompatImageView, url: String, gender: String) {
        GlideApp.with(view.context)
            .load(url)
            .placeholder(
                when (gender) {
                    "male" -> R.drawable.ic_male_placeholder
                    else -> R.drawable.ic_female_placeholder
                }
            )
        .diskCacheStrategy(DiskCacheStrategy.AUTOMATIC)
        .into(view)
    }
}
CircleImageView
A lot of apps often show images that are circle cropped. If you are using Glide for image operations, then simply use the .circleCrop() transformation as shown here. If you wish to create your own view that crops the image in a circular shape, the code below works best.
class CircleImageView @JvmOverloads constructor(
    context: Context, attrs: AttributeSet? = null, defStyleAttr: Int = 0
) : AppCompatImageView(context, attrs, defStyleAttr) {

    var path = Path()

    var radius: Float = 0f
    var centerX: Float = 0f
    var centerY: Float = 0f

    override fun onMeasure(widthMeasureSpec: Int, heightMeasureSpec: Int) {
        super.onMeasure(widthMeasureSpec, heightMeasureSpec)
        radius = measuredWidth / 2f
        centerX = measuredWidth / 2f
        centerY = measuredHeight / 2f

    }

    override fun onDraw(canvas: Canvas?) {
        path.addCircle(centerX, centerY, radius, Path.Direction.CW)
        canvas?.clipPath(path)
        super.onDraw(canvas)
    }

}
DiffUtil
DiffUtil calculates the difference between two lists and returns the output in the form of an updated list. It offers a huge performance improvement, as the algorithm calculating the differences is optimized for space and uses O(N) space to find the minimal number of addition and removal operations between the two lists.
This is especially useful when working with RecyclerView, List, etc., for refresh updates, filtered results, search results, and so on.
class UserDiffUtil(private val newList: ArrayList<User>? = null, private val oldList: ArrayList<User>? = null) : DiffUtil.Callback() {

    override fun areItemsTheSame(oldItemPosition: Int, newItemPosition: Int): Boolean {
        return oldList?.get(oldItemPosition)?.id == newList?.get(newItemPosition)?.id
    }

    override fun getOldListSize(): Int {
        return oldList?.size ?: 0
    }

    override fun getNewListSize(): Int {
        return newList?.size ?: 0
    }

    override fun areContentsTheSame(oldItemPosition: Int, newItemPosition: Int): Boolean {
        return oldList?.get(oldItemPosition) === newList?.get(newItemPosition)
    }
}
Network Connectivity Utility
class NetworkUtil {

    companion object {

        /**
         * Returns integer value for network type available
         *
         * @param context
         * @return network-type: 0 -> None, 1 -> Mobile, 2 -> WiFi
         */
        fun networkType(context: Context): Int {
            var result = 0 // Returns connection type. 0: none; 1: mobile data; 2: wifi
            val cm = context.getSystemService(Context.CONNECTIVITY_SERVICE) as ConnectivityManager?
            if (Build.VERSION.SDK_INT >= Build.VERSION_CODES.M) {
                cm?.run {
                    cm.getNetworkCapabilities(cm.activeNetwork)?.run {
                        if (hasTransport(NetworkCapabilities.TRANSPORT_WIFI)) {
                            result = 2
                        } else if (hasTransport(NetworkCapabilities.TRANSPORT_CELLULAR)) {
                            result = 1
                        }
                    }
                }
            } else {
                cm?.run {
                    cm.activeNetworkInfo?.run {
                        if (type == ConnectivityManager.TYPE_WIFI) {
                            result = 2
                        } else if (type == ConnectivityManager.TYPE_MOBILE) {
                            result = 1
                        }
                    }
                }
            }
            return result
        }

        /**
         * Returns boolean value for network availability
         *
         * @param context
         * @return true -> network available, false -> network unavailable
         */
        fun isNetworkAvailable(context: Context): Boolean {
            return networkType(context) != 0
        }
    }
}
Bonus: Google Play Policy Updates
Google Play policies are constantly evolving to improve the user experience and create a safer ecosystem. It is essential to comply with these policies and updates to be able to publish your Android apps on Google Play.
64-bit device architecture support for Android apps has been mandatory as of August 01, 2020. This means apps must support 64-bit ABIs for their existing 32-bit architecture versions. Games built with Unity 5.6.7 and lower will have to comply by August 01, 2021 at the latest. Here’s how to verify.
Starting August 02, 2021, all new apps using Play Billing must use Billing Library version 3 or newer. By November 01, 2021, all updates to existing apps must use Billing Library version 3 or newer. Here’s how to migrate.
By August 03, 2020, all new apps must target at least Android 10 (API 29). By November 02, 2020, all app updates must target at least Android 10 (API 29). Until then, new apps and app updates must target at least Android 9 (API 28). Here are the API differences that may impact your Android features.
Starting November 01, 2020, all apps that use in-app subscriptions must support Account Hold and Restore. At the same time, all subscriptions will be automatically opted into Pause and Resubscribe unless these features are proactively turned off in Google Play Console. Here’s a guide for this.
Between September 30, 2020, and January 18, 2021, newly submitted apps that access background location will need approval before the apps are made live. All apps published prior to September 30, 2020, that access location in the background must have approval by March 29, 2021, or they will be removed from Google Play. Here’s a guide for this.
Conclusion
Maintaining and scaling mobile apps becomes easy once we use the approach that is right for specific apps, rather than forcing apps to adapt to a certain architecture or approach. While the application architectures described above are versatile and adaptable, there are a lot of other possible variations as well. To choose the right one, follow the tips below:
1. Know your features well—in detail
This will help you decide how to build your own application architecture. By understanding what your app has to offer, you will be able to decide how to decouple its components for reusability.
2. Decide which app components will need constant updates or upgrades
This can be a specific feature, a group of features, or even particular framework dependencies. Separate your components based on how frequently they will evolve. For ever-evolving features, like displaying e-commerce offers, the first approach shown above would be more suitable.
3. Refer to Android’s Application Architecture documentation
This will help you decide how to structure your files, business logic, utilities, and more apart from the structure mentioned in the steps above.
4. Avoid over-engineering apps
A lot of developers tend to get carried away by fancy library and framework changes, which might not always be the solution. For apps that are not feature-heavy, the rule of thumb is to use a minimal number of libraries and keep the app architecture as simple as possible.
5. Know the technical debt of your apps
It is crucial to understand the impact of your actions on your project, especially the code you write. It is wise to aim for an optimum balance between feature implementation and code refactoring. In most cases, if the apps do not have a pool of features, keeping the separation to a minimum level works best since you do not have to re-engineer everything when the functionalities change.

More articles about Android app development:
- How to set up an Android project on Codemagic CI/CD?
- Designing complex UI using Android ConstraintLayout
- Introduction to the core concepts of Android Navigation
Sneh is a Senior Product Manager based in Baroda. He is a community organizer at Google Developers Group and co-host of NinjaTalks podcast. His passion for building meaningful products inspires him to write blogs, speak at conferences and mentor different talents. You can reach out to him over Twitter (@SnehPandya18) or via email (sneh.pandya1@gmail.com).


