


Written by Souvik Biswas
Navigation is one of the core concepts to master if you are working on any Android app that has a complex navigation system. Properly handled navigation also helps to reduce any security flaws in your app through the implementation of functions like authenticating the user before navigating to any sensitive content in the app or preventing any sensitive information from being shared with other apps on the device.
There have been constant improvements to the navigation system used in Android over the past year, and this has introduced a lot of new concepts.
In this article, I will cover some of the important concepts of Android Navigation that come with the Android Jetpack’s Navigation component.
What is the Jetpack Navigation component?
The Android Jetpack Navigation component is a suite of libraries, tooling, and guidance that provides a robust navigation framework for in-app navigation.
The Navigation component also provides some other benefits, like:
- Handling fragment transactions
- Handling Up and Back actions correctly by default
- Implementing deep linking
- Navigation UI patterns, like navigation drawer, bottom navigation, etc.
- Support for Safe Args
ViewModelsupport- Passing data using Android Bundle
- Listening to navigation changes
- Animating navigation
- Testing navigation
The Navigation component works both with Activities and Fragments. In the sample app, we will mostly be working with Fragments, as they also provide good integration with Android’s underlying lifecycle.
When you navigate to different Activities, the application maintains a stack known as the back stack. The back stack helps to handle the behavior of the Up and Back buttons inside the app. The Fragments also maintain a back stack, but in this case, the entire Fragment back stack is contained within the Activity.
The Navigation component adheres to an established set of Android Navigation principles. Let’s take a look at them.
Principles of Android Navigation
To give users a consistent and intuitive user experience across a wide variety of Android apps, there are some core principles followed by navigation. The Navigation component is designed to implement these principles by default.
There’s always a starting place: Every Android app should have a fixed start destination. This is the screen the user sees every time they open the app. This is also the last screen they see when they navigate back from other screens within the app by using the Up button.
A back stack is always maintained: When a user navigates to different Activities or Fragments inside the app, there is a back stack that is always maintained. The back stack helps in navigating the user back to the correct destination from where they came as they go Up or Back. It follows a Last-In-First-Out (LIFO) structure.
- Start Destination is present lower in the stack
- Current Destination is present at the top of the stack
- New Destinations are pushed to the top of the stack
- When going back, the current destination is popped off the stack
Up versus Back: Both the Up and Back buttons act in a similar way. The difference is that the Up button is only used for navigating inside an app—it will never navigate you out of the app. So, the Up button should never be shown on the first screen of the app. However, the Back button can take you outside of the app to the screen that is present the next level down in the navigation hierarchy.
Deep linking simulates manual navigation: Whether you use deep linking or manually navigate to a certain screen inside an app, the back stack is populated with the same screens. So, if you have navigated to a certain page using deep linking, when you go back, the same back stack will be used as when navigating to that screen manually.
Key parts of the Navigation component
The Navigation component consists of three main parts:
Navigation graph: This manages your app’s navigation. It is a resource file that consists of the destinations along with the actions, which are used for navigating to another destination from the current one.
NavHost: An empty container that displays destinations from your navigation graph.NavController: This helps in managing app navigation within aNavHost. It orchestrates the swapping of destination content in theNavHostas users move throughout your app.
The Navigation Editor helps in visualizing and editing the whole navigation system used in your app, which consists of a navigation graph, arguments, transition animations, and deep links.

Our goal
We will be building an app called Quotes Trivia, in which the user has to guess the correct person who said the displayed memorable quote.
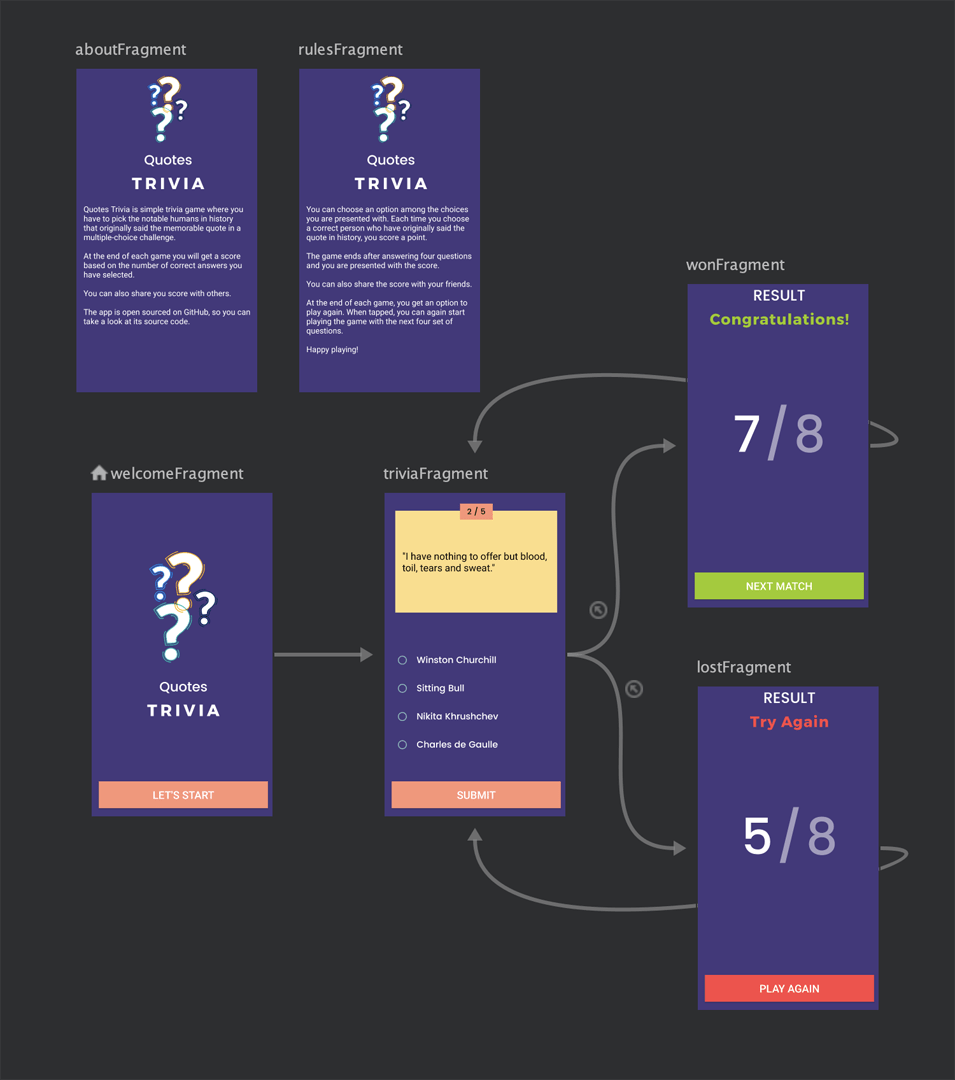
As the main focus of this article is Navigation, we will mostly be covering concepts related to that. But if you want to take a closer look at the UI and logic of the app, you may head over to the GitHub repo of the sample app, which is linked at the end of this article.
Set up the Navigation component
We will be using the Android KTX version of the dependencies, as we are using the Kotlin language in our project. But if you are using Java, non-ktx versions of the same dependencies are also available.
To use the Navigation component, add the following dependencies to your build.gradle (app) file:
dependencies {
    def nav_version = "2.3.0"

    implementation "androidx.navigation:navigation-fragment-ktx:$nav_version"
    implementation "androidx.navigation:navigation-ui-ktx:$nav_version"
}
Add the Navigation graph
Create a new XML file by right-clicking on the res folder and selecting New > Android Resource File. Select the Resource type as Navigation, and use the file name navigation.

Link the navigation resource file
You have to link the navigation.xml file in your activity_main.xml file by adding a NavHostFragment to use it for navigating across different Fragments of your app.
<!-- activity_main.xml -->

<layout xmlns:android="http://schemas.android.com/apk/res/android"
    xmlns:app="http://schemas.android.com/apk/res-auto">

    <LinearLayout
        android:layout_width="match_parent"
        android:layout_height="match_parent"
        android:orientation="vertical">

        <!-- Add the following for linking the navigation resource file -->
        <androidx.fragment.app.FragmentContainerView
            android:id="@+id/myNavHostFragment"
            android:name="androidx.navigation.fragment.NavHostFragment"
            android:layout_width="match_parent"
            android:layout_height="match_parent"
            app:defaultNavHost="true"
            app:navGraph="@navigation/navigation" />

    </LinearLayout>

</layout>
Add a fragment to the graph
Go the Navigation Editor of the navigation.xml file. Click on the New Destination button, and select the screen that you want to add to the Navigation graph.
Navigate to another destination
For navigation from the current destination to any other, you first need to create an action in the Navigation graph.
You have to write the Kotlin code explicitly for triggering the action that you have defined in the Navigation graph.
binding.startButton.setOnClickListener { view: View ->
    view.findNavController().navigate(R.id.action_welcomeFragment_to_triviaFragment)
}
Conditional Navigation
We will use conditional navigation for deciding whether to navigate the user to WonFragment or LostFragment. For our trivia game, the user who manages to answer around 80% of the questions correctly will be considered the winner.
Set up the actions from the TriviaFragment to the two Fragments to which navigation is possible.
Triggering the actions from the Kotlin code:
if (correctAnswers < round(0.8 * numQuestions)) {
    view.findNavController().navigate(R.id.action_triviaFragment_to_lostFragment)
} else {
    view.findNavController().navigate(R.id.action_triviaFragment_to_wonFragment)
}
Manipulate the back stack
If you try to go back from the WonFragment or LostFragment, the app will take you to the TriviaFragment. But this shouldn’t be the default action, as the user might want to go back directly to the home screen. Also, there are NEXT MATCH and PLAY AGAIN buttons for if someone wants to play the game again.
So, to take the user directly from the WonFragment or LostFragment to the WelcomeFragment, we have to manipulate the back stack. This can be done easily by setting the Pop Behavior of any action from the Navigation Editor.
We will set the pop behavior of the action_triviaFragment_to_wonFragment and action_triviaFragment_to_lostFragment to popUpTo TriviaFragment (inclusive).
Using Safe Args
Safe Args is a Gradle plugin that generates simple object and builder classes for type-safe navigation and also simplifies argument passing.
Add the following classpath to your project’s top-level build.gradle file:
dependencies {
    def nav_version = "2.3.0"
    classpath "androidx.navigation:navigation-safe-args-gradle-plugin:$nav_version"
}
Apply the plugin in your app-level build.gradle file:
apply plugin: "androidx.navigation.safeargs.kotlin"
This generates Kotlin code suitable for Kotlin-only modules. If you are using Java-language or mixed Java and Kotlin modules, then use the following:
apply plugin: "androidx.navigation.safeargs"
Do a clean build of the project.
Now, you can replace the the id(s) used for specifying navigation actions with the generated NavDirections classes, like this:
binding.startButton.setOnClickListener { view: View ->
    view.findNavController().navigate(WelcomeFragmentDirections.actionWelcomeFragmentToTriviaFragment())
}
Pass data between fragments
You can add the arguments that you want to pass directly from the Navigation Editor by selecting a Fragment.
Do a clean build.
For passing the arguments from a Fragment, you have to modify the Kotlin code as follows:
view.findNavController().navigate(TriviaFragmentDirections.actionTriviaFragmentToWonFragment(numQuestions, correctAnswers))
Android Bundle is used for retrieving the arguments in the navigated destination:
val args = WonFragmentArgs.fromBundle(requireArguments())

// Setting the values to the TextView(s)
correctAnswersText.text = args.numCorrect.toString()
totalQuestionsText.text = args.numQuestions.toString()
Add support for the Up button
The NavigationUI can handle the Up button behavior by itself so that you don’t have to manage it explicitly. It also automatically hides the Up button when we are on the home screen of the app.
Inside the MainActivity, link the NavController to the ActionBar:
val navHostFragment = supportFragmentManager.findFragmentById(R.id.myNavHostFragment) as NavHostFragment
val navController = navHostFragment.navController
NavigationUI.setupActionBarWithNavController(this, navController)
Then, override the onSupportNavigateUp method from the activity:
override fun onSupportNavigateUp(): Boolean {
    val navController = this.findNavController(R.id.myNavHostFragment)
    return navController.navigateUp()
}
This will take care of all the navigation between different Fragments of this Activity.
Add an overflow menu
Let’s add an overflow menu that will navigate the user to the AboutFragment. This would only be shown in the WelcomeFragment of our app.
Add the AboutFragment to the Navigation graph, but do not create any action for it.
Create a new menu resource called overflow_menu by right-clicking on res and selecting New > Android Resource File.

Declare an item with the same id as that of the Fragment you want it to navigate to.
<menu xmlns:android="http://schemas.android.com/apk/res/android">
    <item
        android:id="@+id/aboutFragment"
        android:title="@string/about_title" />
</menu>
To show the menu only in the WelcomeFragment, add the following to the Fragment:
override fun onCreateView(
    inflater: LayoutInflater, container: ViewGroup?,
    savedInstanceState: Bundle?
): View? {
    // ...

    // Add this line
    setHasOptionsMenu(true)

    return binding.root
}
Override the onCreateOptionsMenu and inflate the menu resource:
override fun onCreateOptionsMenu(menu: Menu, inflater: MenuInflater) {
    super.onCreateOptionsMenu(menu, inflater)
    inflater.inflate(R.menu.overflow_menu, menu)
}
Override the onOptionsItemSelected to connect it to our NavigationUI:
override fun onOptionsItemSelected(item: MenuItem): Boolean {
    return NavigationUI.onNavDestinationSelected(
        item,
        requireView().findNavController()
    ) || super.onOptionsItemSelected(item)
}
Add Navigation Drawer
The Navigation Drawer component is a part of the Android Material Design Library. It is a UI panel that can be opened by swiping from the left edge of the screen or by clicking on the menu icon present in the ActionBar. It is typically present in apps with five or more screens.
Add the Gradle dependency of Material Design to the app-level build.gradle file:
dependencies {
    def material_version = "1.2.1"

    implementation "com.google.android.material:material:$material_version"
}
Add one more Fragment to the Navigation graph called RulesFragment.
Create a new menu resource named navdrawer_menu, and add two item elements to it.
<menu xmlns:android="http://schemas.android.com/apk/res/android">
    <item
        android:id="@+id/rulesFragment"
        android:icon="@drawable/ic_rules"
        android:title="@string/rules_title" />
    <item
        android:id="@+id/aboutFragment"
        android:icon="@drawable/ic_about"
        android:title="@string/about_title" />
</menu>
In activity_main.xml, wrap the LinearLayout with the DrawerLayout:
<layout
    xmlns:android="http://schemas.android.com/apk/res/android"
    xmlns:app="http://schemas.android.com/apk/res-auto">

    <androidx.drawerlayout.widget.DrawerLayout
        android:id="@+id/drawerLayout"
        android:layout_width="match_parent"
        android:layout_height="match_parent">

        <LinearLayout
            android:layout_width="match_parent"
            android:layout_height="match_parent"
            android:orientation="vertical">

            <!-- ... -->

        </LinearLayout>

    </androidx.drawerlayout.widget.DrawerLayout>

</layout>
Add the NavigationView at the bottom of the DrawerLayout.
<com.google.android.material.navigation.NavigationView
    android:id="@+id/navView"
    android:layout_width="wrap_content"
    android:layout_height="match_parent"
    android:layout_gravity="start"
    app:menu="@menu/navdrawer_menu" />
Now, go to the MainActivity:
Add two variables:
private lateinit var drawerLayout: DrawerLayout
private lateinit var appBarConfiguration: AppBarConfiguration
Initialize the
DrawerLayoutinsideonCreate:drawerLayout = binding.drawerLayoutModify to include the drawer:
NavigationUI.setupActionBarWithNavController(this, navController, drawerLayout)Create an
AppBarConfigurationand hook theNavigationUIup to the navigation view:appBarConfiguration = AppBarConfiguration(navController.graph, drawerLayout) NavigationUI.setupWithNavController(binding.navView, navController)In the
onSupportNavigateUpmethod, replace the following:return navController.navigateUp()with this:
return NavigationUI.navigateUp(navController, drawerLayout)This helps in replacing the Up button with the menu button when we come to the first screen of the app.
You can add a headerLayout property to the NavigationView inside activity_main.xml:
<com.google.android.material.navigation.NavigationView
    android:id="@+id/navView"
    app:headerLayout="@layout/nav_header"
    app:menu="@menu/navdrawer_menu" />
The nav_header.xml file looks like this:
<androidx.constraintlayout.widget.ConstraintLayout xmlns:android="http://schemas.android.com/apk/res/android"
    xmlns:app="http://schemas.android.com/apk/res-auto"
    xmlns:tools="http://schemas.android.com/tools"
    android:id="@+id/navHeader"
    android:layout_width="match_parent"
    android:layout_height="192dp"
    android:background="?attr/colorPrimary"
    android:contentDescription="@string/cover_image_desc"
    android:padding="16dp"
    android:theme="@style/ThemeOverlay.AppCompat.Dark">

    <ImageView
        android:id="@+id/imageView"
        android:layout_width="wrap_content"
        android:layout_height="wrap_content"
        app:layout_constraintBottom_toBottomOf="parent"
        app:layout_constraintEnd_toEndOf="parent"
        app:layout_constraintStart_toStartOf="parent"
        app:layout_constraintTop_toTopOf="parent"
        app:srcCompat="@drawable/trivia_cover" />

</androidx.constraintlayout.widget.ConstraintLayout>
Listen to navigation changes
Though you cannot see the menu button on pages other than the first screen, you will still be able to access the Navigation Drawer by swiping from the left edge of the screen on other pages.
In order to fix this issue and prevent it from opening on any other pages, we have to listen to the navigation changes and only enable the drawer on the first screen.
In your MainActivity file inside the onCreate method, add the following:
navController.addOnDestinationChangedListener { nc: NavController, nd: NavDestination, _: Bundle? ->
    if (nd.id == nc.graph.startDestination) {
        drawerLayout.setDrawerLockMode(DrawerLayout.LOCK_MODE_UNLOCKED)
    } else {
        drawerLayout.setDrawerLockMode(DrawerLayout.LOCK_MODE_LOCKED_CLOSED)
    }
}
Now, you will not be able to open the Navigation Drawer from any pages other than the first screen.
Add a share button
You will always like to share your winning score with your friends. So, let’s add a Share button to our app using Intent.
Intents can be primarily of two types:
- Explicit Intent: For launching Activities within the same app
- Implicit Intent: This helps to provide an abstract description of the action that you want to perform, which is used for launching Activities of other apps on the device
If multiple Android apps that can handle a specific implicit intent are present on the user’s device, then a chooser pops up.
Create a new menu resource file called share_menu.
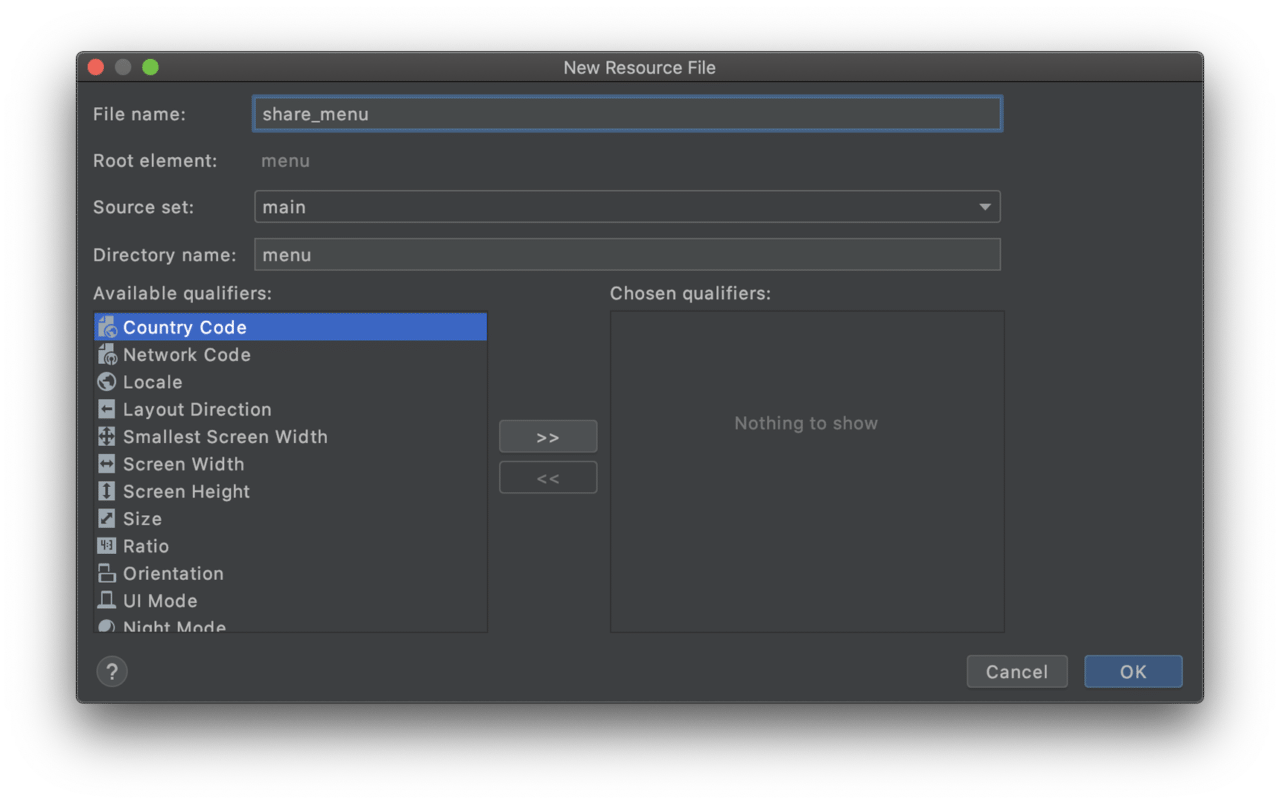
Add a menu item to it:
<menu xmlns:android="http://schemas.android.com/apk/res/android"
    xmlns:app="http://schemas.android.com/apk/res-auto">

    <item
        android:id="@+id/share"
        android:enabled="true"
        android:icon="@drawable/ic_share"
        android:title="@string/share_title"
        android:visible="true"
        app:showAsAction="ifRoom" />

</menu>
We want to show the share icon only in the WonFragment, so we will need to set up only in that Fragment.
Inside onCreateView add:
setHasOptionsMenu(true)
Create a method to define the Intent:
private fun getShareIntent(): Intent {
    val args = WonFragmentArgs.fromBundle(requireArguments())
    val shareIntent = Intent(Intent.ACTION_SEND)
    shareIntent.setType("text/plain")
        .putExtra(
            Intent.EXTRA_TEXT,
            getString(R.string.share_text, args.numCorrect, args.numQuestions)
        )
    return shareIntent
}
Method for starting the Activity:
private fun shareSuccess() {
    startActivity(getShareIntent())
}
Override the onCreateOptionsMenu method, inflate the menu resource, and show the share button only when there is an app installed on the user’s device that can handle that implicit intent.
override fun onCreateOptionsMenu(menu: Menu, inflater: MenuInflater) {
    super.onCreateOptionsMenu(menu, inflater)
    inflater.inflate(R.menu.share_menu, menu)

    if (null == getShareIntent().resolveActivity(requireActivity().packageManager)) {
        menu.findItem(R.id.share)?.isVisible = false
    }
}
Override the onOptionsItemSelected method to handle the action when the share button is clicked.
override fun onOptionsItemSelected(item: MenuItem): Boolean {
    when (item.itemId) {
        R.id.share -> shareSuccess()
    }

    return super.onOptionsItemSelected(item)
}
Animate navigation
You can apply different types of animations to the Navigation.
First of all, create a new animation resource file by right-clicking on the res folder and selecting New > Android Resource File.
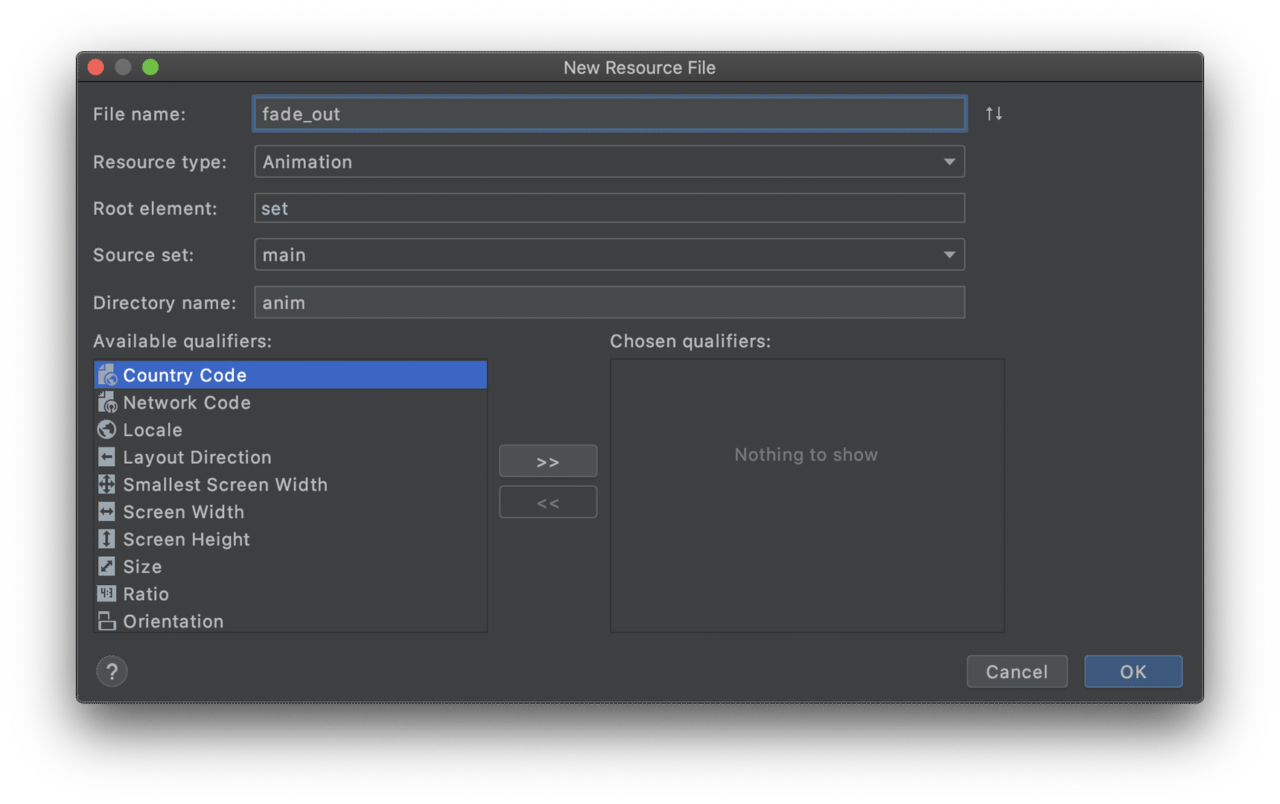
Let’s define a fading animation:
<!-- fade out animation -->
<set xmlns:android="http://schemas.android.com/apk/res/android">
    <alpha
        android:duration="@android:integer/config_mediumAnimTime"
        android:fromAlpha="1.0"
        android:toAlpha="0.0" />
</set>
A sliding animation can be defined as follows:
<!-- slide in left animation -->
<set xmlns:android="http://schemas.android.com/apk/res/android">
    <translate
        android:duration="@android:integer/config_shortAnimTime"
        android:fromXDelta="-100%"
        android:fromYDelta="0%"
        android:toXDelta="0%"
        android:toYDelta="0%" />
</set>
You can use the Navigation Editor for applying the animations directly.
After applying all animations, the app looks like this:
Conclusion
The Android Navigation Component makes the whole navigation system of the app easily manageable. The Navigation Editor, along with the navigation graph, gives a good overview of the destinations, actions, arguments, and animations used in the app. Though we have covered most of the core features in this article, the Navigation component has a lot more awesome features to explore.
Learn More
- GitHub repository of the sample app
- Official documentation of Navigation
- [Video] Jetpack Navigation (Google I/O'19)
- [Video] Navigating navigation
- [Article] How to set up an Android project on Codemagic CI/CD
- Getting started and developing an application with Jetpack Compose
Souvik Biswas is a passionate Mobile App Developer (Android and Flutter). He has worked on a number of mobile apps throughout his journey. Loves open source contribution on GitHub. He is currently pursuing a B.Tech degree in Computer Science and Engineering from Indian Institute of Information Technology Kalyani. He also writes Flutter articles on Medium - Flutter Community.


