


Written by Souvik Biswas
Predicting whether an app will display correctly on a user’s device is a really tough decision, and the huge variety of device screen sizes and shapes makes this even tougher. User interface (UI) testing lets you ensure that your app meets its functional requirements and achieves a high standard of quality such that it is more likely to be successfully adopted by users. This will also help you to prevent getting low ratings and negative reviews on the Google Play Store because of your UI not being laid out properly.
Manual UI testing is a seemingly daunting process, and its success depends on the availability of a large number of devices. Also, this manual approach can be time consuming and error-prone. The efficient approach to solving this is to write automated UI tests.
Espresso is an Android UI testing framework that allows you to programmatically simulate user actions and test complex intra-app user interactions.
Using Espresso, we can achieve automation of running UI tests. But we have one more hurdle to overcome. Though we have access to an Android emulator, testing on a real device is always a better option.
In this article, you will learn how to run UI tests on real mobile devices using AWS Device Farm and how to connect it with Codemagic.

What is AWS Device Farm?
AWS Device Farm is an application testing service that you can use for running UI tests of your app on real mobile devices without having to provision and manage any testing infrastructure. It can run tests concurrently on multiple real devices to speed up execution, and it also generates videos and logs to help you quickly identify issues with your app.
There are two main ways to use Device Farm:
- Automated testing of apps using a variety of testing frameworks.
- Remote access to devices onto which you can load, run, and interact with apps in real time.
Today, we will use automated UI testing using Espresso.
Sample app
We will use a basic app called “Hello Espresso”, which will consist of just an EditText and a TextView for displaying the content of the text field. The app will have two buttons:
- One for updating the content of the
TextView. - Another for navigating to a new Activity and showing the content of the text field.
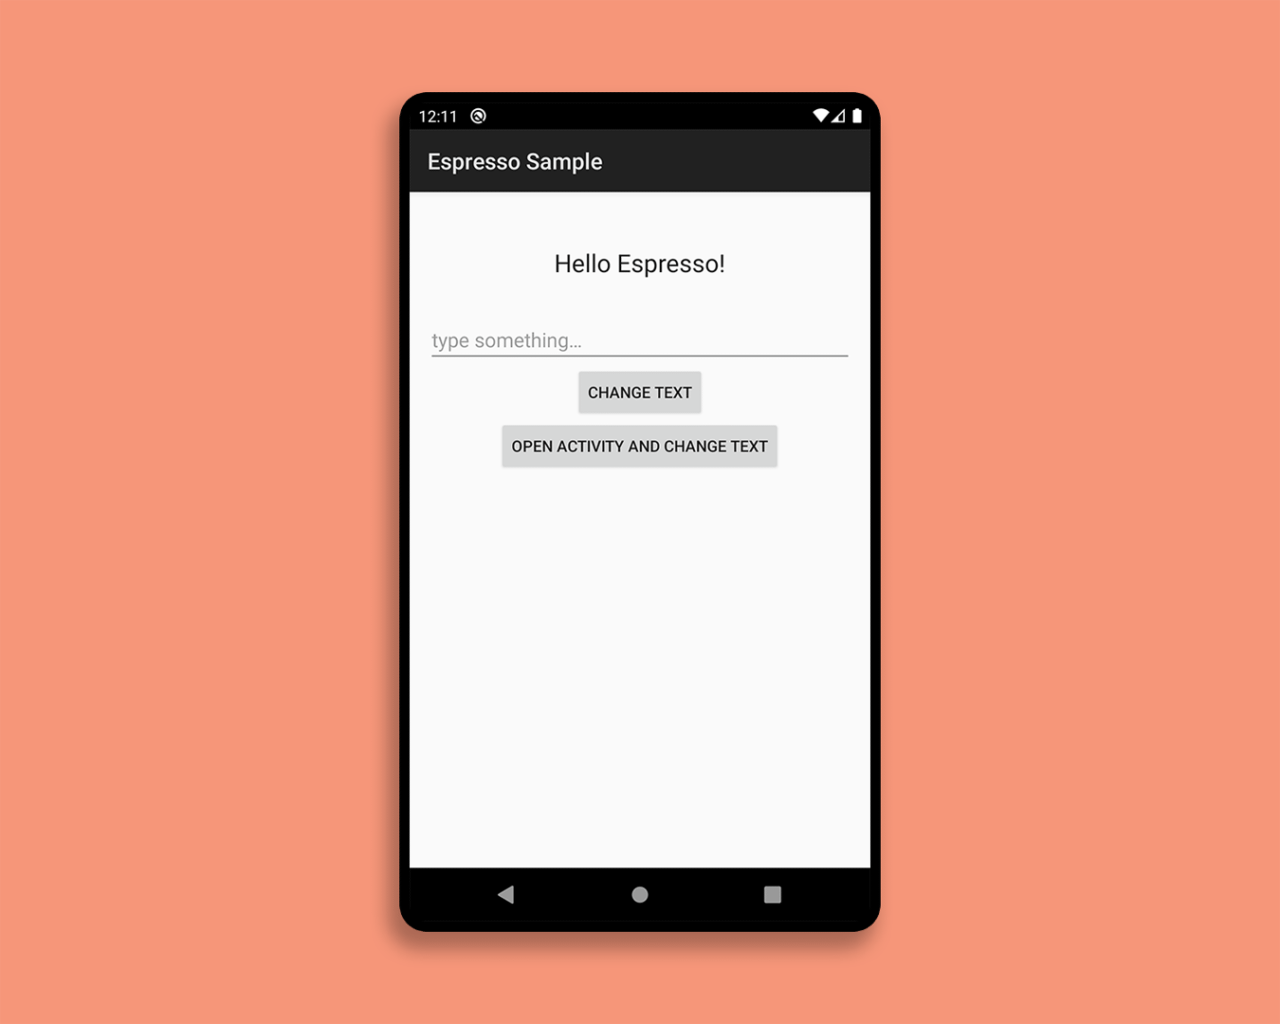
The project contains two instrumented tests:
- One for checking whether the correct text is displayed in the same Activity.
- Another one for checking the text after navigating to the new Activity.
You can find the link to the sample app at the end of this article.
Generate AWS Credentials
To get access to AWS Device Farm, you will need an AWS account and credentials to access it using their CLI tool.
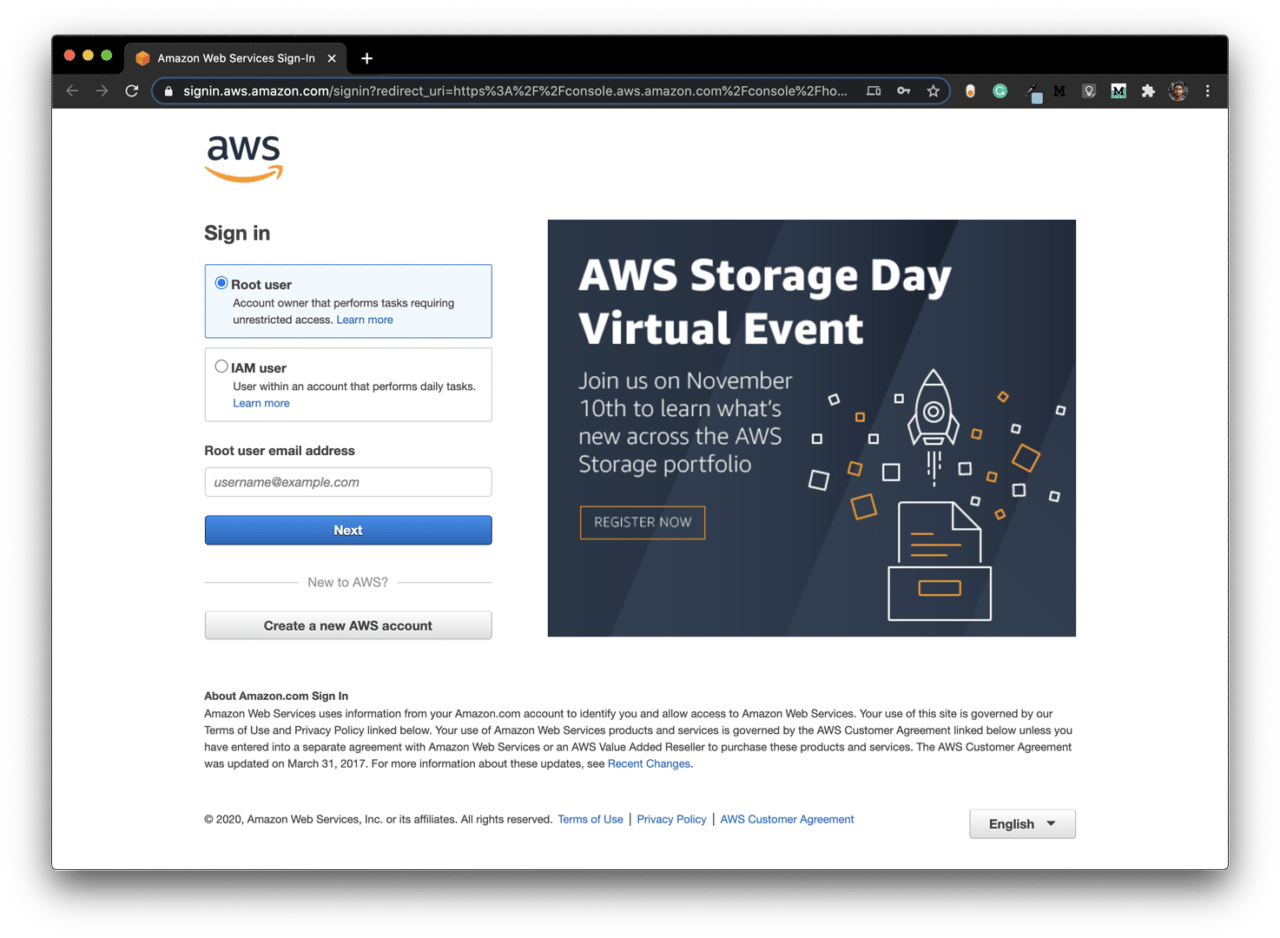
Sign in to the AWS Management Console as a Root user by going here.
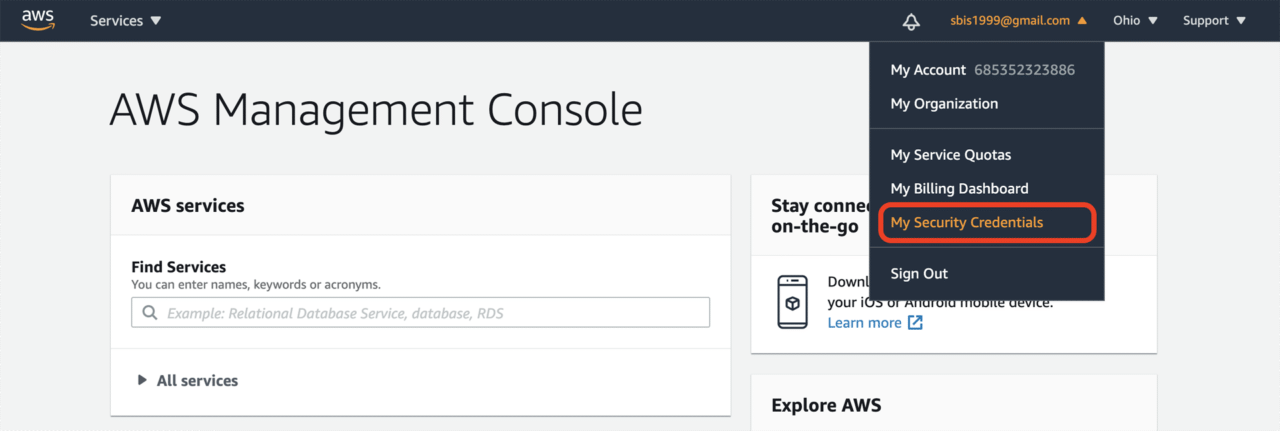
Click on account name in the upper-right corner of the navigation bar, and select My Security Credentials.
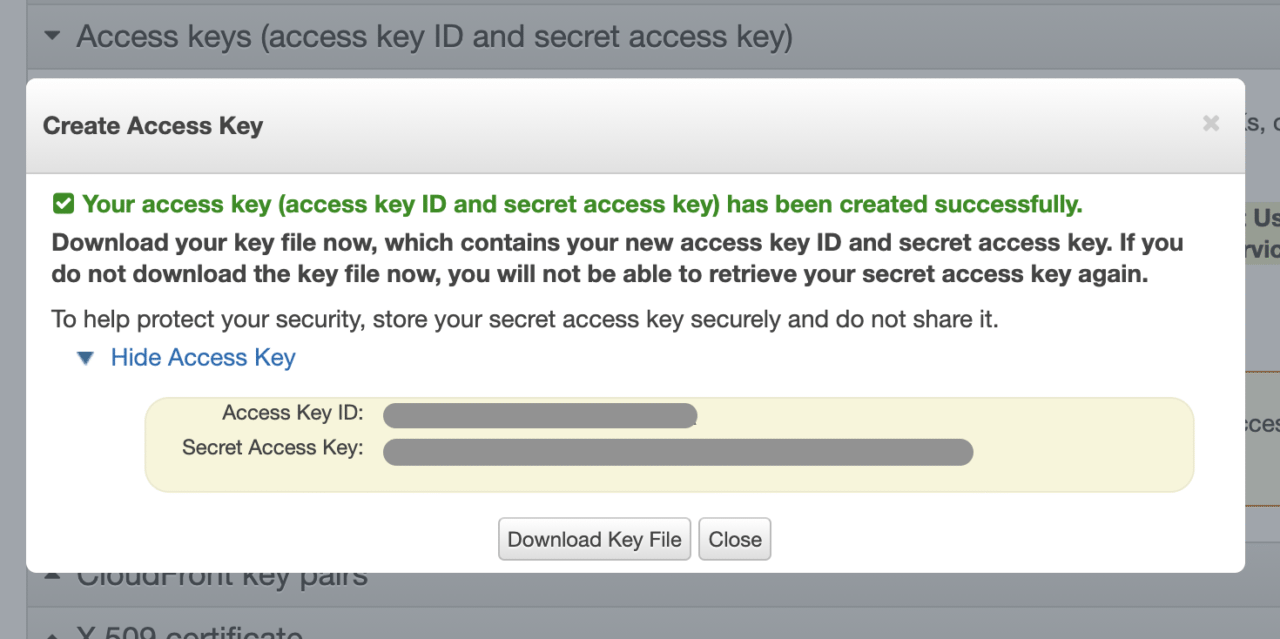
Click on Create New Access Key under the Access keys tab.

Now, download the key file and store it in a secure place. We will require it in the later steps. Click Close.
Set up AWS Device Farm
You will have to create a new project in AWS Device Farm in order to run tests using their server. Then you have to retrieve the Project ARN and Device Pool ARN.
Here, ARN stands for Amazon Resource Names.
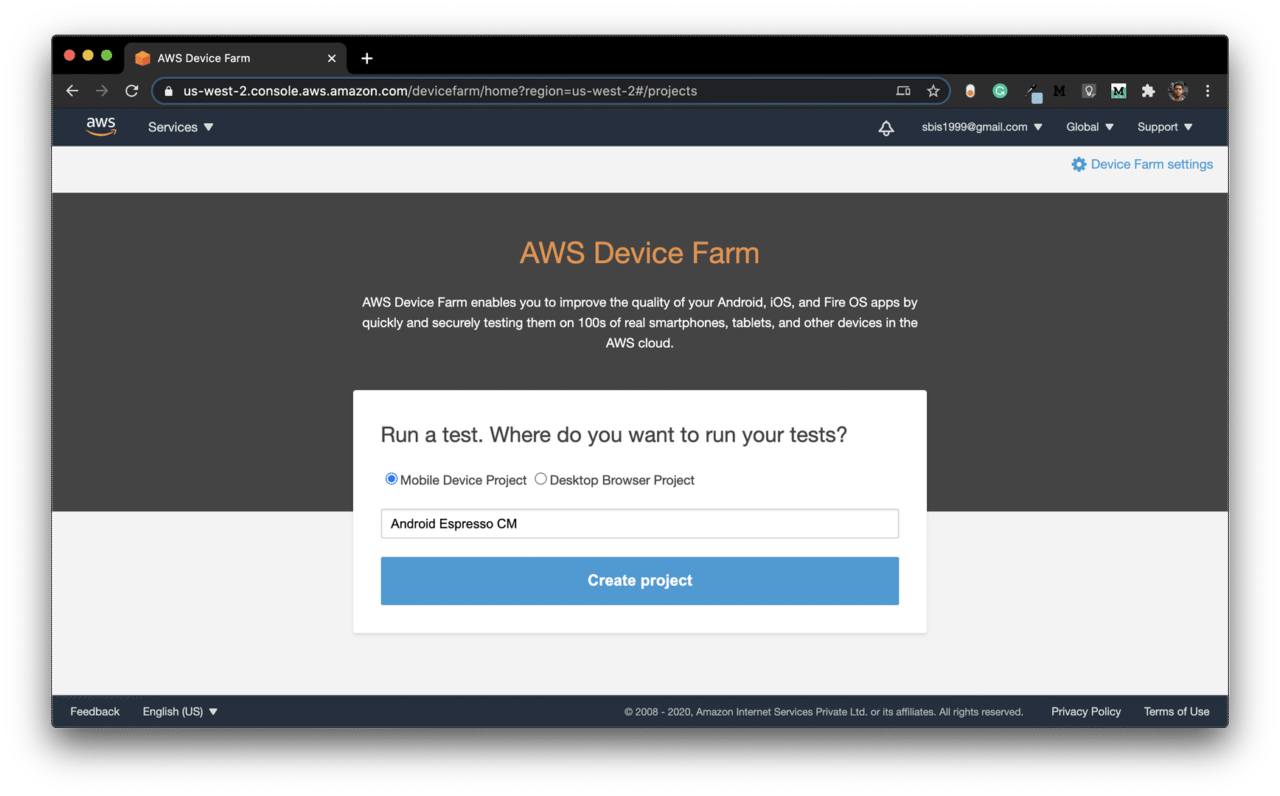
Go to the AWS Device Farm page here.
Select Mobile Device Project, enter a name, and click on Create project.
Download and install the AWS CLI tool from here.
Run the following command to configure AWS:
aws configureTo get the Project ARN, use the following:
aws devicefarm list-projectsTo get the Device Pool ARN, use the following:
aws devicefarm list-device-pools --arn "${AWS_PROJECT_ARN}"
Now, we have all the AWS credentials required for configuring a build pipeline on Codemagic.
Defining Codemagic YAML
For running the build on Codemagic, you will have to use the codemagic.yaml file. You can use the following YAML script as the starting point:
# For more information regarding Codemagic YAML, check out:
# https://docs.codemagic.io/getting-started/yaml/

workflows:
  native-android:
    name: Android Espresso
    environment:
    vars:
      # AWS Device Farm Environment Variables
      # See more information from the official AWS Device Farm docs:
      # https://docs.aws.amazon.com/devicefarm/latest/developerguide/how-to-create-test-run.html#how-to-create-test-run-cli
      AWS_ACCESS_KEY_ID: Encrypted(...) # <-- Put your encrypted access key id here. See more info at https://docs.aws.amazon.com/general/latest/gr/aws-sec-cred-types.html#access-keys-and-secret-access-keys
      AWS_SECRET_ACCESS_KEY: Encrypted(...) # <-- Put your encrypted secret access key here. See more info at https://docs.aws.amazon.com/general/latest/gr/aws-sec-cred-types.html#access-keys-and-secret-access-keys
      AWS_PROJECT_ARN: Encrypted(...) # <-- Put your encrypted Project ARN here. Get Project ARN with `aws devicefarm list-projects`.
      AWS_DEVICE_POOL_ARN: Encrypted(...) # <-- Put your encrypted Device Pool ARN here. Choose a Device Pool ARN using `aws devicefarm list-device-pools --arn "${AWS_PROJECT_ARN}"`.
      AWS_DEFAULT_REGION: "us-west-2" # See available options at https://aws.amazon.com/about-aws/global-infrastructure/regional-product-services/
      # Set up paths to application binary and test package
      AWS_APK_PATH: "$CM_BUILD_DIR/app/build/outputs/apk/debug/app-debug.apk"
      AWS_TEST_APK_PATH: "$CM_BUILD_DIR/app/build/outputs/apk/androidTest/debug/app-debug-androidTest.apk"
      # Specify application and test types
      AWS_APP_TYPE: "ANDROID_APP" # Type of the main app that is being tested. See more about `--type` flag at https://docs.aws.amazon.com/cli/latest/reference/devicefarm/create-upload.html
      AWS_TEST_PACKAGE_TYPE: "INSTRUMENTATION_TEST_PACKAGE" # Type of the test package that is being uploaded. See more about `--type` flag at https://docs.aws.amazon.com/cli/latest/reference/devicefarm/create-upload.html
      AWS_TEST_TYPE: "INSTRUMENTATION" # See more about `--test` flag `type` option at https://docs.aws.amazon.com/cli/latest/reference/devicefarm/schedule-run.html
    scripts:
      # Define the build pipeline here
    artifacts:
      - app/build/outputs/**/*.apk
    publishing:
      email:
        recipients:
          - sbis1999@gmail.com
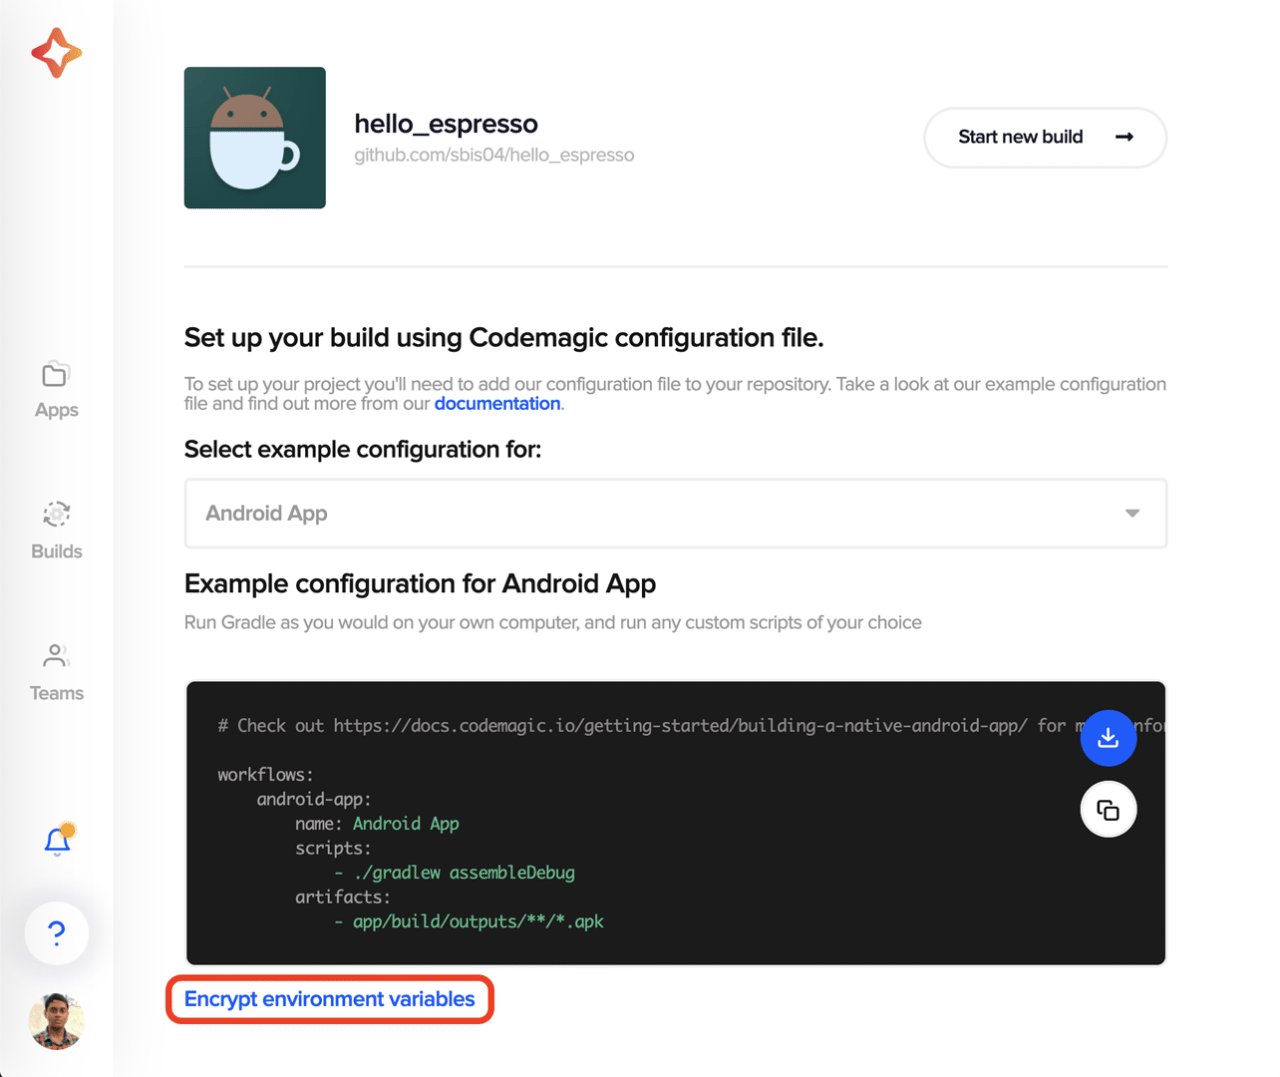
Insert the encrypted version of your AWS credentials in the YAML script given above.
You can encrypt your credentials by going to the Codemagic project settings and clicking on Encrypt environment variables.
Now, you can start defining the main build pipeline script for your Android project.
Configure the AWS CLI:
mkdir ~/.aws
cat >> ~/.aws/config <<EOF
[default]
aws_access_key_id=$AWS_ACCESS_KEY_ID
aws_secret_access_key=$AWS_SECRET_ACCESS_KEY
region=$AWS_DEFAULT_REGION
output=json
EOF
Specify Android SDK location:
echo "sdk.dir=$ANDROID_SDK_ROOT" > "$CM_BUILD_DIR/local.properties"Generate debug keystore:
keytool -genkeypair \
  -alias androiddebugkey \
  -keypass android \
  -keystore $CM_BUILD_DIR/app/debug.keystore \
  -storepass android \
  -dname 'CN=Android Debug,O=Android,C=US' \
  -keyalg 'RSA' \
  -keysize 2048 \
  -validity 10000
Build Android debug APK and test APK:
./gradlew assembleDebug
./gradlew assembleAndroidTest
You can specify a script for running the AWS CLI commands and track its progress as follows (named
run_aws_espresso.sh):#!/usr/bin/env zsh set -e upload_package() { PACKAGE_PATH="${1}" UPLOAD_INFO="${2}" echo "${UPLOAD_INFO}" | jq UPLOAD_URL=$(echo "${UPLOAD_INFO}" | jq -r '.upload.url') UPLOAD_ARN=$(echo "${UPLOAD_INFO}" | jq -r '.upload.arn') curl -T "${PACKAGE_PATH}" "${UPLOAD_URL}" while true; do UPLOAD_RESULT=$(aws devicefarm get-upload --arn "${UPLOAD_ARN}") UPLOAD_STATUS=$(echo "${UPLOAD_RESULT}" | jq -r '.upload.status') if [ "${UPLOAD_STATUS}" = "FAILED" ]; then echo "Upload did not complete successfully, the status was ${UPLOAD_STATUS}" echo "Unable to proceed with the tests" exit 1 elif [ "${UPLOAD_STATUS}" != "SUCCEEDED" ]; then echo "Upload of ${PACKAGE_PATH} is not completed, current status is ${UPLOAD_STATUS}" echo "Wait until upload is completed ..." sleep 5 else echo "Uploading ${PACKAGE_PATH} is completed with status ${UPLOAD_STATUS}" break fi done } wait_for_test_results() { SCHEDULED_TEST_RUN="${1}" TEST_RUN_ARN=$(echo "${SCHEDULED_TEST_RUN}" | jq -r '.run.arn') echo "${SCHEDULED_TEST_RUN}" | jq while true; do TEST_RUN=$(aws devicefarm get-run --arn "${TEST_RUN_ARN}") TEST_RUN_STATUS=$(echo "$TEST_RUN" | jq -r '.run.status') if [ "${TEST_RUN_STATUS}" != "COMPLETED" ]; then echo "Test run is not completed, current status is ${TEST_RUN_STATUS}" sleep 30 else break fi done echo "${TEST_RUN}" | jq echo "${TEST_RUN}" > test-result.json echo "Test run completed, saving result to test-result.json" } # Upload Your Application File # Learn more: https://awscli.amazonaws.com/v2/documentation/api/latest/reference/devicefarm/create-upload.html echo "Upload ${AWS_APK_PATH} to Device Farm" APP_UPLOAD_INFO=$(aws devicefarm create-upload \ --project-arn "${AWS_PROJECT_ARN}" \ --name "$(basename "${AWS_APK_PATH}")" \ --type "${AWS_APP_TYPE}") APP_UPLOAD_ARN=$(echo "${APP_UPLOAD_INFO}" | jq -r '.upload.arn') upload_package "${AWS_APK_PATH}" "${APP_UPLOAD_INFO}" # Upload Your Test Scripts Package echo "Upload ${AWS_TEST_APK_PATH} to Device Farm" TEST_UPLOAD_INFO=$(aws devicefarm create-upload \ --project-arn "${AWS_PROJECT_ARN}" \ --name "$(basename "${AWS_TEST_APK_PATH}")" \ --type "${AWS_TEST_PACKAGE_TYPE}") TEST_UPLOAD_ARN=$(echo "${TEST_UPLOAD_INFO}" | jq -r '.upload.arn') upload_package "${AWS_TEST_APK_PATH}" "${TEST_UPLOAD_INFO}" # Schedule a Test Run # Learn more: https://awscli.amazonaws.com/v2/documentation/api/latest/reference/devicefarm/schedule-run.html echo "Schedule test run for uploaded app and tests package" SCHEDULED_TEST_RUN_INFO=$(aws devicefarm schedule-run \ --project-arn "${AWS_PROJECT_ARN}" \ --app-arn "${APP_UPLOAD_ARN}" \ --device-pool-arn "${AWS_DEVICE_POOL_ARN}" \ --name "CM test run for build" \ --test type=${AWS_TEST_TYPE},testPackageArn="${TEST_UPLOAD_ARN}") wait_for_test_results "${SCHEDULED_TEST_RUN_INFO}"Run the AWS Device Farm test using the script:
cd .scripts && ./run_aws_espresso.shTo verify whether the tests are successful, use the following:
set -e
set -x
export AWS_RESULT=$(cat $CM_BUILD_DIR/.scripts/test-result.json | jq -r '.run.result')
if [ $AWS_RESULT != "PASSED" ]
then
  echo "AWS tests did not pass, the result was $AWS_RESULT"
  exit 1
else
  echo "AWS tests PASSED!"
fi
Running on Codemagic
Insert your run_aws_espresso.sh file in a folder called .scripts, and place it in the root project directory. Also, place the codemagic.yaml file in the root project directory, and commit them to the cloud repository (GitHub, GitLab, Bitbucket, etc.).
Follow the steps below to start the build:
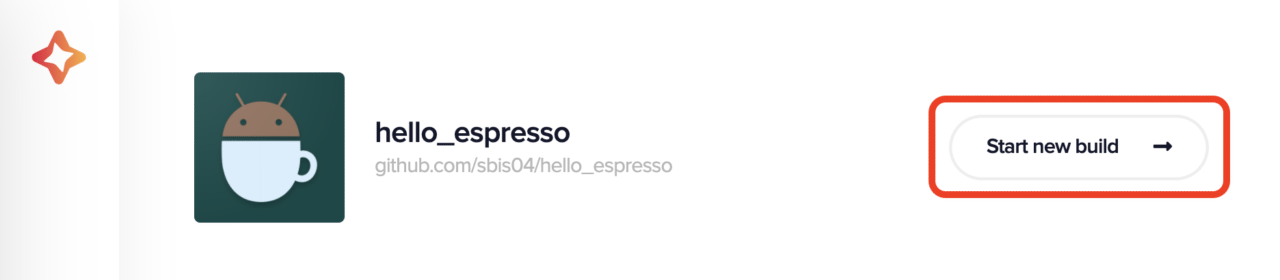
Go to Codemagic project settings
Click on Start new build
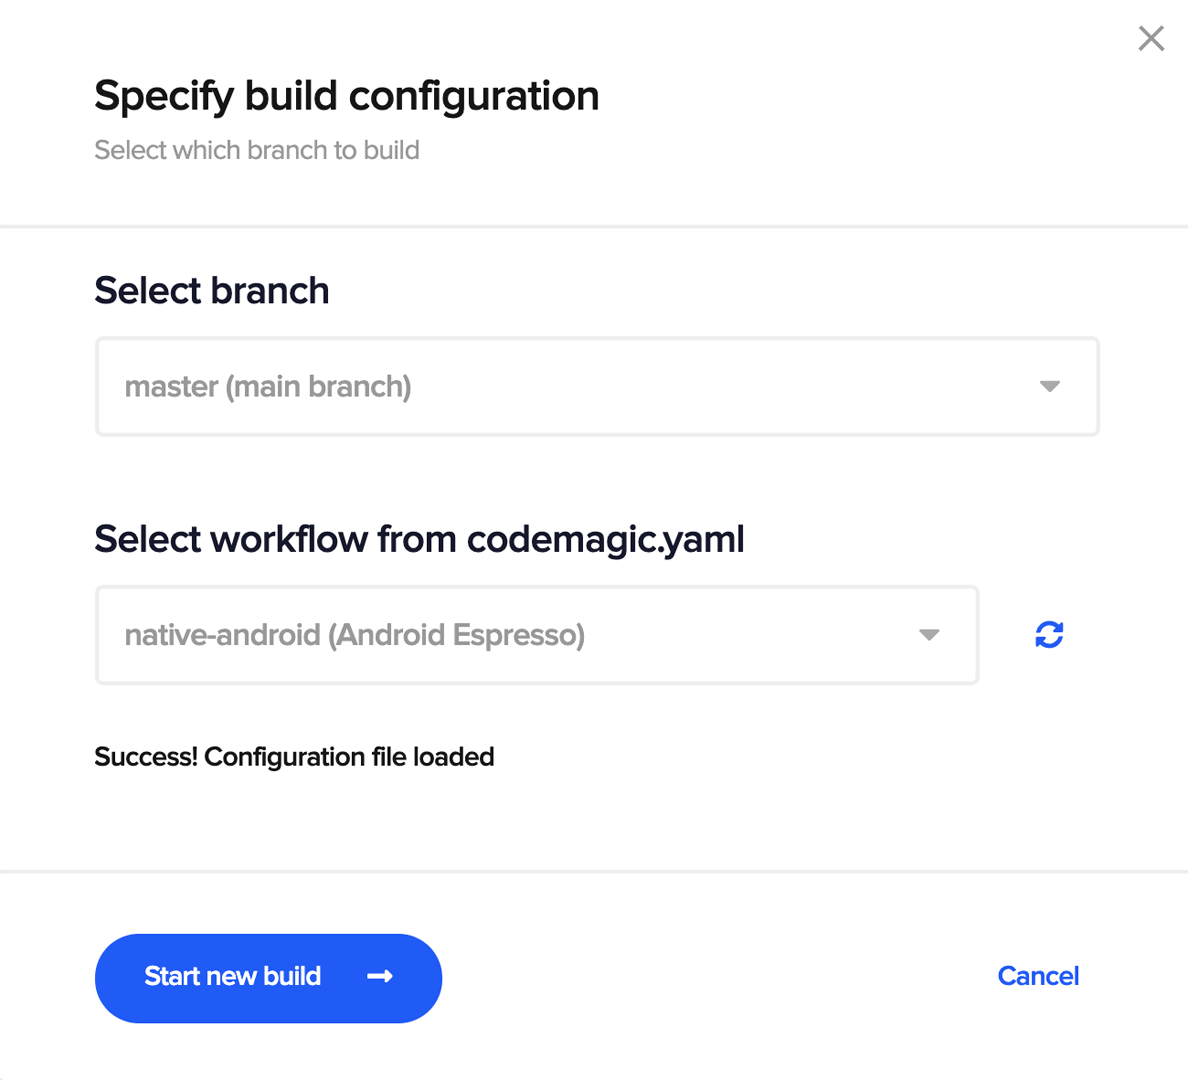
Select the workflow from codemagic.yaml, and click on Start new build
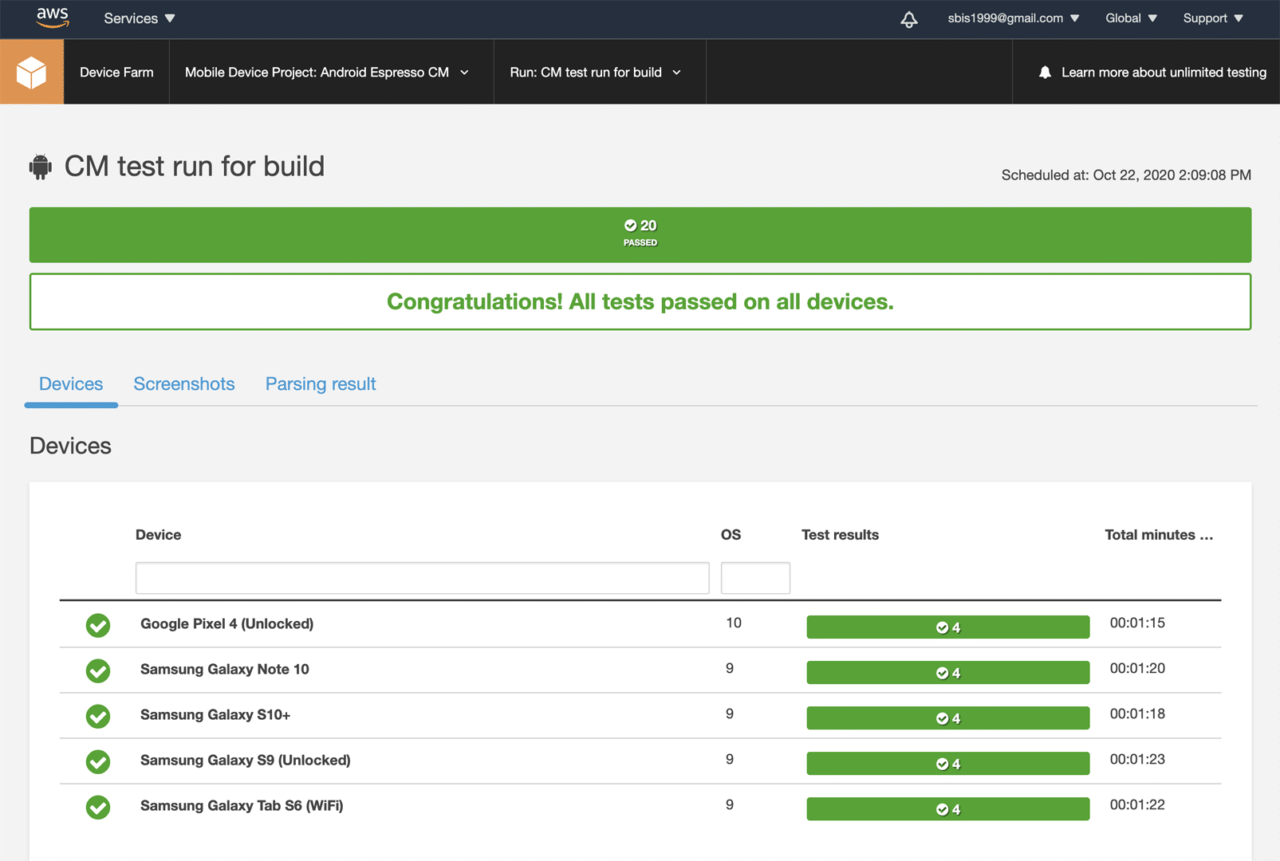
This will start the build on Codemagic and generate the test results on the AWS Device Farm console.
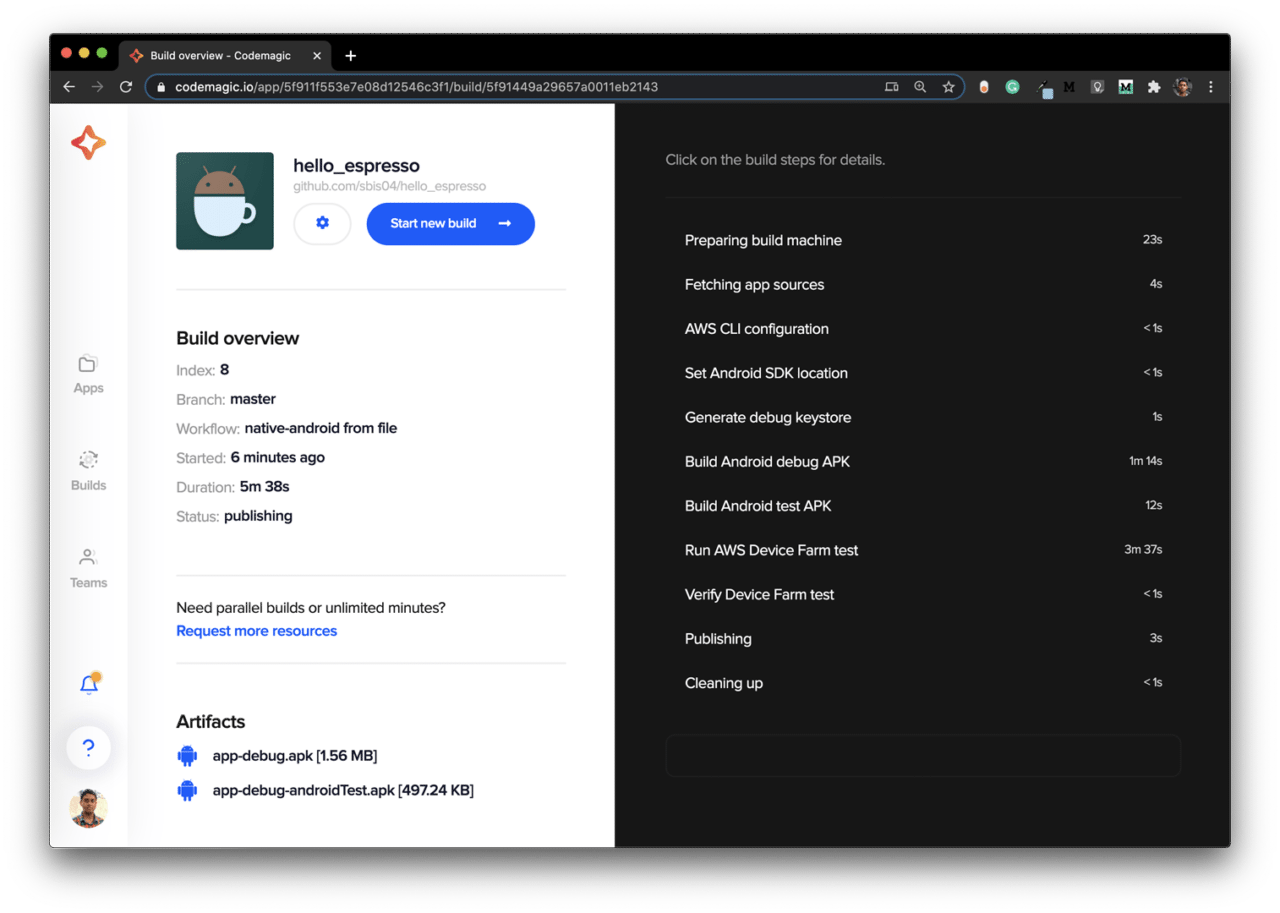
You can view whether you have any issues with any tests, and you can also see the devices on which the tests ran.
Conclusion
AWS Device Farm makes it a lot easier to perform UI testing on physical devices and get comprehensive test results. Codemagic integration with Device Farm makes the entire process fully automated.
Some useful resources
- GitHub repo of the sample app [YAML template for AWS Integration included]
- AWS Device Farm Documentation
- Android Espresso Testing Documentation
- Learn more about other Codemagic integrations
- Learn more about testing mobile apps with Codemagic CI/CD tool
Souvik Biswas is a passionate Mobile App Developer (Android and Flutter). He has worked on a number of mobile apps throughout his journey. Loves open source contribution on GitHub. He is currently pursuing a B.Tech degree in Computer Science and Engineering from Indian Institute of Information Technology Kalyani. He also writes Flutter articles on Medium - Flutter Community.


