


Updated in September 2022
It won’t come as a surprise to any iOS developer out there that iOS apps need to be signed before they can be installed on physical devices and shipped to end-users via App Store. All you need for that is an Apple developer account, a valid signing certificate, a matching provisioning profile… and a Mac to generate these files.
Sounds like a lot of trouble? Judging by the number of questions related to iOS code signing on Stackoverflow, many developers struggle with it. We understand that setting up code signing can be a headache, especially when you’re trying to get it to work in a CI/CD environment, and even more so when you’re developing for multiple platforms, as you can do with the Flutter SDK, and don’t own a Mac.
If you’re new to the concept of code signing, we suggest that you read the blog post on how to code sign and publish iOS apps.
But wait, we have good news to all the Flutter developers! Codemagic has made the entire code signing business easier than ever before by eliminating some of the steps required in conventional iOS code signing process.
Introducing an alternative to conventional iOS code signing
What if we told you that you don’t need a Mac anymore to be able to sign your Flutter app for iOS? And what if you didn’t need to worry about the signing files and could have Codemagic take care of all that for you at no cost?
That’s exactly what we’re saying: With automatic code signing, Codemagic generates the signing certificate and the provisioning profile for your Flutter iOS app on your behalf, allowing you to sign and ship the app to App Store as part of the build process. Continue reading for an overview of code signing basics and Codemagic’s automatic code signing feature.
Understanding the basics of iOS code signing
Before we’re going to describe how Codemagic does its magic with signing your Flutter app for iOS, let’s go over what is normally needed for iOS code signing.
- Apple developer account. Enrollment in the Apple Developer Program is required to use TestFlight for beta testing or releasing the app to end-users on the App Store. It’s also needed to be able to request certificates and download provisioning profiles. However, if you’re only looking for a way to get a build that can be installed on a real device, you can follow this tutorial on how to deploy your app on an iPhone without signing up for Apple Developer Program (but you do need a Mac for that).
Signing certificate. The certificate is a public/private key pair that identifies who developed the code. There is a personal development certificate for code signing the app during the development process and a (shared) App Store and Ad Hoc distribution certificate that’s used when you’re code signing the app for distribution.
Provisioning profile. A provisioning profile contains information about the app ID, the devices on which the app can be installed, and the certificates that can be used for signing the app. Just like with certificates, there are development provisioning profiles for code signing the app during the development process and distribution provisioning profiles (Ad Hoc or App Store) for distribution. More specifically, the Ad Hoc distribution profile can be used for distributing the app to non-Testflight testers (e.g. via HockeyApp or Firebase App Distribution), while you need to use the App Store distribution profile for testing on TestFlight or releasing to the App Store. Unlike other provisioning profiles, the App Store distribution profile is not linked to particular devices.
A Mac. You need a Mac to first request a certificate from Apple and later to generate the certificate file that can be uploaded to third-party systems. You can develop Flutter apps on platforms other than macOS, so this part of the code signing process might turn out to be a problem when you don’t have a Mac that you could use.
To sum up, you will need to use a development certificate along with a development provisioning profile to sign the code and install your app on real devices while developing. When you’re planning to publish the app to testers or release it to the App Store, you will need to use your distribution certificate along with the appropriate distribution provisioning profile. And to be able to do all that, you have to be a member of the Apple Developer Program and own a Mac to get the files necessary for signing.

If you want to read more about this topic, you can take a look at A Beginner’s Guide to iOS Provisioning Profiles.
How it works with Codemagic
With automatic code signing, you can have Codemagic generate a signing certificate and a matching provisioning profile for you and use them for code signing. Depending on the selected provisioning profile type, Codemagic will create a development or a distribution certificate and a development, Ad hoc, or App Store provisioning profile. This way, you can get signed builds that can be installed on real devices and distributed to App Store — without owning a Mac.
Requirements for using automatic code signing
Before setting up automatic code signing, let’s go over what is needed for using Codemagic’s automatic code signing feature.
- Apple developer account. You still need to be a member of the Apple Developer Program to be able to sign code and distribute your apps.
- An app ID for your iOS app in App Store Connect. Note that it is also important to set the app’s bundle ID to
PRODUCT_BUNDLE_IDENTIFIERin theproject.pbxprojfile in your app’s ios folder. You can edit the file without a Mac. - Registered devices. When creating a provisioning profile, Codemagic includes all the devices that have been registered on your Apple developer account.
Set up automatic code signing
Setting up automatic code signing on Codemagic is fast and easy. If you’re using the Flutter Workflow Editor to configure your builds, follow the steps below. If you prefer configuring your builds using codemagic.yaml, refer here instead.
Connect the Apple Developer Portal integration
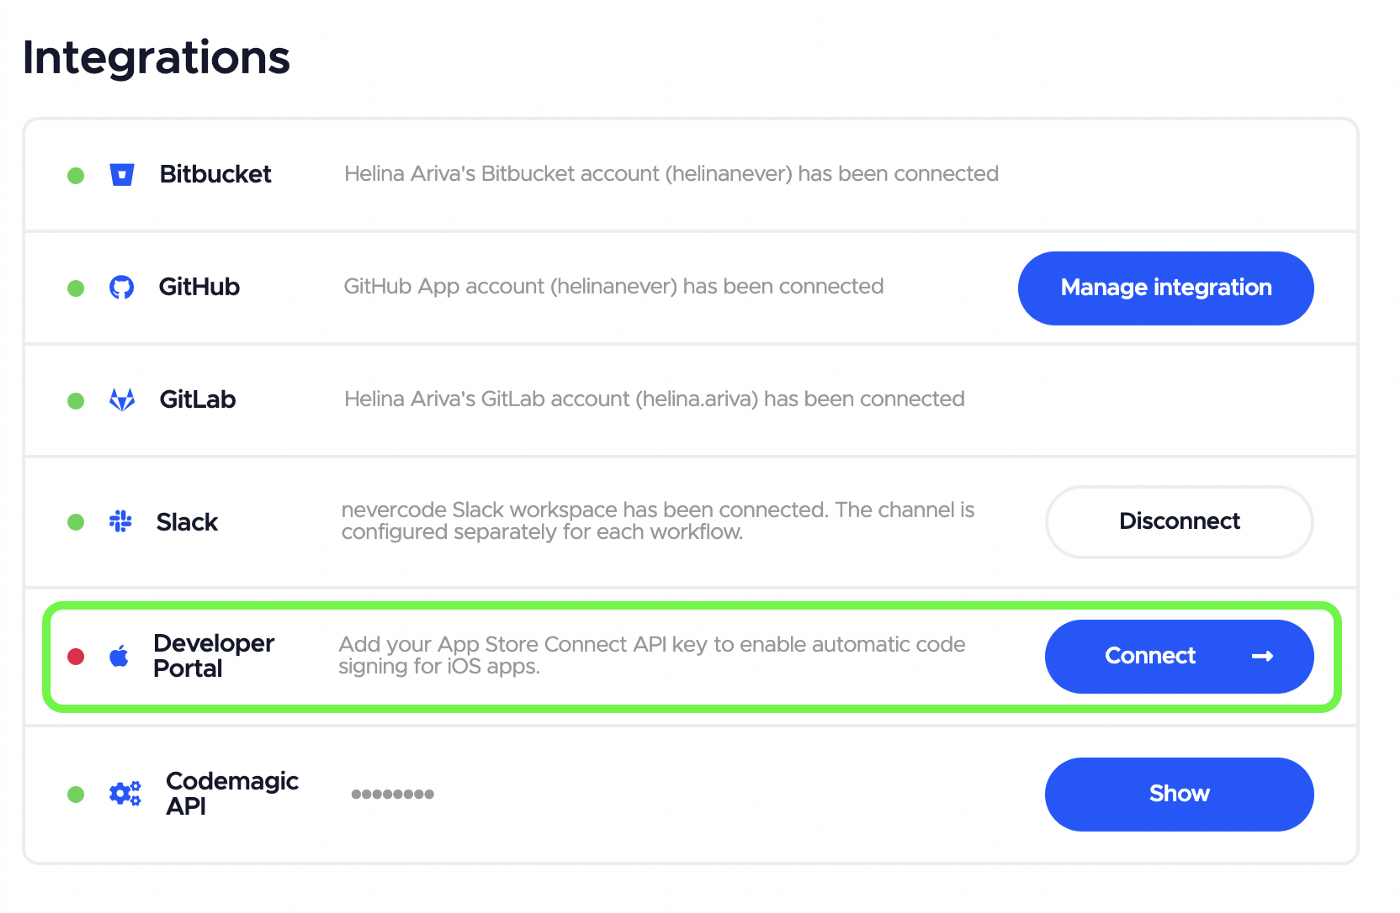
The Apple Developer Portal integration can be connected either in User settings for the apps on your personal account or in team settings for the apps shared in the team.
- In your User or Team settings, scroll down to the Integrations section.
- Click Connect next to the Apple Developer Portal integration.
- Create an App Store Connect API key and upload it to Codemagic to authenticate with the Apple Developer portal. We recommend creating a dedicated key for use in Codemagic. For automatic code signing, create the key with Developer role. To use the integration also for publishing to App Store Connect, the App Manager role is required.
- App Store Connect API key name is a name that helps you to distinguish the key in Codemagic
- Issuer ID is an alphanumeric value above the table of API keys and identifies who created the authentication token.
- You can find the Key ID from the table of API keys
- API key is the .p8 key file that can be downloaded from App Store Connect. Note that the key can be downloaded only once.
![How to sign Flutter apps for iOS automatically without a Mac]()
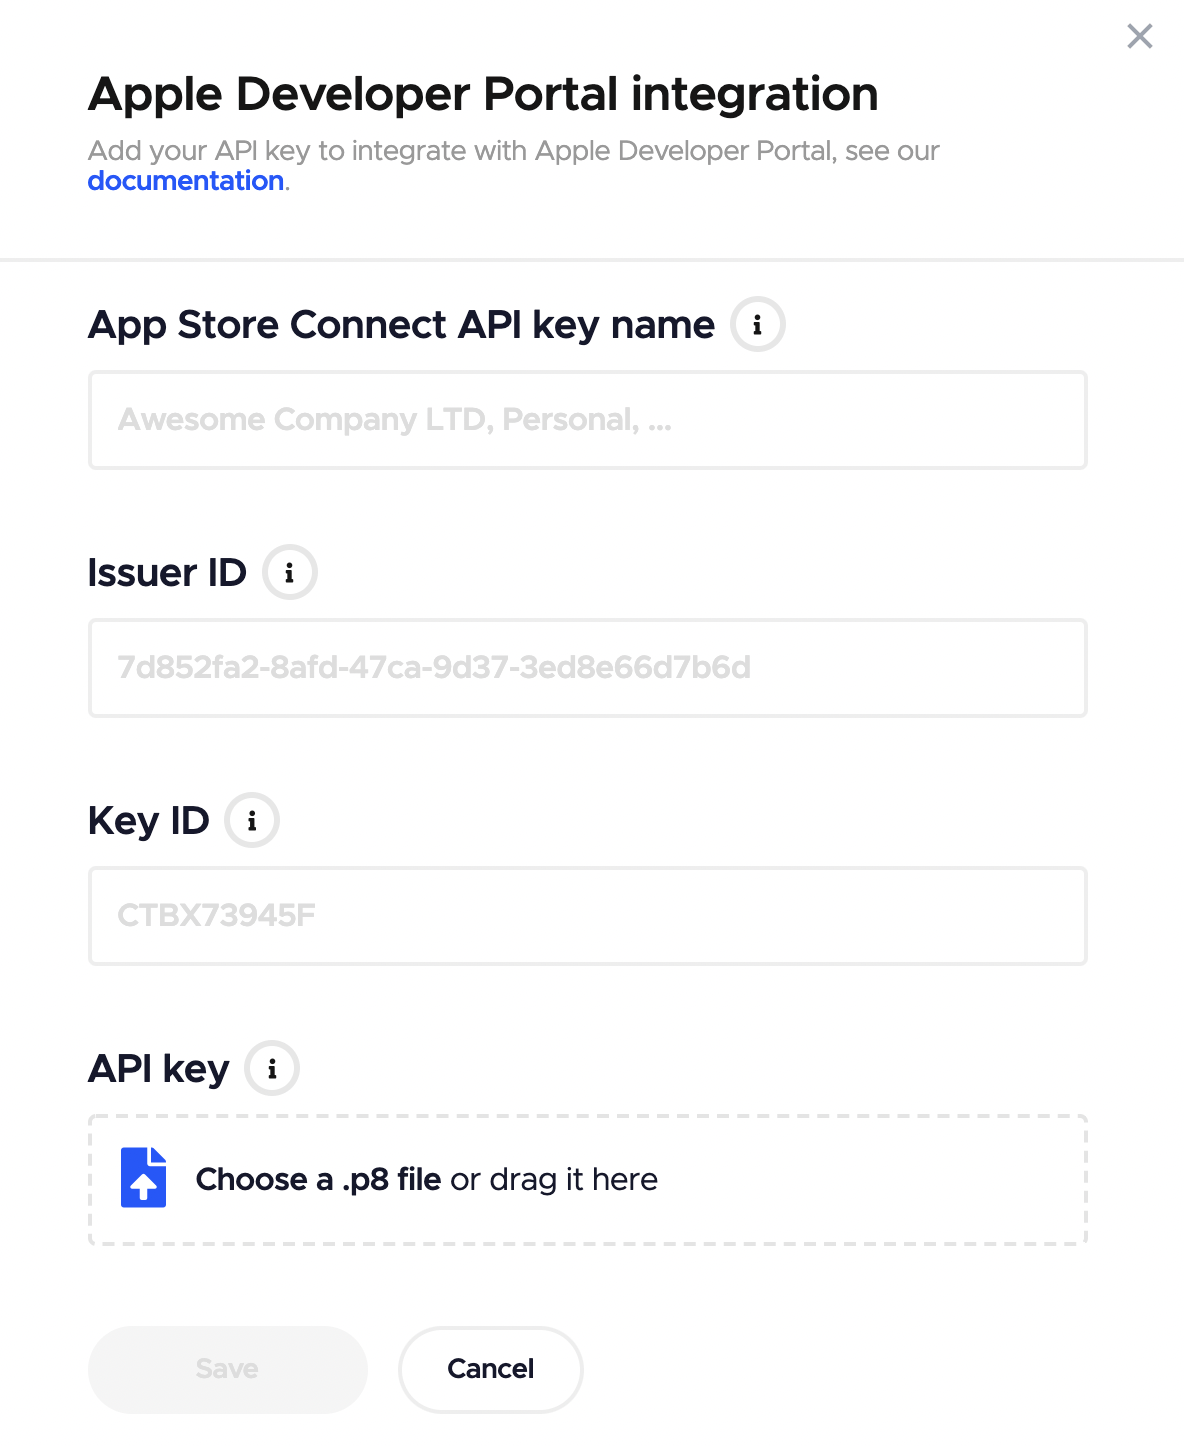
- Click Save. The added API key is now available for use across your personal or team apps.
Set up code signing for a workflow
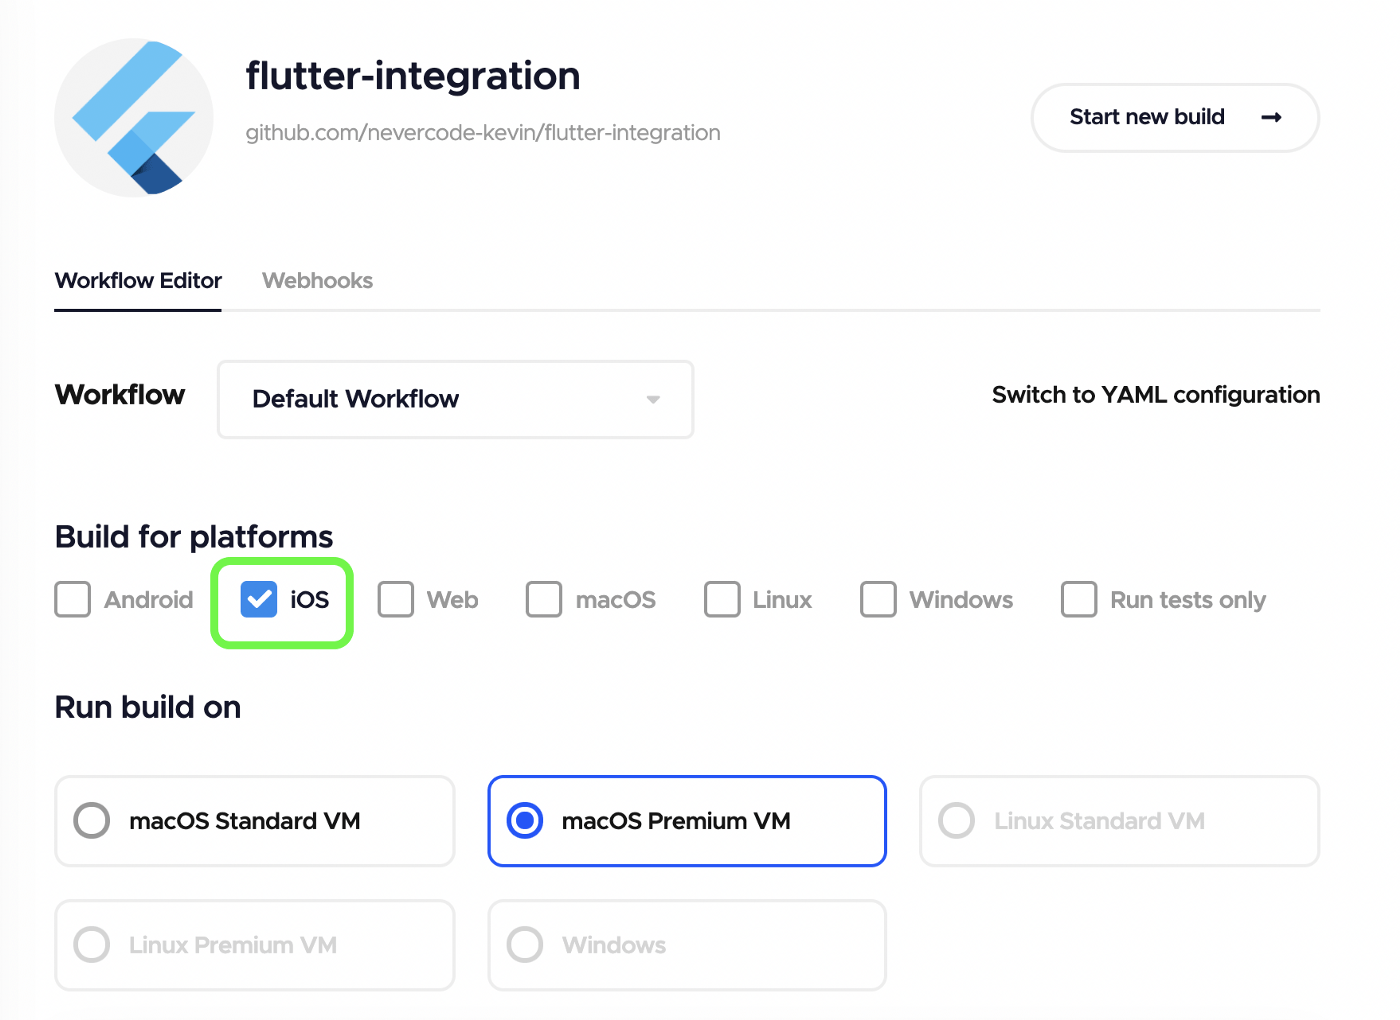
- Go to your App settings.
- Select iOS as the build platform.
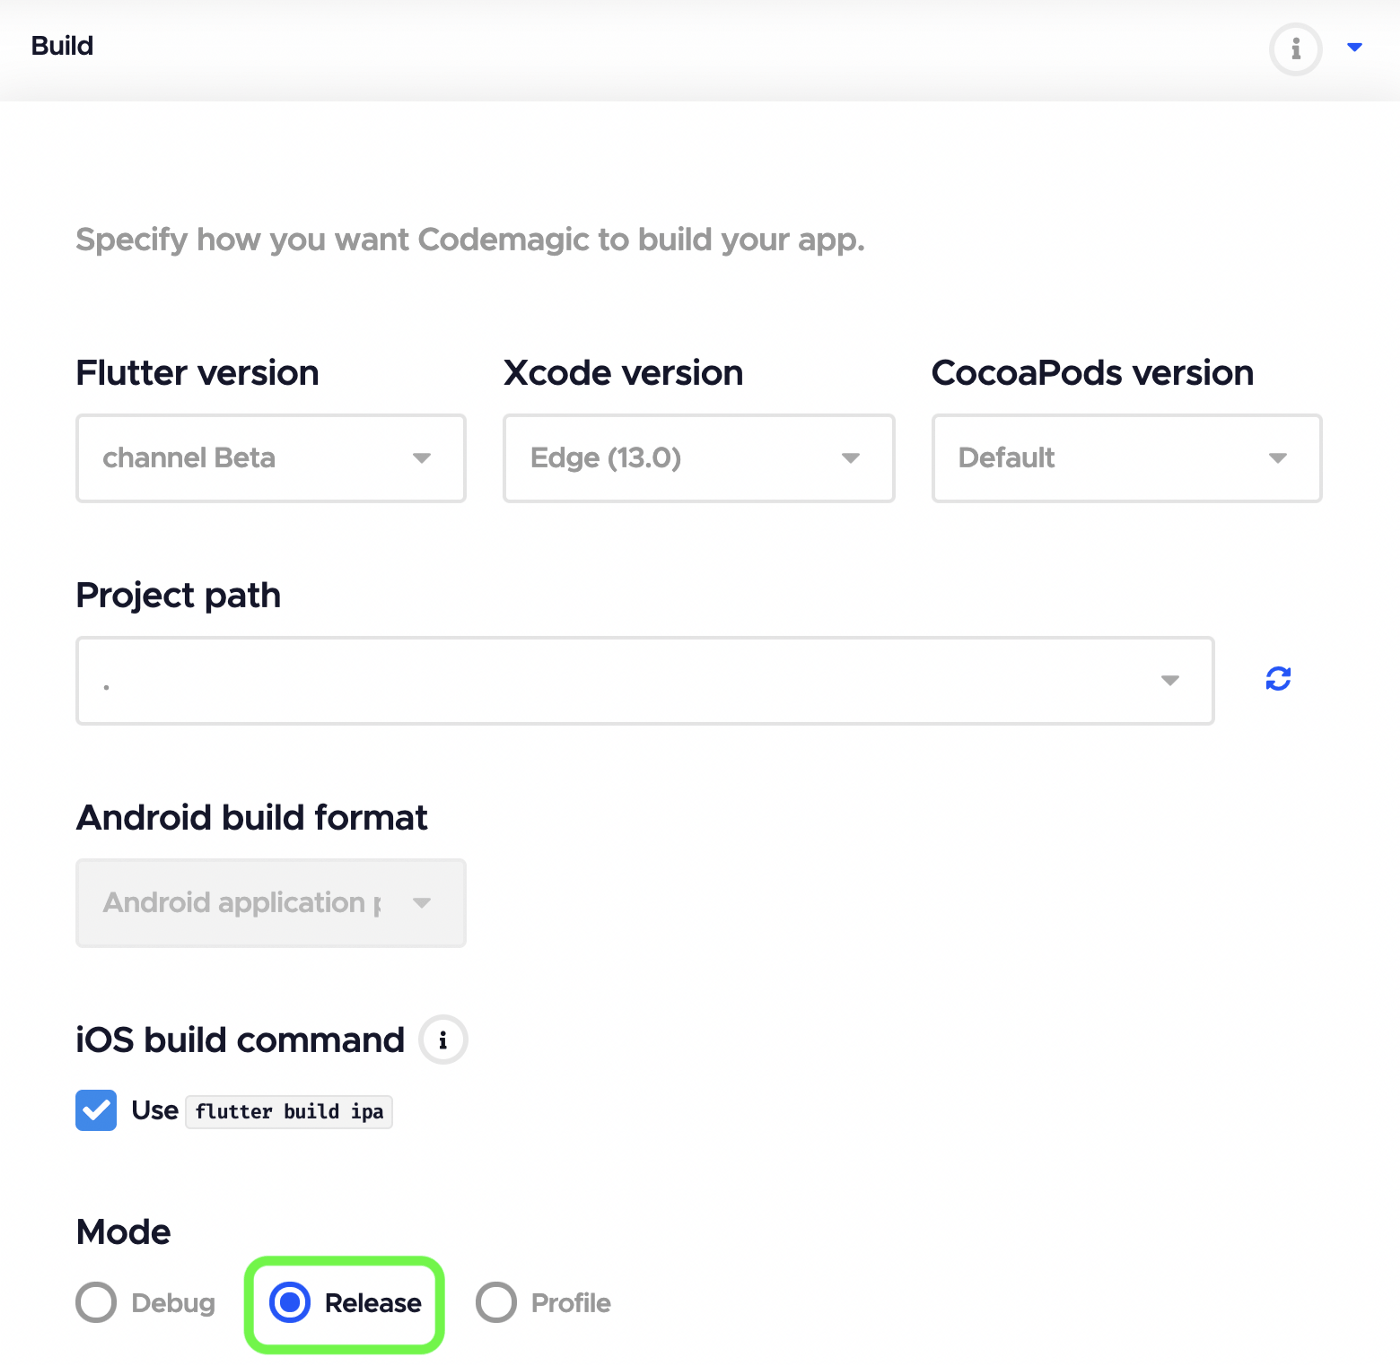
- In the Build section, review Flutter and Xcode version settings and select the Release mode.
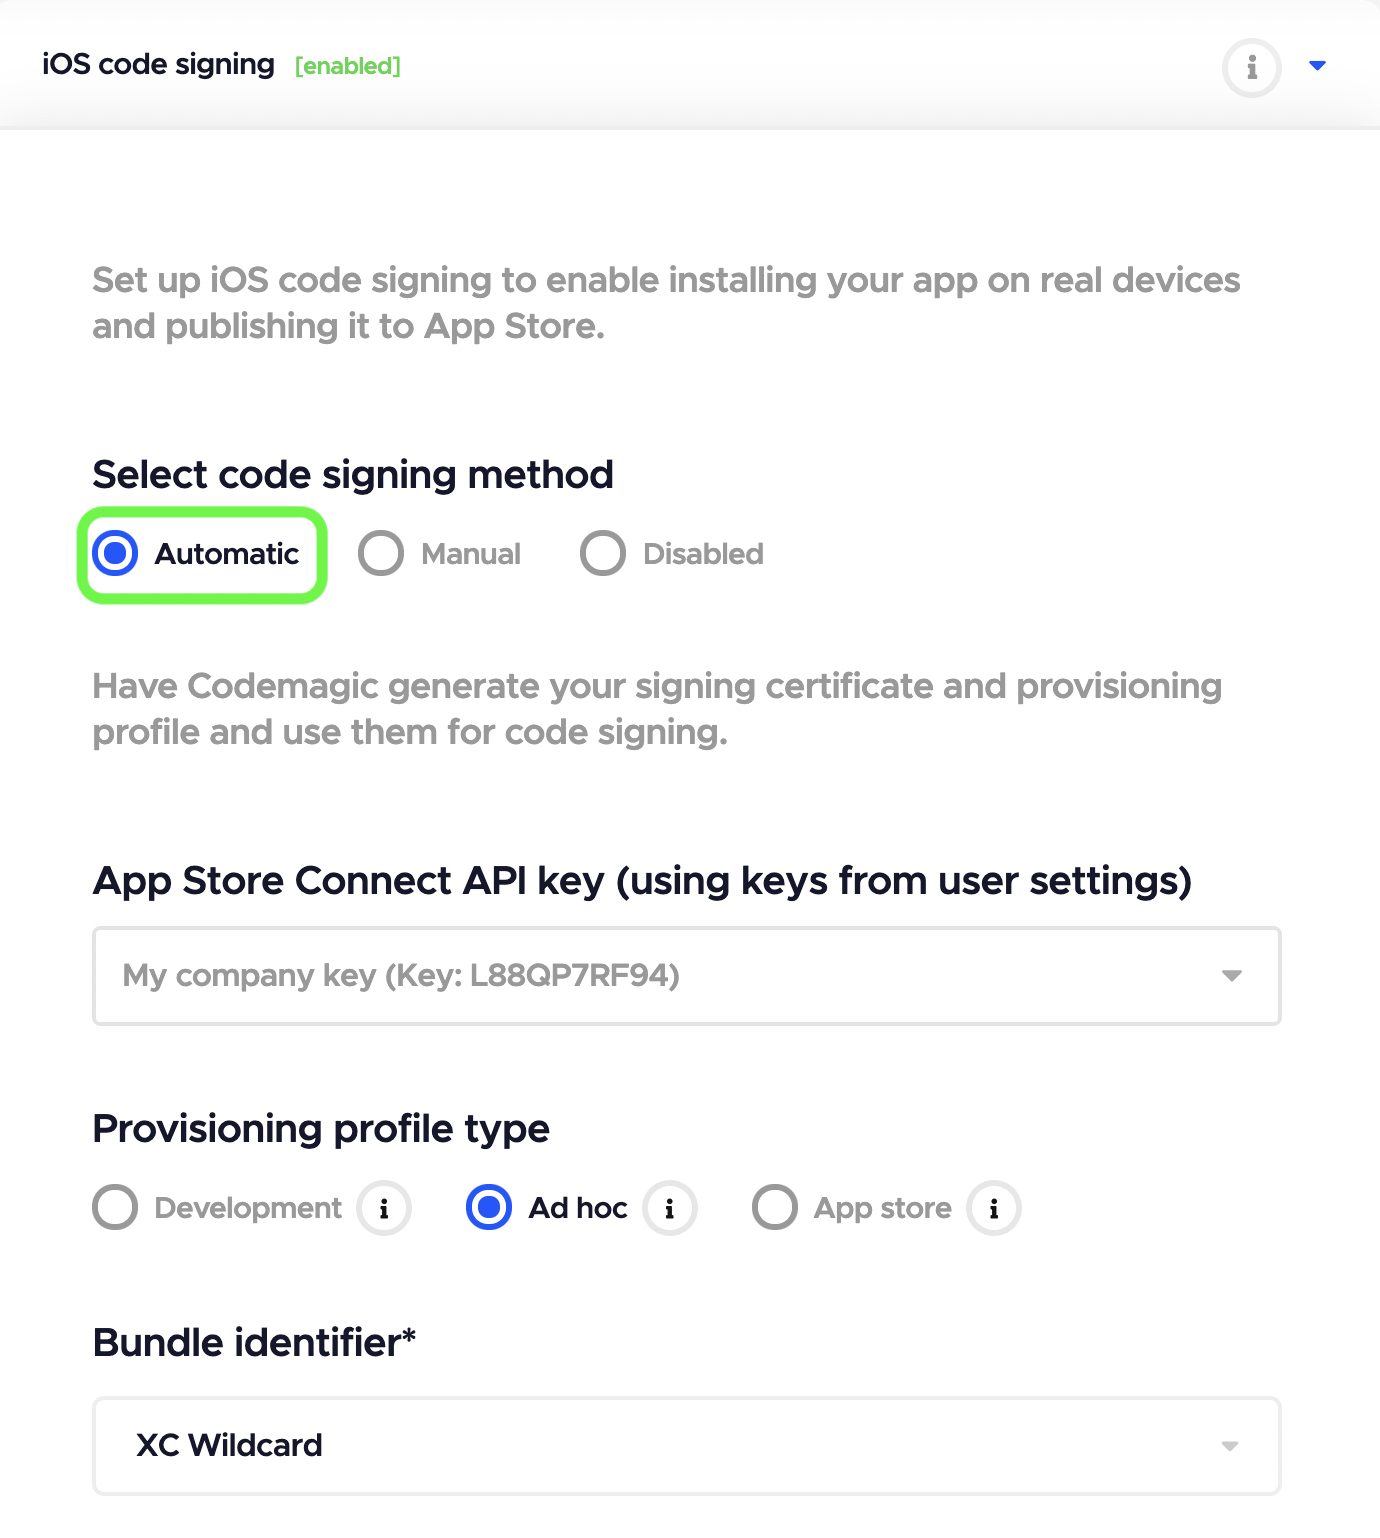
- Scroll down to the Distribution section and click on iOS code signing to expand this step.
- Select Automatic as the code signing method. Then select the App Store Connect API key from the dropdown and select the Provisioning profile type to be created if one doesn’t exist. Finally, select the right Bundle identifier from the list of available bundle IDs.
- To finish the setup, click Save changes at the top of the page.
That’s it. You will now receive signed builds every time you build the workflow. The .ipa file will be available for download in the Artifacts section of the build overview and will be also sent to your email or Slack channel. As the next step, you can configure publishing to App Store Connect to distribute your signed app to testers or submit it for review.
Wrap-up
While you don’t strictly need to sign the app while developing, there’s no escaping from code signing and joining the Apple Developer Program when you’re planning to publish your app to the public via the App Store. Thanks to Codemagic’s automatic code signing, you do not need a Mac to sign your iOS apps and distribute them to the App Store.
In the end, Codemagic’s automatic code signing feature is not just for developers without a Mac: it simply takes the pain out of the entire process by automating yet another aspect of app development.
Give Codemagic a try yourself with 500 free macOS build minutes a month, sign up here.


