


Written by Rudrank Riyam.
As an Apple platforms developer, you have surely come across a scenario in which you have had to create new screenshots for App Store Connect while releasing a new version. The designer may have given you the screenshots beforehand, or maybe you have manually opened the corresponding simulators and taken the screenshots yourself.
You must upload a minimum of three screenshots for each of the four devices on App Store Connect. That is a minimum of 12 screenshots per release. These numbers compound when you add more screenshots per device and grow exponentially when you localize the screenshots. And if you are supporting macOS, tvOS, and watchOS in addition to iOS, then the number of screenshots becomes truly gigantic.
Furthermore, if you make any errors while taking the screenshots, you have to repeat the process again.
Fortunately, you can use fastlane snapshot to automate the process of creating the screenshots for the App Store using UI testing. You can also combine it with Codemagic to get a flawless pipeline to upload the screenshots to the App Store while you go and grab a coffee. This helps you release new versions faster and make sure screenshots are up to date without any human intervention or errors.
This article covers the process of:
- Setting up a UI test bundle for screenshots
- Adding UI tests
- Integrating fastlane
- Adding different screenshot configurations
- Creating a codemagic.yaml file and using it to integrate fastlane
So, let’s get started!

Setting up a UI test bundle for screenshots
You can automate the screenshots by writing UI tests for your project and fastlane’s screenshot helper method. This helps you navigate to a specific screen in your app and take a screenshot of it.
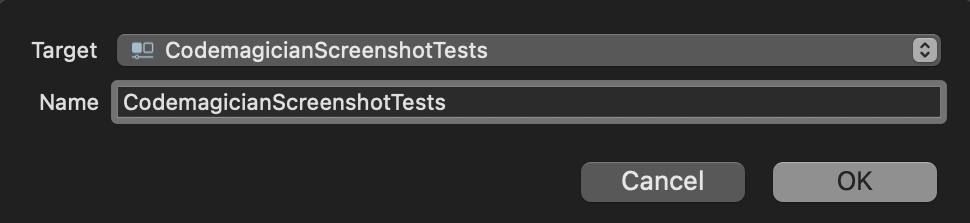
We will add a separate UI testing bundle for writing tests for screenshots. This separates the methods from your normal UI tests. Select File, then click New and select Target. Search for UI Testing Bundle and name it accordingly. For example, you can enter “ScreenshotTests” after the name of your target.
Next, we will add a new Xcode scheme for the test target we created. Go to the current scheme and select New Scheme:

Select the newly created UI target for screenshots. In this case, it is CodemagicianScreenshotTests.
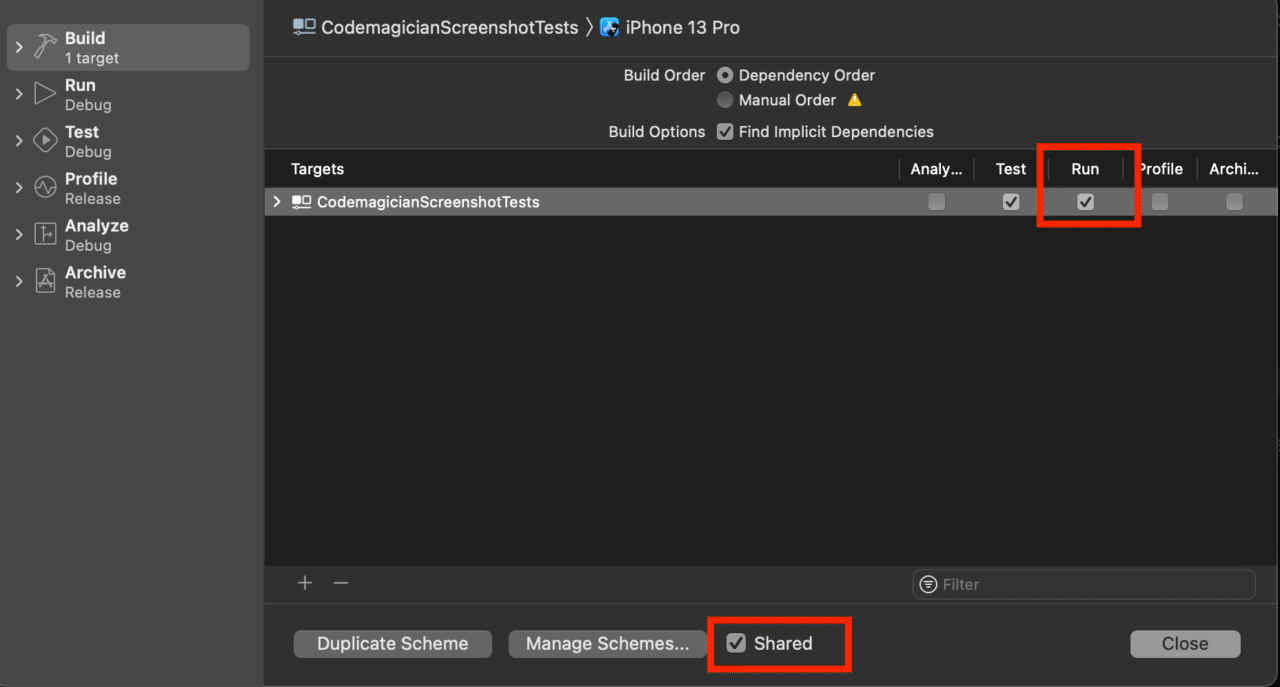
Edit the scheme, select the Build option from the sidebar, and enable the checkbox under your target’s “Run” column. Also, enable the scheme’s Shared box.
Adding UI tests
The sample app contains an onboarding screen that you can swipe through:
struct ContentView: View {
  var body: some View {
    TabView {
      ForEach(OnboardingModel.demo, id: \.title) { model in
        OnboardingView(model: model)
      }
    }
    .tabViewStyle(.page(indexDisplayMode: .always))
  }
}

struct OnboardingView: View {
  var model: OnboardingModel

  var body: some View {
    VStack {
      Text(model.title)
        .font(.system(.title, design: .rounded))
        .bold()
        .multilineTextAlignment(.center)

      Spacer()

      Text(model.description)
        .font(.system(.body, design: .rounded))
        .lineSpacing(2)

      Spacer()

      Image(model.image)
        .resizable()
        .scaledToFit()

      Spacer()
    }
    .padding()
  }
}

struct OnboardingModel {
  var title: String
  var description: String
  var image: String
}

extension OnboardingModel {
  static var demo = [
  ///content
  ]
}
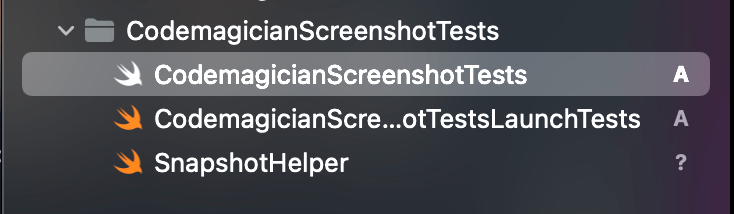
In the CodemagicianScreenshotTests.swift file, you can create a single method for all your screenshots or multiple different methods, depending on whether or not you need to reset the app.
In the next section, we will integrate fastlane, add its snapshot helper to the project, and add methods to take the screenshot.
Integrating fastlane
There are many ways to install fastlane on your machine. For this post, we will use Bundler. You can find more information about getting started with fastlane here.
In this post, we’re installing fastlane for demo purposes. However, fastlane is already preinstalled on Codemagic machines.
To install fastlane, run the following command in the root directory in the terminal:
fastlane snapshot init
fastlane will generate two files in your project:
- SnapshotHelper.swift
- Snapfile
SnapshotHelper.swift helps us take screenshots with a single method for each screenshot. Move SnapshotHelper.swift to the ScreenshotTest folder.
In turn, fastlane gives us two methods to get started to take screenshots. First, we need to get set up by using the setupSnapshot(_:waitForAnimations:) method. So, in the ScreenshotTest class, add the following in the setupWithError() method:
class CodemagicianScreenshotTests: XCTestCase {
  var app: XCUIApplication!

  override func setUpWithError() throws {
    continueAfterFailure = false

    app = XCUIApplication()
    setupSnapshot(app)
    app.launch()
  }
}
Additionally, fastlane gives us the snapshot(_:waitForLoadingIndicator:) method, which takes a screenshot with a particular name that you provide and can wait for the loading indicator. We will create a test for taking the screenshots after opening the screen and snapshotting after each swipe:
func testTakeScreenshots() {
  let scrollView = app.scrollViews.element(boundBy: 0)

  snapshot("01-CICDWithCodemagicScreen")

  scrollView.swipeLeft()

  snapshot("02-AutomatedTestsScreen")

  scrollView.swipeLeft()

  snapshot("03-CLIToolsScreen")

  scrollView.swipeLeft()

  snapshot("04-PostProcessingActionsScreen")

  scrollView.swipeLeft()

  snapshot("05-ContinuousDeliveryScreen")
}
Run the UI test to ensure that it passes successfully. In the next section, we will add the configuration of the screenshot to upload to the App Store.
Adding screenshot configuration
At the time of writing this post, App Store Connect requires you to take screenshots for the following four screen sizes:
- iPhone 5.5-inch display
- iPhone 6.5-inch display
- iPad Pro 2nd Gen 12.9-inch display
- iPad Pro 3rd/4th Gen 12.9-inch display
To allow us to store all the configuration parameters related to screenshots, fastlane provides us with a Snapfile. You can add different devices in the Snapfile to create screenshots for those screen sizes. Open the Snapfile and update the content for the following devices:
devices([
   "iPhone 8 Plus",
   "iPhone 13 Pro Max",
   "iPad Pro (12.9-inch) (2nd generation)",
   "iPad Pro (12.9-inch) (5th generation)"
])

languages([
   "en-US"
])

scheme("CodemagicianScreenshotTests")

output_directory("./screenshots")

override_status_bar(true)

clear_previous_screenshots true
This configures fastlane to capture screenshots on four devices with the English-US language. We specify the CodemagicianScreenshotTests scheme and clean previous screenshots whenever we run the command.
And that’s it! We are ready to automate the screenshot process.
To test how the screenshot looks, run the following command to generate the screenshots using fastlane:
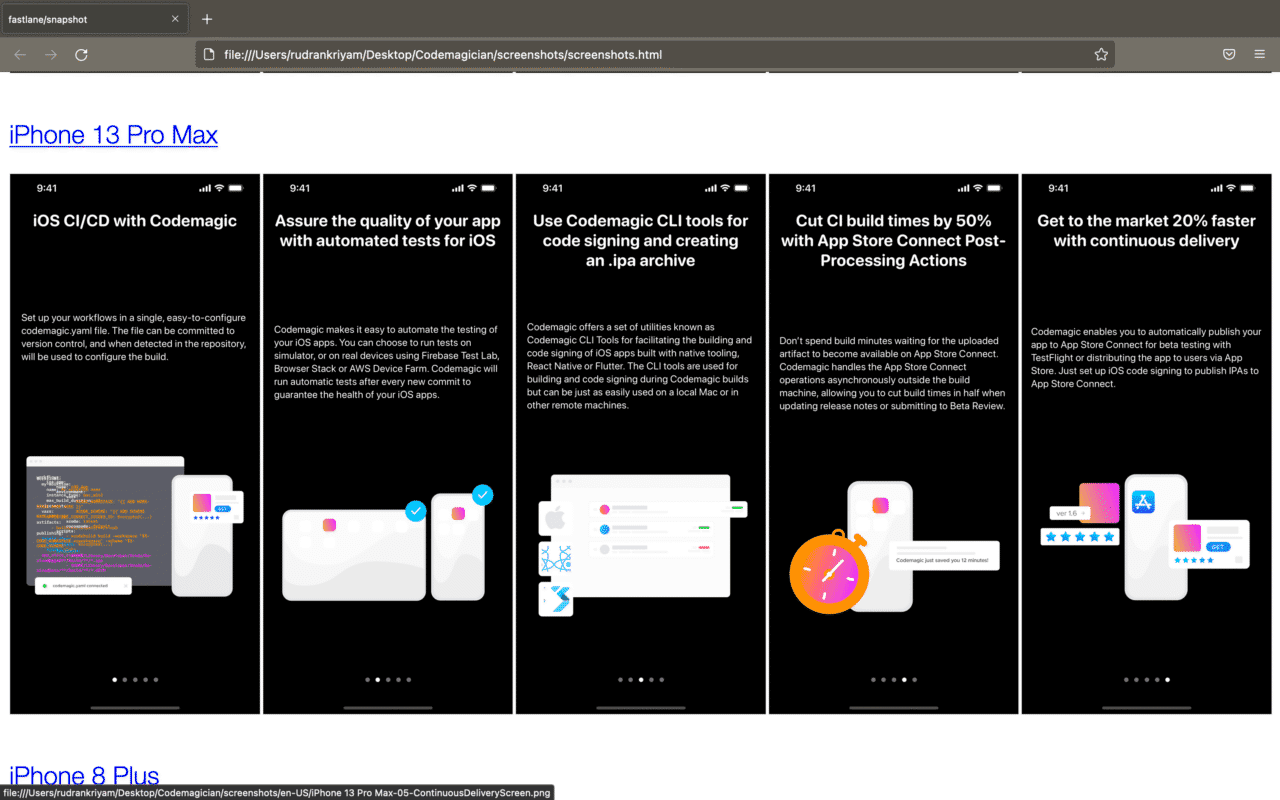
bundle exec fastlane snapshot
After a few minutes, if everything is successful, this should open an HTML file with all the screenshots. The screenshots are categorized by language and device.
Creating a codemagic.yaml file to automate making screenshots with fastlane in CI/CD
While you can run fastlane locally on your own machine, you can also take advantage of the ability to create the screenshots on a remote machine using Codemagic and integrate them with your existing CI/CD pipeline for publishing on the App Store. So, if you want to follow these steps and don’t have an account, sign up here.
Here’s a sample template for creating the screenshots and fetching the artifact after a successful workflow.
workflows:
  ios-screenshots-fastlane:
    name: iOS Screenshots Fastlane
    environment:
      xcode: latest
      cocoapods: default
    triggering:
      events:
        - tag
    scripts:
      - bundle install
      - name: Add 12.9 2nd Gen iPad
        script: xcrun simctl create "iPad Pro (12.9-inch) (2nd generation)" "com.apple.CoreSimulator.SimDeviceType.iPad-Pro--12-9-inch---2nd-generation-" "com.apple.CoreSimulator.SimRuntime.iOS-15-2"
      - bundle exec fastlane snapshot
    artifacts:
      - ./screenshots
Xcode 13 and above do not have the iPad 12.9-inch 2nd generation simulator preinstalled, although Apple requires you to take a screenshot of this particular device. So, we manually create the simulator on the virtual machine before executing the command to take the screenshots.
Finally, we run the command for fastlane to take screenshots:
bundle exec fastlane snapshot
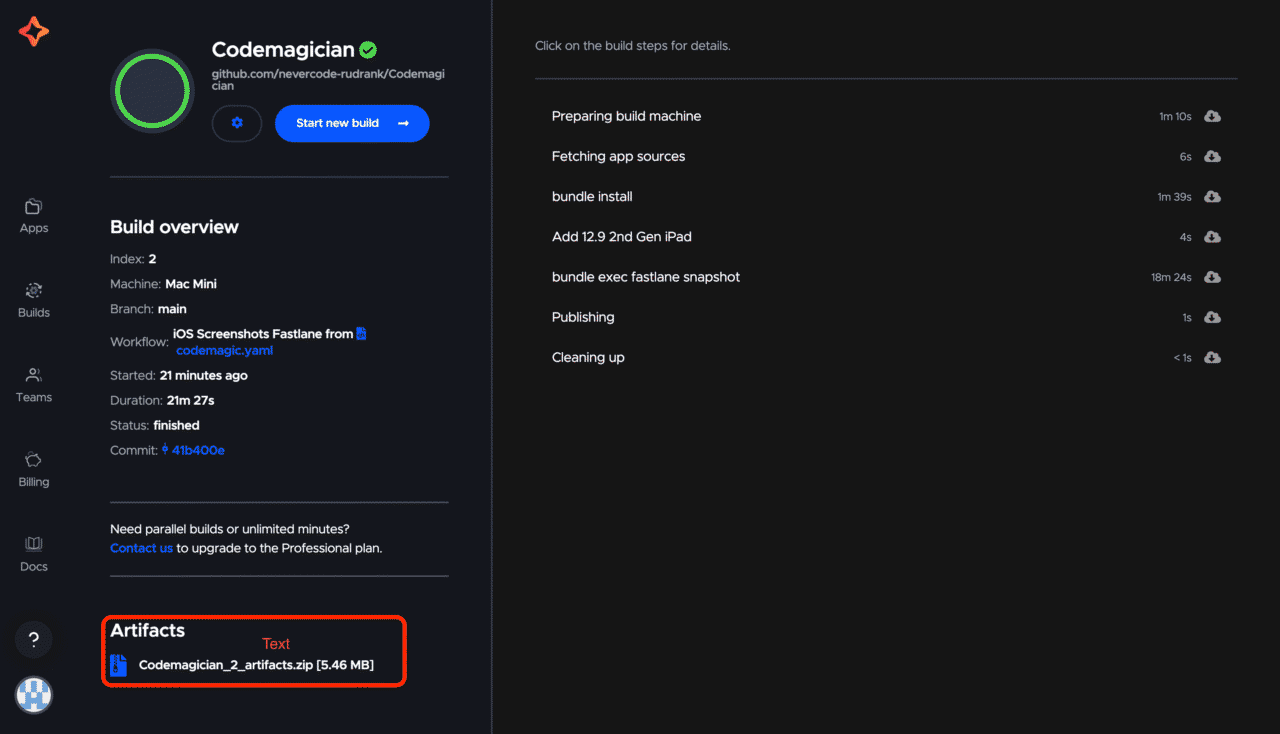
After running it on Codemagic, you get an artifact that you can download containing the screenshots and an HTML file that allows you to see the screenshots in one place:
You can combine it with fastlane deliver to upload screenshots, metadata, and binaries to App Store Connect and submit your app for App Store review!


Conclusion
Creating screenshots manually is a task that is very prone to human error. But you can automate this task and let tools like fastlane combined with Codemagic handle it so that you can focus on providing the best user experience.
You can find this project with a starter workflow and Snapfile template here.
We hope this post helped you automate your screenshots using fastlane and Codemagic. If you have any questions or suggestions, join our Slack community. Our team would love to hear about your experience automating your screenshots for iOS, tvOS, and watchOS apps!
About the author: Rudrank is an aspiring technical author and Apple platforms developer. You can mostly find him on Twitter (@rudrankriyam) or on his personal blog (rudrank.blog).


