


This article is written by Taha Tesser
Building Widgetbook using Codemagic
This article delves into the advantages of Widgetbook and explains how to build and publish Widgetbook builds to the Widgetbook Cloud platform using Codemagic CI/CD.
What is Widgetbook and Widgetbook Cloud?
When developing a Flutter app, you can utilize the widgetbook open-source package to preview and test Flutter widgets. This tool offers a range of features that allow you to test the app’s layout on devices with various screen sizes and languages. Additionally, it provides easy-to-use controls for customizing widget properties directly within the Widgetbook UI.
With the Widgetbook Cloud collaboration platform, you can easily share the Widgetbook with team members and clients. My favorite feature is how Widgetbook Cloud streamlines the app design review process. Gone are the days of taking screenshots or recording videos to gather feedback. There’s no more back-and-forth via email or Slack messages. Widgetbook Cloud simplifies the process, enabling reviewers to directly test and assess widget changes.
For more details visit https://www.widgetbook.io/.
Stay tuned for an interview with Lucas Josefiak, CEO & Co-Founder of Widgetbook.
Widgetbook Setup
As of this writing, the latest Widgetbook 3 release introduces code generation, making it much easier and faster to add widgets or app components to the Widgetbook catalog. However, there’s also a manual approach available where you can catalog each widget or component individually.
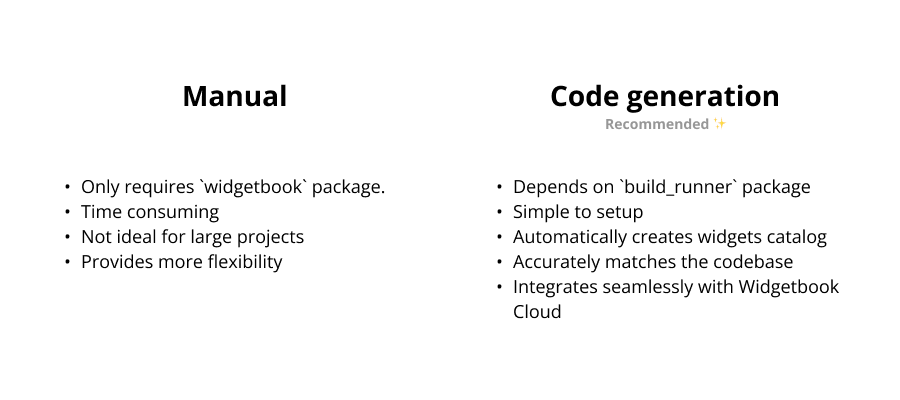
In this article, we’ll be using the code-generation approach. For demonstration purposes, we’ll employ the elegant Wonderous Flutter app developed by the gskinner team.
Let’s start by forking and cloning the Wonderous repository.
git clone <your_flutter_wonderous_app_fork_url>
Add the following Widgetbook packages to our newly forked and cloned Wonderous app to utilize the code-generation approach.
cd flutter-wonderous-app
flutter pub add widgetbook_annotation widgetbook
flutter pub add widgetbook_generator build_runner --dev
Tip: You can also create a new
gitbranch to separate Widgetbook from active development branch.
After adding the packages, a portion of the Wonderous pubspec.yaml will appear as follows:
  webview_flutter: ^4.0.2
  youtube_player_iframe: ^4.0.4
  widgetbook_annotation: ^3.0.0
  widgetbook: ^3.3.0

dev_dependencies:
  icons_launcher: ^2.1.3
  flutter_lints: ^2.0.2
  dependency_validator: ^3.2.2
  widgetbook_generator: ^3.2.0
  # Remove `build_runner` build number if there are any pub conflicts.
  build_runner:
Now, initiate the build_runner generator by using the watch command. This ensures that the build_runner listens for changes and automatically updates Widgetbook.
Run the command: dart run build_runner watch.
Note: If you try
flutter pub run build_runner watch, you’ll encounter a message stating: ”Deprecated. Usedart runinstead.”"
“When executing the build_runner watch command within the Wonderous app folder, you might encounter the following error:
➜  flutter-wonderous-app git:(main) ✗ dart run build_runner watch

Building package executable...
Failed to build build_runner:build_runner:
../../.pub-cache/hosted/pub.dev/build_runner_core-7.2.8/lib/src/logging/build_for_input_logger.dart:13:7: Error: The non-abstract class 'BuildForInputLogger' is missing implementations for these members:
 - Logger.onLevelChanged
Try to either
 - provide an implementation,
 - inherit an implementation from a superclass or mixin,
 - mark the class as abstract, or
 - provide a 'noSuchMethod' implementation.
To resolve this issue, first run flutter pub upgrade and then execute dart run build_runner watch.
Upon successful execution, you should see something similar to this:
➜  flutter-wonderous-app git:(main) ✗ dart run build_runner watch

Building package executable... (3.7s)
Built build_runner:build_runner.
[INFO] Generating build script completed, took 174ms
[INFO] Precompiling build script... completed, took 3.2s
[INFO] Setting up file watchers completed, took 4ms
[INFO] Waiting for all file watchers to be ready completed, took 202ms
[INFO] Building new asset graph completed, took 813ms
[INFO] Checking for unexpected pre-existing outputs. completed, took 0ms
[INFO] Generating SDK summary completed, took 2.4s
[INFO] Running build completed, took 12.4s
[INFO] Caching finalized dependency graph completed, took 66ms
[INFO] Succeeded after 12.5s with 106 outputs (460 actions)
To run Widgetbook separately from the regular app execution, we need to create a dedicated file under the lib folder. While you can name this file whatever you prefer, for the purpose of this guide, we’ll name it widgetbook.dart.
Create a new widgetbook.dart file in the flutter-wonderous-app/lib folder.
Inside this file, we will set up the following to test the Wonderous widgets:
- Import Wonderous app logic and initialize it the
mainfunction. - Create
WidgetbookAppannotated class that is used to generated a file containing a single variable calleddirectories. - Add
DeviceFrameAddonaddon for the device preview and theTimeDilationAddonaddon to slow down animations. For more details, see Addons documentation.
import 'package:flutter/material.dart';
import 'package:widgetbook/widgetbook.dart';
import 'package:widgetbook_annotation/widgetbook_annotation.dart' as widgetbook;
import 'package:wonders/main.dart'; // Import this to get access to the appLogic instance.

import 'widgetbook.directories.g.dart';

void main() async {
  WidgetsFlutterBinding.ensureInitialized();
  // Start app and initialize Wonderous app logic.
  registerSingletons();
  runApp(const WidgetbookApp());
  await appLogic.bootstrap();
}

@widgetbook.App()
class WidgetbookApp extends StatelessWidget {
  const WidgetbookApp({super.key});

  @override
  Widget build(BuildContext context) {
    return Widgetbook.material(
      directories: directories,
      addons: <WidgetbookAddon>[
        DeviceFrameAddon(
          devices: <DeviceInfo>[Devices.ios.iPhone13ProMax, Devices.ios.iPadAir4],
        ),
        TimeDilationAddon(),
      ],
    );
  }
}
Ensure that dart run build_runner watch is still running; this will automatically update the project and create a new widgetbook.directories.g.dart file inside the lib folder.
Now, onto the exciting bit!
We’ll be adding the CircleIconBtn button from the Wonderous codebase to the Wonderous Widgetbook.”
Inspect the CircleIconBtn class to determine the types of properties we can customize within the Widgetbook UI.
class CircleBtn extends StatelessWidget {
  const CircleBtn({
    Key? key,
    required this.child,
    required this.onPressed,
    this.border,
    this.bgColor,
    this.size,
    required this.semanticLabel,
  }) : super(key: key);

  static double defaultSize = 48;

  final VoidCallback onPressed;
  final Color? bgColor;
  final BorderSide? border;
  final Widget child;
  final double? size;
  final String semanticLabel;
/// ....
Create an annotated use-case builder method below the WidgetbookApp class in the widgetbook.dart file.
Here we define a Widgetbook use case with a type of CircleIconBtn and add Widgetbook Knobs (or controls) to the CircleIconBtn parameters. These knobs allow us to modify the CircleIconBtn properties directly from the Widgetbook UI. For a detailed guide on configuring knobs, refer to the documentation".
@widgetbook.UseCase(
  name: 'Properties',
  type: CircleIconBtn,
)
Widget testCircleIconBtn(BuildContext context) {
  AppColors appColors = AppColors();
  String getColorLabel(Color? value) {
    if (value == appColors.accent1) {
      return 'accent1';
    }
    if (value == appColors.accent2) {
      return 'accent2';
    }
    if (value == appColors.offWhite) {
      return 'offWhite';
    }
    if (value == appColors.caption) {
      return 'caption';
    }
    if (value == appColors.body) {
      return 'body';
    }
    if (value == appColors.greyStrong) {
      return 'greyStrong';
    }
    if (value == appColors.greyMedium) {
      return 'greyMedium';
    }
    if (value == appColors.white) {
      return 'white';
    }
    if (value == appColors.black) {
      return 'black';
    }
    return 'unknown';
  }
  List<Color?> colorOptions = [
    appColors.accent1,
    appColors.accent2,
    appColors.offWhite,
    appColors.caption,
    appColors.body,
    appColors.greyStrong,
    appColors.greyMedium,
    appColors.white,
    appColors.black,
  ];

  return Center(
    child: CircleIconBtn(
      icon: context.knobs.list(
        label: 'Iciconon',
        initialOption: AppIcons.next_large,
        options: AppIcons.values,
      ),
      border: context.knobs.boolean(label: 'border', initialValue: false)
          ? BorderSide(
              color: appColors.white,
              width: 2.0,
              strokeAlign: BorderSide.strokeAlignOutside,
            )
          : null,
      bgColor: context.knobs.list(
        label: 'bgColor',
        initialOption: appColors.accent1,
        labelBuilder: (value) {
          return getColorLabel(value);
        },
        options: colorOptions,
      ),
      color: context.knobs.list(
        label: 'color',
        initialOption: appColors.white,
        labelBuilder: (value) {
          return getColorLabel(value);
        },
        options: colorOptions,
      ),
      size: context.knobs.doubleOrNull.slider(
        label: 'size',
        initialValue: 48,
        min: 28,
        max: 120,
      ),
      iconSize: context.knobs.doubleOrNull.slider(
        label: 'iconSize',
        initialValue: 48,
        min: 28,
        max: 120,
      ),
      onPressed: () {},
      semanticLabel: 'CircleIconBtn',
    ),
  );
}
Tip: For testing purposes, you might want to modify the
Image.assetpath string in theapp_icons.dartfile to access the largest icons available within theassetsfolder:String path = 'assets/images/_common/icons/3.0x/icon-$i.png';By doing so, you can test the
CircleIconBtnicon size by scaling it to the maximum resolution available.
Run the Wonderous Widgetbook on supported platforms, Flutter Desktop and Web.
flutter run d macos -t lib/widgetbook.dart
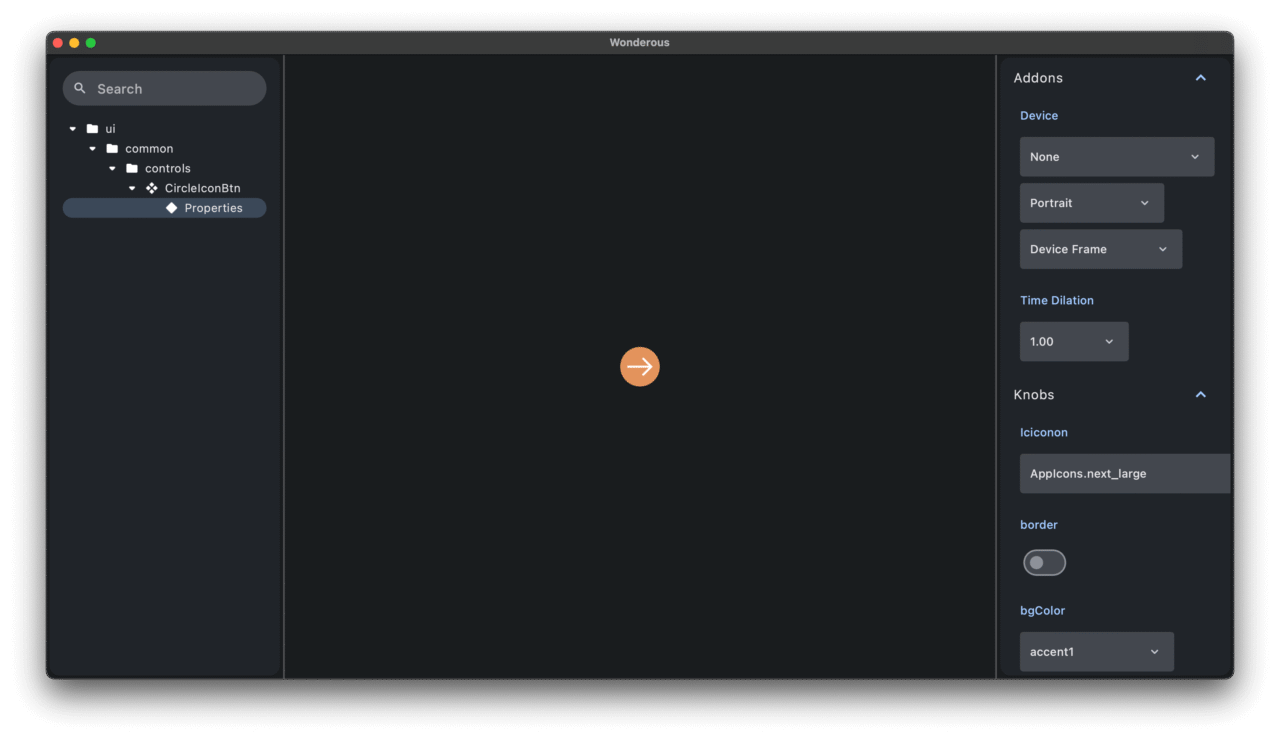
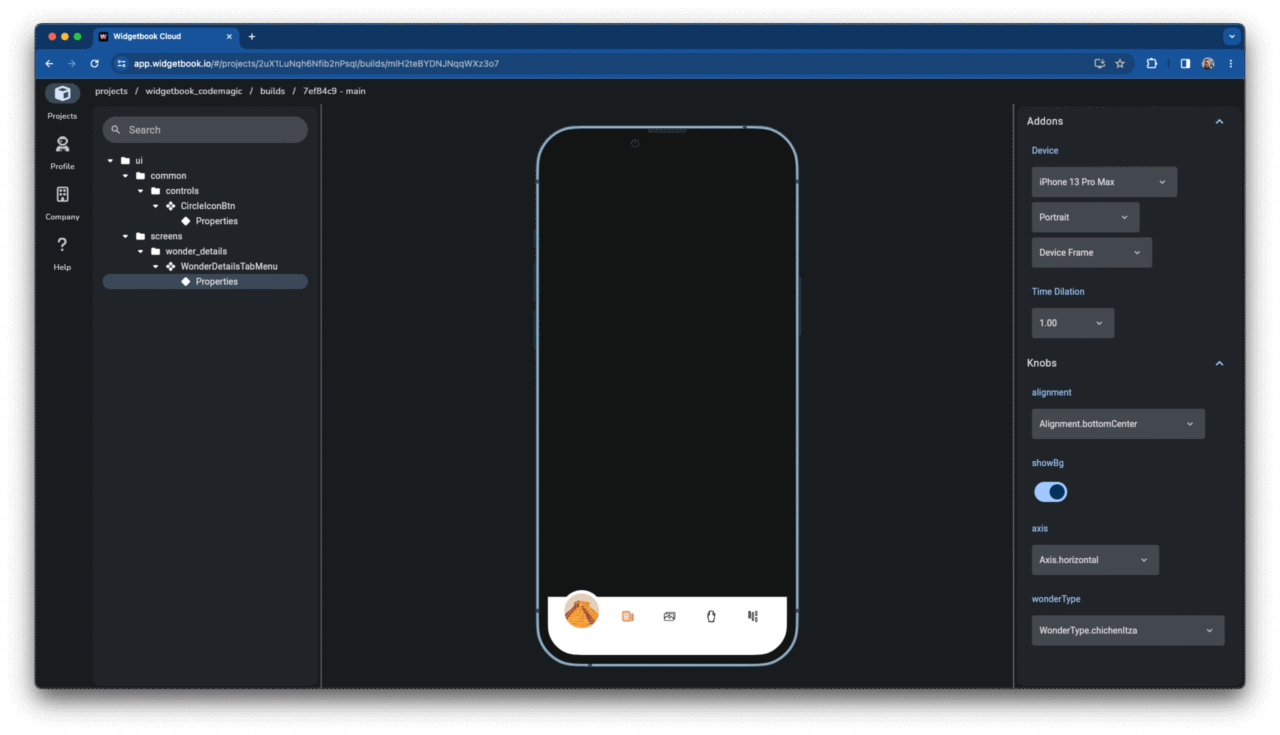
We can directly tweak and test the properties of the CircleIconBtn from the Wonderous app using the Widgetbook UI. Isn’t that amazing?!
Let’s add another Wonderous widget to our freshly created Widgetbook.
We’ll use the annotated testTabMenu Widgetbook use-case builder method. This method returns the TestTabMenu widget containing WonderDetailsTabMenu widget.
@widgetbook.UseCase(
  name: 'Properties',
  type: WonderDetailsTabMenu,
)
Widget testTabMenu(BuildContext context) {
  return TestTabMenu();
}

class TestTabMenu extends StatefulWidget {
  const TestTabMenu({super.key});

  @override
  State<TestTabMenu> createState() => _TestTabMenuState();
}

class _TestTabMenuState extends State<TestTabMenu> with SingleTickerProviderStateMixin {
  late TabController _tabController;

  @override
  void initState() {
    super.initState();
    _tabController = TabController(
      length: 4,
      vsync: this,
      initialIndex: 0,
    );
  }

  @override
  void dispose() {
    _tabController.dispose();
    super.dispose();
  }

  @override
  Widget build(BuildContext context) {
    return Align(
      alignment: context.knobs.list(
        label: 'alignment',
        initialOption: Alignment.bottomCenter,
        options: <AlignmentGeometry>[
          Alignment.bottomCenter,
          Alignment.centerLeft,
        ]
      ),
      child: WonderDetailsTabMenu(
        tabController: _tabController,
        showBg: context.knobs.boolean(label: 'showBg', initialValue: true),
        axis: context.knobs.list(
          label: 'axis',
          initialOption: Axis.horizontal,
          options: Axis.values,
        ),
        wonderType: context.knobs.list(
          label: 'wonderType',
          initialOption: WonderType.chichenItza,
          options: WonderType.values,
        ),
      ),
    );
  }
}
Hot restart the app to refresh the Widgetbook with the WonderDetailsTabMenu widget.
Build and publish to Widgetbook Cloud
While it’s fantastic to run Widgetbook locally and test widgets on your own, there may be times when you want to share Widgetbook with designers, project managers, and clients to gather feedback. Fortunately, Widgetbook Cloud makes this task straightforward. It offers a host of features to collaborate and streamline the review process - capabilities that aren’t achievable when running Widgetbook locally.
If you don’t yet have access to Widgetbook Cloud, you can sign up here.
After securing access to the Widgetbook Cloud platform, ensure you read the quick start guide. Once done, you’re all set and ready to go!
Previously, we were only running the Widgetbook app locally on the macOS platform. However, to upload Widgetbook builds to the Widgetbook Cloud, it’s necessary to build for the web platform.
“First and foremost, run the build_runner build to update the Widgetbook generated file. Following that, proceed to build for the web platform.
dart run build_runner build -d
flutter build web -t lib/widgetbook.dart
With these steps completed, you have the option to publish this Widgetbook build to the Widgetbook Cloud platform from your local environment. However, a more streamlined approach would be setting up a CI/CD pipeline to automate this workflow. This method is highly recommended because it not only saves valuable time but also bypasses potential local issues and minimizes manual interventions.”
I’m going to use Codemagic CI/CD to build and publish Widgetbook builds in minutes.
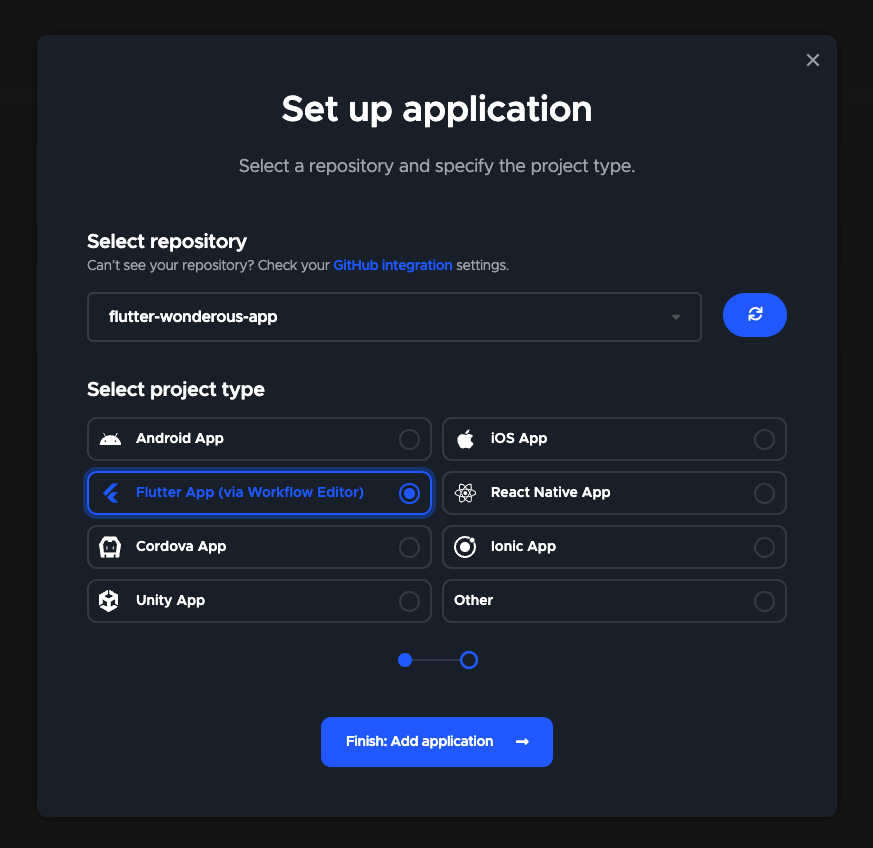
After logging into Codemagic, click on the “Add application” button located at the top right corner. Then, simply follow the provided steps to configure a new application using the forked Wonderous repository.
Within the “Build for platforms” section, ensure you select only the web platform.
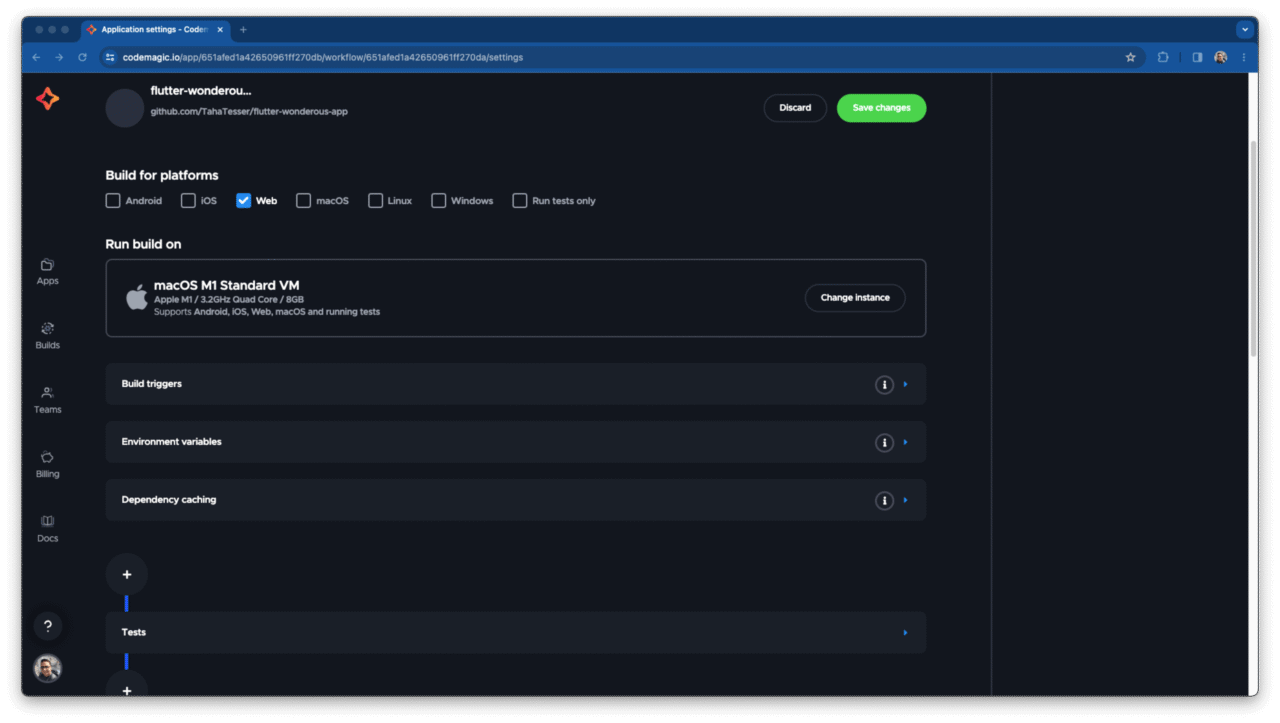
Navigate to the “Build” section and specify the Widgetbook target file.
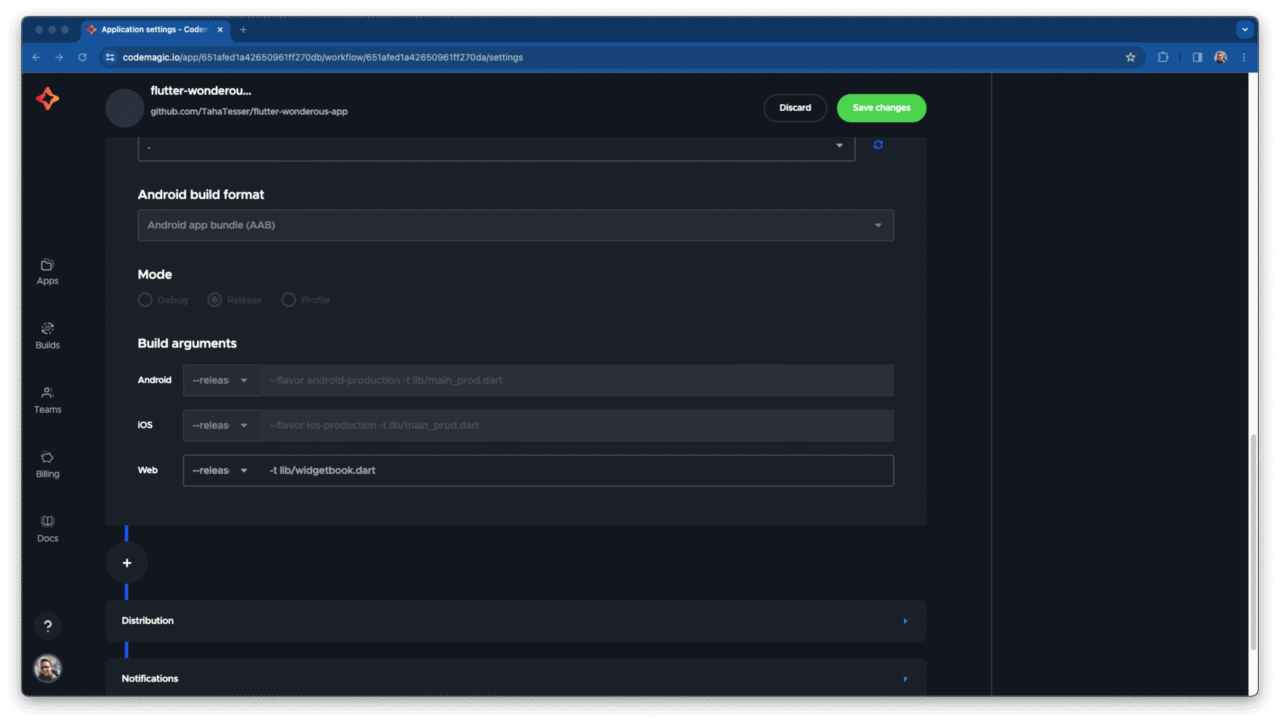
“Finally, within the “Post-publish script” section, input the following script. This will install widgetbook_cli and subsequently publish the Widgetbook build to the Widgetbook Cloud platform.”
dart pub global activate widgetbook_cli 3.0.0-rc.3
widgetbook publish --api-key <widgetbook_project_api_key> --branch main
To retrieve the API key, go to the Widgetbook Cloud project settings. Then, in the ‘Admin Zone’ section, tap the ‘Fetch’ button under Load API key.
All set! You’re now fully equipped to build and publish Widgetbook builds using Codemagic.
Initiate the Codemagic build process. In a mere matter of minutes, you should be able to spot the fresh build on the Widgetbook Cloud platform.
Optionally, you can configure an automatic build trigger upon either a push or a pull request to upload Widgetbook builds.
In my setup, I’ve chosen to activate the automatic build trigger on push. This initiates a new build and publishes the Widgetbook build in Codemagic with every push, saving me even more time!

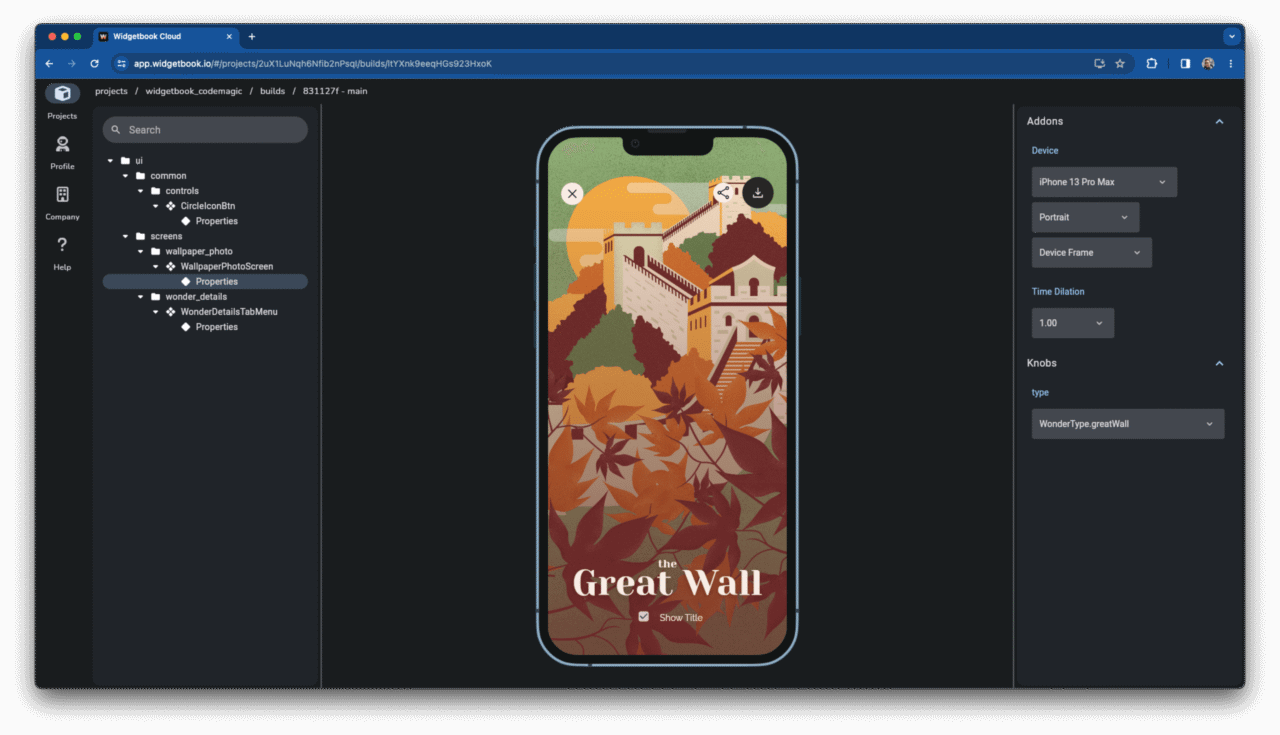
Let’s proceed by pushing another use case to validate the automatic build trigger.
@widgetbook.UseCase(
  name: 'Properties',
  type: WallpaperPhotoScreen,
)
Widget testWallpaperPhotoScreen(BuildContext context) {
  return WallpaperPhotoScreen(
    type: context.knobs.list(label: 'type', options: WonderType.values),
  );
}
Codemagic will spring into action, automatically building and publishing a fresh Widgetbook build to the Widgetbook Cloud. How exciting!
The same workflow can be setup using the codemagic.yaml file.
workflows:
  # Push a new build everytime the staging branch is updated
  widgetbook-workflow:
    name: Widgetbook Workflow
    triggering:
      events:
        - push
      branch_patterns:
        - pattern: 'main'
    environment:
      groups:
        - Widgetbook Credentials
      flutter: stable
    scripts:
      - name: Get Flutter packages
        script: flutter packages pub get
      - name: Run build_runner
        script: dart run build_runner build -d
      - name: Build Widgetbook
        script: flutter build web -t lib/widgetbook.dart
      - name: Install Widgetbook CLI
        script: dart pub global activate widgetbook_cli 3.0.0-rc.3
      - name: Upload Widgetbook
        script: |
          widgetbook publish \
                --api-key $WIDGETBOOK_API_KEY \
                --branch $CM_BRANCH
Interview with Lucas Josefiak (CEO & Co-Founder of Widgetbook)
Conclusion
Widgetbook offers an abundance of flexibility and a sophisticated suite of features that simplify and streamline the often tedious testing and review processes. The Widgetbook team is dedicated and consistently introduces new features and enhancements. Be sure to watch the interview with Lucas for insights into Widgetbook features not covered in this article, as well as a peek into Widgetbook’s future.


