


Written by Matt Rešetár. First published in Reso Coder blog.
Unit tests, widget tests, integration tests - that’s the testing pyramid you’re probably familiar with. The first two have always been quite easy to write and quick to execute. However, integration tests, which are the focus of this tutorial, have had a fair share of their problems - they used to be unnecessarily hard to write and impossible to run on device farms such as Firebase Test Lab. That is, until we had the integration_test package!
Very quick intro to Flutter’s integration tests
Unit tests are for testing the non-UI logic of your app. Widget tests verify the behavior of a single widget. Both of these are quite low-level and can often deal with intricacies that are only familiar to developers and testers. Flutter’s integration tests test the UI flow of the app from the user perspective. In fact, we could say that they simply simulate a user who’s just regularly using the app.
I think the term “integration test”, the way it’s used around Flutter, is rather unfortunate. While they do indeed test the integration of all the classes and widgets, a much more expressive name would be “UI flow test” because that’s exactly what’s being tested.
Unlike unit and widget tests, integration tests run on an actual device or an emulator. This makes them relatively expensive to run - both time-wise and financially. In addition, they test the big picture of the app (just as if it was used by an actual physical user) so while they are immensely useful in finding out about errors that affect the user, integration tests give you very little information about what actually went wrong. That’s the reason why integration tests are not enough on their own but they’re a great complement to unit and widget tests.
What you’ll learn
In this tutorial, you will learn how to write and execute tests using the new integration_test package. We’re going to execute them both locally and also in a more production-grade setup with Firebase Test Lab and Codemagic CI/CD so that you can be fully confident that every piece of code you commit to a repository passes the tests on multiple devices, OS versions, screen sizes, orientations and locales.
The app we’re going to be working with is very simple. It’s already written for you in the starter project you can get from above.
After inputting a text and clicking on the FAB, the user is taken to another page where the same text is displayed. After navigating back, the input is clear. If there is nothing written in the text field but the user still wants to navigate to the other page, an error message is displayed. How does the description above sound to you? Makes sense, right? It simply describes the flow of the app. That’s great, because this is exactly what we’re going to check by writing integration tests. Nothing more, nothing less and everything will be tested from the user’s perspective.
Setting up the project
Before we start, I’d like you to know that you do not need to have any knowledge of the way integration tests used to be written with pure flutter_driver. In fact, flutter driver users can disregard all of their previous integration test experiences. Don’t worry though, you won’t need to learn yet another API to write your tests. They’re now written in the same way as widget tests! 🎉
To start, add the integration_test package to your dev_dependencies:
🛠 pubspec.yaml
dev_dependencies:
  flutter_test:
    sdk: flutter
  integration_test: ^1.0.1
The tests we’re about to write will be executed on an actual device or an emulator. This means that there is some Dart and also native code in the integration_test package that’s responsible for making all the simulated taps and drags happen. Later on in this tutorial you’ll learn how to build an Android APK that’s capable of running the integration tests fully on its own - this is a requirement for the Firebase Test Lab.
Running tests on iOS and also web is possible but we won’t cover it here for time-related reasons. To learn more about running tests on these platforms, check out the package documentation and also an example project.
While we’re still inside of our code editor though, it’s useful to run the tests directly on from machine without the minor hassle of building an APK file ourselves. For that to happen, we need an integrationDriver which we can use to “fake” the old flutter_driver approach.
Create a folder called test_driver at the root of the Flutter project and inside it a file called integration_test.dart. This will run the integrationDriver.
test_driver/integration_driver.dart
import 'package:integration_test/integration_test_driver.dart';

Future<void> main() => integrationDriver();
Writing integration tests
You’ve already read the verbal description of what the app does. Now comes the time to check if everything happens correctly with a test.
The test file is going to be called app_test.dart since it tests the flow of the whole app. We’re going to place it inside a new folder called integration_test which will be at the root of the Flutter project.
The tests themselves use the familiar widget test syntax, however, there’s an important line to call at the beginning of the main method:
integration_test/app_test.dart
void main() {
  IntegrationTestWidgetsFlutterBinding.ensureInitialized();

  // Tests will go here...
}
You don’t need to know how the app is implemented in order to write an integration test. After all, we’re testing from the user’s perspective. (If you really want to know, check out the code inside of the starter project). What you do need to know is this:
- The page widget with the text input is of type
TypingPage. - The second page which displays the input is of type
DisplayPage. - The
TextFormFieldon the first page has a keyKey('your-text-field').
Let’s first write a test for when the user doesn’t input any text. Notice how much information the test description conveys.
🛠 integration_test/app_test.dart
testWidgets(
  "Not inputting a text and wanting to go to the display page shows "
  "an error and prevents from going to the display page.",
  (WidgetTester tester) async {
    // Testing starts at the root widget in the widget tree
    await tester.pumpWidget(MyApp());

    await tester.tap(find.byType(FloatingActionButton));
    // Wait for all the animations to finish
    await tester.pumpAndSettle();

    expect(find.byType(TypingPage), findsOneWidget);
    expect(find.byType(DisplayPage), findsNothing);
    // This is the text displayed by an error message on the TextFormField
    expect(find.text('Input at least one character'), findsOneWidget);
  },
);
Even if you’ve never written a line of widget/integration test code before, it almost reads by itself. The second test will be for checking the UI flow when the user does input a text.
🛠 integration_test/app_test.dart
testWidgets(
  "After inputting a text, go to the display page which contains that same text "
  "and then navigate back to the typing page where the input should be clear",
  (WidgetTester tester) async {
    await tester.pumpWidget(MyApp());

    // Input this text
    final inputText = 'Hello there, this is an input.';
    await tester.enterText(find.byKey(Key('your-text-field')), inputText);

    // Tap on a FAB
    await tester.tap(find.byType(FloatingActionButton));
    await tester.pumpAndSettle();

    // We should be in the DisplayPage that displays the inputted text
    expect(find.byType(TypingPage), findsNothing);
    expect(find.byType(DisplayPage), findsOneWidget);
    expect(find.text(inputText), findsOneWidget);

    // Tap on the back arrow in the AppBar
    await tester.tap(find.byType(BackButton));
    await tester.pumpAndSettle();

    // We should be back in the TypingPage and the previously inputted text
    // should be cleared out
    expect(find.byType(TypingPage), findsOneWidget);
    expect(find.byType(DisplayPage), findsNothing);
    expect(find.text(inputText), findsNothing);
  },
);
Running tests with flutter drive
It doesn’t make much sense to run your tests on Firebase Test Lab if they won’t even pass on your local machine, does it? We’ve already set up all the necessary files to be able to use the flutter drive command. Just start up an emulator/simulator or even connect a real device through a USB and then run the following:
👨💻 terminal
flutter drive --driver=test_driver/integration_test.dart --target=integration_test/app_test.dart
After running this command, you should see something similar on your emulator and also an output saying “All tests passed!” in the terminal.
Preparing to run tests from an APK file
Once you know that your newly written tests pass at least on one device, it’s good to start thinking about how you can check if the app has the same behavior across multiple devices and configurations. That’s what we’re going to use Firebase Test Lab for. Also, to automate the process of running the tests whenever a new commit is pushed to a git repository, we’re going to use Codemagic CI/CD.
In order to run the tests purely from an APK file, we need to do a little bit of a setup for the native Android project of the Flutter app. In the native Android world, there are instrumentation tests and we are basically going to hook up the multiplatform Flutter integration tests to run as if they were native instrumentation tests on Android.
Inside android/app/src create two new folders androidTest/java. Then create nested folders with names according to YOUR project’s package name. How to find your package name? Well, find the file which holds the MainActivity class. I guess it’s easier to understand on a picture:
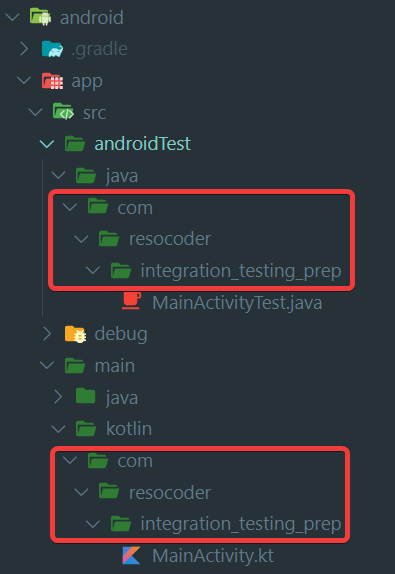
For the project on the picture above, we’d now have androidTest/java/com/resocoder/integration_testing_prep. This is where we put the MainActivityTest.java file. Notice the comments telling you to use your own package name.
🛠 MainActivityTest.java
// Change this line to YOUR package name:
package com.resocoder.integration_testing_prep;

import androidx.test.rule.ActivityTestRule;
import dev.flutter.plugins.integration_test.FlutterTestRunner;
import org.junit.Rule;
import org.junit.runner.RunWith;
// Import MainActivity from YOUR package
import com.resocoder.integration_testing_prep.MainActivity;

@RunWith(FlutterTestRunner.class)
public class MainActivityTest {
  @Rule
  public ActivityTestRule<MainActivity> rule = new ActivityTestRule<>(MainActivity.class, true, false);
}
Lastly, we need to add native Android dependencies into android/app/build.gradle file.
🛠 build.gradle
android {

  defaultConfig {

    testInstrumentationRunner "androidx.test.runner.AndroidJUnitRunner"
  }
}

dependencies {
    testImplementation 'junit:junit:4.12'

    androidTestImplementation 'androidx.test:runner:1.2.0'
    androidTestImplementation 'androidx.test.espresso:espresso-core:3.2.0'
}
With all of this set up, we’re now able to build an APK that’s going to run our integration tests. It doesn’t make much sense to build it though before we set up Firebase Test Lab and Codemagic to automatize the building & testing process.
Setting up Firebase Test Lab
To run tests on the Firebase Test Lab, you need a Firebase project. Don’t worry though, you don’t need to use any Firebase dependencies in you Flutter app. Test Lab doesn’t care if you use the other Firebase services or not.
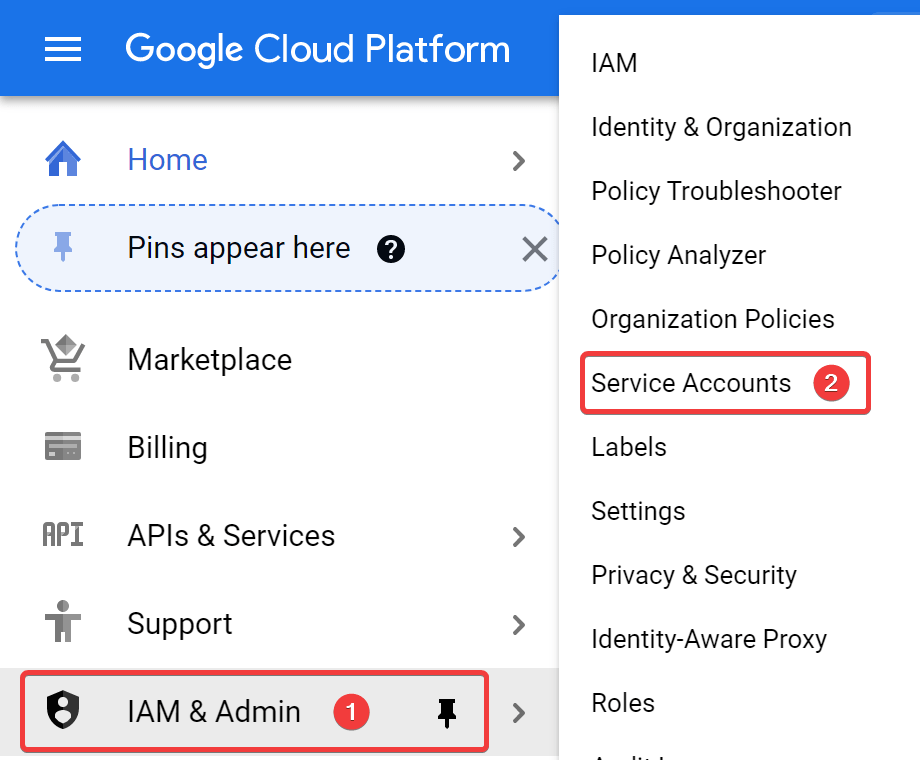
You can either use an existing Firebase project or create a new one on the Firebase Console. Again, you don’t need to do any app-specific setup, so if you’re creating a new project, feel free to skip through all the steps talking about adding files and dependencies into your Flutter project. We’re working with Google Firebase projects so there’s obviously a need for authentication. Because we want to use Firebase Test Lab without any interaction on our part (such as clicking through a Google account selection screen), we have to use a service account. Go to Google Cloud Console and sign in using the same Google account that you use for Firebase and select your Firebase project. Then open the Service Accounts page from the menu.
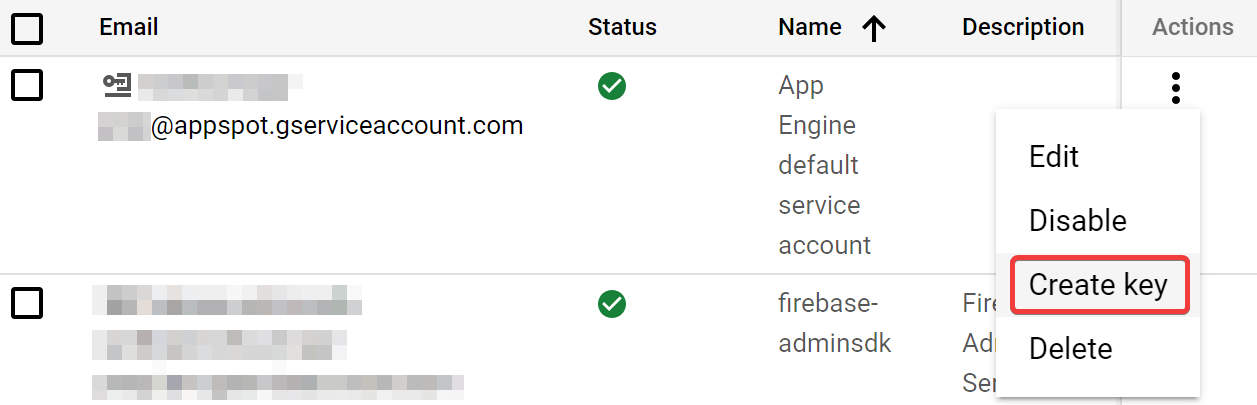
You should have a few service accounts associated with your project. The way that we can authenticate with a service account is by providing its key. Select the first available service account (or create a new one) and hit “Create key”.
In the popup which appears next, select JSON as the format of the key. And there you go! You now have a service account key that can be used for authenticating with the Google Cloud services which includes the Firebase Test Lab. Save the file somewhere securely and don’t check it into source control! You’re going to need this file in just a bit.
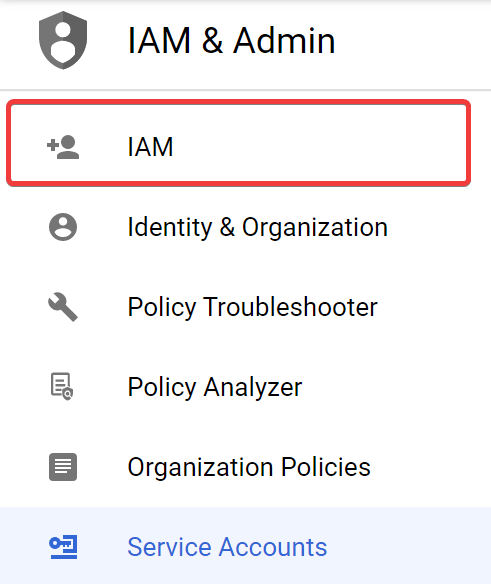
Make sure that the service account has an editor role. Select “IAM” from the sidebar.
Find the service account for which you’ve created the key. If it says “Editor” next to it, you’re set. If not, tap on the pen icon to edit the permissions for that service account…

and add an editor role.
There’s one more step we need to do on the Google Cloud Console and that is to enable the Cloud Tool Results API. Either search for this API in the Console’s API library or click on this link to enable it in your project.
Automatically running the tests with Codemagic
Codemagic is a continuous integration and delivery for mobile apps designed with Flutter in mind. Among other things, it’s perfect for kicking off integration tests on the Firebase Test Lab whenever there’s a new commit or pull request in a git repository. If you’re following along with this tutorial, now’s the time to push your code into a remote repository. Codemagic works with any git repository you throw at it but it’s especially well integrated with GitHub, Bitbucket and GitLab. I’m going to use GitHub in this tutorial. Log in or sign up to Codemagic using your GitHub account (the OAuth option). You should immediately see all the repositories you have access to with your GitHub account. If you have any issues, consult the official documentation. Search for and click “Set up build” for the remote repository you’ve just created.

Adding the Google service account key file
Remember that JSON file that you’ve saved? We’re now going to need it to authenticate from the build machine on Codemagic. While you cannot upload files directly, you can always convert them to a base64 string and set them up as environment variables. There are many ways to do this but these three should work for 99.9% of you. While GitBash on Windows outputs the string directly into the command line, MacOS and Linux outputs the string into a file.
👨💻 terminal
# Windows (GitBash)
base64 your-key-file.json
# MacOS
openssl base64 -in your-key-file.json -out outfile.txt
# Linux
base64 --encode your-key-file.json outfile.txt
Once you have the string in base64, paste it into an environment variable on Codemagic under the name GCLOUD_KEY_FILE. Make sure to tick on the “Secure” option. Codemagic will automatically encrypt it and then decrypt it when we try to read it from a script.
Script to run the tests on Firebase Test Lab
Codemagic allows you to run scripts in many different parts of the build process. The best place for starting the execution of tests on Firebase Test Lab is the post-build script. That’s for a very simple reason - the documentation of the integration_test package says that we should build the app with the usual flutter build apk command first and only then build the “testing APK”.
Let’s therefore skip the many other configuration options on Codemagic for now and open the post-build script by clicking on the “+” button as you can see below.
post-build script
# CM_BUILD_DIR is a predefined environment variable pointing to the root of the Flutter project
cd $CM_BUILD_DIR

# Go to the android folder which contains the "gradlew" script used
# for building Android apps from the terminal
pushd android
# Build an Android test APK (that's why we've created the MainActivityTest.java)
./gradlew app:assembleAndroidTest
# Build a debug APK, passing in the integration test file
./gradlew app:assembleDebug -Ptarget="$CM_BUILD_DIR/integration_test/app_test.dart"
# Go back to the root of the project
popd

# Write the environment variable in base64 into a JSON file
echo $GCLOUD_KEY_FILE | base64 --decode > ./gcloud_key_file.json

# Using the gcloud CLI (preinstalled on Codemagic) authenticate using the service account key
gcloud auth activate-service-account --key-file=gcloud_key_file.json

# Select YOUR Firebase project through which want to run the tests
gcloud --quiet config set project your-project-id

# Run the Flutter integration tests as if they were regular Android instrumentation tests
gcloud firebase test android run \
  --type instrumentation \
  --app build/app/outputs/apk/debug/app-debug.apk \
  --test build/app/outputs/apk/androidTest/debug/app-debug-androidTest.apk \
  --timeout 2m
The last command for running the tests can be expanded to specify on which devices, orientations and locales they should be run. Also, to run an unlimited amount of tests on many different device configurations, you need to be on the Blaze plan (paid).
Starting the build & test process
Codemagic can be configured to automatically start the build process after a commit or a PR using build triggers. To keep things focused, we’re going to manually start a build by hitting the button in the upper right corner. After it starts, just kick back, go drink some coffee ☕ and after a few minutes, you should see the test results in the Firebase Console. In addition to seeing which test cases passed or failed, you can also see a video recording of the tests running.
And that’s it! You’ve learned how to write tests using the new integration_test package, how to execute them easily locally, how to set up the Flutter project for building testing APKs and lastly, how to execute the tests automatically and on many different devices using the power of Firebase Test Lab and Codemagic.
Matt Rešetár is an app developer with a knack for teaching others. Working as a Flutter freelancer and most importantly developer educator, he doesn’t have a lot of free time 😅 Yet he still manages to squeeze in tough workouts 💪
dev_dependencies: flutter_test: sdk: flutter integration_test: ^1.0.1


