


Written by Souvik Biswas and updated in August 2021
The Codemagic YAML file makes it a lot easier to manage and configure your CI/CD pipelines on Codemagic. You can use this single file to manage all of your workflows specific to a project, and just commit the file to your version control repository. It gets automatically detected by Codemagic during the build.
In this cheat sheet, you will get to learn about some of the best features of codemagic.yaml, as well as get yourself familiarized with it.
Building with YAML
You can get the basic YAML template for any project directly from the Codemagic project settings page.
For Flutter projects, you can download the YAML file from the Configuration as code section by clicking on Download configuration.
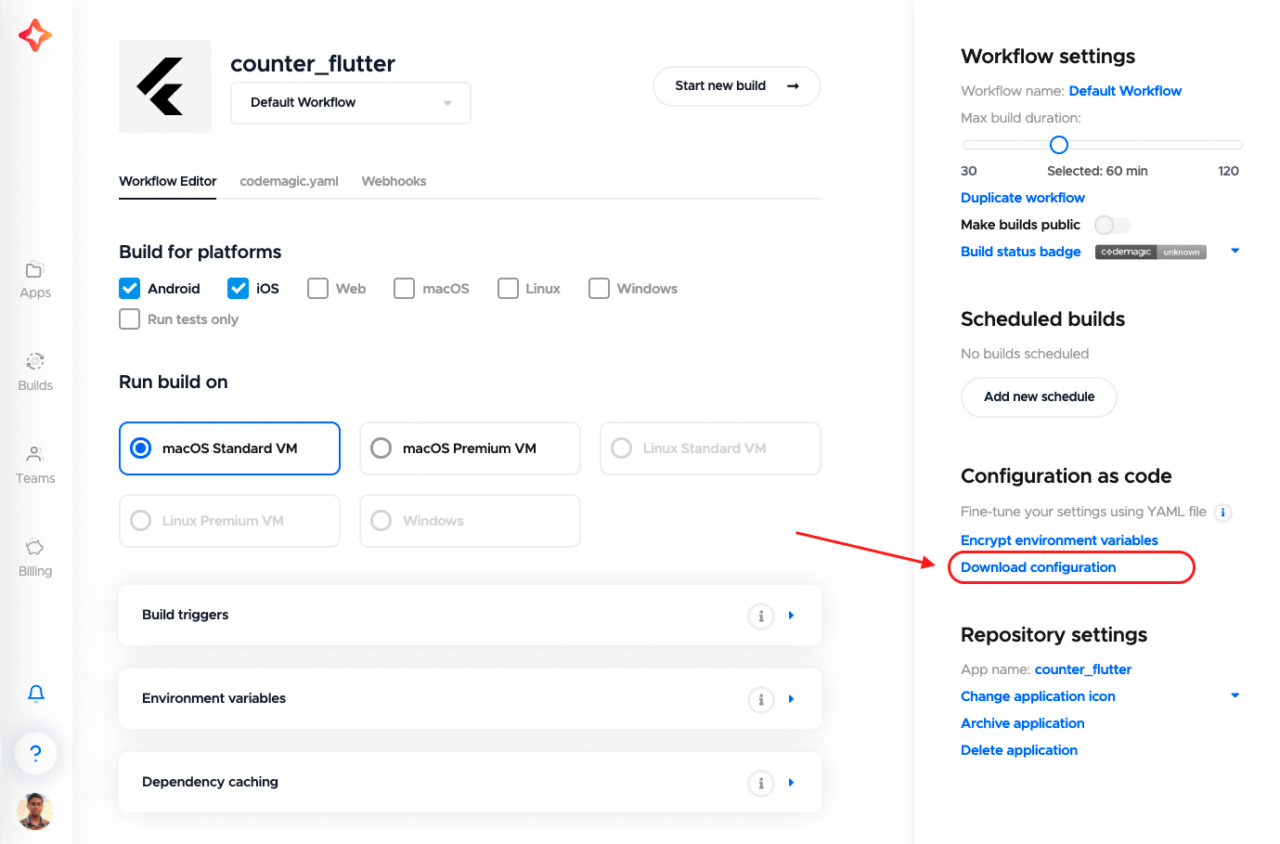
Place the codemagic.yaml file in the root project directory of the repository.
For any other project, you have to create the codemagic.yaml file in the root project directory of the repository.
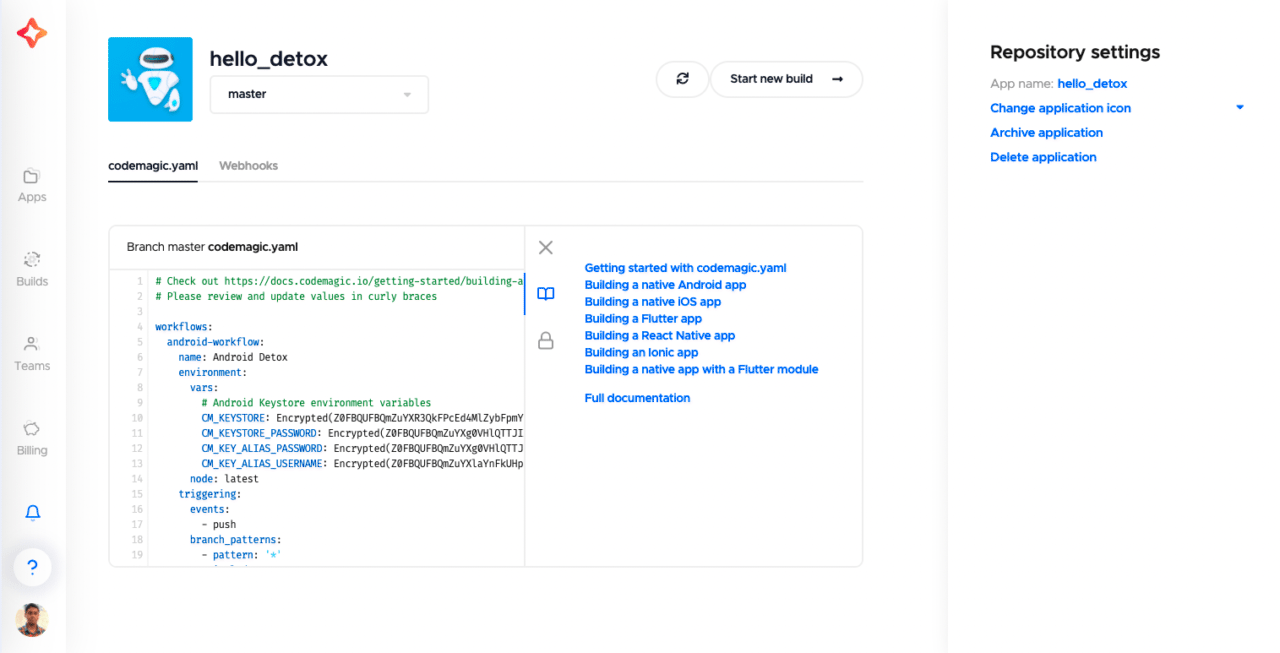
You can view this YAML file directly on Codemagic as well (for Flutter projects you have to go to the codemagic.yaml tab). Links to the documentation of each type of project is provided under the Documentation tab.
You can see detailed syntax validation errors of the codemagic.yaml file and edit the configuration on web. This syntax validation also works locally, to know more click here.
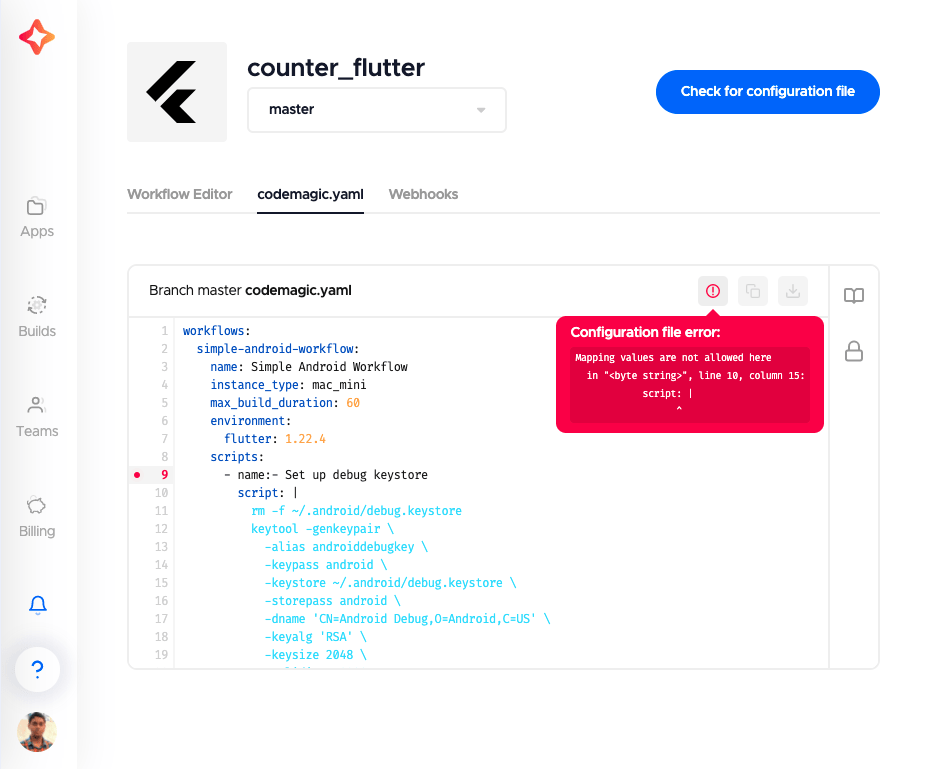
NOTE: You’ll still need to copy, paste, and commit the updated yaml file to your version control system in order to build with it.
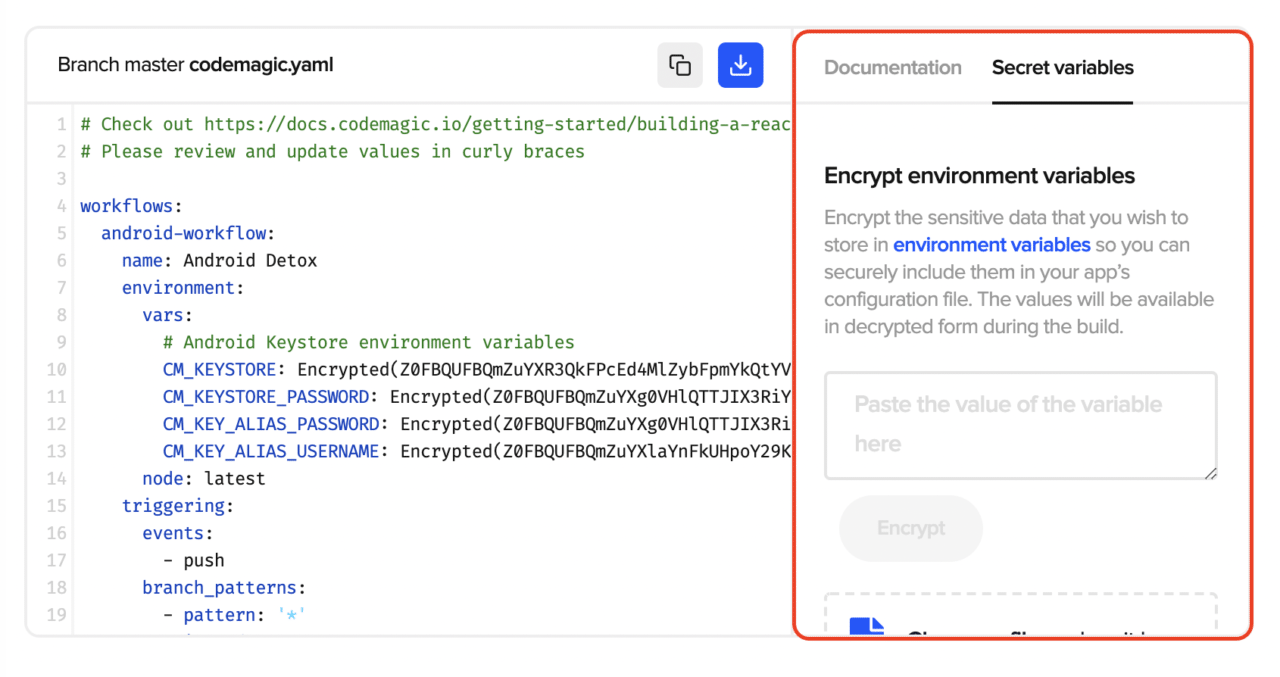
If you want to encrypt any environment variable to use it securely in your YAML file, go to the Secret variables tab.
You can run a build manually using codemagic.yaml by going to the project settings from the Codemagic dashboard and clicking on Start new build.
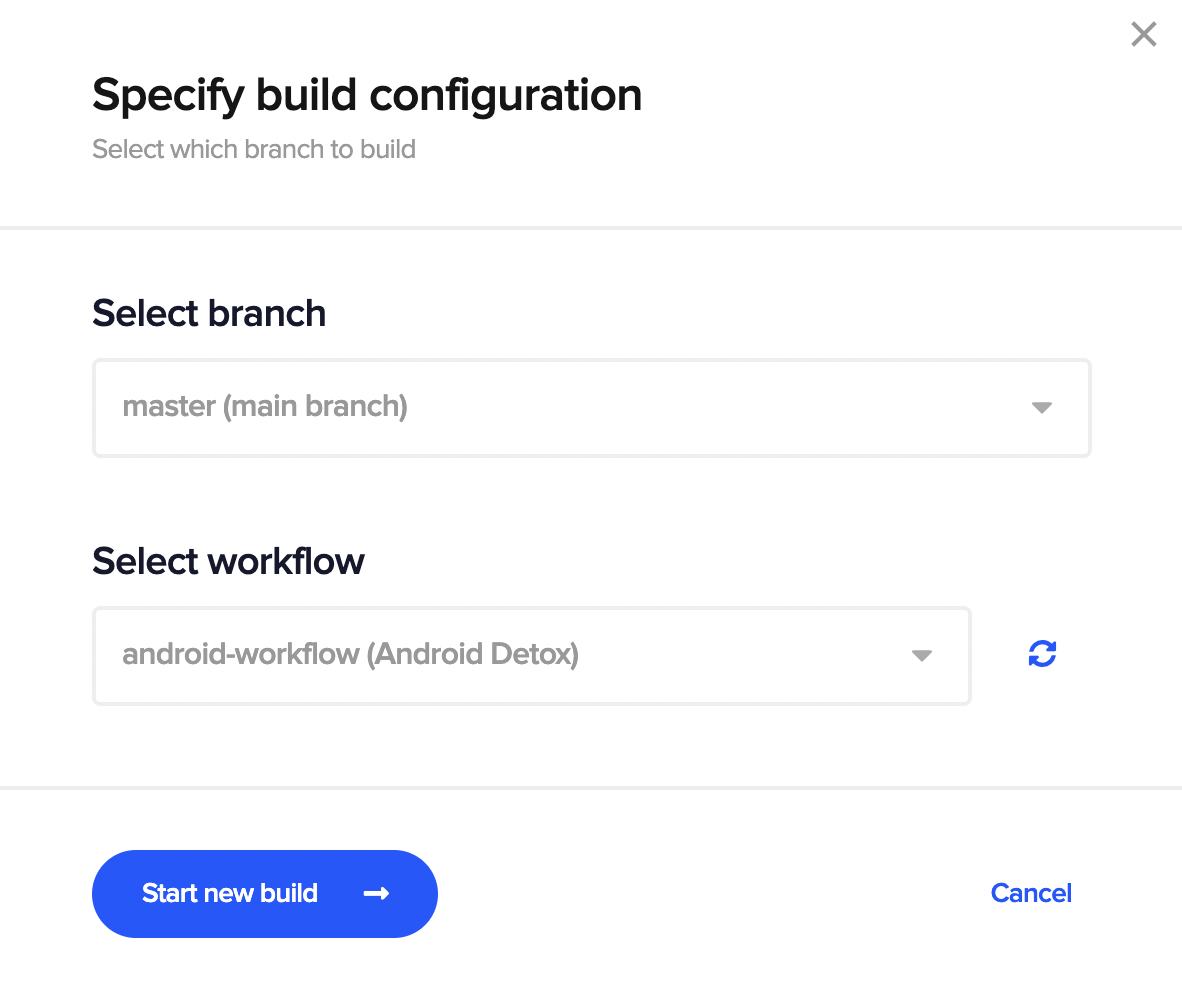
In the Specify build configuration dialog box, choose your workflow. Finally, click on the Start new build button to start the build.
For Flutter projects, the default selection is to build using configurations defined from the Workflow Editor. For any other project, the YAML file is the only option.
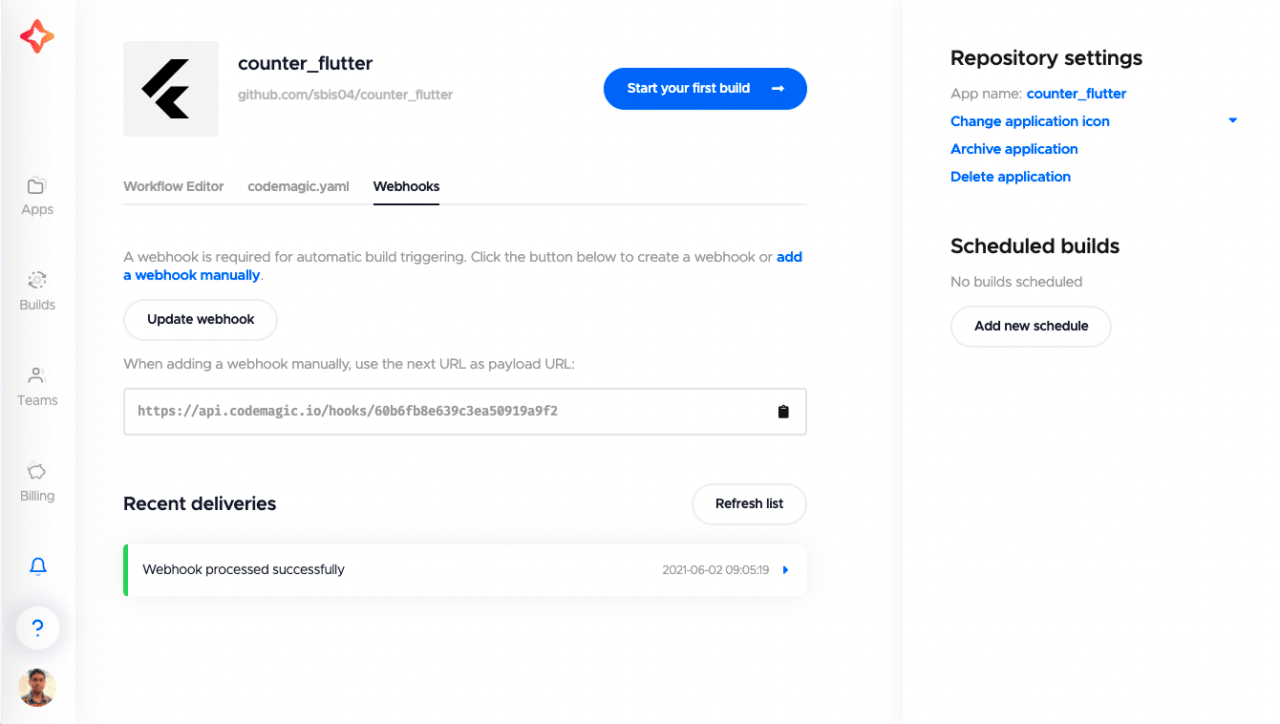
Apart from this, you can also set up triggers to start your build automatically when a particular event occurs. For using automatic build triggering you have to set up Webhooks.
You can get the payload URL required for adding a webhook manually on the Webhooks tab inside the application settings. Also, the list of all triggered builds will be available on this page under the Recent deliveries section.
Getting started
The Codemagic YAML file follows the traditional YAML syntax. Before going into the depths of YAML, here are a few tips on structuring your configuration file in a better way:
Section names
You can divide the script into different meaningful sections. This will make your configuration file more readable and will also make your build logs better (as these section names will be shown there as steps).
scripts:
  - name: Build for iOS         # Name of the section
    script: flutter build ios   # The script(s) to be run in that section
Reusing sections
If you want to reuse a particular section of your script, you can avoid repetitions by using anchors. This is also convenient when you need to make changes to the code, as you only have to edit it in one place.
Define the section to be reused by adding & in front of it.
scripts:
  - &increment_build_number       # Defined section
    name: Increment build number
    script: agvtool new-version -all $(($PROJECT_BUILD_NUMBER +1))
Reuse the section elsewhere by adding a * in front of it.
scripts:
  - script1
  - *increment_build_number       # Reused section
  - script3
Codemagic YAML at a glance
Let’s take a look at the structure of the codemagic.yaml file. Each section of this YAML file is described in more detail below.
# An example of the YAML file (template)

workflows:
  my-workflow:
    name: My workflow name
    instance_type: mac_mini
    max_build_duration: 60
    environment:
      vars:
        PUBLIC_ENV_VAR: "value here"
      flutter: stable
      xcode: latest
    cache:
      cache_paths:
        - ~/.pub-cache
    triggering:
      events:
        - push
      branch_patterns:
        - pattern: '*'
          include: true
          source: true
      cancel_previous_builds: false
    scripts:
      - ...
    artifacts:
      - build/**/outputs/**/*.aab
    publishing:
      email:
        recipients:
          - name@example.com
Workflows
Under the workflows section, you can define multiple build pipelines with different configurations for the project. You may have separate workflows for different platforms or for developing, testing and publishing the app.
Multiple workflows can be defined like this:
workflows:
  default-workflow:         # first workflow
    name: Default Workflow
    scripts:
  android-workflow:         # second workflow
    name: Android Workflow
    scripts:
  ios-workflow:             # third workflow
    name: iOS Workflow
    scripts:
The main properties of each workflow are as follows:
workflows:
  my-workflow:                # workflow ID
    name: My workflow name    # workflow name displayed in UI
    instance_type: mac_mini   # machine type to use (currently supported: `mac_mini`, `mac_pro`, `linux`, `linux_x2`)
    max_build_duration: 60    # build duration in minutes (min 1, max 120)
    environment:
    cache:
    triggering:
    scripts:
    artifacts:
    publishing:
Some more information regarding the properties that can be defined under each workflow ID is given below.
Environment
Under the environment section, you can specify some public or encrypted environment variables (like credentials and API keys) that may be required during the build. You can also specify the version of the pre-installed frameworks and tools to be used during the Codemagic build here.
environment:
  vars:             # Define your environment variables here
    PUBLIC_ENV_VAR: "value here"
    SECRET_ENV_VAR: Encrypted(...)
  flutter: stable   # Define the channel name or version (e.g., v1.13.4)
  xcode: latest     # Define latest, edge or version (e.g., 11.2)
  cocoapods: 1.9.1  # Define default or version
  node: 12.14.0     # Define default, latest, current, lts, carbon (or another stream), nightly or version
  npm: 6.13.7       # Define default, latest, next, lts or version
  ndk: r21d         # Define default or revision (e.g., r19c)
  java: 1.8         # Define default, or platform version (e.g. 11). The default platform version is 1.8
Cache
Here, you can define the paths to be cached and stored on Codemagic. This helps in speeding up the build in some cases.
cache:
  cache_paths:
    - $FLUTTER_ROOT/.pub-cache          # Dart cache
    - $HOME/.gradle/caches              # Gradle cache
    - $HOME/Library/Caches/CocoaPods    # CocoaPods cache
Triggering
You can define events for automatic build triggering and watched branches under the triggering section. You can specify the name of a particular branch or use wildcard symbols to match branches that have the same pattern using branch_patterns, or you can also match Git tag label patterns using tag_patterns.
You can set cancel_previous_builds to true in order to automatically cancel all ongoing and queued builds triggered by webhooks on push or pull request commits when a more recent build has been triggered for the same branch.
triggering:
  events:                       # List the events that trigger builds
    - push
    - pull_request
    - tag
  branch_patterns:              # Include or exclude watched branches
    - pattern: '*'
      include: true
      source: true
    - pattern: excluded-target
      include: false
      source: false
    - pattern: included-source
      include: true
      source: true
  tag_patterns:                 # Include or exclude watched tag labels
    - pattern: '*'
      include: true
    - pattern: exluded-tag
      include: false
    - pattern: included-tag
      include: true
  cancel_previous_builds: false  # Set to `true` to automatically cancel outdated webhook builds
Scripts
This is the most important section of the configuration file. This is where you can specify the commands to test, build and code sign your project. Here, you can also specify shell (sh) scripts directly, run scripts in other languages by defining the language with a shebang line or launch a script present in your repository.
You can set ignore_failure to true to let the workflow continue to run even if the script fails.
scripts:
  - echo "single line script"
  - name: Flutter test
    script: flutter test
    ignore_failure: true
  - |
    #!/usr/bin/env python3

    print('Multiline Python script')
  - name: Build for iOS
    script: flutter build ios
Some of the things you should keep in mind while working with the yaml script are:
Using
cdbetween scripts does not work because the shell script runs in the subshell and once the script is over it returns to the parent shell, that is the directory where all the scripts are running in general.An example of this is as follows:
scripts:
  - name: script_1
    script: cd ./second/dir && pwd
  - name: script_2
    script: pwd
Output of this on build machine:
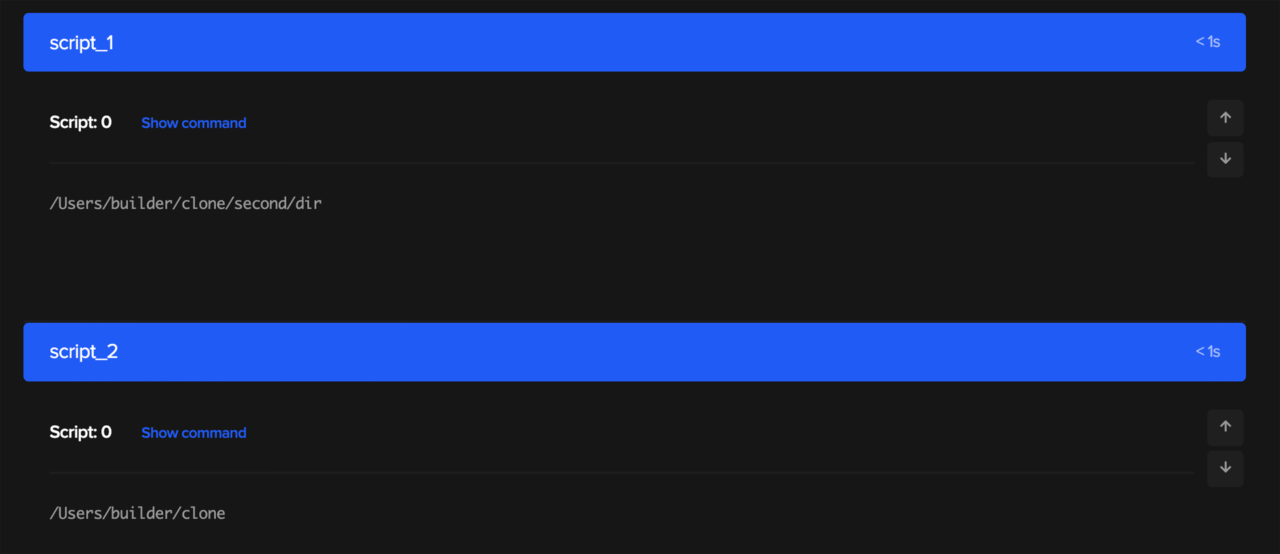
So, it returns back to the parent directory while running
script_2.Also for the exact same reason, environment variables cannot be used between scripts as each one of them is independent from another. That means, if you define an environment variable in one script, and try to access it from another, it won’t work. So, you should always define them under the environment variable section of YAML to access them globally.
Later in this cheat sheet, we will take a deeper look at some of the most useful commands that you can define and use in your build pipeline.
Artifacts
You can define the path to the files that you want to retrieve from the build machine for publishing or to have it available for download on the build page. All paths are relative to the clone directory, but absolute paths are supported as well.
artifacts:
  - build/**/outputs/**/*.apk                   # relative path for a project in root directory
  - subfolder_name/build/**/outputs/**/*.apk    # relative path for a project in subfolder
  - build/**/outputs/**/*.aab
  - build/**/outputs/**/mapping.txt
  - build/ios/ipa/*.ipa
  - /tmp/xcodebuild_logs/*.log
  - flutter_drive.log
Publishing
You can use this section to set up publishing to external services. Codemagic provides a number of integrations (e.g., email, Slack, Google Play, App Store Connect, GitHub releases) for publishing, but you can also use custom scripts to publish elsewhere.
publishing:
  email:                # For publishing to an email
    recipients:
      - name@example.com
Conditional build triggers
You can skip triggering build on particular commits by checking for the changes in specific file.
Skip building a commit
If you do not want Codemagic to trigger build on a particular commit, include [skip ci] or [ci skip] in your commit message.
Watch for changes in files
In order to avoid unnecessary builds on Codemagic if there wasn’t any changes to the functional component of the project (for example, if the README.md file is updated), you can watch files for changes and decide accordingly.
To watch files for changes, you can specify changeset by using the includes and excludes keys.
workflows:
  build-app:
    name: Build App
    triggering:
      events:
        - push
    when:
      changeset:
        includes:
          - '.'
        excludes:
          - '**/*.md'
In the above example, the build won’t be triggered if there were changes only to Markdown files (.md).
Both keys
includesandexcludesinchangesetare optional. If theincludeskey is not specified, its value would default to'.'. Theexcludeskey by default, if not specified, doesn’t exclude any file.
Conditional build steps
You can apply similar conditions to specific build steps as well. An example is as follows:
workflows:
  build-android:
    name: Build All
    scripts:
      - name: Build Android
        script: ./gradlew assembleDebug
        when:
          changeset:
            includes:
              - 'android/'
            excludes:
              - '**/*.md'
If there are no changes to the android folder in the latest commit then the Build Android step is skipped.
Building apps
Codemagic not only supports building Flutter apps, but Android, iOS, React Native and Ionic as well. We will take a look at some of the YAML commands you should be familiar with in order to build an app using the framework of your choice.
Android
For building an Android app, you can use the following YAML command:
- name: Build Android debug     # for building in debug mode
  script: ./gradlew assembleDebug

- name: Build Android release   # for building in release mode
  script: ./gradlew assembleRelease
In order to build in release mode, you need to have the setup for code signing.
More information regarding Android code signing can be found here. An example Android workflow template is available here.
You can retrieve the build artifact from this path:
artifacts:
  - app/build/outputs/**/**/*.apk
iOS
For building an iOS app, you can use the following YAML command:
- name: Build iOS unsigned      # this will generate .app file
  script: |
    xcodebuild build -project "MyXcodeProject.xcodeproj" \
    -scheme "MyScheme" \
    CODE_SIGN_INDENTITY="" \
    CODE_SIGNING_REQUIRED=NO \
    CODE_SIGNING_ALLOWED=NO

- name: Build iOS signed      # this will generate .ipa file
  script: xcode-project build-ipa --project "MyXcodeProject.xcodeproj" --scheme "MyScheme"
Refer to this documentation for code signing your iOS app (required for generating the
.ipafile). An example iOS workflow template is available here. To learn more about the concept of code signing, read this blog post.
You can retrieve the build artifact from this path:
artifacts:
  - $HOME/Library/Developer/Xcode/DerivedData/**/Build/**/*.app # for unsigned build
  - build/ios/ipa/*.ipa # for signed build
  - /tmp/xcodebuild_logs/*.log # Xcode build log
  - $HOME/Library/Developer/Xcode/DerivedData/**/Build/**/*.dSYM # Xcode Debugging Symbols, if dSYM is enabled
Flutter
The YAML commands for building a Flutter app for each platform are given below.
- name: Set up local properties # required for Android build
  script: echo "flutter.sdk=$HOME/programs/flutter" > "$CM_BUILD_DIR/android/local.properties"
- name: Build Android debug     # for building in debug mode
  script: flutter build apk --debug
- name: Build Android release   # for building in release mode
  script: flutter build apk --release
- name: Build iOS unsigned   # for building iOS (.app)
  script: flutter build ios --debug --no-codesign
- name: Build iOS signed   # for building iOS (.ipa)
  script: |
    xcode-project use-profiles
    xcode-project build-ipa --workspace ios/Runner.xcworkspace --scheme Runner
- name: Build web           # for building Flutter web app
  script: |
    flutter config --enable-web
    flutter build web --release
    cd build/web
    7z a -r ../web.zip ./*
Native app with Flutter module
You can also build native apps with Flutter modules on Codemagic. The following YAML commands assume that the Flutter module directory (referred to as my_flutter_module in templates) is on the same level as the host app directory (referred to as my_host_app).
Using a Flutter module as a library
This will build the Flutter module from the source each time the host app builds.
Android app:
- name: Set up local properties
  script: echo "sdk.dir=$ANDROID_SDK_ROOT" > "$CM_BUILD_DIR/my_host_app/local.properties"
- name: Build Flutter module & host application
  script: |
    cd my_flutter_module && flutter pub get
    cd my_host_app && ./gradlew assembleDebug
iOS app:
- name: Build Flutter module from the source
  script: |
    cd my_flutter_module
    flutter pub get
    flutter build ios --release --no-codesign
    cd .ios
    pod install
- name: Build host application
  script: |
    cd my_host_app
    pod install
    xcodebuild build -project "MyXcodeProject.xcodeproj" -scheme "MyXcodeScheme" CODE_SIGN_IDENTITY="" CODE_SIGNING_REQUIRED=NO CODE_SIGNING_ALLOWED=NO
Using a prebuilt Flutter module
This lets you avoid building the Flutter module each time the host app is built if there are no changes to the module. You may speed up your overall building time by pre-compiling your Flutter module once, committing it to the repository and reusing it afterward.
Android app:
- name: Set up local properties
  script: echo "sdk.dir=$ANDROID_SDK_ROOT" > "$CM_BUILD_DIR/my_host_app/local.properties"
- name: Pre-compile the Flutter module
  script: |
    cd my_flutter_module
    flutter pub get
    flutter build aar
- name: Build host application
  script: |
    cd my_host_app
    ./gradlew assembleDebug
iOS app:
- name: Pre-compile the Flutter module
  script: |
    cd my_flutter_module
    flutter packages get
    flutter build ios-framework --output=$CM_BUILD_DIR/my_host_app/Flutter
- name: Build host application
  script: |
    cd my_host_app
    pod install
    xcodebuild build -project "MyXcodeProject.xcodeproj" -scheme "MyXcodeScheme" CODE_SIGN_IDENTITY="" CODE_SIGNING_REQUIRED=NO CODE_SIGNING_ALLOWED=NO
React Native
You can use the following YAML commands for building a React Native app on Android and iOS.
- name: Set up local properties # required for Android build
  script: echo "sdk.dir=$ANDROID_SDK_ROOT" > "$CM_BUILD_DIR/android/local.properties"

- name: Build Android debug     # for building in debug mode
  script: |
    cd android
    ./gradlew assembleDebug

- name: Build iOS signed        # for building iOS (.ipa)
  script: |
    xcode-project use-profiles
    xcode-project build-ipa --workspace "ios/MyReact.xcworkspace" --scheme "MyReact"
You can find the full workflow templates for both Android and iOS here.
Ionic
The YAML templates for both Ionic Capacitor and Ionic Cordova are given below.
Ionic Capacitor
Android app:
- name: Install npm dependencies for Ionic Capacitor project
  script: npm install
- name: Set Android SDK location
  script: echo "sdk.dir=$ANDROID_SDK_ROOT" > "$CM_BUILD_DIR/android/local.properties"
- name: Update dependencies and copy web assets to native project
  script: npx cap sync
- name: Build Android debug
  script: |
    cd android
    ./gradlew assembleDebug
iOS app:
- name: Install npm dependencies for Ionic project
  script: npm install
- name: CocoaPods installation
  script: cd ios/App && pod install
- name: Update dependencies and copy web assets to native project
  script: npx cap sync
- name: Set up code signing settings on Xcode project
  script: xcode-project use-profiles
- name: Build ipa for distribution
  script: xcode-project build-ipa --workspace "$XCODE_WORKSPACE" --scheme "$XCODE_SCHEME"
Ionic Cordova
Android app:
- name: Install npm dependencies and update to Cordova version 9
  script: |
    npm ci
    cvm install 9.0.0
    cvm use 9.0.0
- name: Set up Cordova Android platform
  script: |
    ionic cordova platform remove android --nosave
    ionic cordova platform add android --confirm --no-interactive --noresources
- name: Build Android Cordova App
  script: ionic cordova build android --release --no-interactive --prod --device
iOS app:
- name: Install npm dependencies and update to Cordova version 9
  script: |
    npm ci
    cvm install 9.0.0
    cvm use 9.0.0
- name: Set up Cordova iOS platform
  script: |
    ionic cordova platform remove ios --nosave
    ionic cordova platform add ios --confirm --no-interactive --noresources
- name: CocoaPods installation
  script: cd platforms/ios && pod install
- name: Build ipa for distribution
  script: |
    xcode-project use-profiles
    xcode-project build-ipa --workspace "platforms/ios/YOUR_APP.xcworkspace" --scheme "$YOUR_SCHEME"
You can take a look at the full workflow for Ionic Capacitor and Cordova here.
Testing
Test scripts are usually added before the build commands in the scripts section of the YAML file. You can display test results visually on the build overview page of Codemagic by including the test_report field in YAML.
Android tests
You can run Android unit tests using the following script:
- name: Android unit tests
  script: ./gradlew test
  test_report: app/build/test-results/**/*.xml
For running UI tests (also known as instrumented tests):
- name: Launch emulator
  script: |
    cd $ANDROID_HOME/tools
    emulator -avd emulator &
    adb wait-for-device
- name: Android instrumented tests
  script: |
    set -e
    ./gradlew connectedAndroidTest
    adb logcat -d > emulator.log
  test_report: app/build/outputs/androidTest-results/connected/*.xml
iOS tests
- name: iOS test
    script: |
    xcode-project run-tests \
        --workspace MyAwesomeApp.xcworkspace \
        --scheme MyAwesomeApp \
        --device "iPhone 11"
    test_report: build/ios/test/*.xml
Flutter tests
You can use the following command for running Flutter unit tests:
- name: Flutter unit tests
  script: |
    mkdir -p test-results
    flutter test --machine > test-results/flutter.json
  test_report: test-results/flutter.json
For running Flutter integration tests on iOS, use:
- name: Flutter integration tests (iOS)
  script: |
    flutter emulators --launch apple_ios_simulator
    flutter drive \
    --driver=test_driver/integration_driver.dart \
    --target=integration_test/app_test.dart \
    -d iPhone
For running Flutter integration tests on Android, use:
- name: Flutter integration tests (Android)
  script: |
    flutter emulators --launch emulator
    adb wait-for-device
    flutter drive \
    --driver=test_driver/integration_driver.dart \
    --target=integration_test/app_test.dart \
    -d emulator-5554
Running Flutter integration tests on web (Chrome or Safari), use:
# Running on Chrome
- name: Flutter web integration tests (Chrome)
  script: |
    chromedriver --port=4444 &
    flutter config --enable-web
    flutter drive \
    --driver=test_driver/integration_driver.dart \
    --target=integration_test/app_test.dart \
    -d web-server --release --browser-name chrome

# Running on Safari
- name: Flutter web integration tests (Safari)
  script: |
    sudo safaridriver --enable
    safaridriver --port 4444 &
    flutter config --enable-web
    flutter drive \
    --driver=test_driver/integration_driver.dart \
    --target=integration_test/app_test.dart \
    -d web-server --release --browser-name safari
React Native tests
For running React Native tests using Jest, use the following script (assuming that Jest tests are defined in the package.json file):
- name: React Native tests
  script: npm test
Detox tests
You can run Detox tests of your React Native app using the following YAML script.
This script assumes that you have already added Detox configurations to the
.detoxrc.jsonfile.
Android
- name: Install Detox dependencies
  script: brew tap wix/brew
- name: Install detox-cli
  script: |
    npm install -g detox-cli
    cd $CM_BUILD_DIR && npm install detox --save-dev
- name: Build with Detox # add the code signing steps before performing a release build
  script: detox build -c android.emu.release
- name: Test with Detox # the name of the config is "android.emu.release"
  script: detox test -c android.emu.release
iOS
- name: Install Detox dependencies
  script: |
    brew tap wix/brew
    brew install applesimutils
- name: Install detox-cli
  script: npm install -g detox-cli
- name: Install CocoaPods dependencies
  script: cd ios && pod install
- name: Build with Detox # add the code signing steps before performing a release build
  script: |
    #!/bin/sh
    set -e
    set -x
    detox build -c ios.sim.release -l verbose
- name: Test with Detox # the name of the config is "ios.sim.release"
  script: detox test -c ios.sim.release
Code signing
You will require code signing in order to distribute your apps to various services, like Google Play Store, App Store Connect, etc. The YAML scripts for performing code signing are given below.
Signing Android apps
Configure your Gradle for code signing.
Add credentials to the
environmentsection:environment: vars: CM_KEYSTORE: Encrypted(...) CM_KEYSTORE_PASSWORD: Encrypted(...) CM_KEY_ALIAS: Encrypted(...) CM_KEY_PASSWORD: Encrypted(...)Set up the
key.propertiesfile in thescriptssection:- name: Set up key.properties script: | echo $CM_KEYSTORE | base64 --decode > /tmp/keystore.keystore cat >> "$CM_BUILD_DIR/project_directory/android/key.properties" <<EOF storePassword=$CM_KEYSTORE_PASSWORD keyPassword=$CM_KEY_PASSWORD keyAlias=$CM_KEY_ALIAS storeFile=/tmp/keystore.keystore EOFNow, you can perform the release build of the Android app.
Signing iOS apps
You can choose either automatic code signing or manual code signing of your iOS app.
Automatic code signing
Add the following environment variables:
environment:
  vars:
    APP_STORE_CONNECT_ISSUER_ID: Encrypted(...)
    APP_STORE_CONNECT_KEY_IDENTIFIER: Encrypted(...)
    APP_STORE_CONNECT_PRIVATE_KEY: Encrypted(...)
    CERTIFICATE_PRIVATE_KEY: Encrypted(...)
Use the following in the
scriptssection before the build commands:- name: Set up keychain script: keychain initialize - name: Fetch signing files script: | app-store-connect fetch-signing-files "io.codemagic.app" \ # Fetch signing files for specified bundle ID (use "$(xcode-project detect-bundle-id)" if not specified) --type IOS_APP_DEVELOPMENT \ # Specify provisioning profile type --create # Allow creating resources if existing are not found. - name: Set up signing certificate script: keychain add-certificates - name: Set up code signing settings on Xcode project script: xcode-project use-profiles
Manual code signing
Add the following environment variables:
environment:
  vars:
    CM_CERTIFICATE: Encrypted(...)
    CM_CERTIFICATE_PASSWORD: Encrypted(...)
    CM_PROVISIONING_PROFILE: Encrypted(...)
Use the following in the
scriptssection before the build commands:- name: Set up keychain script: keychain initialize - name: Set up Provisioning profiles script: | PROFILES_HOME="$HOME/Library/MobileDevice/Provisioning Profiles" mkdir -p "$PROFILES_HOME" PROFILE_PATH="$(mktemp "$PROFILES_HOME"/$(uuidgen).mobileprovision)" echo ${CM_PROVISIONING_PROFILE} | base64 --decode > $PROFILE_PATH echo "Saved provisioning profile $PROFILE_PATH" - name: Set up signing certificate script: | echo $CM_CERTIFICATE | base64 --decode > /tmp/certificate.p12 keychain add-certificates --certificate /tmp/certificate.p12 --certificate-password $CM_CERTIFICATE_PASSWORD keychain add-certificates --certificate /tmp/certificate.p12 - name: Set up code signing settings on Xcode project script: xcode-project use-profiles
Configuring Firebase
For building projects integrated with Firebase you will need to provide its configuration file, for Android projects it is google-services.json file and for iOS projects it is GoogleService-Info.plist file (if building a cross-platform project you will be having both of them for each platform).
You shouldn’t commit these Firebase configuration files to the version control as they contain sensitive data, like the API key and information about the app. Rather you can provide them only during the build as encrypted environment variables.
Go to the Secret variables section, drag and the configuration file.
Copy the generated encrypted version of the file (present as a String).
Add a new environment variable (inside the
codemagic.yamlfile) asANDROID_FIREBASE_SECRETorIOS_FIREBASE_SECRET, and provide the encrypted String as it’s value.workflows: default-workflow: name: Default Workflow # ... environment: vars: # Firebase secrets ANDROID_FIREBASE_SECRET: Encrypted(...) IOS_FIREBASE_SECRET: Encrypted(...)Use the following YAML snippet to decrypt the environment variables and place them in the correct path.
- name: Decrypt Firebase environment vars
  script: |
    #!/bin/sh
    echo $ANDROID_FIREBASE_SECRET | base64 --decode > $CM_BUILD_DIR/android/app/google-services.json
    echo $IOS_FIREBASE_SECRET | base64 --decode > $CM_BUILD_DIR/ios/Runner/GoogleService-Info.plist
If your project has a nested structure, you have to place the configuration files at the correct path. You can use the following YAML snippet:
- name: Decrypt Firebase environment vars
  script: |
    #!/bin/sh
    PROJECT_ROOT=$CM_BUILD_DIR/project/path      # Add your project directory path here

    echo $ANDROID_FIREBASE_SECRET | base64 --decode > $PROJECT_ROOT/android/app/google-services.json
    echo $IOS_FIREBASE_SECRET | base64 --decode > $PROJECT_ROOT/ios/Runner/GoogleService-Info.plist
Now, you can successfully build your project integrated with Firebase on Codemagic.
Integrations
Codemagic provides integration with various services. We will take a look at some of the integrations and how you can access them using codemagic.yaml.
Codecov
For publishing your Flutter test coverage results to Codecov, you can follow the steps below:
Add the repository to Codecov.
In the environment variable section, add the Codecov token:
environment:
  vars:
    CODECOV_TOKEN: Encrypted(...) # add the encrypted token here
Use the following script:
- name: Coverage Test
  script: |
    #!/bin/bash
    flutter test --coverage
    bash <(curl -s https://codecov.io/bash) -t $CODECOV_TOKEN
SonarQube
You can generate and upload your build analysis result to SonarQube using Codemagic YAML.
Before uploading your build analysis results, you should have that repository already connected to SonarCloud.
Add your SonarCloud credentials to the environment variable section:
environment:
  vars:
    SONAR_TOKEN: Encrypted(...)
    SONAR_PROJECT_KEY: Encrypted(...)
    SONAR_ORG_KEY: Encrypted(...)
Use the following YAML script for uploading the results.
Android project:
- name: Generate and upload code analysis report
  script: |
    ./gradlew sonarqube \
    -Dsonar.projectKey=$SONAR_PROJECT_KEY \
    -Dsonar.organization=$SONAR_ORG_KEY \
    -Dsonar.projectVersion=1.0.0-cm \
    -Dsonar.host.url=https://sonarcloud.io \
    -Dsonar.login=$SONAR_TOKEN
iOS project:
- name: Download and install SonarQube
  script: |
    wget -O $CM_BUILD_DIR/sonar-scanner.zip https://binaries.sonarsource.com/Distribution/sonar-scanner-cli/sonar-scanner-cli-4.4.0.2170-macosx.zip
    unzip $CM_BUILD_DIR/sonar-scanner.zip
    mv sonar-scanner-* sonar-scanner
- name: Generate test coverage result
  script: |
    xcodebuild \
    -project "BMI Calculator.xcodeproj" \
    -scheme "BMI Calculator" \
    -sdk iphonesimulator \
    -destination 'platform=iOS Simulator,name=iPhone 11 Pro,OS=14.0' \
    -derivedDataPath Build/ \
    -enableCodeCoverage YES \
    clean build test CODE_SIGN_IDENTITY="" CODE_SIGNING_REQUIRED=NO
- name: Convert coverage report to SonarQube format
  script: |
    bash xccov-to-sonarqube-generic.sh Build/Logs/Test/*.xcresult/ > sonarqube-generic-coverage.xml
- name: Upload code analysis report
  script: |
    export PATH=$PATH:$CM_BUILD_DIR/sonar-scanner/bin
    sonar-scanner \
    -Dsonar.projectKey=$SONAR_PROJECT_KEY \
    -Dsonar.organization=$SONAR_ORG_KEY \
    -Dsonar.host.url=https://sonarcloud.io \
    -Dsonar.login=$SONAR_TOKEN \
    -Dsonar.projectVersion=1.0.0-cm \
    -Dsonar.sources=. \
    -Dsonar.cfamily.build-wrapper-output.bypass=true \
    -Dsonar.coverageReportPaths=sonarqube-generic-coverage.xml \
    -Dsonar.c.file.suffixes=- \
    -Dsonar.cpp.file.suffixes=- \
    -Dsonar.objc.file.suffixes=-
For iOS, you will require an additional file that can convert the coverage result generated by Xcode to a format that can be uploaded to SonarCloud. Just place a file called “xccov-to-sonarqube-generic.sh” in the root of the repository, and then use the above YAML script.
A detailed guide for integrating SonarQube with Codemagic is available here.
AWS Device Farm
Codemagic provides integration with AWS Device Farm, which helps to run tests on physical devices.
The YAML script given below can be used for running Android Espresso tests on AWS Device Farm.
Add the following environment variables:
environment:
    vars:
        # AWS Device Farm Environment Variables
        # See more information from official AWS Device Farm docs:
        # https://docs.aws.amazon.com/devicefarm/latest/developerguide/how-to-create-test-run.html#how-to-create-test-run-cli
        AWS_ACCESS_KEY_ID: Encrypted(...) # <-- Put your encrypted access key id here. See more info at https://docs.aws.amazon.com/general/latest/gr/aws-sec-cred-types.html#access-keys-and-secret-access-keys
        AWS_SECRET_ACCESS_KEY: Encrypted(...) # <-- Put your encrypted secret access key here. See more info at https://docs.aws.amazon.com/general/latest/gr/aws-sec-cred-types.html#access-keys-and-secret-access-keys
        AWS_PROJECT_ARN: Encrypted(...) # <-- Put your encrypted Project ARN here. Get the Project ARN with `aws devicefarm list-projects`.
        AWS_DEVICE_POOL_ARN: Encrypted(...) # <-- Put your encrypted Device Pool ARN here. Choose a Device Pool ARN using `aws devicefarm list-device-pools --arn "${AWS_PROJECT_ARN}"`.
        AWS_DEFAULT_REGION: "us-west-2" # See available options at https://aws.amazon.com/about-aws/global-infrastructure/regional-product-services/
        # Set up paths to application binary and test package
        AWS_APK_PATH: "$CM_BUILD_DIR/app/build/outputs/apk/debug/app-debug.apk"
        AWS_TEST_APK_PATH: "$CM_BUILD_DIR/app/build/outputs/apk/androidTest/debug/app-debug-androidTest.apk"
        # Specify application and test types
        AWS_APP_TYPE: "ANDROID_APP" # Type of the main app that is being tested. See more about the `--type` flag at https://docs.aws.amazon.com/cli/latest/reference/devicefarm/create-upload.html
        AWS_TEST_PACKAGE_TYPE: "INSTRUMENTATION_TEST_PACKAGE" # Type of the test package that is being uploaded. See more about the `--type` flag at https://docs.aws.amazon.com/cli/latest/reference/devicefarm/create-upload.html
        AWS_TEST_TYPE: "INSTRUMENTATION" # See more about the `--test` flag `type` option at https://docs.aws.amazon.com/cli/latest/reference/devicefarm/schedule-run.html
Use the following script:
scripts:
    - name: AWS CLI configuration
      script: |
        mkdir ~/.aws
        cat >> ~/.aws/config <<EOF
        [default]
        aws_access_key_id=$AWS_ACCESS_KEY_ID
        aws_secret_access_key=$AWS_SECRET_ACCESS_KEY
        region=$AWS_DEFAULT_REGION
        output=json
        EOF
    - name: Build Android test APK
      script: ./gradlew assembleAndroidTest
    - name: Run AWS Device Farm test
      script: cd .scripts && ./run_aws_espresso.sh
    - name: Verify Device Farm test
      script: |
        set -e
        set -x
        export AWS_RESULT=$(cat $CM_BUILD_DIR/.scripts/test-result.json | jq -r '.run.result')
        if [ $AWS_RESULT != "PASSED" ]
        then
          echo "AWS tests did not pass, the result was $AWS_RESULT"
          exit 1
        else
          echo "AWS tests PASSED!"
        fi
The above script skips some steps related to Android code signing. The full YAML template is available here.
Before running the above script, you will also need to create a file called “run_aws_espresso.sh” inside a folder .scripts and place it in the root project directory. This file contains AWS CLI commands required for running and tracking the progress of the test.
The full guide for running Android instrumented tests on real devices using AWS Device Farm is available here.
Slack
To get your build notifications on Slack, you can use the following script:
publishing:
  slack:
    channel: '#channel-name'
    notify_on_build_start: true    # To receive a notification when a build starts
    notify:
      success: false               # To not receive a notification when a build succeeds
      failure: false               # To not receive a notification when a build fails
Remember that you will need to connect a Slack workspace to Codemagic before using this script. Follow this guide.
Google Play
Using Codemagic, you can automatically publish your app to the internal, alpha, beta, production or to your custom testing tracks on Google Play. Follow this guide to set up a service account in Google Play Console before using the script.
Codemagic allows setting the update priority if the application supports in-app updates, otherwise you don’t need to define in_app_update_priority.
Instead of releasing the app to everyone, to can release it to a fraction of testers or users by defining rollout_fraction.
publishing:
  google_play:                        # For Android app
    credentials: Encrypted(...)       # JSON key file for Google Play service account
    track: alpha                      # Name of the track: internal, alpha, beta, production, internal app sharing, or your custom track name
    in_app_update_priority: 3         # Priority of the release (only set if in-app updates are supported): integer in range [0, 5]
    rollout_fraction: 0.25            # Rollout fraction (set only if releasing to a fraction of users): value between (0, 1)
App Store Connect
Codemagic allows automatic publishing of your iOS apps to App Store Connect. Use the following script:
publishing:
  app_store_connect:                  # For iOS app
    apple_id: name@example.com        # Email address used for login
    password: Encrypted(...)          # App-specific password
Firebase App Distribution
You can distribute your app to testers easily using Firebase App Distribution. Before running the following script, make sure to encrypt FIREBASE_TOKEN as an environment variable. Check the Firebase documentation for details.
Android
- name: Publish the app to Firebase App Distribution
  script: |
    apkPath=$(find build -name "*.apk" | head -1)
    if [[ -z ${apkPath} ]]
    then
      echo "No APKs were found, skip publishing to Firebase App Distribution"
    else
      echo "Publishing $apkPath to Firebase App Distribution"
      firebase appdistribution:distribute --app <your_android_application_firebase_id> --groups <your_android_testers_group> $apkPath
    fi
iOS
- name: Publish the app to Firebase App Distribution
  script: |
    ipaPath=$(find build -name "*.ipa" | head -1)
    if [[ -z ${ipaPath} ]]
    then
      echo "No IPAs were found, skip publishing to Firebase App Distribution"
    else
      echo "Publishing $ipaPath to Firebase App Distribution"
      firebase appdistribution:distribute --app <your_ios_application_firebase_id> --groups <your_ios_testers_group> $ipaPath
    fi
Build status badge
You can add a build status badge to your repository to track the latest build status whether it passed or failed.
If you are using codemagic.yaml file to configure your builds, your build status badge URL will be in this format:
https://api.codemagic.io/apps/<app-id>/<workflow-id>/status_badge.svg
You can find the app ID easily by navigating to your project settings on the Codemagic UI, copy the ID after https://codemagic.io/app/ and substitute <app-id> with it.
If your YAML looks like this:
workflows:
  default-workflow:
    name: Default Workflow
Then default-workflow is your <workflow-id>, substitute it in the URL.
The final build status badge URL will look like this:
https://api.codemagic.io/apps/6045bd26be2f9fe47542401b/default-workflow/status_badge.svg
You can insert it in Markdown like this:

References

Souvik Biswas is a passionate Mobile App Developer (Android and Flutter). He has worked on a number of mobile apps throughout his journey, and he loves open source contribution on GitHub. He is currently pursuing a B.Tech degree in Computer Science and Engineering from Indian Institute of Information Technology Kalyani. He also writes Flutter articles on Medium - Flutter Community.


