


 for Ionic apps")
This is a getting started guide to build Ionic apps with Codemagic CI/CD tool. Written by Sneh Pandya (updated June 2021)
According to the developer survey conducted in 2020 by the official Ionic team, a striking 86% of developers in the cross-platform mobile development space continued using Ionic to develop their apps. Even more surprisingly, over 75% of all these developers are web developers. The bigger takeaway is that business executives and developers have responded that mobile frameworks like Ionic can, in fact, provide stellar app experiences across platforms.
With this, it becomes even more important to have seamless integration to automate your apps. In this article, we will set up the building, testing and distribution of Ionic apps with Codemagic.
It is recommended to go through the article for a better understanding, but if you already have experience with using the
codemagic.yamlfile, you can get the YAML templates for the Ionic project here.
Getting started: Continuous Integration and Delivery for Ionic apps
This article is written specific to Ionic CLI version
6.14.1stable release and Ionic Core version5.6.6stable release.
To start, you will need to have your current Ionic project hosted on a code repository platform, like GitHub, GitLab or Bitbucket, using a version control system. Then, proceed with the steps below to set up and download the codemagic.yaml file for your project.
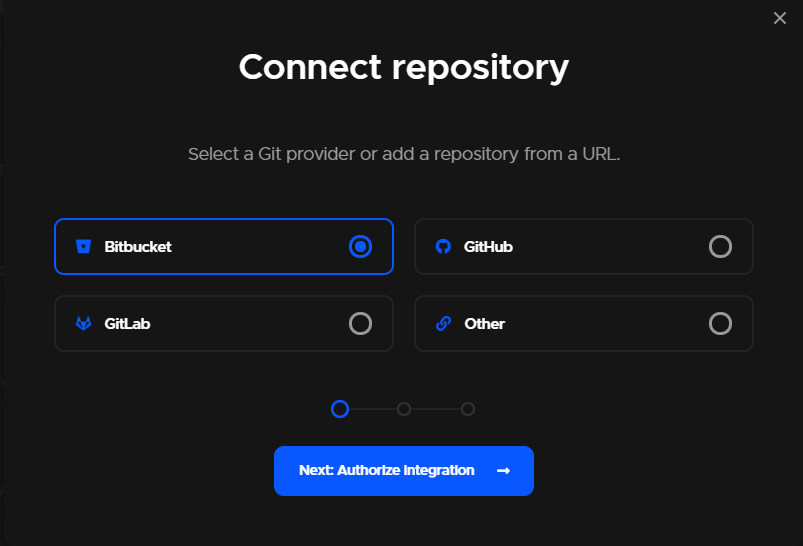
- Log in or sign up to Codemagic using your preferred method, either via email or via a version control platform where your project is hosted as a repository.
Once on the Codemagic dashboard, you need to connect the repository which you want to set up CI/CD for. Click on Add application to connect your repository with Codemagic.
You will be prompted to choose your preferred version control system. Click on Next: Authorize integration to provide Codemagic CI/CD with authorized access to your version control system.
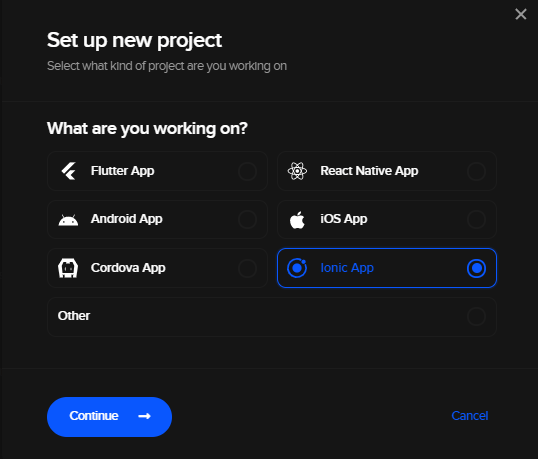
Once the authorization is completed successfully, go to Codemagic dashboard and you will find the project that you chose to set up CI/CD has been added successfully. Now, click on Set up build.
Select Ionic App as the app starter workflow.
- Download the YAML template for the Ionic project by clicking the download button.
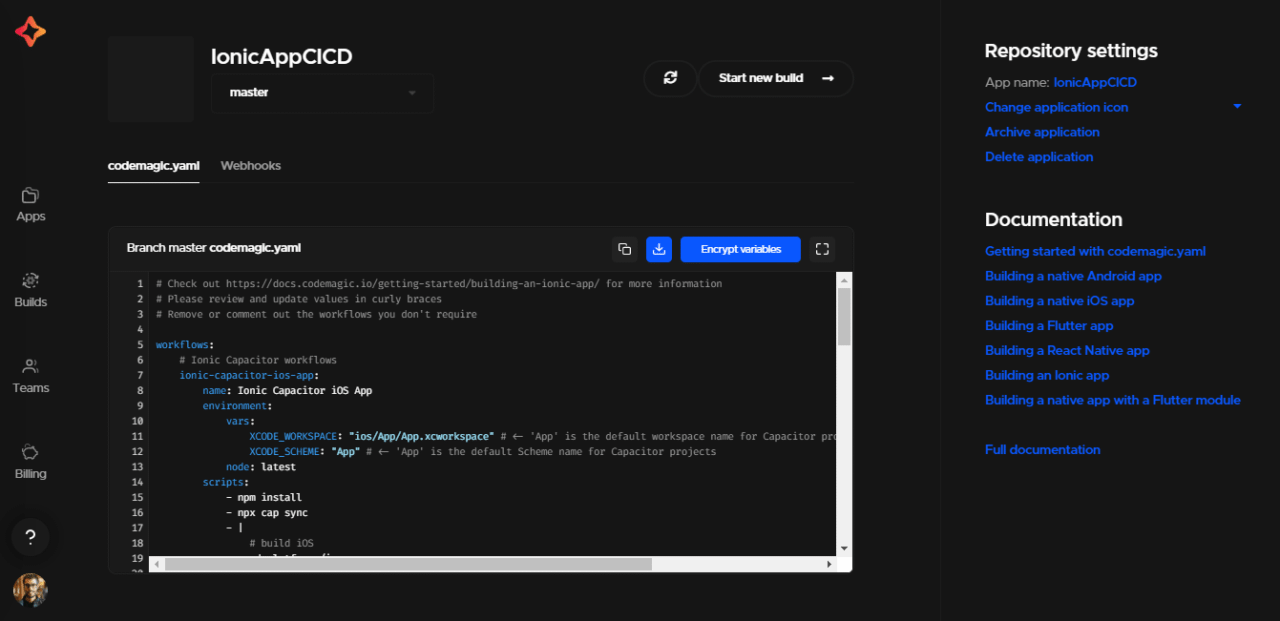
- Now, open the
codemagic.yamlfile using your preferred code editor. The file contents will look like this:
# Check out https://docs.codemagic.io/getting-started/building-an-ionic-app/ for more information
# Please review and update values in curly braces
# Remove or comment out the workflows you don't require

workflows:
    # Ionic Capacitor workflows
    ionic-capacitor-ios-app:
        name: Ionic App
        environment:
            vars:
                XCODE_WORKSPACE: "ios/App/IonicApp.xcworkspace" # <- 'IonicApp' is the default workspace name for Capacitor projects
                XCODE_SCHEME: "IonicApp" # <- 'IonicApp' is the default Scheme name for Capacitor projects
            node: latest
        scripts:
            - npm install
            - npx cap sync
            - |
                # build iOS
                cd platforms/ios
                pod install
                xcodebuild build -workspace "$XCODE_WORKSPACE" -scheme "$XCODE_SCHEME" CODE_SIGN_IDENTITY="" CODE_SIGNING_REQUIRED=NO CODE_SIGNING_ALLOWED=NO
        artifacts:
            - $HOME/Library/Developer/Xcode/DerivedData/**/Build/**/*.app
            - $HOME/Library/Developer/Xcode/DerivedData/**/Build/**/*.dSYM
    ionic-capacitor-android-app:
        name: Ionic App
        environment:
            node: latest
        scripts:
            - npm install
            - npx cap sync
            - |
                # build Android
                cd android
                ./gradlew assembleDebug
        artifacts:
            - android/app/build/outputs/**/*.apk
    # Ionic Cordova workflows
    ionic-cordova-ios-app:
        name: Ionic Cordova iOS App
        environment:
            vars:
                XCODE_WORKSPACE: "{{ ADD WORKSPACE NAME HERE }}"
                XCODE_SCHEME: "{{ ADD SCHEME NAME HERE }}"
            node: latest
        scripts:
            - |
                # install dependencies and update to Cordova version 9
                npm install
                cvm install 9.0.0
                cvm use 9.0.0
            - |
                # Setup Cordova iOS platform
                ionic cordova platform remove ios --nosave
                ionic cordova platform add ios --confirm --no-interactive --noresources
            - |
                # build iOS
                cd platforms/ios
                pod install
                xcodebuild build -workspace "$XCODE_WORKSPACE" -scheme "$XCODE_SCHEME" CODE_SIGN_IDENTITY="" CODE_SIGNING_REQUIRED=NO CODE_SIGNING_ALLOWED=NO
        artifacts:
            - $HOME/Library/Developer/Xcode/DerivedData/**/Build/**/*.app
            - $HOME/Library/Developer/Xcode/DerivedData/**/Build/**/*.dSYM
    ionic-cordova-android-app:
        name: Ionic Cordova Android App
        environment:
            node: latest
        scripts:
            - |
                # install dependencies and update to Cordova version 9
                npm install
                cvm install 9.0.0
                cvm use 9.0.0
            - |
                # Setup Cordova Android platform
                ionic cordova platform remove android --nosave
                ionic cordova platform add android --confirm --no-interactive --noresources
            - |
                # Build Android Cordova App
                script: ionic cordova build android --debug --no-interactive --device
        artifacts:
            - platforms/android/app/build/outputs/**/*.apk
- Click on Webhooks section to set up webhook for your application. A webhook is required for automatic build triggering.
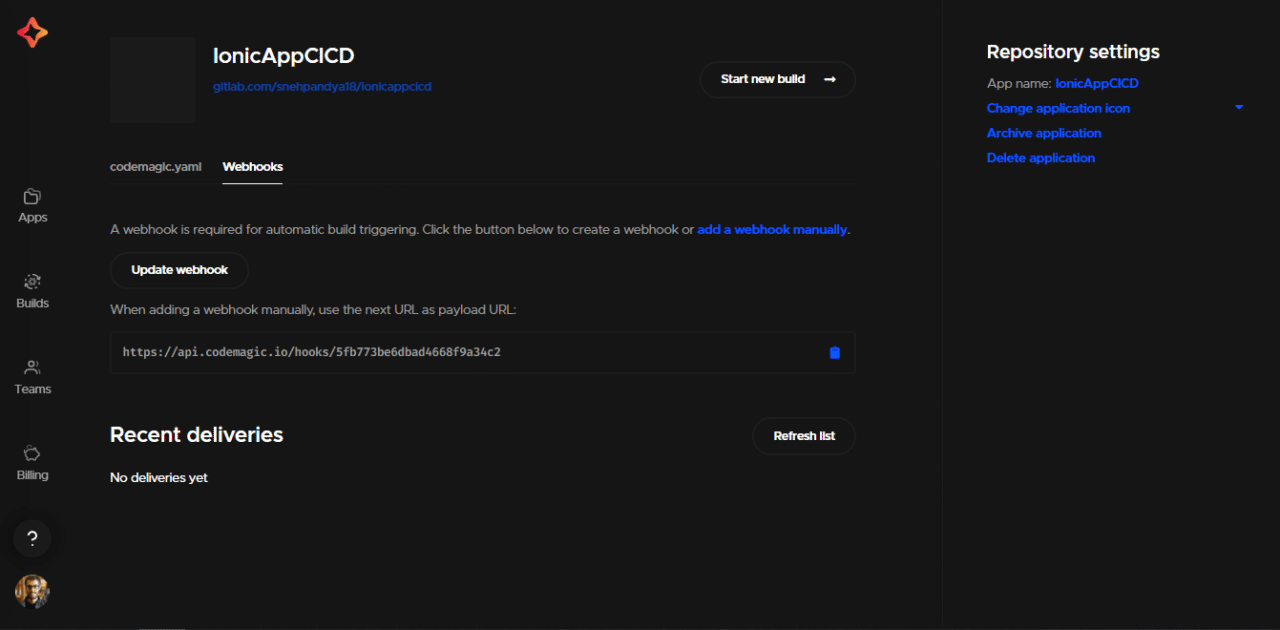
Click on Update webhook and then copy the URL. You need to declare the copied URL as payload URL in your application.
Once the webhook URL is copied, follow the steps according to the version control system you’ve connected with Codemagic and follow the steps as specified in the Codemagic documentation for setting up webhooks.
Once the webhook is successfully configured, you will be able to trigger automated builds when the code is pushed to your version control system.
Default YAML configuration
There are two types of workflows specified for Ionic in the YAML configuration file: Capacitor and Cordova. The iOS Cordova workflow specified in the YAML file will require an Xcode workspace name and an Xcode scheme. You will need to specify them in the YAML file under environment variables.
In order to generate the .ipa file for iOS, you will need to set up code signing. Android does not require any specific setup steps to generate apk builds.
How to code sign Ionic apps for iOS
To set up code signing for iOS, you will need two different configuration files:
Certificate
iOS provisioning profile
To publish your app on App Store Connect, you will need an iOS Distribution Certificate. If you only want to generate the ipa build file for iOS, then an iOS Development Certificate also works.
To download the required configuration files, follow the steps below:
Open Xcode.
Go to Xcode → Preferences from the top navigation bar.
From the top of the window, navigate to the Accounts section.
Now, select the Team under your Apple ID for which you want to download the certificate.
Click on Manage Certificates.
Right-click the Development Certificate and select Export Certificate. Enter your credentials and save the certificate.
To generate the provisioning profile, click Download Manual Profiles. This will save the provisioning profile in the directory
~/Library/MobileDevice/Provisioning Profiles/.
Now you are ready to upload the files on Codemagic and proceed to the next steps.
Understanding YAML for Ionic apps
Let’s talk about codemagic.yaml for Ionic projects. The default YAML script consists of two different workflows: Capacitor workflow and Cordova workflow. Both of the workflows include configurations for both Android and iOS. You should remove or comment out the workflow that you don’t require.
Adding environment variables
We need to add the credentials in encrypted form in the environment variables section of the codemagic.yaml file. These environment variables will be used to generate Android and iOS builds.
Android environment variables for release APK generation and Google Play Store automated publishing:
CM_KEYSTORE: keystore file in encrypted format
CM_KEYSTORE_PASSWORD: keystore password in encrypted format
CM_KEY_PASSWORD: keystore alias password in encrypted format
CM_KEY_ALIAS: keystore alias username in encrypted format
credentials: JSON key file for Google Play service account in encrypted format
iOS environment variables for automatic code signing and App Store Connect publishing:
APP_STORE_CONNECT_ISSUER_ID: App Store Connect Issuer ID
APP_STORE_CONNECT_KEY_IDENTIFIER: App Store Connect key identifier
APP_STORE_CONNECT_PRIVATE_KEY: App Store Connect private key
CERTIFICATE_PRIVATE_KEY: Certificate private key
password: App Store Connect app-specific password in encrypted format
You can find more information on this here and here.
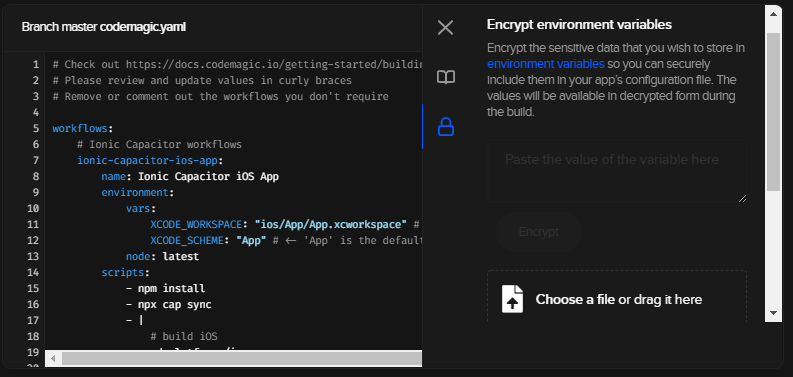
You can generate the encrypted versions of these files/variables by following these steps:
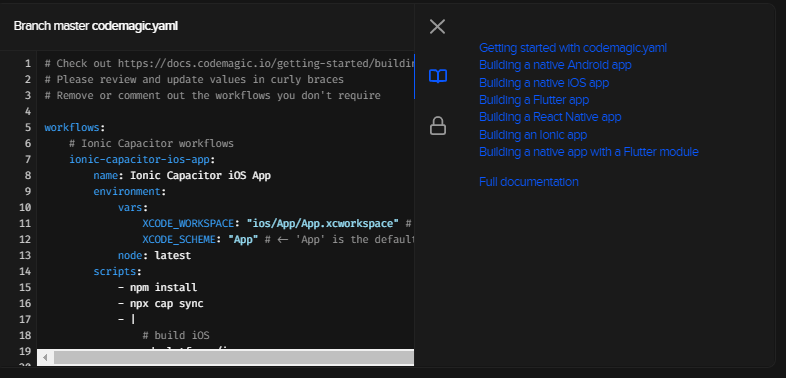
Go to the project settings.
You will find the notebook icon, click on the icon. It will open a list of links to useful guides for project setup.
Click on lock icon which will open Encrypt environment variables.
Upload the files or enter the variables to generate the encrypted versions of each.
Testing Ionic apps
To run the tests for your Android and iOS builds, you need to modify your script accordingly, as shown below. The code for testing an Ionic project also goes under the scripts section:
- name: iOS test
    script: |
    xcode-project run-tests \
        --workspace "$XCODE_WORKSPACE" \
        --scheme "$XCODE_SCHEME" \
        --device "iPhone 11"
    test_report: build/ios/test/*.xml

- name: Android test
  script: ./gradlew test
  test_report: app/build/test-results/**/*.xml
Collecting artifacts
All generated artifacts are stored on the path specified in the script. All of these artifacts can be published to external services. The currently available integrations are email, Slack and Google Play. It is also possible to publish elsewhere with custom scripts (e.g., Firebase App Distribution). More examples for publishing scripts can be found here.
Publishing
All Android applications need to be signed before release. To learn about Gradle code signing configuration for Ionic Capacitor apps, refer to the Android code signing documentation. If you are building Ionic Cordova Android apps, the configuration is included in the workflow itself.
Likewise, all iOS applications need to be signed before release. To learn about iOS code signing configuration, refer to the iOS code signing documentation.
Building Ionic apps on Codemagic
Before starting a build on Codemagic, make sure that you have the codemagic.yaml file committed in the same project at the root level via the version control system.
To start the build, follow the steps below:
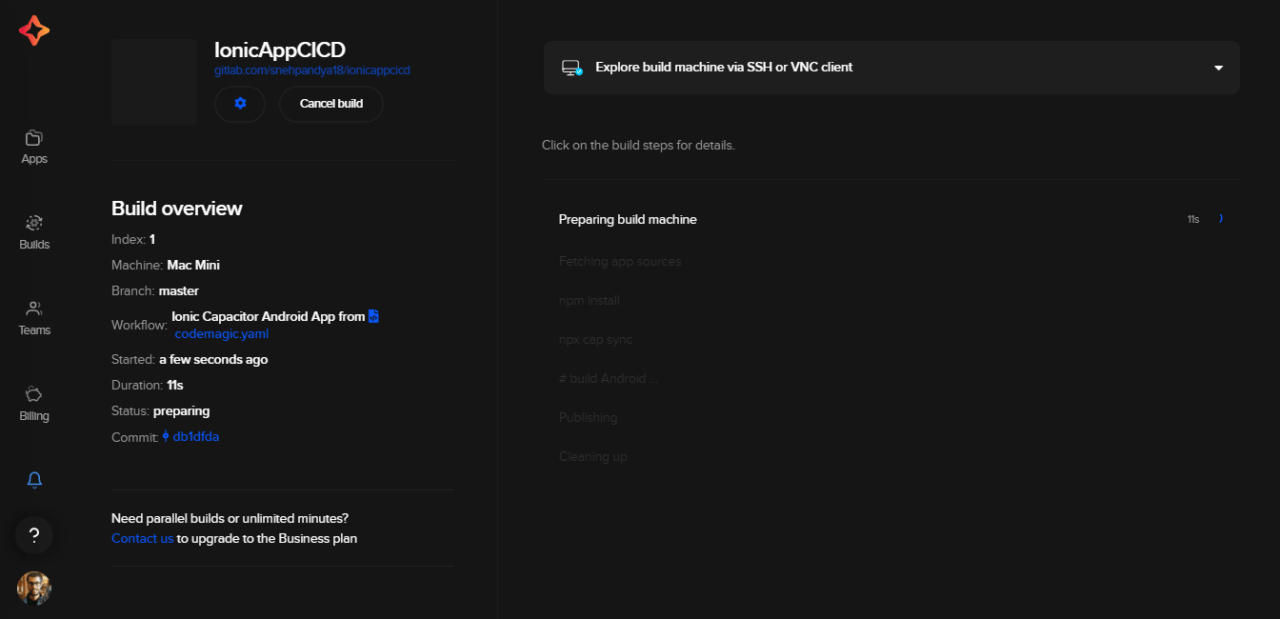
In the application settings for your Ionic project, click Check for configuration file.
Click Start your first build to start building your Android and iOS apps from the Ionic project.

- Select the workflow from the
codemagic.yamlfile, and click Start new build.
This will start a new build for your project and take you to the build processing page.
Once the build is completed, you can download artifacts as well as get your app published if you have configured automated publishing in codemagic.yaml file.
Conclusion
With the combination of a cross-platform mobile application development framework and a continuous integration and delivery solution like Codemagic, it is seamless to build, test and deploy apps using Ionic framework. Also, using codemagic.yaml removes the hassle of repeatedly performing tedious steps. You can manage your own workflows and trigger builds whenever you wish to, including new pushes on the version control system.
Do you like building Ionic apps with Codemagic CI/CD tool? Was this getting started guide helpful? Let us know HERE.
Useful links and references
The repository used to showcase the sample project can be found here.
The documentation for YAML can be found here.
Build and deliver apps with Codemagic: React Native, iOS and Android.
For discussions, learning and support, join the Codemagic Slack community.

Sneh is a Senior Product Manager based in Baroda. He is a community organizer at Google Developers Group and co-host of NinjaTalks podcast. His passion for building meaningful products inspires him to write blogs, speak at conferences and mentor different talents. You can reach out to him over Twitter (@SnehPandya18) or via email (sneh.pandya1@gmail.com).


