


Written by Souvik Biswas and updated in June 2021
If you want to conveniently convey details of places, directions and routes to the end-user, Google Maps is an essential part of your app. Luckily, there is an official Google Maps plugin available for Flutter.
In this article, I will show you how to integrate Google Maps in Flutter to find a route between two places and calculate its distance.

The topics that I am going to cover in this article are:
- Create & setup a new Google Cloud Platform (GCP) project
- Add Google Maps SDK (for both Android & iOS) and Directions API to the GCP project
- Create an API Key on GCP
- Setup Flutter project to use Google Maps
- Add Google Maps widget
- Use Geocoding to translate coordinates into a place address and vice versa
- Use Polylines for drawing route between two places
- Calculate distance of that route
There’s a lot to learn from this article. So bear with me and follow along.
So, let’s get started, but first, let us know what’s your main difficulty when building apps?
Creating a GCP project
You will need a GCP project to get access to the Google Maps API and generate an API key.
NOTE: If you have never used GCP before, you will have to set up a Billing account. You can follow the official guide here.
To create a new GCP project, follow the steps below:
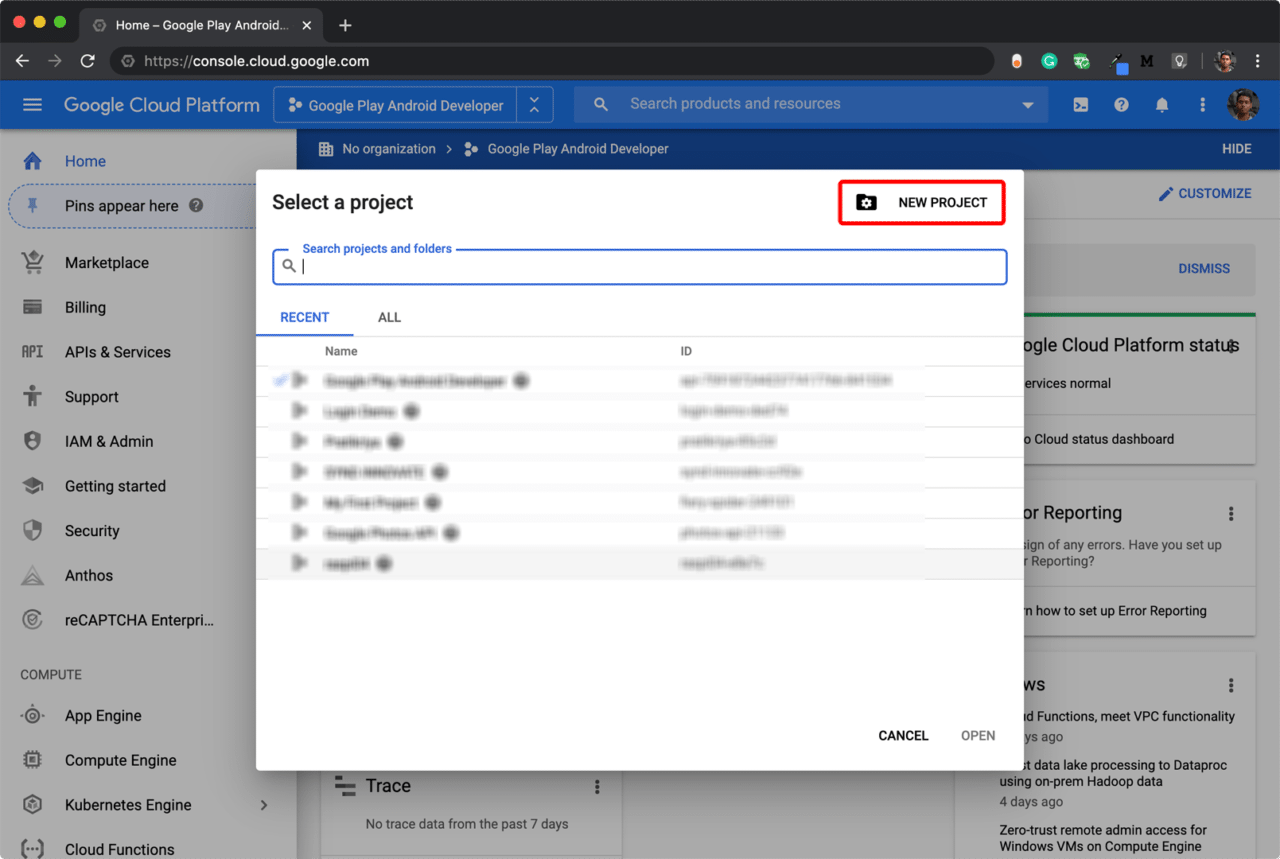
Go to the GCP Console.
Go to the Project Selection dialog box and click New Project.
Enter a name for your project and click Create.
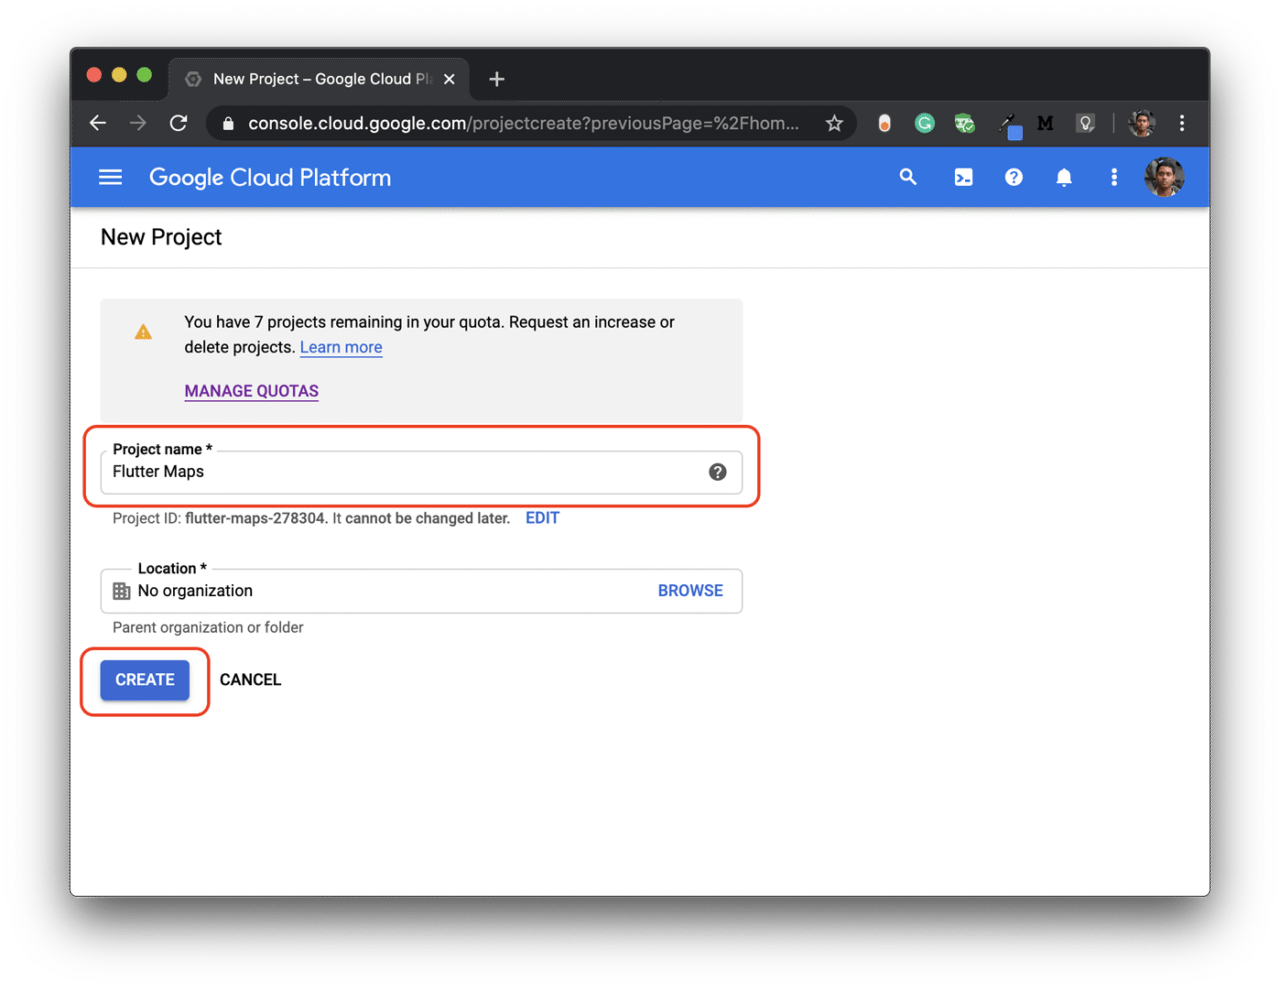
This will create a new GCP Project.
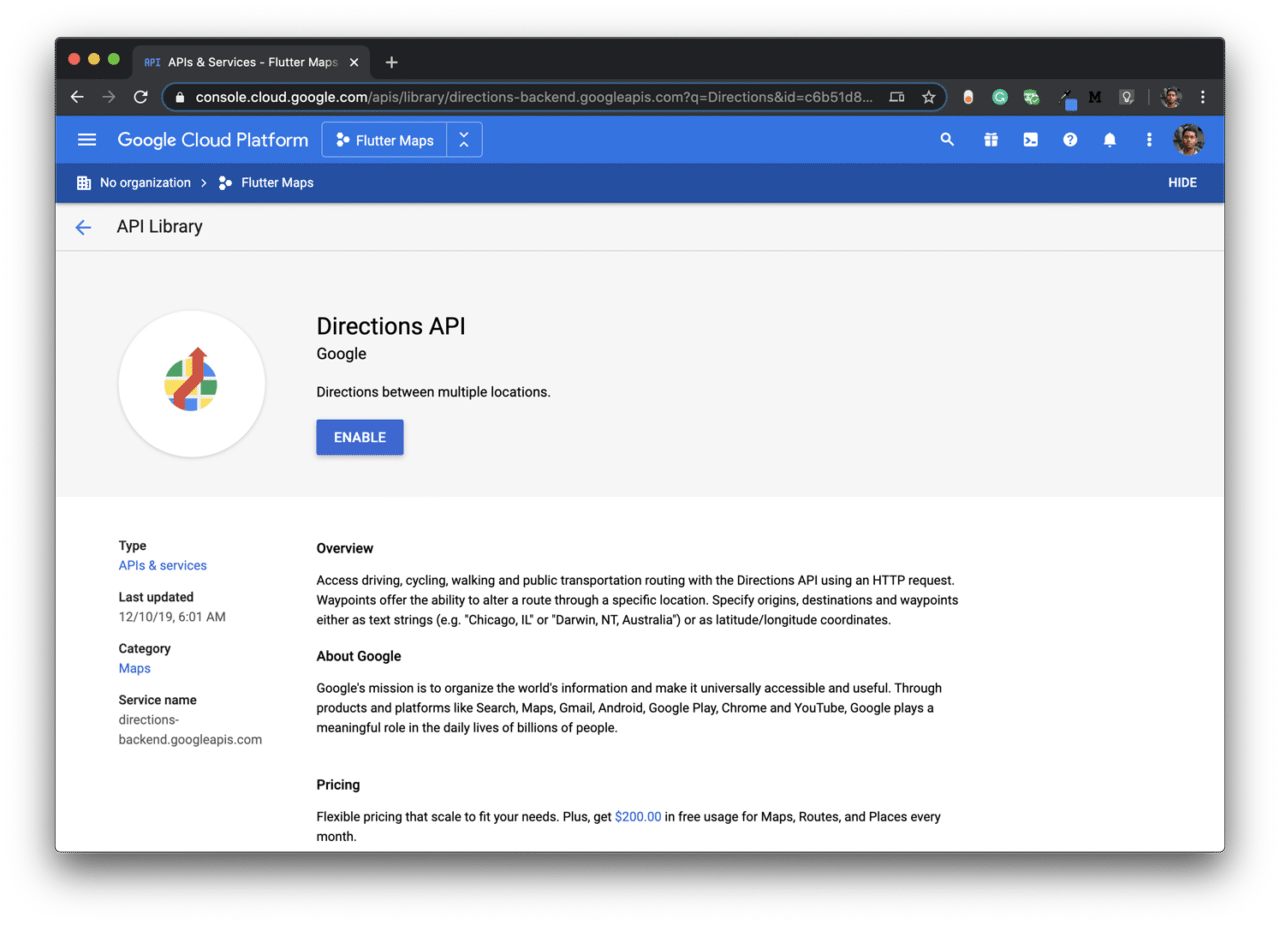
Enabling APIs
In order to use Google Maps in your app, you will need to enable Maps SDK for both platforms.
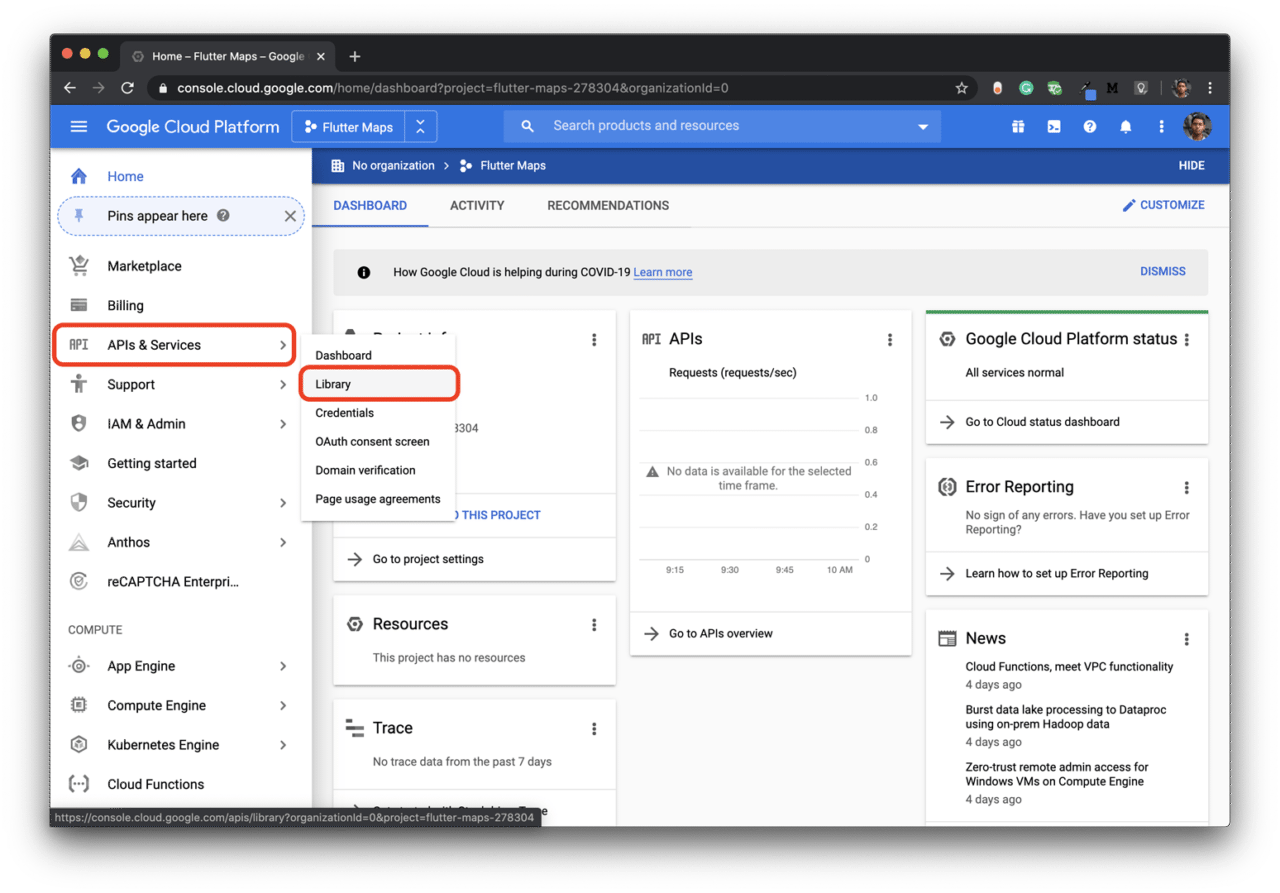
Go to APIs & Services from the left menu and select Library.
Now, search for Maps and enable Maps SDK for both platforms.
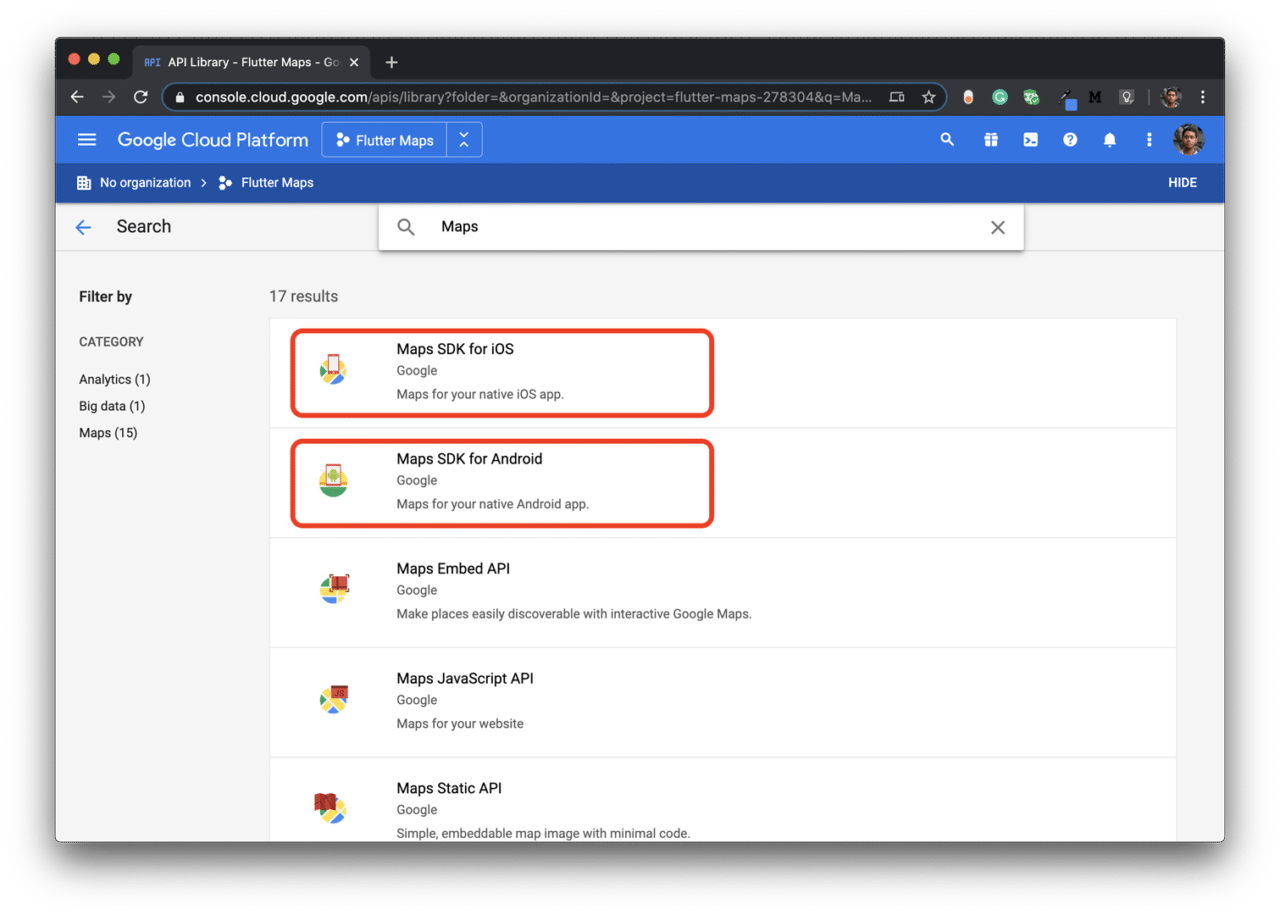
You will also need the Directions API while drawing the routes. So enable that as well.
Generating an API key
You will need an API key for integrating Google Maps with your app.
Go to APIs & Services from the left menu and select Credentials.
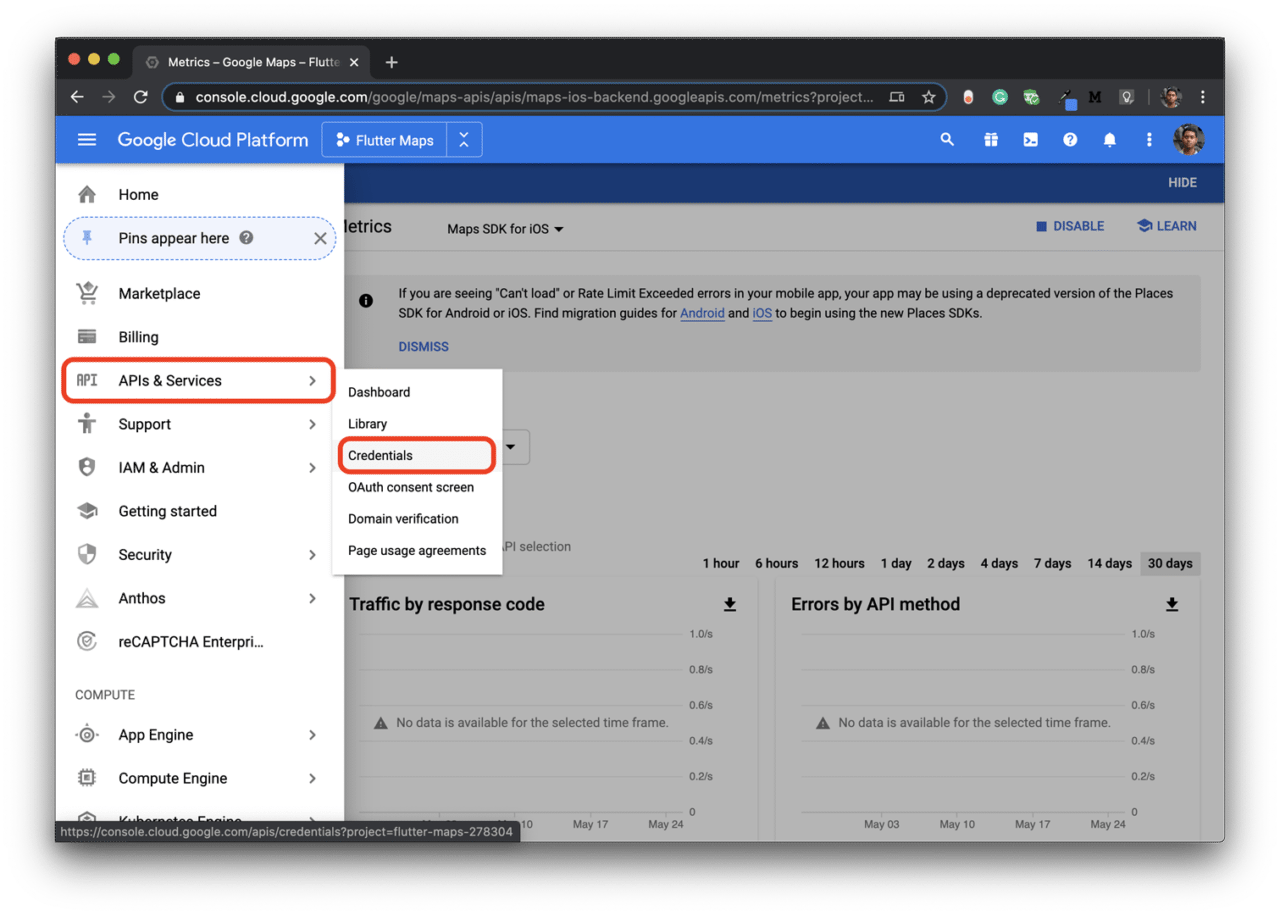
Click CREATE CREDENTIALS and select API key.

This will generate an API key that you will need in the next step.
Set up the Flutter project
Create a new Flutter project.
flutter create flutter_mapsOpen the project using your favorite IDE. For opening with VS Code:
code flutter_mapsAdd the google_maps_flutter plugin to the
pubspec.yamlfile:google_maps_flutter: ^2.0.6
Android setup
Go to
android/app/build.gradleand set theminSdkVersionto 20:android { defaultConfig { minSdkVersion 20 } }Navigate to the file
android/app/src/main/AndroidManifest.xmland add the following code snippet inside theapplicationtag:<!-- Add your Google Maps API Key here --> <meta-data android:name="com.google.android.geo.API_KEY" android:value="YOUR KEY HERE"/>You will also need the location access in the app. Add the following permission in the same file inside the
manifesttag:<uses-permission android:name="android.permission.ACCESS_FINE_LOCATION"/>
iOS setup
Navigate to the file
ios/Runner/AppDelegate.swiftand replace the whole code with the following:import UIKit import Flutter import GoogleMaps @UIApplicationMain @objc class AppDelegate: FlutterAppDelegate { override func application( _ application: UIApplication, didFinishLaunchingWithOptions launchOptions: [UIApplication.LaunchOptionsKey: Any]? ) -> Bool { //Add your Google Maps API Key here GMSServices.provideAPIKey("YOUR KEY HERE") GeneratedPluginRegistrant.register(with: self) return super.application(application, didFinishLaunchingWithOptions: launchOptions) } }To get the location permission, add the following to the same file:
<key>NSLocationWhenInUseUsageDescription</key>
<string>This app needs access to location when open.</string>
This completes the setup for both platforms in Flutter.
Integrating the Google Maps Widget
Now you are ready to add the Google Maps widget to your Flutter app.
You can start with the following code:
import 'package:flutter/material.dart';

void main() {
  runApp(MyApp());
}

class MyApp extends StatelessWidget {
  @override
  Widget build(BuildContext context) {
    return MaterialApp(
      title: 'Flutter Maps',
      theme: ThemeData(
        primarySwatch: Colors.blue,
      ),
      home: MapView(),
    );
  }
}

class MapView extends StatefulWidget {
  @override
  _MapViewState createState() => _MapViewState();
}

class _MapViewState extends State<MapView> {
  @override
  Widget build(BuildContext context) {
    // Determining the screen width & height
    var height = MediaQuery.of(context).size.height;
    var width = MediaQuery.of(context).size.width;

    return Container(
      height: height,
      width: width,
      child: Scaffold(
        body: Stack(
          children: <Widget>[
            // TODO: Add Map View
          ],
        ),
      ),
    );
  }
}
I have defined the Container height and width to be the size of the screen so that the Google Maps widget takes up the entire screen.
I am also using a Stack to keep Google Maps widget in the background and add other necessary widgets on top of it.
Now replace the TODO in the above code snippet with the Google Maps widget.
// Import the Google Maps package
import 'package:google_maps_flutter/google_maps_flutter.dart';

// Initial location of the Map view
CameraPosition _initialLocation = CameraPosition(target: LatLng(0.0, 0.0));

// For controlling the view of the Map
late GoogleMapController mapController;

// Replace the "TODO" with this widget
GoogleMap(
  initialCameraPosition: _initialLocation,
  myLocationEnabled: true,
  myLocationButtonEnabled: false,
  mapType: MapType.normal,
  zoomGesturesEnabled: true,
  zoomControlsEnabled: false,
  onMapCreated: (GoogleMapController controller) {
    mapController = controller;
  },
),
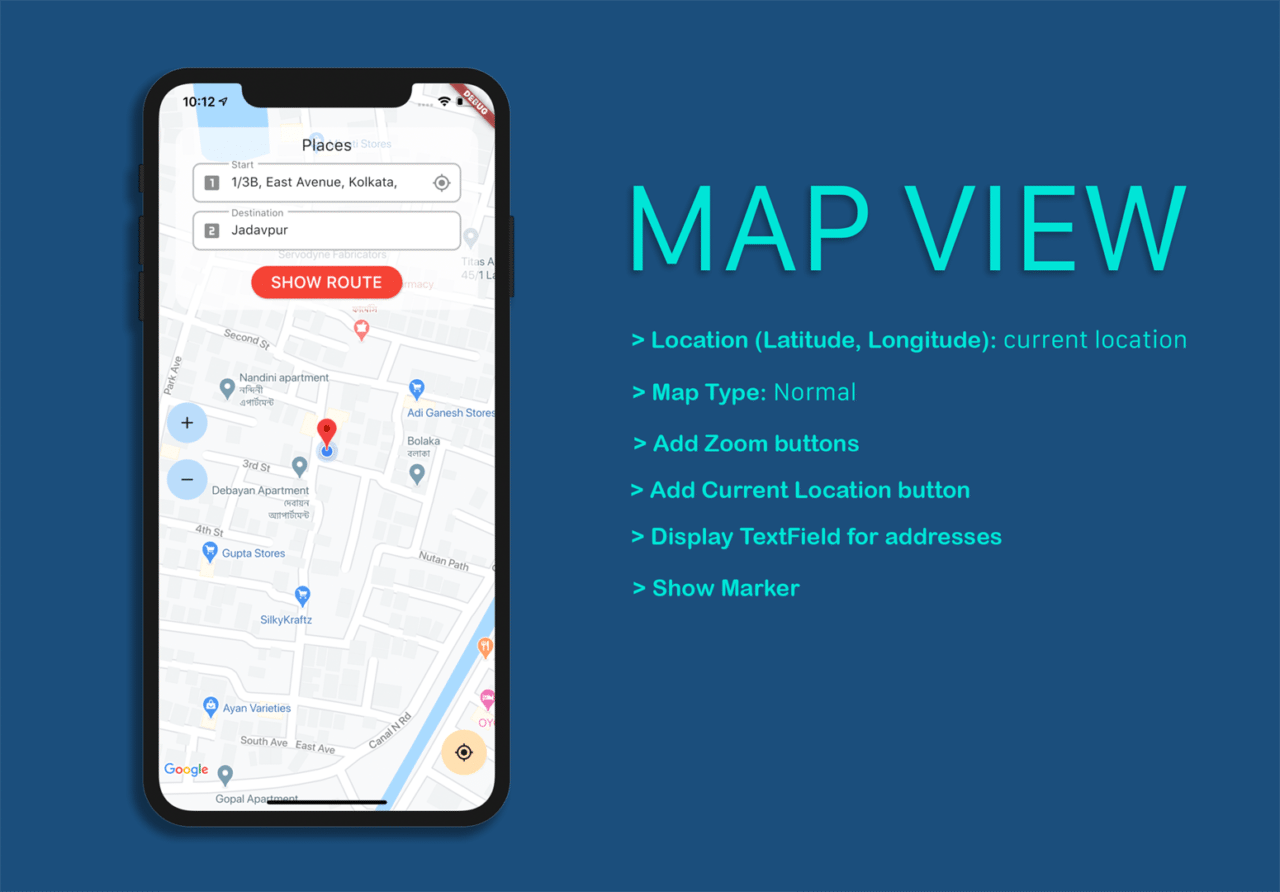
Let’s take a look at the parameters defined in the Google Maps widget:
- initialCameraPosition: This is a required parameter that is used for loading the map view on initial start-up.
- myLocationEnabled: For showing your current location on the map with a blue dot.
- myLocationButtonEnabled: This button is used to bring the user location to the center of the camera view.
- mapType: For specifying the displayed map type (normal, satellite, hybrid or terrain).
- zoomGesturesEnabled: Whether the map view should respond to zoom gestures.
- zoomControlsEnabled: Whether to show zoom controls (only applicable for Android).
- onMapCreated: Callback for when the map is ready to use.
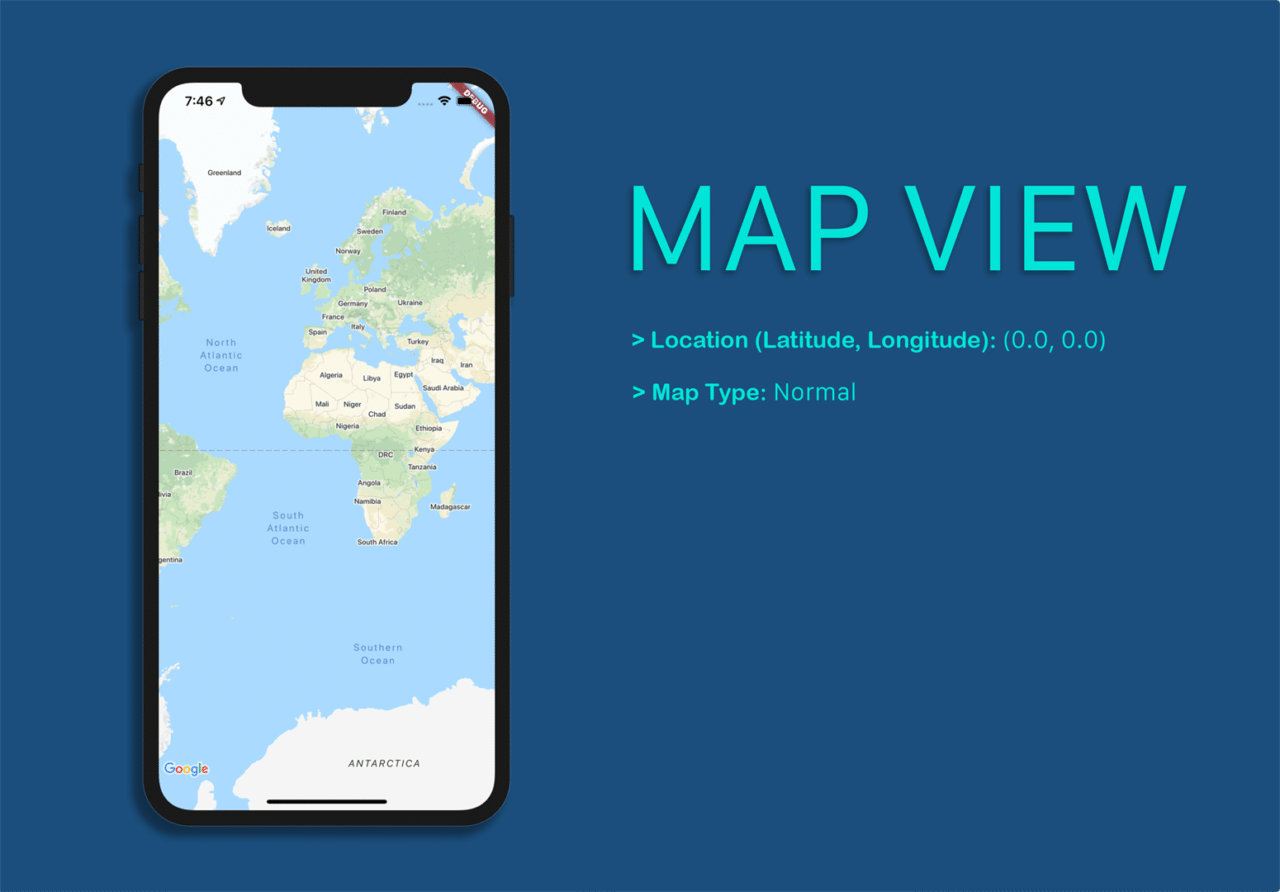
I have set the myLocationButtonEnabled and zoomControlsEnabled parameters as false because I am going to show you how to define a custom button with the same functionality but with better control.
mapController would be used to control the camera position of the map view.
By now, the app looks like this:
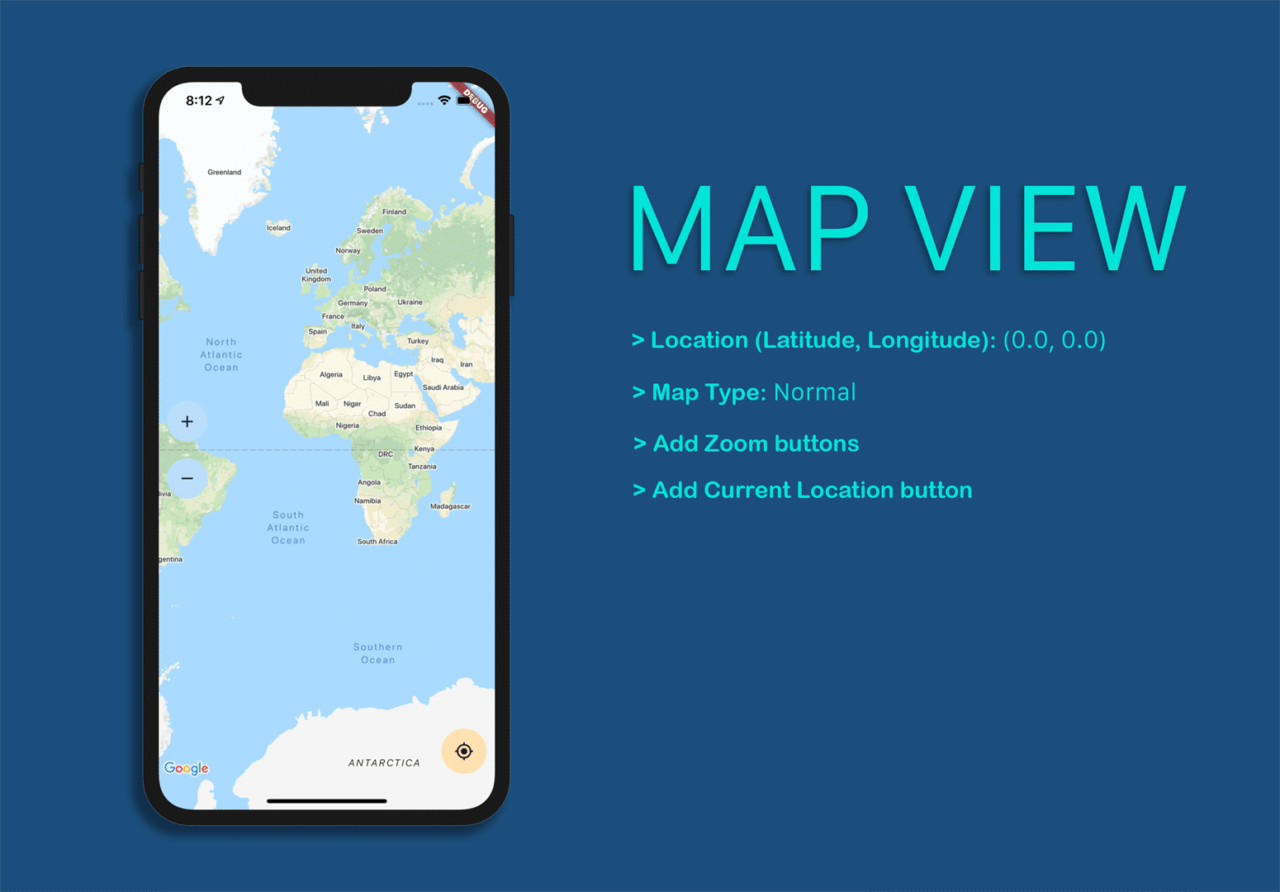
To display the zoom buttons and the current location button you can add them as children to the Stack widget and position them accordingly.
The code for designing a button is given below:
// Design for current location button

ClipOval(
  child: Material(
    color: Colors.orange.shade100, // button color
    child: InkWell(
      splashColor: Colors.orange, // inkwell color
      child: SizedBox(
        width: 56,
        height: 56,
        child: Icon(Icons.my_location),
      ),
      onTap: () {
        // TODO: Add the operation to be performed
        // on button tap
      },
    ),
  ),
),
Other buttons have a similar design.
You can take a look at the code snippet for the design and positioning of the zoom buttons here and the code for the current location button is available here.
Using zoom in the map view
You can use the mapController to zoom in and out on a map.
// Zoom In action
mapController.animateCamera(
  CameraUpdate.zoomIn(),
);

// Zoom Out action
mapController.animateCamera(
  CameraUpdate.zoomOut(),
);
Move to a new position
You can use the following code snippet to move to a new position:
// Move camera to the specified latitude & longitude
mapController.animateCamera(
  CameraUpdate.newCameraPosition(
    CameraPosition(
      target: LatLng(
        // Will be fetching in the next step
        _currentPosition.latitude,
        _currentPosition.longitude,
      ),
      zoom: 18.0,
    ),
  ),
);
Here, I have only specified the target and zoom properties of the CameraPosition widget. There are two more properties, bearing and tilt that you can use in a similar manner.
In the target property, you have to pass the latitude and longitude of the position you want to move.
Here, we need the Current Location button to move the camera view to the user’s present location. Let’s see how to achieve that.
After adding the buttons, the app will look like this:
Fetching current location
There is a nice plugin for Flutter called Geolocator that can help you fetch the user’s current location.
Add it to your pubspec.yaml file:
geolocator: ^7.0.3
Now let’s get started and go through it step-by-step.
Define a variable to store the retrieved current location:
// For storing the current position
Position _currentPosition;
Get the current location of the user:
// Method for retrieving the current location

_getCurrentLocation() async {
  await Geolocator.getCurrentPosition(desiredAccuracy: LocationAccuracy.high)
      .then((Position position) async {
    setState(() {
      // Store the position in the variable
      _currentPosition = position;

      print('CURRENT POS: $_currentPosition');

      // For moving the camera to current location
      mapController.animateCamera(
        CameraUpdate.newCameraPosition(
          CameraPosition(
            target: LatLng(position.latitude, position.longitude),
            zoom: 18.0,
          ),
        ),
      );
    });
    await _getAddress();
  }).catchError((e) {
    print(e);
  });
}
Add this method to the
initStateto fetch the user’s current location as soon as the app launches, and to move the camera to the detected location.@override void initState() { super.initState(); _getCurrentLocation(); }Also pass the latitude and longitude to the
onTapmethod of the custom button for fetching the current location.
After completing these, the camera will automatically move to the detected location as the app launches.
Geocoding
When you have the initial app set up and working, you can move on to adding two places and finding the suitable route between them on the map. For this, you will need the latitude and longitude of these places. Since figuring out the geographic coordinates can be pretty complicated, we will use geocoding.
Geocoding is a technique by which the address of a place can be converted into coordinates (latitude and longitude) and vice versa.
Add the geocoding Flutter package to your pubspec.yaml file:
geocoding: ^2.0.0
To get started, you need to insert the addresses as user inputs using TextField.
You can find the code for the design of the TextField here.
If you want to show the address of the starting location, you have to define a TextEditingController for the starting address and update the text as soon as the address of the user’s current location is retrieved.
final startAddressController = TextEditingController();
You can retrieve the address by using the following method:
// Method for retrieving the address

_getAddress() async {
  try {
    // Places are retrieved using the coordinates
    List<Placemark> p = await placemarkFromCoordinates(
        _currentPosition.latitude, _currentPosition.longitude);

    // Taking the most probable result
    Placemark place = p[0];

    setState(() {

      // Structuring the address
      _currentAddress =
          "${place.name}, ${place.locality}, ${place.postalCode}, ${place.country}";

      // Update the text of the TextField
      startAddressController.text = _currentAddress;

      // Setting the user's present location as the starting address
      _startAddress = _currentAddress;
    });
  } catch (e) {
    print(e);
  }
}
You can use a similar method to retrieve the coordinates from the starting address and the destination address. You will need these coordinates to draw a route on the map and to place markers.
// Retrieving placemarks from addresses
List<Location> startPlacemark = await locationFromAddress(_startAddress);
List<Location> destinationPlacemark = await locationFromAddress(_destinationAddress);

// Storing latitude & longitude of start and destination location
double startLatitude = startPlacemark[0].latitude;
double startLongitude = startPlacemark[0].longitude;
double destinationLatitude = destinationPlacemark[0].latitude;
double destinationLongitude = destinationPlacemark[0].longitude;
Placing Markers
You can use the coordinates retrieved in the previous step to place markers on the map.
First of all, define a variable for storing the markers:
Set<Marker> markers = {};Create the markers:
String startCoordinatesString = '($startLatitude, $startLongitude)';
String destinationCoordinatesString = '($destinationLatitude, $destinationLongitude)';

// Start Location Marker
Marker startMarker = Marker(
  markerId: MarkerId(startCoordinatesString),
  position: LatLng(startLatitude, startLongitude),
  infoWindow: InfoWindow(
    title: 'Start $startCoordinatesString',
    snippet: _startAddress,
  ),
  icon: BitmapDescriptor.defaultMarker,
);

// Destination Location Marker
Marker destinationMarker = Marker(
  markerId: MarkerId(destinationCoordinatesString),
  position: LatLng(destinationLatitude, destinationLongitude),
  infoWindow: InfoWindow(
    title: 'Destination $destinationCoordinatesString',
    snippet: _destinationAddress,
  ),
  icon: BitmapDescriptor.defaultMarker,
);
Add the markers:
// Add the markers to the list
markers.add(startMarker);
markers.add(destinationMarker);
Display the markers on the map:
// Add the markers property to the widget
GoogleMap(
  markers: Set<Marker>.from(markers),
  // ...
),
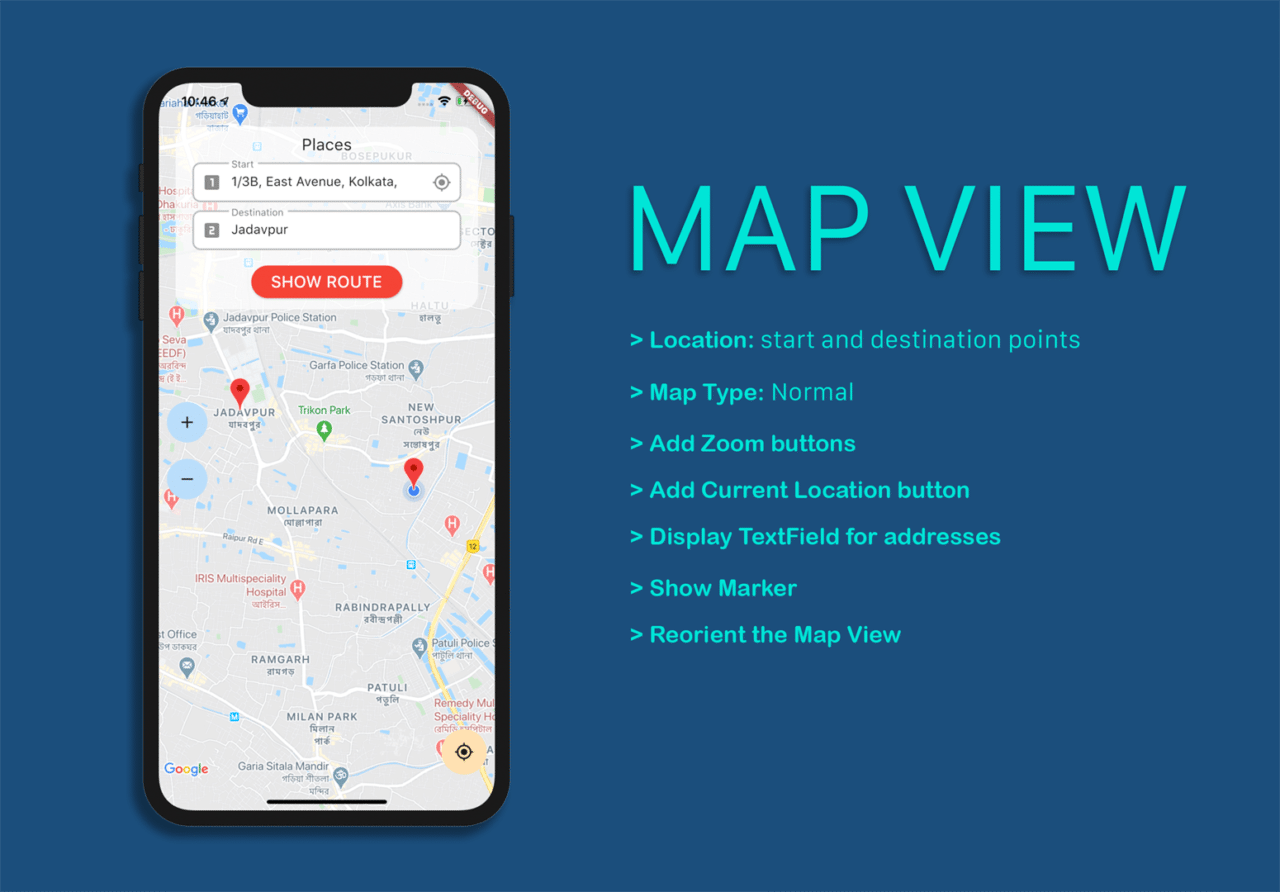
If you run the app now, it will look like this:
You will notice that only one of the markers is visible, although you placed two of them, one at the starting point and the other at the destination.
So what’s happening here?
Actually, both markers are added to the map, but only one of them is visible because the other one is out of the view. If you zoom out a bit, you will notice the other one too.
You can use the following code snippet to reorient the map view to accommodate both markers.
// Calculating to check that the position relative
// to the frame, and pan & zoom the camera accordingly.
double miny = (startLatitude <= destinationLatitude)
    ? startLatitude
    : destinationLatitude;
double minx = (startLongitude <= destinationLongitude)
    ? startLongitude
    : destinationLongitude;
double maxy = (startLatitude <= destinationLatitude)
    ? destinationLatitude
    : startLatitude;
double maxx = (startLongitude <= destinationLongitude)
    ? destinationLongitude
    : startLongitude;

double southWestLatitude = miny;
double southWestLongitude = minx;

double northEastLatitude = maxy;
double northEastLongitude = maxx;

// Accommodate the two locations within the
// camera view of the map
mapController.animateCamera(
  CameraUpdate.newLatLngBounds(
    LatLngBounds(
      northeast: LatLng(northEastLatitude, northEastLongitude),
      southwest: LatLng(southWestLatitude, southWestLongitude),
    ),
    100.0,
  ),
);
Drawing a route
Polyline is used for drawing routes on Google Maps. It is a list of points where line segments are drawn between consecutive points.
There is a Flutter package available for drawing polylines, known as flutter_polyline_points. It uses the Directions API that you enabled in the beginning.
Add the package to your
pubspec.yamlfile.flutter_polyline_points: ^1.0.0Define some variables.
// Object for PolylinePoints
late PolylinePoints polylinePoints;

// List of coordinates to join
List<LatLng> polylineCoordinates = [];

// Map storing polylines created by connecting two points
Map<PolylineId, Polyline> polylines = {};
Define a method for creating the polylines. You have to pass the starting and destination positions.
// Create the polylines for showing the route between two places

_createPolylines(
  double startLatitude,
  double startLongitude,
  double destinationLatitude,
  double destinationLongitude,
) async {
  // Initializing PolylinePoints
  polylinePoints = PolylinePoints();

  // Generating the list of coordinates to be used for
  // drawing the polylines
  PolylineResult result = await polylinePoints.getRouteBetweenCoordinates(
    Secrets.API_KEY, // Google Maps API Key
    PointLatLng(startLatitude, startLongitude),
    PointLatLng(destinationLatitude, destinationLongitude),
    travelMode: TravelMode.transit,
  );

  // Adding the coordinates to the list
  if (result.points.isNotEmpty) {
    result.points.forEach((PointLatLng point) {
      polylineCoordinates.add(LatLng(point.latitude, point.longitude));
    });
  }

  // Defining an ID
  PolylineId id = PolylineId('poly');

  // Initializing Polyline
  Polyline polyline = Polyline(
    polylineId: id,
    color: Colors.red,
    points: polylineCoordinates,
    width: 3,
  );

  // Adding the polyline to the map
  polylines[id] = polyline;
}
Display polyline on the Map.
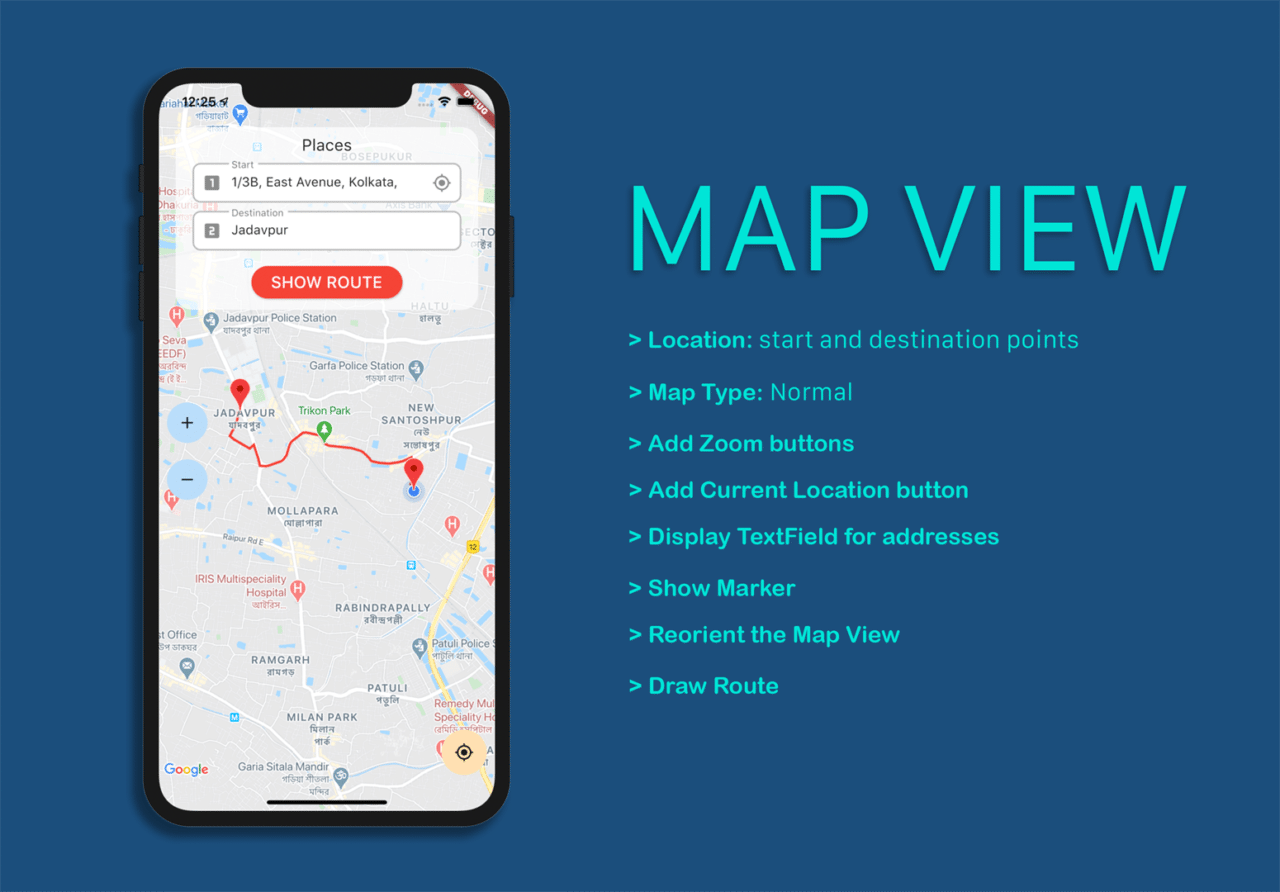
// Add the polylines property to the widget
GoogleMap(
  polylines: Set<Polyline>.of(polylines.values),
  // ...
),
After drawing the route, the app will look like this:
Calculating Distance
You have arrived to the last phase of this project. With the markers properly positioned and the route drawn, you might want to calculate the distance between the two locations.
There is a method that comes with the geolocator package that is helpful here. You can use it to calculate the distance between two places just by providing their coordinates.
// Calculating the distance between the start and end positions
// with a straight path, without considering any route

double distanceInMeters = await Geolocator.bearingBetween(
  startLatitude,
  startLongitude,
  destinationLatitude,
  destinationLongitude,
);
However, this method does not calculate the distance of the actual route. It uses the Haversine formula to calculate the distance based upon the supplied GPS coordinates.
You can find more information about this here.
What you can do, is break the entire route into several small parts and calculate their distances, then sum them up. Remember, you have already calculated the coordinates while drawing the polyline. You can use these coordinates to calculate the total distance of the route.
The formula that I used for calculating the distance between two geographic coordinates is as follows:
import 'dart:math' show cos, sqrt, asin;

double _coordinateDistance(lat1, lon1, lat2, lon2) {
    var p = 0.017453292519943295;
    var c = cos;
    var a = 0.5 -
        c((lat2 - lat1) * p) / 2 +
        c(lat1 * p) * c(lat2 * p) * (1 - c((lon2 - lon1) * p)) / 2;
    return 12742 * asin(sqrt(a));
  }
Now you can use this formula to calculate the distances between two coordinates and sum them up to find the total distance.
double totalDistance = 0.0;

// Calculating the total distance by adding the distance
// between small segments
for (int i = 0; i < polylineCoordinates.length - 1; i++) {
  totalDistance += _coordinateDistance(
    polylineCoordinates[i].latitude,
    polylineCoordinates[i].longitude,
    polylineCoordinates[i + 1].latitude,
    polylineCoordinates[i + 1].longitude,
  );
}

// Storing the calculated total distance of the route
setState(() {
  _placeDistance = totalDistance.toStringAsFixed(2);
  print('DISTANCE: $_placeDistance km');
});
Show the calculated distance on the UI:
Visibility(
  visible: _placeDistance == null ? false : true,
  child: Text(
    'DISTANCE: $_placeDistance km',
    style: TextStyle(
      fontSize: 16,
      fontWeight: FontWeight.bold,
    ),
  ),
),
The final app will look like this:

Conclusion
There’s a lot more you can do using Google Maps and some of its supported APIs. I hope this article will help you to get started with Google Maps in Flutter.
The project is available on GitHub here.
You can find the Official Documentation for Google Maps Platform here.

Souvik Biswas is a passionate Mobile App Developer (Android and Flutter). He has worked on a number of mobile apps throughout his journey. Loves open source contribution on GitHub. He is currently pursuing a B.Tech degree in Computer Science and Engineering from Indian Institute of Information Technology Kalyani. He also writes Flutter articles on Medium - Flutter Community.

