


This article is written by Dmitry Zhifarsky
CLI stands for command-line interface, a text-based interface you can use to input commands and perform various operations. If you’ve ever used the dart or flutter commands in your console, you’ve used a CLI.
Sometimes, though, you may end up writing a CLI of your own.
Why write a CLI in Dart?
When might you need to write a CLI? If you want to statically analyze your code for potential issues (like dart_code_metrics does), automate some of your daily repeated actions (for example, scaffolding a template, like very_good_cli does), or refactor a bunch of code at once (which is called a codemod), writing a CLI is a good option to start with.
You’d likely want it to work across multiple operating systems, so it would be best to use a language that allows you to compile your CLI for all of them without any problems. The Dart programming language would be an excellent choice for this situation. So, in this article, we will explain how to write a CLI in Dart and cross-compile it for various platforms using Codemagic.
While Dart is mostly used for writing Flutter apps, it’s a general-purpose language that you can use to create other types of apps as well. For example, you can use Dart to write back-end apps (using packages like dart_frog or shelf) and CLI apps. VGV’s and DCM’s examples already prove that Dart can and has been used to write very good (pun intended) CLIs.
Cross-compilation: Getting executables for all major platforms
Currently, there are three ways to call a Dart CLI application from the console:
The first is to add a package with the executable as a dependency to the target package and then call
dart run package_name:executable_name <args>. While this is a good option to start with, when you call the CLI app this way, it will need some time to compile before the execution. Depending on the capabilities of the device you run the code on, it might take tens of seconds just to compile the executable.The second option is to activate the package executable globally via
dart pub global activate. This command needs compilation only once after the activation (and for each version update) but requires additional awareness of the package version you want to activate. This is because, by default, it activates the latest version of the package available. So, if you use a package this way on your CI/CD and the package has a newer major version with a breaking change, it might break your pipeline. Also, the platform should have the Dart SDK available to activate and compile the package.The third option is to provide a compiled executable via
dart compile exethat can be downloaded and added to the PATH environment directly or distributed via package managers like Homebrew, Chocolatey, or apt. While this approach takes more time to set up, compiling the package this way offers better performance compared with other options.
The problem is that Dart doesn’t support cross-compilation itself, meaning that the executable you get after calling dart compile exe can only be run on the same platform you compile it on. That’s why we need four different platforms to compile our executable: Windows, Linux, macOS Intel, and macOS Arm. But instead of buying physical devices or setting up multiple virtual machines, we can use CI/CD platforms like Codemagic that provide all of them while also integrating the compilation process into our development flow.
So, let’s see how we can configure Codemagic to compile our Dart CLI apps.
Codemagic configuration for Dart CLI apps
To complete this task, we need a Codemagic account. If you don’t have one, you can sign up here.
We will be using the codemagic.yaml configuration.
Every codemagic.yaml file should start with the workflows section. We need four workflows (one for each target platform) to compile our executable.
workflows:
  compile-mac:
    …
  compile-mac-m1:
    …
  compile-windows:
    …
  compile-linux:
    …
Let’s take a closer look at how the compile-mac workflow is defined:
compile-mac:
    instance_type: mac_pro
    max_build_duration: 10
    environment:
      flutter: stable
First, we need to set instance_type to mac_pro since we’re compiling for Intel Macs, limit our build time (to avoid builds that take unexpectedly long, burning the time for nothing) with max_build_duration, and set up the environment to have Flutter available. We don’t need Flutter itself, but we do require the dart executable to be available so that we can later call dart compile exe.
Next, let’s define when the compilation happens. Since we don’t need to compile the executable on every push, let’s use tags as a trigger for compilation.
compile-mac:
  …
  triggering:
      events:
        - tag
      tag_patterns:
        - pattern: "*"
          include: true
      cancel_previous_builds: true
We’ve added cancel_previous_builds, which allows us to cancel previous builds if we push a new tag before the compilation is completed, saving some build time.
And that’s all we need to do to set up the environment.
Now, let’s take a look at the scripts section:
  scripts:
      - name: Install dependencies
        script: dart pub get

      - name: Create target directory
        script: mkdir macos

      - name: Compile executable
        script: dart compile exe <path_to_dart_file> -o macos/compiled_executable
The first step installs the dependencies for our app. Then we create a target directory where the compiled executable will be placed. The last step compiles the executable.
Note: If you have a monorepository, just running a
dart pub getcommand won’t work for you. To set up dependency resolution for monorepo, you can use thevery_good_clipackage. Here’s how the setup might look:
      - name: Install Very Good CLI
        script: dart pub global activate very_good_cli

      - name: Install dependencies
        script: very_good packages get -r
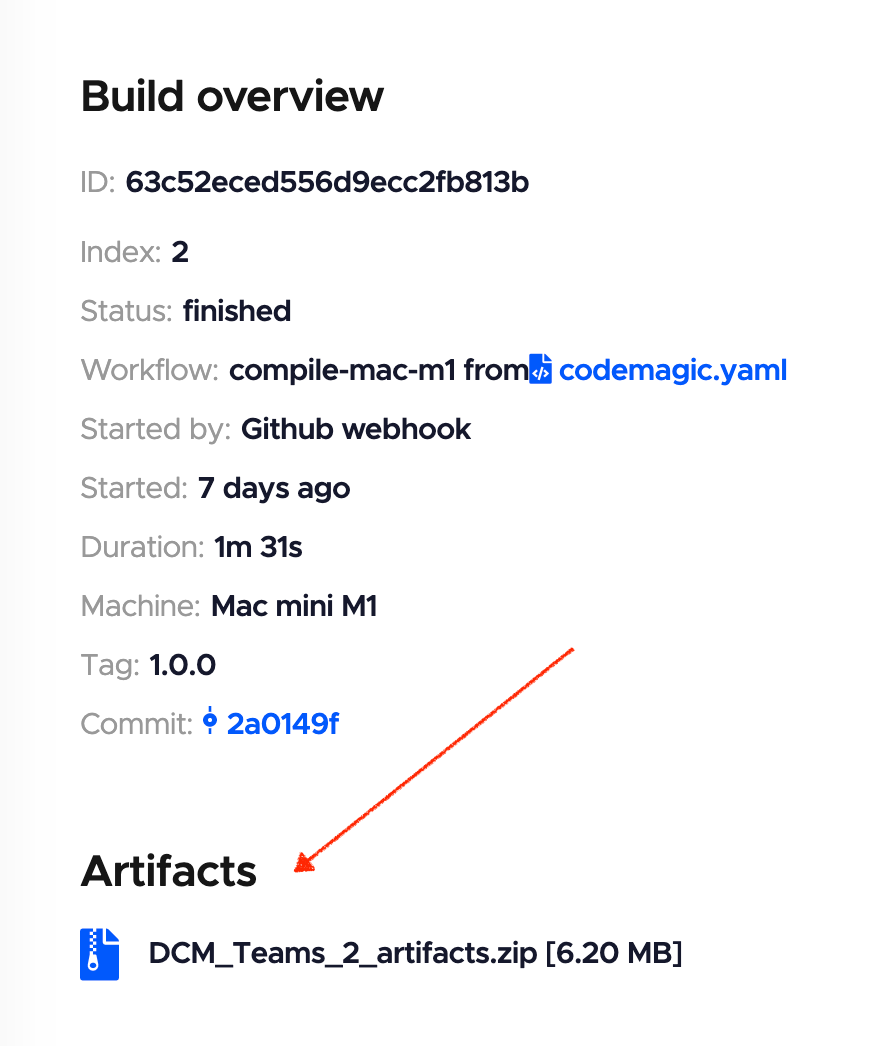
Last but not least, we’ll deal with artifacts. The artifacts section allows you to download the compiled executable from a Codemagic build page.
artifacts:
      - macos/**
Full workflow code:
  compile-mac:
    instance_type: mac_pro
    max_build_duration: 10
    environment:
      flutter: stable
    triggering:
      events:
        - tag
      tag_patterns:
        - pattern: "*"
          include: true
      cancel_previous_builds: true
    scripts:
      - name: Install dependencies
        script: dart pub get

      - name: Create target directory
        script: mkdir macos

      - name: Compile executable
        script: dart compile exe <path_to_dart_file> -o macos/compiled_executable

    artifacts:
      - macos/**
Publishing to GitHub Releases
By default, our executable files will be available as a ZIP archive. But what if we want to have them published to another platform, such as GitHub? Codemagic can help us with that as well.
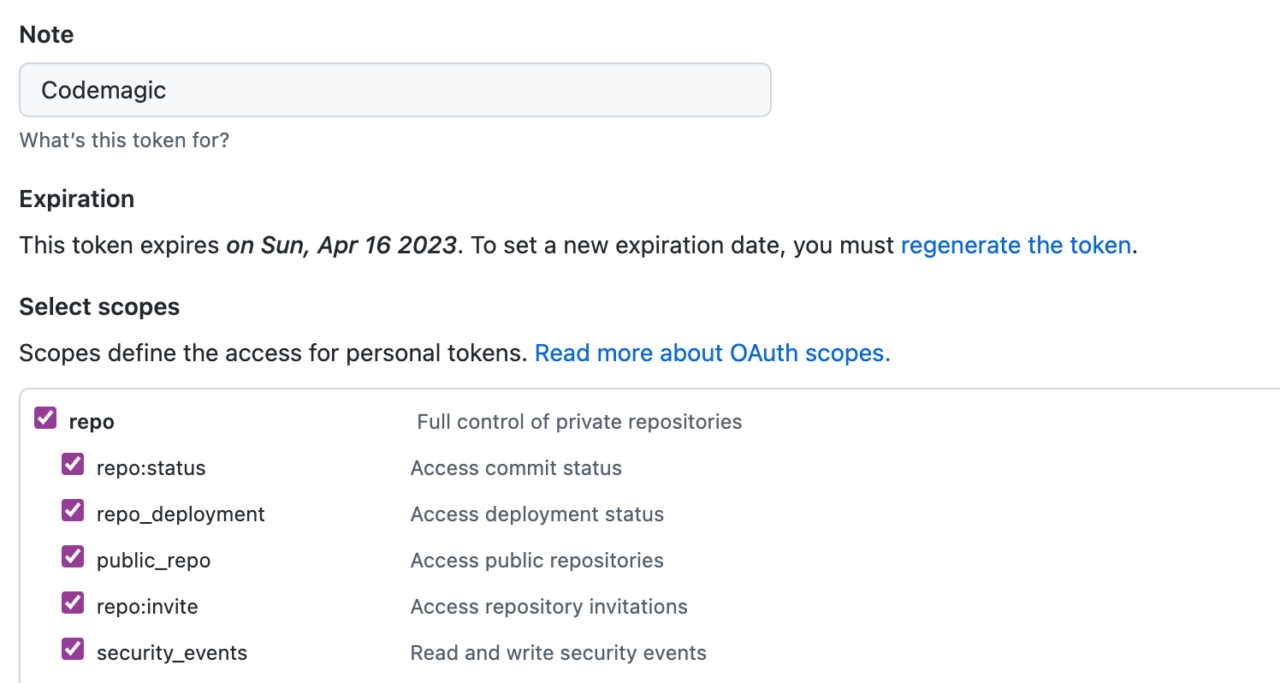
First, we need to add a GitHub token to our workflow environment to have access to GitHub Releases. To generate a token, go to https://github.com/settings/tokens and click “Generate new token”. Note that the GitHub API currently supports only classic tokens, so you’ll need to generate a classic token. Then type the token name (Codemagic, for example) and choose the “repo” scope.
After saving the token, copy its value and open your Codemagic app environment settings.
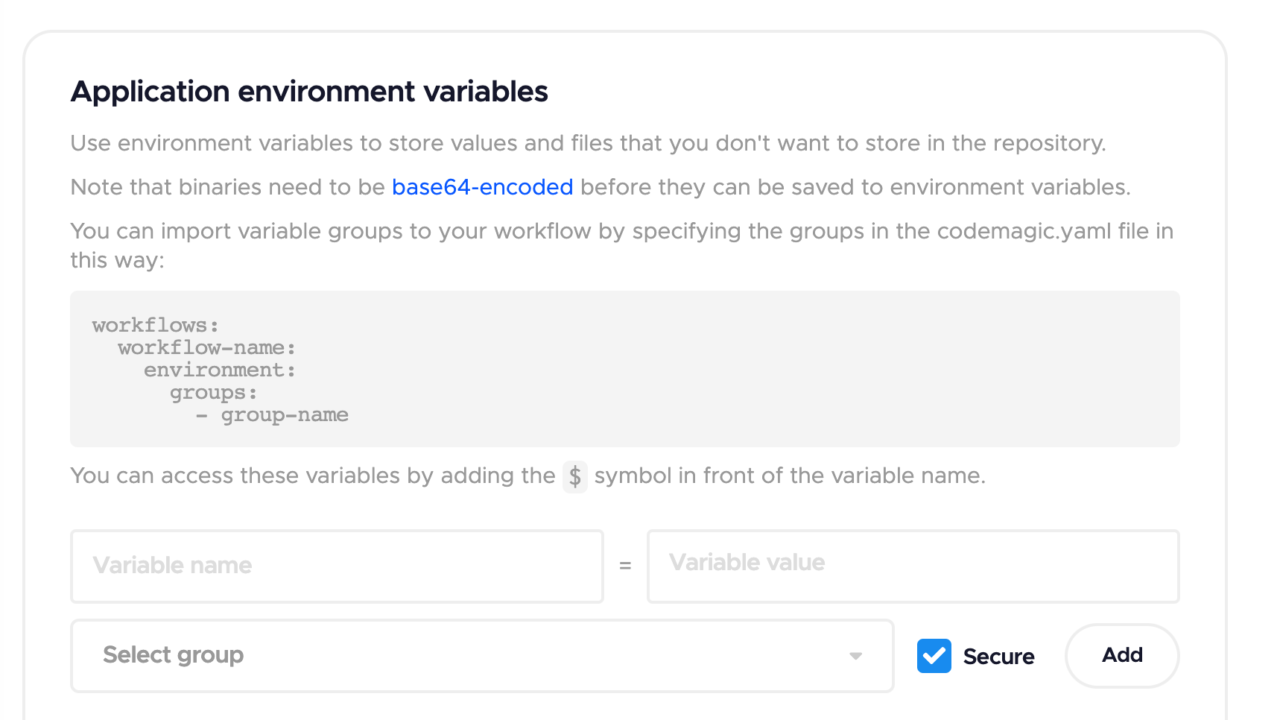
Add a new environment variable. Set the variable name to GITHUB_TOKEN, paste the token you copied before in the “variable value” field, and select (or create) a group. Then click “add”.
After that, we need to update the workflow environment configuration:
   environment:
      groups:
        - GitHub
Note: I use a group name here as a more convenient way to deal with variables.
Now, we need to set up a publishing section in our codemagic.yaml file:
    publishing:
      scripts:
        - name: Publish to GitHub
          script: |
            #!/usr/bin/env zsh
            gh release create -d "${CM_TAG}" \
              --title "${CM_TAG}" \
              macos/compiled_executable
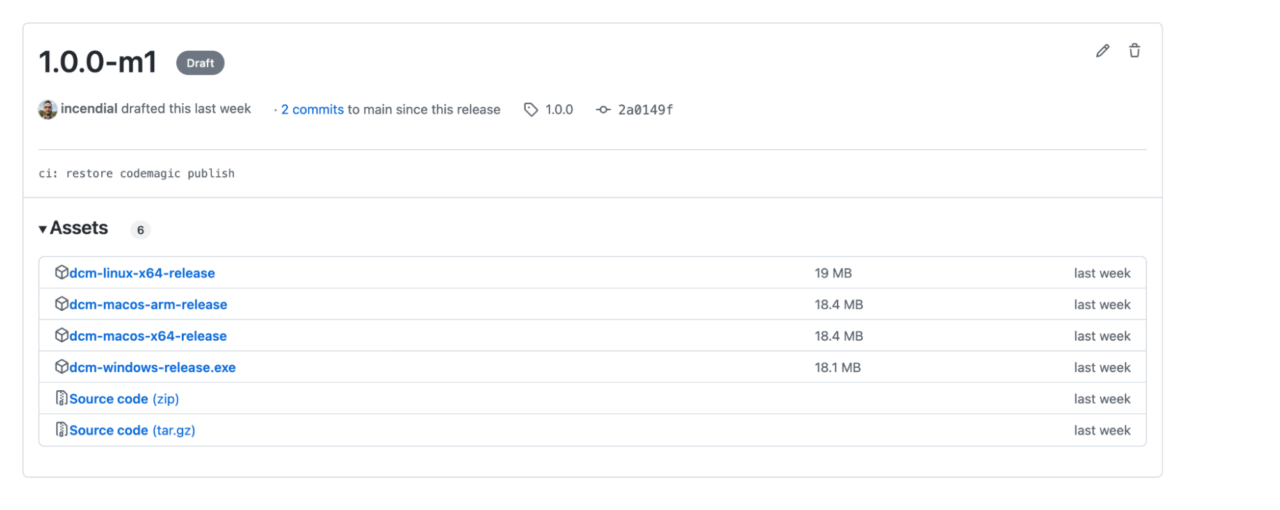
This script will create a new draft release using the tag data with our executables attached as assets.
 .
.
Full workflow code with publishing to GitHub Releases
workflows:
  compile-mac:
    instance_type: mac_pro
    max_build_duration: 10
    environment:
      flutter: stable
      groups:
        - GitHub
    triggering:
      events:
        - tag
      tag_patterns:
        - pattern: "*"
          include: true
      cancel_previous_builds: true

    scripts:
      - name: Install dependencies
        script: dart pub get

      - name: Create target directory
        script: mkdir macos

      - name: Compile executable
        script: dart compile exe <path_to_dart_file> -o macos/compiled_executable

    artifacts:
      - macos/**

    publishing:
      scripts:
        - name: Publish to GitHub
          script: |
            #!/usr/bin/env zsh
            gh release create -d "${CM_TAG}" \
              --title "${CM_TAG}" \
              macos/compiled_executable
This workflow builds our CLI as an executable for Intel-based Mac machines and publishes it to GitHub Releases. Similar to how we have created this workflow, we can add three more workflows for Apple silicon Mac, Linux, and Windows machines, respectively. You can find the full codemagic.yaml file with all the workflows in the last section of this article.
Caveats (aka feature requests for the Codemagic dev team)
No way to wait for the workflows to complete
Codemagic currently does not support waiting for the workflows to complete, meaning that if you have set up publishing to GitHub Releases and want to create a release only if all the workflows have passed successfully, you’ll need additional code to make it work. If you have questions, you can join this discussion: https://github.com/orgs/codemagic-ci-cd/discussions/1235
No support for matrixes
Matrixes are another useful feature when it comes to writing workflows for multiple platforms when multiple steps are repeated. Without them, the configuration file might get too bloated with the copied steps. Codemagic doesn’t yet have support for matrixes. However, this doesn’t prevent us from building the pipeline — it just makes the YAML file longer.
Conclusion
If you have followed the steps in this article, you now know how to build a Codemagic pipeline to cross-compile your CLI in Dart for all the major platforms it may be needed on.
As a creator of one such CLI you may even use, Dart Code Metrics, I encourage you to experiment and build something of your own. And if you find it helpful, don’t hesitate to share it with the community to help others who encounter similar problems.
Dmitry Zhifarsky is a passionate software engineer specializing in various front-end frameworks, as well as Dart and Flutter. He’s also the co-creator of DCM. You can find him on Twitter, GitHub, or deeply immersed in VS Code. Do not disturb him if it’s the latter.
Full codemagic.yaml example
workflows:
  compile-mac: &base_workflow
    instance_type: mac_pro
    max_build_duration: 10
    environment: &base_environment
      flutter: stable
      groups:
        - GitHub
      vars: &base_vars
        DART_FILE_PATH: "my/dart/file" # Enter the path to your dart file
        TARGET_DIR: macos
        TARGET_FILE: compiled_executable
    triggering:
      events:
        - tag
      tag_patterns:
        - pattern: "*"
          include: true
      cancel_previous_builds: true
    scripts: &scripts
      - name: Install dependencies
        script: dart pub get

      - name: Create target directory
        script: mkdir $TARGET_DIR

      - name: Compile executable
        script: dart compile exe $DART_FILE_PATH -o $TARGET_DIR/$TARGET_FILE

    artifacts:
      - $TARGET_DIR/**
    publishing:
      scripts:
        - name: Publish to GitHub
          script: |
            #!/usr/bin/env zsh
            gh release create -d "${CM_TAG}" \
              --title "${CM_TAG}" \
              $TARGET_DIR/$TARGET_FILE

  compile-mac-m1:
    instance_type: mac_mini_m1
    <<: *base_workflow
    environment:
      <<: *base_environment
      vars:
        TARGET_DIR: macos-m1
        <<: *base_vars


  compile-windows:
    instance_type: windows_x2
    <<: *base_workflow
    environment:
      <<: *base_environment
      vars:
        TARGET_DIR: windows
        TARGET_FILE: compiled_executable.exe
        <<: *base_vars

  compile-linux:
    instance_type: linux_x2
    <<: *base_workflow
    environment:
      <<: *base_environment
      vars:
        TARGET_DIR: linux
        <<: *base_vars


