


This article is written by Arnold Veltmann
The process of building, code signing, and publishing mobile apps can be tedious and time-consuming, especially when working in a large team and also needing to share builds with QA engineers. That’s why Codemagic offers a cloud-based CI/CD service for mobile apps that automates the whole workflow with minimal time-effort on configuration. But what if you want to use Codemagic’s features locally or in another CI/CD environment, such as GitHub Actions? That’s where Codemagic CLI tools come in handy.
What are Codemagic CLI tools for?
Codemagic CLI tools are a set of free and open-source command-line tools that Codemagic uses under the hood to run its CI/CD service. They allow you to simplify various tasks related to mobile app development, such as building, code signing, and publishing. You can use them with any iOS or Android project, regardless of the framework or technology you use. They are very well documented and up to date, as they are constantly improved by the Codemagic team and contributors from other companies.
One of the key advantages of Codemagic CLI tools is their platform-agnostic nature, allowing usage across multiple operating systems. Their support extends to both iOS and Android platforms, eliminating the need for different tools for different app stores. Unlike fastlane, which requires extensive configuration, Codemagic CLI tools are designed for simplicity and ease of use, making them an accessible choice for beginners and seasoned developers alike.
In this article, I will show you how to use Codemagic CLI tools with GitHub Actions to deploy your Flutter app to App Store Connect. You will learn how to:
- Generate an API key for App Store Connect.
- Create a GitHub Actions workflow to run Codemagic CLI tools and upload your build to App Store Connect.
- Install and use Codemagic CLI tools on your local machine.
By following along, you will be able to streamline your app distribution process and save time and resources. You will also be able to use Codemagic CLI tools for other tasks, such as versioning or registering new test devices.
Setting things up in App Store Connect
Before we dive into the technicalities, it’s important to confirm a few prerequisites. I’m assuming you’re already enrolled in the Apple Developer Program, have a registered bundle ID, and an existing Flutter mobile application record in App Store Connect. If not, make sure to set everything up before proceeding further.
Generate an API key for App Store Connect
In this section of the article, I’ll walk you through the process of generating an API key for App Store Connect. This key is crucial as it grants the Codemagic CLI tools the permissions needed to upload your app to App Store Connect.
To ensure the Codemagic CLI tools can upload and fetch data from App Store Connect, you’ll need to generate an App Store Connect API key with App Manager access.
- Log in to App Store Connect and navigate to Users and Access > Integrations.
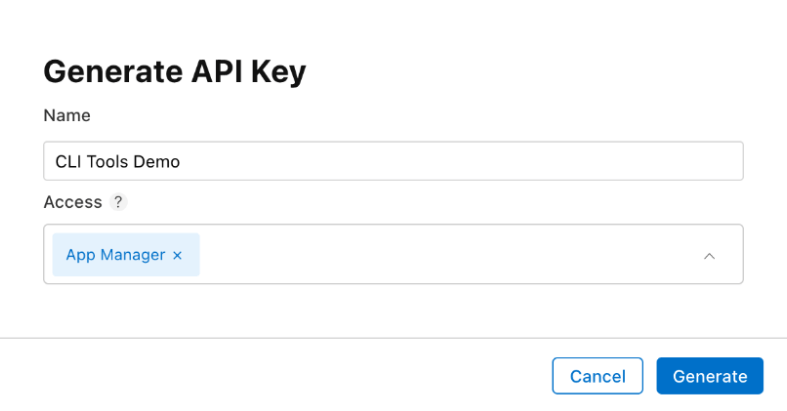
- Click on the + sign to generate a new API key.
- Enter the name for the key and select an access level. Choose App Manager access rights.
- As soon as the key is generated, you see it added to the list of active keys. Click Download API Key to save the private key for later. Note that the key can only be downloaded once.
Take note of the Issuer ID above the table of active keys as well as the Key ID of the generated key as these will be required when setting up your pipeline.

Setting up the environment
In this section, you will learn how to set up the necessary environment variables and secrets that we need later to set up our pipeline.
Before we proceed, make sure that you have followed the previous steps of this article and that everything matches between your application records and code. Discrepancies, such as a mismatched bundle ID, can lead to unexpected and challenging debugging scenarios. Thankfully, the CLI tools have mitigated some of the potential pain points.
Configure secrets and variables
To use Codemagic CLI tools with GitHub Actions, you’ll need to configure some environment variables and secrets in your GitHub repository. Environment variables are plain text values that are accessible to your workflow steps. Secrets are encrypted values that are only visible to you and the workflow steps that need them. You should use secrets to store sensitive information such as passwords, keys, or certificates.
To add new secrets and variables in your repository, you can navigate to Settings > Secrets and Variables, and create new values in the Secrets and Variables tabs respectively.
To follow along, you will need to set the following variables:
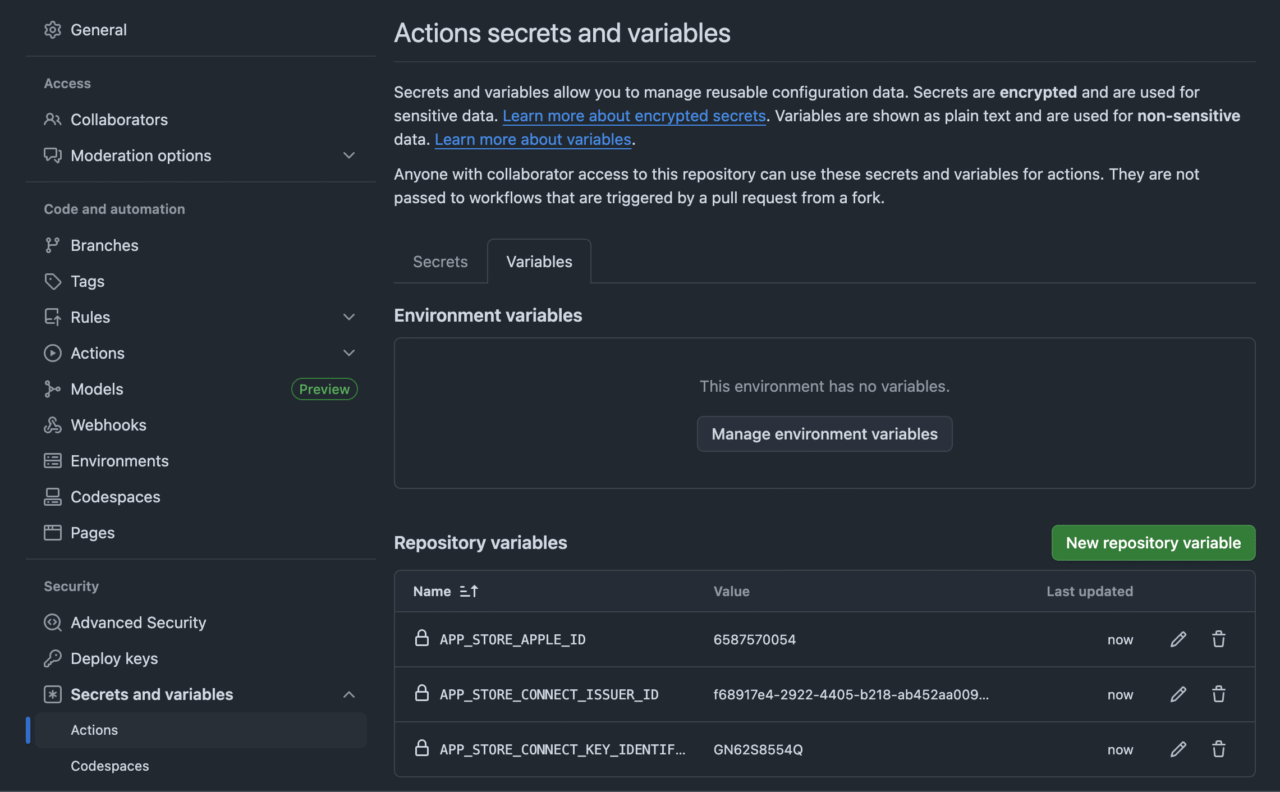
APP_STORE_CONNECT_ISSUER_ID: You can find it above the table of active API keys in the Apple Developer portal, as noted in the Generate an API key for App Store Connect section (it’s a lowercase alphanumeric value e.g.aaaaaaaa-bbbb-cccc-dddd-eeeeeeeeeeee).APP_STORE_CONNECT_KEY_IDENTIFIER: This is the key ID of the App Store Connect API key that you created in the previous Generate an API key for App Store Connect section. You can find it next to the name of your key in the Apple Developer portal, it should also be included in the file name of your key (it’s an upper-cased alphanumerical 10-character value e.g.ABC1234567).APP_STORE_APPLE_ID: This is an automatically generated ID assigned to your app in App Store Connect. You can find it by selecting your app in the App Store Connect portal and looking at the General > App Information section (it’s a 10-digit number, e.g.0123456789).
You should see something like this in your GitHub UI:
In addition to the variables set above, we’ll have to set the required secrets. First, navigate to the Secrets tab and create the following secret:
APP_STORE_CONNECT_PRIVATE_KEY: This is the content of the App Store Connect API key file that you downloaded in the Generate an API key for App Store Connect section. It is a text file with the.p8extension that starts with-----BEGIN PRIVATE KEY-----and ends with-----END PRIVATE KEY-----. You can copy and paste the content of the file directly to the secret value field. You can also use the terminal to copy the contents to your clipboard with:cat /path/to/api/key/AuthKey_XXXYYYZZZ.p8 | pbcopy
Now, we have two options for setting up the code signing for our app: we can either let Codemagic CLI tools handle the creation of certificates and profiles for us, or we can use existing signing credentials (in case you have them already at hand). I’ll show you how to set up both.
Automatic certificates and profiles generation
If you wish to use your existing code signing credentials, you can skip straight to the next section Using existing certificates and profiles.
However, if you want to use the automatic code signing option, you need to create and provide a certificate private key and an App Store Connect API key to Codemagic CLI tools. The certificate private key is an RSA 2048 bit key that will be included in the certificate that Codemagic creates. The App Store Connect API key is the same one that we created and used for the variables above. The Codemagic generated files will be available in App Store Connect.
In addition to the variables and secret set above, we’ll have to set one additional secret under the Secrets tab:
CERTIFICATE_PRIVATE_KEY: This is the content of the certificate private key that you need to generate. You can use the following terminal command to create a new key and save it as acert_keyfile:ssh-keygen -t rsa -b 2048 -m PEM -f cert_key -q -N ""After you have created the key, you need to copy and paste the content of the file to the secret value field. You can use the following terminal command to copy the content to your clipboard:
cat cert_key | pbcopy
After all the required secrets have been set, you should see something like this in your UI:

Using existing certificates and profiles
If you already have existing distribution code signing files that you want to use, you can skip creating the certificate private key outlined in the previous step, and instead provide your certificate, profile, and password as additional secrets in your GitHub repository. Make sure that you are using a distribution certificate and the profile includes the certificate, otherwise the pipeline will fail.
To use the existing code signing files, you need to create the following secrets in addition to the APP_STORE_CONNECT_PRIVATE_KEY secret shown in the Configure secrets and variables step:
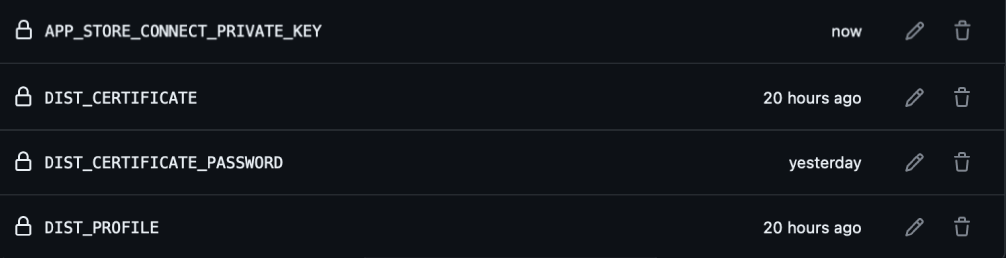
DIST_CERTIFICATE: This is the content of your distribution certificate file. It is a binary file that has a.p12extension. You need to base64 encode the file content and copy it to the secret value field. Base64 encoding is a way of converting binary data to text data that can be easily transmitted and stored. You can use a graphical tool or a terminal command to base64 encode the file. For example, on macOS, you can use the following terminal command to base64 encode the file and copy it to your clipboard:base64 -i <cert_name>.p12 | pbcopyDIST_CERTIFICATE_PASSWORD: This is the password of your distribution certificate file. It is a text value that you entered when you exported the certificate from Keychain Access or created it using a terminal command. You can copy and paste the password directly to the secret value field.DIST_PROFILE: This is the content of your distribution profile file. It is a binary file that has a.mobileprovisionextension. You need to base64 encode the file content and copy it to the secret value field. You can use the same method as for the certificate file to base64 encode and copy the profile file.base64 -i <profile_name>.mobileprovision | pbcopy
After all the required secrets have been set, you should see something like this in your UI:
Setting up the GitHub Actions pipeline
In this section, you’ll learn how to use GitHub Actions to automate the building of your Flutter app and upload it to App Store Connect using Codemagic CLI tools.
Remember to save your own YAML files in the .github/workflows/ directory of your project, and ensure they have the .yaml extension.
GitHub Actions come with Python pre-installed. For Codemagic CLI tools, Python 3.8 or higher is required. You can use the setup-python action for a specific version.
Furthermore, again, as previously said, there are also two ways of setting things up within our pipeline: automatic generation of code signing files, or using existing signing credentials. Regardless, the YAML structure and commands are similar, and I’ll show examples and a full pipeline for both.
Here’s a simple GitHub Actions YAML file that echoes Hello world!:
name: Hello World Workflow
on: [push]
jobs:
  build:
    runs-on: ubuntu-latest
    steps:
      - name: Echo Hello World
        run: echo "Hello, World!"
The workflow is triggered on any push to the repository and runs on the latest ubuntu environment (ubuntu-latest).
However, we’ll need to modify some things to get everything working correctly for us. First, for testing purposes, we’ll set the workflow to trigger manually (workflow_dispatch). We’ll also need to set up the pipeline to use our previously configured environment variables and secrets to interact with App Store Connect and to sign the app.
Thus, to build and deploy your iOS application, you should make the following changes and/or additions to your YAML:
You need to fetch the code from your repository: Use the actions/checkout@v4 action to checkout your repository onto the runner:
- uses: actions/checkout@v4Change the machine, otherwise the pipeline won’t be able to properly compile your application: Modify the runs-on to use
macos-latest:runs-on: macos-latestNote: When using the
macos-latestlabel, the actual machine used may not be the latest available version. If you encounter an error at this step, please check the currently available version here and, if necessary, specify the version directly (e.g.,macos-15).Set up Flutter: Use the subosito Flutter action for that. We’ll use the stable channel, but it’s possible to select a specific version or some other channel:
- name: Set up Flutter
  uses: subosito/flutter-action@v2
  with:
    channel: 'stable'
Install Codemagic CLI tools: Add a job to install the Codemagic CLI tools:
- name: Install Codemagic CLI tools
  run: pip install codemagic-cli-tools
Set up environment variables: Depending on whether you’re using existing credentials or want Codemagic to handle the creation of signing files, set up your environment section accordingly. Note that variables can be set in the pipeline with the
varsprefix, and secrets with thesecretsprefix:build: runs-on: macos-latest env: APP_STORE_CONNECT_ISSUER_ID: ${{ vars.APP_STORE_CONNECT_ISSUER_ID }} APP_STORE_CONNECT_KEY_IDENTIFIER: ${{ vars.APP_STORE_CONNECT_KEY_IDENTIFIER }} APP_STORE_CONNECT_PRIVATE_KEY: ${{ secrets.APP_STORE_CONNECT_PRIVATE_KEY }} CERTIFICATE_PRIVATE_KEY: ${{ secrets.CERTIFICATE_PRIVATE_KEY }} APP_STORE_APPLE_ID: ${{ vars.APP_STORE_APPLE_ID }}If you are setting things up with existing credentials, you’ll need to adjust your setup. Instead of
CERTIFICATE_PRIVATE_KEY, add the secrets that you have configured in the previous steps:DIST_CERTIFICATE: ${{ secrets.DIST_CERTIFICATE }} DIST_CERTIFICATE_PASSWORD: ${{ secrets.DIST_CERTIFICATE_PASSWORD }} DIST_PROFILE: ${{ secrets.DIST_PROFILE }}Initialize keychain: Use the
keychain initializecommand to initialize a new keychain for code signing.- name: Set up keychain run: keychain initializeFetch signing files or set up existing files: If you want the CLI tools to generate new files, use the
app-store-connect fetch-signing-filescommand. If you want to use existing files, decode them in the build machine. In both cases you can add the certificates to the keychain with thekeychain add-certificatescommand:Option 1 - Fetch signing files
- name: Fetch signing files run: | app-store-connect fetch-signing-files $(xcode-project detect-bundle-id) \ --type IOS_APP_STORE \ --create - name: Set up signing certificate run: keychain add-certificatesOption 2 - Set up with existing files
If you went with the existing credentials approach, then instead of the scripts above, use the following scripts:
- name: Set up Provisioning profiles run: | PROFILES_HOME="$HOME/Library/MobileDevice/Provisioning Profiles" mkdir -p "$PROFILES_HOME" PROFILE_PATH="$(mktemp "$PROFILES_HOME"/$(uuidgen).mobileprovision)" echo ${DIST_PROFILE} | base64 --decode > "$PROFILE_PATH" echo "Saved provisioning profile $PROFILE_PATH" - name: Set up signing certificate run: | echo $DIST_CERTIFICATE | base64 --decode > /tmp/certificate.p12 keychain add-certificates --certificate /tmp/certificate.p12 --certificate-password $DIST_CERTIFICATE_PASSWORDUnfortunately, with GitHub Actions, we’ll have to accept that some steps require some not-so-pretty scripts and work to set everything up. If you’ve previously used the Codemagic CI/CD itself (not explicitly the tools), then you might know that a lot of this boilerplate code is prettified into different YAML sections.
Note: For Option 1, we use the
xcode-project detect-bundle-idaction to get the bundle ID from our project. This could be replaced by a hard-coded value, but the current approach mitigates the risk of making any typos or mistakes, as it can be quite difficult to find the issue, if the bundle ID does not match in App Store Connect and the pipeline.Set up code signing settings on Xcode project: Use the
xcode-project use-profilescommand to configure the Xcode project to use the fetched or decoded signing profiles:- name: Set up code signing settings on Xcode project run: xcode-project use-profilesIncrement build number: Increment the build number of the app using
app-store-connect get-latest-testflight-build-numbercommand to get the latest build number from TestFlight. Use theagvtool new-version -allcommand to increment the version by 1:- name: Increment build number run: | cd ios agvtool new-version -all $(($(app-store-connect get-latest-testflight-build-number "$APP_STORE_APPLE_ID") + 1))Note: In Codemagic CLI tools, the same command exists for Google Play. I reckon it’s one of the most useful tools, as versioning can be notoriously annoying to be set up in a consistent manner - especially when deploying to both stores. It also guarantees that each new build has an increment of one, instead of relying on some pseudo-build-numbers for versioning.
Build ipa for distribution: Build the .ipa file for distribution using the
flutter build ipacommand with the--releaseflag to build the app in release mode. In addition add the--export-options-plistflag to properly set the archiving settings:- name: Build ipa for distribution run: | flutter build ipa --release --export-options-plist=$HOME/export_options.plistThe
export_options.plistfile is the output of thexcode-project use-profilescommand.Publish the app to App Store Connect: Use the
app-store-connect publishcommand to publish the built app archive to App Store Connect by passing the file path to the command with the--pathflag:- name: Publish the app to App Store Connect run: | APP_FILE=$(find $(pwd) -name "*.ipa") app-store-connect publish \ --path "$APP_FILE"
And that’s it! With this workflow, you can automate the process of publishing your iOS app to App Store Connect with GitHub Actions and Codemagic CLI tools.
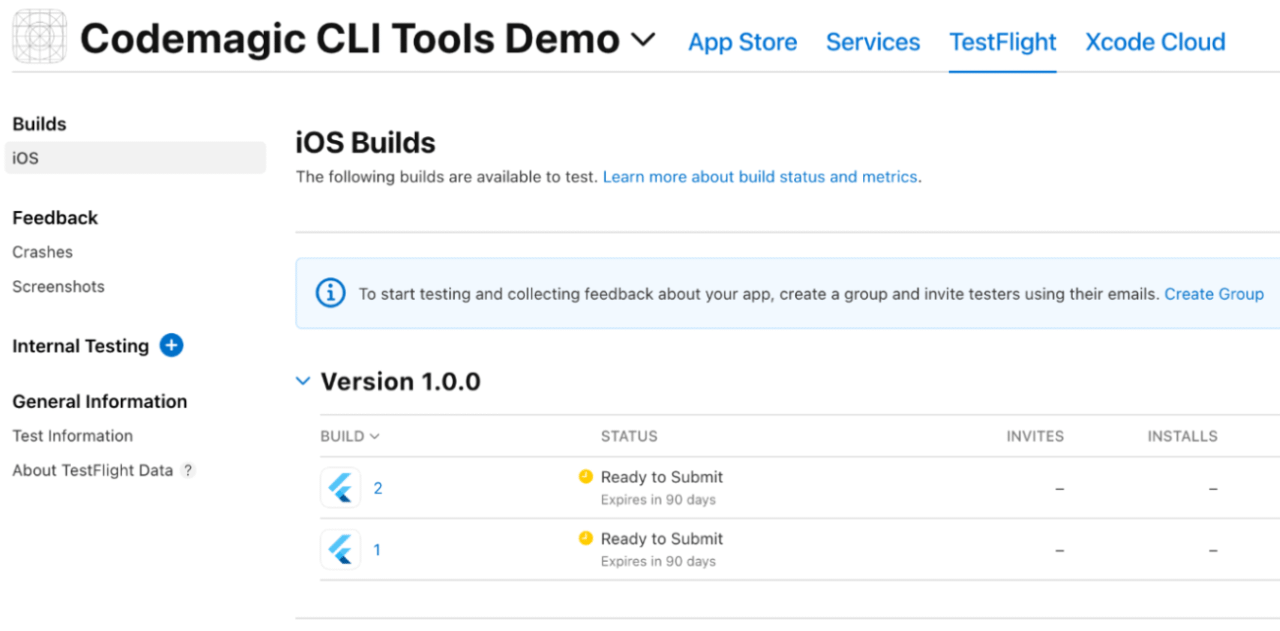
With this pipeline, you can ensure that each new build will upload the app with an incremented build version. In the following screenshot, you can see the outcome of running both of the workflows (with automatic signing and manual). In case you set up only one of the pipelines (which makes sense), then of course you chould end up with only one build. :)
You can find complete YAML examples in the sections below, as well as in the demo demo project repository created for this article.
Full example pipeline with the automatic approach
Below is the complete pipeline that demonstrates using Codemagic CLI tools to handle the generation of new code signing credentials (certificate and profiles):
name: Publish to App Store Connect
on:
workflow_dispatch:
jobs:
build:
  runs-on: macos-latest
  env:
    APP_STORE_CONNECT_ISSUER_ID: ${{ vars.APP_STORE_CONNECT_ISSUER_ID }}
    APP_STORE_CONNECT_KEY_IDENTIFIER: ${{ vars.APP_STORE_CONNECT_KEY_IDENTIFIER }}
    APP_STORE_CONNECT_PRIVATE_KEY: ${{ secrets.APP_STORE_CONNECT_PRIVATE_KEY }}
    CERTIFICATE_PRIVATE_KEY: ${{ secrets.CERTIFICATE_PRIVATE_KEY }}
    APP_STORE_APPLE_ID: ${{ vars.APP_STORE_APPLE_ID }}
steps:
- uses: actions/checkout@v4
- name: Set up Flutter
uses: subosito/flutter-action@v2
with:
channel: 'stable'
- name: Install Codemagic CLI tools
run: pip install codemagic-cli-tools
- name: Set up keychain
run: keychain initialize
- name: Fetch signing files
run: |
app-store-connect fetch-signing-files $(xcode-project detect-bundle-id) \
--type IOS_APP_STORE \
--create
- name: Set up signing certificate
run: keychain add-certificates
- name: Set up code signing settings on Xcode project
run: xcode-project use-profiles
- name: Increment build number
run: |
cd ios
agvtool new-version -all $(($(app-store-connect get-latest-testflight-build-number "$APP_STORE_APPLE_ID") + 1))
- name: Build ipa for distribution
run: |
flutter build ipa --release --export-options-plist=$HOME/export_options.plist
- name: Publish the app to App Store Connect
run: |
APP_FILE=$(find $(pwd) -name "*.ipa")
app-store-connect publish \
--path "$APP_FILE"
Full example pipeline with existing certificate and profiles
Below is the complete example that demonstrates using existing code signing credentials in your pipeline:
name: Publish to App Store Connect (manual)
on:
workflow_dispatch:
jobs:
build:
runs-on: macos-latest
env:
APP_STORE_CONNECT_ISSUER_ID: ${{ vars.APP_STORE_CONNECT_ISSUER_ID }}
APP_STORE_CONNECT_KEY_IDENTIFIER: ${{ vars.APP_STORE_CONNECT_KEY_IDENTIFIER }}
APP_STORE_CONNECT_PRIVATE_KEY: ${{ secrets.APP_STORE_CONNECT_PRIVATE_KEY }}
    DIST_CERTIFICATE: ${{ secrets.DIST_CERTIFICATE }}
    DIST_CERTIFICATE_PASSWORD: ${{ secrets.DIST_CERTIFICATE_PASSWORD }}
    DIST_PROFILE: ${{ secrets.DIST_PROFILE }}
APP_STORE_APPLE_ID: ${{ vars.APP_STORE_APPLE_ID }}
steps:
- uses: actions/checkout@v4
- name: Set up Flutter
uses: subosito/flutter-action@v2
with:
channel: 'stable'
- name: Install Codemagic CLI tools
run: pip install codemagic-cli-tools
- name: Set up keychain
  run: keychain initialize
- name: Set up Provisioning profiles
  run: |
    PROFILES_HOME="$HOME/Library/MobileDevice/Provisioning Profiles"
    mkdir -p "$PROFILES_HOME"
    PROFILE_PATH="$(mktemp "$PROFILES_HOME"/$(uuidgen).mobileprovision)"
    echo ${DIST_PROFILE} | base64 --decode > "$PROFILE_PATH"
    echo "Saved provisioning profile $PROFILE_PATH"
- name: Set up signing certificate
  run: |
    echo $DIST_CERTIFICATE | base64 --decode > /tmp/certificate.p12
    keychain add-certificates --certificate /tmp/certificate.p12 --certificate-password $DIST_CERTIFICATE_PASSWORD
- name: Set up code signing settings on Xcode project
  run: xcode-project use-profiles
- name: Increment build number
  run: |
    cd ios
    agvtool new-version -all $(($(app-store-connect get-latest-testflight-build-number "$APP_STORE_APPLE_ID") + 1))
- name: Build ipa for distribution
  run: |
    flutter build ipa --release --export-options-plist=$HOME/export_options.plist
- name: Publish the app to App Store Connect
  run: |
    APP_FILE=$(find $(pwd) -name "*.ipa")
    app-store-connect publish \
    --path "$APP_FILE"
Bonus - Local usage and more tools!
In addition to being able to utilize Codemagic CLI tools in various CI/CD pipelines, they work great in your local environment as well. Similarly to your CI/CD environment, if you wish to run them locally, you will have to have Python 3.8+ installed.
To start, you can install the tools with this simple command:
pip3 install codemagic-cli-tools
Running the tools locally can be useful for various reasons. For example, you can test setting up your environment (e.g. variables, configurations) locally before attempting to do so in a CI/CD pipeline. This can help you reduce the number of issues and simplify debugging in case you’ve accidentally incorrectly set some variables. In addition - this might help you potentially save some precious build minutes.
The Codemagic docs have some great examples of how to use some of the tools locally for archiving the application. But there is one thing you should remember: after running keychain initialize on a local machine, you should also run keychain use-login to set your login keychain as the default. This will prevent any authentication problems with your apps.
But the tools are not limited to archiving: Codemagic CLI tools can make your life easier regarding other various tasks, such as generating changelogs, managing review submissions, or registering devices.
Generating changelogs
Running git-changelog generate will create a textual overview of changes (commits) you have made in your repository:
vearnold@Arnolds-MBP cm_cli_tools_demo % git-changelog generate
* Add manual pipeline
* Add pipeline
* Create flutter demo project
Generated 3 change log lines
More information about the git-changelog tool can be found in the official documentation.
Review submissions
You can use the app-store-connect review-submissions command to create, list, and manage review submissions. This can be very handy when you want to automate the process of submitting your app for review (either locally or in a pipeline). You can use this tool to check the status of your build (as in most cases it is not processed instantly) and submit it when it’s ready.
This has been made super easy for Codemagic CI/CD users as the feature is already built into the pipeline and there’s no need to set up your own script to ping Apple. It’s also done free-of-charge in the sense that Codemagic does it during the Post-processing step after the build has already completed, which does not consume build minutes. But as said, this can still be very well utilized in other pipelines or locally as well!
More information about the review-submissions tool and its usage can be found in the official documentation.
Registering devices
Another useful tool is app-store-connect devices register, which allows you to register a device to your provisioning profile. This is very convenient when you want to test your app on a new device. You don’t have to go to the Apple Developer Portal and do it there manually. You can just run this command with the name and UDID of your device:
app-store-connect devices register --name iPhone8-Arnold --udid <device_udid>
This works very well (even better) if you have a large number of test devices, as you can save yourself the headache of adding them one-by-one in the Apple Developer portal. The command can accept multiple devices!
More information about the app-store-connect devices tool and its usage can be found in the official documentation.
Conclusion
While Codemagic CI/CD itself offers a streamlined, up-to-date environment optimized for mobile development, code signing, and straightforward YAML configurations, the CLI tools offer additional features that can be leveraged in pipelines both within Codemagic and outside. Whether you’re working locally or in a CI/CD pipeline, these tools provide a flexible solution for building and publishing your mobile apps.
In this article, I went over the steps to publish an iOS build to App Store Connect with the use of Codemagic CLI tools within a GitHub Actions pipeline, demonstrating their ease of use and aforementioned flexibility. I highly encourage you to give them a try! :)
Additionally, by setting up a similar workflow for Google Play alongside the App Store Connect, you can further streamline your development process.
Check out the following article for more details👇
Deploy your app to Google Play with Codemagic CLI tools and GitHub Actions


