


This article is written by Masaki Sato
We previously explored how Codemagic CLI tools can streamline iOS app deployment to App Store Connect with GitHub Actions. The Codemagic team has continuously improved these tools, extending their capabilities to Android releases on Google Play Console.
What are Codemagic CLI tools?
Codemagic CLI tools are free, open-source utilities that power Codemagic’s CI/CD platform internally. These tools help streamline mobile development workflows including app building, code signing, and store deployment.
Their standout feature is cross-platform compatibility — you can use the same toolset for both iOS and Android projects. Unlike Codemagic’s cloud-based CI/CD service, these CLI tools provide the flexibility to run builds locally on your development machine or integrate with any CI/CD platform like GitHub Actions. Built with user-friendliness in mind, these tools offer a gentle learning curve while providing powerful capabilities for experienced developers.
In this article, I’ll show you how to deploy Flutter apps to Google Play Console using these CLI tools with GitHub Actions.
By implementing the content of this article, you’ll be able to streamline your app distribution process and save significant time and resources.
Requirements
To follow the steps in this article, you will need the following:
Registering a Google Play Developer Account
Releasing on the Google Play Store requires a paid account registration.
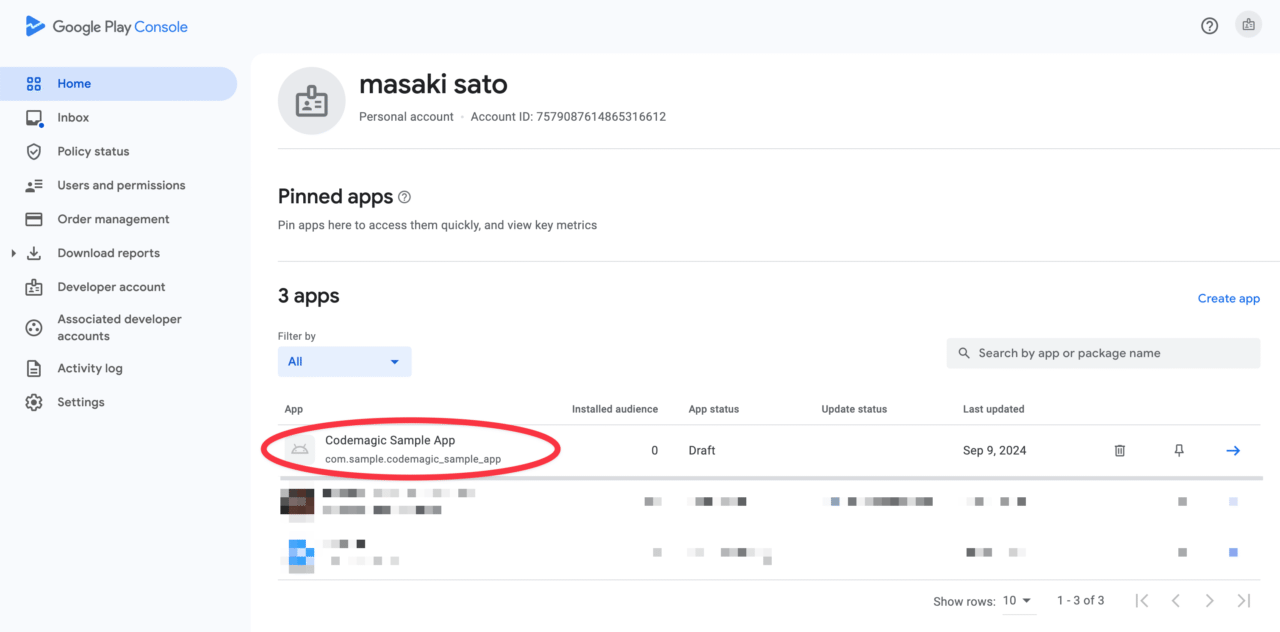
Registering the App on Google Play Console
The app must already be created on the Google Play Console.
Preparation
First, let’s perform the necessary preparations to create the Codemagic workflow.
Checking the Keystore Configuration
Open the Flutter project you are using in your IDE.
Check the /android/key.properties file, which contains the jks file and the storePassword, keyPassword, and keyAlias for uploading to Google Play.
Example:
storePassword=XXXXXXXX
keyPassword=XXXXXXXX
keyAlias=upload
storeFile=upload-keystore.jks
If the jks file has not been created yet, create it with the following command:
keytool -genkey -v -keystore ~/upload-keystore.jks -keyalg RSA \
        -keysize 2048 -validity 10000 -alias upload
For details, please refer to the official documentation.
Keep the created file and the passwords used during the creation process handy.
Checking the build.gradle Configuration
Open the app-level build.gradle or build.gradle.kts file.
Make sure it is set up to reference key.properties as follows:
build.gradle
// ...

def keystoreProperties = new Properties()
def keystorePropertiesFile = rootProject.file('key.properties')
if (keystorePropertiesFile.exists()) {
    keystoreProperties.load(new FileInputStream(keystorePropertiesFile))
}

android {
    // ...

    signingConfigs {
        release {
            keyAlias = keystoreProperties['keyAlias']
            keyPassword = keystoreProperties['keyPassword']
            storeFile = keystoreProperties['storeFile'] ? file(keystoreProperties['storeFile']) : null
            storePassword = keystoreProperties['storePassword']
        }
    }
    buildTypes {
        release {
            signingConfig = signingConfigs.release
        }
    }
// ...
}
build.gradle.kts
import java.util.Properties
import java.io.FileInputStream

plugins {
   ...
}

val keystoreProperties = Properties()
val keystorePropertiesFile = rootProject.file("key.properties")
if (keystorePropertiesFile.exists()) {
    keystoreProperties.load(FileInputStream(keystorePropertiesFile))
}

android {
    // ...

    signingConfigs {
        create("release") {
            keyAlias = keystoreProperties["keyAlias"] as String
            keyPassword = keystoreProperties["keyPassword"] as String
            storeFile = keystoreProperties["storeFile"]?.let { file(it) }
            storePassword = keystoreProperties["storePassword"] as String
        }
    }
    buildTypes {
        release {
            signingConfig = signingConfigs.getByName("release")
        }
    }
...
}
For details, please refer to the official documentation.
The
key.propertiesfile itself will be automatically generated by Codemagic during execution, so it does not need to be committed to the repository (do not include it in version control as it contains sensitive information).
Setting up Google Play API Access
Set up the necessary API access to publish the app to Google Play via Codemagic.
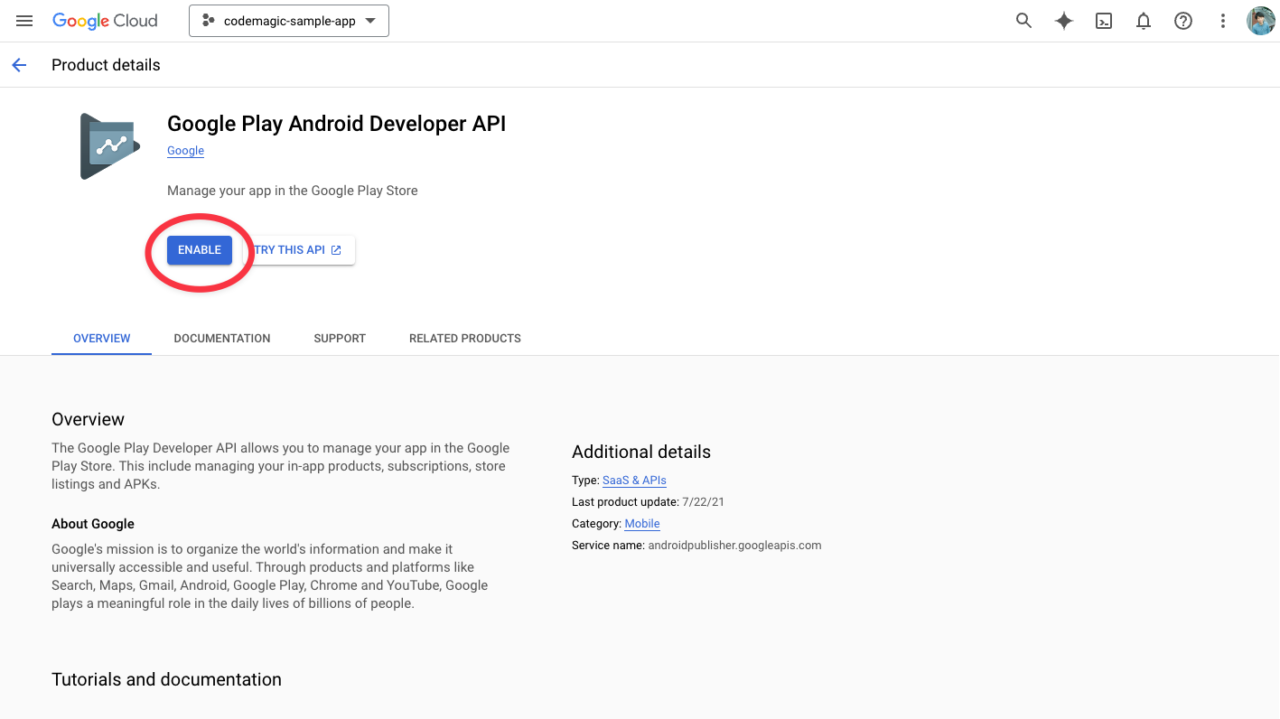
Open the project for the target app in the Google Cloud Console (create a new project from here if necessary).
Enable the Google Play Android Developer API.
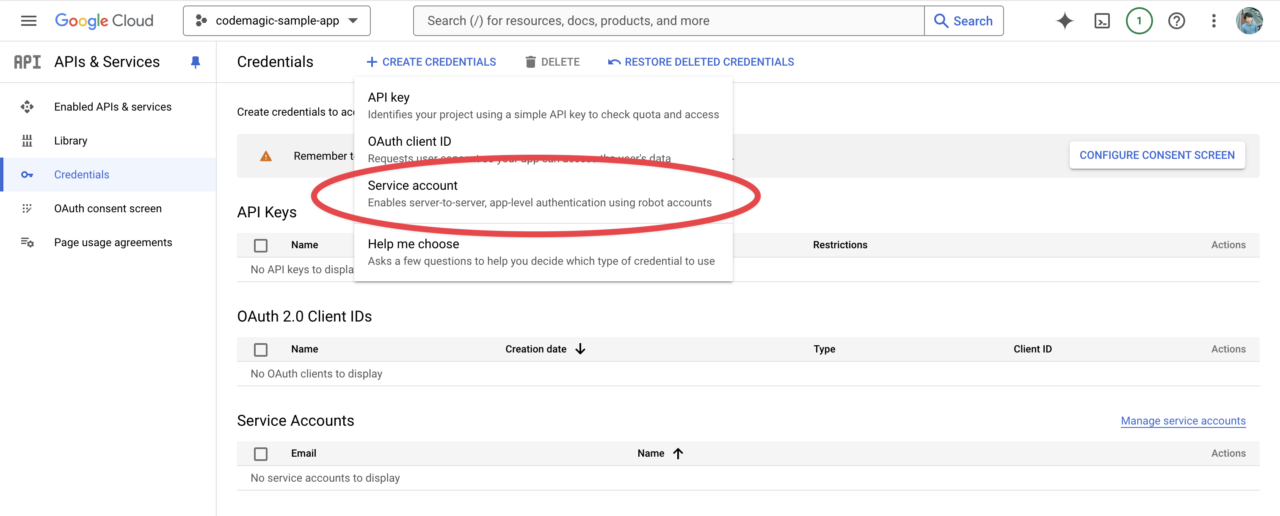
From the Credentials menu page, create a new service account by clicking “CREATE CREDENTIALS”.
In the first step, enter the account name and description.
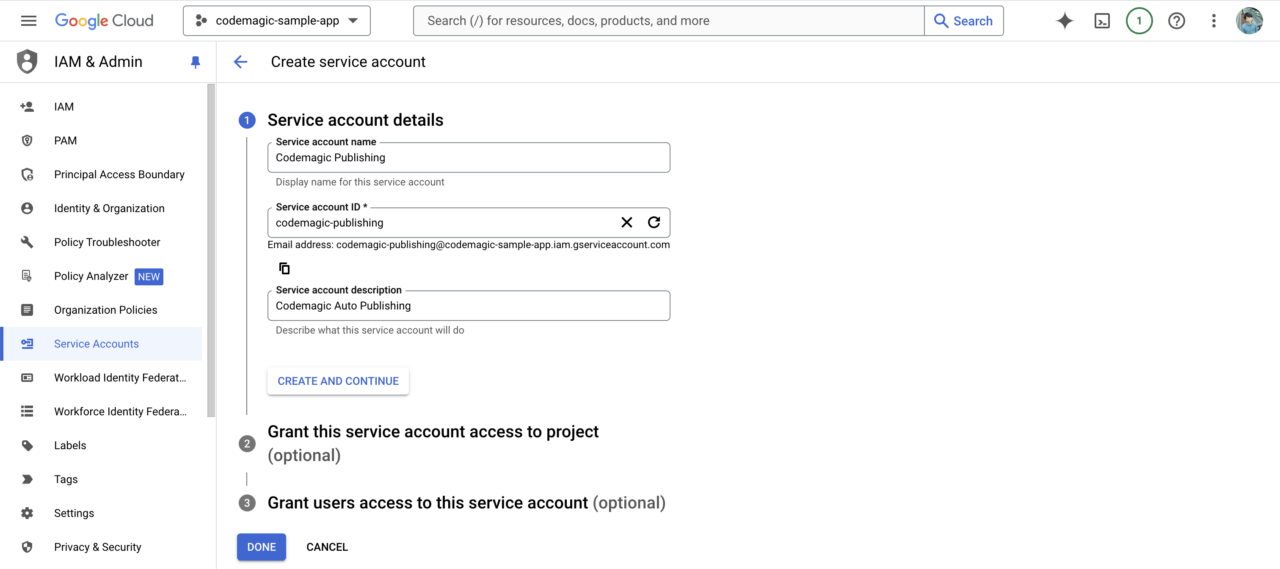
In the second step, select the role Service Accounts > Service Account User.
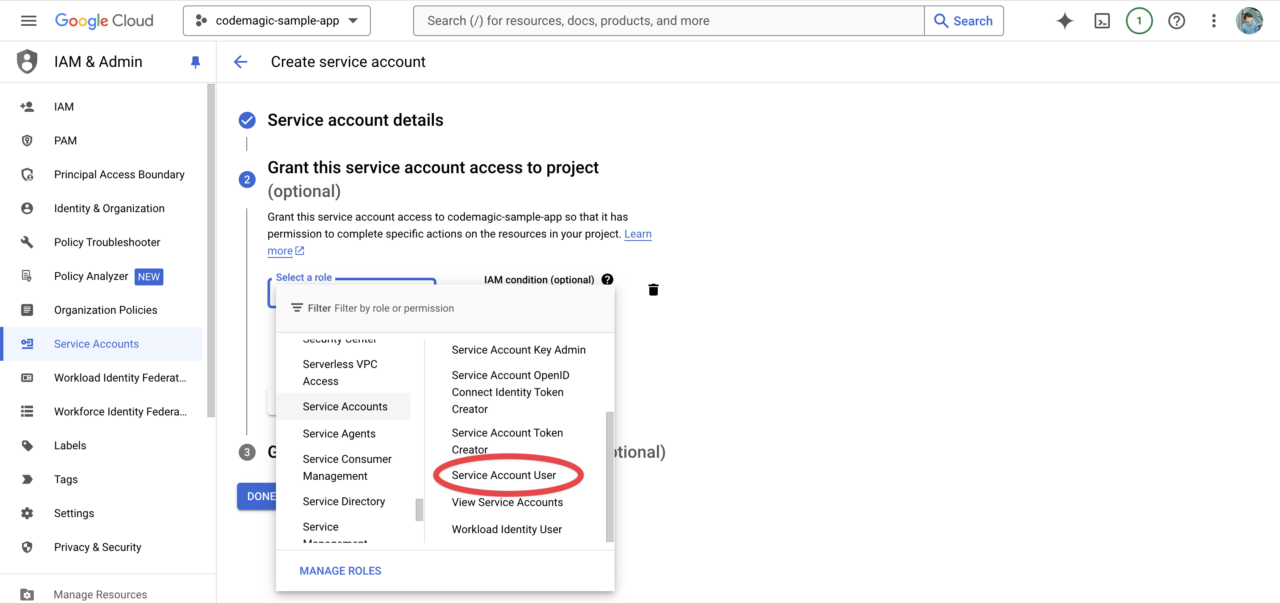
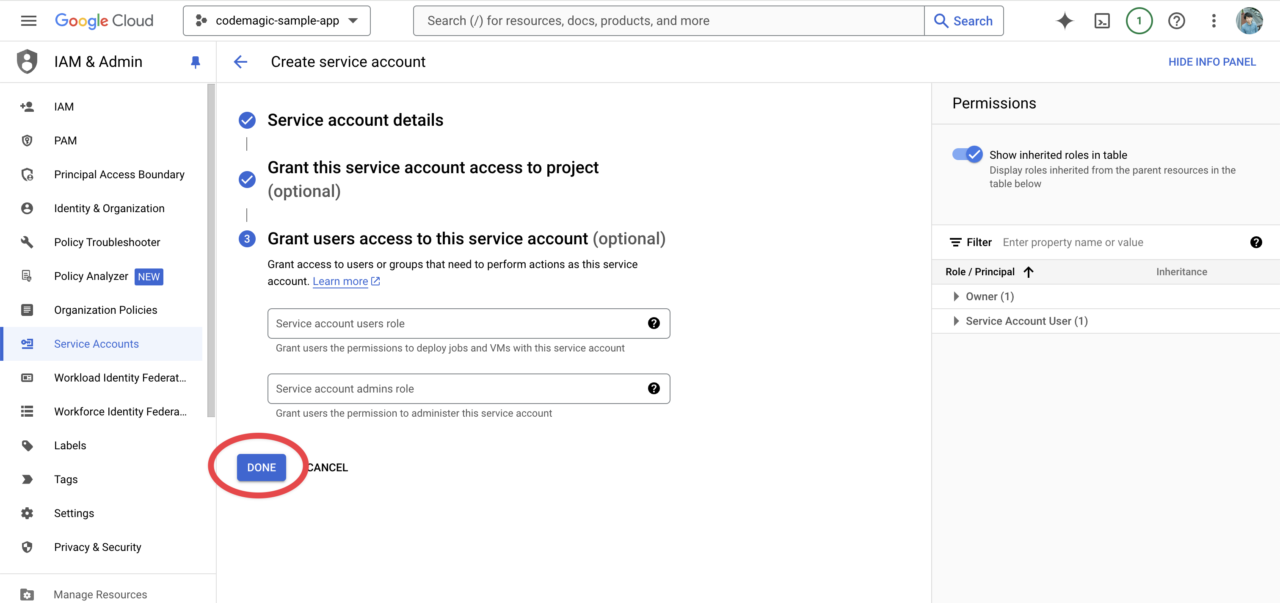
The third step is unnecessary, so click Done to complete.
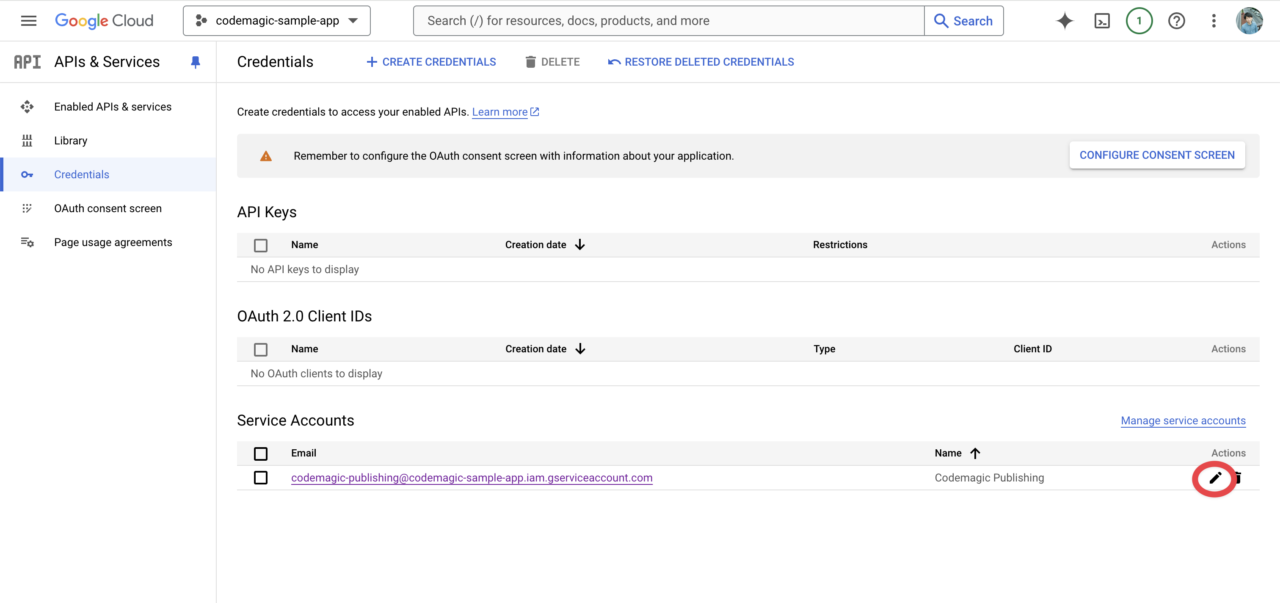
Open the edit screen from the Actions column of the created service account.
From the Keys tab, click Create new key.
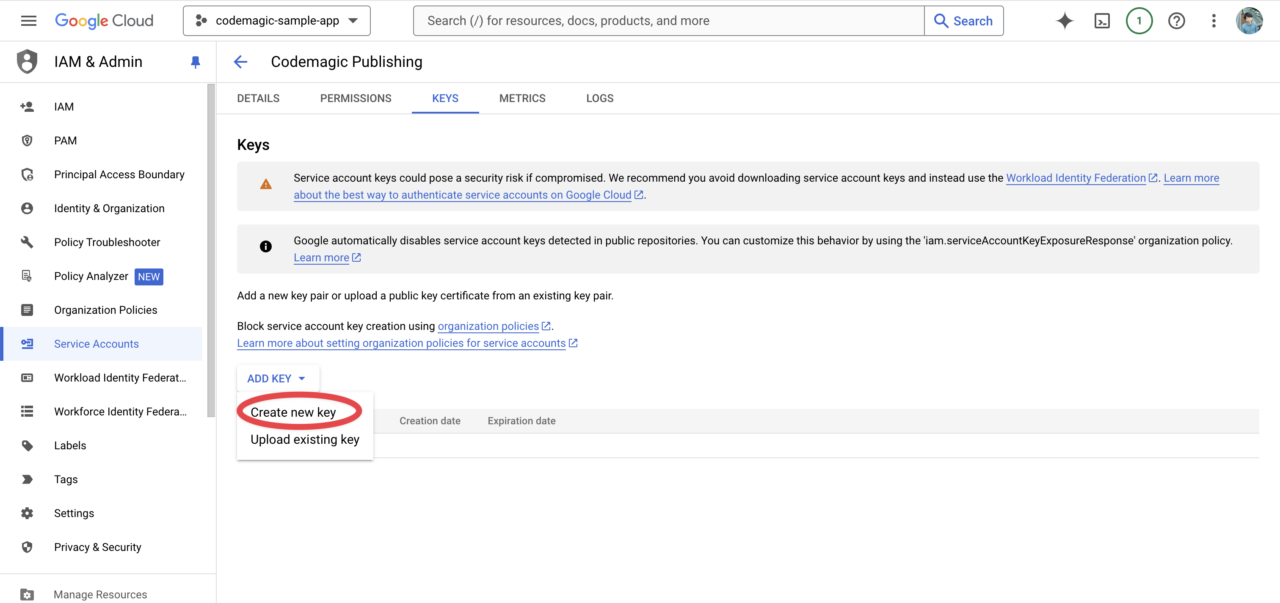
Select JSON for the key type and create a new key.
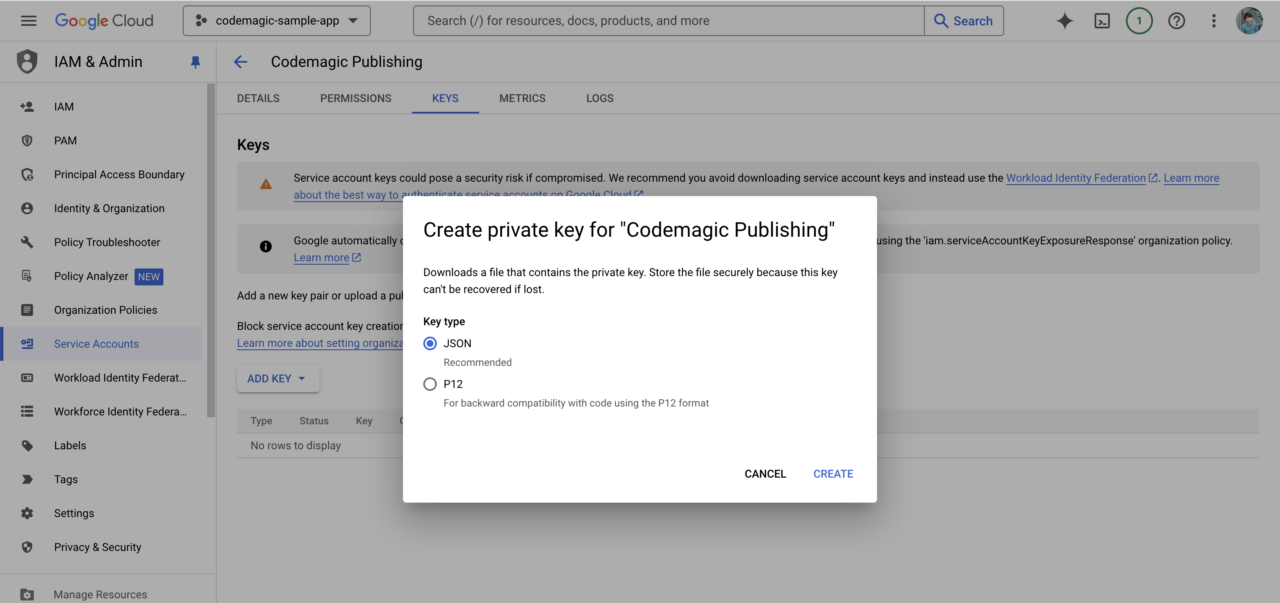
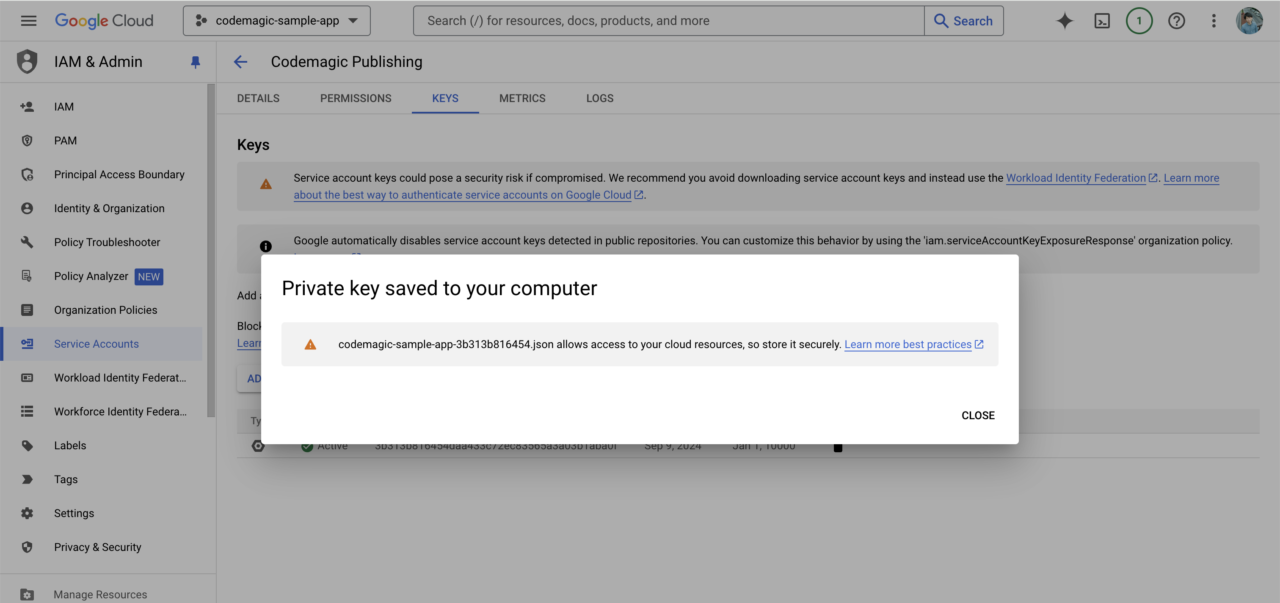
A private key for this service account will be downloaded. Keep it in a safe place as it will be needed for Codemagic settings later.
Once this is done, go to the Google Play Console.
Click
Invite new useron the Users and permissions page.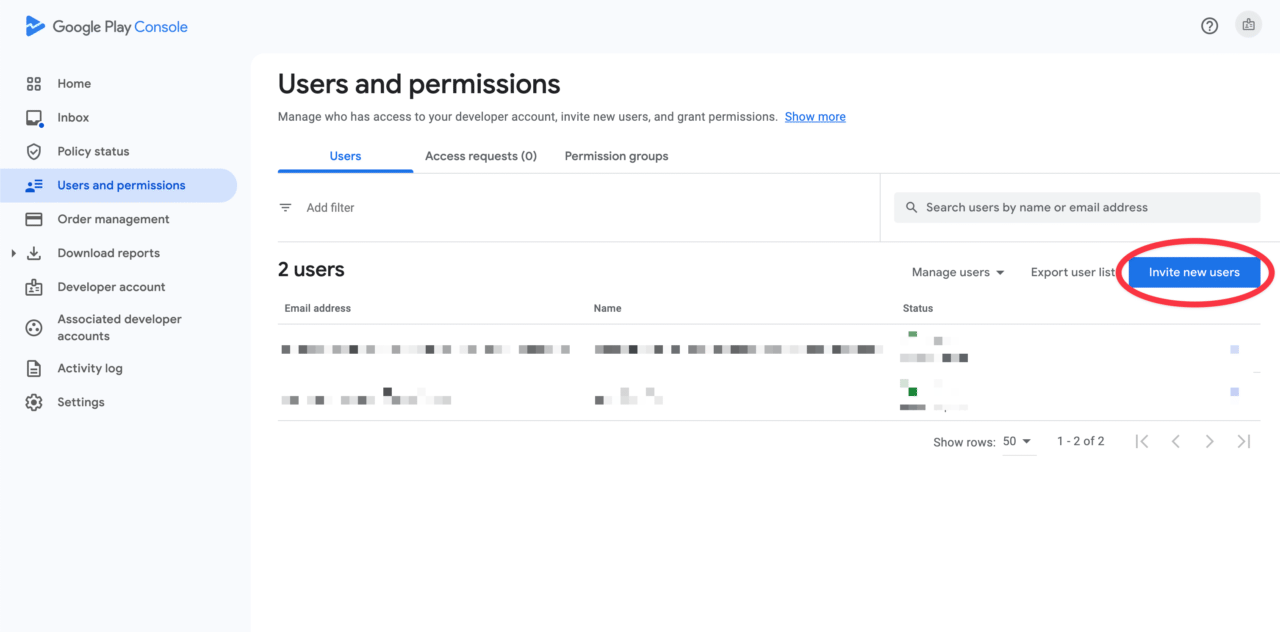
Enter the email address of the service account created earlier.
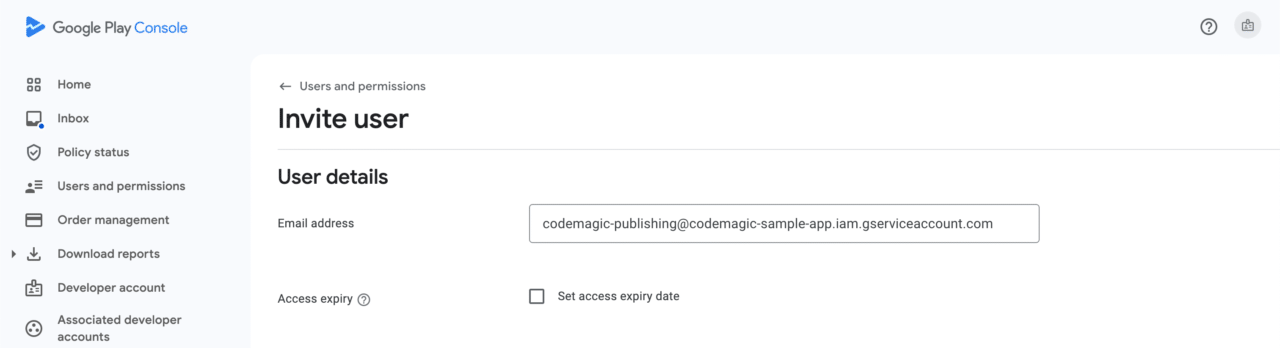
Select the relevant app from
Add app.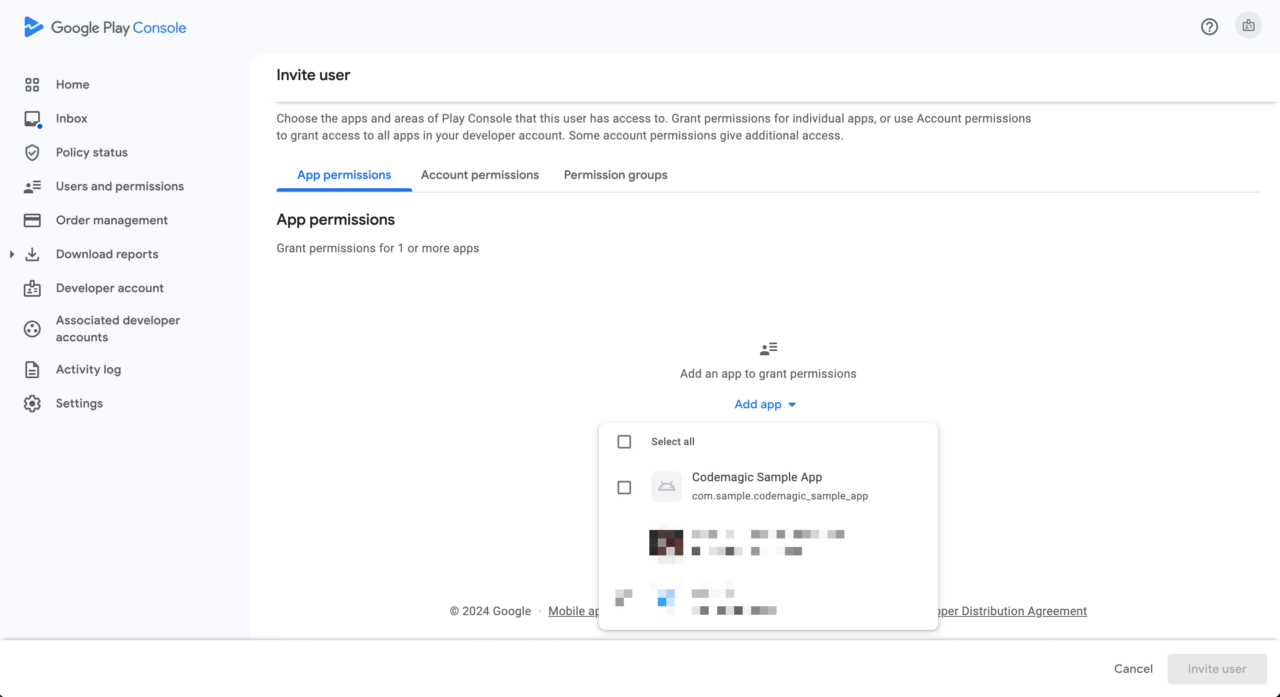
Grant release section permissions and click
Apply.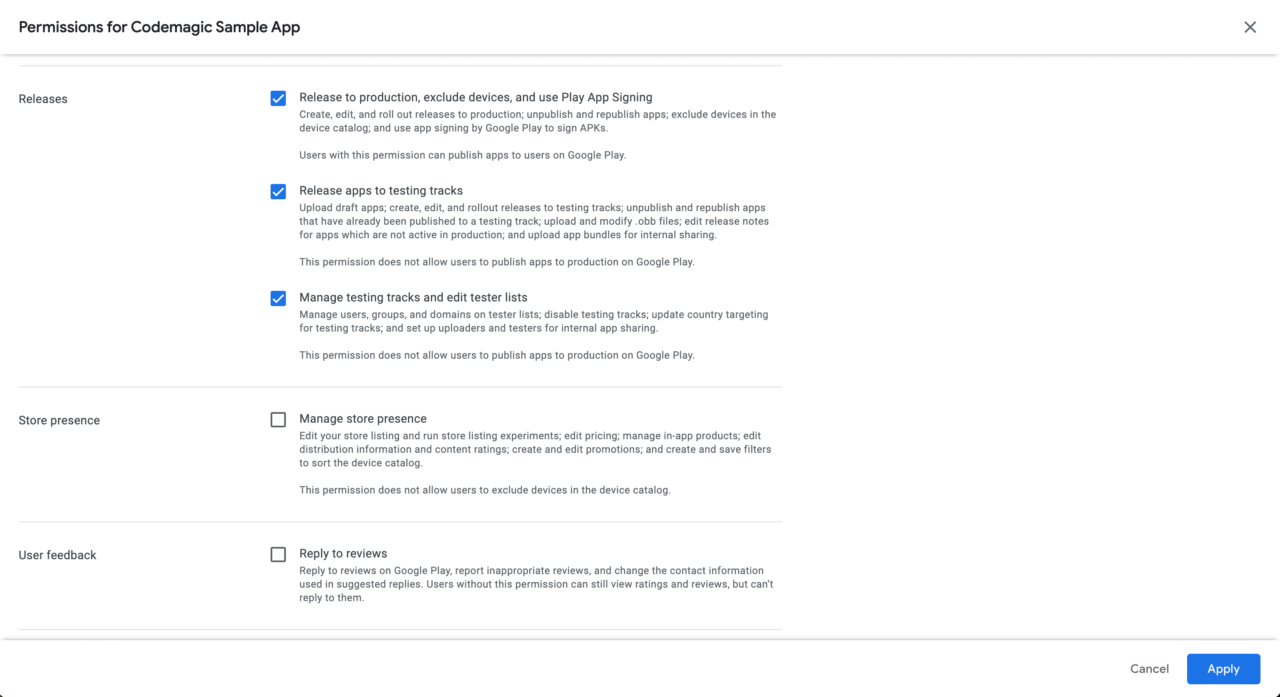
Invite the service account by clicking
Invite user.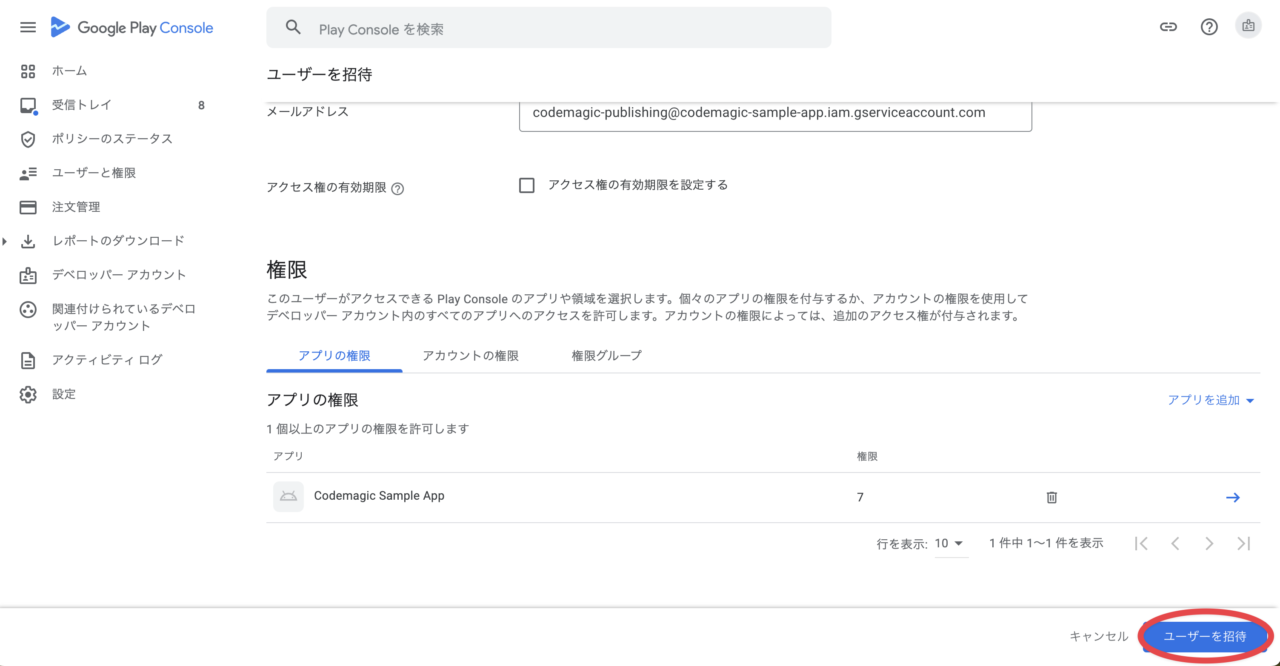
Setting up the environment
This section explains how to set up repository variables and secrets that will be needed later in the pipeline.
To use Codemagic CLI tools with GitHub Actions, you need to set up variables and secrets in your repository. Variables are text values that can be referenced within workflows, while secrets are encrypted and allow you to securely manage sensitive information (such as passwords and certificates).
You can add new values from Settings > Secrets and Variables in your GitHub repository:
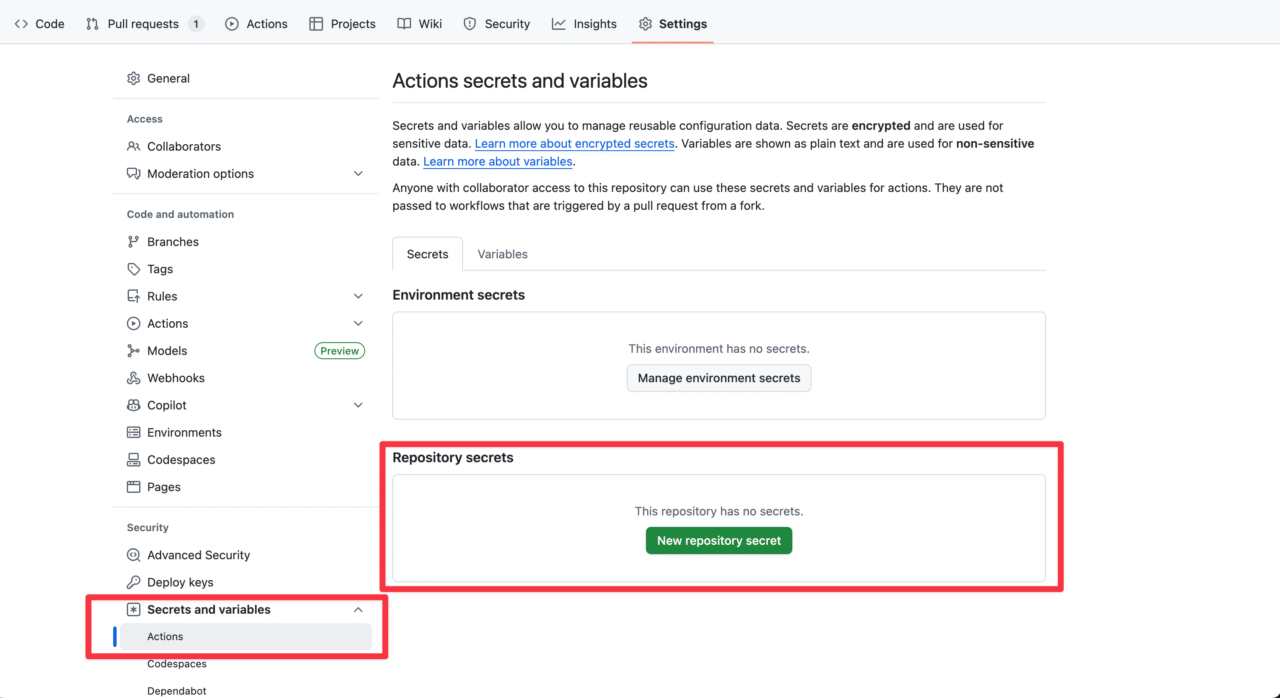
Let’s input the values prepared during the preparation phase.
Setting up Variables
Set up the following variables:
ANDROID_KEY_ALIAS: The value ofkeyAliasinkey.properties(e.g.,upload).ANDROID_KEYSTORE_FILENAME: The value ofstoreFileinkey.properties(e.g.,upload-keystore.jks).GOOGLE_PLAY_PACKAGE_NAME: The package name of the app registered in Google Play (e.g., com.example.app).
Setting up Secrets
Set up the following secrets:
ANDROID_KEYSTORE: The JKS upload key. If it’s stored inandroid/app/upload-keystore.jksas in the preparation example, you can copy the base64 encoded value to the clipboard by running the following command from the project root:
openssl base64 < android/app/upload-keystore.jks | pbcopy
ANDROID_KEYSTORE_PASSWORD: The value ofstorePasswordinkey.properties.ANDROID_KEY_PASSWORD: The value ofkeyPasswordinkey.properties.GOOGLE_PLAY_SERVICE_ACCOUNT_CREDENTIALS: The JSON key for the service account. This is the one you saved in step 10 of the “Setting up Google Play API Access” preparation section. Paste the contents of the file.
Setting up the GitHub Actions pipeline
In this section, you’ll learn how to use GitHub Actions to build your Flutter app and upload it to Google Play using Codemagic CLI tools.
YAML files should be saved in your project’s .github/workflows/ directory with the .yaml extension.
GitHub Actions comes with Python pre-installed. Codemagic CLI tools require Python 3.8 or higher, but you can also explicitly specify a version using setup-python.
First, let’s start with a simple example that outputs Hello world! to get familiar with GitHub Actions:
name: Hello World Workflow
on: [push]
jobs:
  build:
    runs-on: ubuntu-latest
    steps:
      - name: Echo Hello World
        run: echo "Hello, World!"
This workflow is triggered by any push to the repository and runs on the latest Ubuntu environment (ubuntu-latest).
To make it work according to our requirements, we need to make several modifications. First, for testing purposes, we’ll set the workflow to trigger manually (workflow_dispatch). We also need to configure the pipeline to use the repository variables and secrets we set up earlier to integrate with Google Play.
Follow these steps to add and modify the YAML:
- Code checkout
Use the actions/checkout@v4 action to checkout your repository code to the runner.
- uses: actions/checkout@v4
- Set up Flutter
Use subosito/flutter-action. Here we use the stable channel, but you can select a specific version or other channels.
- name: Set up Flutter
  uses: subosito/flutter-action@v2
  with:
    channel: stable
- Install Codemagic CLI tools
Add a job to install the Codemagic CLI tools.
- name: Install Codemagic CLI tools
  run: pip install codemagic-cli-tools
Set up environment variables Configure the environment variables for use in the pipeline that we registered in the previous section. Reference variables with the
varsprefix and secrets with thesecretsprefix.build: runs-on: ubuntu-latest env: # Google Play authentication - Service account JSON key GOOGLE_PLAY_SERVICE_ACCOUNT_CREDENTIALS: ${{ secrets.GOOGLE_PLAY_SERVICE_ACCOUNT_CREDENTIALS }} # Android signing information ANDROID_KEYSTORE_FILENAME: ${{ vars.ANDROID_KEYSTORE_FILENAME }} ANDROID_KEY_ALIAS: ${{ vars.ANDROID_KEY_ALIAS }} ANDROID_KEYSTORE: ${{ secrets.ANDROID_KEYSTORE }} ANDROID_KEYSTORE_PASSWORD: ${{ secrets.ANDROID_KEYSTORE_PASSWORD }} ANDROID_KEY_PASSWORD: ${{ secrets.ANDROID_KEY_PASSWORD }} # Google Play app configuration GOOGLE_PLAY_PACKAGE_NAME: ${{ vars.GOOGLE_PLAY_PACKAGE_NAME }}Set up Android keystore
Decode the upload key used for signing the Android app and store it in the specified location.
- name: Set up Android keystore
run: |
echo "$ANDROID_KEYSTORE" | base64 --decode > android/app/$ANDROID_KEYSTORE_FILENAME
- Create key.properties file
Create the key.properties file needed to sign the app bundle in the Flutter build process.
- name: Create key.properties
run: |
cat > android/key.properties << EOF
storePassword=$ANDROID_KEYSTORE_PASSWORD
keyPassword=$ANDROID_KEY_PASSWORD
keyAlias=$ANDROID_KEY_ALIAS
storeFile=$ANDROID_KEYSTORE_FILENAME
EOF
This file contains Android signing configuration information and is used by the Flutter build process to sign the App Bundle.
- Build Android App Bundle
Get the latest build number from Google Play and build the app bundle with a build number that’s incremented by 1.
- name: Build Android App Bundle
run: |
FLUTTER_BUILD_NUMBER=$(($(google-play get-latest-build-number --package-name "$GOOGLE_PLAY_PACKAGE_NAME") + 1))
flutter build appbundle --release --build-number=$FLUTTER_BUILD_NUMBER
This step retrieves the latest build number from all Google Play tracks and increments it by 1 to build a new app bundle. This ensures consistent versioning management without relying on pseudo build numbers.
- Publish to Google Play
Publish the built app bundle to Google Play’s internal testing track as a draft.
- name: Publish to Google Play
run: |
google-play bundles publish \
--bundle "build/app/outputs/bundle/release/app-release.aab" \
--track internal \
--draft
Change the track (
internal,alpha,beta,production) and publishing options (with or without--draft) as needed.
This completes the workflow for automatically publishing your app to Google Play using GitHub Actions and Codemagic CLI tools.
When you run this workflow, the version will be automatically incremented for each build and uploaded to the Google Play Console.

Code Sample
Here’s the complete code sample example:
name: Publish to Google Play
on:
workflow_dispatch:
jobs:
build:
  runs-on: ubuntu-latest
  env:
    # Google Play authentication - Service account JSON key
    GOOGLE_PLAY_SERVICE_ACCOUNT_CREDENTIALS: ${{ secrets.GOOGLE_PLAY_SERVICE_ACCOUNT_CREDENTIALS }}

    # Android signing information
    ANDROID_KEYSTORE_FILENAME: ${{ vars.ANDROID_KEYSTORE_FILENAME }}
    ANDROID_KEY_ALIAS: ${{ vars.ANDROID_KEY_ALIAS }}
    ANDROID_KEYSTORE: ${{ secrets.ANDROID_KEYSTORE }}
    ANDROID_KEYSTORE_PASSWORD: ${{ secrets.ANDROID_KEYSTORE_PASSWORD }}
    ANDROID_KEY_PASSWORD: ${{ secrets.ANDROID_KEY_PASSWORD }}

    # Google Play app configuration
    GOOGLE_PLAY_PACKAGE_NAME: ${{ vars.GOOGLE_PLAY_PACKAGE_NAME }}
steps:
- uses: actions/checkout@v4
- name: Set up Flutter
uses: subosito/flutter-action@v2
with:
channel: stable
- name: Install Codemagic CLI tools
run: pip install codemagic-cli-tools
- name: Set up Android keystore
  run: |
    echo "$ANDROID_KEYSTORE" | base64 --decode > android/app/$ANDROID_KEYSTORE_FILENAME
- name: Create key.properties
  run: |
    cat > android/key.properties << EOF
    storePassword=$ANDROID_KEYSTORE_PASSWORD
    keyPassword=$ANDROID_KEY_PASSWORD
    keyAlias=$ANDROID_KEY_ALIAS
    storeFile=$ANDROID_KEYSTORE_FILENAME
    EOF
- name: Build Android App Bundle
  run: |
    FLUTTER_BUILD_NUMBER=$(($(google-play get-latest-build-number --package-name "$GOOGLE_PLAY_PACKAGE_NAME") + 1))
    flutter build appbundle --release --build-number=$FLUTTER_BUILD_NUMBER
- name: Publish to Google Play
  run: |
    google-play bundles publish \
    --bundle "build/app/outputs/bundle/release/app-release.aab" \
    --track internal \
    --draft
Conclusion
While Codemagic CI/CD provides a modern environment optimized for mobile development, code signing, and simple YAML configuration, utilizing CLI tools allows you to access additional features in pipelines both within and outside of Codemagic. Whether in a local environment or on a CI/CD pipeline, these tools enable flexible and efficient mobile app building and publishing.
In this article, we introduced the steps for publishing Android builds to Google Play from GitHub Actions pipelines using Codemagic CLI tools, and explained their ease of use and flexibility. Please give it a try!
Additionally, by setting up a similar workflow for App Store Connect alongside the Google Play, you can further streamline your development process.
Check out the following article for more details👇
Deploy your app to App Store Connect with Codemagic CLI tools and GitHub Actions
Let’s continue to enjoy developing comfortably with Codemagic!


