


Written by Mike Hughes
Firebase App Distribution is a service that allows you to distribute pre-release apps to testers. It’s like using Google Play for internal/alpha/beta releases, but with less setup, waiting and hoops to jump through. This makes it a good way to distribute early versions of your app for alpha testing before going through the Google Play setup.
If you’d like to know more about everything that Firebase App Distribution can do, you should look at the official documentation.
There are three ways to get your apps into Firebase App Distribution:
- Firebase App Distribution of Android and iOS apps using the CLI with Codemagic is covered in this article.
- Firebase App Distribution of Android apps using the Gradle plugin with Codemagic is covered in another article here.
- Firebase App Distribution using fastlane locally is covered in yet another article here.
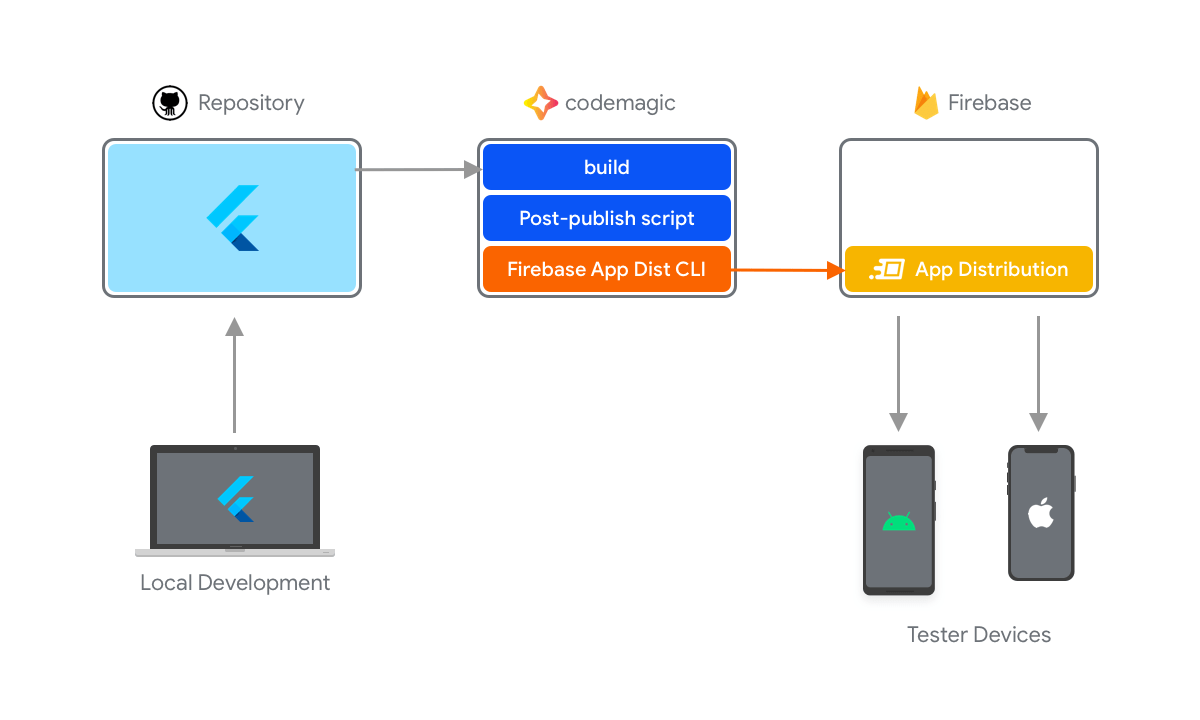
This article focuses on setting up the distribution of your Flutter Android and iOS apps to testers via Firebase App Distribution using the Command Line Interface (CLI) in Codemagic.
Why use the CLI method?
Using the CLI approach has several advantages for use with Codemagic:
- Android and iOS – the CLI approach can distribute builds for both platforms.
- No install for Codemagic - Codemagic build servers now have Firebase App Distribution CLI installed by default on every build instance, so you don’t have to do it yourself.
- No extra project plugins – you must add Firebase support to your app but that’s it, nothing else.
- Easy setup – a simple post-publish script added to Codemagic.
This makes the CLI option probably the easiest way to send the apps built in Codemagic to Firebase App Distribution. This is how it works:
- Codemagic does the build of your app as usual.
- Codemagic’s post-publish script uses the Android and/or iOS app build and sends it to Firebase App Distribution.
- Firebase App Distribution then distributes your app automatically (if you have set this up).
You can also install and set up the Firebase CLI on your local development machine to get your app builds into Firebase App Distribution, but this article focuses on using it with Codemagic to achieve a Continuous Delivery (CD) capability to pair with the Codemagic Continuous Integration (CI). This means that you can push a commit to Codemagic and have it built, tested and then distributed to your test users automatically.
Things to note
Only one build and no failed builds - your app is not rebuilt, it is still only built once by Codemagic, so it uses very few Codemagic build minutes. Typically this means less than 1 minute, even if you publish both the Android and iOS apps. If your build fails, the app is not sent to Firebase App Distribution or released to testers.
It gets to testers fast - your app will appear in the Firebase App Distribution console immediately. There is no review, no long processing and it is ready for automatic distribution to testers. Typically I find that testers are notified of the new release of the app within a minute of the Codemagic build finishing.
Set up a Firebase project and Firebase support for your Flutter project
To make sure that your app has Firebase support, you have to set it up yourself. This is actually the biggest hurdle of the whole project. There are two parts to that:
- Firebase project – a single Firebase project via the Firebase web console.
- Flutter project Firebase support – set up in the Firebase web console and within your Flutter project, Firebase support for the Android and/or iOS versions of your app.
You may want Firebase support for your project for other capabilities such as Firebase Analytics, Crashlytics or one of the other Firebase services. This is a one-time setup for all Firebase services, so it’s well worth your time.
Rather than repeat these steps here, I find that the official documentation is clear, easy to follow and more importantly, it is maintained and up to date. So I’d recommend following the official guide for adding Firebase to your Flutter app, which has instructions for both Android and iOS. A couple of tips about some steps described there as you do this:
Step 2 (“Register Your App with Firebase”) - for Android you probably won’t need a SHA-1 Debug Signing Certificate at this stage, as only some Firebase services require it.
Step 4 (“Add FlutterFire Plugins”) - you may want to add Firebase Analytics plugin as well while you are here. Check the latest versions of FlutterFire packages like flutter_analytics on pub.dev.
These key files are:
google-services.jsonfor AndroidGoogleService-Info.plistfor iOS
If your project repository is public then anyone can look at these files in your repository and get your credentials. To secure these files in Codemagic environment variables, exclude them from going into your repository via the .gitignore file and encrypt them. If you need any help, check out these blog posts:
- Practical guide: Flutter + Firebase + Codemagic (for iOS) covers how to secure your
GoogleService-Info.plistfile in Codemagic environment variables and encrypt it. - Practical guide: Flutter + Firebase + Codemagic (for Android) covers how to secure your
google-services.jsonfile in Codemagic environment variables and encrypt it.
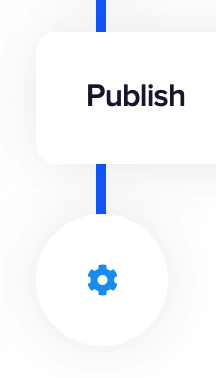
Set up Codemagic’s post-publish script
Add a post-publish script to your Codemagic workflow. You can access this in the web interface by clicking on the cog icon after the Publish section at the bottom of your workflow in Codemagic:
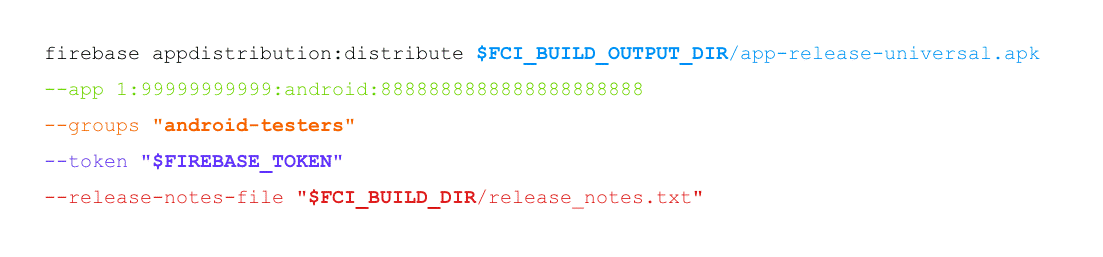
An example script (make sure to change relevant values for your own setup):
#!/usr/bin/env sh

set -e   # exit on first failed command
set -x   # print all executed commands to the log

if [ "$CM_BUILD_STEP_STATUS" == "success" ]
then

  # Android Firebase App Distribution CLI
  firebase appdistribution:distribute $CM_BUILD_OUTPUT_DIR/app-release-universal.apk --app 1:99999999999:android:8888888888888888888888 --groups "android-testers" --token "$FIREBASE_TOKEN" --release-notes-file "$CM_BUILD_DIR/release_notes.txt"

  # iOS Firebase App Distribution CLI
  firebase appdistribution:distribute $CM_BUILD_OUTPUT_DIR/Flutter_I_O.ipa --app 1:77777777777:ios:6666666666666666666666 --groups "ios-testers" --token "$FIREBASE_TOKEN" --release-notes-file "$CM_BUILD_DIR/release_notes.txt"

fi
Things to note about this script example:
- there are two distribution commands in this script, one for the Android and one for the iOS builds of the app. If you are only distributing to Android, you only need the first one (and only the second one for iOS).
- the
ifcommand makes sure that no failed builds will be distributed and Codemagic build minutes are not wasted.
Key command from the Firebase App Distribution
The key command for the Firebase App Distribution is shown below. Change the values based on your project setup:
Firebase App Distribution CLI is installed by default on all Codemagic build machines, thus this command is available for your scripts.
$CM_BUILD_OUTPUT_DIR that you see in the code is a Codemagic standard environment variable that is the directory on the build machines where the app build artifacts will end up once they are built. It is used to find the build artifacts for your specific project.
The best way to know what your artifacts are called is to check your last Codemagic build. Also note that these names might change from time to time so make sure to double check them, but generally Codemagic uses the following naming conventions:
- Android – for Flutter release builds, universal APK files are called
app-release-universal.apkand bundles are calledapp-release.aab. - iOS – for Flutter release builds it will be named after your app, something like
app_name.ipa.
The --app parameter refers to your app’s Firebase App ID which you can find in the Firebase console, under Project Overview / Project Settings.
The --groups parameter specifies the group of testers you have set up in the Firebase console for app distribution. If you have not done this yet, select App Distribution in the Firebase console on the left side menu, then select the Testers & Groups tab and create an empty group for now.
Once you have created the group, check the internal name by clicking the information icon next to the name, for example:

You can use a --groups-file parameter instead and specify a file with all your testers. See the References in the end of the article for the syntax. You can also use a --testers or --testers-file parameter as a list of email addresses for your testers. These can be used instead of --groups or --groups-file.
During the initial setup for a project I usually use the testers property to make sure it is all configured correctly and working. Then I later change to the groups property because I like to use the Firebase console to manage the test users for distribution, as you end up adding/remove people constantly.
If you prefer to control these tester email lists in a file, use the --testers-file or --groups-file properties.
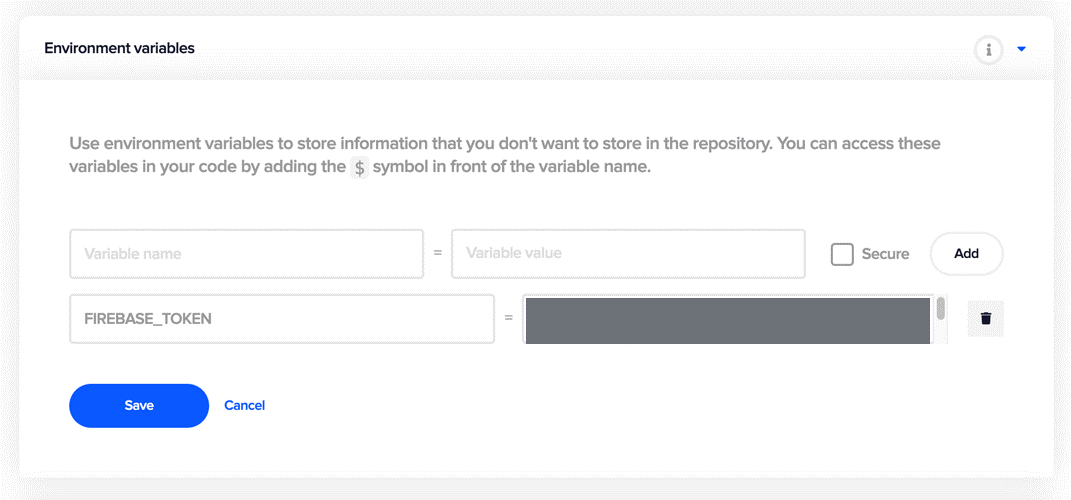
--token is the Firebase project token that must be generated to allow Codemagic to authenticate to Firebase and then upload the app builds. This is a short process, which involves a one-time install of the Firebase CLI install on your local machine to generate a token. It is documented here.
Once you have that token, add it into your Codemagic workflow configuration under Environment variables and name it FIREBASE_TOKEN. You can read the official Codemagic documentation about adding environment variables.
--release-notes can be specified and will appear in Firebase App Distributions for your test users, so they help give testing or other instructions to your testers about specific app releases. So when distributing a release, if you want your test users to know there is a new feature, you can mention it and describe how to use it in the release notes.
I’d suggest creating a release_notes.txt file in the root of your Flutter project directory (even if its empty right now). Then you can add notes specific to every release you distribute. It will then be used by Codemagic and sent to Firebase App Distribution where it will appear for your test users so they can read them.
Once you have the post-publish script and you have customised the values for your project, run another Codemagic build. Check the Codemagic console, expand the Post-publish script section, and you should see something like this:
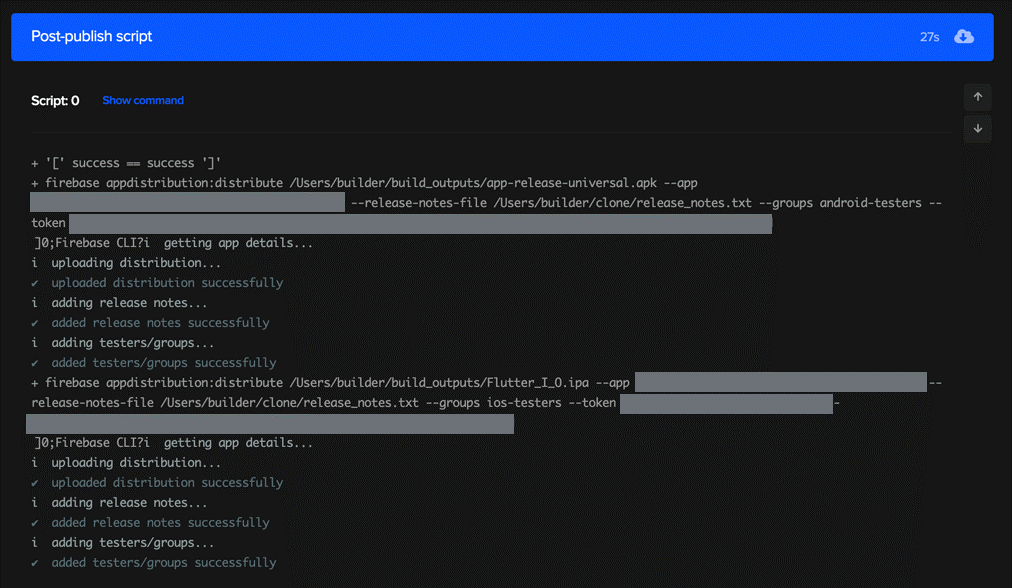
This example performed both an Android and iOS distribution …. and it took less than 30 seconds!
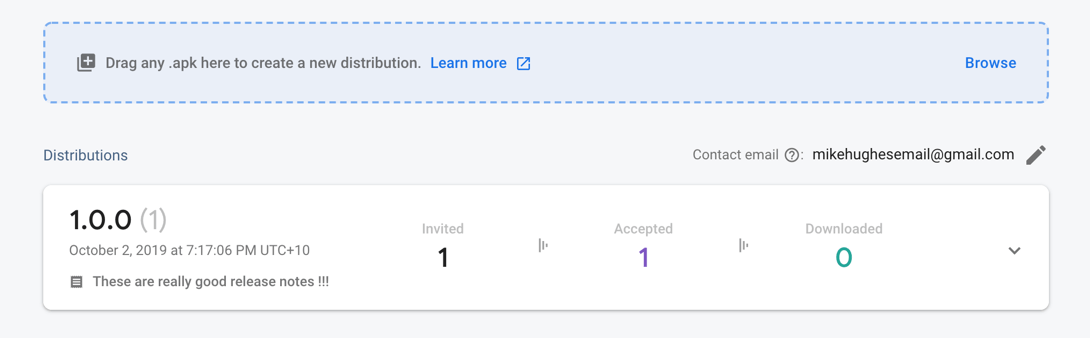
Check the app distribution
Log in to the Firebase console and select App Distribution from the left side menu:

You should see your distribution that looks something like this:
Congratulations, you now have your Codemagic builds setup ready to be distributed to your test users. I hope this has helped you get Firebase App Distribution working with your Codemagic setup in a really simple way. Happy distributing!
References
Official documentation:
- Firebase App Distribution - the documentation.
- Firebase App Distribution CLI documentation for all the command parameters.
- Firebase Release Notes - search for “App Distribution” on the page to see which SDKs have been updated.
Codemagic documentation and helpful blog posts:
- Default read-only environment variables contains a list of the default environment variables.
- Adding your own environment variables describes how to add the Firebase token as an environment variable.
- Practical guide: Flutter + Firebase + Codemagic (for iOS) gives an overview of setting up basic Firebase support for your app for iOS.
- Practical guide: Flutter + Firebase + Codemagic (for Android) gives an overview of setting up basic Firebase support for your app for Android.
This article is written by Mike Hughes.
Mike is a Product Manager, Flutter Developer, GDG Melbourne Organiser and he leads the Flutter Melbourne Meetup group. He likes to build native mobile, web and other digital products for businesses.
You can contact him on Twitter at @mikehughestweet, or at LinkedIn


