Firebase Authentication provides backend services, easy-to-use SDKs, and ready-made UI libraries to authenticate users to your app. It supports authentication using passwords, phone numbers, popular federated identity providers like Google, Facebook and Twitter, and more.
In this article, I will show how to set up a Flutter app and implement Google Sign-In using Firebase authentication.
NOTE: This article uses the latest Flutter 2.0 stable release with null safety enabled to create the sample app. We updated this article in March 2021
In this article, we will cover the following topics:
- Create a new Flutter project with null safety
- Create a new Firebase project
- Set up Firebase for Android, iOS & web
- Configure Firebase Authentication
- User auto login
- Configure Firebase on Codemagic (CI/CD for Flutter)
- Troubleshooting some common issues
Project overview
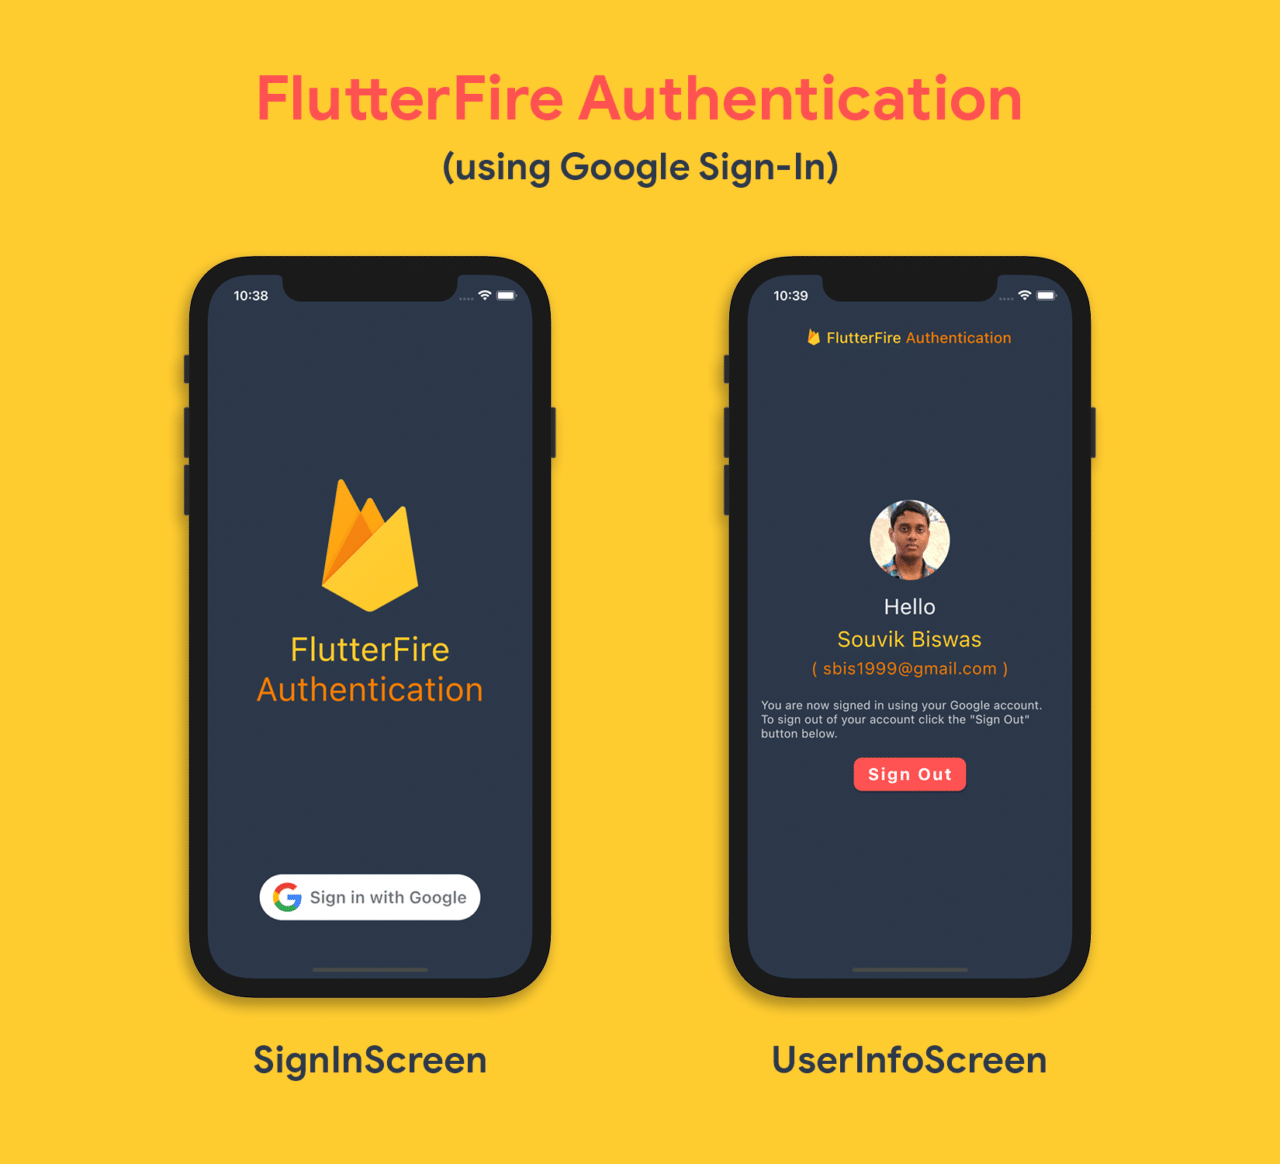
The app layouts will be simple, consisting of just two screens. The initial screen will be a sign-in screen (where users can sign in using their Google account), and the next screen will be the user info screen (which will display some of the user information retrieved from one’s Google account) with a button for signing out.
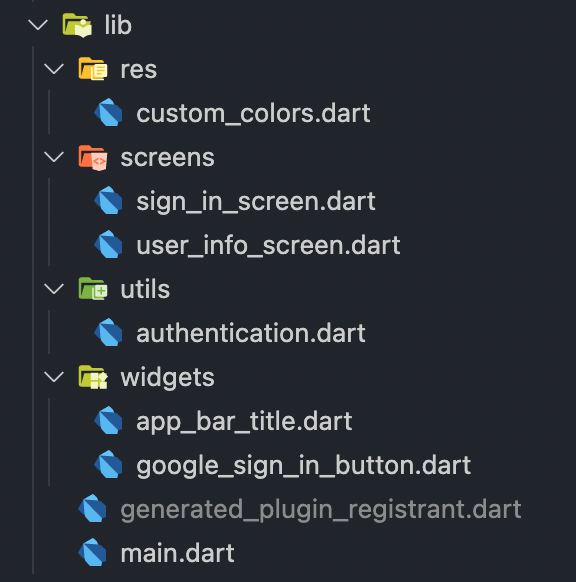
The project directory structure will be as follows:
Getting started
We will start by creating a new Flutter project with the latest version of Flutter 2 and migrate it to null safety. Then, we will add the required packages and assets to the project.
Create a new Flutter project
Open Terminal or use the terminal in your code editor. Navigate to the folder where you want to create the project, and use the following command:
flutter create flutterfire_samples
Then open the project using your favorite code editor. To open it with VS Code, you can use:
code flutterfire_samples
Flutter 2.0 has support for null safety in the stable channel, but in order to use it inside the app, you have to run a command to migrate the project to null safety.
Before running the migration command, check if all your current project dependencies support null safety by using:
dart pub outdated --mode=null-safety
Then, run the following command to migrate:
dart migrate
You can follow the migration guide here.
Plugins
The plugins needed for this project are:
- firebase_core: for initializing Firebase
- firebase_auth: for implementing Firebase authentication
- google_sign_in: to use Google Sign-In
You will need to include the
firebase_coreplugin for using any other Firebase-related plugins, as it is used for initializing theFirebaseApp().
You can import the packages to your Flutter project by adding them to your pubspec.yaml file:
firebase_core: ^1.0.1
firebase_auth: ^1.0.1
google_sign_in: ^5.0.0
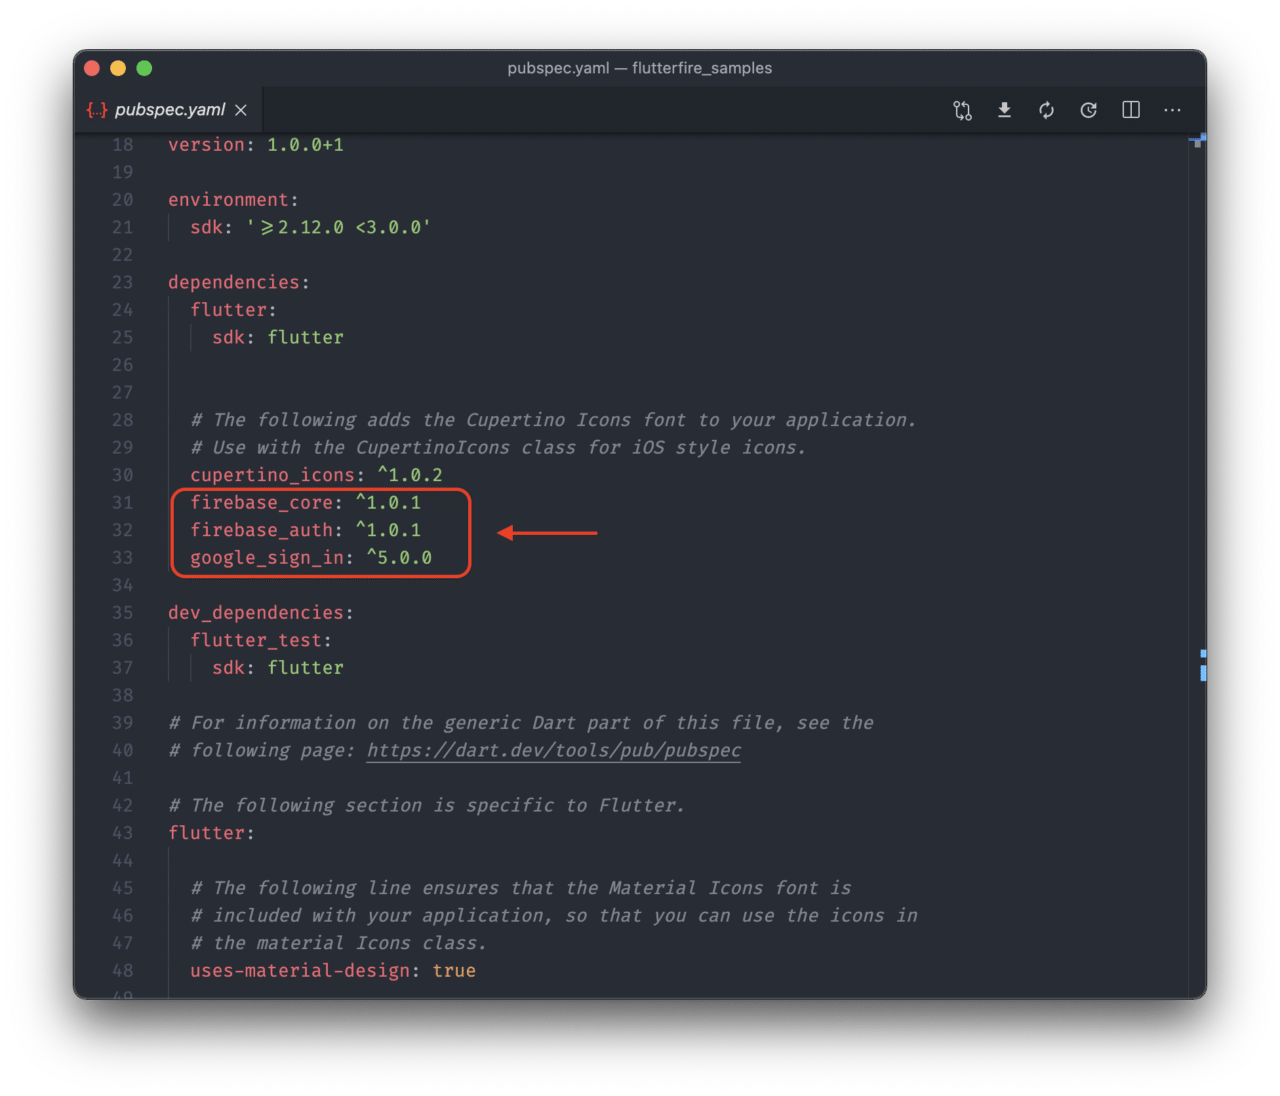
Save it to run flutter packages get.
Assets
You will need two images while building the UI of this sample app.
You can get the image from here.
Create a new folder called assets in your project directory, and insert the two images (google_logo.png and firebase_logo.png) that you downloaded.
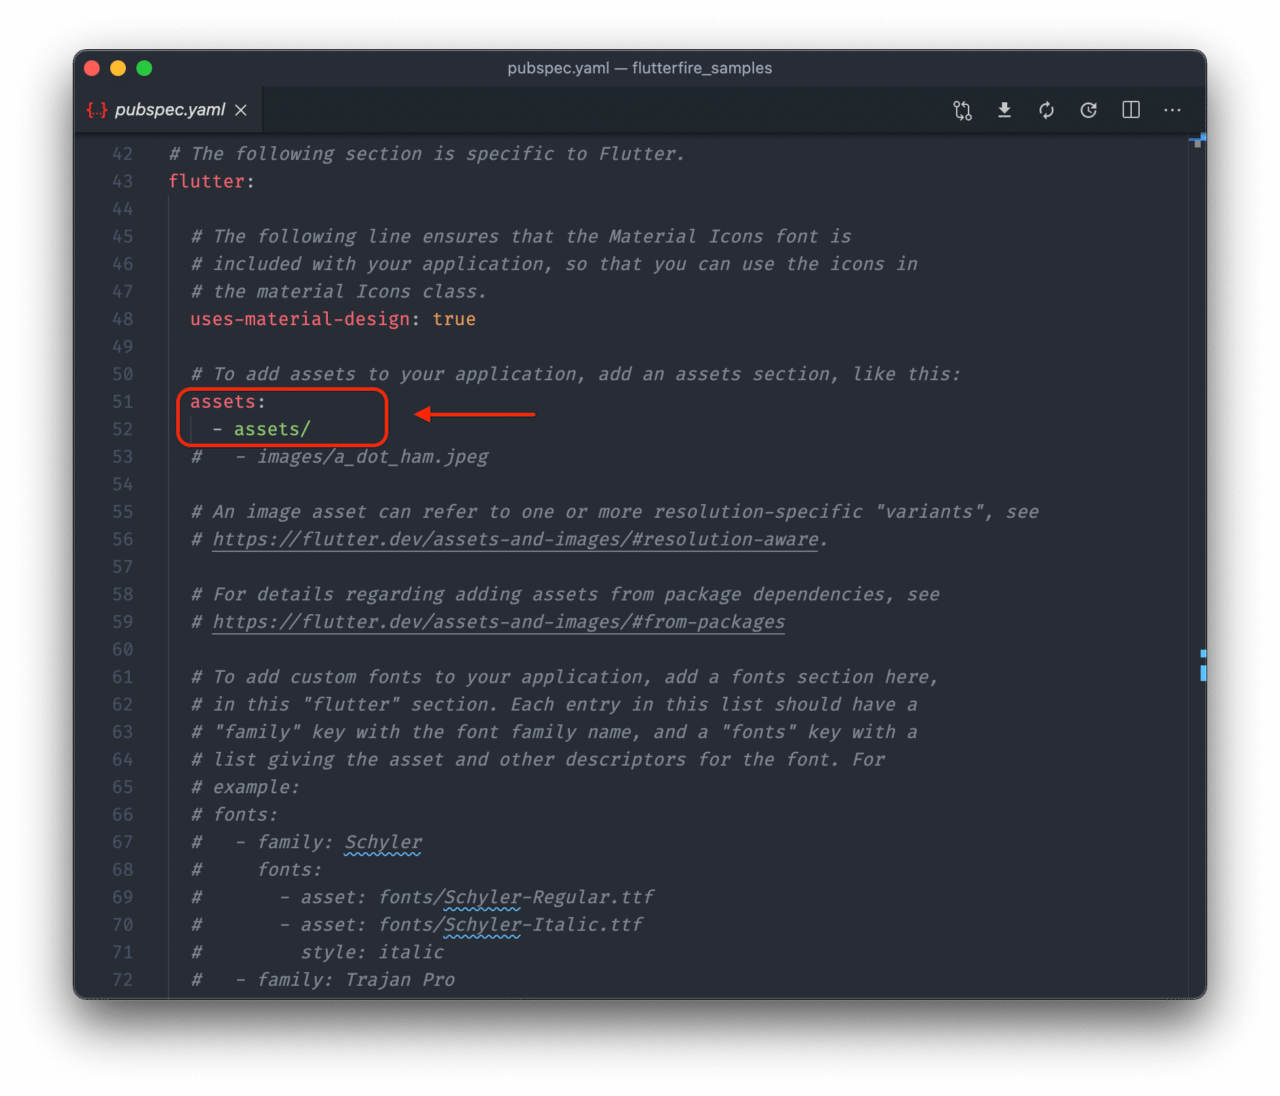
Now, import the assets folder in your pubspec.yaml file.
Set up Firebase project
To start using Firebase with the application, you first have to create a new Firebase project. Follow the steps below:
-
Create a new Firebase project by going to the Firebase console.
-
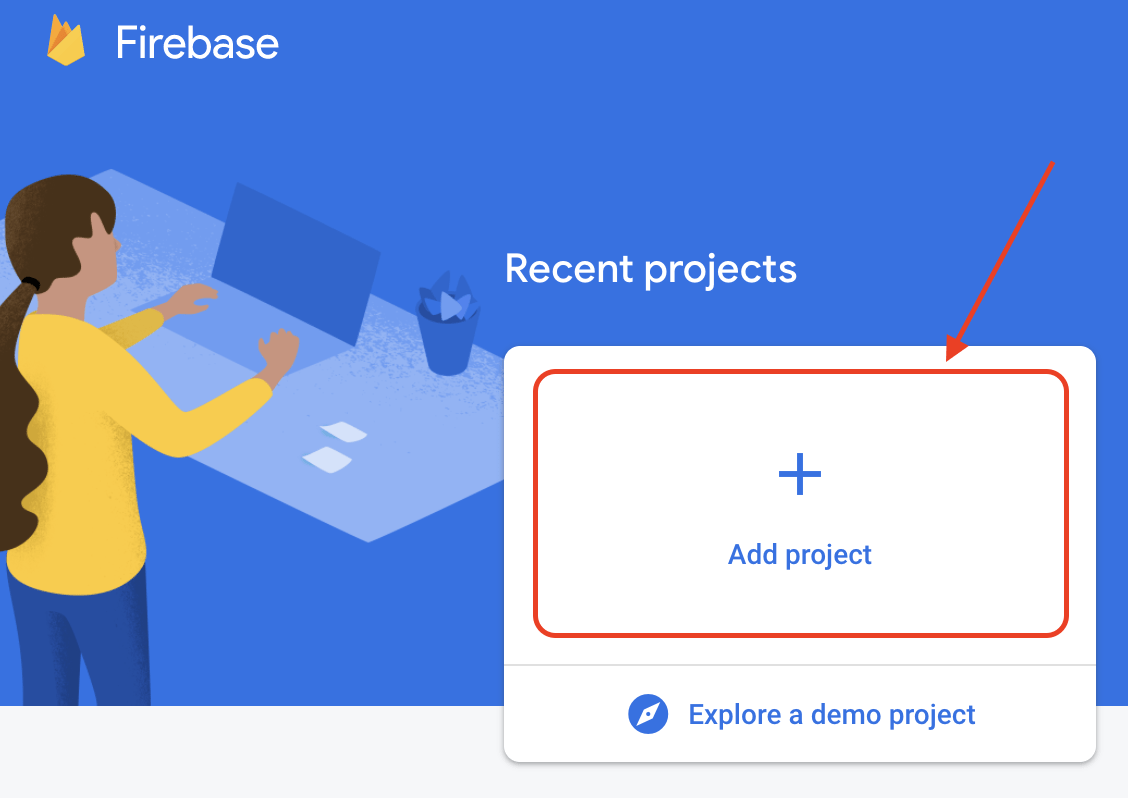
Click on Add project.
-
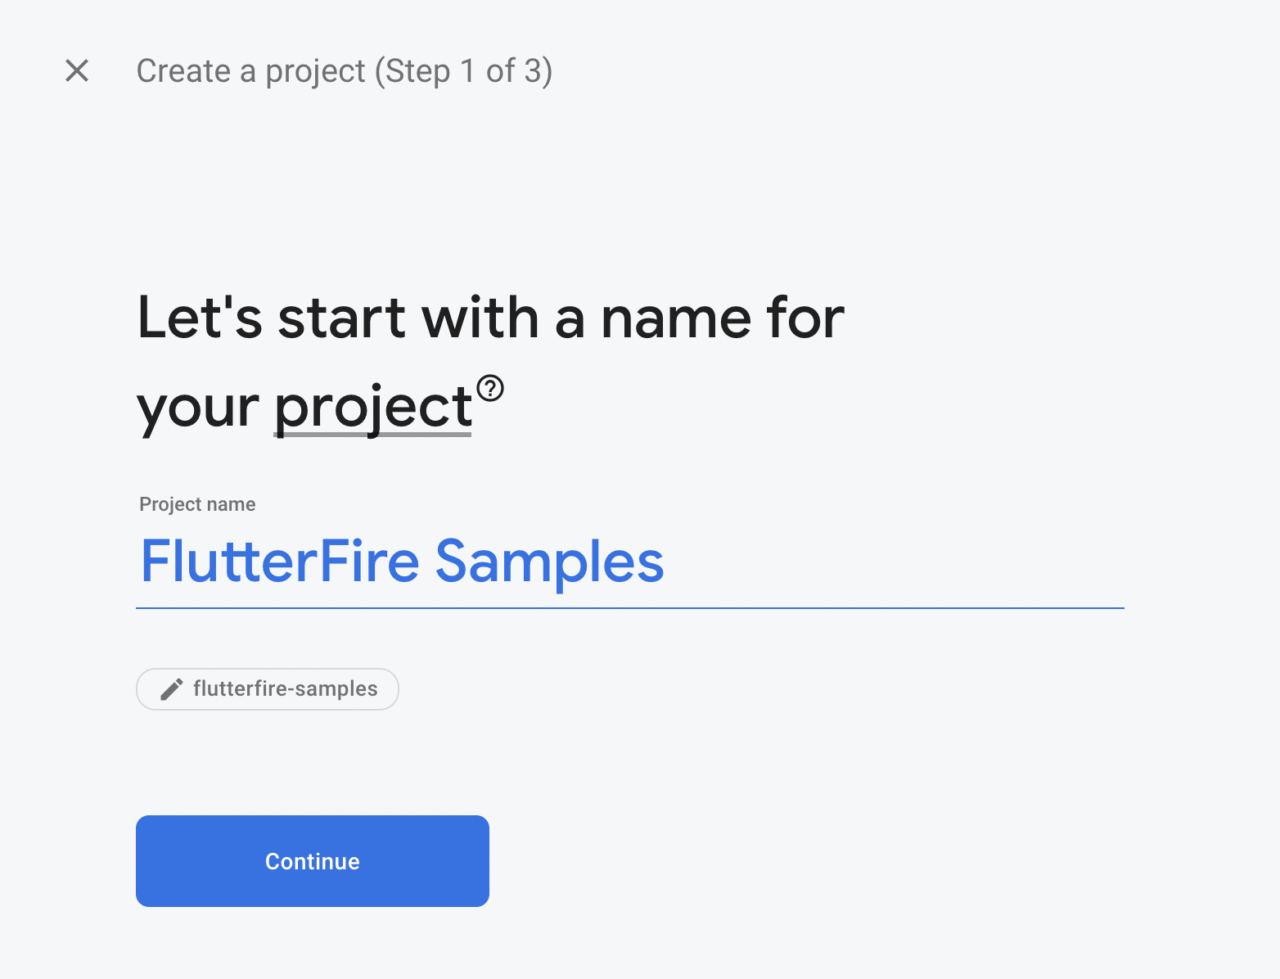
Enter a Project name and click on Continue.
-
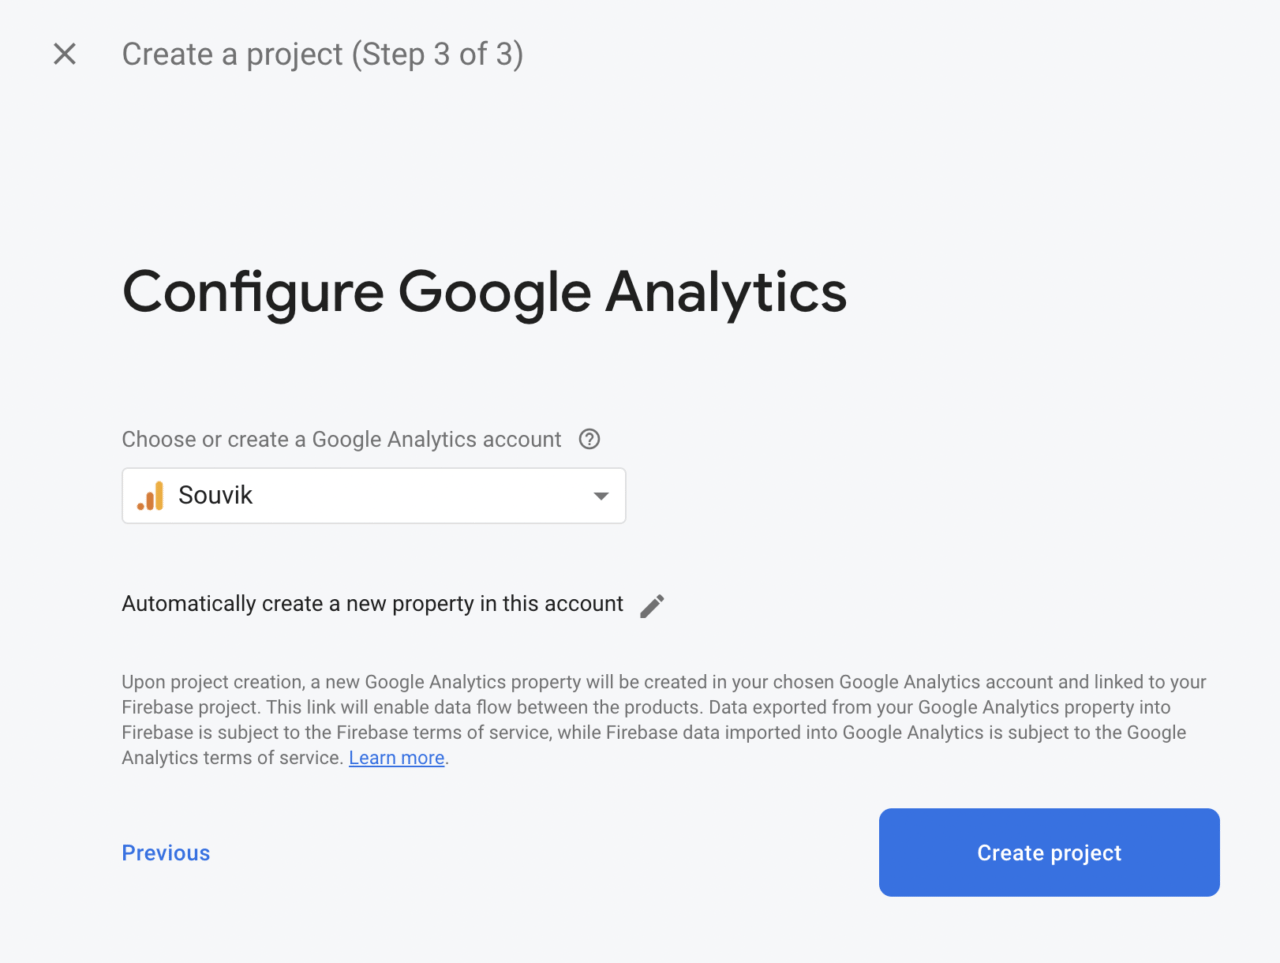
Next, you will be asked whether you want to enable Google Analytics for the project. We won’t be needing analytics, as this is just a sample project. Click on Create project.

If you want to enable Google Analytics anyway, then you will be prompted to select a Google Analytics account on the next screen:
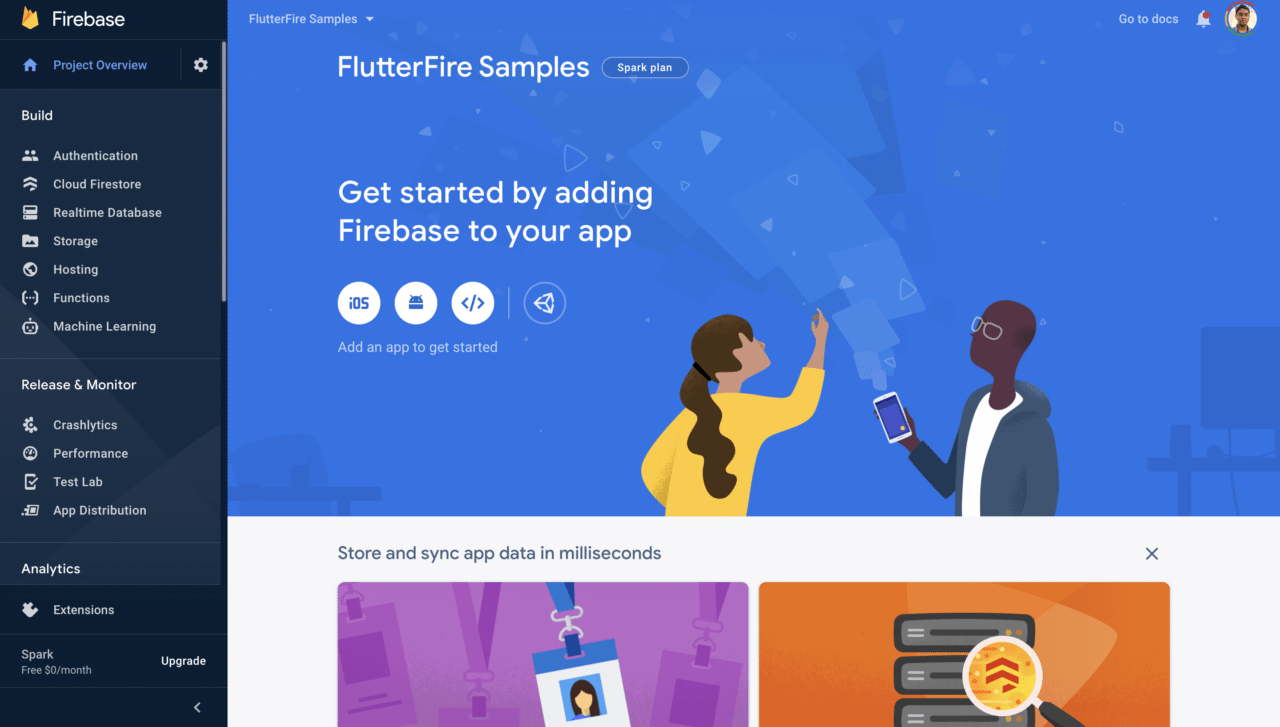
Wait for the project to be created, and you will be navigated to the Firebase dashboard of the project.
Platform configurations
Now, we have to complete the platform-specific Firebase configurations. Though we are using Flutter (which is a cross-platform framework), we still have to integrate the Firebase project separately for each platform. Flutter 2.0 has support for Android, iOS and web in its stable channel, so we will be configuring for all three platforms.
Android setup
First of all, let’s configure for the Android platform.
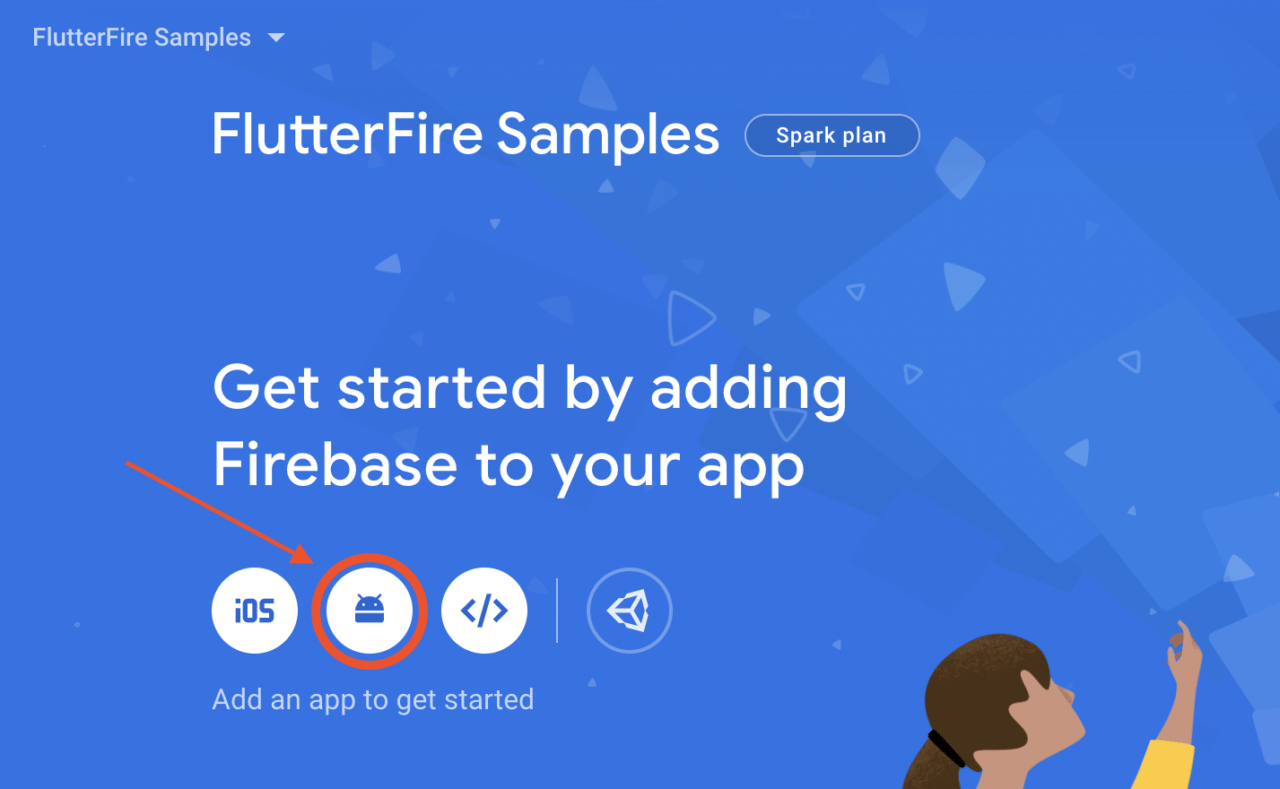
-
Select the Android icon from the Firebase dashboard.
-
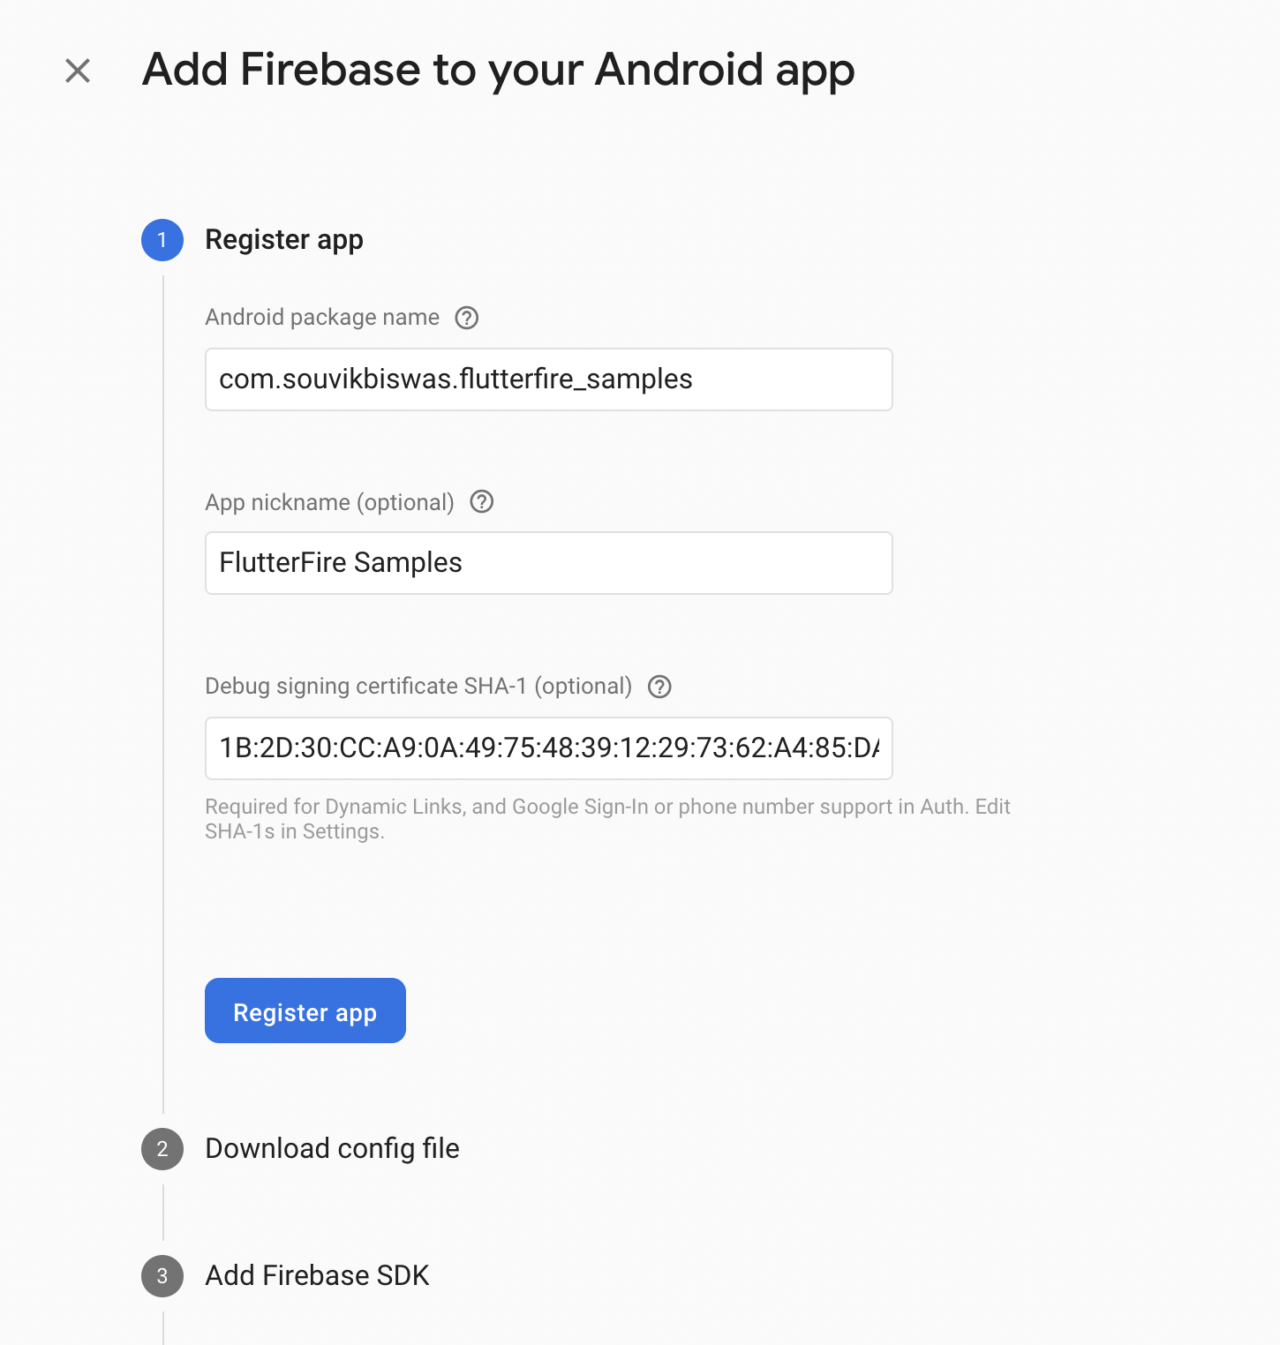
Enter the Android package name, an app nickname and the SHA-1. Click on Register app.
-
Download the
google-services.jsonfile, and place it in the android -> app directory. Click on Next.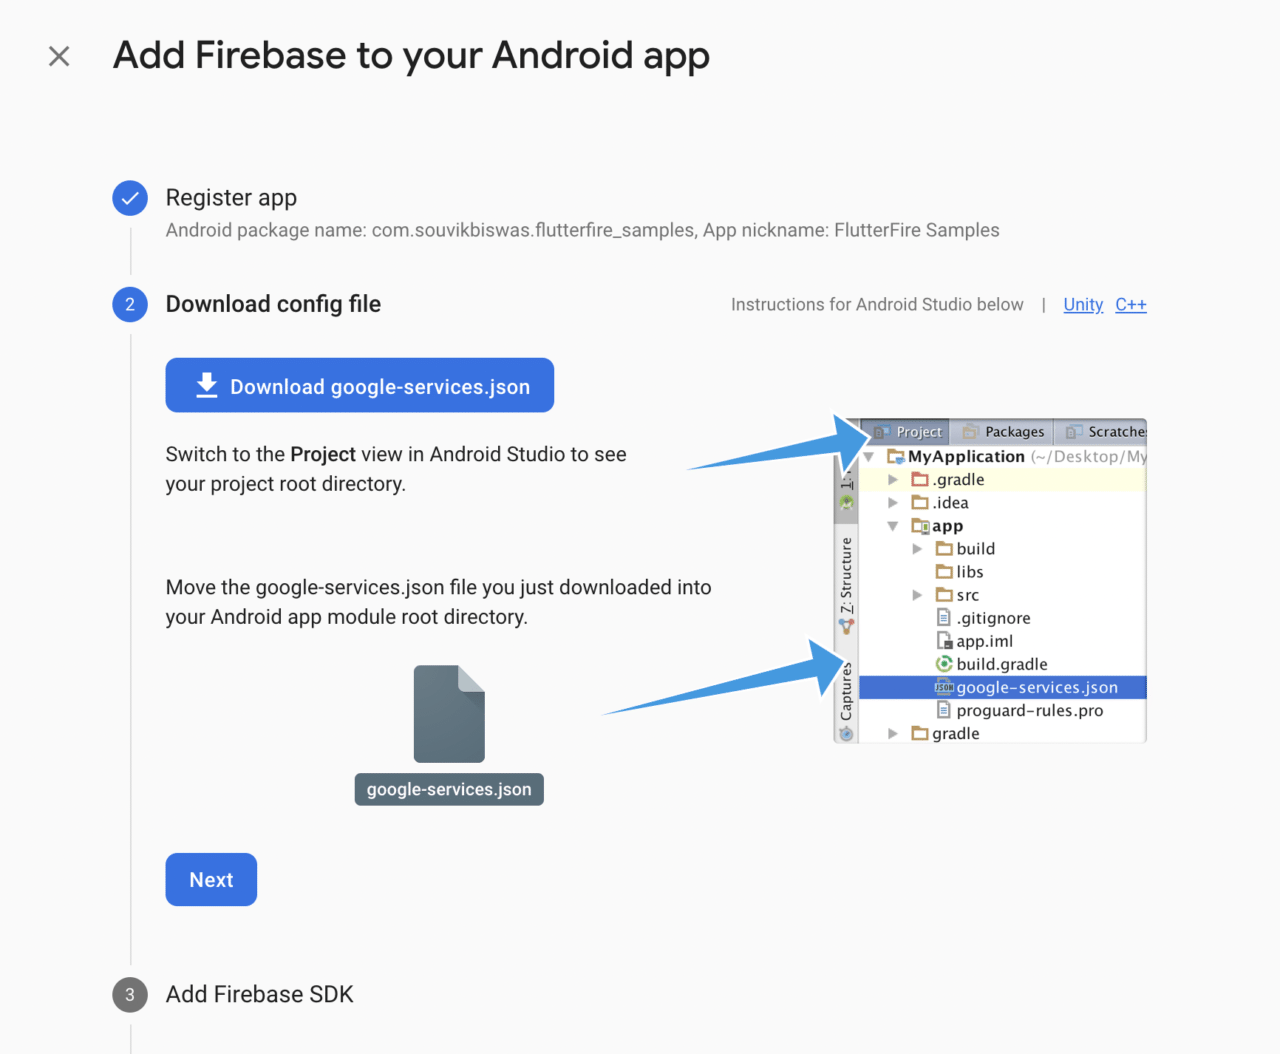
-
Just follow the instructions, and add the required code snippets to your project. Click on Next.
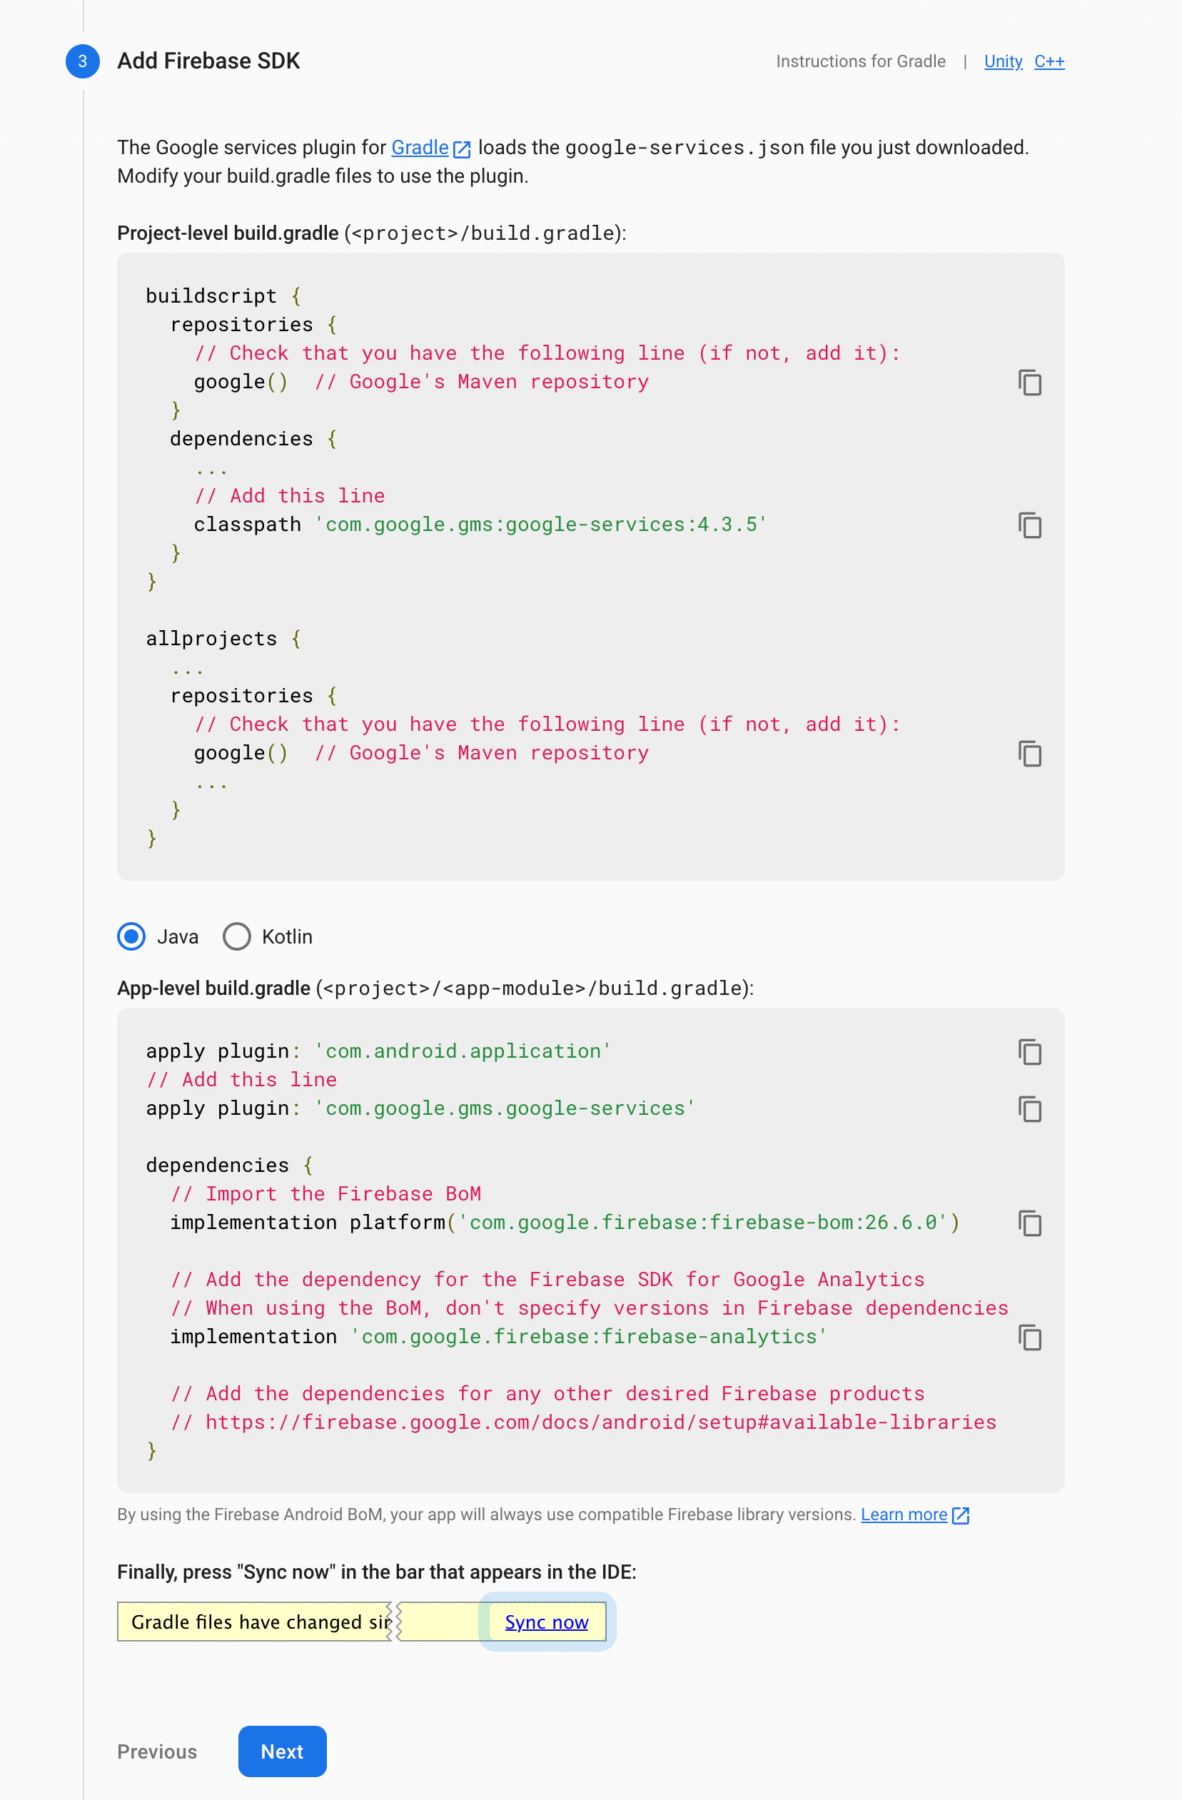
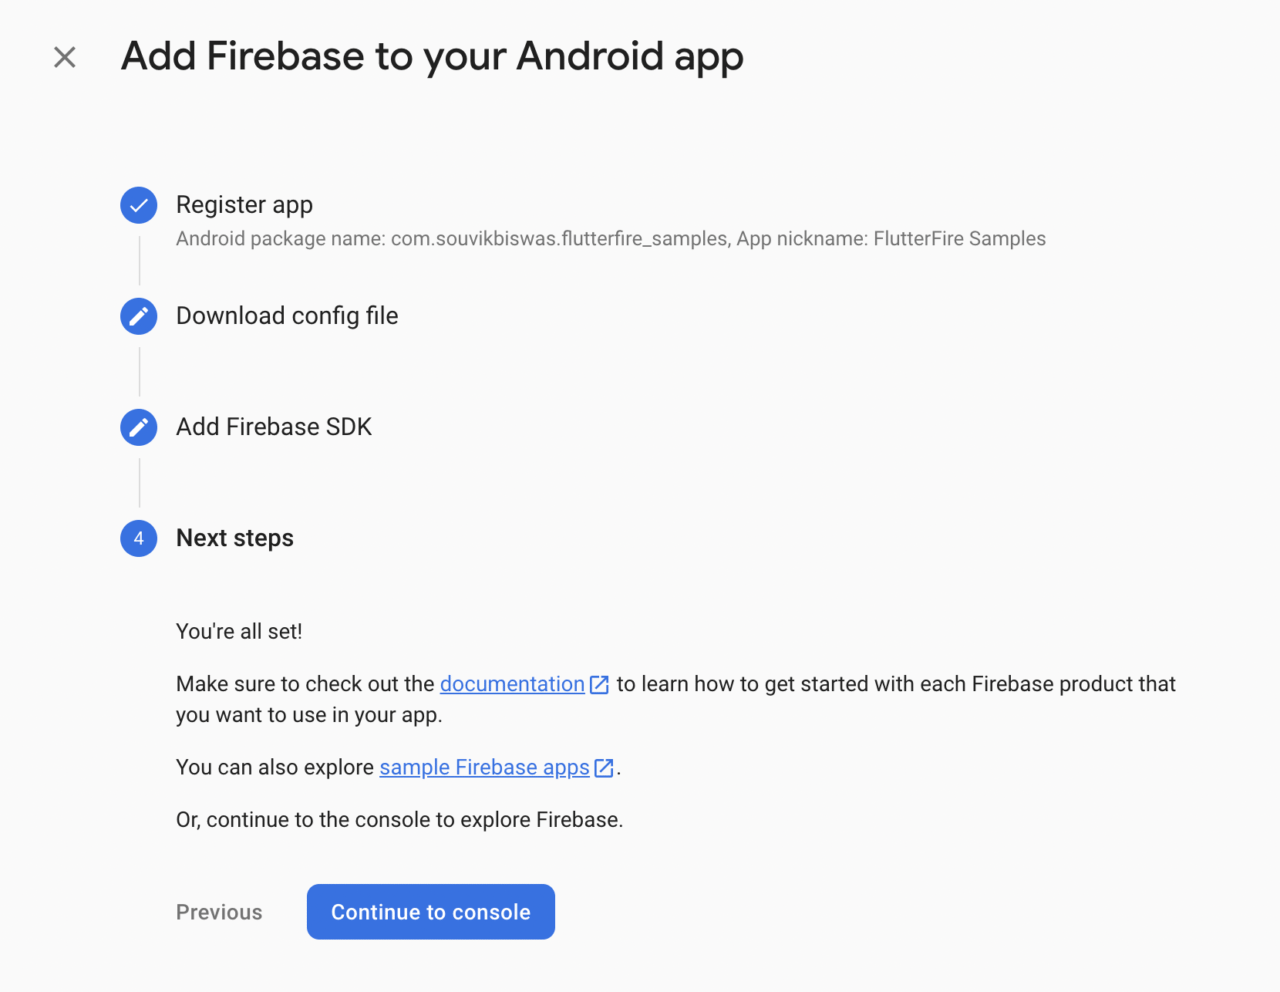
You have successfully configured Firebase for Android. On the final step, click on Continue to console to go back to the dashboard.
iOS setup
-
Select the iOS icon on the dashboard.

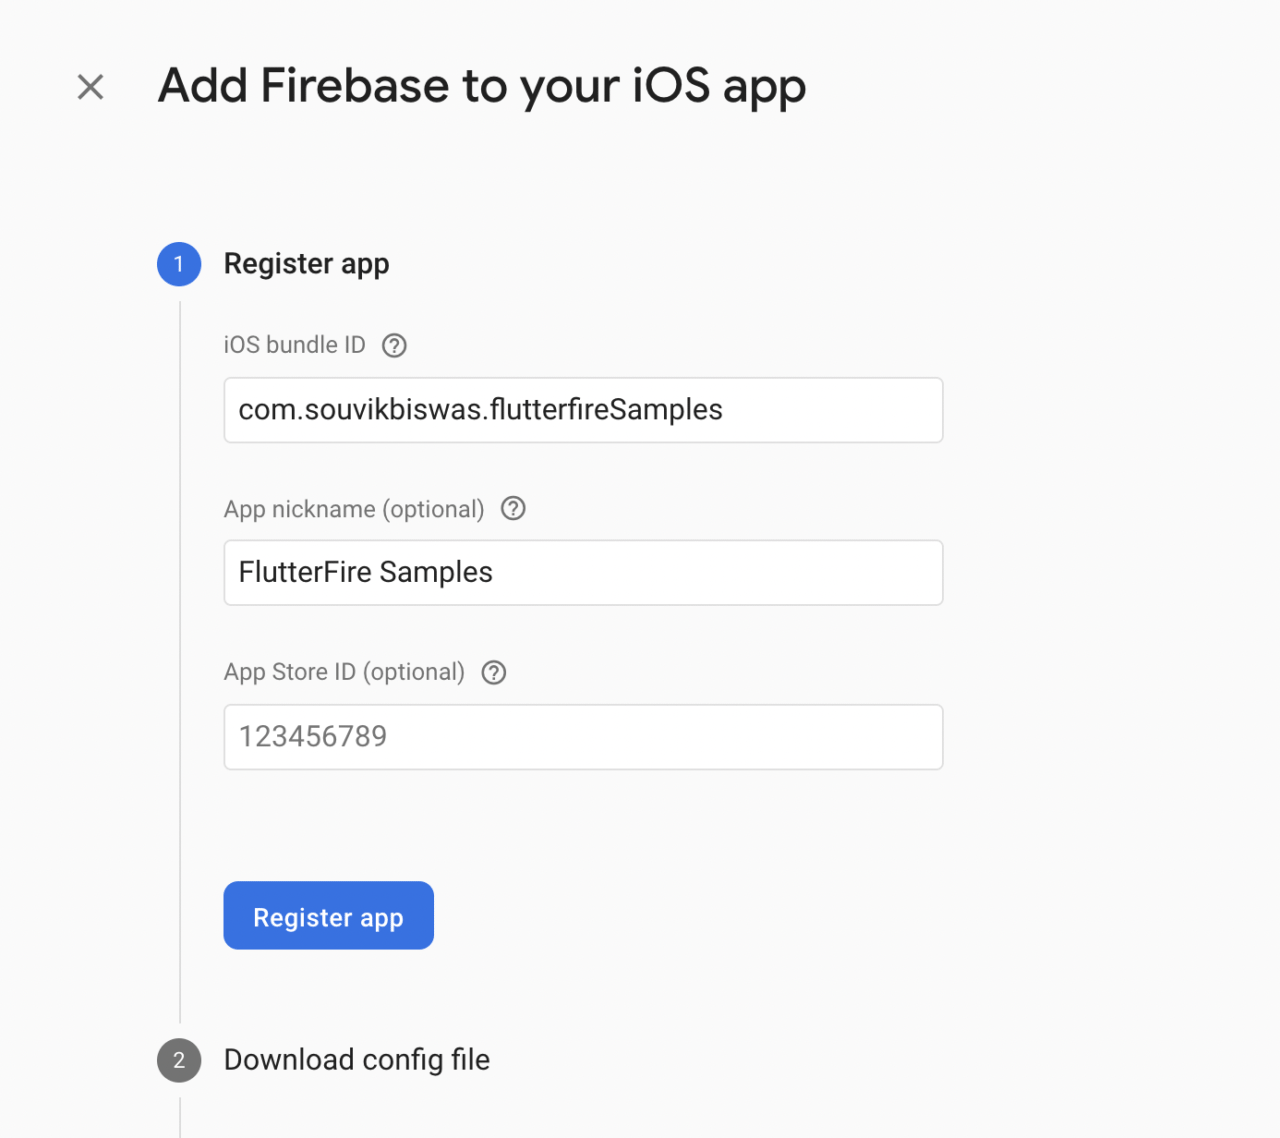
-
Enter your iOS bundle ID and an app nickname. Click on Register app.
-
Download the
GoogleService-Info.plistfile. Click on Next.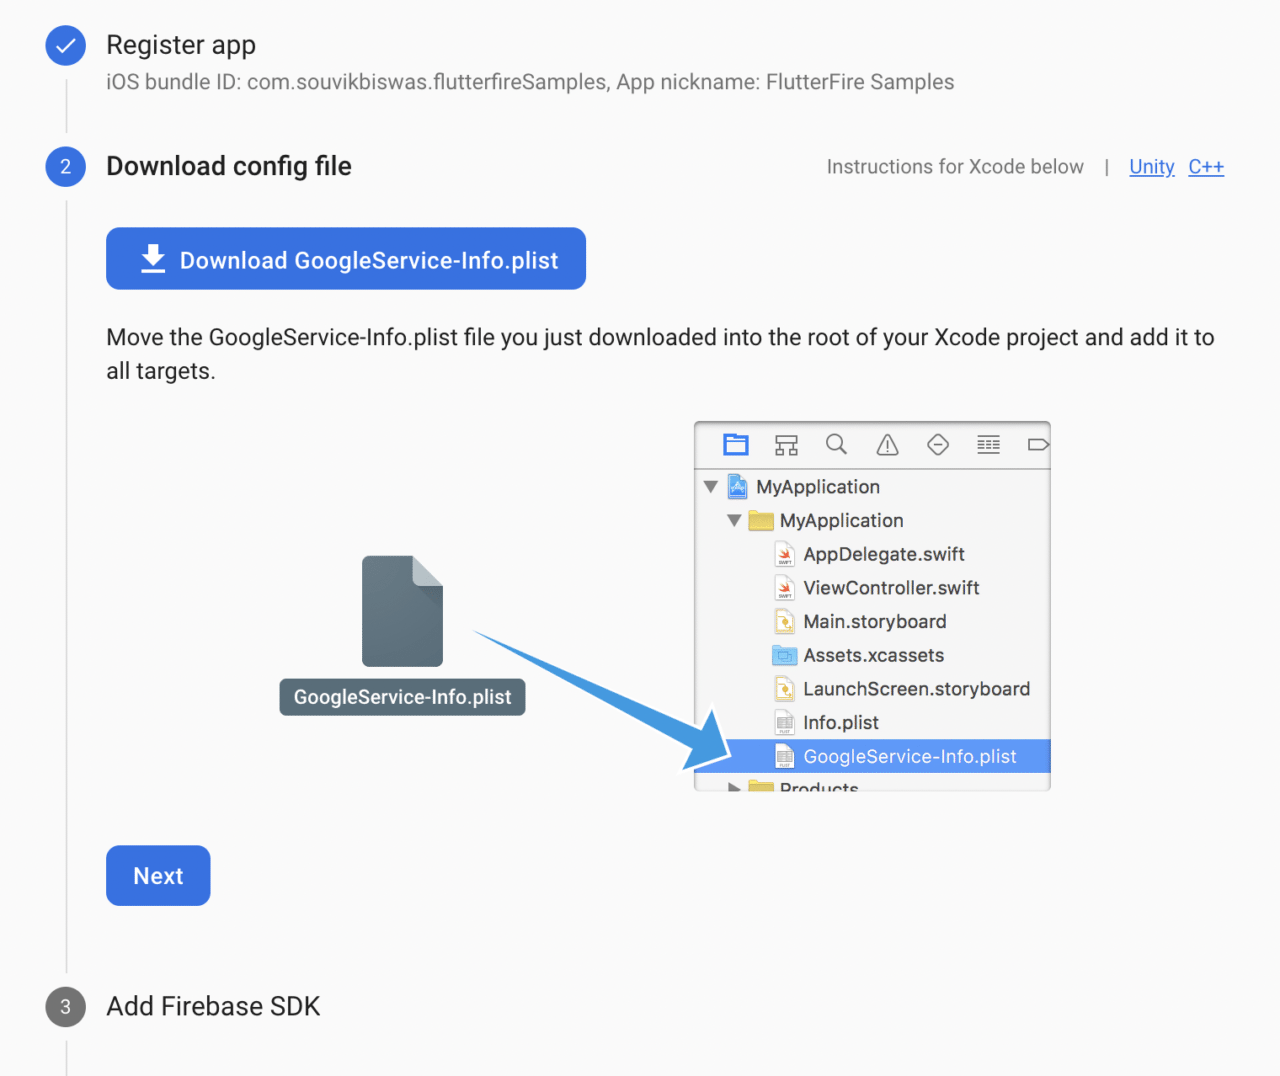
-
Go back to your project, open the
iosfolder using Xcode, and drag and drop the file that you downloaded into the Runner subfolder. When a dialog box appears, make sure that Runner is selected in the “Add to targets” box. Then click Finish. -
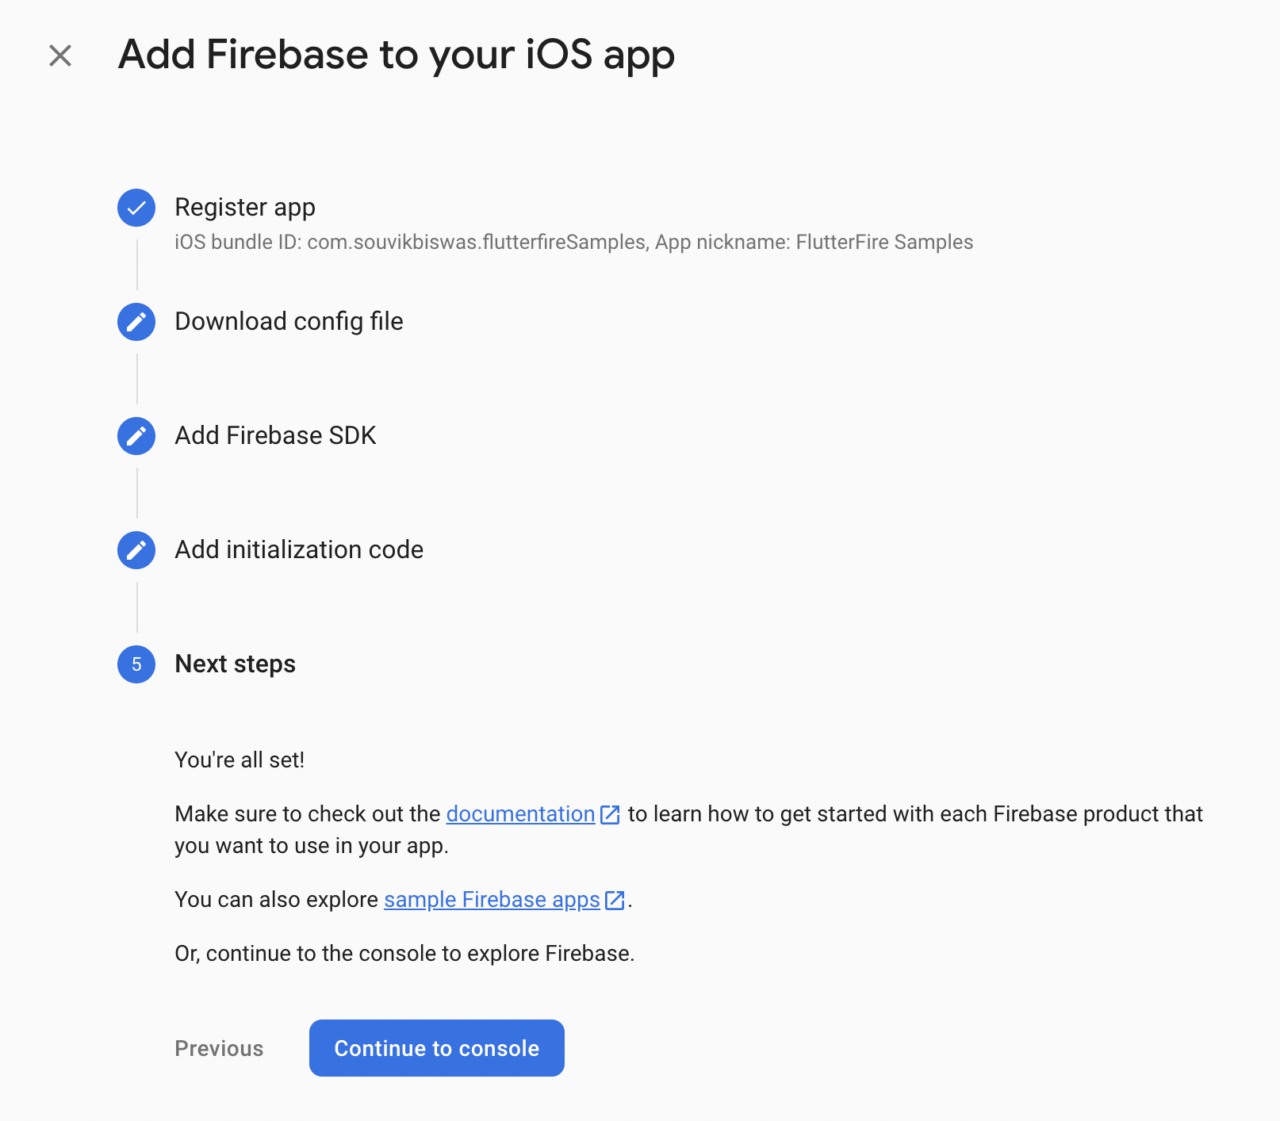
You can skip steps 3 and 4, as they are automatically configured by the Flutter Firebase plugin that we will be adding soon. Click on Continue to console to go back to the dashboard.
Web setup
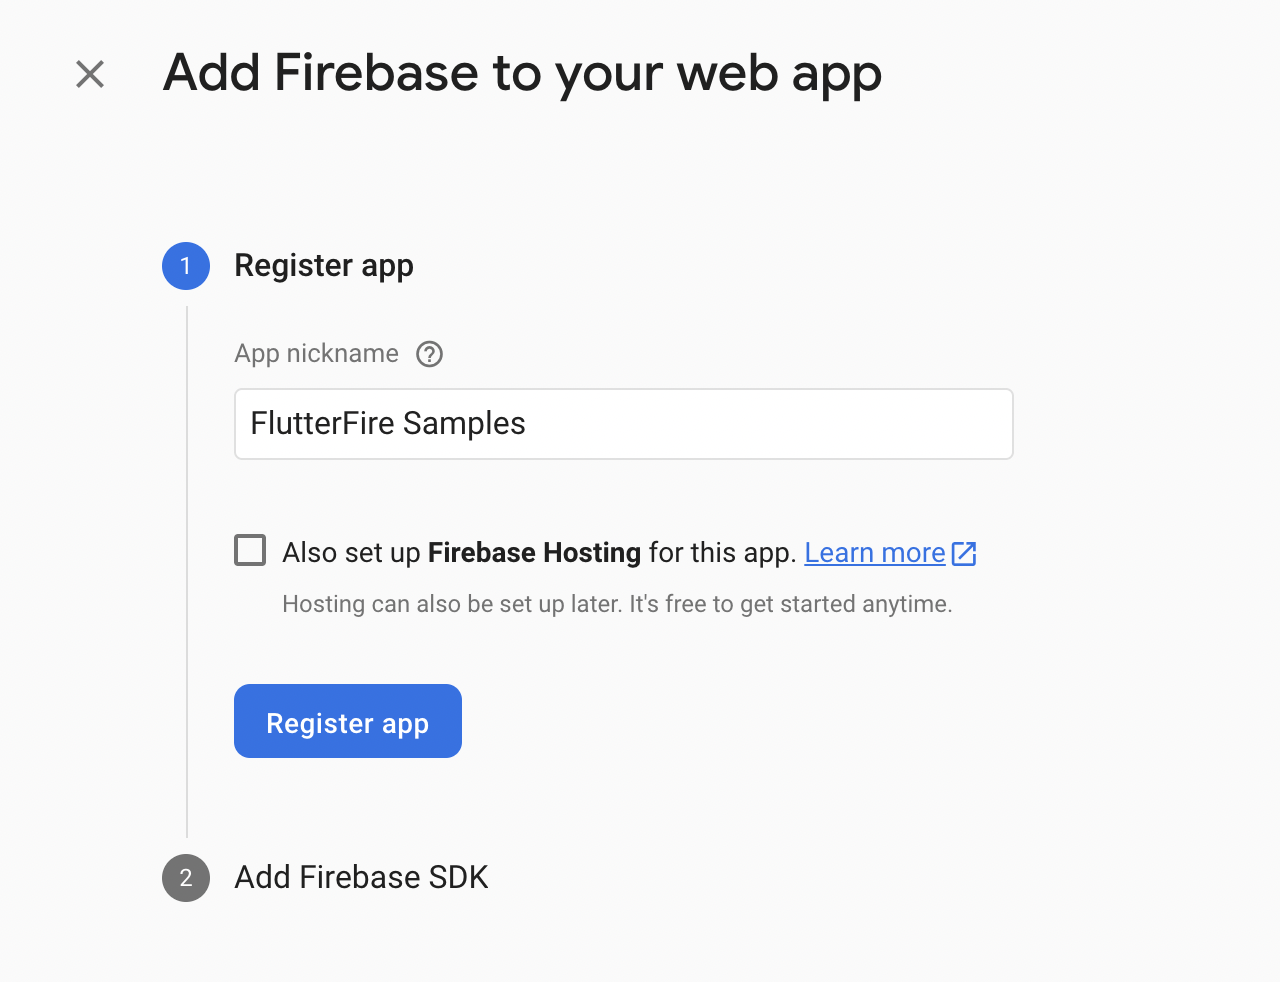
-
Select the Web icon on the dashboard.

-
Enter the App nickname, and click on Register app.
-
Now, add the code snippets for integrating the Firebase SDK into the web app.
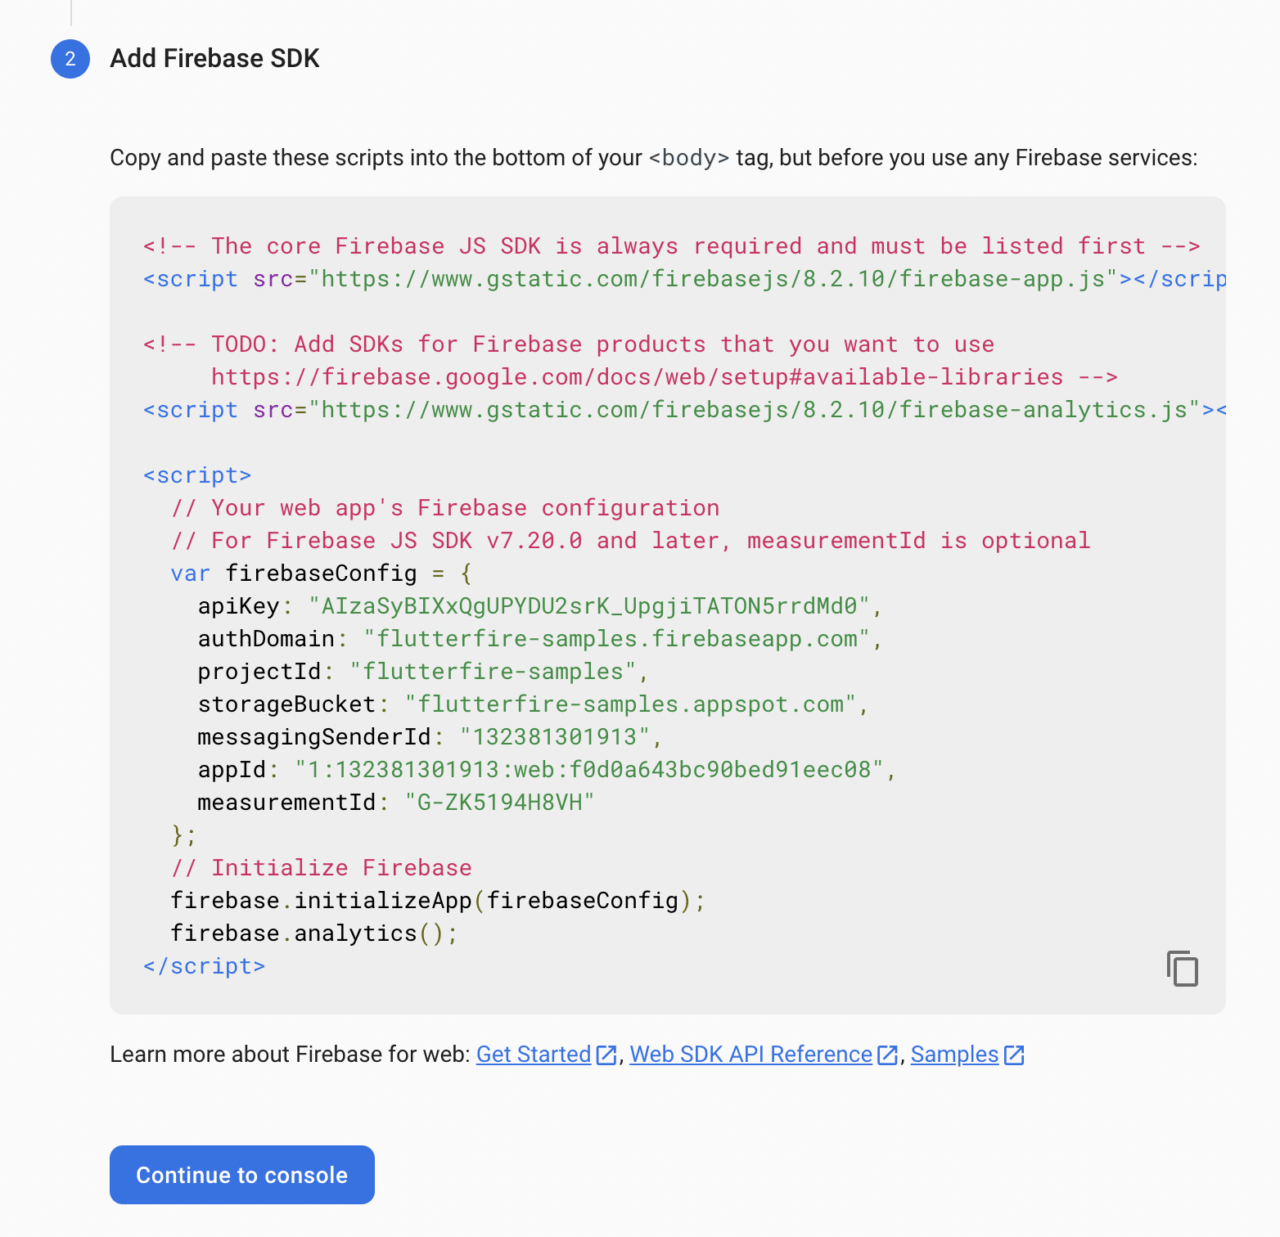
Then, click on Continue to console to navigate back to the dashboard.
Finally, you have completed the Firebase configuration for all three platforms.
Set up Authentication
In order to use Google Sign-In with Firebase Authentication, you have to enable it by going to the Authentication page from the left menu of the Firebase dashboard and selecting the Sign-in method tab.
Here, enable Google (under Provider), enter the project name and support email, and click on Save.
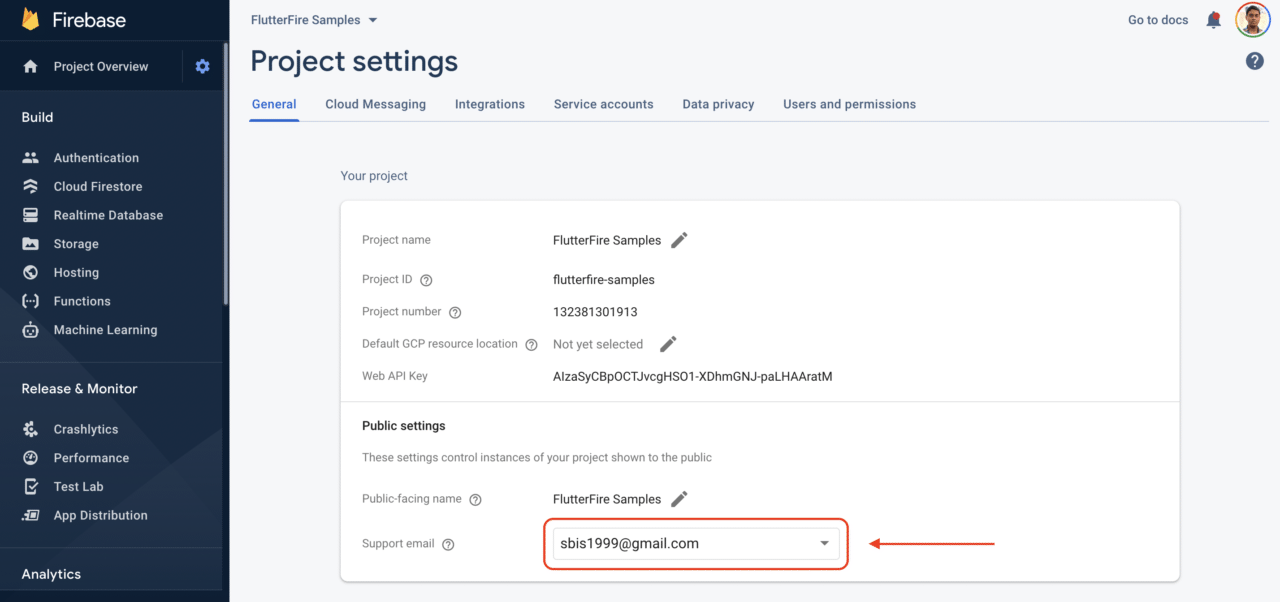
Make sure you also add the support email in Firebase project settings -> General.
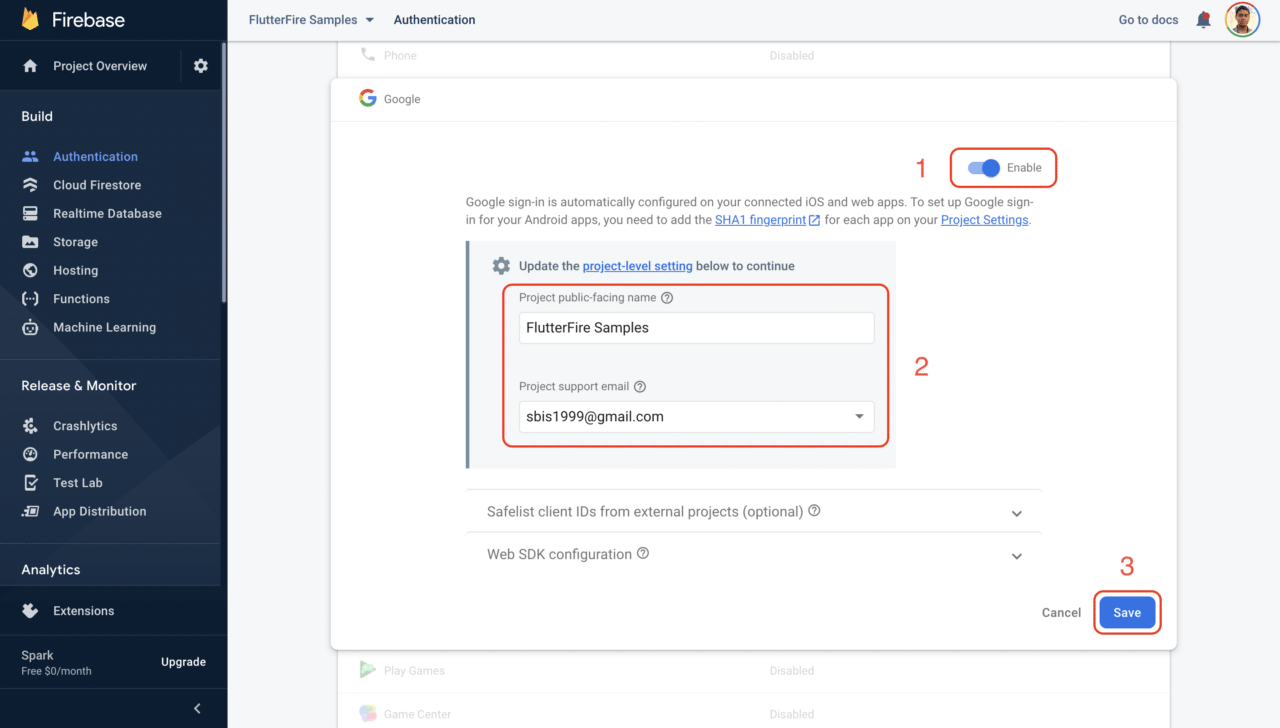
There is no extra configuration required to use Google Sign-In on an Android device. But to use it on an iOS device, you have to do just one more thing.
Go to your project directory -> ios -> Runner -> Info.plist file, and add the following there:
<!-- Put me in the [my_project]/ios/Runner/Info.plist file -->
<!-- Google Sign-In section -->
<key>CFBundleURLTypes</key>
<array>
	<dict>
		<key>CFBundleTypeRole</key>
		<string>Editor</string>
		<key>CFBundleURLSchemes</key>
		<array>
			<!-- TODO Replace this value: -->
			<!-- Copied from GoogleService-Info.plist key REVERSED_CLIENT_ID -->
			<string>com.googleusercontent.apps.861823949799-vc35cprkp249096uujjn0vvnmcvjppkn</string>
		</array>
	</dict>
</array>
<!-- End of the Google Sign-In section -->
Don’t forget to replace the value as per the above comment with the
REVERSED_CLIENT_IDpresent in theGoogleService-Info.plistfile.
Initialize Firebase
As we have configured the project for using Google Sign-In with Firebase Authentication, we can start defining methods for the authentication logic.
Create a new file called authentication.dart inside the folder lib -> utils. To use any other Firebase service, we have to first initialize the FirebaseApp:
class Authentication {
  static Future<FirebaseApp> initializeFirebase() async {
    FirebaseApp firebaseApp = await Firebase.initializeApp();

    // TODO: Add auto login logic

    return firebaseApp;
  }
}
In the above code, we have initialized Firebase inside the initializeFirebase() method. Later, we will add the logic for auto login here.
Implement Google Sign-In
Now, let’s add the method for Google Sign-In:
class Authentication {
  static Future<User?> signInWithGoogle({required BuildContext context}) async {
    FirebaseAuth auth = FirebaseAuth.instance;
    User? user;

    final GoogleSignIn googleSignIn = GoogleSignIn();

    final GoogleSignInAccount? googleSignInAccount =
        await googleSignIn.signIn();

    if (googleSignInAccount != null) {
      final GoogleSignInAuthentication googleSignInAuthentication =
          await googleSignInAccount.authentication;

      final AuthCredential credential = GoogleAuthProvider.credential(
        accessToken: googleSignInAuthentication.accessToken,
        idToken: googleSignInAuthentication.idToken,
      );

      try {
        final UserCredential userCredential =
            await auth.signInWithCredential(credential);

        user = userCredential.user;
      } on FirebaseAuthException catch (e) {
        if (e.code == 'account-exists-with-different-credential') {
          // handle the error here
        }
        else if (e.code == 'invalid-credential') {
          // handle the error here
        }
      } catch (e) {
        // handle the error here
      }
    }

    return user;
  }
}
Here, we can handle the error more elegantly by showing a SnackBar. (You may have noticed that’s why we have passed the BuildContext to this method.) The try-catch block can be modified to this:
try {
  final UserCredential userCredential =
      await auth.signInWithCredential(credential);

  user = userCredential.user;
} on FirebaseAuthException catch (e) {
  if (e.code == 'account-exists-with-different-credential') {
    ScaffoldMessenger.of(context).showSnackBar(
      Authentication.customSnackBar(
        content:
            'The account already exists with a different credential.',
      ),
    );
  } else if (e.code == 'invalid-credential') {
    ScaffoldMessenger.of(context).showSnackBar(
      Authentication.customSnackBar(
        content:
            'Error occurred while accessing credentials. Try again.',
      ),
    );
  }
} catch (e) {
  ScaffoldMessenger.of(context).showSnackBar(
    Authentication.customSnackBar(
      content: 'Error occurred using Google Sign-In. Try again.',
    ),
  );
}
The customSnackBar() method looks like this:
static SnackBar customSnackBar({required String content}) {
  return SnackBar(
    backgroundColor: Colors.black,
    content: Text(
      content,
      style: TextStyle(color: Colors.redAccent, letterSpacing: 0.5),
    ),
  );
}
The signInWithGoogle() method that we have defined will help to authenticate user with Google Sign-In on the Android and iOS platforms. But in order to use Google Sign-In on the web, you have to modify it to the following:
import 'package:flutter/foundation.dart' show kIsWeb;

class Authentication {
  static Future<User?> signInWithGoogle({required BuildContext context}) async {
    FirebaseAuth auth = FirebaseAuth.instance;
    User? user;

    if (kIsWeb) {
      GoogleAuthProvider authProvider = GoogleAuthProvider();

      try {
        final UserCredential userCredential =
            await auth.signInWithPopup(authProvider);

        user = userCredential.user;
      } catch (e) {
        print(e);
      }
    } else {
      final GoogleSignIn googleSignIn = GoogleSignIn();

      final GoogleSignInAccount? googleSignInAccount =
          await googleSignIn.signIn();

      if (googleSignInAccount != null) {
        final GoogleSignInAuthentication googleSignInAuthentication =
            await googleSignInAccount.authentication;

        final AuthCredential credential = GoogleAuthProvider.credential(
          accessToken: googleSignInAuthentication.accessToken,
          idToken: googleSignInAuthentication.idToken,
        );

        try {
          final UserCredential userCredential =
              await auth.signInWithCredential(credential);

          user = userCredential.user;
        } on FirebaseAuthException catch (e) {
          if (e.code == 'account-exists-with-different-credential') {
            // ...
          } else if (e.code == 'invalid-credential') {
            // ...
          }
        } catch (e) {
          // ...
        }
      }
    }

    return user;
  }
}
On the web platform, you have to use the signInWithPopup() method on the FirebaseAuth instance.
Sign-out method
The sign-out method is quite simple to implement, but on the web platform, you do not need to call the googleSignIn.signOut() method. (This would result in an error.) Just calling FirebaseAuth.instance.signOut() will do the job.
import 'package:flutter/foundation.dart' show kIsWeb;

class Authentication {
  static Future<void> signOut({required BuildContext context}) async {
    final GoogleSignIn googleSignIn = GoogleSignIn();

    try {
      if (!kIsWeb) {
        await googleSignIn.signOut();
      }
      await FirebaseAuth.instance.signOut();
    } catch (e) {
      ScaffoldMessenger.of(context).showSnackBar(
        Authentication.customSnackBar(
          content: 'Error signing out. Try again.',
        ),
      );
    }
  }
}
Building the UI
Just delete everything from the main.dart file, and paste the boilerplate code given below.
import 'package:flutter/material.dart';

import 'screens/sign_in_screen.dart';

void main() {
  runApp(MyApp());
}

class MyApp extends StatelessWidget {
  @override
  Widget build(BuildContext context) {
    return MaterialApp(
      title: 'FlutterFire Samples',
      debugShowCheckedModeBanner: false,
      theme: ThemeData(
        primarySwatch: Colors.indigo,
        brightness: Brightness.dark,
      ),
      home: SignInScreen(),
    );
  }
}
Let’s build the UI for SignInScreen.
SignInScreen layout
Create a new dart file called sign_in_screen.dart inside the directory lib -> screens.
The SignInScreen layout would look like this:
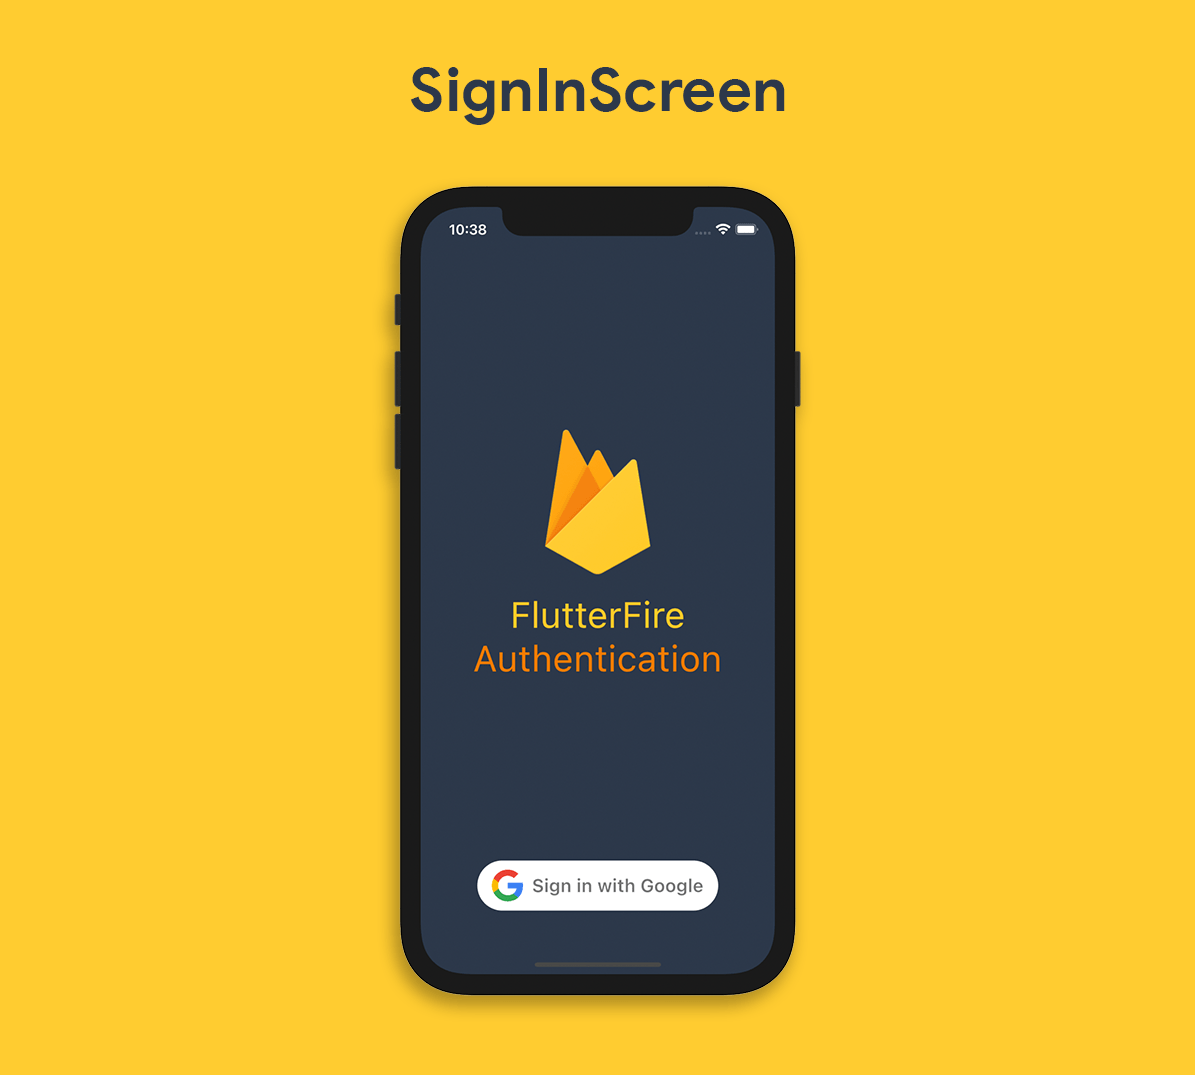
SignInScreen should be a Stateful Widget because we will be making some changes to the UI later, which will require the widgets to be redrawn.
class SignInScreen extends StatefulWidget {
  @override
  _SignInScreenState createState() => _SignInScreenState();
}

class _SignInScreenState extends State<SignInScreen> {
  @override
  Widget build(BuildContext context) {
    return Container();
  }
}
The code for the SignInScreen UI will look like this:
class _SignInScreenState extends State<SignInScreen> {
  @override
  Widget build(BuildContext context) {
    return Scaffold(
      backgroundColor: CustomColors.firebaseNavy,
      body: SafeArea(
        child: Padding(
          padding: const EdgeInsets.only(
            left: 16.0,
            right: 16.0,
            bottom: 20.0,
          ),
          child: Column(
            mainAxisSize: MainAxisSize.max,
            children: [
              Row(),
              Expanded(
                child: Column(
                  mainAxisSize: MainAxisSize.min,
                  mainAxisAlignment: MainAxisAlignment.center,
                  children: [
                    Flexible(
                      flex: 1,
                      child: Image.asset(
                        'assets/firebase_logo.png',
                        height: 160,
                      ),
                    ),
                    SizedBox(height: 20),
                    Text(
                      'FlutterFire',
                      style: TextStyle(
                        color: CustomColors.firebaseYellow,
                        fontSize: 40,
                      ),
                    ),
                    Text(
                      'Authentication',
                      style: TextStyle(
                        color: CustomColors.firebaseOrange,
                        fontSize: 40,
                      ),
                    ),
                  ],
                ),
              ),
              FutureBuilder(
                future: Authentication.initializeFirebase(context: context),
                builder: (context, snapshot) {
                  if (snapshot.hasError) {
                    return Text('Error initializing Firebase');
                  } else if (snapshot.connectionState == ConnectionState.done) {
                    return GoogleSignInButton();
                  }
                  return CircularProgressIndicator(
                    valueColor: AlwaysStoppedAnimation<Color>(
                      CustomColors.firebaseOrange,
                    ),
                  );
                },
              ),
            ],
          ),
        ),
      ),
    );
  }
}
In the above code, you will notice a FutureBuilder in which we wait for Firebase to get initialized before showing the GoogleSignInButton widget.
Now we have to design the Sign in with Google button. Create a new file called google_sign_in_button.dart inside the directory lib -> widgets.
It will be a StatefulWidget and will contain a method call to the Google Sign-In authentication inside the onPressed() method.
class GoogleSignInButton extends StatefulWidget {
  @override
  _GoogleSignInButtonState createState() => _GoogleSignInButtonState();
}

class _GoogleSignInButtonState extends State<GoogleSignInButton> {
  bool _isSigningIn = false;

  @override
  Widget build(BuildContext context) {
    return Padding(
      padding: const EdgeInsets.only(bottom: 16.0),
      child: _isSigningIn
          ? CircularProgressIndicator(
              valueColor: AlwaysStoppedAnimation<Color>(Colors.white),
            )
          : OutlinedButton(
              style: ButtonStyle(
                backgroundColor: MaterialStateProperty.all(Colors.white),
                shape: MaterialStateProperty.all(
                  RoundedRectangleBorder(
                    borderRadius: BorderRadius.circular(40),
                  ),
                ),
              ),
              onPressed: () async {
                setState(() {
                  _isSigningIn = true;
                });

                // TODO: Add a method call to the Google Sign-In authentication

                setState(() {
                  _isSigningIn = false;
                });
              },
              child: Padding(
                padding: const EdgeInsets.fromLTRB(0, 10, 0, 10),
                child: Row(
                  mainAxisSize: MainAxisSize.min,
                  mainAxisAlignment: MainAxisAlignment.center,
                  children: <Widget>[
                    Image(
                      image: AssetImage("assets/google_logo.png"),
                      height: 35.0,
                    ),
                    Padding(
                      padding: const EdgeInsets.only(left: 10),
                      child: Text(
                        'Sign in with Google',
                        style: TextStyle(
                          fontSize: 20,
                          color: Colors.black54,
                          fontWeight: FontWeight.w600,
                        ),
                      ),
                    )
                  ],
                ),
              ),
            ),
    );
  }
}
We haven’t filled the onPressed() method in the above code. Let’s add the authentication method call:
onPressed: () async {
  setState(() {
    _isSigningIn = true;
  });

  User? user =
      await Authentication.signInWithGoogle(context: context);

  setState(() {
    _isSigningIn = false;
  });

  if (user != null) {
    Navigator.of(context).pushReplacement(
      MaterialPageRoute(
        builder: (context) => UserInfoScreen(
          user: user,
        ),
      ),
    );
  }
}
If the authentication successfully returns the user, then this will navigate to the UserInfoScreen and pass the retrieved user to it.
UserInfoScreen layout
Create a new dart file called user_info_screen.dart inside the directory lib -> screens.
The UserInfoScreen layout will look like this:
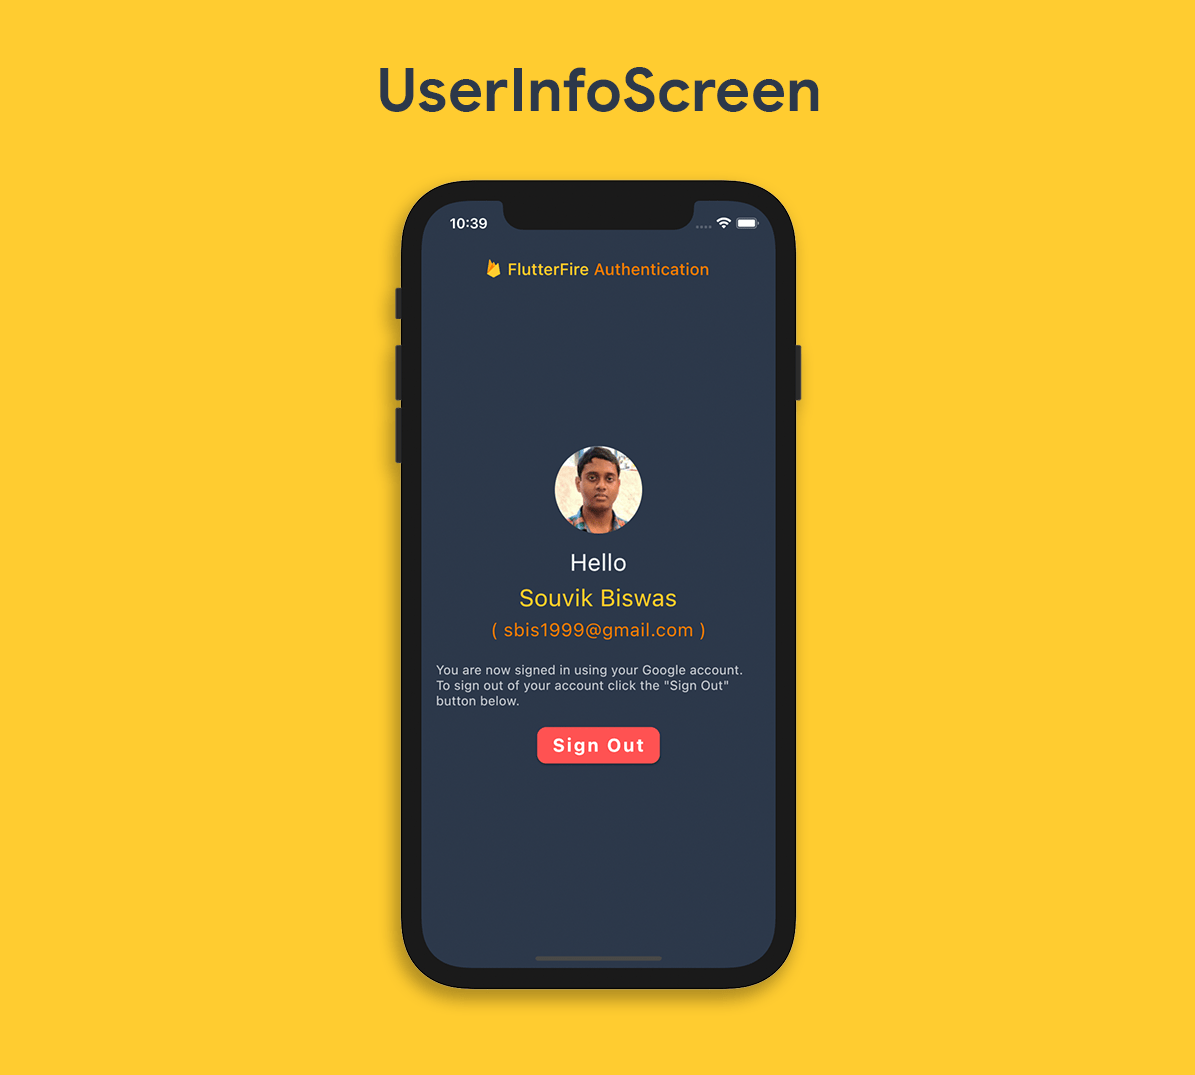
The UserInfoScreen should be a Stateful Widget where some user info will be shown along with a Sign Out button.
class UserInfoScreen extends StatefulWidget {
  const UserInfoScreen({Key? key, required User user})
      : _user = user,
        super(key: key);

  final User _user;

  @override
  _UserInfoScreenState createState() => _UserInfoScreenState();
}

class _UserInfoScreenState extends State<UserInfoScreen> {
  late User _user;
  bool _isSigningOut = false;

  Route _routeToSignInScreen() {
    return PageRouteBuilder(
      pageBuilder: (context, animation, secondaryAnimation) => SignInScreen(),
      transitionsBuilder: (context, animation, secondaryAnimation, child) {
        var begin = Offset(-1.0, 0.0);
        var end = Offset.zero;
        var curve = Curves.ease;

        var tween =
            Tween(begin: begin, end: end).chain(CurveTween(curve: curve));

        return SlideTransition(
          position: animation.drive(tween),
          child: child,
        );
      },
    );
  }

  @override
  void initState() {
    _user = widget._user;

    super.initState();
  }

  @override
  Widget build(BuildContext context) {
    return Scaffold(
      backgroundColor: CustomColors.firebaseNavy,
      appBar: AppBar(
        elevation: 0,
        backgroundColor: CustomColors.firebaseNavy,
        title: AppBarTitle(),
      ),
      body: SafeArea(
        child: Padding(
          padding: const EdgeInsets.only(
            left: 16.0,
            right: 16.0,
            bottom: 20.0,
          ),
          child: Column(
            mainAxisAlignment: MainAxisAlignment.center,
            children: [
              Row(),
              _user.photoURL != null
                  ? ClipOval(
                      child: Material(
                        color: CustomColors.firebaseGrey.withOpacity(0.3),
                        child: Image.network(
                          _user.photoURL!,
                          fit: BoxFit.fitHeight,
                        ),
                      ),
                    )
                  : ClipOval(
                      child: Material(
                        color: CustomColors.firebaseGrey.withOpacity(0.3),
                        child: Padding(
                          padding: const EdgeInsets.all(16.0),
                          child: Icon(
                            Icons.person,
                            size: 60,
                            color: CustomColors.firebaseGrey,
                          ),
                        ),
                      ),
                    ),
              SizedBox(height: 16.0),
              Text(
                'Hello',
                style: TextStyle(
                  color: CustomColors.firebaseGrey,
                  fontSize: 26,
                ),
              ),
              SizedBox(height: 8.0),
              Text(
                _user.displayName!,
                style: TextStyle(
                  color: CustomColors.firebaseYellow,
                  fontSize: 26,
                ),
              ),
              SizedBox(height: 8.0),
              Text(
                '( ${_user.email!} )',
                style: TextStyle(
                  color: CustomColors.firebaseOrange,
                  fontSize: 20,
                  letterSpacing: 0.5,
                ),
              ),
              SizedBox(height: 24.0),
              Text(
                'You are now signed in using your Google account. To sign out of your account, click the "Sign Out" button below.',
                style: TextStyle(
                    color: CustomColors.firebaseGrey.withOpacity(0.8),
                    fontSize: 14,
                    letterSpacing: 0.2),
              ),
              SizedBox(height: 16.0),
              _isSigningOut
                  ? CircularProgressIndicator(
                      valueColor: AlwaysStoppedAnimation<Color>(Colors.white),
                    )
                  : ElevatedButton(
                      style: ButtonStyle(
                        backgroundColor: MaterialStateProperty.all(
                          Colors.redAccent,
                        ),
                        shape: MaterialStateProperty.all(
                          RoundedRectangleBorder(
                            borderRadius: BorderRadius.circular(10),
                          ),
                        ),
                      ),
                      onPressed: () async {
                        setState(() {
                          _isSigningOut = true;
                        });
                        await Authentication.signOut(context: context);
                        setState(() {
                          _isSigningOut = false;
                        });
                        Navigator.of(context)
                            .pushReplacement(_routeToSignInScreen());
                      },
                      child: Padding(
                        padding: EdgeInsets.only(top: 8.0, bottom: 8.0),
                        child: Text(
                          'Sign Out',
                          style: TextStyle(
                            fontSize: 20,
                            fontWeight: FontWeight.bold,
                            color: Colors.white,
                            letterSpacing: 2,
                          ),
                        ),
                      ),
                    ),
            ],
          ),
        ),
      ),
    );
  }
}
Here, the Authentication.signOut() method that we defined earlier is used for signing out a user.
The _routeToSignInScreen() method is just used to show a slide transition animation (from left to right) while navigating back from the UserInfoScreen to the SignInScreen as the user signs out of the account.
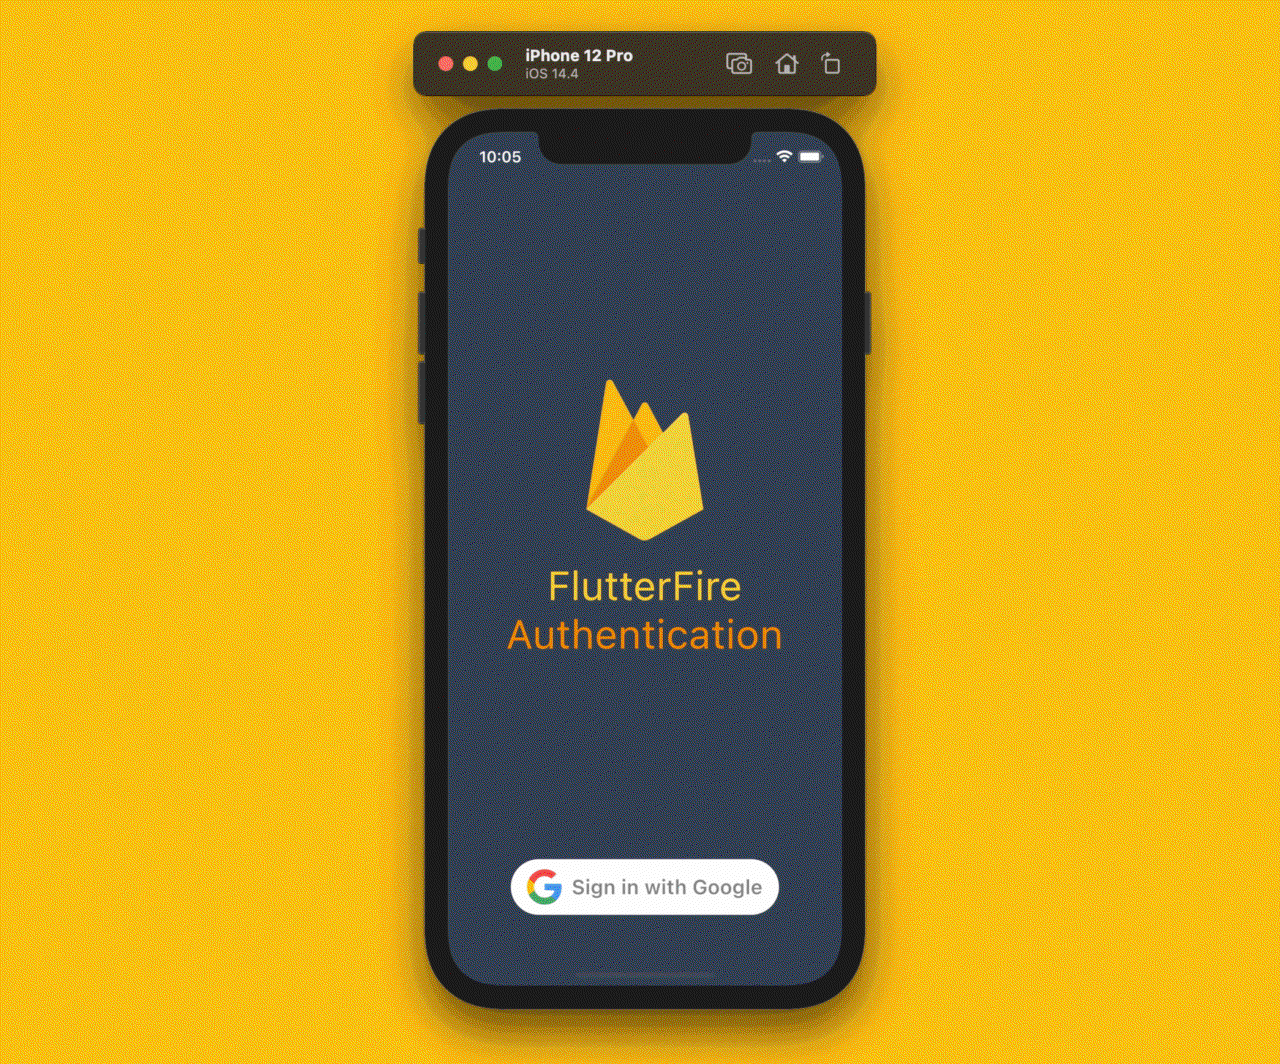
We have almost completed the app. There is just one more thing to be discussed.
Auto login
If a user has logged in to the app and then closed it, when the user comes back to the app, it should automatically sign in (that is, without requiring credentials every time the user returns to the app).
To implement this, we just have to complete the TODO that we left in the initializeFirebase() method. The modified method will be as follows:
static Future<FirebaseApp> initializeFirebase({
  required BuildContext context,
}) async {
  FirebaseApp firebaseApp = await Firebase.initializeApp();

  User? user = FirebaseAuth.instance.currentUser;

  if (user != null) {
    Navigator.of(context).pushReplacement(
      MaterialPageRoute(
        builder: (context) => UserInfoScreen(
          user: user,
        ),
      ),
    );
  }

  return firebaseApp;
}
Configure Firebase on Codemagic
First of all you obviously need Codemagic which is a CI/CD tool for mobile apps. In case you are not a Codemagic user yet, you can sign up here:
In our local configuration, we have downloaded the google-services.json and GoogleService-Info.plist files and kept them in the android and ios directories of the Flutter app, respectively. These files contain sensitive data, like the API key and information about the app. These files shouldn’t be checked into version control or exposed to the world. We have to take certain steps to secure our sensitive data.
Ignore the files in the version control system
First of all, we have to list the two private files, google-services.json (present in the folder android/app/) and GoogleService-Info.plist (present in the folder ios/Runner/), in the .gitignore file to prevent them from being checked into a version control system, such as Git.
Once you have added the two files into .gitignore, commit the .gitignore file.
Encode the files
At this stage, we have ensured that we won’t commit the sensitive files to the version control system. However, the continuous integration server will expect to find this file in order to successfully build the Flutter app.
To encode the files, in the Configuration as code section of the Flutter project, you can go to the Encrypt environment variables option.
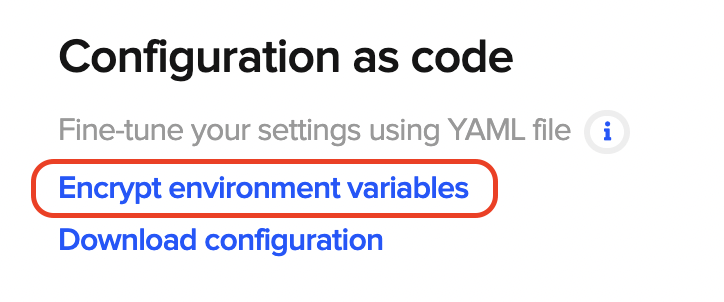
Then just drag and drop the files you want to encrypt, and an encrypted string will be generated.
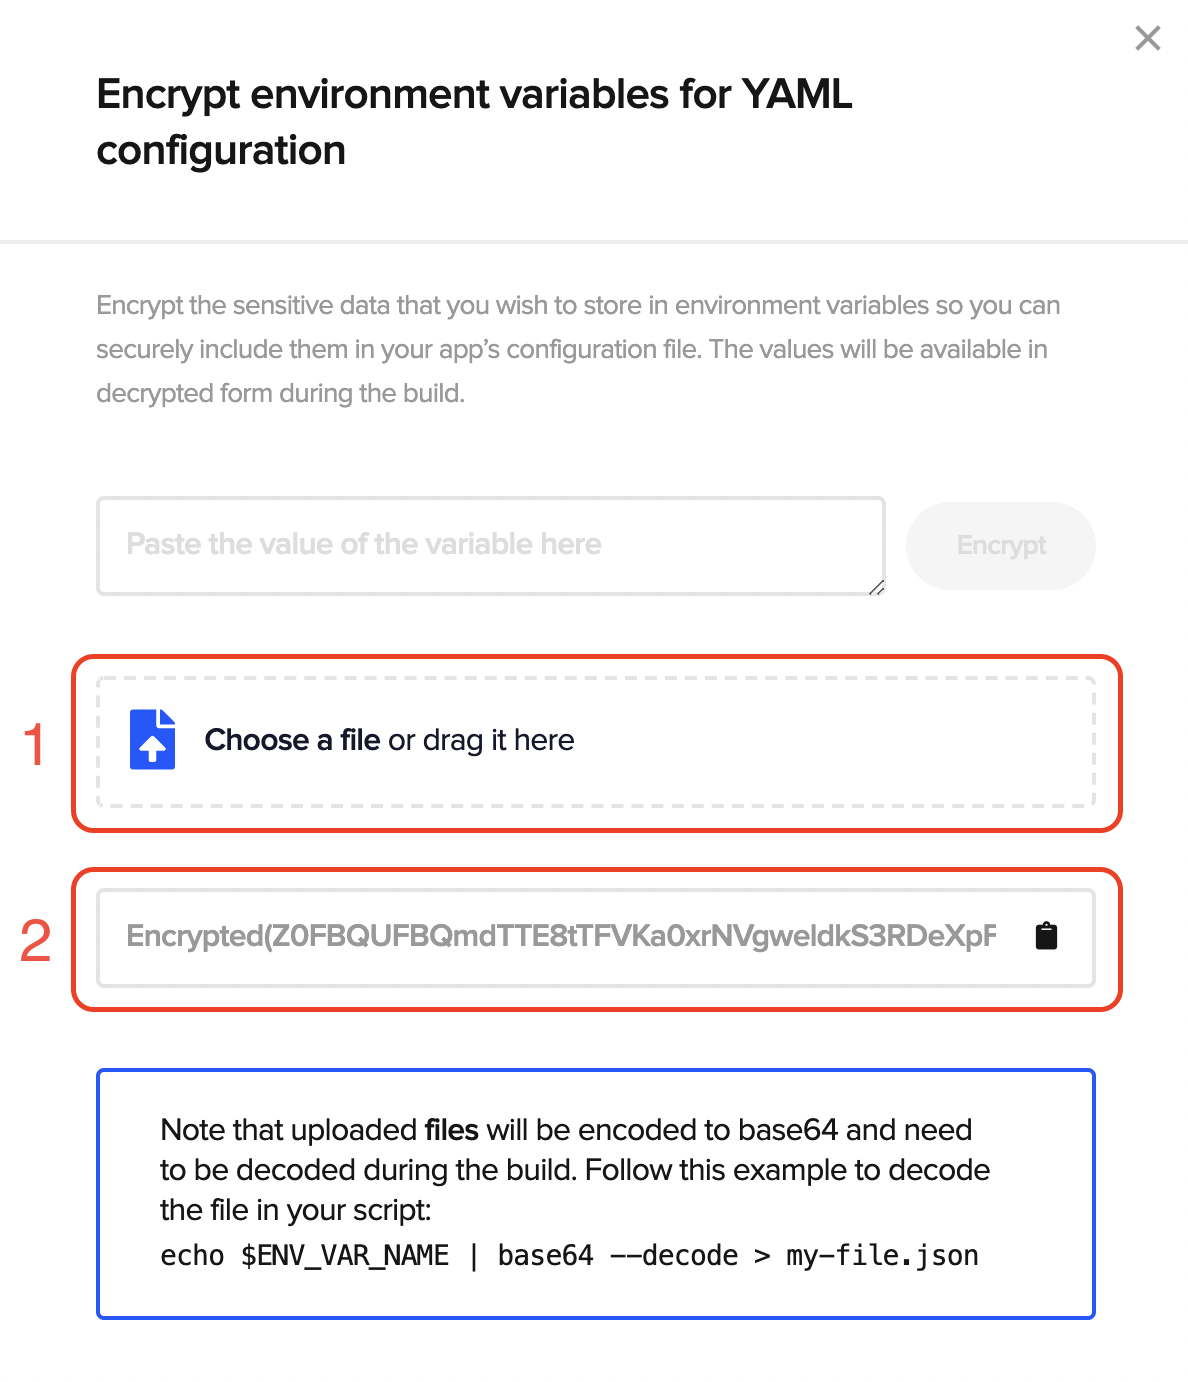
Copy the generated string, and add it to the Environment variables section of the project.
Adding the environment variable in Codemagic
-
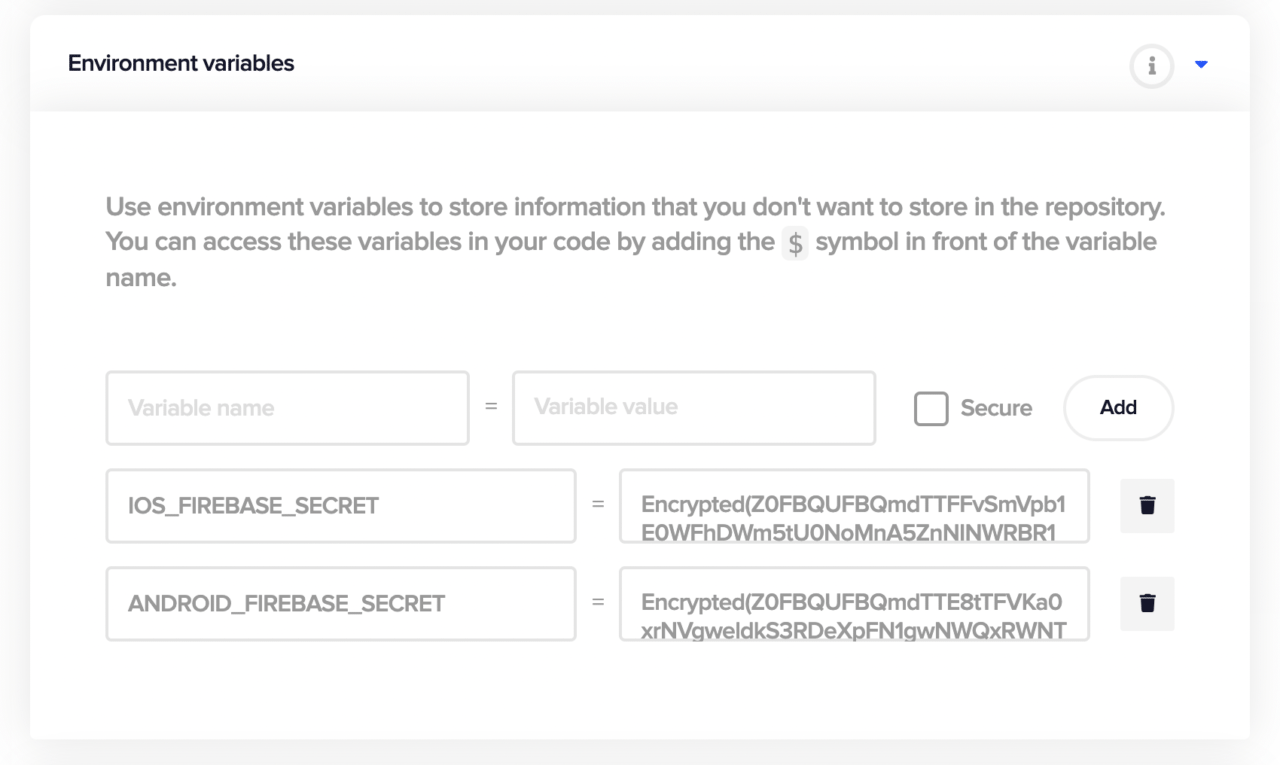
Expand the Environment variables tab.
-
Add the two encrypted strings generated from the terminal as:
ANDROID_FIREBASE_SECRET(Variable name) -> encoded string fromgoogle-services.json(Variable value)IOS_FIREBASE_SECRET(Variable name) -> encoded string fromGoogleService-Info.plist(Variable value)
-
Click on Save changes.
Adding a pre-build script
-
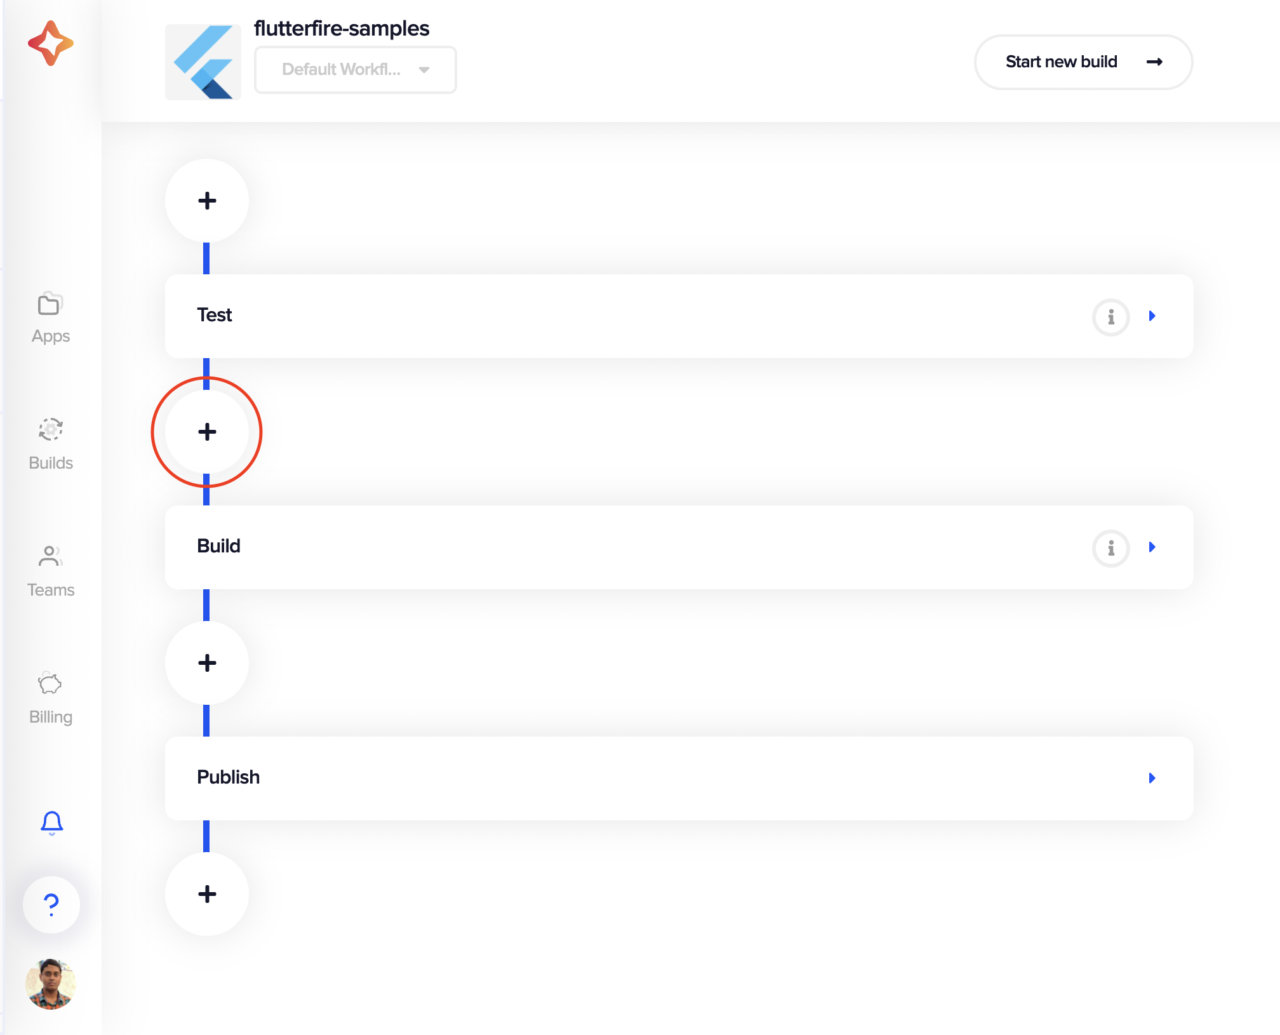
In the Codemagic project settings, click on the + button before the Build stage.
-
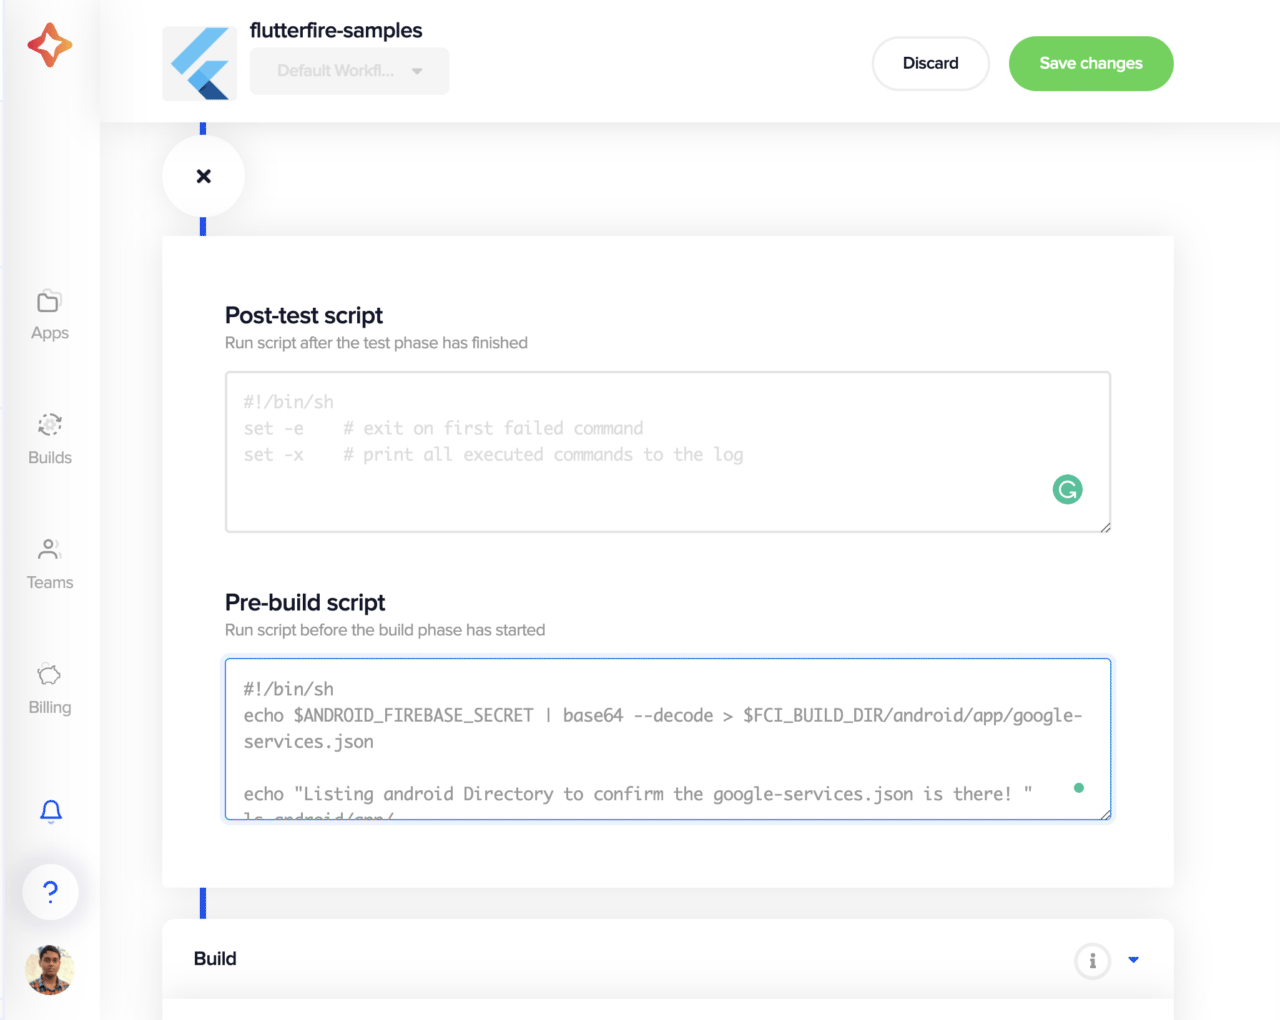
Add the following to the Pre-build script.
#!/bin/sh echo $ANDROID_FIREBASE_SECRET | base64 --decode > $CM_BUILD_DIR/android/app/google-services.json echo "Listing android Directory to confirm the google-services.json is there! " ls android/app/ echo $IOS_FIREBASE_SECRET | base64 --decode > $CM_BUILD_DIR/ios/Runner/GoogleService-Info.plist echo "\nListing iOS Directory to confirm the GoogleService-Info.plist is there! " ls ios/Runner/ -
Click on Save changes.
Start building
Click the Start new build button to start the build process.

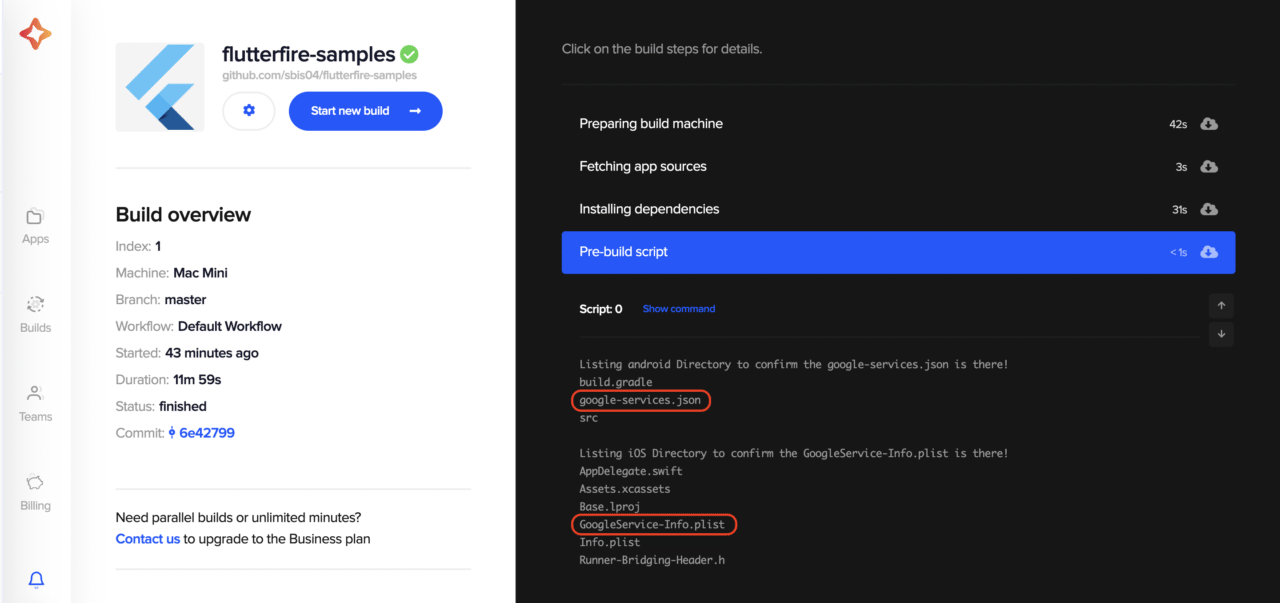
While the build process is running, you can click the Pre-build tab to see the output of the code we added to the pre-build script. You can see that both files, google-services.json and GoogleService-Info.plist, are present, although we did not add them to the version control system. They are generated from the encoded strings.
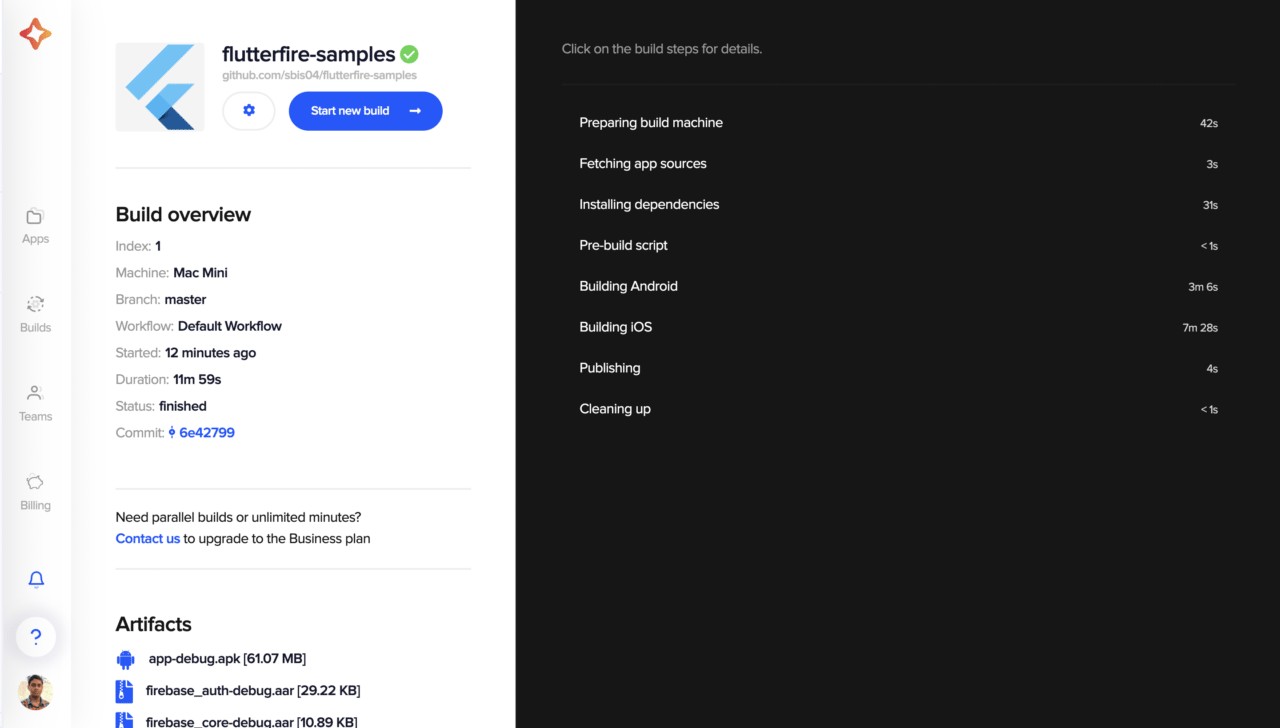
After the build is finished successfully, you can also download the artifacts to test it on a real device.
If you want to generate a release build of your app, then check out the following articles:
Dependency caching
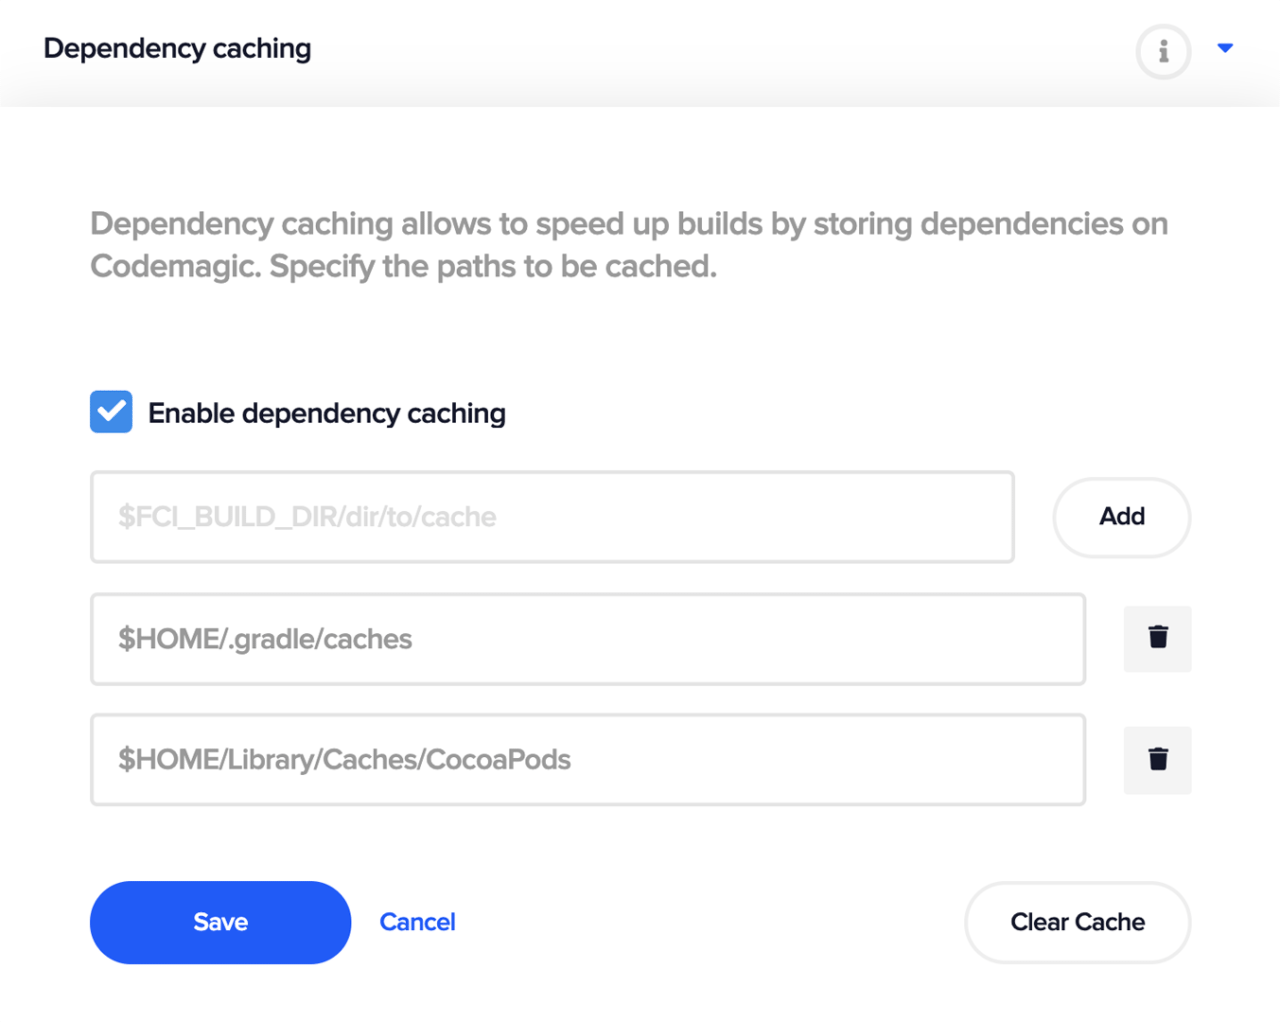
Firebase dependencies take longer to build. In order to prevent this, you can use dependency caching on Codemagic to lower the build time.
To cache your Gradle and CocoaPods, enable dependency caching and include the following two paths in the Dependency caching section in your Codemagic project settings:
$HOME/.gradle/caches

$HOME/Library/Caches/CocoaPods


Troubleshooting some common issues
Following are some of the most common issues that people face while working with a project containing Firebase:
Releasing to Play Store
Having a completely configured app with Firebase doesn’t mean it is ready to be published in Play Store. The biggest mistake made while generating a release build of an app containing Firebase is not updating the google-services.json file.
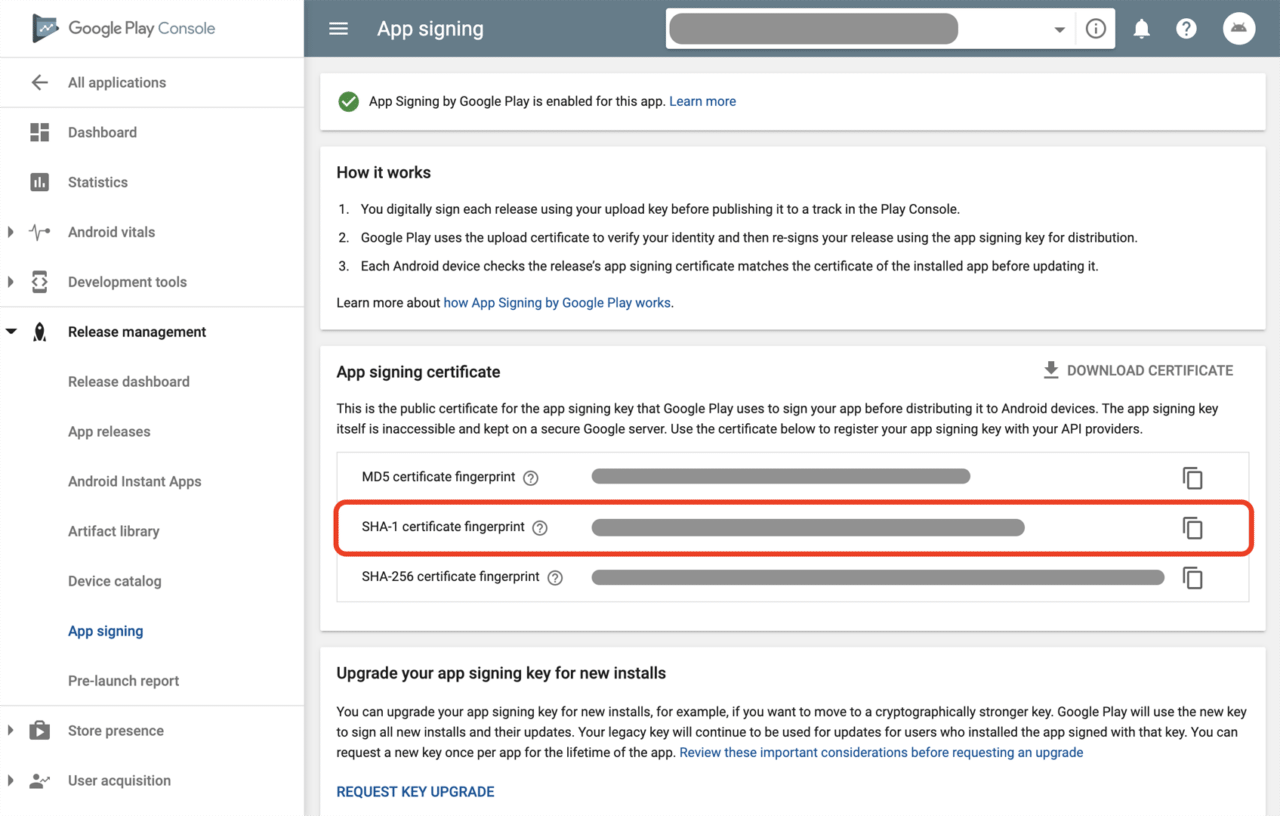
After creating a new project in Play Console, a new SHA-1 key is generated. Copy the new SHA-1, and go your Firebase project -> Project settings -> Add fingerprint to add the new key.
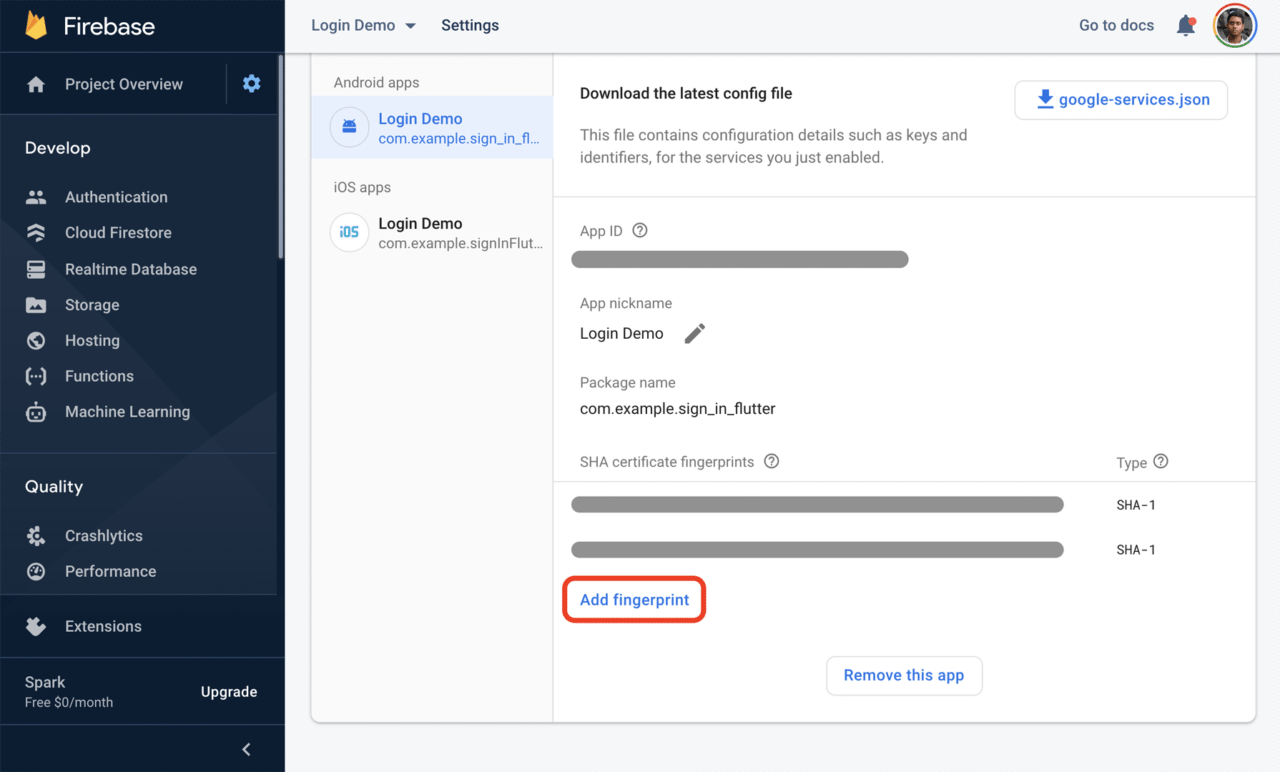
Download the latest google-services.json file, and replace it with this in your Flutter project.
iOS Podfile issue
The Podfile format was changed in Flutter version 1.20. (Learn more about this here.) If you have created your Flutter project post v1.20, then you might face a Podfile is out of date warning or something related to this.

If you have not made any custom configuration changes to the default Podfile generated by Flutter, it is pretty easy to fix.
Just follow these steps:
-
Run Flutter clean:
flutter clean -
Run the following from the
ios/folder:pod repo update -
Delete
ios/Pods/,ios/Podfile.lockand/ios/Podfile -
Then run the Flutter build again – this should fix the issue
If you have custom configurations in the Podfile, follow the steps above, and then include the custom changes again.
Xcode signing identifier error
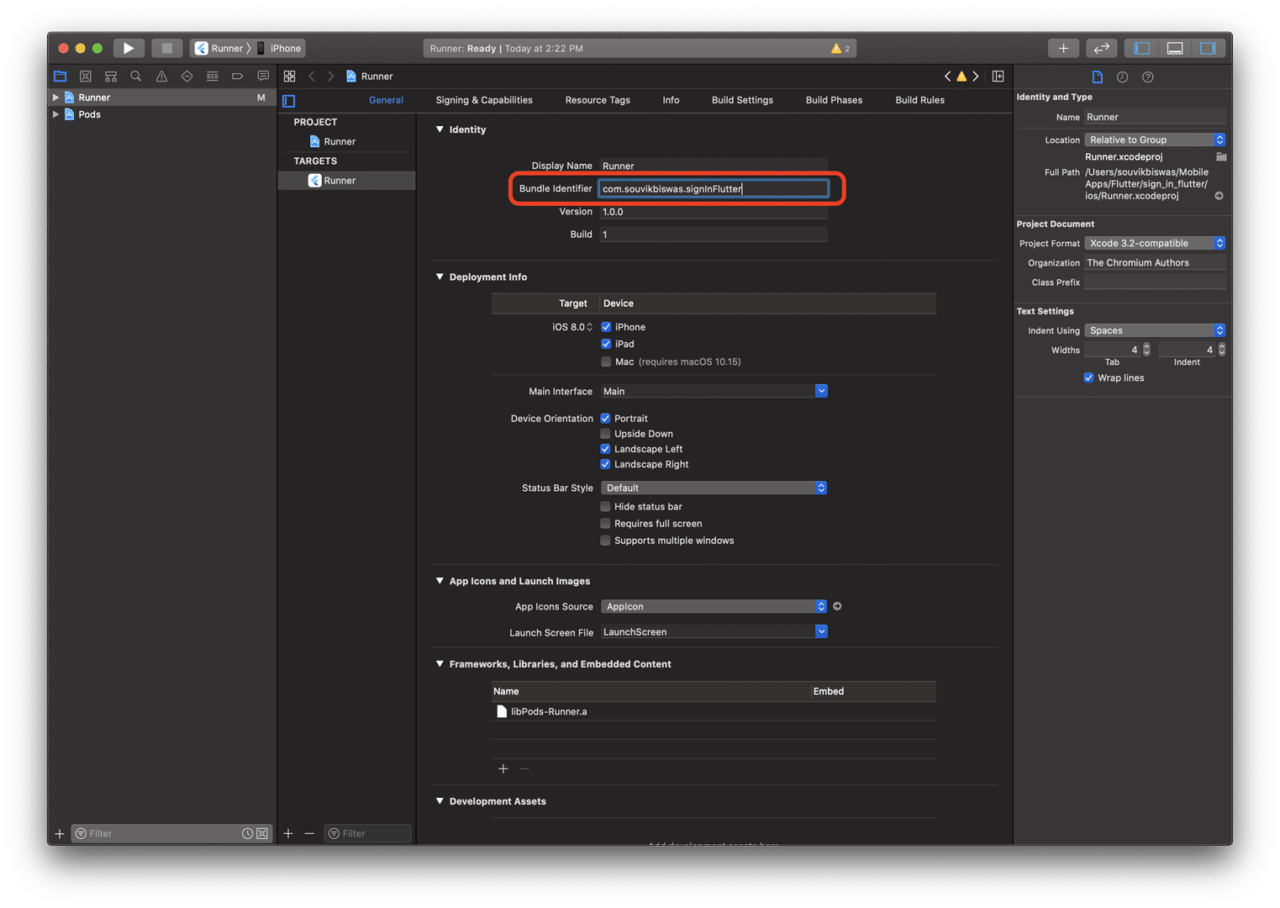
If you have not set the organization (using the --org flag) while creating the Flutter project, it will be set to the default. But for running the project on an iOS device, you will need to use a unique signing identifier. Otherwise, you will get the following error:

Open the ios/ folder in Xcode by right-clicking and selecting Open in Xcode. Now, select Runner. Under the General tab, set a unique Bundle Identifier.
Also, go to the Signing & Capabilities tab, select your Team and check if the Bundle Identifier is correct.
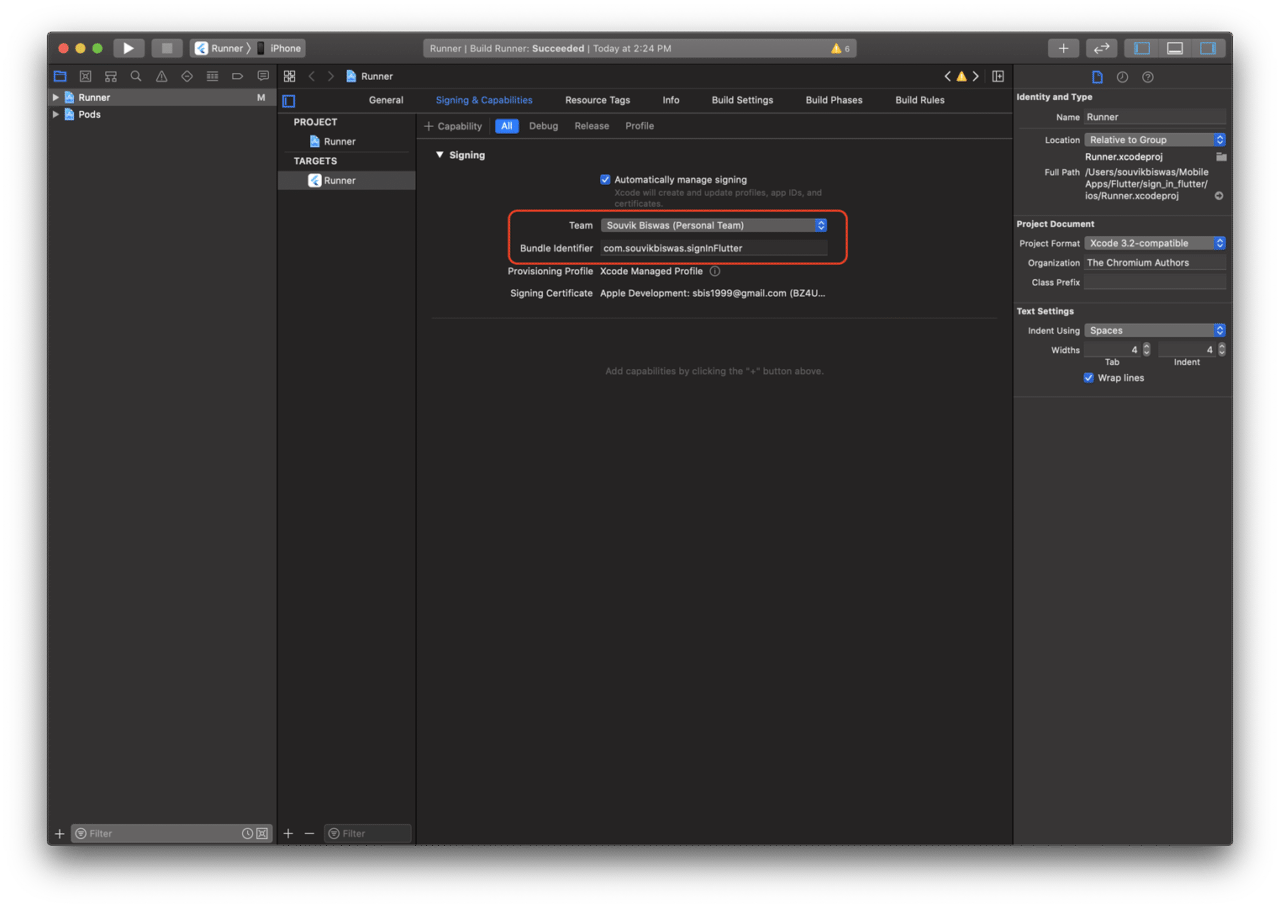
If you close Xcode and build your Flutter app again, the issue should now be solved.
Conclusion
The FlutterFire Authentication app is now complete, and we have successfully tested it with Codemagic by setting up Firebase with encoded files. I hope that you found some useful information in this article.
You can find the GitHub repo for this project here.
Was this article useful? 🤔 Let us know HERE.
More articles about Firebase:
- Firebase App Distribution using CLI
- Deploying Flutter app to Firebase App Distribution using Fastlane
- Firebase App Distribution using the Gradle plugin in Codemagic
- Practical guide: Flutter + Firebase + Codemagic
This article is written by Souvik Biswas. He is a passionate Mobile App Developer (Android and Flutter) and has worked on a number of mobile apps throughout his journey. He loves open-source contribution on GitHub. He is currently pursuing a B.Tech degree in Computer Science and Engineering from Indian Institute of Information Technology Kalyani. He also writes Flutter articles on Medium - Flutter Community.


