


Written by Souvik Biswas
Integration tests help in evaluating the performance of a complete app to verify all the widgets and services work together as expected. Integration testing is also known as end-to-end testing or UI testing.
Flutter uses the integration_test package along with the flutter_driver to run these automated tests on a target device, which can be a physical device or emulator (Android, iOS or the web). You can use the flutter_test APIs with this package to write these tests in a simple manner, similar to writing widget tests.
In this article, we’ll look into an advanced testing style of integration tests called automated screenshot tests. This helps in detecting visual changes in the app’s user interface with every iteration.
⚠️ NOTE: At the time of writing this article, Flutter screenshot testing using the
integration_testpackage is in active development, and you need to be on the Fluttermasterchannel to use it. It is currently only available for Android and the web. Work is in progress for iOS support. Once it’s ready, you should be able to use the same APIs for the iOS platform as well.
Getting started
Let’s get started by creating a basic Flutter project where we can add the integration tests for taking the screenshots.
Before creating the project, make sure you are on the master branch of Flutter:
flutter channel
If you are not on the correct branch, use the following commands:
flutter channel master
flutter upgrade
Create a new Flutter project using the following command:
flutter create screenshot_integration_demo
Open the project using your favorite IDE. To open it with VS Code, you can use:
code screenshot_integration_demo
Dependencies
You will need to add a few dependencies to the pubspec.yaml file of your project to use integration testing. Add the following under dev_dependencies:
dev_dependencies:
  flutter_test:
    sdk: flutter
  integration_test:
    sdk: flutter
  flutter_driver:
    sdk: flutter
Get the packages using the following command:
flutter packages get
Testing script
You should write the integration test by creating a file under the integration_test directory. In the root directory of your Flutter project, create a folder called integration_test. Inside this folder, create a screenshot_test.dart file. This is where we’re going to write the test.
Create a main function and instantiate IntegrationTestWidgetsFlutterBinding.
import 'dart:io';

import 'package:flutter_test/flutter_test.dart';
import 'package:integration_test/integration_test.dart';

import 'package:screenshot_integration_demo/main.dart';
import 'package:flutter/foundation.dart' show kIsWeb;

void main() {
  final IntegrationTestWidgetsFlutterBinding binding =
      IntegrationTestWidgetsFlutterBinding();

  // TODO: Write the test here
}
The testing script will be a bit different for the web platform compared to the mobile platform (Android). We’ll write it in such a way that it can be used with both platforms.
Use the testWidgets function to start defining the integration test. Give it a name (here, we have given it a name, screenshot) and a callback function.
void main() {
  // ...

  testWidgets('screenshot', (WidgetTester tester) async {
    // Render the UI of the app
    await tester.pumpWidget(MyApp());

    // TODO: Add screenshot test
  });
}
The pumpWidget method is used to trigger the rendering of the specified widget. In our case, it will be the MyApp widget.
Now, we have to check whether it’s running on Android or the web. If it’s running on Android, we have to call the convertFlutterSurfaceToImage() method on the binding object.
testWidgets('screenshot', (WidgetTester tester) async {
  // ...

  String platformName = '';

  if (!kIsWeb) {
    // Not required for the web. This is required prior to taking the screenshot.
    await binding.convertFlutterSurfaceToImage();

    if (Platform.isAndroid) {
      platformName = "android";
    } else {
      platformName = "ios";
    }
  } else {
    platformName = "web";
  }

  // TODO: Take screenshot
});
The convertFlutterSurfaceToImage() method helps in converting the Flutter surface to an image view on the Android platform. (This might be different for the iOS platform when it’s ready.) We have used a String to store the platform name – we’ll use this to store the screenshot file along with the name of the platform so that we can easily identify the platform it was taken on.
Finally, we have to make sure at least one frame of the app widget has finished rendering before taking the screenshot.
testWidgets('screenshot', (WidgetTester tester) async {
  // ...

  // To make sure at least one frame has rendered
  await tester.pumpAndSettle();
  // Take the screenshot
  await binding.takeScreenshot('screenshot-$platformName');
});
Driver script
You can use the driver script to retrieve the screenshot taken during the integration test and store it locally on your host machine. This also helps you to easily retrieve the screenshots taken while running in a CI environment.
We will use the onScreenshot property inside the integrationDriver() function to retrieve the screenshot as bytes and store it as a file.
import 'dart:io';
import 'package:integration_test/integration_test_driver_extended.dart';

Future<void> main() async {
  try {
    await integrationDriver(
      onScreenshot: (String screenshotName, List<int> screenshotBytes) async {
        final File image = await File('screenshots/$screenshotName.png')
            .create(recursive: true);
        image.writeAsBytesSync(screenshotBytes);
        return true;
      },
    );
  } catch (e) {
    print('Error occured: $e');
  }
}
This stores the screenshot as a .png file on the host machine inside the folder screenshots. (The folder is created if it is not already present.) We have wrapped the entire function call inside a try-catch block to avoid any crashes.
While running on the web, this code throws an error, though the screenshot gets saved successfully. There’s also a GitHub issue regarding this. The try-catch block helps to prevent crashes from these types of errors. As this functionality is in a very early stage and still in active development, errors like these are common.
Running the test
We have finished defining all the test scripts for taking the screenshot, and now we are ready to run. There are some extra steps needed to run it on the web, which we’ll look into in a bit.
On mobile
To run the screenshot test on mobile (Android), you can use the following command:
flutter drive \
  --driver=test_driver/integration_test.dart \
  --target=integration_test/screenshot_test.dart \
  -d "<device_name>"
Replace the
<device_name>with the name of the physical device or the emulator on which you want to run the test. You can get the device names of all the connected devices using the commandflutter devices.
This will generate a screenshot with the name screenshot-android.png and store it in the folder screenshots.
On the web
Follow the steps below to run the screenshot test on the web.
Download ChromeDriver from here.
Run
chromedriver:./chromedriver --port=4444Run the test using the following command from a different terminal window:
flutter drive \
 --driver=test_driver/integration_test.dart \
 --target=integration_test/screenshot_test.dart \
 -d web-server
This will run the test and generate a screenshot with the name screenshot-web.png inside the screenshots folder.
Automation using Codemagic
Now, let’s take a look at how you can automate this screenshot generation using Codemagic so that with every commit, you get its respective screenshots.
First of all, commit your project to the version control system.
Log in to Codemagic.
Click on Add application.
Select your Git provider, or add a repository from a URL.
Select the repository to add, and choose Flutter App for the project type.
This will add the project repository to Codemagic. For Flutter projects, you have two options: Either you can use the Workflow Editor (default) or Codemagic YAML configuration. We’ll take a look at both of these methods.
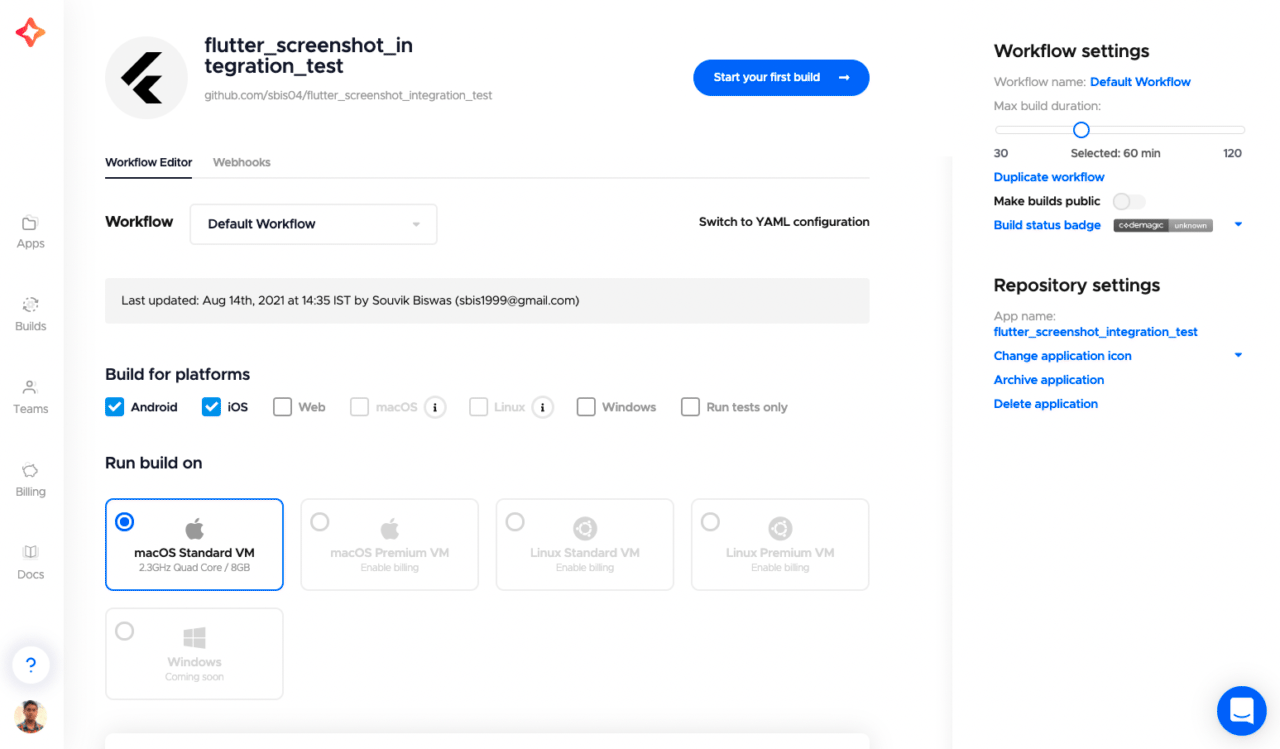
Using Workflow Editor
With Workflow Editor, you can only run the integration test on one of the platforms at once. Let’s start by configuring the workflow for Android screenshot testing.
Select the Android platform.
Add the following to the Pre-test script:
#!/bin/sh
flutter emulators --launch emulator
Under the Test section, enable the Flutter Driver tests.
Select the Android emulator.
Add the following to the Flutter drive arguments:
drive --driver=test_driver/integration_test.dart --target=integration_test/screenshot_test.dart -d emulatorIn the Post-test script, add:
#!/bin/sh
cp -r screenshots $CM_EXPORT_DIR
This will help in retrieving the screenshots as a zipped folder.
Click Save changes.
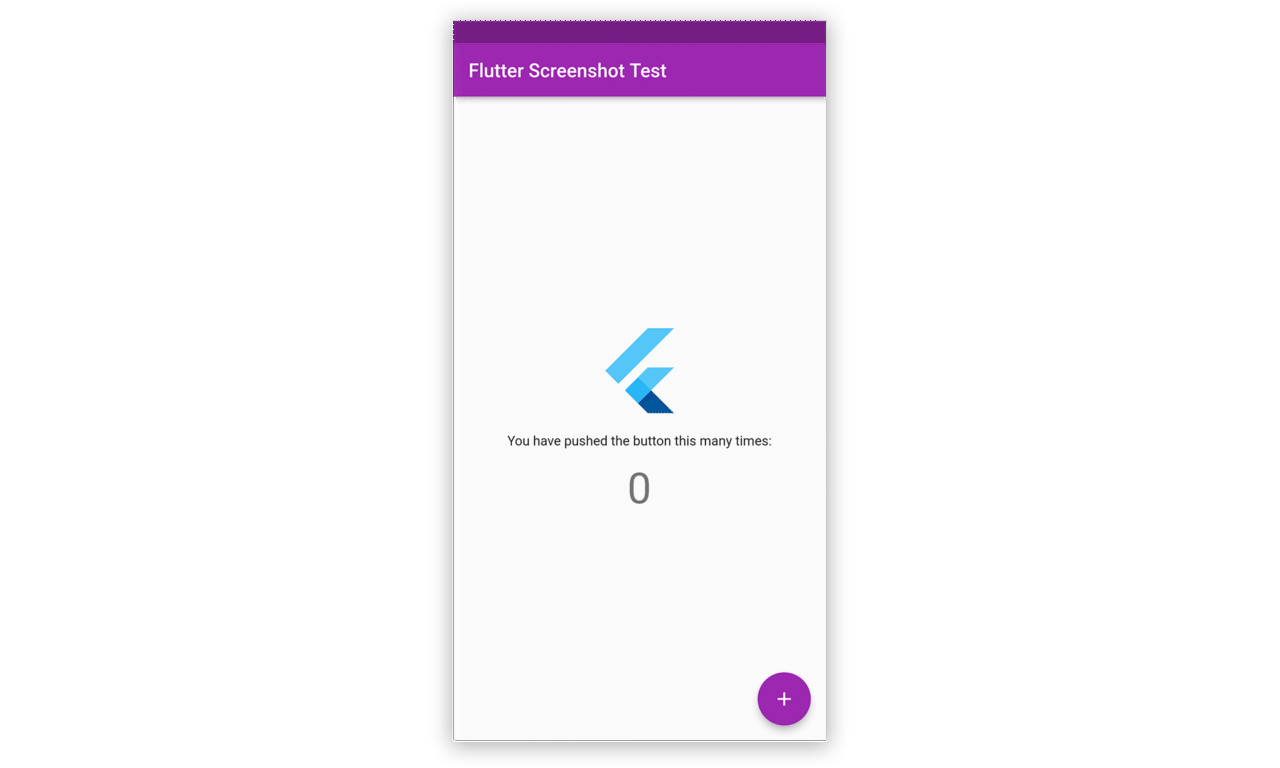
Now, you can run the build with this configuration to generate the screenshots.
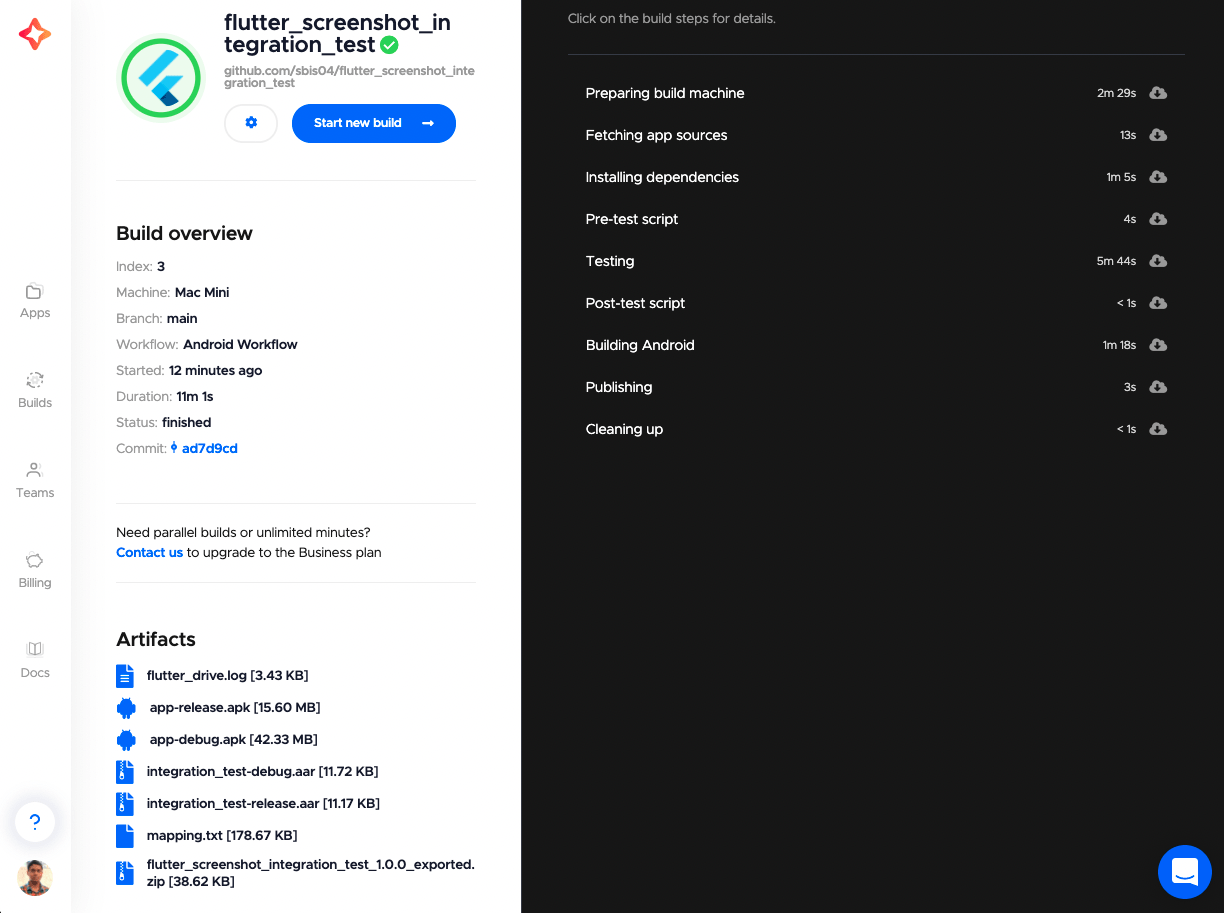
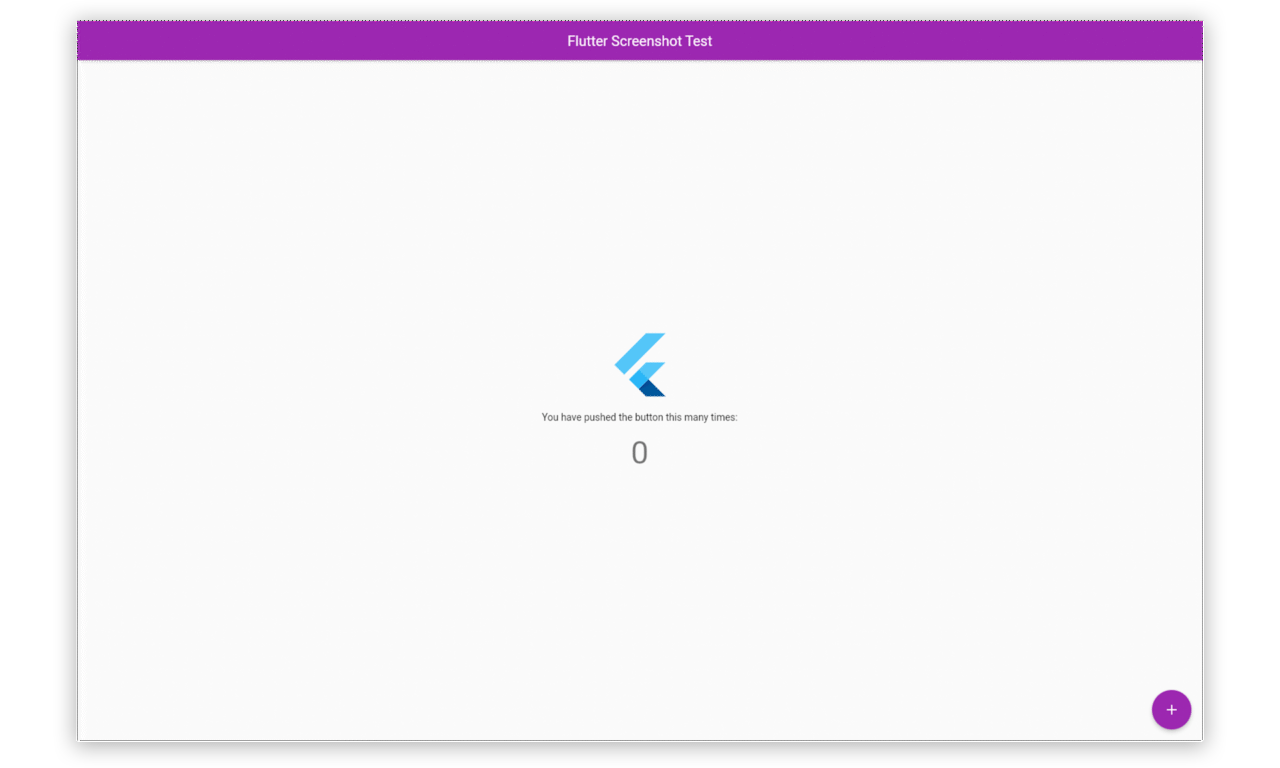
The generated screenshot of the app running on Android:
You can use a separate workflow to generate the screenshots for the web platform. On the menu on the right, click on Duplicate workflow under Workflow settings.
Name it Web Workflow.
Select Web as the build platform.
Replace the Pre-test script with the following:
#!/bin/sh
chromedriver --port=4444 &
sleep 10
The 10-second
sleephelps make sure thechromedriveris initialized properly before running the test.Under the Tests section, replace the Flutter drive arguments with:
drive --driver=test_driver/integration_test.dart --target=integration_test/screenshot_test.dart -d web-server --release --browser-name chromeClick Save changes.
You can use this workflow to generate the screenshots of the app running on the web platform.
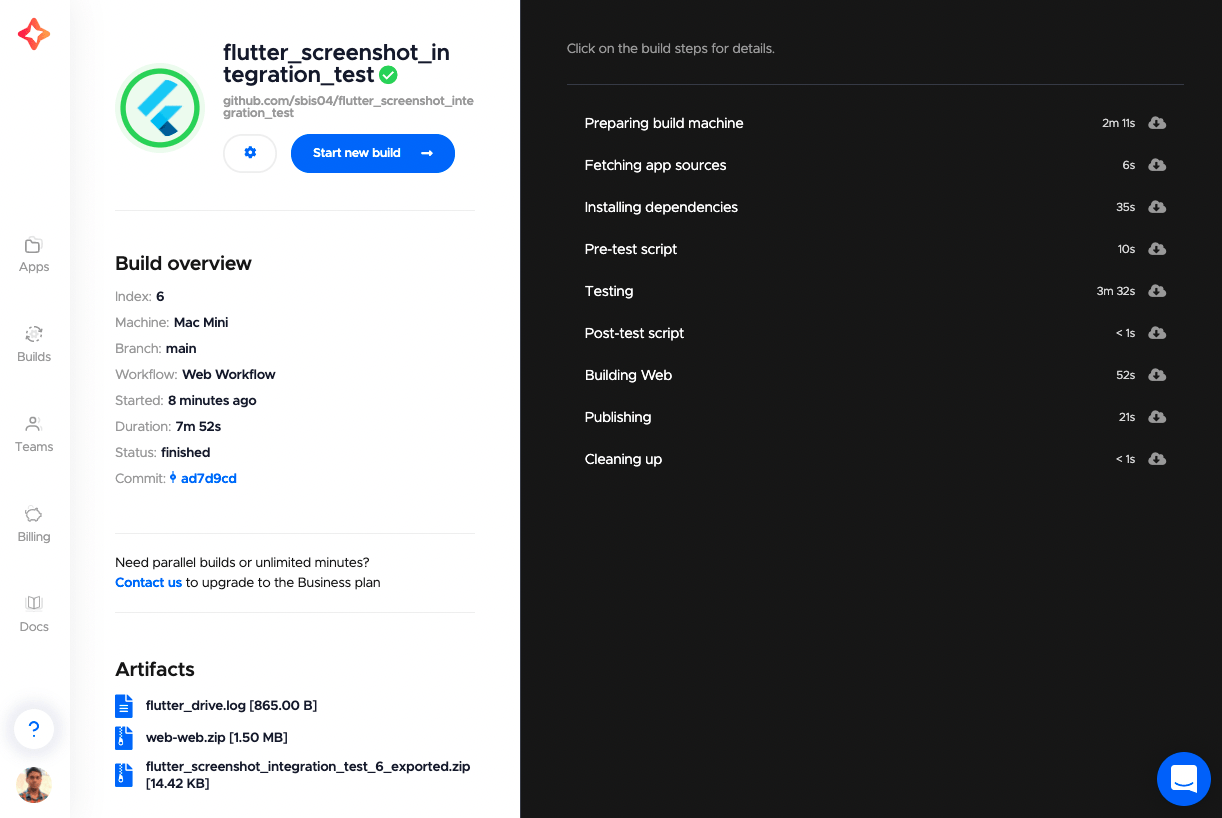
Here is the generated screenshot of the app running on the web:
Using Codemagic YAML
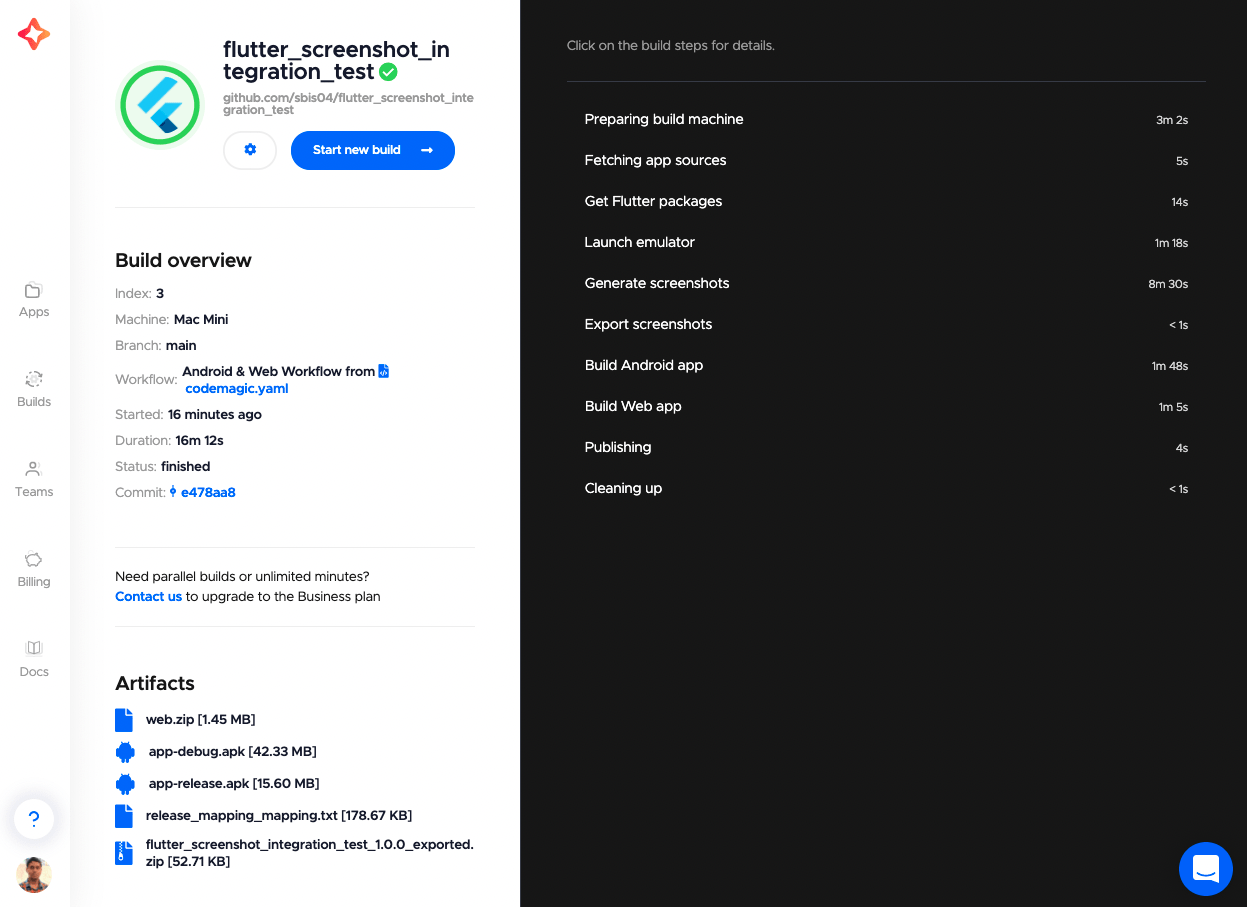
If you are using the codemagic.yaml file, then you can run the screenshot tests on both the Android and web platforms in a single workflow.
I won’t go deep into the YAML script, but you can learn more about the YAML configuration from here.
You can find the codemagic.yaml script here. It contains three workflows:
- Android Workflow (runs the screenshot test only on an Android emulator)
- Web Workflow (runs the screenshot test only on the web platform)
- Android & Web Workflow (runs the screenshot test on both the Android and web platforms)
Conclusion
Congratulations 🎉, you have successfully added screenshots to your Flutter integration testing and ran the automated tests on Codemagic. You can learn more about integration testing from the following links.
References
- Integration test package docs
- Testing Flutter apps on Codemagic using YAML and Workflow editor
- Codemagic YAML docs

Souvik Biswas is a passionate Mobile App Developer (Android and Flutter). He has worked on a number of mobile apps throughout his journey. Loves open source contribution on GitHub. He is currently pursuing a B.Tech degree in Computer Science and Engineering from Indian Institute of Information Technology Kalyani. He also writes Flutter articles on Medium - Flutter Community.


