


Have you always wanted to create a highly customized user interface with awesome animations? Fear not, Flutter CustomPaint Widget has got you covered.
Flutter has a huge number of Widgets. But among these, there is a unique widget known as CustomPaint that gives you access to low-level graphics.
Working on custom designs might be very time consuming and complex in native Android and iOS development. Forget these painful days, as in Flutter, the CustomPaint widget combined with Flutter’s Hot Reload helps you to iterate upon your creations quickly and efficiently.
In this article, I will show you how to get started with CustomPaint widget for drawing some custom designs and adding animations to them.
Written by Souvik Biswas
Basic structure of the app
Create a new Flutter project from the terminal using the following command:
flutter create custom_painter
Open the project in your favorite IDE. To open it in VS Code:
code custom_painter
Now, remove all of the code for the demo counter app present in the main.dart file of the lib directory.
First of all, let’s create the basic structure of the app to get started with painting.
// main.dart

import 'dart:ui';

import 'package:flutter/material.dart';

void main() => runApp(MyApp());

class MyApp extends StatelessWidget {
  @override
  Widget build(BuildContext context) {
    return MaterialApp(
      title: 'Flutter Custom Painter',
      theme: ThemeData(
        primarySwatch: Colors.pink,
      ),
      home: MyPainter(),
    );
  }
}
Here, I have defined a MaterialApp containing MyPainter widget as the home.
I will define MyPainter as a StatelessWidget having a Scaffold containing CustomPaint widget in its body.
// main.dart

class MyPainter extends StatelessWidget {
  @override
  Widget build(BuildContext context) {
    return Scaffold(
      appBar: AppBar(
        title: Text('Lines'),
      ),
      body: CustomPaint(
        painter: ShapePainter(),
        child: Container(),
      ),
    );
  }
}
Some of the important properties of the CustomPaint Widget are:
- painter: The painter that paints before the child.
- foregroundPainter: The painter that paints after the child.
- child: By default, the canvas will take the size of the child, if it is defined.
- size: If the child is not defined, then the size of the canvas should be specified.
For getting started with basic shapes, you will just need two of these properties:
- painter
- child
Here, I have defined a Container as the child. As you might know, by default, Container takes up the entire size of the screen when there is no child specified within it.
Now, you have to define the ShapePainter widget, which should extend the CustomPainter class.

Understanding CustomPainter
As the ShapePainter class extends from CustomPainter, which is an abstract class, two methods must be implemented within it:
- paint: This method is called whenever the object needs to be repainted.
- shouldRepaint: This method is called when a new instance of the class is provided.
class ShapePainter extends CustomPainter {
  @override
  void paint(Canvas canvas, Size size) {
    // TODO: implement paint
  }

  @override
  bool shouldRepaint(CustomPainter oldDelegate) {
    // TODO: implement shouldRepaint
    return null;
  }
}
The paint method has two parameters:
- canvas
- size
If we have a child specified inside the CustomPaint widget, then the canvas will have the same size as that child. In our case, the canvas area will take the size of the entire Container.
The Canvas Area
It is crucial to understand the coordinate system used by the canvas in order to draw anything on it.
The default coordinate system of the canvas area is given below:
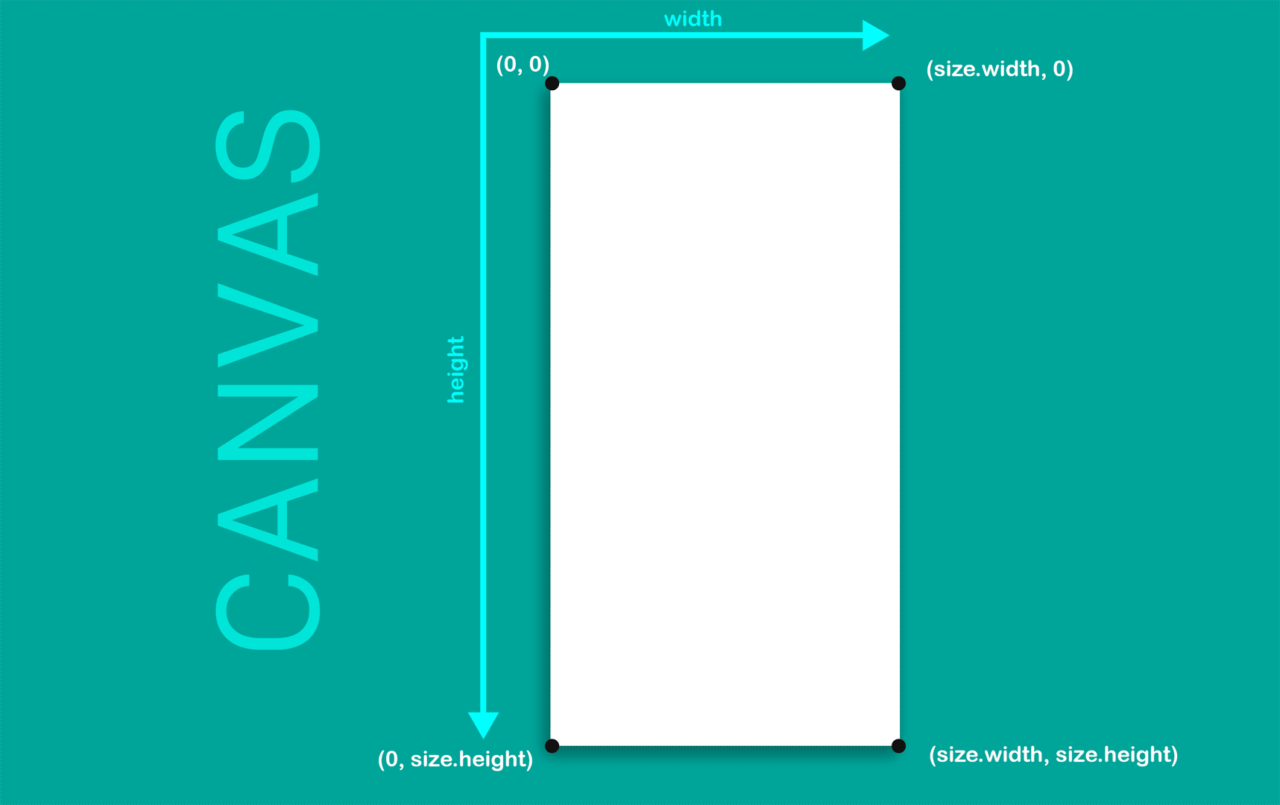
You can see that the origin (0, 0) is located at the top-left corner of the canvas. All drawings are done in relation to the origin, as that is where the painter starts.
Draw Line
Now, I am going to draw a horizontal line located at the center of the screen (as if it is dividing the screen into two halves vertically).
To draw that line, you have to determine the two pairs of coordinates that it would be joining, and then you can just connect them by drawing a line.

The code for drawing the line is given below:
// main.dart

// FOR PAINTING LINES
class ShapePainter extends CustomPainter {
  @override
  void paint(Canvas canvas, Size size) {
    var paint = Paint()
      ..color = Colors.teal
      ..strokeWidth = 5
      ..strokeCap = StrokeCap.round;

    Offset startingPoint = Offset(0, size.height / 2);
    Offset endingPoint = Offset(size.width, size.height / 2);

    canvas.drawLine(startingPoint, endingPoint, paint);
  }

  @override
  bool shouldRepaint(CustomPainter oldDelegate) {
    return false;
  }
}
Here, you have the paint variable storing an instance of the Paint class, which is like a paintbrush and helps in specifying its color, strokeWidth, strokeCap, etc.
Then, there are two Offset variables that specify the starting and ending position coordinates.
Finally, the drawLine method is called on the canvas for drawing a line between the two Offset positions, and the paint variable is also passed to this method.
You can return false in the shouldRepaint method because there is no need to redraw the line.
There is also another method you can follow for drawing a line using Path.
// main.dart

// FOR PAINTING LINES
class ShapePainter extends CustomPainter {
  @override
  void paint(Canvas canvas, Size size) {
    var paint = Paint()
      ..color = Colors.teal
      ..strokeWidth = 5
      ..style = PaintingStyle.stroke
      ..strokeCap = StrokeCap.round;

    var path = Path();
    path.moveTo(0, size.height / 2);
    path.lineTo(size.width, size.height / 2);
    canvas.drawPath(path, paint);
  }

  @override
  bool shouldRepaint(CustomPainter oldDelegate) {
    return false;
  }
}
While using Path, you will need to specify another property for the paint variable, that being style (here, I have defined it to be PaintingStyle.stroke). If you do not specify this property, then the drawn line will not be visible.
The moveTo method is used for changing the current location of the point to the specified coordinate.
The lineTo method is used for drawing a line from the current point to the specified point on the canvas.
Then the drawPath method is called on the canvas for applying the paint to the path and displaying it on screen.
This will produce exactly the same result as the first method.
Draw Circle
You can draw a simple circle with the center at (size.width/2, size.height/2), i.e. at the center the Container, by either using the drawCircle method on the canvas or by using Path.
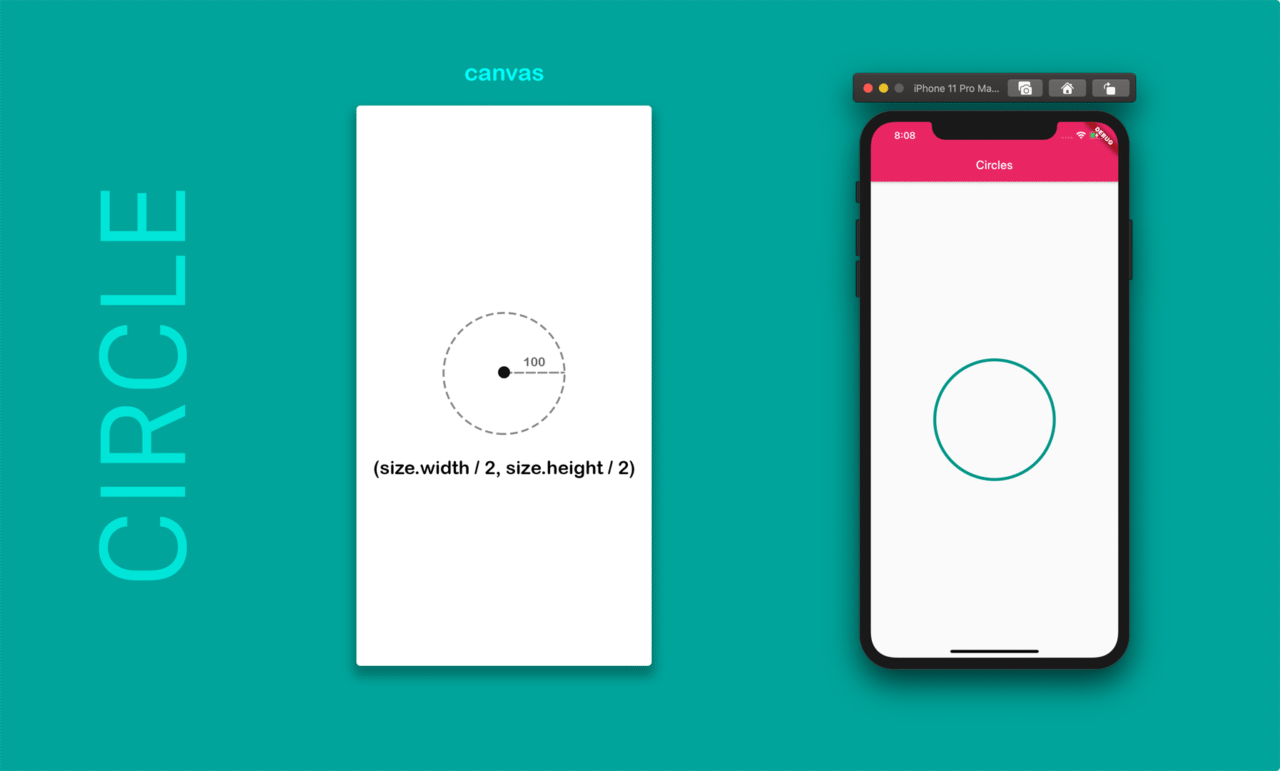
The code for drawing a circle using the drawCircle method is given below:
// FOR PAINTING CIRCLES
class ShapePainter extends CustomPainter {
  @override
  void paint(Canvas canvas, Size size) {
    var paint = Paint()
      ..color = Colors.teal
      ..strokeWidth = 5
      ..style = PaintingStyle.stroke
      ..strokeCap = StrokeCap.round;

    Offset center = Offset(size.width / 2, size.height / 2);

    canvas.drawCircle(center, 100, paint);
  }

  @override
  bool shouldRepaint(CustomPainter oldDelegate) {
    return false;
  }
}
The drawCircle method takes the coordinates for the center of the circle, its radius, and the paint object as the arguments for drawing a circle.
The code for drawing a circle using Path is given below:
// FOR PAINTING CIRCLES
class ShapePainter extends CustomPainter {
  @override
  void paint(Canvas canvas, Size size) {
    var paint = Paint()
      ..color = Colors.teal
      ..strokeWidth = 5
      ..style = PaintingStyle.stroke
      ..strokeCap = StrokeCap.round;

    var path = Path();
    path.addOval(Rect.fromCircle(
      center: Offset(size.width / 2, size.height / 2),
      radius: 100,
    ));
    canvas.drawPath(path, paint);
  }

  @override
  bool shouldRepaint(CustomPainter oldDelegate) {
    return false;
  }
}
The path.addOval method is used here for drawing a circle with a center Offset and a radius of 100 pixels.
Again, the drawPath method is used for drawing the path with the specified paint on the canvas.
Draw Polygons
The best method for drawing polygons is to use a circle as the reference and calculate the coordinates according to the angles, which can be determined by applying basic trigonometry.
Let’s see how to determine the coordinates.
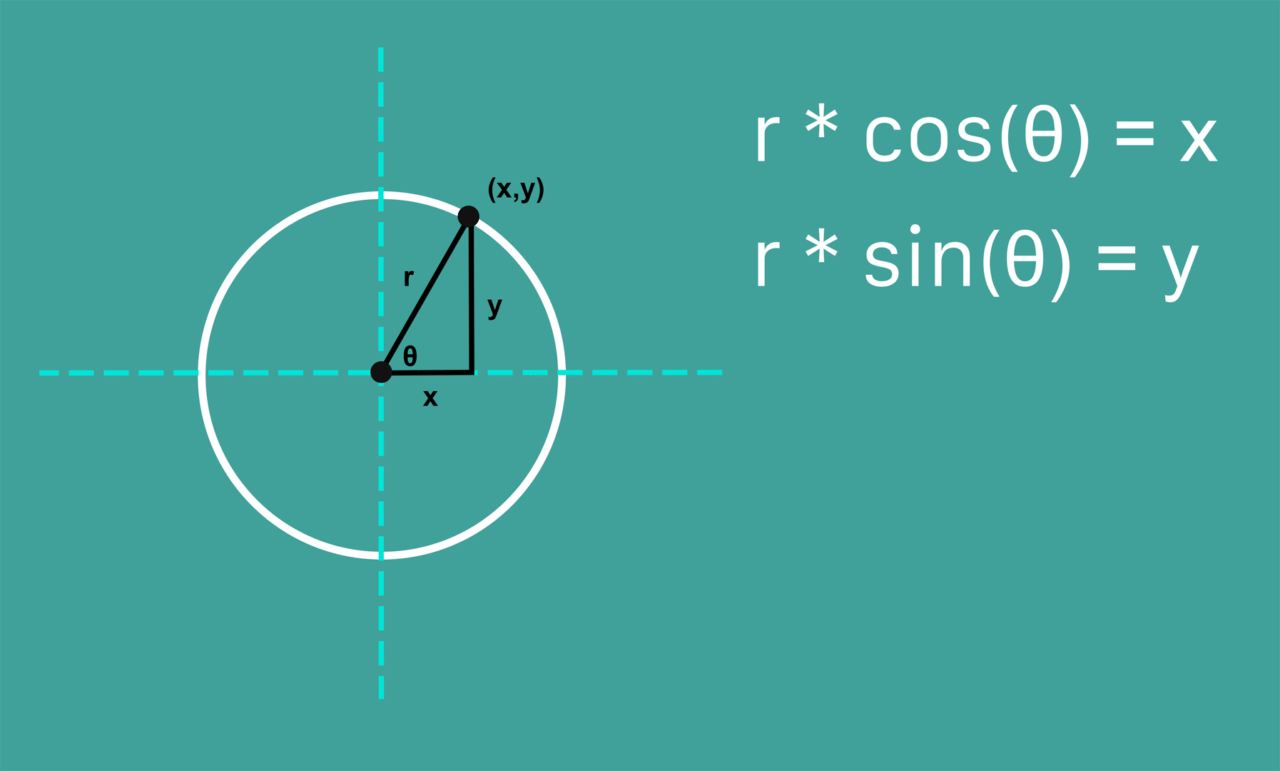
In this way, you will be able to calculate the coordinates of the point on the circle with the help of the angle.
Below is the code snippet for drawing a square (i.e. a polygon with 4 sides):
// DETERMINING THE PATH TO BE DRAWN

var path = Path();
var angle = (math.pi * 2) / sides;

Offset center = Offset(size.width / 2, size.height / 2);

// startPoint => (100.0, 0.0)
Offset startPoint = Offset(radius * math.cos(0.0), radius * math.sin(0.0));

path.moveTo(startPoint.dx + center.dx, startPoint.dy + center.dy);

for (int i = 1; i <= sides; i++) {
  double x = radius * math.cos(angle * i) + center.dx;
  double y = radius * math.sin(angle * i) + center.dy;
  path.lineTo(x, y);
}
path.close();
To draw any polygon, you have to first determine its points, and then they can just be connected using lines to create the whole shape.
The total angle of the circle in radians is 2π. A square can be drawn by joining four points, which can be determined by dividing the circle into four parts.
The value of the angle for each part is stored in the angle variable, which is later used for determining the points on the circle.
The starting point coordinates are (r _ cos(0.0), r _ sin(0.0)) [(100.0, 0.0) in our case, as the radius is 100 pixels]. But we want to draw the square relative to the center of the canvas, so the coordinates of the center are added to it for determining the correct coordinates.
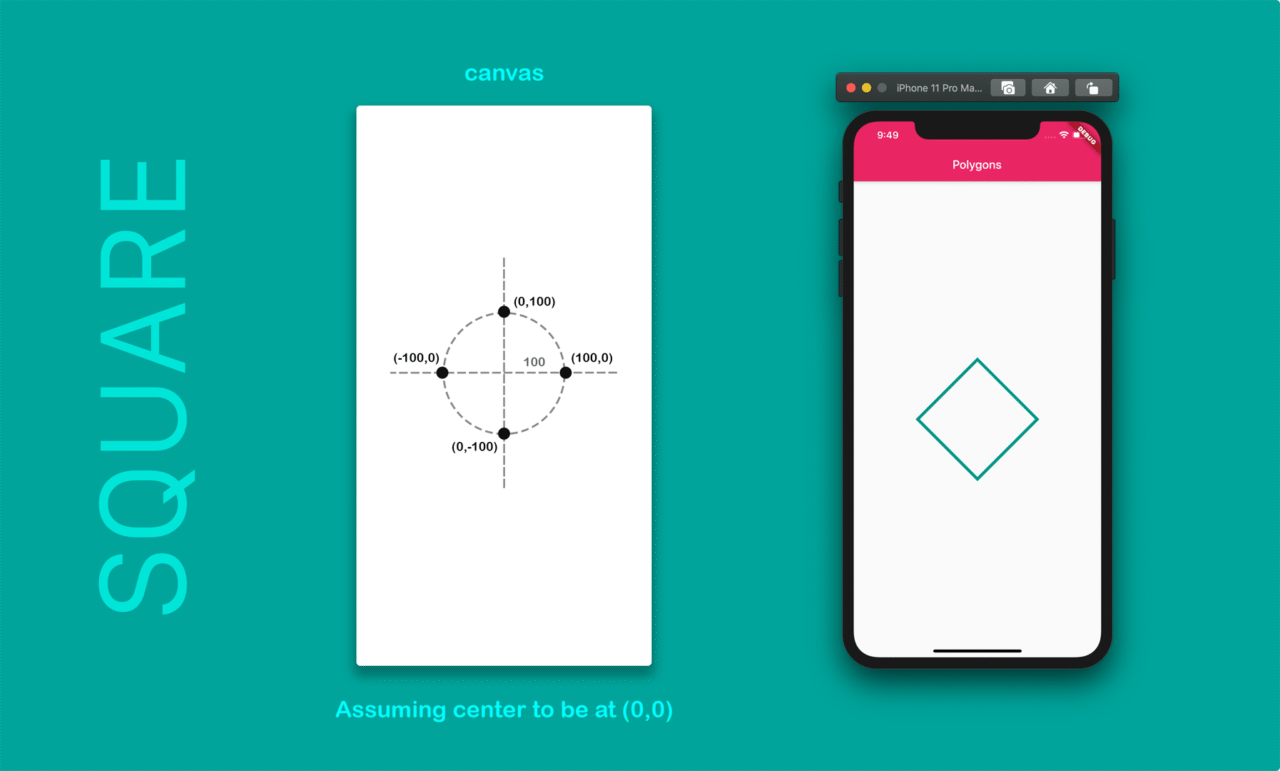
Thus, any polygon can be drawn using this same theory by simply changing the number of sides.
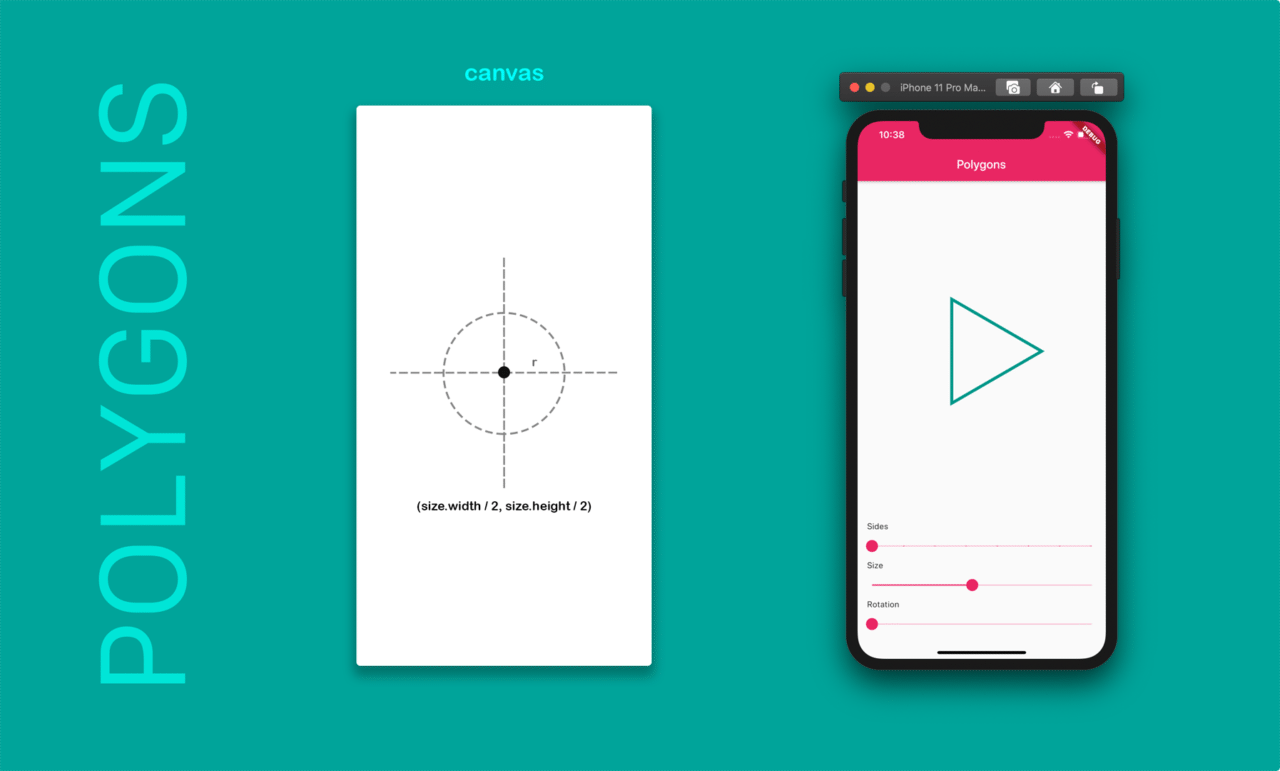
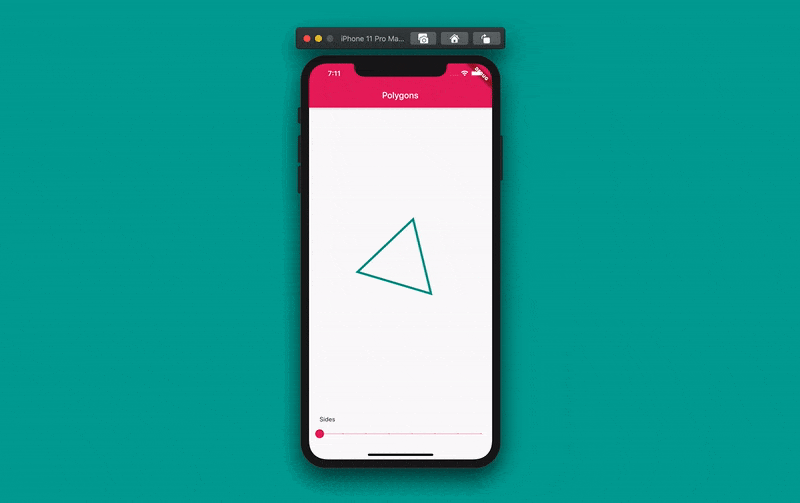
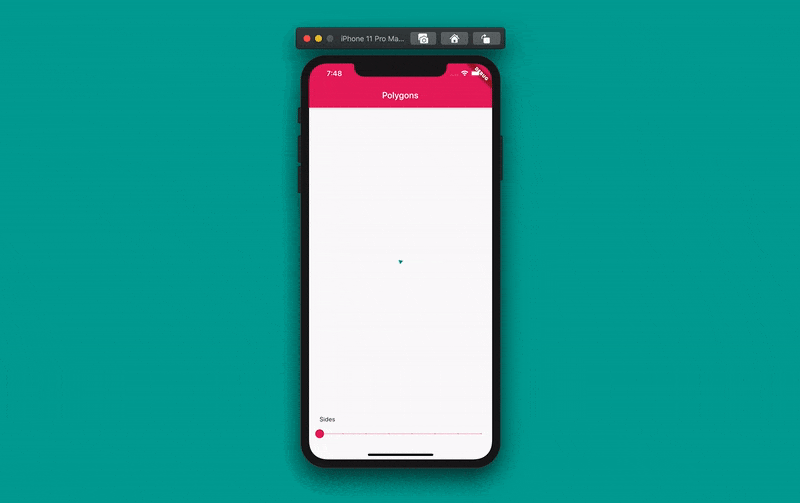
In the above example, I have added three Slider widgets to change the number of sides, size, and rotation of the polygons.
You can try it out on DartPad here.
Adding Animations
Animations can be easily added to these polygons. Let’s animate the rotation of the polygon.
Just follow the steps below for animating the rotation of the polygon:
First of all, convert the MyPainter Widget to a
StatefulWidget, and extend it fromTickerProviderStateMixin, which helps in applying an animation.Define two variables,
animationandcontroller:Animation<double> animation; AnimationController controller;An infinite rotation can be achieved by applying a Tween from -π to π:
Tween<double> _rotationTween = Tween(begin: -math.pi, end: math.pi);Initialize the
controllerand theanimationvariable inside theinitStatemethod. For an infinite rotation, you can just repeat the animation as soon as it is complete.controller.forward()is used to start the animation.@override void initState() { super.initState(); controller = AnimationController( vsync: this, duration: Duration(seconds: 4), ); animation = _rotationTween.animate(controller) ..addListener(() { setState(() {}); }) ..addStatusListener((status) { if (status == AnimationStatus.completed) { controller.repeat(); } else if (status == AnimationStatus.dismissed) { controller.forward(); } }); controller.forward(); }Then just pass the animation value in place of the
radiansto get the animation effect.ShapePainter(_sides, _radius, animation.value)
After applying this, you will get an animation like below:
Multiple animations can also be applied:
You can try it out on DartPad here.
Conclusion
I hope this article has helped you to get a good grasp on using CustomPainter in Flutter. Now you can try to apply these basics to create custom designs and animations for your app.
You can also create nice visualizers (like wave formations, graph formations, etc.) for your apps.
Below is an example of a point tracking visualizer.
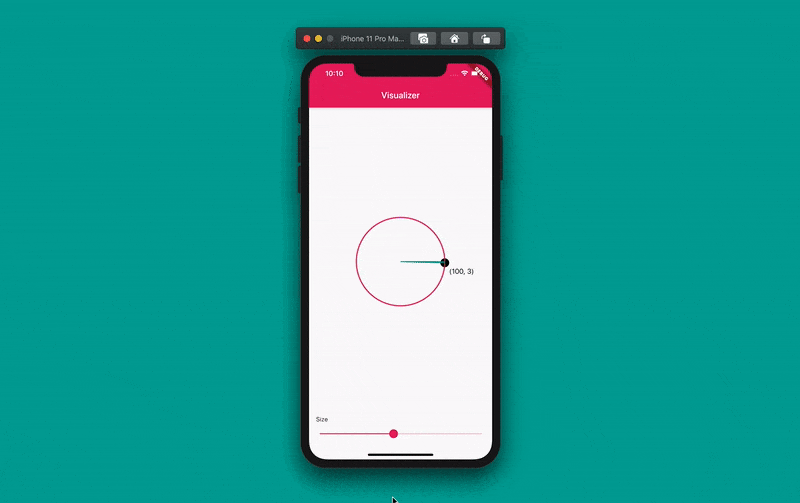
You can try it out on DartPad here.
All of the source code is available on GitHub here.
Some additional resources
- CustomPaint (Flutter Widget of the Week)
- Custom painting in Flutter - Flutter In Focus
- Use CustomPaint to create a Drawing App (The Boring Flutter Development Show)
- Flutter Tutorial: Animations for Lazy People
Souvik Biswas is a passionate Mobile App Developer (Android and Flutter). He has worked on a number of mobile apps throughout his journey and loves open source contribution on GitHub. He is currently pursuing a B.Tech degree in Computer Science and Engineering from Indian Institute of Information Technology, Kalyani. He also writes Flutter articles on Medium - Flutter Community.


