


Written by Souvik Biswas
Flutter is known for its cross-platform and performant applications that can be compiled natively on mobile, web, desktop, and embedded devices. Desktop support for Flutter was in an experimental phase for quite some time, but with the introduction of Flutter 2.0, desktop support (macOS, Linux, and Windows) is now available on the stable branch of Flutter.
In this article, you will learn to set up Flutter SDK to build apps on different desktop operating systems, create simple desktop apps, and build them on Codemagic CI/CD.
Before getting started, make sure the following prerequisites are in place.

Prerequisites for building Flutter desktop apps
First of all, you should have the following:
- Flutter SDK configured on your system.
- An IDE with Flutter support, Android Studio, IntelliJ IDEA, or VS Code.
To get access to Flutter desktop support on the stable channel, you should have Flutter 2.0 or higher. Flutter desktop support is currently in beta, but to make it easier to try out, a beta snapshot is available on the stable channel.
You can check your Flutter version and the current channel by running the following command:
flutter --version
It should show an output like this:

Platform configuration
There are some additional requirements, depending on the operating system on which you will be building the Flutter app.
NOTE: To compile a desktop application, you should build it on the targeted platform – build a macOS app on macOS, a Linux app on Linux, and a Windows app on Windows.
Configure Flutter for macOS apps
To build macOS apps, you should have the following installed on your system:
After you have the dependencies installed on your system, enable the platform that you want to build Flutter for. Use the following format for the command:
flutter config --enable-<platform>-desktop
Run the following command to enable macOS support in Flutter:
flutter config --enable-macos-desktop
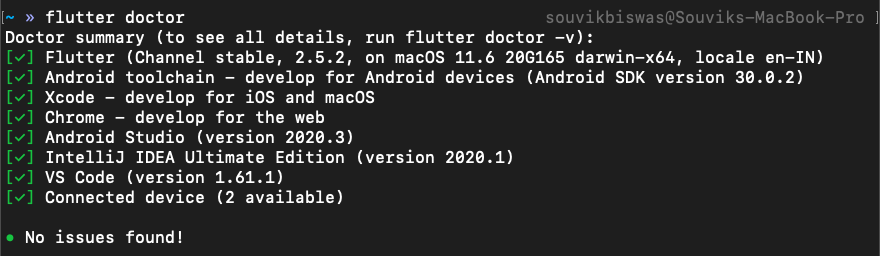
Now, run flutter doctor to check if there are any unresolved issues. The output will look like this:
If you run flutter devices, you should see macos listed as one of the available devices:

Configure Flutter for Linux apps
To build Linux apps, you should have the following installed on your system:
If you have installed Flutter SDK on Linux using the Snap Store, then you should already have these dependencies installed along with it.
Otherwise, run the following command to install these dependencies:
sudo apt-get install clang cmake ninja-build pkg-config libgtk-3-dev
Run the following command to enable Linux support in Flutter:
flutter config --enable-linux-desktop
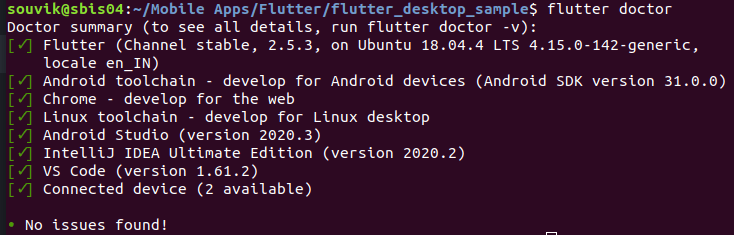
Run flutter doctor once to check if there are any unresolved issues. The output should be similar to this:
If you run flutter devices, you should see linux listed as one of the available devices:

Configure Flutter for Windows apps
To build Windows apps, you should have the following installed on your system:
- Visual Studio 2019
- For Win32: Install the “Desktop development with C++” workload
- For UWP: Install the “Universal Windows Platform development” workload
By default, Flutter builds apps for Win32 on Windows. You can enable it by running the following command:
flutter config --enable-windows-desktop
In order to build UWP (Universal Windows Platform) apps, you need to be on the dev channel of Flutter. Run the following commands:
flutter channel dev
flutter upgrade
flutter config --enable-windows-uwp-desktop
Run flutter doctor once to check if there are any unresolved issues. The output should be similar to this:

If you run flutter devices, you should see windows listed as one of the available devices:

Announcement: Codemagic now supports building Flutter apps for Windows as well, as our build infrastructure now includes Windows VMs! Here you can learn to build and package Flutter apps for Windows and publish them to the Microsoft Store.
Sign up and build Flutter apps for Windows
Creating a new Flutter app
Once you have enabled the platform for which you want to build the app, you can simply run the flutter create command to generate a new project with desktop support.
Using the command line, run the following:
flutter create <project_name>
Replace
<project name>with a name that you want to use for the project – for example,flutter create flutter_desktop_sample.
Now, open the project using your favorite IDE.
You can also create a new Flutter app directly from an IDE like VS Code, Android Studio, or IntelliJ. You can find more information on this here.
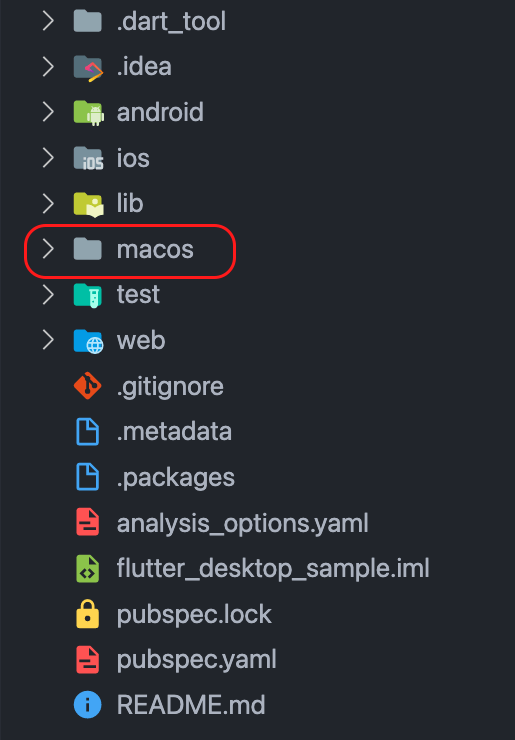
After opening the project with your IDE, have a look at the directories that are present inside the project. You will notice that in addition to android, ios, and web, you also have a directory called macos, linux, or windows (depending on the desktop platforms that you have enabled).
Adding desktop support to a pre-existing Flutter app
If you have an existing Flutter project that you had created before enabling any desktop platform flag, it won’t have desktop support by default. But you can easily add desktop support to those projects. To do so, first enable the platform that you want to support by running any one of the following commands:
flutter config --enable-macos-desktop
flutter config --enable-linux-desktop
flutter config --enable-windows-desktop
flutter config --enable-windows-uwp-desktop
Then run:
flutter create .
This will add the new desktop platform directory to your existing project so that you can build for it.
If you want to add only specific desktop platforms, use the following command:
flutter create --platforms=windows,macos,linux .
Running a Flutter app on desktop
You can run a Flutter app either using your IDE or from the command line. From your IDE, select the desktop platform that you want to run the app on, and launch it.
Using the command line, you can launch the app on a desktop using the following commands.
Run on macOS
To run the app on the macOS platform:
flutter run -d macos
Run on Linux
To run the app on the Linux platform:
flutter run -d linux
Run on Windows
To run the app on the Windows platform using Win32:
flutter run -d windows
To run the app using UWP, use the following command from the command line:
flutter run -d winuwp
Windows UWP apps need a sandboxed environment to run. Open PowerShell in Administrator mode, and run the following command:
checknetisolation loopbackexempt -is -n=[APP_CONTAINER_NAME]
Go back to the previous command line and press “Y”. Now, you will have the Flutter app running using Windows UWP.
Building layouts for desktop apps
Layouts for desktop apps might be a bit challenging to build compared to layouts for mobile apps. There are some important points you should keep in mind if you want your Flutter app to feel like a native desktop app.
Responsive layout
As desktop apps are resizable, you should try to use responsive layouts so that the widgets adapt to every screen size. If you properly implement a responsive layout, it should prevent any overflow issues when resizing the screen in your app.
In this article, we won’t be covering the concepts for building a responsive layout. However, you can check out this article to learn about the best practices and widgets to use for creating a responsive layout in Flutter.
Limiting window size
Try shrinking the window size of the default desktop app created using Flutter. You will notice that the app has no minimum window size, i.e., the window can be squeezed as small as you want.
This will result in the widgets inside the current layout being squeezed, causing an overflow error:

If you compare this with native desktop apps, you will notice there’s a minimum screen width and height beyond which you can’t shrink the window. For example, here’s a demo that shows what happens when you try to shrink a macOS app window:
In order to fix this issue, you can use an amazing plugin created by Google called window_size.
The plugin is currently not available on pub.dev, so add it to your pubspec.yaml file like this:
dependencies:
  window_size:
    git:
      url: git://github.com/google/flutter-desktop-embedding.git
      path: plugins/window_size
Now, go to your main.dart file. You can set the window size inside the main() function before runApp() is called.
import 'dart:io';
import 'package:flutter/material.dart';
import 'package:window_size/window_size.dart';

void main() {
  WidgetsFlutterBinding.ensureInitialized();
  if (Platform.isWindows || Platform.isLinux || Platform.isMacOS) {
    setWindowTitle('Flutter Demo');
    setWindowMinSize(const Size(400, 300));
    setWindowMaxSize(Size.infinite);
  }

  runApp(const MyApp());
}
In the above code snippet, the window size is set to have a minimum screen width of 400 pixels and a minimum screen height of 300 pixels. If you try to squeeze the Flutter app window now, it won’t shrink beyond the minimum size.
Tooltip visibility
By default, a Flutter app running on desktop shows a tooltip whenever you hover your mouse over a tappable widget inside the app. Generally, tooltips are an accessibility feature that is not enabled on most native desktop apps (or only appear after you hover for a longer duration over a certain component).

It can be very annoying to have tooltips popping up all the time on a Flutter app running on desktop. Fortunately, there’s a way to disable the tooltip in Flutter.
NOTE: At the time of writing this article, the feature to disable tooltips is only available on the
masterchannel of Flutter. So, you won’t be able to use this widget from any other channel.
You can wrap the entire MaterialApp with the TooltipVisibility widget and set the visibility to false to disable tooltips throughout all of the widgets in the app.
TooltipVisibility(
  visible: false, // disables tooltip
  child: MaterialApp(
    title: 'Flutter Demo',
    theme: ThemeData(
      primarySwatch: Colors.blue,
    ),
    home: const MyHomePage(),
  ),
)

Keyboard input
If you want to use keyboard shortcuts in your Flutter desktop app, there are two ways to do so:
- Using the
RawKeyboardListenerwidget or - Using the
FocusableActionDetectorwidget
The biggest limitation of the RawKeyboardListener widget is that it can only listen to the key-down and key-up events of a single key on the keyboard. This means that you won’t be able to use key combinations to trigger any functionalities.
The more elegant way of handling keyboard input is using the FocusableActionDetector widget. Using this widget, you can also handle key combinations easily (up to four keys at a time).
Let’s take a look at how you can implement key bindings in the starter app of Flutter (the counter app).
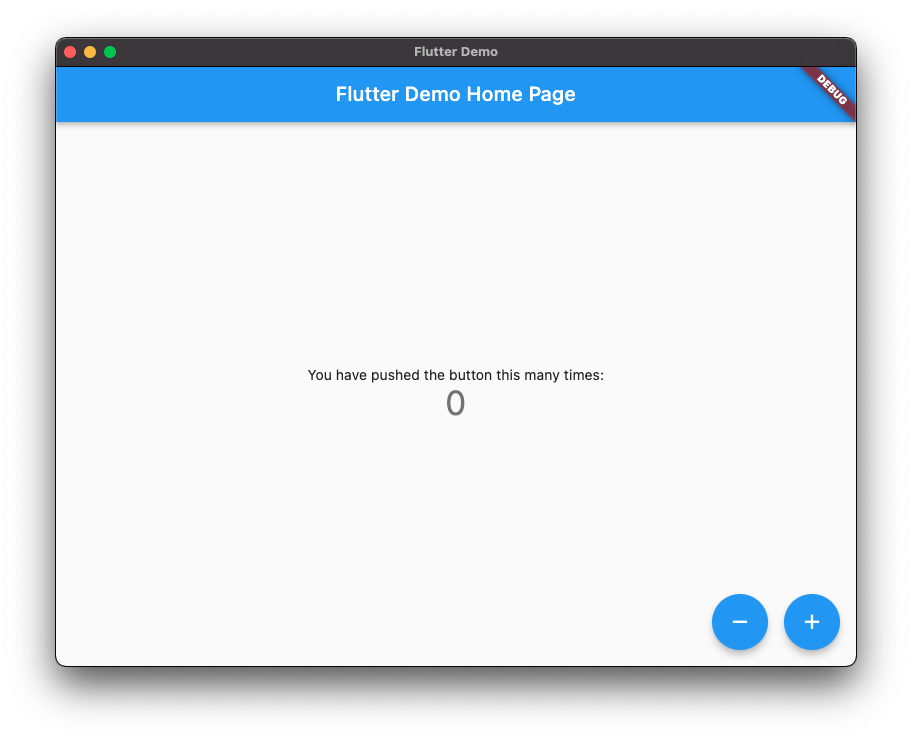
I have made a minor modification to the counter app by adding a second button that decrements the counter value.
First of all, define the key combinations that you want to use for incrementing and decrementing the counter value. Define the following variables globally:
final incrementKeys = LogicalKeySet(
  Platform.isMacOS ? LogicalKeyboardKey.meta : LogicalKeyboardKey.control,
  LogicalKeyboardKey.equal,
);

final decrementKeys = LogicalKeySet(
  Platform.isMacOS ? LogicalKeyboardKey.meta : LogicalKeyboardKey.control,
  LogicalKeyboardKey.minus,
);
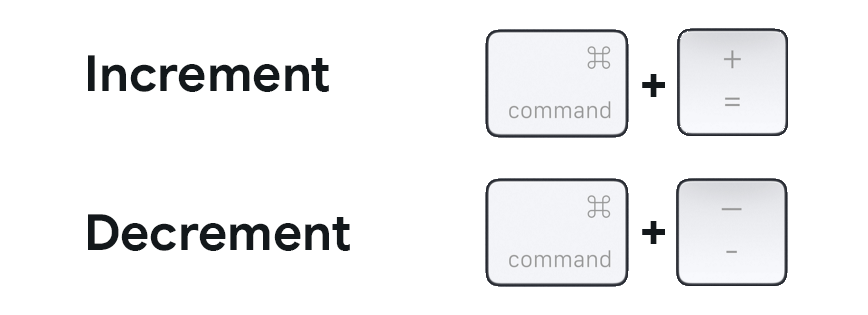
Here,
metais actually thecommandkey on macOS. When it’s run on Windows or Linux, thecontrolkey is used in place of it.
On macOS, the above keyboard key combinations refer to the following:
Next, define two Intents:
class IncrementIntent extends Intent {}

class DecrementIntent extends Intent {}
In Flutter, an Intent is an object that is bound to an Action and helps in updating the application’s state based on a keyboard key combination trigger.
You have to configure a listener for these Intent(s):
class KeyBinding extends StatelessWidget {
  const KeyBinding({
    Key? key,
    required this.child,
    required this.onIncrementTriggered,
    required this.onDecrementTriggered,
  }) : super(key: key);

  final Widget child;
  final VoidCallback? onIncrementTriggered;
  final VoidCallback? onDecrementTriggered;

  @override
  Widget build(BuildContext context) {
    return FocusableActionDetector(
      autofocus: true,
      shortcuts: {
        incrementKeys: IncrementIntent(),
        decrementKeys: DecrementIntent(),
      },
      actions: {
        IncrementIntent: CallbackAction(
          onInvoke: (e) => onIncrementTriggered?.call(),
        ),
        DecrementIntent: CallbackAction(
          onInvoke: (e) => onDecrementTriggered?.call(),
        ),
      },
      child: child,
    );
  }
}
In the above class, there are two callbacks that are triggered based on the key combinations, and the FocusableActionDetector widget helps in updating the application state accordingly.
Now, you can just wrap the Scaffold of the counter app screen with the KeyBinding widget:
KeyBinding(
  onIncrementTriggered: _incrementCounter,
  onDecrementTriggered: _decrementCounter,
  child: Scaffold(
    appBar: AppBar(
        title: Text(widget.title),
    ),
    body: Center(),
  ),
)
You can check out this article to learn more about keyboard shortcuts in Flutter.
Configuration for building on Codemagic
Flutter apps can be built on Codemagic using either the Workflow Editor or the codemagic.yaml file. Codemagic currently supports building Flutter desktop apps for macOS, Linux and Windows platforms.
Our build infrastructure now includes Windows VMs so you can also build Windows apps!
Before you get started with the build configuration, add your project to Codemagic.
Adding a new project
Your project should be present on a code hosting platform (like GitHub, Bitbucket, or GitLab) using a version control system.
Follow the steps below to add your project:
- Log in to Codemagic. If you’re a new user, then sign up:
On the Applications page, click Add application:

Select a Git provider you want to use (or select Other if you want to add using the clone URL of a repository):
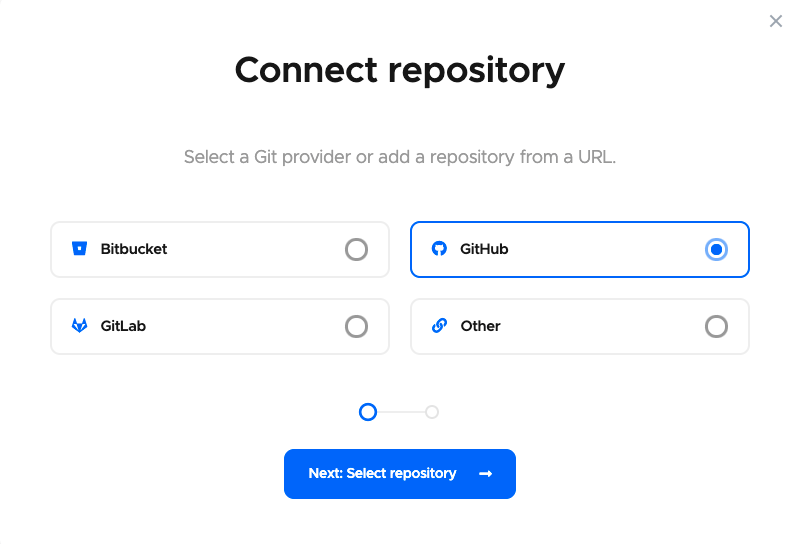
Click Next: Authorize integration to authorize Codemagic. If you have already authorized your selected Git provider, click Next: Select repository instead.
If you are using GitHub as your Git provider, then there is one additional step you need to take before selecting the repository: Click Install GitHub App to set up the integration. Learn more about configuring GitHub app integration here.
Now, select your repository (or add the clone URL if using Other) and the project type. Then, click Finish: Add application:
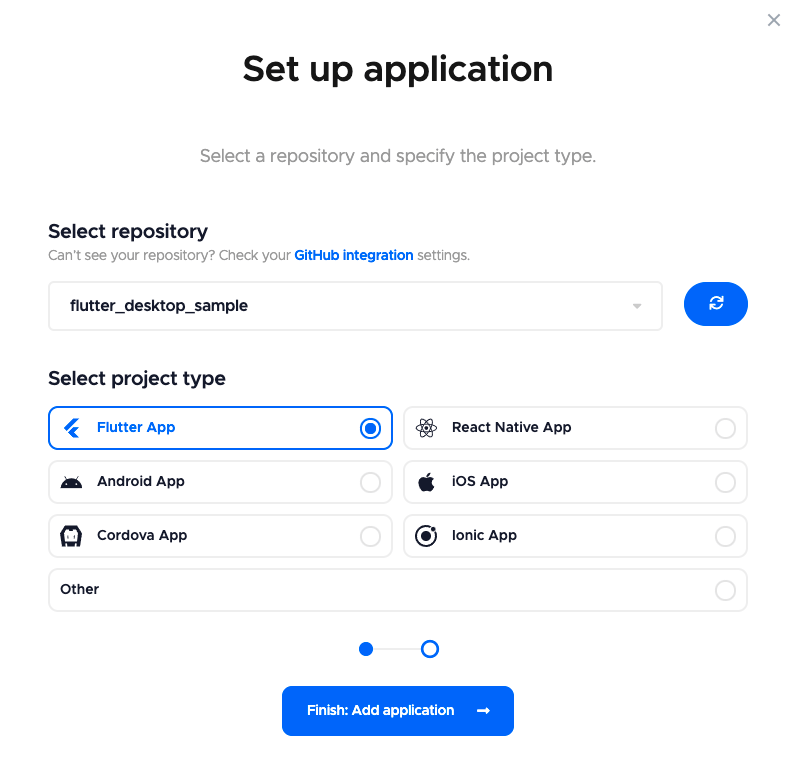
You will be taken to the project settings. The Workflow Editor tab will be selected by default.
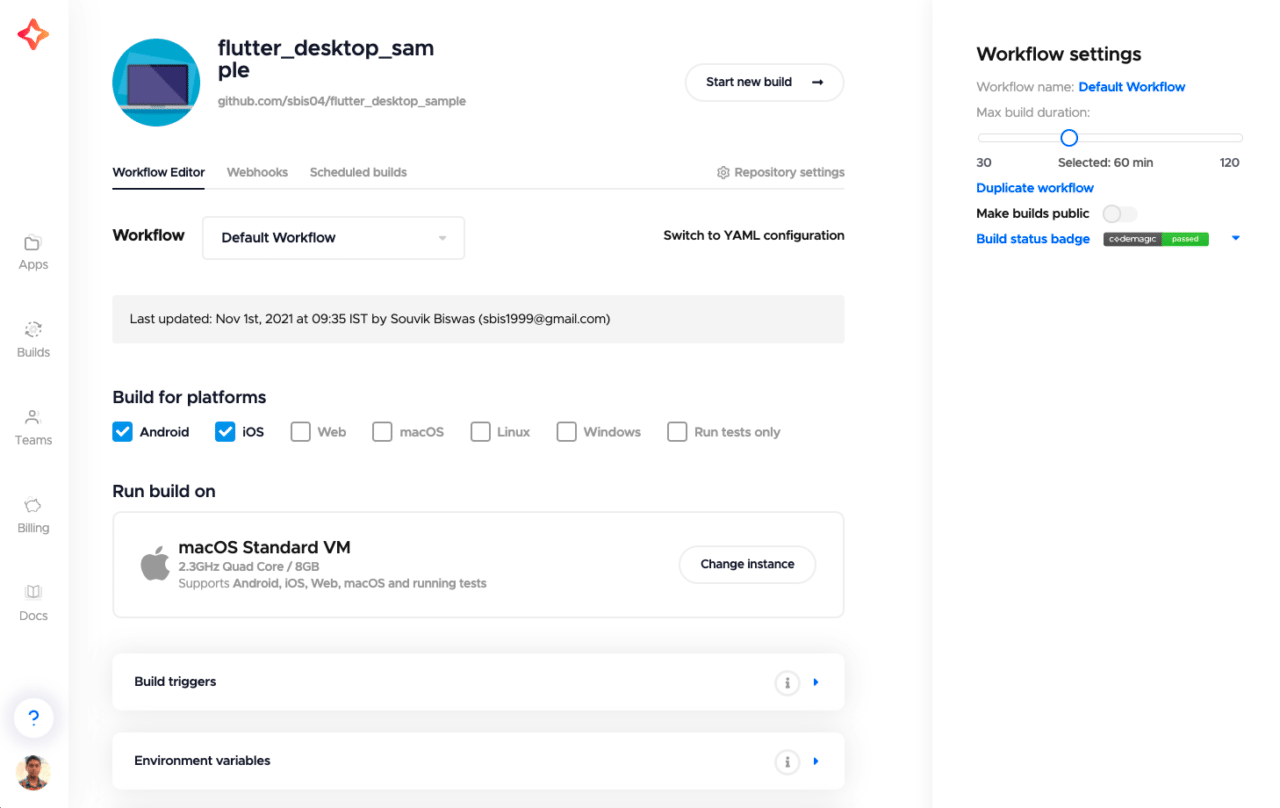
Configuring using the workflow editor
The Android and iOS platforms are selected by default on Codemagic. To build the app for the macOS or Linux platforms, you’ll have to select the corresponding options. You also need to change the VM accordingly, as macOS apps can only be built using macOS and Linux apps using Linux.
NOTE: You can build for one of the desktop platforms in a single workflow, as they use different build machines (one with macOS and the other with the Linux operating system installed). You can create another workflow by clicking on Duplicate workflow (in the right menu) and configuring this workflow as per the platform you want to build for.
To build for the Linux platform:
- Select Linux under Build for platforms.
- Change the VM instance to either Linux Standard VM or Linux Premium VM.
- Go to the Build tab. From here, you can set the Flutter version and Linux app build Mode (as Debug, Release, or Profile).
- If you want to build the app for publishing to the Snap Store, follow the steps here.
To build for the macOS platform:
- Select macOS under Build for platforms.
- Change the VM instance to either macOS Standard VM or macOS Premium VM.
- Go to the Build tab. From here, you can set the Flutter, Xcode, and CocoaPods versions. Specify the macOS app build Mode (as Debug, Release, or Profile).
- Go to the Distribution tab to configure code signing and publishing. You need to perform the code signing in order to build a macOS app. If you just want to build a macOS app to use personally or distribute within your team, use the Mac Developer certificate. To publish to the Mac App Store, use the Mac Distribution certificate.
Learn more about generating release builds for macOS apps and publishing to the Mac App Store here.
Configuring using Codemagic YAML
Alternatively, you can build your desktop apps on Codemagic using the codemagic.yaml file. Follow the steps below:
On Codemagic, click on Switch to YAML configuration to use the YAML file.
Return to your Flutter project, and create a new file called
codemagic.yamlin the root directory of the project.Add the following template to the file:
workflows:
  my-workflow:
    name: Workflow name
    instance_type: mac_mini
    max_build_duration: 60
    environment:
      groups:
        - ...
      flutter: stable
    cache:
      cache_paths:
        - ~/.pub-cache
    scripts:
      - ...
    artifacts:
      - ...
    publishing:
      email:
        recipients:
          - name@example.com
This is a basic workflow template for building apps on Codemagic. Check out the Docs for more information.
Here’s how to modify the workflow template to build a Flutter app for the Linux platform:
Set an appropriate workflow name, and define a Linux VM instance:
workflows:
  linux-workflow:
    name: Linux workflow
    instance_type: linux
    max_build_duration: 60
Set the Flutter version as master under the
environment:environment: flutter: masterUnder the
scriptssection, start by getting the Flutter dependencies:scripts: - name: Get Flutter packages script: flutter packages pub getEnable the Linux platform:
- name: Configure for Linux
  script: flutter config --enable-linux-desktop
Build for the Linux platform:
- name: Build Linux
  script: flutter build linux
Export the generated Linux build artifact:
- name: Export bundle
  script: cp -r build/linux/x64/release/bundle $CM_EXPORT_DIR/bundle
Retrieve the generated artifacts using their paths:
artifacts:
  - build/linux/**/*.zip
  - flutter_drive.log
Follow these steps to modify the workflow template to build a Flutter app for the macOS platform:
Set an appropriate workflow name, and define a macOS VM instance:
workflows:
  macos-workflow:
    name: macOS workflow
    instance_type: mac_mini
    max_build_duration: 60
Set the Flutter, Xcode, and CocoaPods versions under the
environment:environment: flutter: master xcode: latest cocoapods: defaultUnder the
scriptssection, start by getting the Flutter dependencies:scripts: - name: Get Flutter packages script: flutter packages pub getEnable the macOS platform, and install the Podfile:
- name: Configure for macOS
  script: |
    flutter config --enable-macos-desktop
    find . -name "Podfile" -execdir pod install \;
Initialize the keychain:
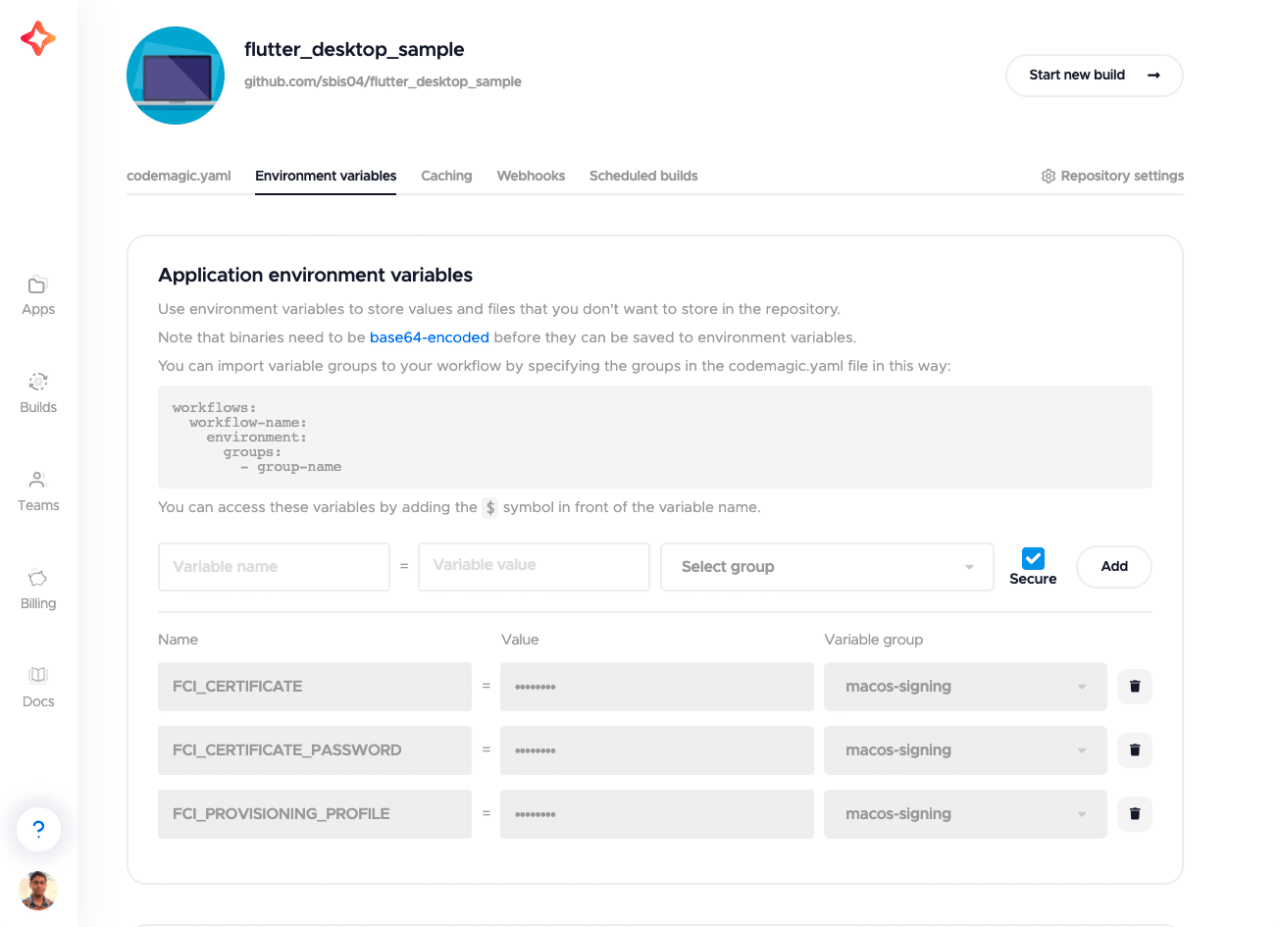
- name: Set up keychain
  script: keychain initialize
To perform the code signing process, you have to add an API key and some related secret files as environment variables to Codemagic. Go to the Environment variables tab of your project on Codemagic.
Add the following variables for automatic code signing:
APP_STORE_CONNECT_KEY_IDENTIFIERAPP_STORE_CONNECT_ISSUER_IDAPP_STORE_CONNECT_PRIVATE_KEYCERTIFICATE_PRIVATE_KEY
Add the following variables for manual code signing:
CM_CERTIFICATECM_CERTIFICATE_PASSWORDCM_PROVISIONING_PROFILE
To learn more about how to generate these variables, head over to the Docs here.
Add the environment variable group name in your YAML file:
environment:
  groups:
    - macos-signing
For automatic code signing, add the following scripts:
- name: Fetch Mac App Distribution certificate and Mac App Store profile
  script: |
    app-store-connect fetch-signing-files \
      "io.codemagic.app" \
      --platform MAC_OS \
      --type MAC_APP_STORE \
      --create
- name: Fetch Mac Installer Distribution certificates
  script: |
    app-store-connect create-certificate --type MAC_INSTALLER_DISTRIBUTION --save || \
      app-store-connect list-certificates --type MAC_INSTALLER_DISTRIBUTION --save
- name: Set up signing certificate
  script: keychain add-certificates
For manual code signing, add the following:
- name: Set up provisioning profile
  script: |
    PROFILES_HOME="$HOME/Library/MobileDevice/Provisioning Profiles"
    mkdir -p "$PROFILES_HOME"
    PROFILE_PATH="$(mktemp "$PROFILES_HOME"/$(uuidgen).mobileprovision)"
    echo ${CM_PROVISIONING_PROFILE} | base64 --decode > "$PROFILE_PATH"
    echo "Saved provisioning profile $PROFILE_PATH"
- name: Set up signing certificate
  script: |
    echo $CM_CERTIFICATE | base64 --decode > /tmp/certificate.p12
    if [ -z ${CM_CERTIFICATE_PASSWORD+x} ]; then
      # when using a certificate that is not password-protected
      keychain add-certificates --certificate /tmp/certificate.p12
    else
      # when using a password-protected certificate
      keychain add-certificates --certificate /tmp/certificate.p12 --certificate-password $CM_CERTIFICATE_PASSWORD
    fi
Use the code signing for the project:
- name: Set up code signing
  script: xcode-project use-profiles
Build the macOS app:
- name: Build macOS
  script: flutter build macos
Retrieve the generated build artifacts using their paths:
artifacts:
  - build/macos/**/*.app
  - flutter_drive.log
Start building on Codemagic
To start your first build:
Go to your project from the Applications dashboard on Codemagic.
Click Start new build.
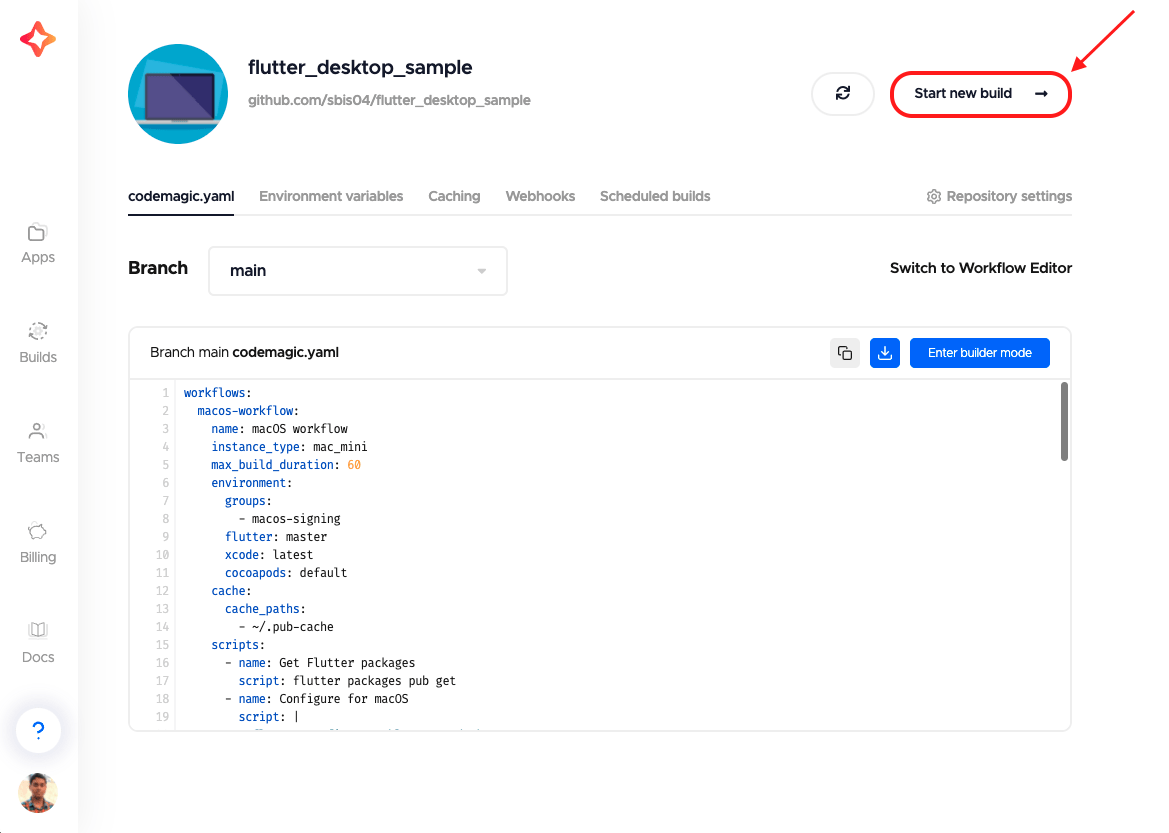
Select the correct workflow, and click Start new build.
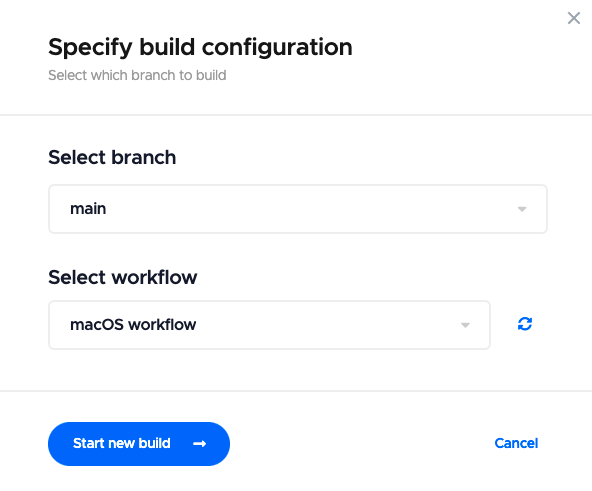
This will start a new build using either the Workflow Editor or the codemagic.yaml file configurations, as per your selection. After the build completes, you will get access to the generated artifacts.
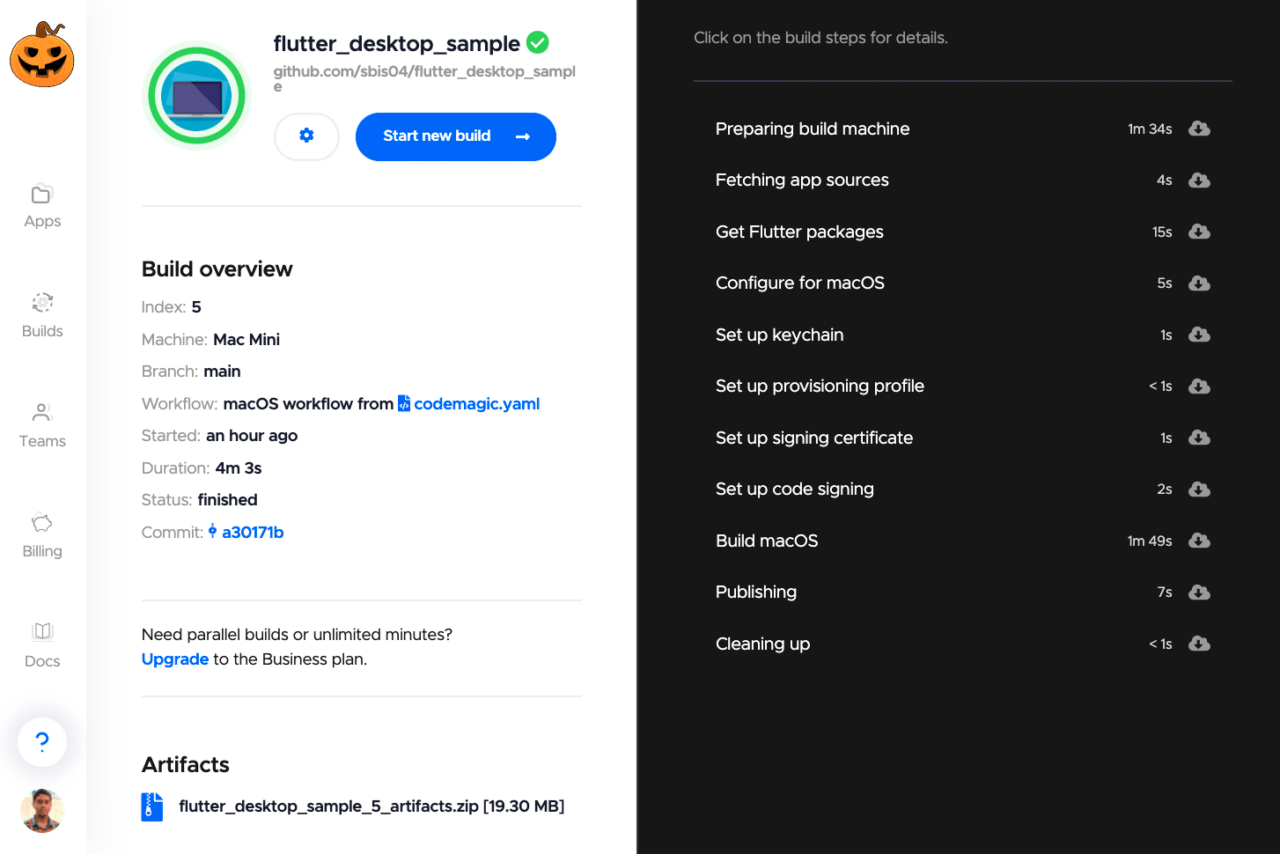
Wrapping up
Congratulations! 🎉 You have successfully built Flutter apps on Codemagic for both the Linux and macOS platforms.
Once your Flutter desktop app is ready to be published, you can easily publish it directly from Codemagic to the Snapcraft Snap Store (Linux apps) or Mac App Store (macOS apps). Learn more about publishing apps using Codemagic from the following links:
- Linux apps: Snapcraft Snap Store (Workflow Editor or Codemagic YAML)
- macOS apps: App Store Connect (Workflow Editor or Codemagic YAML)

You can find the complete codemagic.yaml configuration file here. Check out the sample Flutter desktop app on this GitHub repository.
Souvik Biswas is a passionate Mobile App Developer (Android and Flutter). He has worked on a number of mobile apps throughout his journey, and he loves open source contribution on GitHub. He is currently pursuing a B.Tech degree in Computer Science and Engineering from Indian Institute of Information Technology Kalyani. He also writes Flutter articles on Medium - Flutter Community.


