


Ivy Walobwa shows you in this article how to build a game with Flutter Flame.
Flutter enables you to develop applications for platforms such as Android, iOS, desktop, and the web from a single codebase. As a multiplatform UI toolkit, the Flutter team is dedicated to enabling all kinds of developers to quickly build and release applications. Game developers, for instance, are now able to build beautiful game apps without worrying about performance, load times, and app sizes.
This tutorial will provide you with an introduction to the Flutter Flame game engine. You’ll learn how to set up and build a Flutter Flame game, load sprites, and add animations.
This tutorial assumes that you have a working knowledge of Dart and Flutter.
Flame engine
Flame is a 2D game development framework that runs on top of Flutter. The Flame engine makes it easy to implement a game loop and other necessary functions, such as animations, collision and bounce detection, and parallax scrolling.
Flame is modular and provides independent packages that you can use to extend its functionality, such as:
- flame_audio: provides audio capabilities
- flame_forge2d: provides physics capabilities
- flame_tiled: provides the capability to work with tiles
Flutter Flame setup
To get started with Flame, you need to install the package. In your pubspec.yaml file, add the dependency as shown below:
    dependencies:
      flame: ^1.1.1
To render a game, you use the GameWidget. Adding the code snippet below in the main.dart file renders a Flame game, which is currently a black screen.
    void main() {
      final game = FlameGame();
      runApp(
        GameWidget(
          game: game,
        ),
      );
    }
You are now ready to add some graphics to your game.
Loading sprites
To render static images, you’ll need to make use of the SpriteComponent class. Add your game graphics in the assets/images folder, and update your pubspec.yaml file to load the assets. This tutorial contains player and background images that will be loaded.
You’ll create and update the three files below in the lib folder:
dino_player.dart, which will load and position our player:
    import 'package:flame/components.dart';

    class DinoPlayer extends SpriteComponent with HasGameRef {
      DinoPlayer() : super(size: Vector2.all(100.0));

      @override
      Future<void> onLoad() async {
        super.onLoad();
        sprite = await gameRef.loadSprite('idle.png');
        position = gameRef.size / 2;
      }
    }
dino_world.dart, which will load our game background:
    import 'package:flame/components.dart';

    class DinoWorld extends SpriteComponent with HasGameRef {
      @override
      Future<void> onLoad() async {
        super.onLoad();
        sprite = await gameRef.loadSprite('background.png');
        size = sprite!.originalSize;
      }
    }
dino_game.dart, which will manage all our game components. It adds our game player and background and positions them:
    import 'dart:ui';

    import 'package:flame/game.dart';
    import 'dino_player.dart';
    import 'dino_world.dart';

    class DinoGame extends FlameGame{
      DinoPlayer _dinoPlayer = DinoPlayer();
    DinoWorld _dinoWorld = DinoWorld();
      @override
      Future<void> onLoad() async {
        super.onLoad();
        await add(_dinoWorld);
        await add(_dinoPlayer);
        _dinoPlayer.position = _dinoWorld.size / 1.5;
        camera.followComponent(_dinoPlayer,
            worldBounds: Rect.fromLTRB(0, 0, _dinoWorld.size.x, _dinoWorld.size.y));
      }
    }
The camera.followComponent function sets the game viewport to follow the player. This function is necessary, as we’ll be adding motion to our player.
Update your main.dart file to load the DinoGame as shown below:
    import 'package:flame/game.dart';
    import 'package:flutter/material.dart';
    import 'dino_game.dart';

    void main() {
      final game = DinoGame();
      runApp(
        GameWidget(game: game),
      );
    }
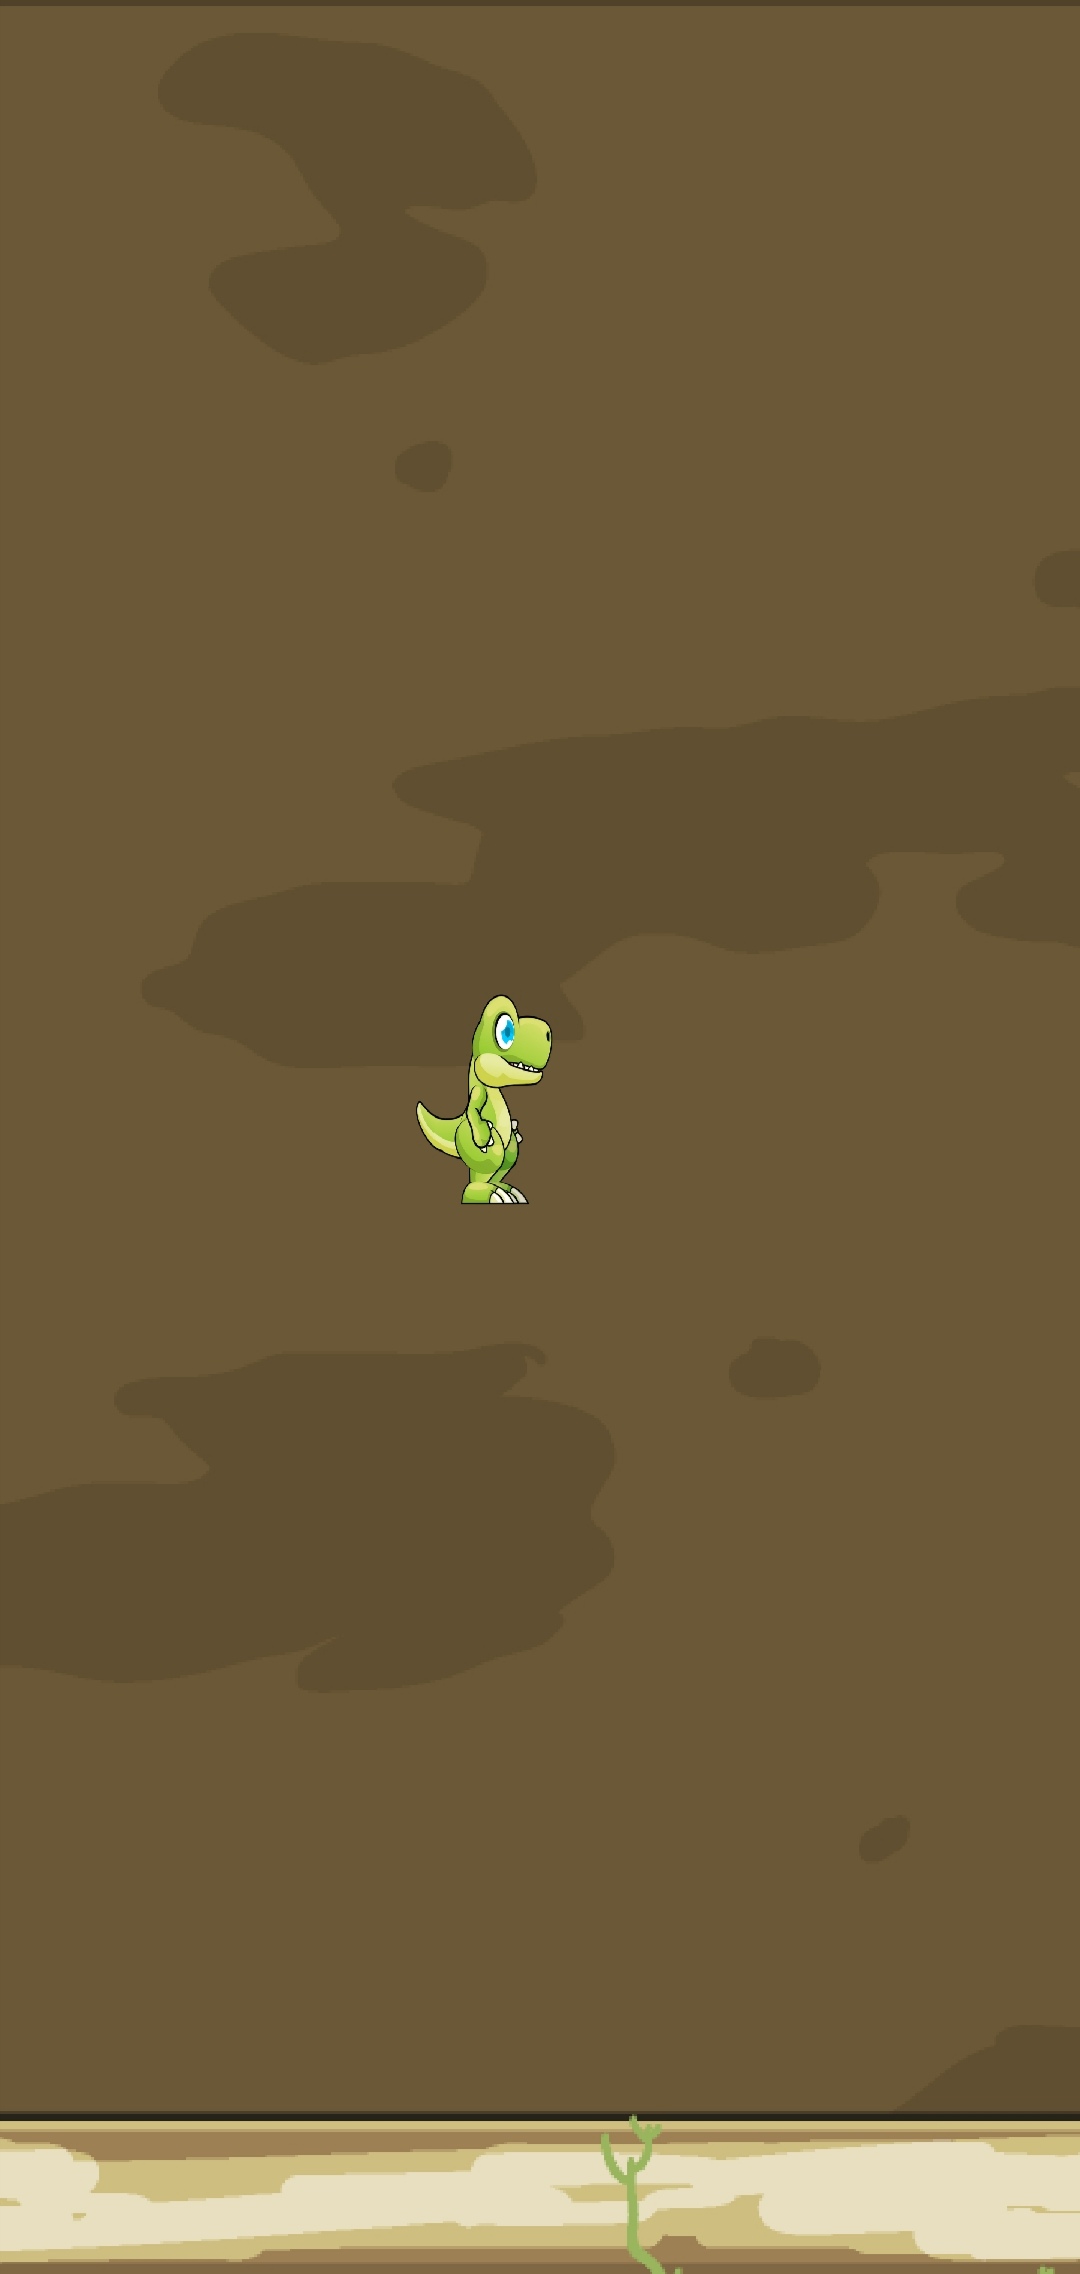
Running your application should display your player and a background.
Sprite movement
To move your player, you need to detect and respond to the direction you select. In this tutorial, you’ll use the game’s arrow keys to add movement to your player.
First, create a helpers folder with the files below, and update them as shown:
directions.dartcontains the directions enum:
enum Direction { up, down, left, right, none }
navigation_keys.dartcontains the UI and logic of the navigation keys:
    import 'package:flutter/gestures.dart';
    import 'package:flutter/material.dart';
    import 'directions.dart';

    class NavigationKeys extends StatefulWidget {
      final ValueChanged<Direction>? onDirectionChanged;

      const NavigationKeys({Key? key, required this.onDirectionChanged})
          : super(key: key);

      @override
      State<NavigationKeys> createState() => _NavigationKeysState();
    }

    class _NavigationKeysState extends State<NavigationKeys> {
      Direction direction = Direction.none;

      @override
      Widget build(BuildContext context) {
        return SizedBox(
          height: 200,
          width: 120,
          child: Column(
            children: [
              ArrowKey(
                icons: Icons.keyboard_arrow_up,
                onTapDown: (det) {
                  updateDirection(Direction.up);
                },
                onTapUp: (dets) {
                  updateDirection(Direction.none);
                },
                onLongPressDown: () {
                  updateDirection(Direction.up);
                },
                onLongPressEnd: (dets) {
                  updateDirection(Direction.none);
                },
              ),
              Row(
                mainAxisAlignment: MainAxisAlignment.center,
                children: [
                  ArrowKey(
                    icons: Icons.keyboard_arrow_left,
                    onTapDown: (det) {
                      updateDirection(Direction.left);
                    },
                    onTapUp: (dets) {
                      updateDirection(Direction.none);
                    },
                    onLongPressDown: () {
                      updateDirection(Direction.left);
                    },
                    onLongPressEnd: (dets) {
                      updateDirection(Direction.none);
                    },
                  ),
                  ArrowKey(
                    icons: Icons.keyboard_arrow_right,
                    onTapDown: (det) {
                      updateDirection(Direction.right);
                    },
                    onTapUp: (dets) {
                      updateDirection(Direction.none);
                    },
                    onLongPressDown: () {
                      updateDirection(Direction.right);
                    },
                    onLongPressEnd: (dets) {
                      updateDirection(Direction.none);
                    },
                  ),
                ],
              ),
              ArrowKey(
                icons: Icons.keyboard_arrow_down,
                onTapDown: (det) {
                  updateDirection(Direction.down);
                },
                onTapUp: (dets) {
                  updateDirection(Direction.none);
                },
                onLongPressDown: () {
                  updateDirection(Direction.down);
                },
                onLongPressEnd: (dets) {
                  updateDirection(Direction.none);
                },
              ),
            ],
          ),
        );
      }

      void updateDirection(Direction newDirection) {
        direction = newDirection;
        widget.onDirectionChanged!(direction);
      }
    }

    class ArrowKey extends StatelessWidget {
      const ArrowKey({
        Key? key,
        required this.icons,
        required this.onTapDown,
        required this.onTapUp,
        required this.onLongPressDown,
        required this.onLongPressEnd,
      }) : super(key: key);
      final IconData icons;
      final Function(TapDownDetails) onTapDown;
      final Function(TapUpDetails) onTapUp;
      final Function() onLongPressDown;
      final Function(LongPressEndDetails) onLongPressEnd;

      @override
      Widget build(BuildContext context) {
        return GestureDetector(
          onTapDown: onTapDown,
          onTapUp: onTapUp,
          onLongPress: onLongPressDown,
          onLongPressEnd: onLongPressEnd,
          child: Container(
            margin: const EdgeInsets.all(8),
            decoration: BoxDecoration(
              color: const Color(0x88ffffff),
              borderRadius: BorderRadius.circular(60),
            ),
            child: Icon(
              icons,
              size: 42,
            ),
          ),
        );
      }
    }
Then, update the main.dart file to display your game and keys as shown below:
    void main() {
      final game = DinoGame();
      runApp(
        MaterialApp(
          debugShowCheckedModeBanner: false,
          home: Scaffold(
            body: Stack(
              children: [
                GameWidget(
                  game: game,
                ),
                Align(
                  alignment: Alignment.bottomRight,
                  child: NavigationKeys(onDirectionChanged: game.onArrowKeyChanged,),
                ),
              ],
            ),
          ),
        ),
      );
    }
Add the function below into the dino_game.dart file to execute the player’s movement:
    onArrowKeyChanged(Direction direction){
      _dinoPlayer.direction = direction;
    }
Finally, update the dino_player.dart file to update the player’s position by including the code snippet below:
    Direction direction = Direction.none;

    @override
    void update(double dt) {
      super.update(dt);
      updatePosition(dt);
    }

    updatePosition(double dt) {
      switch (direction) {
        case Direction.up:
          position.y --;
          break;
        case Direction.down:
          position.y ++;
          break;
        case Direction.left:
          position.x --;
          break;
        case Direction.right:
          position.x ++;
          break;
        case Direction.none:
          break;
      }
    }
Running your application and pressing any of the arrow keys should update your player’s position.
Sprite animations
Now, your player moves as expected, but the movement is not yet animated to look natural. To animate your player, you’ll need to make use of a sprite sheet.
A sprite sheet is a collection of sprites arranged in rows and columns. It is quick to load compared with individual sprites. The Flame engine can load and render only a section of the sprite sheet. The image below displays a sprite sheet of the dino player.
![]()
The sprite sheet contains different player frames that can be animated to illustrate actions like walking right or left. The sprite sheet is added to the assets/images folder.
To animate your player, do the following in the dino_player.dart file:
- Extend
SpriteAnimationComponentinstead ofSpriteComponent. - Initialize your animations and animation speed. In this tutorial, we’ll focus on the animations for walking left and right.
    late final SpriteAnimation _walkingRightAnimation;
    late final SpriteAnimation _walkingLeftAnimation;
    late final SpriteAnimation _idleAnimation;

    final double _animationSpeed = .15;
- Load your sprites from the sprite sheet. The sprites are loaded depending on their position on the sheet. You can load the sprites by specifying the width and column of each sprite or by selecting each sprite based on its row and column position.
    Future<void> _loadAnimations() async {
      final spriteSheet = SpriteSheet.fromColumnsAndRows(
          image: await gameRef.images.load('spritesheet.png'),
          columns: 30,
          rows: 1);

      _idleAnimation = spriteSheet.createAnimation(
          row: 0, stepTime: _animationSpeed, from: 0, to: 9);

      _walkingRightAnimation = spriteSheet.createAnimation(
          row: 0, stepTime: _animationSpeed, from: 10, to: 19);

      _walkingLeftAnimation = spriteSheet.createAnimation(row: 0, stepTime: _animationSpeed, from: 20, to: 29);
    }
The spriteSheet.createAnimation function selects a sequence of sprites defined by the row, from, and to properties and animates them.
- Update the player to load the selected animation.
First, override the onLoad function to load the _idleAnimation.
    @override
    Future<void> onLoad() async {
      super.onLoad();
      await _loadAnimations().then((_) => {animation = _idleAnimation});
    }
Then update the updatePosition function to load different animations based on the direction the player is facing. The sprites for the idle state, right movement, and left movement are provided in this tutorial.
    updatePosition(double dt) {
      switch (direction) {
        case Direction.up:
          position.y --;
          break;
        case Direction.down:
          position.y ++;
          break;
        case Direction.left:
          animation = _walkingLeftAnimation;
          position.x --;
          break;
        case Direction.right:
          animation = _walkingRightAnimation;
          position.x ++;
          break;
        case Direction.none:
          animation = _idleAnimation;
          break;
      }
    }
Running your app and moving left or right updates your player’s movement, which looks more realistic now.
Congrats, you just made your first simple game with Flame!
You can use the flame_tiled package to load custom maps or tiles with an added collision layer to your app to improve your game. To design maps and tiles, you need to know how to create them using Tiled.
You can also add audio to your game using the flame_audio package.
Build and share your app artifacts with Codemagic
So you’ve created your game using the Flame engine, but how can you easily build it and share your app artifacts? The solution is to use a CI/CD tool like Codemagic to automatically handle all the builds, tests, and releases for your project.
To build and share your app artifacts with Codemagic, you first need to have your Flutter app hosted on your favorite Git provider. To prepare the app for release, you need to:
- Set the app launcher icon
- Set the app name
- Assign a unique app ID
You can follow the guide in the official Flutter documentation to prepare your app for release.
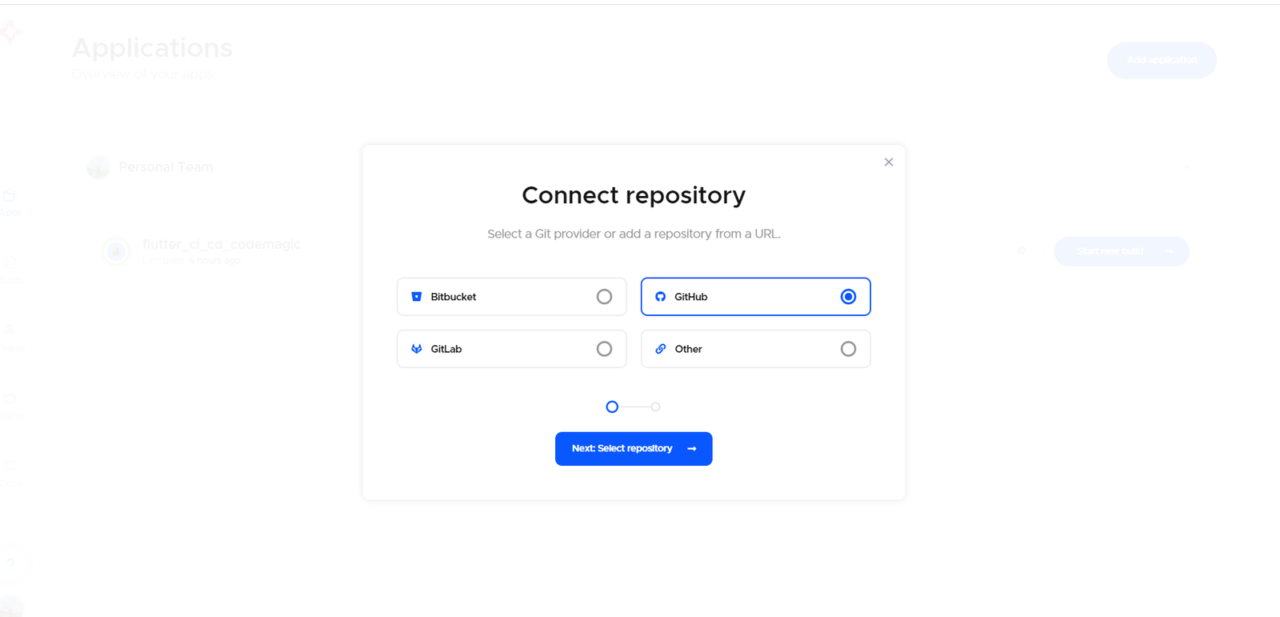
You then need a Codemagic account to use the CI/CD tool. If you don’t already have one, you can sign up for Codemagic with your Git provider. Set up Codemagic by following the steps below:
Create an application and connect a repository from your Git provider.
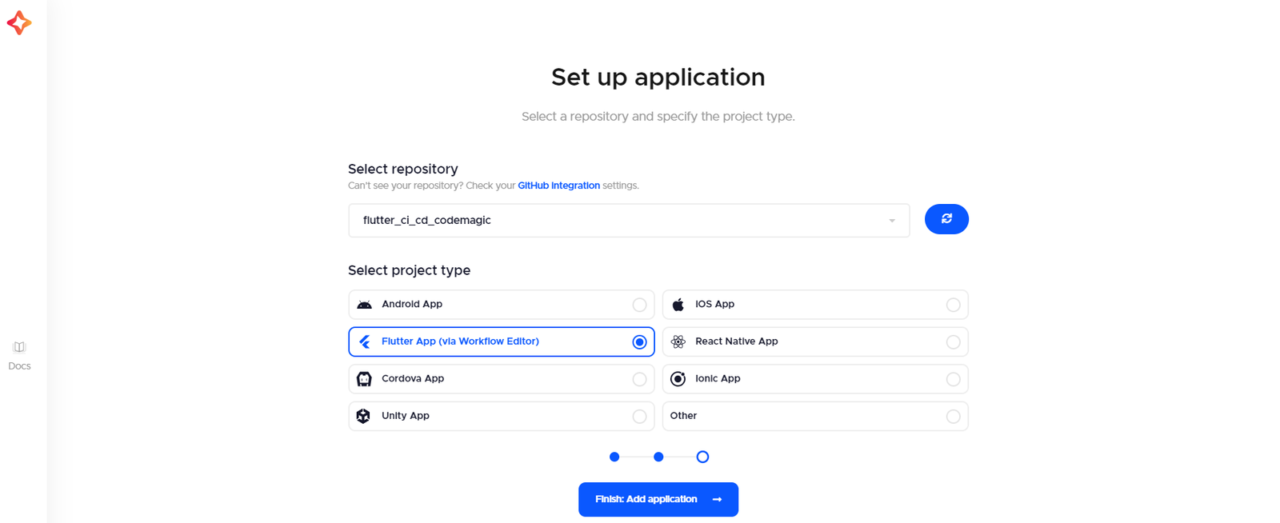
Select your project repository and type. In this case, the project type is “Flutter App (via WorkFlow Editor)”.
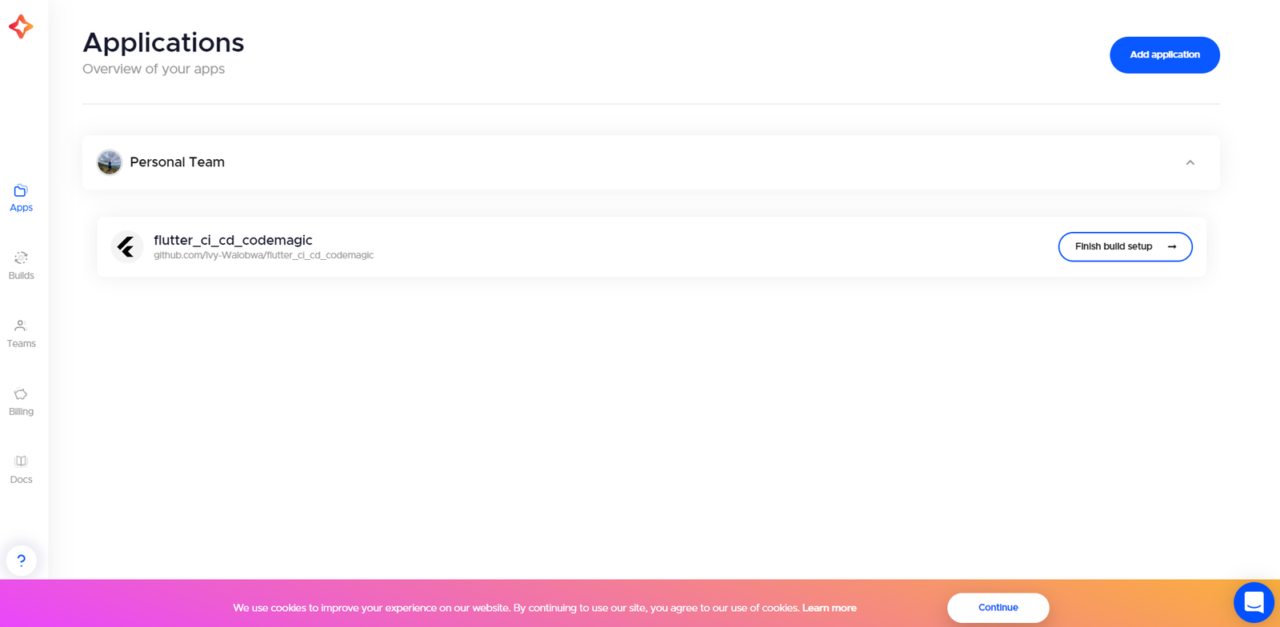
Your app is ready, and you can now add some settings to determine how your app is built.
To build your app, you need to customize the build settings to suit your app:
- Click on “Finish build setup” for first-time applications. For an existing app, click on the settings icon.
- Select “Android” as your build platform on the Workflow editor page.
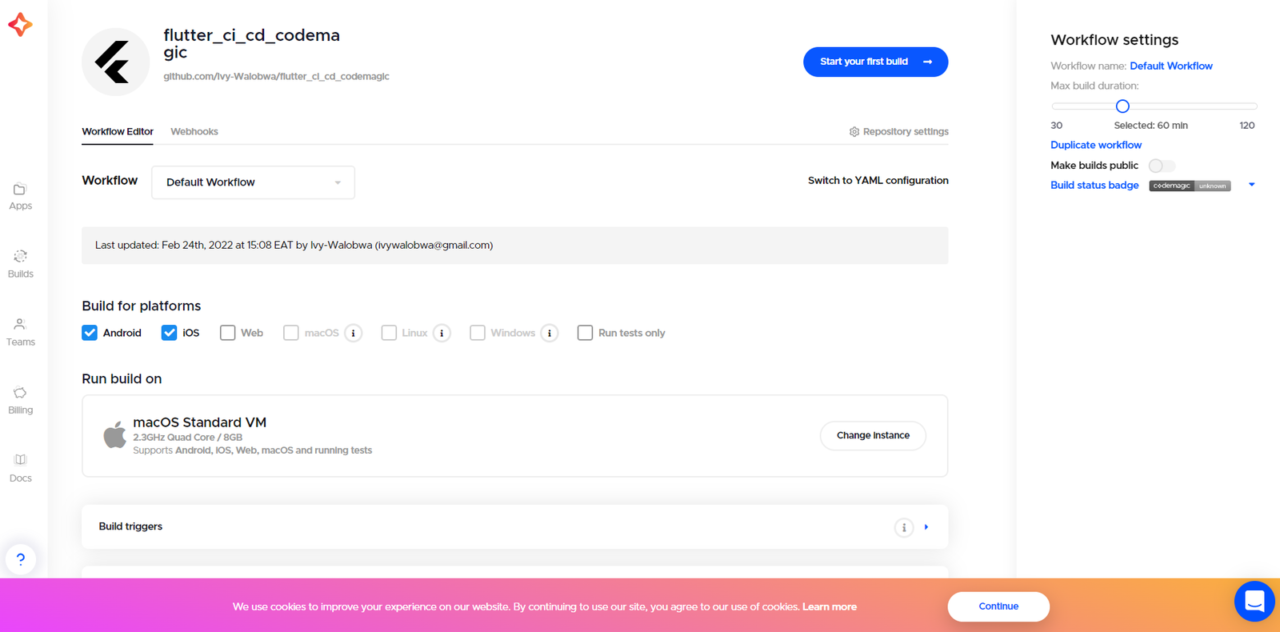
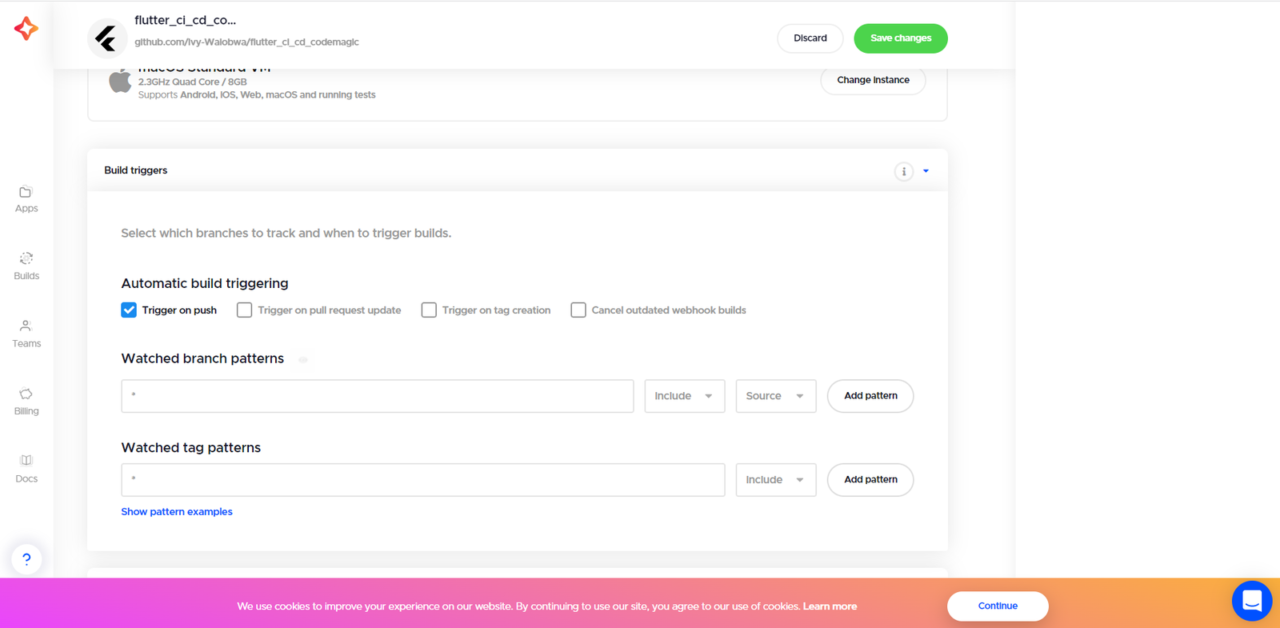
- Expand the “Build triggers” section and select your preferred build trigger. You can also configure the watched branches and tags. These settings will trigger an app build whenever they occur.
- Expand the “Build” section and select your app’s build format and mode.

- Save the changes and start a new build. Codemagic will add a green check beside your app name if your app builds successfully. Downloadable Android artifacts are added as well.
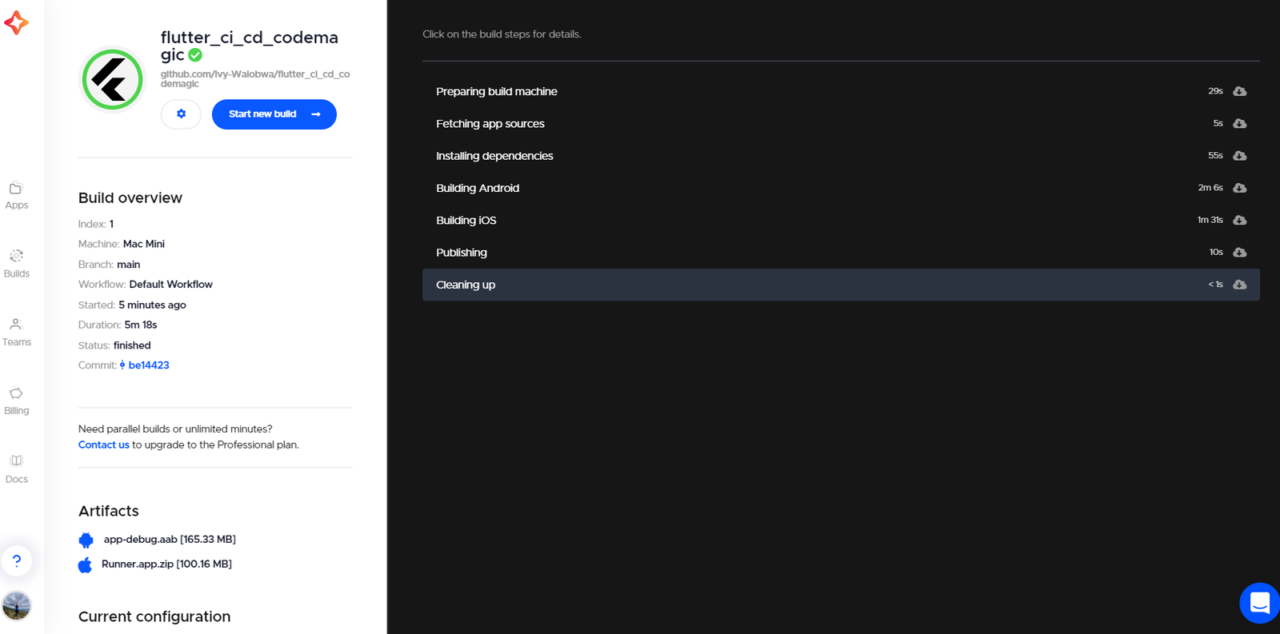
Congrats! You just made your first build with Codemagic and can now download and share your app artifacts!
Conclusion
Flame is a lightweight game engine built on Flutter that enables developers to create 2D games quickly.
In this tutorial, you learned how to install and set up Flame. We also covered how to load sprites and add sprite movements and animations by working on a Flutter Flame game example. You were introduced to the different independent packages you can use to enhance your game. Finally, we showed you how to build and share your app artifacts with Codemagic.
You can find the application used in this tutorial on GitHub. We hope you enjoyed this tutorial!
This article is written by Ivy Walobwa, a Flutter Developer and Technical Author. She’s passionate about communities and always willing to help facilitate students’ learning in the tech space. If she’s not building communities or creating content, she’s probably hiking on a random trail. Check out her profile.

