Written by Katarina Sheremet
Testing is a very important aspect of development—it helps to make sure that your app works properly and looks correct for its users. It is great that there are CI/CD tools that automate some of the work for you by checking the app quality, notifying the team if something goes wrong, and releasing the app to the end user.
In this article, I’m going to explain how to run Golden tests with Codemagic CI/CD.
Step 1: Create the Golden (Snapshot) test
In one of my previous articles, I’ve covered how to create Flutter Snapshot tests; therefore, I won’t focus on that topic here. Instead, I’ll just copy over some code snippets so that you don’t have to go back and forth between articles to follow.
Create golden_widget_test.dart in the test folder of the counter app and copy the following code into it:
void main() {
 testWidgets(‘Golden test’, (WidgetTester tester) async {
   await tester.pumpWidget(MyApp());
   await expectLater(find.byType(MyApp),
                     matchesGoldenFile(‘goldens/main.png’));
  });
}
Generate Snapshots:
flutter test --update-goldens
I’ve created a counter app with a Golden test and pushed it to GitHub. I was able to see my new app in Codemagic Applications.
Step 2: Run Golden (Snapshot) test with Codemagic
When you generate Golden (Snapshot) tests, the different OS platforms generate different files. There is an issue filed on GitHub for this, but it’s been closed because this is actually working as intended, even if it’s not very convenient. This means that if you generate your golden files on Linux and, afterward, run your tests on macOS, your Golden tests will most likely fail. However, All tests that you run with Codemagic are executed on macOS.
Thus, people who use macOS have an advantage. All passing Golden tests will succeed on Codemagic CI/CD without any extra work. If you are a macOS user, you need to press “Start new build”, and you are all set—just do not forget to first locally generate (see above) and commit golden files.

If everyone in your team uses macOS, you are done. 🥳 No need to continue reading.
Step 3: Run Golden tests if you are not a macOS user
Codemagic supports free remote connection to macOS infrastructure and also has the CM_EXPORT_DIR variable to upload any files from builder machines when a build has finished. You don’t need to generate golden files on your machine; instead, you can do this using Codemagic. I’ve pushed my code without generated Snapshots to GitHub. After that, you need to create a new workflow just for the generation of Snapshots, since you don’t want to lose the build minutes and run the release workflow with tests that will fail anyway.

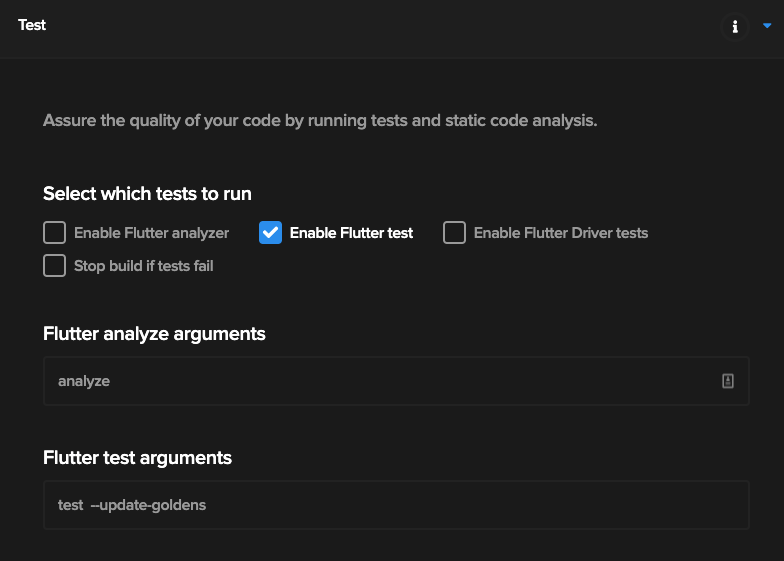
In the Test section, you need to enable Flutter test and set the Flutter test arguments to:
test --update-goldens

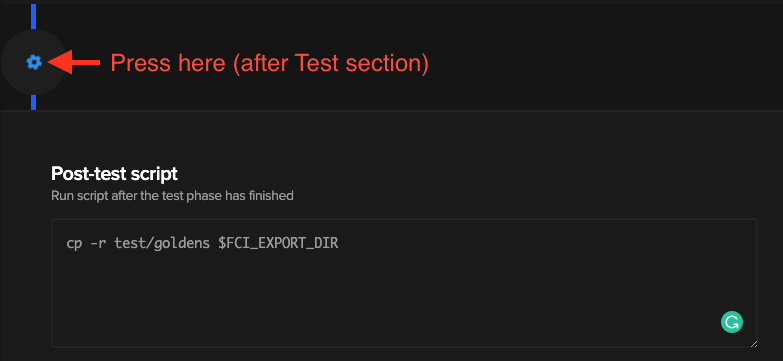
The command above will generate Snapshots for you. Then you should copy generated Snapshots to $CM_EXPORT_DIR with the following command in the Post-test script section:
cp -r test/goldens $CM_EXPORT_DIR

Don’t forget to disable the Build and Publish section as well!

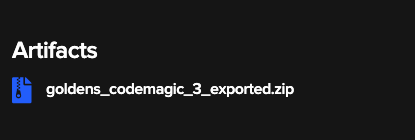
Save settings and start a new build. After finishing the build, you should see the generated golden files in the Artifacts section on the left.

Now, you just need to download this ZIP file and extract the generated golden files into your project.
Tip: If you have Golden tests in your project, you should add the skip parameter if the platform is not macOS. Then, if you run Flutter test locally, the tests won’t fail because of golden differences with Mac.
testWidgets('Golden test', (WidgetTester tester) async {
   await tester.pumpWidget(MyApp());
   await expectLater(
     find.byType(MyApp), matchesGoldenFile('goldens/main.png'),
   );
}, skip: !Platform.isMacOS);
Where to go from here?
If you are hungry for more, there is also a follow-up article where I explain how to send a Pull Request with updated Flutter Golden Snapshots using Codemagic. Make sure to check it out.
Useful links:
Katarina Sheremet is Flutter Developer and Google Developer Expert in Flutter and Dart, WTM Switzerland Ambassador. In her free time, she works on her own projects and apps, that are published on Google Play and App Store, Flutter packages. She also organizes events about technologies, gives talks and writes articles about Flutter and Dart. Check out her on Twitter; Medium and Expert Profile.


