


State management is a hot topic in relation to Flutter and is also an important concept that you should definitely explore. Many people who are just getting started with Flutter (and even those who have some experience) are afraid of the term state management. This is partially due to Flutter’s huge range of choices when it comes to state management. Though this is a good thing, it makes it quite intimidating for developers to choose a proper state management approach for their project.
In this article, we will take a look into what “states” in Flutter are and why you even need a state management solution (when the Flutter framework itself manages most of the states for you 🤔). Finally, we will take a deep dive into Riverpod and explore how it simplifies Flutter state management.
This article is written by Souvik Biswas
Ephemeral state and app state
In a broad sense, app state consists of everything that is loaded in memory while the app is running, including the app’s assets and the information about the framework, like the UI, animation state, fonts and so on.
But these are already handled by the Flutter framework, so when we talk about managing state, we are referring to the data you need in order to rebuild your UI at any moment in time. (You will also find this in the official Flutter state management docs.)
The states that you need to manage can be separated into two conceptual types:
- Ephemeral state
- App state
Ephemeral state
The state that is local to any widget is known as ephemeral state (sometimes also called UI state). As the state is contained within a single widget, there is no need for any complex state management techniques – just using a simple StatefulWidget to rebuild the UI is enough.
To learn more about the difference between
StatelessWidgetandStatefulWidget, check out this article.
App state
The state that is shared across different widgets is known as the app state (sometimes also called shared state). This is where state management solutions help a lot.
Why do you need state management in your Flutter project?
In simple apps, setState() is enough to manage the state of widgets in your app. This is something you might not care about much when you first start working with an app idea, but as the app grows further down the line, you might need to retain and share a state across different classes. This is when you realize you require some kind of state management technique.
Another important reason for using state management in Flutter is to separate your business logic and the app UI by creating some abstraction. This helps to keep the codebase manageable as it grows and also to prevent a few bugs.
Options out there
The first step to make your code more concise is to avoid passing variables through constructors that you need to access three to four levels down the widget tree. The first solution for this that is provided by the Flutter framework itself is the InheritedWidget. Using this, you can grab variables further up the widget tree directly (without passing them).
This sort of solves the issue, but InheritedWidget itself leads to a lot of boilerplate and nested code (reducing readability). There are various libraries that try to make this verbose code better, and the most highly recommended package among them is Provider. It is not actually a state management solution (as it doesn’t deal with the architecture of the app), but it is rather more like a dependency injection technique, and it also provides some additional advantages.
“Provider is InheritedWidget, but easier” – said by Rémi Rousselet in Flutter Europe.
Now, the first question that should strike your mind is:
What is a state management solution, then?
As I already said, state management deals with the architecture of the app (the way in which you want to structure your app) so that it’s easier to understand and manage. Some of the state management solutions are BLoC, Redux, MobX and many more.
Get to know about other state management approaches here.

Limitations of these packages
Most of the state management solutions (like BLoC and Redux) require a lot of boilerplate code to start using them. This boilerplate might be good for apps with huge codebases, but in most apps, it’s not that necessary and might lead to some confusion (if you don’t have much knowledge about the architecture).
Though Provider is well known and widely used by the community, it has some limitations as well. Some of them are:
The code becomes nested, and widgets are used to provide dependencies, which should be avoided (ideally, the UI code should be decoupled from the logic).
In a nested provider situation, we cannot get an object of the same type that is far away. (Only an object that is closer to the call site can be fetched.)
Causes runtime failure. Calling a provider with a different type that isn’t present in the code doesn’t give any compile-time error but instead results in a crash during runtime.
Depends on Flutter. It requires access to
BuildContextfor listening to providers.
In order to solve these issues, Riverpod was introduced (by the same person who created Provider, Rémi Rousselet). Riverpod not only improves the dependency injection technique, but it also comes tightly integrated with StateNotifier, which is a state management class.
Getting started with Riverpod

There are three variants of Riverpod packages available:
- riverpod: doesn’t depend on Flutter
- flutter_riverpod: the basic way to use Riverpod with Flutter
- hooks_riverpod: a way to use flutter_hooks with Riverpod
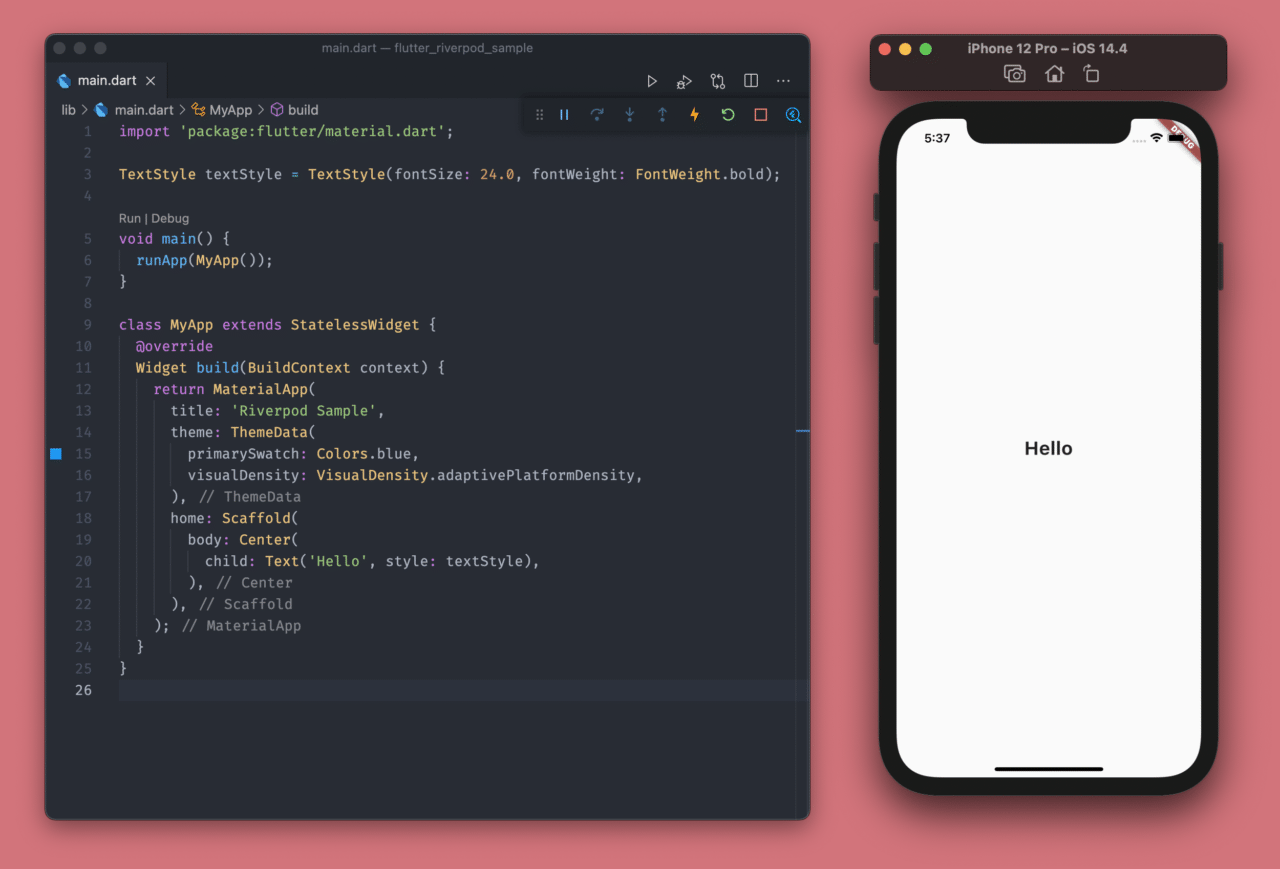
The starter code that we will be using is as follows:
import 'package:flutter/material.dart';

TextStyle textStyle = TextStyle(fontSize: 24.0, fontWeight: FontWeight.bold);

void main() {
  runApp(MyApp());
}

class MyApp extends StatelessWidget {
  @override
  Widget build(BuildContext context) {
    return MaterialApp(
      title: 'Riverpod Sample',
      theme: ThemeData(
        primarySwatch: Colors.blue,
        visualDensity: VisualDensity.adaptivePlatformDensity,
      ),
      home: Scaffold(
        body: Center(
          child: Text('Hello', style: textStyle),
        ),
      ),
    );
  }
}
We need the flutter_riverpod package to start with our first implementation.
Add the package to your pubspec.yaml file:
dependencies:
  flutter_riverpod: ^0.12.4
Let’s start with a very simple provider, which provides only a String.
First of all, you have to wrap the MyApp widget with ProviderScope:
import 'package:flutter/material.dart';
import 'package:flutter_riverpod/flutter_riverpod.dart';

void main() {
  runApp(
    ProviderScope(
      child: MyApp(),
    ),
  );
}
The ProviderScope consists of ProviderContainer, which is responsible for storing the state of individual providers.
Next, define the provider itself:
final welcomeProvider = Provider((ref) => 'Welcome to Riverpod');
You also have to define it globally.
The first question that should come to your mind:
Aren’t globals bad? Yes, they are. 😉
In this case, only the provider definition is global, but it can be scoped locally where it would be used. This is usually within a widget, so the value gets disposed as soon as the widget is disposed.
The Riverpod’s provider is Flutter independent.
Now, you can use the provider within your app in two ways. The simplest way is by changing the StatelessWidget to a ConsumerWidget:
class MyApp extends ConsumerWidget {
  @override
  Widget build(BuildContext context, ScopedReader watch) {
    final welcomeString = watch(welcomeProvider);

    return MaterialApp(
      title: 'Riverpod Sample',
      theme: ThemeData(
        primarySwatch: Colors.blue,
        visualDensity: VisualDensity.adaptivePlatformDensity,
      ),
      home: Scaffold(
        body: Center(
          child: Text(welcomeString, style: textStyle),
        ),
      ),
    );
  }
}
While using the ConsumerWidget, you have to add one more argument to the build() method, i.e., ScopedReader, and usually, it is named watch.
You can use this watch method to get access to the String stored in the provider and store it in a variable that you can display inside a Text widget.
final welcomeString = watch(welcomeProvider);
The second (and better) way to use the provider is by keeping the MyApp widget as a StatelessWidget and then wrapping the widget that you want to rebuild with a widget called Consumer. (This doesn’t rebuild the entire widget inside the build() method, optimizing widget rebuilds.)
class MyApp extends StatelessWidget {
  @override
  Widget build(BuildContext context) {
    return MaterialApp(
      title: 'Riverpod Sample',
      theme: ThemeData(
        primarySwatch: Colors.blue,
        visualDensity: VisualDensity.adaptivePlatformDensity,
      ),
      home: Scaffold(
        body: Center(
          child: Consumer(
            builder: (context, watch, child) {
              final welcomeString = watch(welcomeProvider);

              return Text(welcomeString, style: textStyle);
            },
          ),
        ),
      ),
    );
  }
}
Similarly, you can use the watch() method to get the provider value, as we did previously.

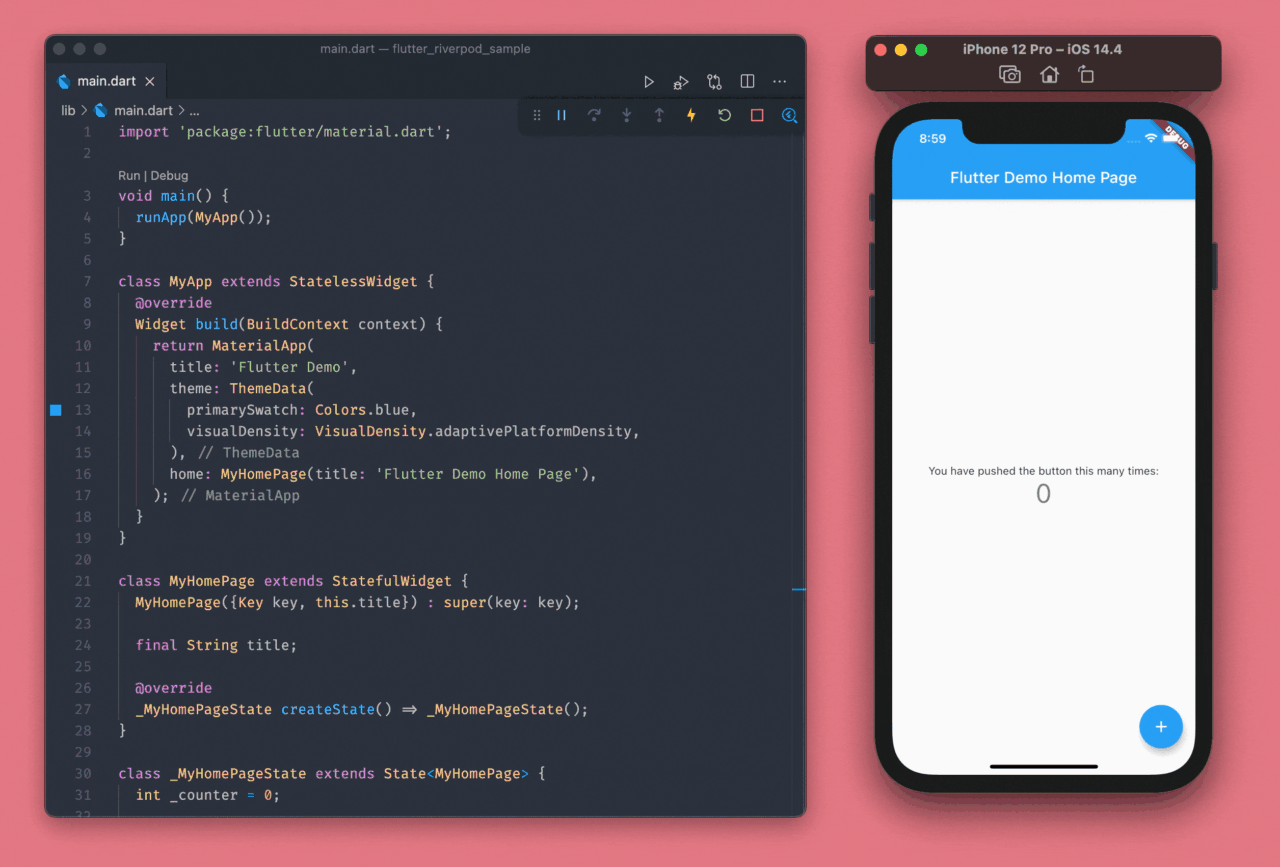
Counter app using Riverpod
Let’s try to refactor the counter app to use Riverpod.
The normal counter app that comes pre-built along with Flutter looks like this:
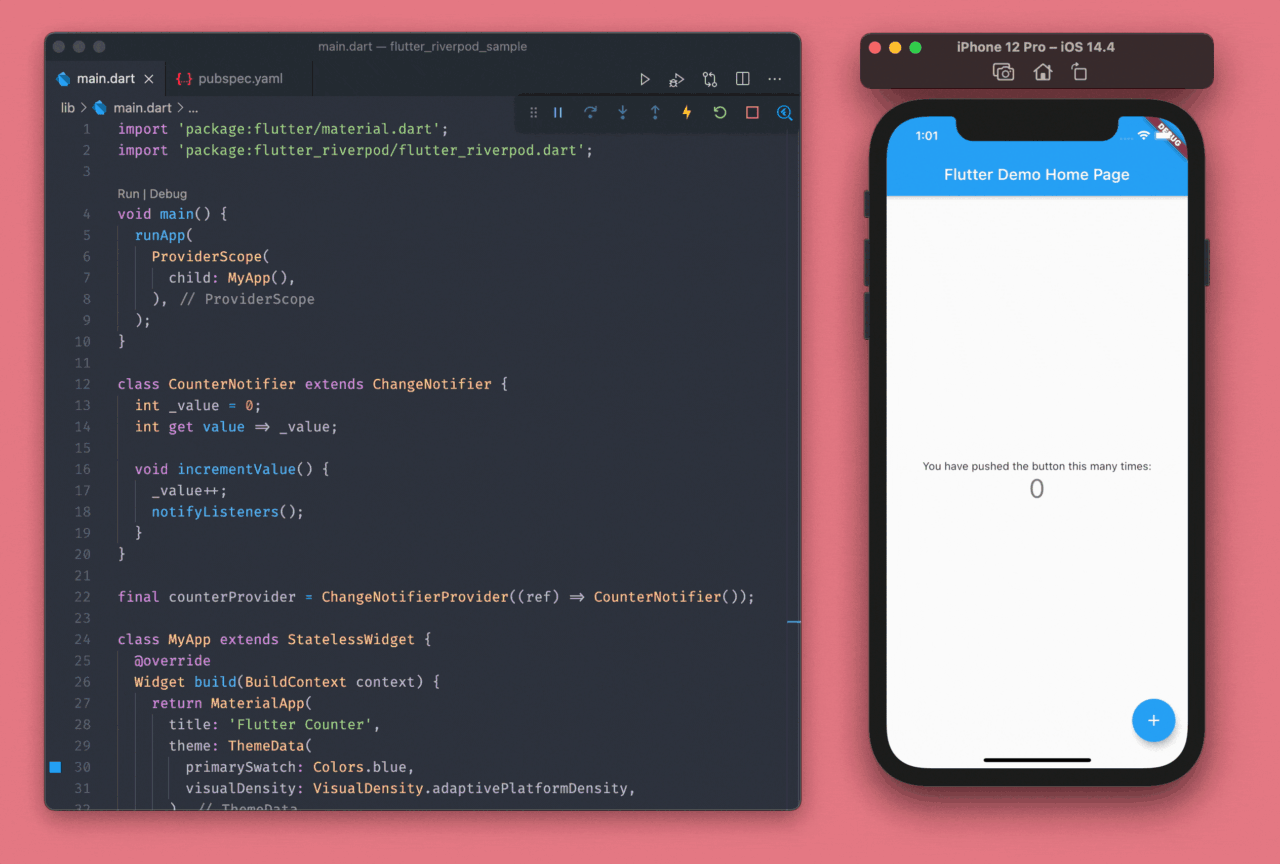
As usual, first wrap the MyApp widget with ProviderScope:
void main() {
  runApp(
    ProviderScope(
      child: MyApp(),
    ),
  );
}
Create a new class called CounterNotifier, which extends the ChangeNotifier class. Here, we will declare a variable and an increment() method.
class CounterNotifier extends ChangeNotifier {
  int _value = 0;
  int get value => _value;

  void incrementValue() {
    _value++;
    notifyListeners();
  }
}
The notifyListeners() method is used to notify the listeners when the value gets updated.
Define a global variable for ChangeNotifierProvider, which calls the CounterNotifier class:
final counterProvider = ChangeNotifierProvider((ref) => CounterNotifier());
We need to update the Text widget that is displaying the counter value, so wrap it with the Consumer widget, and use the value from the counterProvider:
class MyHomePage extends StatefulWidget {
  MyHomePage({Key key, this.title}) : super(key: key);

  final String title;

  @override
  _MyHomePageState createState() => _MyHomePageState();
}

class _MyHomePageState extends State<MyHomePage> {
  @override
  Widget build(BuildContext context) {
    return Scaffold(
      appBar: AppBar(
        title: Text(widget.title),
      ),
      body: Center(
        child: Column(
          mainAxisAlignment: MainAxisAlignment.center,
          children: <Widget>[
            Text(
              'You have pushed the button this many times:',
            ),
            Consumer(
              builder: (context, watch, child) {
                final counterNotifier = watch(counterProvider);
                return Text(
                  '${counterNotifier.value}',
                  style: Theme.of(context).textTheme.headline4,
                );
              },
            ),
          ],
        ),
      ),
      floatingActionButton: FloatingActionButton(
        onPressed: () => _incrementCounter(context),
        tooltip: 'Increment',
        child: Icon(Icons.add),
      ),
    );
  }
}
Finally, we have to update the _incrementCounter() method by passing the context to it because we will require the BuildContext to call the read() method supplied by Riverpod in order to get access to the incrementValue() method of the CounterNotifier class.
class _MyHomePageState extends State<MyHomePage> {

  // Method for incrementing the counter value
  void _incrementCounter(BuildContext context) {
    context.read(counterProvider).incrementValue();
  }

  @override
  Widget build(BuildContext context) {
    return Scaffold(
      // ...
    );
  }
}
You have successfully refactored the counter app to use Riverpod. 🎉
Also, you don’t need to use a StatefulWidget for MyHomePage anymore. Convert it to a StatelessWidget:
class MyHomePage extends StatelessWidget {
  MyHomePage({Key key, this.title}) : super(key: key);

  final String title;

  void _incrementCounter(BuildContext context) {
    context.read(counterProvider).incrementValue();
  }

  @override
  Widget build(BuildContext context) {
    return Scaffold(
      appBar: AppBar(
        title: Text(title),
      ),
      body: Center(
        child: Column(
          mainAxisAlignment: MainAxisAlignment.center,
          children: <Widget>[
            Text(
              'You have pushed the button this many times:',
            ),
            Consumer(
              builder: (context, watch, child) {
                final counterNotifier = watch(counterProvider);
                return Text(
                  '${counterNotifier.value}',
                  style: Theme.of(context).textTheme.headline4,
                );
              },
            ),
          ],
        ),
      ),
      floatingActionButton: FloatingActionButton(
        onPressed: () => _incrementCounter(context),
        tooltip: 'Increment',
        child: Icon(Icons.add),
      ),
    );
  }
}
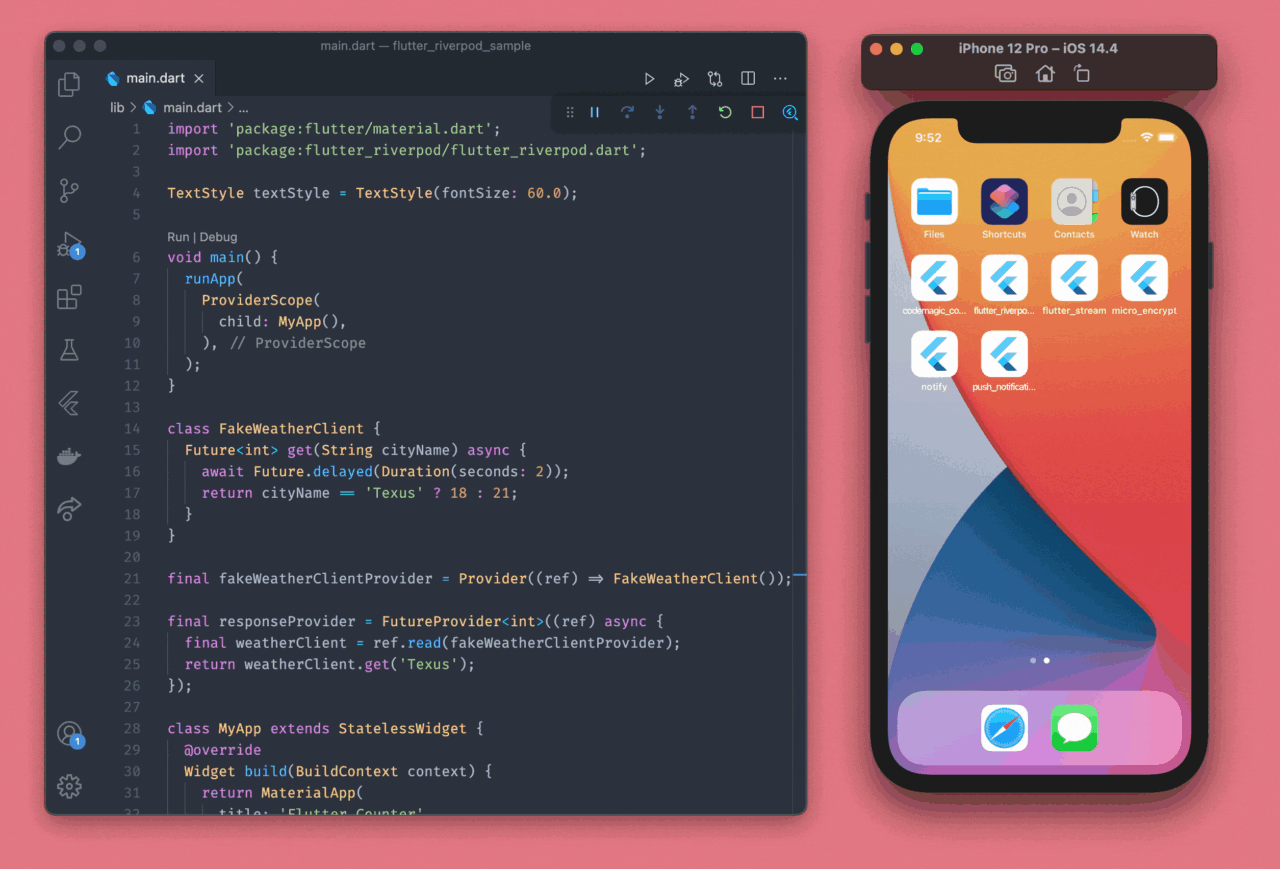
Using FutureProvider with Riverpod
Let’s look into how you can handle Future events using Riverpod. To demonstrate, we will use a FakeWeatherClient class that has a get() method, which returns a temperature value by taking a city name as a parameter.
class FakeWeatherClient {
  Future<int> get(String cityName) async {
    await Future.delayed(Duration(seconds: 2));
    return cityName == 'Texus' ? 18 : 21;
  }
}
Create a provider definition for FakeWeatherClient:
final fakeWeatherClientProvider = Provider((ref) => FakeWeatherClient());
You will also need to define another provider (this time, a FutureProvider) that returns the temperature as the response and stores it in the responseProvider global variable:
final responseProvider = FutureProvider<int>((ref) async {
  final weatherClient = ref.read(fakeWeatherClientProvider);
  return weatherClient.get('Texus');
});
Now, you can use the Consumer widget inside the UI to watch for the provider.
class HomePage extends StatelessWidget {
  @override
  Widget build(BuildContext context) {
    return Scaffold(
      body: Center(
        child: Column(
          mainAxisAlignment: MainAxisAlignment.center,
          children: [
            Consumer(
              builder: (context, watch, child) {
                final responseValue = watch(responseProvider);

                // TODO: Show the data
              },
            ),
          ],
        ),
      ),
    );
  }
}
We have Freezed unions inside Riverpod, which makes it much easier to handle different states of a FutureProvider:
Consumer(
  builder: (context, watch, child) {
    final responseValue = watch(responseProvider);

    return responseValue.map(
      data: (weather) => Text('${weather.value}', style: textStyle),
      loading: (_) => CircularProgressIndicator(),
      error: (message) => Text(message.error),
    );
  },
),
When we watch a FutureProvider, the return type is an AsyncValue (which is a union). You can use the map() method on the responseValue to get access to the three states of a Future and show an appropriate widget in each of them.
If you want to pass a variable/object to the provider, then you can modify the provider like this:
final responseProvider =
    FutureProvider.autoDispose.family<int, String>((ref, cityName) async {
  final weatherClient = ref.read(fakeWeatherClientProvider);
  return weatherClient.get(cityName);
});
In this case, the family modifier is used to pass a String value, which is used to call the get() method.
Watching and consuming the provider:
Consumer(
  builder: (context, watch, child) {
    final responseValue = watch(responseProvider('Texus'));

    return responseValue.map(
      data: (weather) => Text('${weather.value}', style: textStyle),
      loading: (_) => CircularProgressIndicator(),
      error: (message) => Text(message.error),
    );
  },
),

Notice that in the above GIF, when we change the city name back to Texus, there is no loading indicator.
Wondering why this is?🤔
It’s because of the fact that Riverpod’s providers have an inbuilt caching feature. Pretty neat, right? 👌
But sometimes, you don’t want the caching to take place. Riverpod has another modifier called autoDispose, which destroys the state of a provider when it is no longer used, even when the widget state is not yet disposed.

Now, when we go back to Texus, we again see the loading indicator.
Riverpod + StateNotifier
Let’s look at a practical guide on how you can use Riverpod as your Flutter state management solution in your production application.
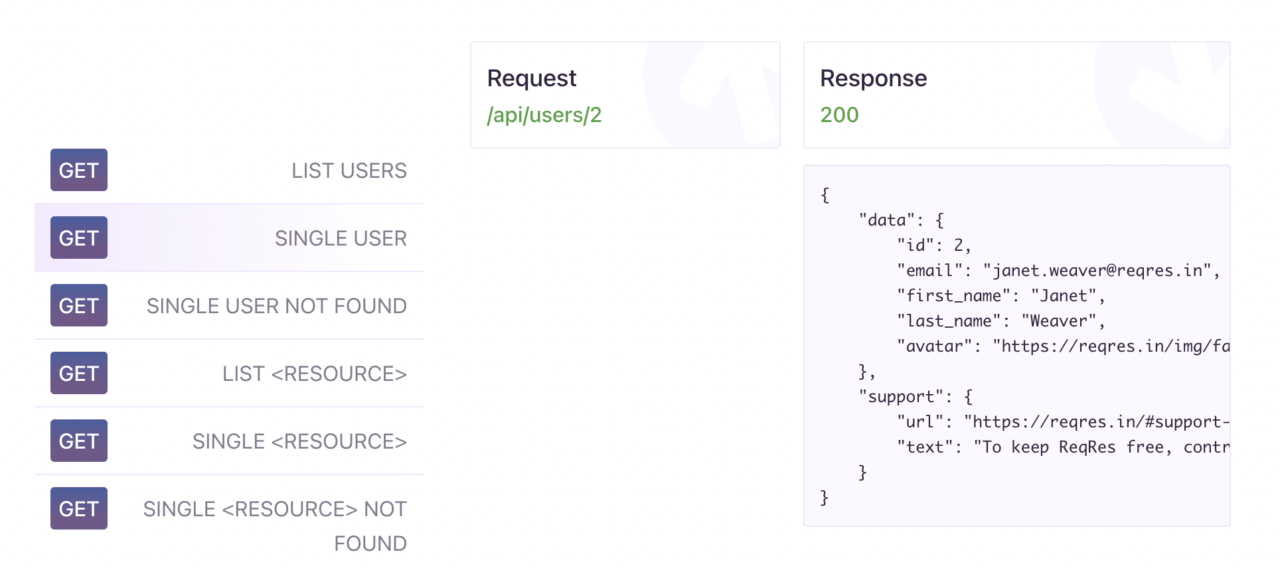
For this demonstration, we will be using a test REST API, which is available here. The SINGLE USER request will return brief user information by taking the ID as an input.
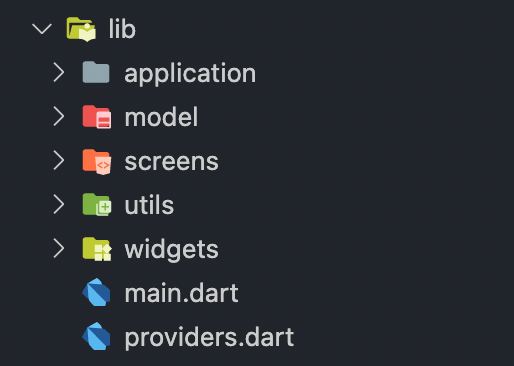
Our app structure will look like this (we are not following any strict architecture pattern, just keeping the files organized):
We will be using the following plugins:
- flutter_riverpod: for using Riverpod with Flutter
- json_annotation: for defining the annotations used by json_serializable
- dio: for HTTP requests
- freezed: for union code generation
- build_runner: for generating Dart files
- json_serializable: to easily handle JSON data
Add the plugins to your pubspec.yaml file:
dependencies:
  flutter_riverpod: ^0.12.4
  json_annotation: ^3.1.1
  dio: ^3.0.10

dev_dependencies:
  freezed: ^0.12.7
  build_runner: ^1.11.1
  json_serializable: ^3.5.1
Create two model classes user.dart and user_data.dart containing the following:
// user.dart file

part 'user.g.dart';

@JsonSerializable()
class User {
  User({
    this.data,
  });

  UserData data;

  factory User.fromRawJson(String str) => User.fromJson(json.decode(str));

  factory User.fromJson(Map<String, dynamic> json) => User(
        data: UserData.fromJson(json["data"]),
      );
}
// user_data.dart file

part 'user_data.g.dart';

@JsonSerializable()
class UserData {
  UserData({
    this.id,
    this.email,
    this.firstName,
    this.lastName,
    this.avatar,
  });

  int id;
  String email;
  String firstName;
  String lastName;
  String avatar;

  factory UserData.fromRawJson(String str) =>
      UserData.fromJson(json.decode(str));

  factory UserData.fromJson(Map<String, dynamic> json) => UserData(
        id: json["id"],
        email: json["email"],
        firstName: json["first_name"],
        lastName: json["last_name"],
        avatar: json["avatar"],
      );
}
Now, run the build runner to generate the toJson() method using:
flutter pub run build_runner serve --delete-conflicting-outputs
Build a client class in the user_client.dart file for making the HTTP requests, and place it inside the utils folder:
class UserClient {
  Dio _dio;

  Future<User> fetchUserInfo(String userId) async {
    BaseOptions options = BaseOptions(
      baseUrl: 'https://reqres.in/api/',
      connectTimeout: 5000,
      receiveTimeout: 3000,
      headers: {
        "Content-Type": 'application/json',
      },
    );

    _dio = Dio(options);

    Response response = await _dio.get('/users/$userId');

    if (response.statusCode == 200) {
      User user = User.fromJson(response.data);

      return user;
    }

    return null;
  }
}
You can now define the states that you are expecting from the HTTP request as Freezed unions. Create a folder state inside the application folder, and define a file called user_state.dart with the following content:
part 'user_state.freezed.dart';

@freezed
abstract class UserState with _$UserState {
  const factory UserState() = Initial;
  const factory UserState.loading() = Loading;
  const factory UserState.loaded(User user) = UserData;
  const factory UserState.error({String message}) = Error;
}
Define a user_notifier.dart file inside the directory application -> notifier. The UserNotifier class extends the StateNotifier class:
class UserNotifier extends StateNotifier<UserState> {
  final UserClient _userClient;

  UserNotifier(this._userClient) : super(UserState());

  Future<void> getUserInfo(String userId) async {
    try {
      state = UserState.loading();
      final userInfo = await _userClient.fetchUserInfo(userId);
      state = UserState.loaded(userInfo);
    } catch (e) {
      state = UserState.error(message: 'Error fetching user info, id:$userId');
    }
  }
}
Define the providers inside the providers.dart file:
final userClientProvider = Provider<UserClient>((ref) => UserClient());

final userNotifierProvider = StateNotifierProvider(
  (ref) => UserNotifier(ref.watch(userClientProvider)),
);
So, we have defined the model classes, states, notifiers and the provider for getting access to the notifier. Now, we are ready to build the UI.
First of all, wrap the MyApp widget with ProviderScope:
void main() {
  runApp(
    ProviderScope(
      child: MyApp(),
    ),
  );
}

class MyApp extends StatelessWidget {
  @override
  Widget build(BuildContext context) {
    return MaterialApp(
      title: 'Flutter Riverpod StateNotifier',
      theme: ThemeData(
        primarySwatch: Colors.blue,
        visualDensity: VisualDensity.adaptivePlatformDensity,
      ),
      home: HomePage(),
    );
  }
}
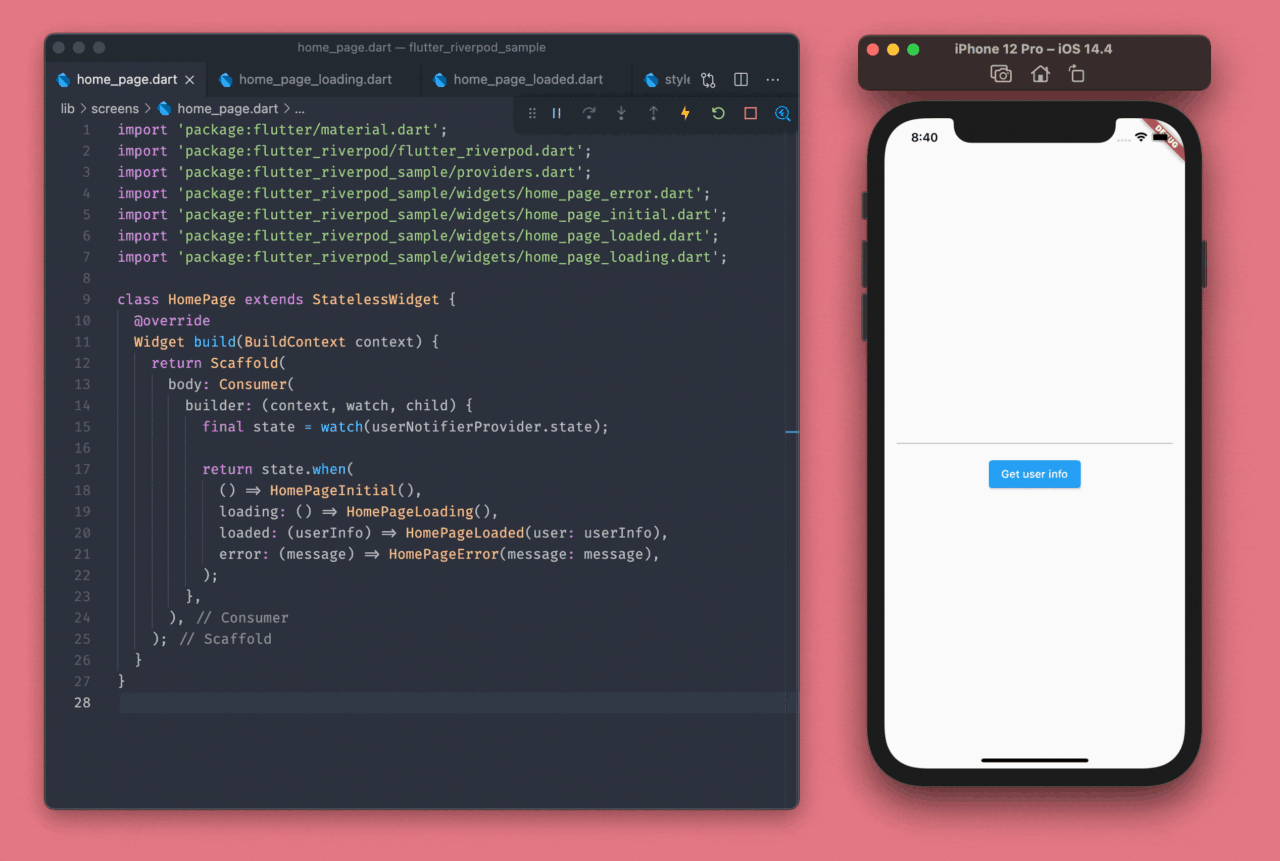
Inside the HomePage, watch for the provider state, and define the union cases like this:
class HomePage extends StatelessWidget {
  @override
  Widget build(BuildContext context) {
    return Scaffold(
      body: Consumer(
        builder: (context, watch, child) {
          final state = watch(userNotifierProvider.state);

          return state.when(
            () => HomePageInitial(),
            loading: () => HomePageLoading(),
            loaded: (userInfo) => HomePageLoaded(user: userInfo),
            error: (message) => HomePageError(message: message),
          );
        },
      ),
    );
  }
}
Finally, define the respective widgets for the four union cases.
You can find the code for them here.
Congratulations! 🎉 You have successfully built a Flutter app with an amazing and simple Flutter state management library, Riverpod.
Conclusion
Riverpod solves the limitations of Provider. It is compile-safe, can use multiple Providers of the same type, is decoupled from the BuildContext of Flutter and is also DevTools friendly. Though we have covered a lot about Riverpod in this article, there are a few things we have left out. Riverpod is also pretty easy to test – you can learn more about that here.
What state management solution are you using for your Flutter projects and why? 🤔 Let us know HERE.
References
- Riverpod docs
- Reinventing provider talk by Rémi Rousselet
- Find a list of other state management solutions in an ebook “Flutter libraries we love”
- Pros and cons of popular state management approaches
Souvik Biswas is a passionate Mobile App Developer (Android and Flutter). He has worked on a number of mobile apps throughout his journey, and he loves open source contribution on GitHub. He is currently pursuing a B.Tech degree in Computer Science and Engineering from Indian Institute of Information Technology Kalyani. He also writes Flutter articles on Medium - Flutter Community.


