


Written by Salman Mustafa
So, you have learned how to quickly hack a beautiful app in Flutter. But as your project grows, so does the Flutter widget tree, and when you don’t care about not mixing your application logic with the UI, you end up with messy code, which is not only hard to read but is nearly impossible to update.
It’s time to decide on a good state management technique that not only manages your application logic efficiently but should also be easy to learn and code. If you want an introduction to the different state management techniques that Flutter offers, here’s a quick guide for you, and I recommend starting from Provider.
So, let’s get started, but first, let us know how many mobile app projects do you have in Git repositories?
Simple != Efficient?
When you decide to start a long-term project on Flutter, the Provider approach seems too simple to be efficient. So, here comes an unpopular opinion. You don’t need state management techniques like BLoC or Redux to have a good long-term project. BLoC pattern is not beginner friendly, and it requires a lot of boilerplate code. I am not saying that BLoC is inherently bad, but we should always remember the “You aren’t gonna need it” (YAGNI) principle that states that a programmer should not add functionality until it’s deemed necessary.
Let’s Talk About App Architecture
Usually, we create apps that have some UI screens, and app login is performed by making API calls and storing these results in databases.

When we call something from the UI in App logic (1), we’re usually calling a function as a result of interacting with a UI element, such as when we press a button. So, we don’t need streams in this case. But when data flows from app logic to the UI (2), we are not certain about what to expect.
The data could be an exception/error due to unavailability of the internet, or it could be partial data. (For example, in a social media app, some images may have been loaded from the internet, while others are still loading.) The streams look like an efficient approach here. If you don’t already know what a stream is, you should check out this article before proceeding.

A Beginner’s Guide to Architecting a Flutter App
As we all know, none of the above-mentioned state management techniques are enough. But what if instead of following just one approach religiously, we take advantage of multiple approaches simultaneously?
Today, we are going to learn how to architect an app using Provider and Streams (which are some techniques from BLoC pattern) by creating a cute kitten app that will display a list of kitten images from different categories.
Here’s what our app will look like:
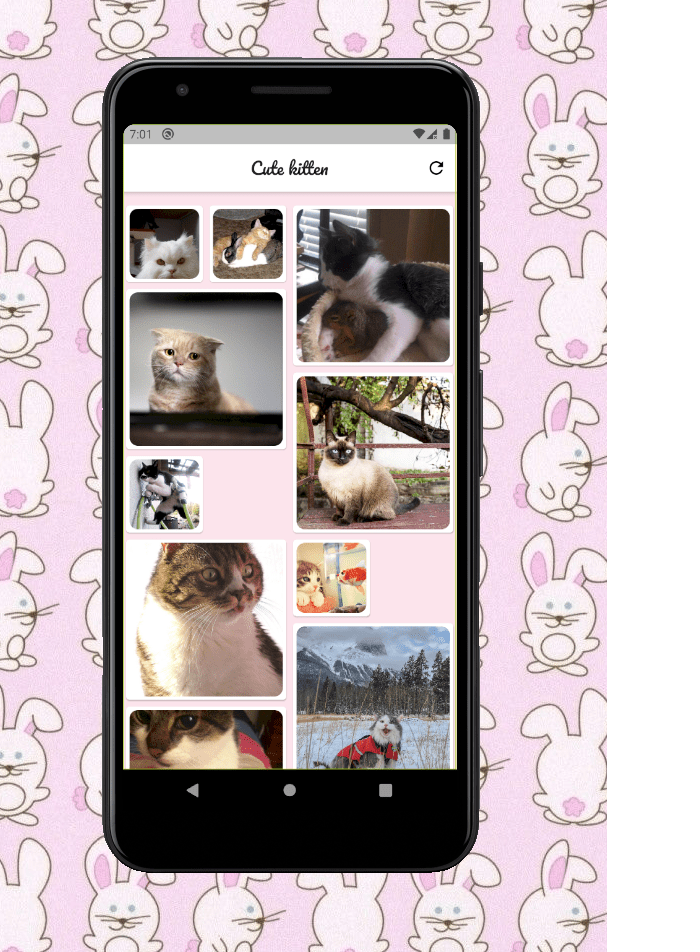
Enough talking, let’s start coding.
Code Time
Add the dependency in the pubspec.yaml file:
dependencies:
  Flutter:
    sdk: Flutter
  http: ^0.12.0+4
  Flutter_staggered_grid_view: ^0.3.0
  provider: ^4.0.4
We need the http package to make request calls to TheCatAPI.com, which will provide us with cute cat pictures and their details. It requires an API key, but it’s free. Also, to display our cute kitten in an Instagram/Pinterest-style grid view, we will use the Flutter_staggered_grid_view package. It’s optional, as it will only add visual beauty, but cats will be sad if you display their pictures in a plain old vertical list, and no one wants to make cats sad.
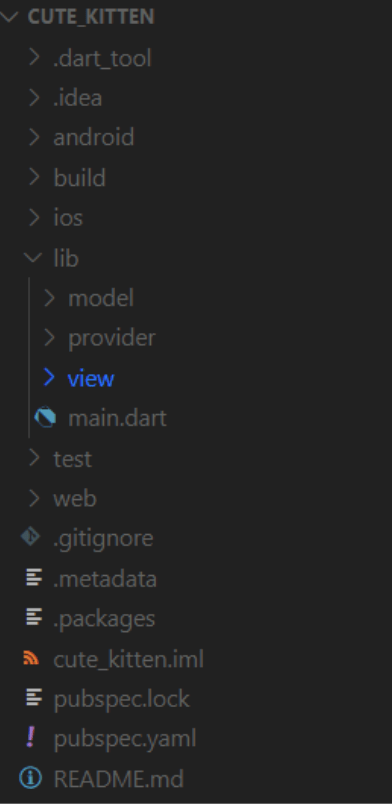
Overview of App Structure
Here’s the overview of our project structure: In the lib folder, we will make the following folders:
- The
viewfolder houses all the code for the UI. - The
modelfolder contains the application logic, like classes and code, to make API calls for cat photos. - The
providerfolder contains our provider to connect the UI and application logic.
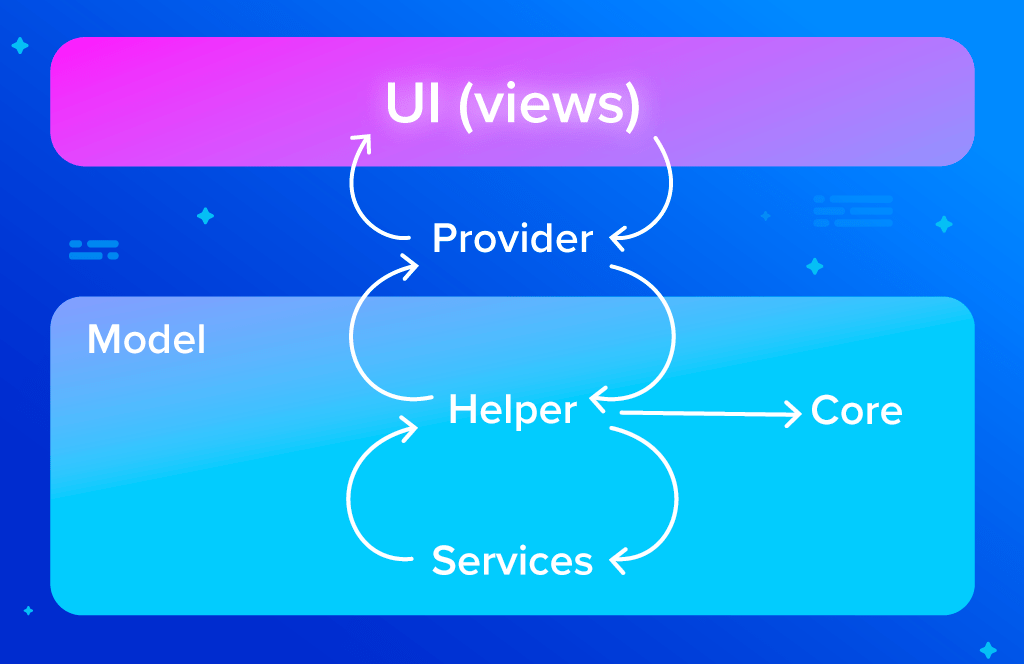
Let’s divide our model into 3 parts so that we can update it easily, and also so that it doesn’t depend on the UI of the app.
- The
Corefolder will contain our classes, like the CatPhoto class. - The
Servicesfolder will contain classes to make external calls, like calls to get photos. These classes don’t care about the UI or how the UI wants to display the data. They can throw an exception when something goes wrong. - The
Helperfolder will contain classes that will convert the raw data from Services to the form that is useful in our app. These classes gracefully handle exceptions that can occur in Services and convert them to messages which will be helpful to UI developers.
As many exceptions can occur while making calls in Services, we don’t want our UI developers to handle exceptions/errors of code. So, we are going to create a
Glitchclass with a user-friendly message stating what went wrong to display in the UI.
Create a glitch folder in the model folder and create a Glitch.dart file in it.
class Glitch {
  String message;
  Glitch({
    this.message,
  });

  @override
  String toString() => 'Glitch(message: $message)';

  @override
  bool operator ==(Object o) {
    if (identical(this, o)) return true;

    return o is Glitch &&
      o.message == message;
  }

  @override
  int get hashCode => message.hashCode;
}
One popular error/exception that can occur while making an HTTP call is unavailability of the internet. So, let’s create a NoInternetGlitch class that extends the Glitch class.
import 'package:cute_kitten/model/glitch/glitch.dart';

class NoInternetGlitch extends Glitch {
  NoInternetGlitch() : super(message: "Unable to connect to internet");
}
But we are not sure when these pesky little glitches will occur in our code. When we make an HTTP call, we expect two kinds of outputs:
- Actual data that we want; and
- An exception.
To handle two kinds of output, we will use the
dartzpackage. It has anEitherclass, which will help us to handle two outputs. First of all, import thedartzpackage in your pubspec.yaml file.
dartz: ^0.8.9
Services
Let’s start from the Services folder, which will only handle external calls. Create a CatPhotoApi.dart file in the Services folder, and create a getRandomCatPhoto() function, which will give us the server response when we make API calls to get a random cat photo.
import 'package:dartz/dartz.dart';
import 'package:http/http.dart' as http;

class CatPhotoApi {
  String endpoint = "api.thecatapi.com";
  Future<Either<Exception, String>> getRandomCatPhoto() async {
    try {
      final queryParameters = {
        "api_key": "YOUR_API_HERE",
      };
      final uri = Uri.https(endpoint, "/v1/images/search", queryParameters);
      final response = await http.get(uri);
      return Right(response.body);
    } catch (e) {
      return (Left(e));
    }
  }
}
In the getRandomCatPhoto() function, the return type is Future<Either<Exception, String>>. This may confuse you at first glance, but let’s try to understand it bit by bit. The template, Either<Exception, String>, states that the function will return either an Exception (bad) in the case of an error OR a String (good), which will contain the server response.
When we get the server response successfully, we return Right(response.body), which states that we are returning a String, and when an exception occurs, we return Left(e), which states that we are returning an Exception.
Core
Now, we don’t want to write JSON parsing code in the UI, so we should create a CatPhoto class that will contain the data of cats, like id, url, etc.
Let’s create a CatPhoto.dart file in the Core folder and create a CatPhoto class in it.
import 'dart:convert';

class CatPhoto {
  final String id;
  final String url;
  final int width;
  final int height;

  const CatPhoto({
    this.id,
    this.url,
    this.width,
    this.height,
  });


  Map<String, dynamic> toMap() {
    return {
      'id': id,
      'url': url,
      'width': width,
      'height': height,
    };
  }

  static CatPhoto fromMap(Map<String, dynamic> map) {
    if (map == null) return null;

    return CatPhoto(
      id: map['id'],
      url: map['url'],
      width: map['width'],
      height: map['height'],
    );
  }

  String toJson() => json.encode(toMap());

  static CatPhoto fromJson(String source) => fromMap(json.decode(source));

  @override
  String toString() {
    return 'CatPhoto(id: $id, url: $url, width: $width, height: $height)';
  }
}
If you don’t want to write the boring code to convert to and from JSON, I would highly recommend installing the “Dart data class generator” extension in VS code, which will generate the class constructor and JSON serialization code for you.
Helper
Now, let’s convert the raw response of the cat API server to a CatPhoto instance through our helper. Create a CatPhotoHelper.dart file in the Helper folder and create a CatPhotoHelper class in it.
import 'dart:convert';
import 'package:cute_kitten/model/Service/CatPhotosApi.dart';
import 'package:cute_kitten/model/core/CatPhoto.dart';
import 'package:cute_kitten/model/glitch/NoInternetGlitch.dart';
import 'package:cute_kitten/model/glitch/glitch.dart';
import 'package:dartz/dartz.dart';

class CatPhotoHelper {
  final api = CatPhotoApi();
  Future<Either<Glitch, CatPhoto>> getRandomCatPhoto() async {
    final apiResult = await api.getRandomCatPhoto();
    return apiResult.fold((l) {
      // There can be many types of error, but for simplicity, we are going
      // to assume only NoInternetGlitch
      return Left(NoInternetGlitch());
    }, (r) {
      // the API returns breed, id, url, width, height, category, details, etc.,
      // but we will take only the information we need in our app and ignore
      // the rest
      // here we will decode the API result to CatPhoto
      final photo = CatPhoto.fromMap(jsonDecode(r)[0]);
      return Right(photo);
    });
  }
}
The getRandomCatPhoto() function in the CatHelper class will convert the Exception into a proper glitch (to keep the code simple to understand, we are just converting every exception into a NoInternetGlitch() and the JSON response of the server into a CatPhoto instance. Here, we are also utilizing the magic of Either and returning either Right(photo) or Left(NoInternetGlitch()).
Provider Time
Now, our application logic part is done. But we want to display 20 images in the photo grid at a time. As it is part of our UI to show 20 images at a time, we should not create a getTwentyRandomCatImages() function in the helper or Service class. This is because in the future, we may decide to show 30 images at a time in the UI, which would purely be a UI change, but it would affect functions in the helper and Service classes. So, we will write such functions in our provider, which will be accessible in the UI code.
We will use streams here to handle image loading and errors. Create the CatProvider.dart file in the Provider folder and create the CatProvider class in it. We are going to create a StreamController, which will handle the flow of cat photos.
class CatProvider extends ChangeNotifier {
  final _helper = CatPhotoHelper();
  final _streamController = StreamController<Either<Glitch, CatPhoto>>();
  Stream<Either<Glitch, CatPhoto>> get catPhotoStream {
    return _streamController.stream;
  }
}
Now, let’s create a getTwentyRandomPhoto() function in CatProvider, which will fetch 20 CatPhoto instances through CatPhotoHelper and add them in catPhotoStream.
Future<void> getTwentyRandomPhoto() async {
    for (int i = 0; i < 20; i++) {
      final catHelperResult = await _helper.getRandomCatPhoto();
      _streamController.add(catHelperResult);
    }
  }
Widgets Time
Now, we are ready to write some Flutter widgets to paint our UI. Before we start, I want to tell you about another package that will help us write UI code efficiently. Oftentimes, we want to initialize something after loading all the widgets. In our app, we want to call getTwentlyRandomPhoto() to get photos to display.
But we should not call this function in the build() function of our widget, as the build() function can be called many times from the framework (such as in the case of device rotation), and we don’t want to waste bandwidth by redundantly calling the getTwentlyRandomPhoto() function again and again. Therefore, we will use the after_layout package. This package provides us with AfterLayoutMixin. To use this mixin in our widget, we use the “with” keyword in our widget state class declaration and override the afterFirstLayout() function.
class _CatGridState extends State<CatGrid> with AfterLayoutMixin {
@override
  void afterFirstLayout(BuildContext context) {

}
This function is called once when all the widgets have been drawn on the screen for the first time. So, we will call functions like getTwentlyRandomPhoto() in this function. Now, it’s time to convert CatPhoto into Grid tile. We will create a CatPhotoTile widget for it. It’s a good practice to always cache images from the internet so that bandwidth is not wasted if the same image is downloaded again. To keep the UI code simple, I have implemented cached images here, but you can check the Work with cached images cookbook to learn how to do this.
class CatPhotoTile extends StatelessWidget {
  const CatPhotoTile(this.imageUrl);
  final String imageUrl;
  @override
  Widget build(BuildContext context) {
    return Card(
      child: Center(
          child: Padding(
              padding: const EdgeInsets.all(4.0),
              child: Container(
                decoration: BoxDecoration(
                  borderRadius:
                      BorderRadius.all(const Radius.circular(10.0)),
                  image: DecorationImage(
                      image: NetworkImage(imageUrl), fit: BoxFit.cover),
                ),
              ))),
    );
  }
}
Also, to handle errors, we are going to create a CatPhotoErrorTile widget.
class CatPhotoErrorTile extends StatelessWidget {
  const CatPhotoErrorTile(this.backgroundColor, this.errorMessage);
  final Color backgroundColor;
  final String errorMessage;
  @override
  Widget build(BuildContext context) {
    return Card(
      color: backgroundColor,
      child: InkWell(
        onTap: () {},
        child: Center(
          child: Padding(
            padding: const EdgeInsets.all(4.0),
            child: Text(errorMessage),
          ),
        ),
      ),
    );
  }
}
We will listen to the photo stream from the CatProvider class in the AfterLayout function. We are storing cat photos in the catPhoto list and the tiles for cat photos in the catPhotosTile list. catPhotoTile is a list of StaggeredTile, which is just a placeholder for the space in which we will display the cat photo. StaggeredTile’s two parameters are crossAxisCount and MainAxisCount, which we are randomly generating. You can learn more about StaggeredGrid and StaggeredTile from here.
Code to Listen to Cat Photos Stream:
@override
  void afterFirstLayout(BuildContext context) {
    provider.getTwentyRandomPhoto();

    provider.catPhotoStream.listen((snapshot) {
      snapshot.fold((l) {
        if (l is NoInternetGlitch) {
          Color randomColor = Color.fromRGBO(
            Random().nextInt(255),
            Random().nextInt(255),
            Random().nextInt(255),
            1
          );
          catPhotos.add(CatPhotoErrorTile(randomColor, "Unable to Connect"));
        }
      },
      (r) => {
        catPhotos.add(CatPhotoTile(r.url)),
      });
      int count = Random().nextInt(4);
      catPhotoTiles.add(StaggeredTile.count(count, count));

      setState(() {});
    });
  }
At this point, you may have a question: How am I getting the provider instance here? One way is to use Provider.of() syntax, but to use this syntax, we have to wrap our widget in the ChangeNotifierProvider widget, which will make the widget tree unnecessarily long.
Instead of using the ChangeNotifierProvider widget, we will use the get_it package. It’s not required to use get_it, and you can easily use ChangeNotifierProvider from the provider package if you prefer that.
The get_it package is sometimes preferred for providing singletons. In this case, it will provide us with the CatProvider singleton, which we can use in our UI code.
First of all, add get_it in your pubspec.yaml file.
get_it: ^4.0.1
Create a “getit.dart” file in the lib folder and create a setup() function, which will register the CatProvider singleton.
import 'package:cute_kitten/provider/CatProvider.dart';
import 'package:get_it/get_it.dart';

final getIt = GetIt.instance;

void setup() {
  getIt.registerSingleton<CatProvider>(CatProvider());
}
You can get this CatProvider instance anywhere through getIt.
class _CatGridState extends State<CatGrid> with AfterLayoutMixin {
  final provider = getIt<CatProvider>();
}
Now, it’s time for the Scaffold. We are going to create a refresh button in the AppBar, which will clear the currently displayed photo and call the stream again.
@override
  Widget build(BuildContext context) {
    return Scaffold(
        backgroundColor: Colors.pink[50],
        appBar: AppBar(
          actions: <Widget>[
            IconButton(
              icon: Icon(Icons.refresh),
              onPressed: () {
                catPhotoTiles.clear();
                catPhotos.clear();
                provider.refreshGird();
              },
            )
          ],
          backgroundColor: Colors.white,
          centerTitle: true,
          title: Text(
            'Cute kitten',
            style: GoogleFonts.pacifico(),
          ),
        ),
        body: Padding(
            padding: const EdgeInsets.only(top: 12.0),
            child: catPhotos.length == 0
                ? Center(
                    child: CircularProgressIndicator(),
                  )
                : StaggeredGridView.countBuilder(
                    crossAxisCount: 4,
                    staggeredTileBuilder: (index) => catPhotoTiles[index],
                    itemCount: catPhotos.length,
                    itemBuilder: (context, index) {
                      return catPhotos[index];
                    })));
  }
The CatProvider refresh() function only calls getTwentyRandomPhoto() again.
void refreshGird() {
getTwentyRandomPhoto();
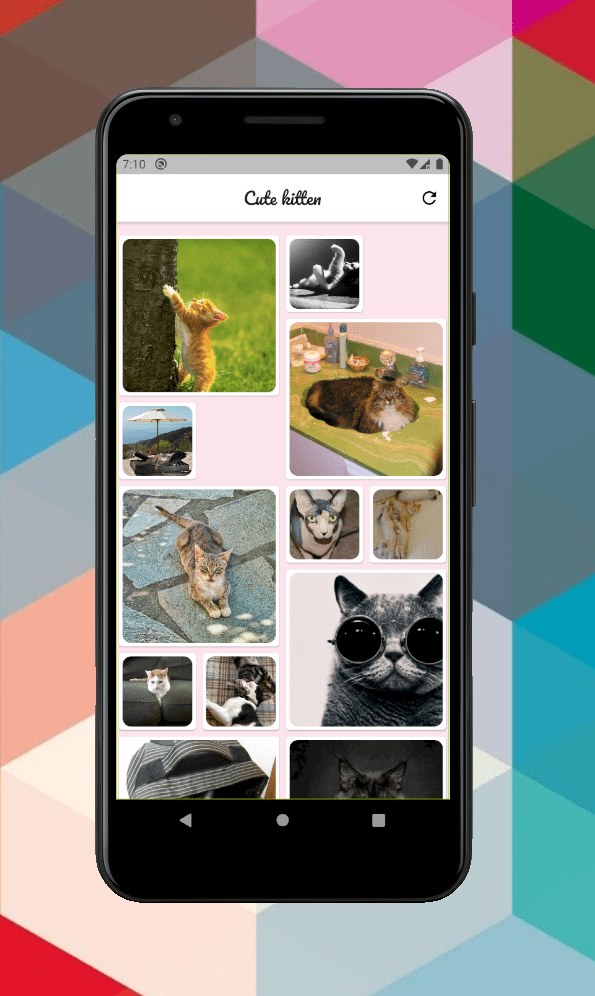
}
Now, whenever we press the refresh button, a new grid of cat photos appears.
You can get the complete code on GitHub from here.

Summary
Keep in mind that the reason it’s important to take time to architect your app is so that you can divide responsibilities and keep each part of the code focused on only its own task. The service call should not worry about a CatPhoto instance or how to display in the UI, and the UI code’s job is to display the widget, not fetch the data in it.
Through the architecture explained above, we divided the responsibilities efficiently among the layers so that a layer only communicates with the layer below and above it. The services class communicates with external APIs and provides its output to the helper. The helper class gets the data from services and provides it to the Provider. Finally, the UI communicates with the provider to get data.
In this architecture, when we want to update something (such as if we want to get the cat photos from another API), we know that only the Services class depends on the API. Similarly, when we want to display a list of images instead of a grid, we know that we only have to update code in the “View” folder, as the application logic is separated from the UI.
I hope you learned a good way of architecting your app. While you should take time on the architecture of your app, keep in mind that as long as it works for your app, it is good enough. Don’t try to over-engineer your app architecture.


