


Cross-platform mobile app development frameworks are usually challenging to test because the testing needs to be done across multiple platforms. Flutter has a rich set of testing features, including unit testing, widget testing and integration testing. In the normal testing pyramid, integration testing is the phase after unit testing where developers test the integration of multiple modules. In the Flutter world, however, integration tests are equivalent to UI tests. It is unclear why UI tests are called integration tests in the Flutter world, but we are going to use UI testing for this tutorial.
In this tutorial, we will cover how to set up UI testing for Flutter apps.
What’s UI Testing?
The purpose of UI testing is to mimic the behaviour of real users. UI tests perform actions on apps as a real user would and cover various user journeys. UI testing can find bugs that cannot be found during lower levels of testing, such as unit testing or integration testing. However, there are certain things you should keep in mind about UI tests:
- UI tests are hard and expensive to write
- UI tests are brittle and hard to maintain
- UI tests go through different layers, like networking, database and API, which cause flakiness.
- UI testing requires different skills and mindsets. Developers usually consider UI tests as unit or integration tests, which is incorrect.
- UI tests require constant maintenance, there is no getting around this. The tests are written according to the current state of your application.
At the moment, there are tools like Appium, XCUITest and Espresso available on the market to perform the UI testing of mobile apps. You can read a comparison of these tools here with regard to different criteria.
In Flutter apps, unit or widget testing covers the testing of individual modules, but it doesn’t cover how to piece the work together. In order to perform the end-to-end testing of apps, UI testing is needed.
How does UI Testing Work in Flutter?
In the Flutter world, UI testing is referred to as integration testing. Flutter integration tests are similar to Xcode UI tests or Android Espresso tests which go through the UI to perform specific operations. Flutter integration tests run in a separate process and can be run on real devices or on simulators or emulators. Flutter provides a separate package, flutter driver, to drive these tests.
The Dart package flutter_driver is being used for the UI testing of Flutter apps. This library provides an API to test Flutter apps in real devices, simulators or emulators. The UI testing of Flutter apps works like this:
- Flutter UI tests run as black boxes. The tests run in a separate thread from the main app.
- Flutter UI tests cannot access the data or API of the main Flutter apps which brings additional challenges to testing the UI of Flutter apps.
- Flutter UI tests work as a pair. First, you have to create an instrumented version of the app and deploy it in the emulator, simulator or real device. After that, you need to drive the app from the test suite. The flutter_driver is used to create an instrumented app and drive that app from the test suit.
- Flutter Driver tests start a local server where you can see the test logs.
Enabling Flutter UI Tests
While setting up a new Flutter project, the default Flutter template doesn’t include UI testing support. You have to explicitly add UI testing support for your Flutter apps if you want it. In order to enable UI testing for the existing Flutter apps, we need to perform the following tasks:
- Get the flutter_driver package
- Set up a test directory
- Create an instrumented app for testing
- Write UI tests using flutter_driver API
- Execute the UI tests in the real device or simulator
Let’s cover each of these steps in detail.
Get the flutter_driver Package
The first step to enable UI testing support for the Flutter app is to get the flutter_driver package. In order to do this, you need to add flutter_diver dependency to the dev_dependencies section of your pubspec.yaml file.
dev_dependencies:
flutter_driver:
sdk: flutter
Once you have added this to your pubspec.yaml file, run the following command to download the package:
flutter packages upgrade
This will download the latest version of the flutter_driver package and lock the version in the pubpec.lock file. You now have a flutter_driver package in your project.
Set up the UI test directory
You now have to create a separate test directory for the UI testing of Flutter apps. The directory is usually called test_driver, but you can rename it something else. Inside that directory, we have two files: one for an instrumented app and another for the actual UI tests for the instrumented app. Let’s create main.dart for the instrumented app and main_test.dart for the actual UI test. You can usually achieve that by running these commands:
mkdir test_driver
touch test_driver/main.dart
touch test_driver/main_test.dart
You’ve now got a test directory with test files inside. At the moment, you’ve got blank files, but we will add code later.
Creating an Instrumented App
In order to create an instrumented app, you need to enable the Flutter driver extension and run the app. Ideally, you can run your main app. Let’s add the following code to the test_driver/main.dart file:
import 'package:flutter_driver/driver_extension.dart';
import 'package:flutter_demo/main.dart' as app;

void main() {
    enableFlutterDriverExtension();
    app.main();
}
Now, this code will enable the instrumented version of the app.
Writing the UI Test
Once you’ve got an instrumented app, you can write UI tests using the Flutter Driver package. As for the Flutter documentation on writing UI tests, there are four steps. As an example, we will use the Codemagic-Demo app, which is the default Flutter app. The app counts the number of clicks on the plus button. We will write a UI test to verify that the default text is present on the home screen. The test involves the following stages:
- Connect the App to the device in the setup
- Disconnect the app in the teardown method
- Use SerializableFinder to find the widget
- Use expect to assert the message
The test will look like this in the main_test.dart:
void main() {
    group('Home Screen Test', () {
        FlutterDriver driver;
        setUpAll(() async {
            // Connects to the app
            driver = await FlutterDriver.connect();
        });
        tearDownAll(() async {
            if (driver != null) {
                // Closes the connection
                driver.close();
            }
        });
        test('verify the text on home screen', () async {
            SerializableFinder message = find.text("You have pushed the button this many times:");
            await driver.waitFor(message);
            expect(await driver.getText(message), "You have pushed the button this many times:");
        });
    });
}
Running the Test
You need to have a device or simulator connected before executing the test.
Once the device is ready, you can run the test using the following command:
flutter driver --target test_driver/main_test.dart
This command will execute the UI tests in the real device. The following things will happen when you run the test:
- The Flutter driver connects the app to http://127.0.0.1:50669/
- It starts to receive the commands from the driver and act accordingly.
- Once the test finishes the connection is destroyed.
The test logs look like this:
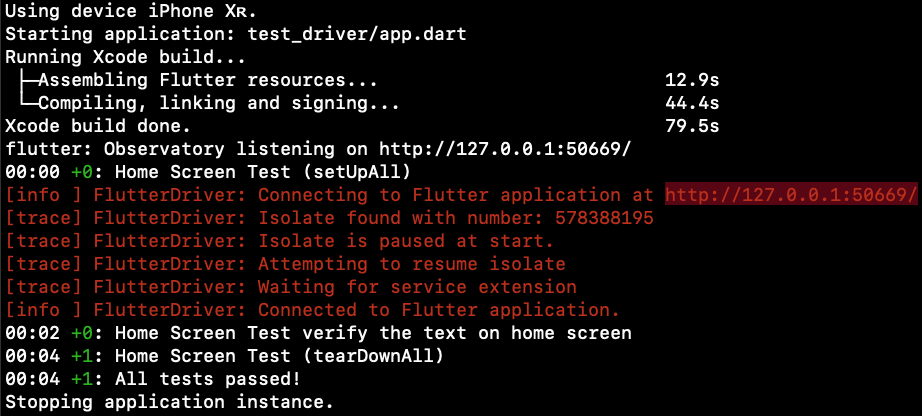
You have now successfully executed the UI test in the local device.
Running UI Tests on Codemagic CI
Codemagic is an official CI/CD solution for Flutter apps. The process of setting up the tests on a CI server usually requires some setup and configuration, but with Codemagic it is entirely painless, since:
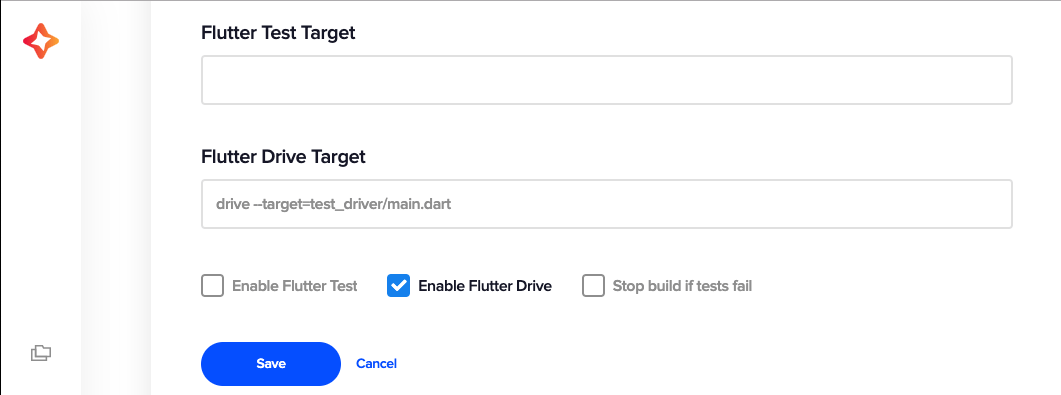
- Codemagic analyses the Flutter project and provides an option to enable Flutter tests;
- Codemagic scans the code for integration tests and provides an option to enable Flutter driver tests.
Codemagic has become the de facto tool for CI/CD of Flutter apps. Codemagic’s getting started guide covers the onboarding process of Flutter apps. You just need a Flutter app with UI tests. Codemagic will detect your Flutter project and tests. You don’t have to explicitly do anything to enable the testing of the Flutter app unless your tests use a custom configuration. You can also enable the UI test from the app settings of Codemagic.
Once the test has finished executing, we can see the test logs and driver logs from Codemagic.
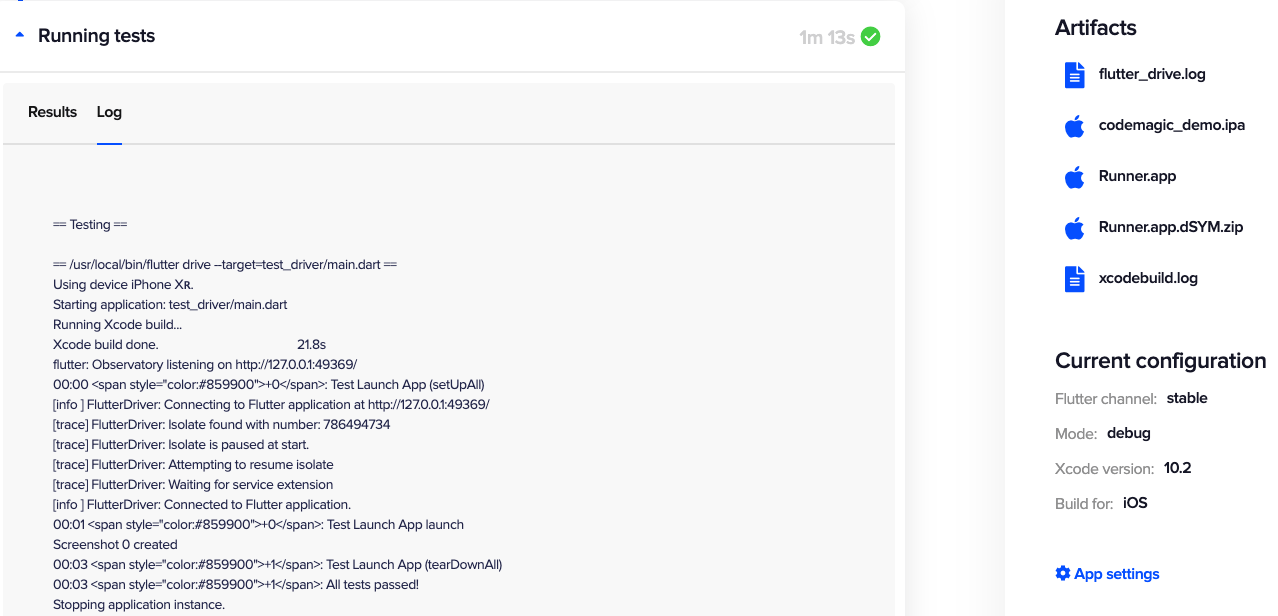
In this tutorial, we used the demo app Codemagic-Demo which has UI tests and has successfully executed UI tests locally as well as on Codemagic CI.
Flutter UI Testing - Current Limitation
Although Flutter UI testing is a powerful feature for testing apps like a real user, there are some limitations to UI testing at the moment:
- Flutter UI tests take a lot of time to execute as they involve connecting to the local server and re-building the app.
- Flutter UI tests aren’t supported by any real device testing providers, like Firebase Test Labs, Sauce Labs, Amazon Device Farm or Bitbar. They still don’t accept Flutter testing bundles as an input to execute the test on real devices.
- Mocking and Stubbing UI tests aren’t as easy as unit and widget tests. Mockito cannot be used to mock the responses, as Flutter UI tests run in a separate process from the main app.
- Flutter UI testing requires knowledge of Dart, so it is very challenging for automation engineers to learn Dart and use Flutter Driver to enable UI testing.
Conclusion
UI testing is a great feature supported by Flutter framework and it works like a charm. Flutter UI testing can find bugs in an application before it hits production. However, there are still certain challenges to be addressed in order to fully enable the UI testing of Flutter apps. Have you enabled UI testing for your Flutter apps? What are your experiences with UI testing? Share your thoughts with us @codemagicio.


