


This article was updated to incorporate Flutter 2 in March 2021. Written by Souvik Biswas.
Welcome to the third part of the Flutter web article series. Previously, you learned how to make a Flutter web app responsive as well as how to add animations and dynamic theming support to it.
If you are not familiar with the previous two articles, you can check them out here:
In this article, I will cover a really important topic – authentication for your web app. If you want to create any kind of web app for a practical use case, you will definitely need it. In-app authentication is necessary if you want to restrict users based on their access levels. It also helps to provide a more personalized experience for your users.
In this article, we will mainly look into two types of user authentication:
- Authentication via email and password
- Authentication via Google Sign-In
I will be using Firebase Authentication for our purposes, as it is very easy to use with very minimal setup.
You might already be familiar with Firebase Authentication for Flutter mobile apps, but keep reading because integrating Firebase with Flutter web is a bit different.

So, let’s get started, but first, let us know what’s your relationship with CI/CD tools?
Creating a new Firebase project
You need to create a new Firebase project in order to get access to Firebase’s services.
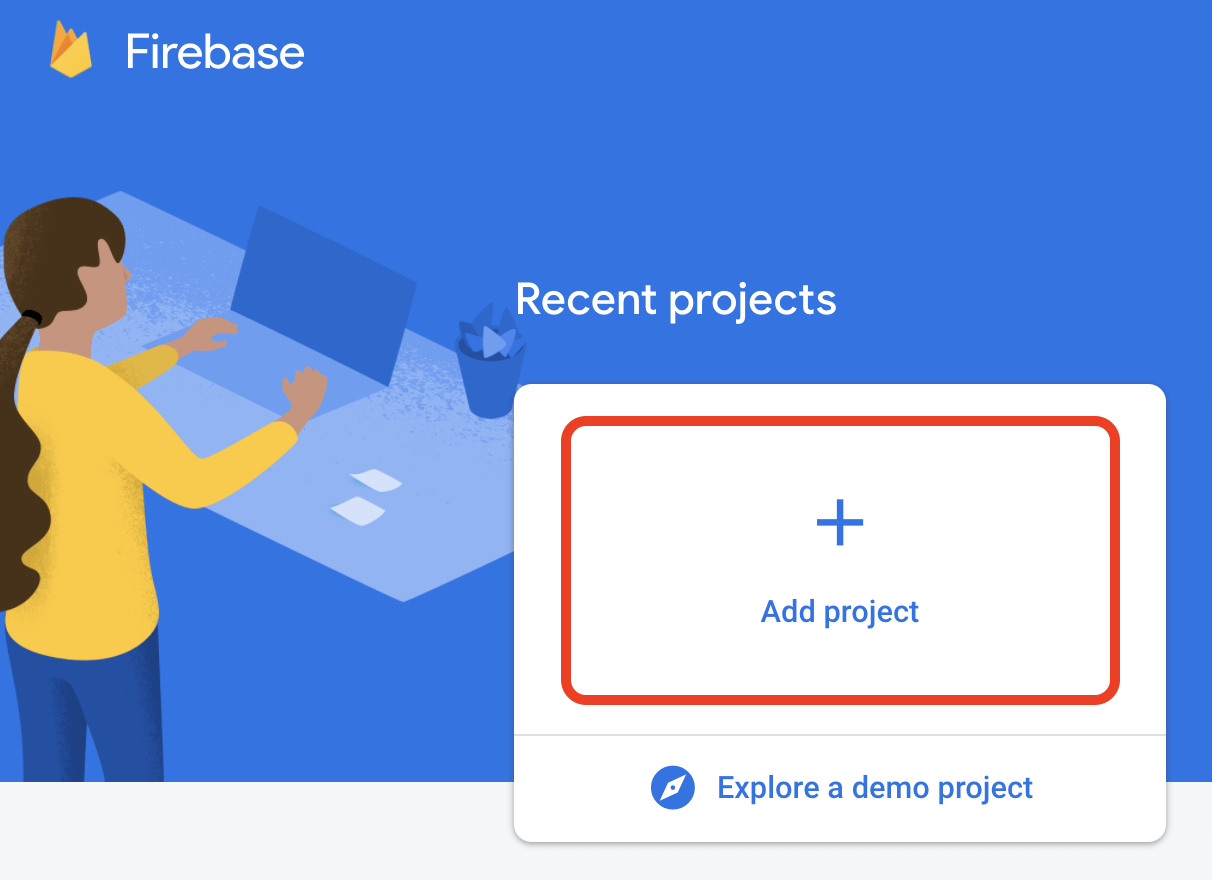
Go to Firebase console.
Sign in with your Google account.
Click on Add project.
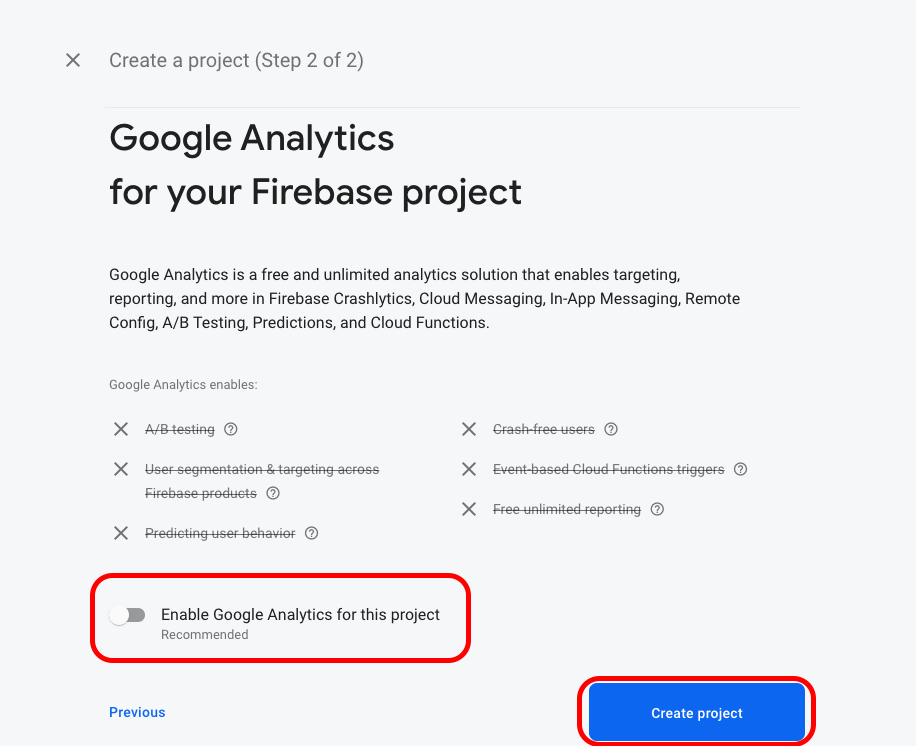
Enter a Project name and click Continue.

Turn off Google Analytics for this project and click Create project.
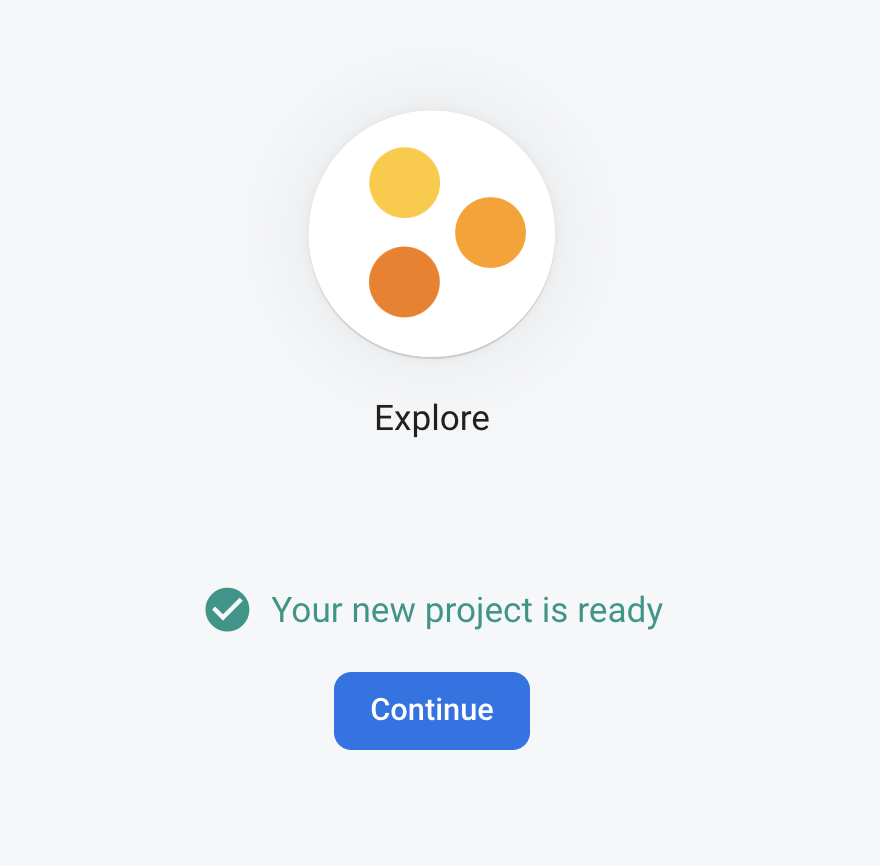
Wait for the creation process to complete, and then click Continue.
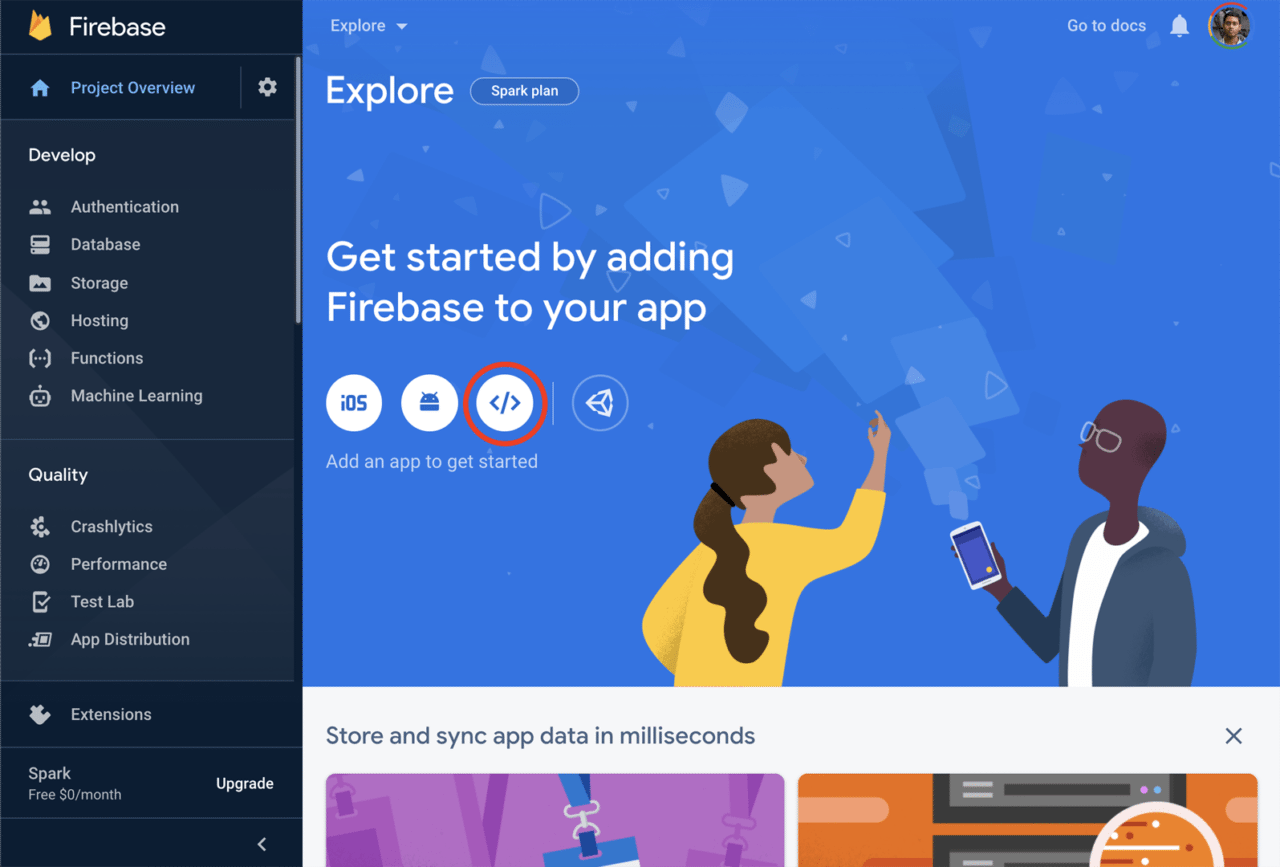
This will lead you to the Project Overview page. From here, you will be able to set up Firebase for your web app.

Configuring Firebase for web
Your new Firebase project has been created, and you can proceed to set up Firebase for your web app.
Select the Web icon on the Project Overview page. (I’ve circled it in red.)
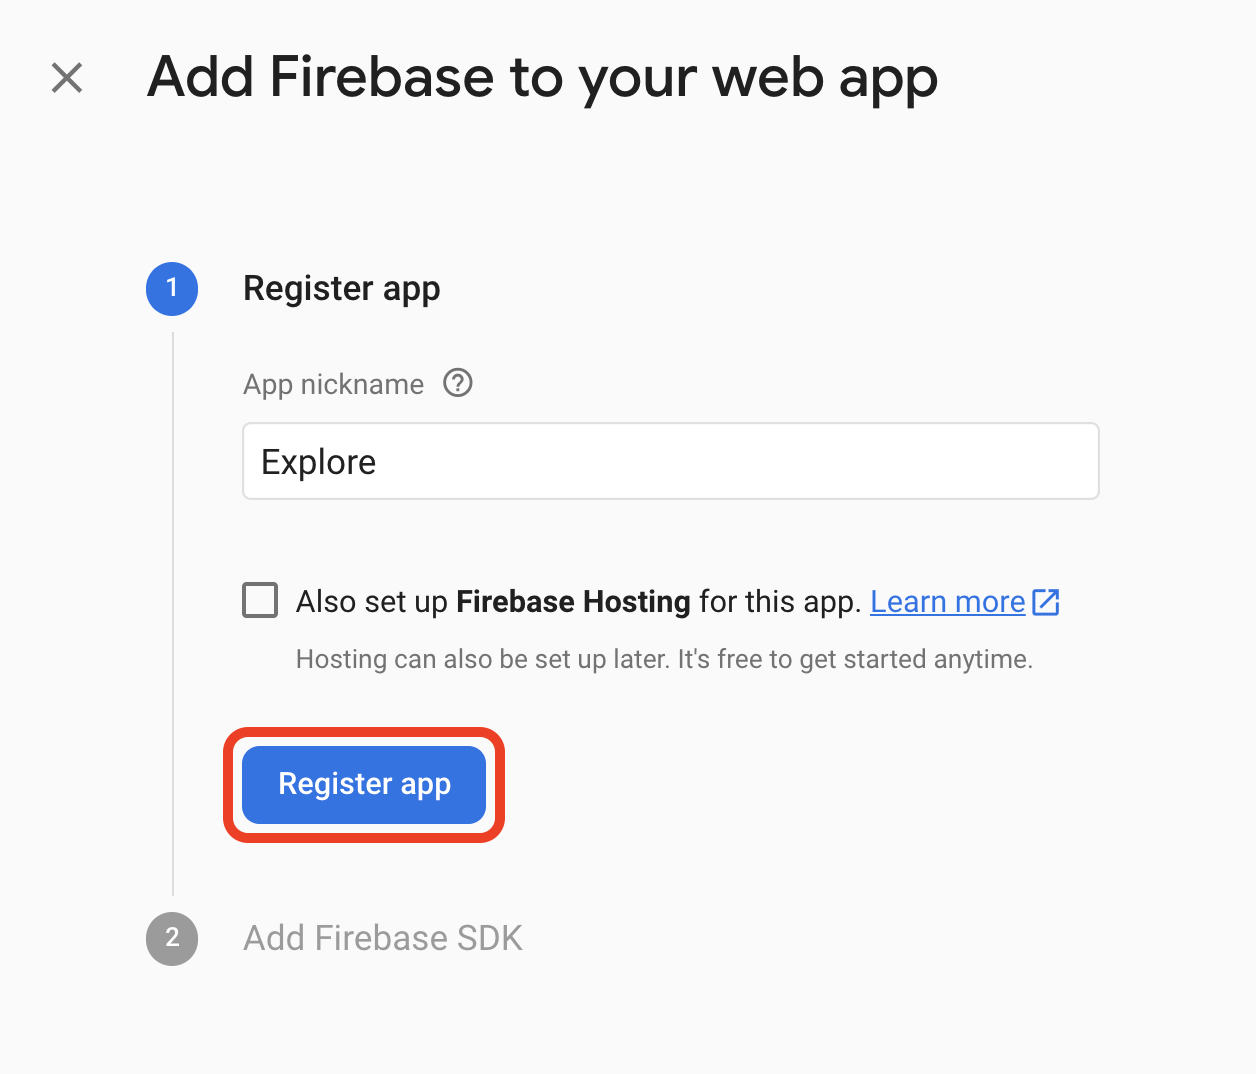
Choose a nickname for your app (App nickname), and click on Register app.
Copy the script.
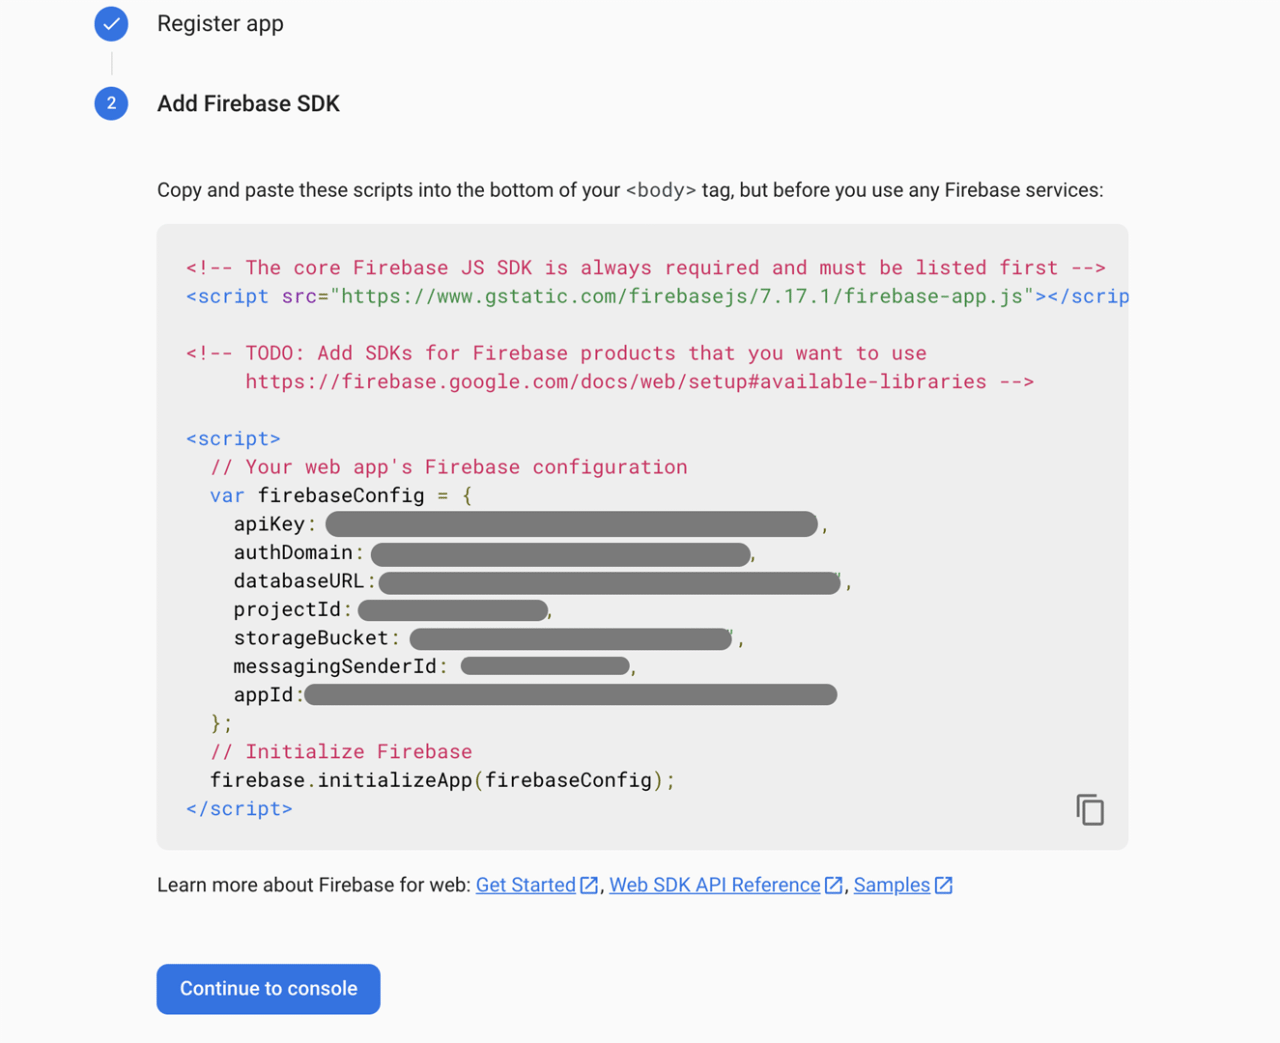
Navigate to root project directory –> web –> index.html, and paste the script into the
bodytag before yourmain.dart.jsscript.<!DOCTYPE html> <html> <!-- ... --> <body> <!-- ... --> <!-- ADD THIS BEFORE YOUR main.dart.js SCRIPT --> <!-- The core Firebase JS SDK (always required for using any Firebase service) --> <script src="https://www.gstatic.com/firebasejs/7.20.0/firebase-app.js"></script> <!-- Firebase Auth SDK --> <script src="https://www.gstatic.com/firebasejs/7.20.0/firebase-auth.js"></script> <script> // Your web app's Firebase configuration var firebaseConfig = { apiKey: '...', authDomain: '...', databaseURL: '...', projectId: '...', storageBucket: '...', messagingSenderId: '...', appId: '...', } // Initialize Firebase firebase.initializeApp(firebaseConfig) </script> <!-- END OF FIREBASE INIT CODE --> <script src="main.dart.js" type="application/javascript"></script> </body> </html>Click Continue to console.
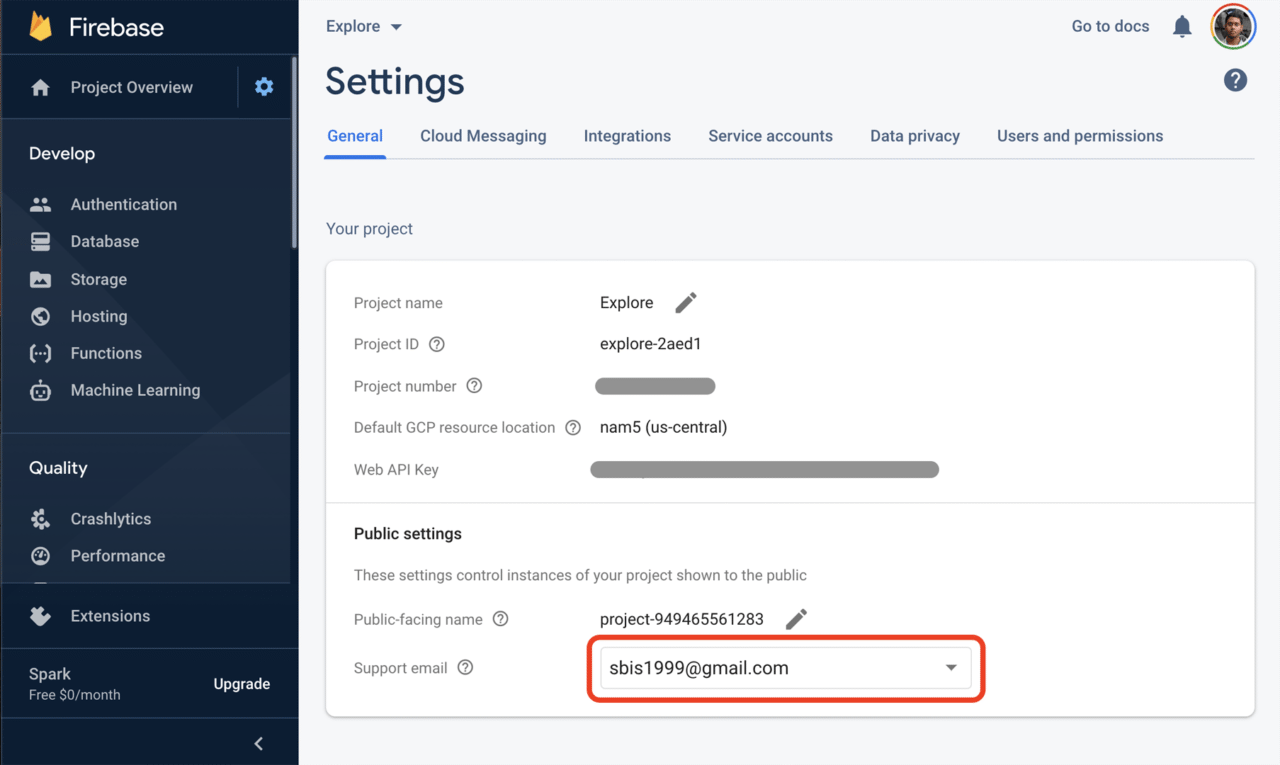
Go to your Project settings.
Under the General tab, select your Support email.
Let’s start integrating Firebase Authentication with our Flutter app.
Integrating Firebase Authentication into Flutter web
Add the firebase_core and firebase_auth plugins to your
pubspec.yamlfile.The web implementations of these plugins, i.e., firebase_core_web and firebase_auth_web, are automatically added to your dependencies.
dependencies:
  firebase_core: ^1.0.2
  firebase_auth: ^1.0.1
Create a new Dart file called
authentication.dartin the pathlib/utils.Import the packages:
import 'package:firebase_core/firebase_core.dart';
import 'package:firebase_auth/firebase_auth.dart';
Create an instance of
FirebaseAuth, and add a few variables that we will use later:final FirebaseAuth _auth = FirebaseAuth.instance; String? uid; String? userEmail;
Authenticating using email and password
You will first need to register the user using email and password, and then they can log in using the proper credentials.
To register a new user, you can use the method createUserWithEmailAndPassword provided by FirebaseAuth.
We will define a new function called registerWithEmailPassword that will handle the whole process of registering a new user. This function will contain two parameters, an email and a password, which will be used to authenticate the user.
Future<User?> registerWithEmailPassword(String email, String password) async {
  // Initialize Firebase
  await Firebase.initializeApp();
  User? user;

  try {
    UserCredential userCredential = await _auth.createUserWithEmailAndPassword(
      email: email,
      password: password,
    );

    user = userCredential.user;

    if (user != null) {
      uid = user.uid;
      userEmail = user.email;
    }
  } catch (e) {
    print(e);
  }

  return user;
}
Instead of using a single catch for handling any type of error, it is recommended to handle the Firebase authentication exceptions separately.
Future<User?> registerWithEmailPassword(String email, String password) async {
  try {
    // ...
  } on FirebaseAuthException catch (e) {
    if (e.code == 'weak-password') {
      print('The password provided is too weak.');
    } else if (e.code == 'email-already-in-use') {
      print('An account already exists for that email.');
    }
  } catch (e) {
    print(e);
  }
}
After a user is successfully registered, they can log in using their correct credentials. You can use the method signInWithEmailAndPassword provided by FirebaseAuth to authenticate the login process.
We will define another function called signInWithEmailPassword for handling the login process.
Future<User?> signInWithEmailPassword(String email, String password) async {
  await Firebase.initializeApp();
  User? user;

  try {
    UserCredential userCredential = await _auth.signInWithEmailAndPassword(
      email: email,
      password: password,
    );
    user = userCredential.user;

    if (user != null) {
      uid = user.uid;
      userEmail = user.email;

      SharedPreferences prefs = await SharedPreferences.getInstance();
      await prefs.setBool('auth', true);
    }
  } on FirebaseAuthException catch (e) {
    if (e.code == 'user-not-found') {
      print('No user found for that email.');
    } else if (e.code == 'wrong-password') {
      print('Wrong password provided.');
    }
  }

  return user;
}
Shared Preferences is used for caching the login status. This will be helpful while we set up auto-login in our web app. Even here, we have handled some Firebase authentication exceptions that may occur while a user is trying to log in.
Let’s also define a handy function for signing out of an account.
Future<String> signOut() async {
  await _auth.signOut();

  SharedPreferences prefs = await SharedPreferences.getInstance();
  prefs.setBool('auth', false);

  uid = null;
  userEmail = null;

  return 'User signed out';
}
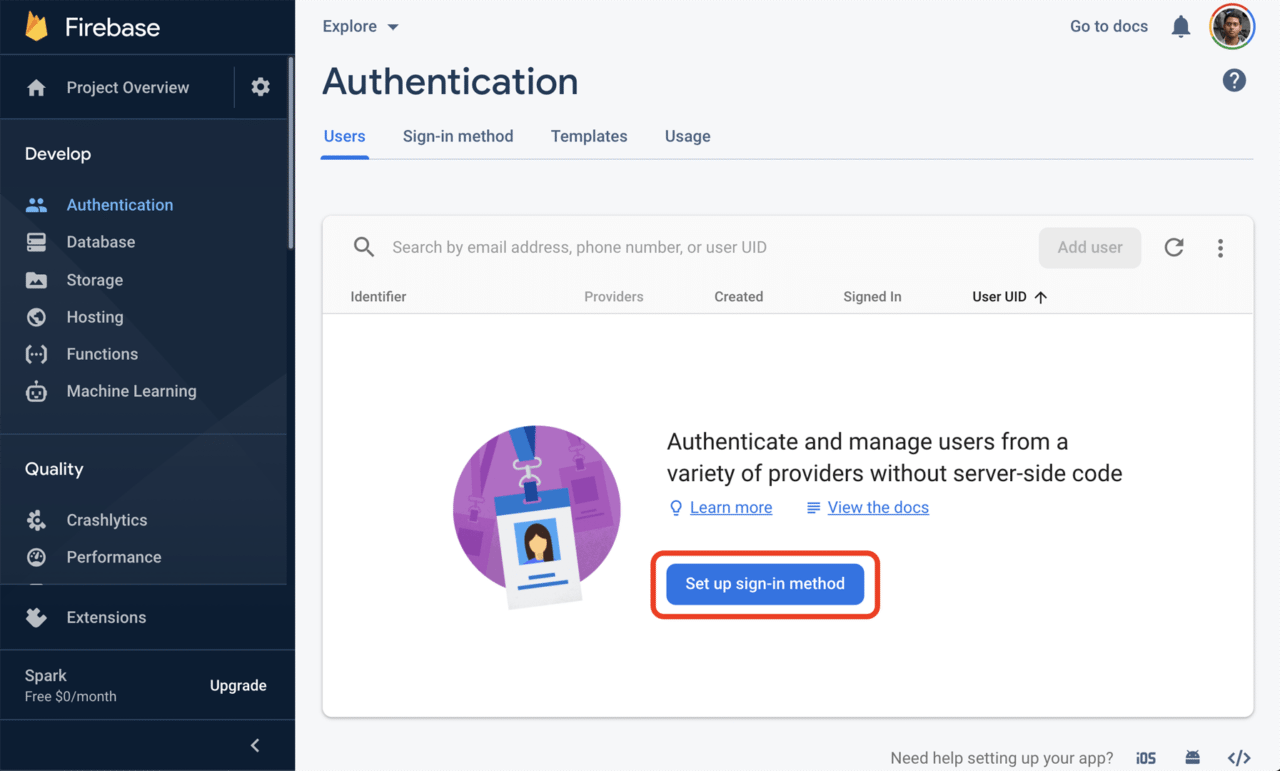
In order to use email and password authentication from your Flutter web app, you will have to enable it in the Firebase Authentication settings.
Open your project page on Firebase.
Go to Authentication from the left-side menu, and then under the Users tab, click on Set up sign-in method.
Go to the Sign-in method tab, and enable Email/Password from the Sign-in providers list.
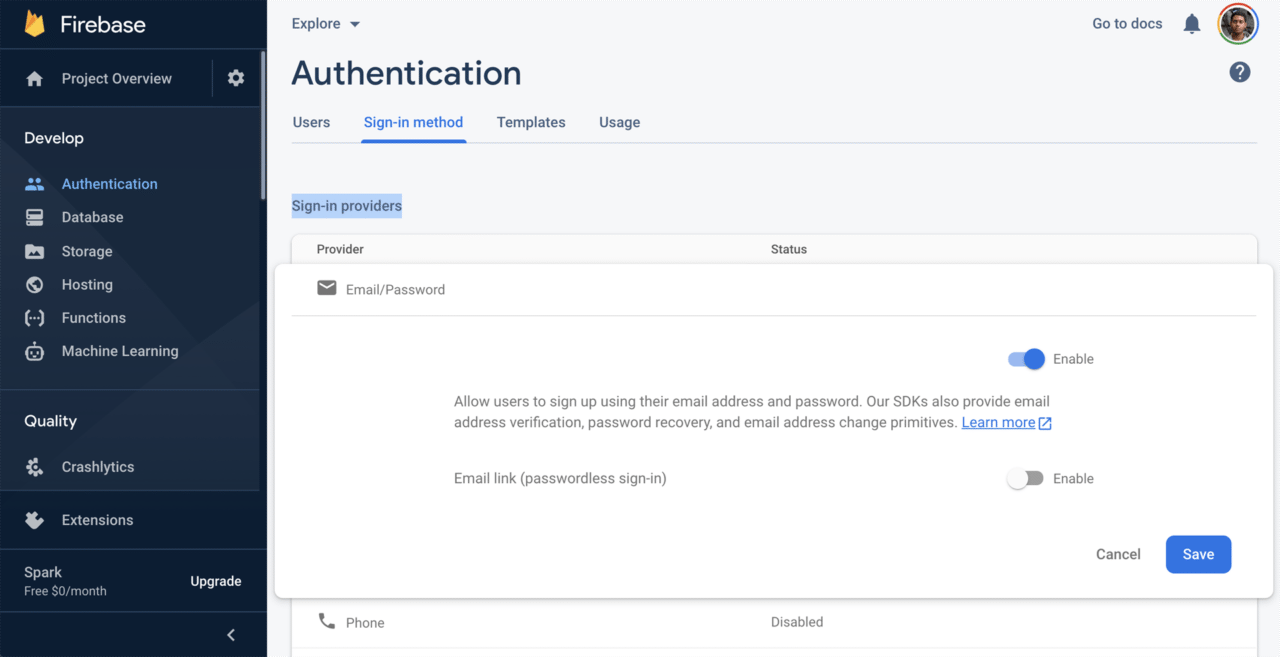
Click Save.
Authenticating using Google Sign-In
Add the google_sign_in plugin to your
pubspec.yamlfile.The web implementation of this plugin, i.e., google_sign_in_web, is automatically added to your dependencies.
dependencies:
  google_sign_in: ^5.0.1
Import the package in your
authentication.dartfile:import 'package:google_sign_in/google_sign_in.dart';Create an instance of
GoogleSignIn, and add a few more variables:final GoogleSignIn googleSignIn = GoogleSignIn(); String? name; String? imageUrl;Define a new function called
signInWithGoogle, which we will use to handle the Google Sign-In process:Future<String> signInWithGoogle() async { // Initialize Firebase await Firebase.initializeApp(); User? user; // The `GoogleAuthProvider` can only be used while running on the web GoogleAuthProvider authProvider = GoogleAuthProvider(); try { final UserCredential userCredential = await _auth.signInWithPopup(authProvider); user = userCredential.user; } catch (e) { print(e); } if (user != null) { uid = user.uid; name = user.displayName; userEmail = user.email; imageUrl = user.photoURL; SharedPreferences prefs = await SharedPreferences.getInstance(); prefs.setBool('auth', true); } return user; }In the above implementation, the
signInWithGooglemethod will only work on the web, as theGoogleAuthProviderclass is only accessible while running on the web. If you are looking for user authentication on Flutter mobile apps, check out this article.Next, define a handy function for signing out of Google:
void signOutGoogle() async {
  await googleSignIn.signOut();
  await _auth.signOut();

  SharedPreferences prefs = await SharedPreferences.getInstance();
  prefs.setBool('auth', false);

  uid = null;
  name = null;
  userEmail = null;
  imageUrl = null;

  print("User signed out of Google account");
}
In order to authenticate using Google Sign-In from your Flutter web app, you will have to enable it in the Firebase Authentication settings.
Open your project page on Firebase.
Go to Authentication –> Sign-in method.
Enable Google from the Sign-in providers list, and enter a project name.
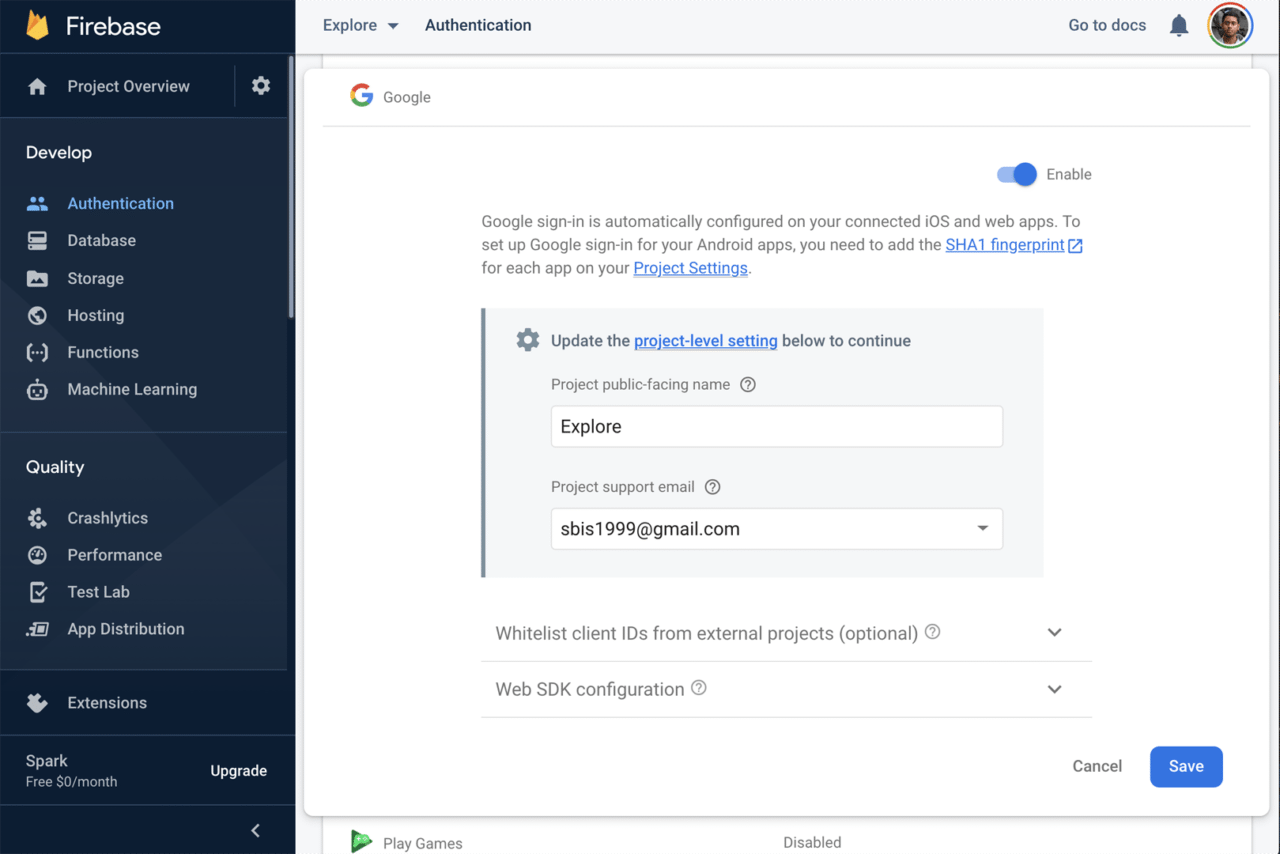
Click Save.
We have successfully configured both types of authentication for our web app and have also defined all the functions required for handling user registration and login.
Now, we can move on and integrate them with the UI of our Flutter web app.
Building the AuthDialog UI
We will be showing a dialog box for the authentication UI. Users can either log in using email and password or using Google Sign-In.
Create a new file called auth_dialog.dart in the path lib/widgets. Inside it, define a StatefulWidget called AuthDialog. It will mainly consist of two TextField widgets, Log in and Sign up buttons, and a button for using Google Sign-In.
// The basic skeleton structure of the widget

class AuthDialog extends StatefulWidget {
  @override
  _AuthDialogState createState() => _AuthDialogState();
}

class _AuthDialogState extends State<AuthDialog> {
  @override
  Widget build(BuildContext context) {
    return Dialog(
      // ...
      child: SingleChildScrollView(
        child: Padding(
          padding: const EdgeInsets.all(16.0),
          child: Container(
            child: Column(
              crossAxisAlignment: CrossAxisAlignment.start,
              mainAxisSize: MainAxisSize.min,
              children: [
                Text('Email address'),
                TextField(hintText: "Email"),
                Text('Password'),
                TextField(hintText: "Password"),
                Row(
                  mainAxisSize: MainAxisSize.max,
                  mainAxisAlignment: MainAxisAlignment.spaceAround,
                  children: [
                    Flexible(
                      flex: 1,
                      child: Container(
                        width: double.maxFinite,
                        child: TextButton(
                          onPressed: () {},
                          child: Text(
                            'Log in',
                            style: TextStyle(fontSize: 14, color: Colors.white),
                          ),
                        ),
                      ),
                    ),
                    Flexible(
                      flex: 1,
                      child: Container(
                        width: double.maxFinite,
                        child: TextButton(
                          onPressed: () {},
                          child: Text(
                            'Sign up',
                            style: TextStyle(fontSize: 14, color: Colors.white),
                          ),
                        ),
                      ),
                    ),
                  ],
                ),
                Center(child: GoogleButton()),
              ],
            ),
          ),
        ),
      ),
    );
  }
}
Email and password TextField(s)
Let’s take a better look at the TextField widgets. Here, I am showing only the email text field. You can define the password text field in a similar manner.
Define a
TextEditingController, aFocusNodeand a boolean to track whether the text field is being used.late TextEditingController textControllerEmail; late FocusNode textFocusNodeEmail; bool _isEditingEmail = false;Initialize them:
@override
void initState() {
  textControllerEmail = TextEditingController();
  textControllerEmail.text = '';
  textFocusNodeEmail = FocusNode();
  super.initState();
}
Define a method to validate an email address:
String? _validateEmail(String value) {
  value = value.trim();

  if (textControllerEmail.text.isNotEmpty) {
    if (value.isEmpty) {
      return 'Email can\'t be empty';
    } else if (!value.contains(RegExp(
        r"^[a-zA-Z0-9.a-zA-Z0-9.!#$%&'*+-/=?^_`{|}~]+@[a-zA-Z0-9]+\.[a-zA-Z]+"))) {
      return 'Enter a correct email address';
    }
  }

  return null;
}
The email
TextFieldwidget should look like this:TextField( focusNode: textFocusNodeEmail, keyboardType: TextInputType.emailAddress, textInputAction: TextInputAction.next, controller: textControllerEmail, autofocus: false, onChanged: (value) { setState(() { _isEditingEmail = true; }); }, onSubmitted: (value) { textFocusNodeEmail.unfocus(); FocusScope.of(context).requestFocus(textFocusNodePassword); }, style: TextStyle(color: Colors.black), decoration: InputDecoration( border: new OutlineInputBorder( borderRadius: BorderRadius.circular(10), borderSide: BorderSide( color: Colors.blueGrey[800]!, width: 3, ), ), filled: true, hintStyle: new TextStyle( color: Colors.blueGrey[300], ), hintText: "Email", fillColor: Colors.white, errorText: _isEditingEmail ? _validateEmail(textControllerEmail.text) : null, errorStyle: TextStyle( fontSize: 12, color: Colors.redAccent, ), ), )
Log in and Sign up buttons
The following is the code for the Log in button, which invokes the function registerWithEmailPassword that we defined earlier.
TextButton(
  style: TextButton.styleFrom(
    primary: Colors.blueGrey.shade800,
    shape: RoundedRectangleBorder(
      borderRadius: BorderRadius.circular(15),
    ),
  ),
  onPressed: () async {
    setState(() {
      _isRegistering = true;
    });
    await registerWithEmailPassword(
            textControllerEmail.text,
            textControllerPassword.text)
        .then((result) {
      if (result != null) {
        setState(() {
          loginStatus =
              'You have registered successfully';
          loginStringColor = Colors.green;
        });
        print(result);
      }
    }).catchError((error) {
      print('Registration Error: $error');
      setState(() {
        loginStatus =
            'Error occured while registering';
        loginStringColor = Colors.red;
      });
    });

    setState(() {
      _isRegistering = false;
    });
  },
  child: Padding(
    padding: EdgeInsets.only(
      top: 15.0,
      bottom: 15.0,
    ),
    child: _isRegistering
        ? SizedBox(
            height: 16,
            width: 16,
            child: CircularProgressIndicator(
              strokeWidth: 2,
              valueColor:
                  new AlwaysStoppedAnimation<Color>(
                Colors.white,
              ),
            ),
          )
        : Text(
            'Sign up',
            style: TextStyle(
              fontSize: 14,
              color: Colors.white,
            ),
          ),
  ),
),
The UI code for the Sign up button will be similar to this. The main difference is that you have to invoke the function signInWithEmailPassword.
Google Sign-In button
You will need an image to design the Google Sign-In button. Download it from here.
Add it in the path assets/images, and import it using the pubspec.yaml file:
flutter:
  assets:
    - assets/images/
The UI code for the button is as follows:
class GoogleButton extends StatefulWidget {
  @override
  _GoogleButtonState createState() => _GoogleButtonState();
}

class _GoogleButtonState extends State<GoogleButton> {
  bool _isProcessing = false;

  @override
  Widget build(BuildContext context) {
    return DecoratedBox(
      decoration: ShapeDecoration(
        shape: RoundedRectangleBorder(
          borderRadius: BorderRadius.circular(20),
          side: BorderSide(color: Colors.blueGrey, width: 3),
        ),
        color: Colors.white,
      ),
      child: OutlinedButton(
        style: OutlinedButton.styleFrom(
          primary: Colors.blueGrey.shade100,
          shape: RoundedRectangleBorder(
            borderRadius: BorderRadius.circular(20),
            side: BorderSide(color: Colors.blueGrey, width: 3),
          ),
          elevation: 0,
        ),
        onPressed: () async {
          setState(() {
            _isProcessing = true;
          });
          await signInWithGoogle().then((result) {
            print(result);
            if (result != null) {
              Navigator.of(context).pop();
              Navigator.of(context).pushReplacement(
                MaterialPageRoute(
                  fullscreenDialog: true,
                  builder: (context) => HomePage(),
                ),
              );
            }
          }).catchError((error) {
            print('Registration Error: $error');
          });
          setState(() {
            _isProcessing = false;
          });
        },
        child: Padding(
          padding: const EdgeInsets.fromLTRB(0, 10, 0, 10),
          child: _isProcessing
              ? CircularProgressIndicator(
                  valueColor: new AlwaysStoppedAnimation<Color>(
                    Colors.blueGrey,
                  ),
                )
              : Row(
                  mainAxisSize: MainAxisSize.min,
                  mainAxisAlignment: MainAxisAlignment.center,
                  children: <Widget>[
                    Image(
                      image: AssetImage("assets/images/google_logo.png"),
                      height: 30.0,
                    ),
                    Padding(
                      padding: const EdgeInsets.only(left: 20),
                      child: Text(
                        'Continue with Google',
                        style: TextStyle(
                          fontSize: 20,
                          color: Colors.blueGrey,
                        ),
                      ),
                    )
                  ],
                ),
        ),
      ),
    );
  }
}
Updating the HomePage UI
We have to make changes in two places for integrating the AuthDialog widget: in the top bar (for large screens) and the drawer (for small screens).
To show the dialog box, make a call to the showDialog method from the onTap of the Sign in button.
InkWell(
  onTap: userEmail == null
      ? () {
          showDialog(
            context: context,
            builder: (context) => AuthDialog(),
          );
        }
      : null,

  // ...
)
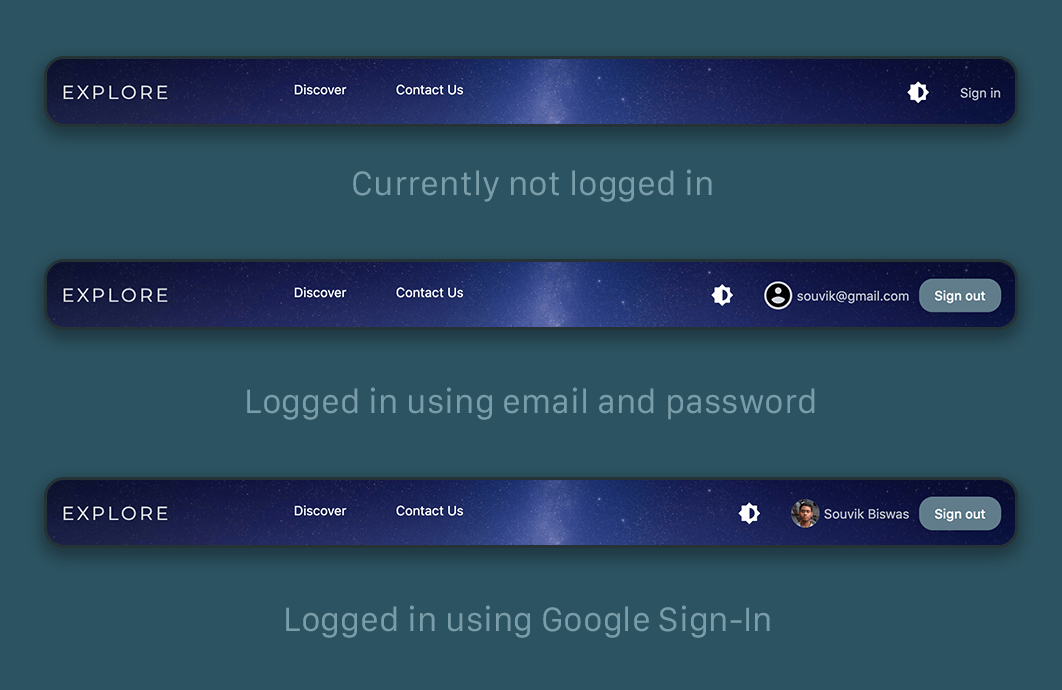
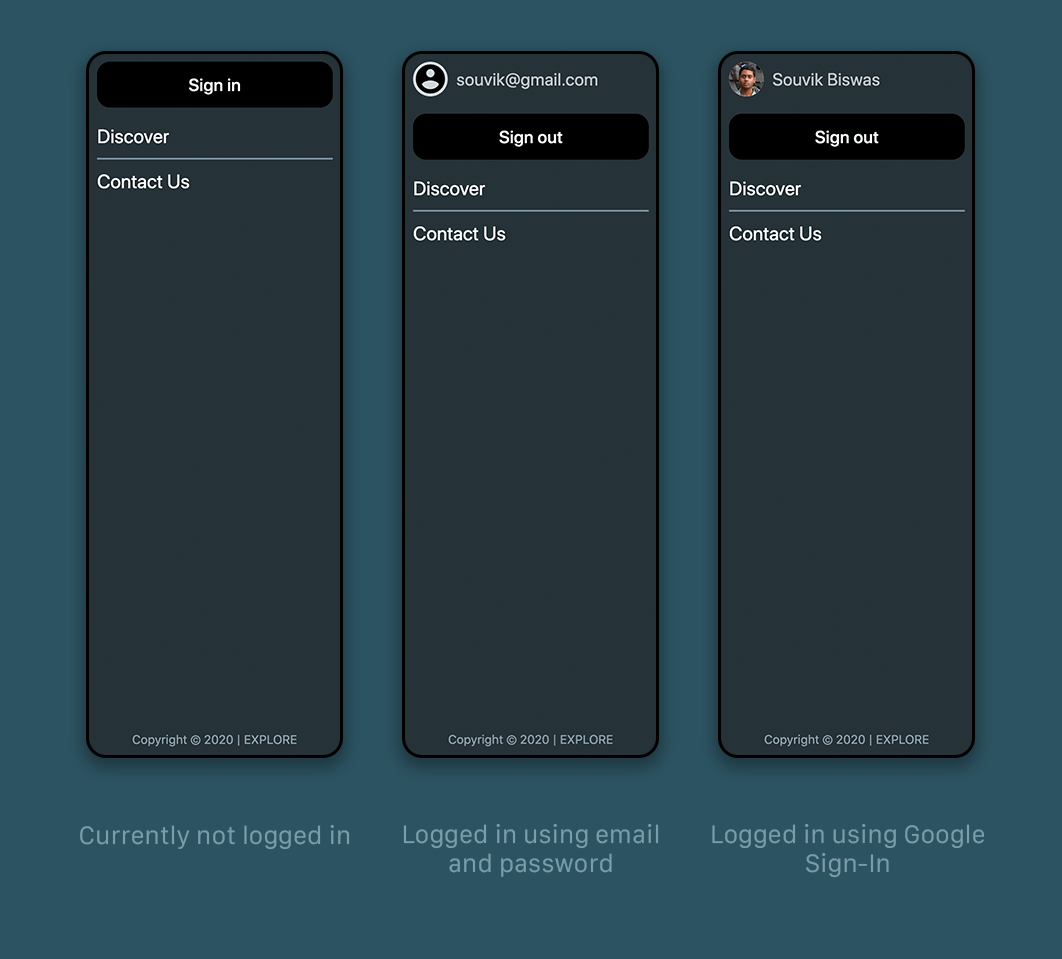
Update the child of the InkWell to show the Sign in button only when the user is not signed in already; otherwise, display the user profile picture (if present), user email/name and a Sign out button.
If the user is logged in, the
userEmailwill be non-null, irrespective of the authentication method.
// Code for the Sign in button, present in the top bar

InkWell(
  child: userEmail == null
      ? Text(
          'Sign in',
          style: TextStyle(
            color: _isHovering[3] ? Colors.white : Colors.white70,
          ),
        )
      : Row(
          children: [
            CircleAvatar(
              radius: 15,
              backgroundImage: imageUrl != null
                  ? NetworkImage(imageUrl)
                  : null,
              child: imageUrl == null
                  ? Icon(Icons.account_circle, size: 30)
                  : Container(),
            ),
            Text(
              name ?? userEmail,
              style: TextStyle(
                color: _isHovering[3]
                    ? Colors.white
                    : Colors.white70,
              ),
            ),
            TextButton(
              // ...
              onPressed: () {},
              child: Text(
                'Sign out',
                style: TextStyle(
                  fontSize: 14,
                  color: Colors.white,
                ),
              ),
            ),
          ],
        ),
),
The full code for the Sign out button is as follows:
TextButton(
  style: TextButton.styleFrom(
    primary: Colors.blueGrey,
    shape: RoundedRectangleBorder(
      borderRadius: BorderRadius.circular(15),
    ),
  ),
  onPressed: _isProcessing
      ? null
      : () async {
          setState(() {
            _isProcessing = true;
          });
          await signOut().then((result) {
            print(result);
            Navigator.of(context).pushReplacement(
              MaterialPageRoute(
                fullscreenDialog: true,
                builder: (context) => HomePage(),
              ),
            );
          }).catchError((error) {
            print('Sign Out Error: $error');
          });
          setState(() {
            _isProcessing = false;
          });
        },
  child: Padding(
    padding: EdgeInsets.only(
      top: 8.0,
      bottom: 8.0,
    ),
    child: _isProcessing
        ? CircularProgressIndicator()
        : Text(
            'Sign out',
            style: TextStyle(
              fontSize: 14,
              color: Colors.white,
            ),
          ),
  ),
)
You have to make similar code changes to the Drawer (which is displayed only on small screens).
The code changes for the Drawer are available here.
Auto-login
In order to prevent users from having to log in every time they come back to your web app or reload the web page, you can cache their login status and auto-login when they come back to your web app.
Define a new function in the
authentication.dartfile calledgetUserto retrieve the user’s information if they have already logged in previously:Future getUser() async { // Initialize Firebase await Firebase.initializeApp(); SharedPreferences prefs = await SharedPreferences.getInstance(); bool authSignedIn = prefs.getBool('auth') ?? false; final User? user = _auth.currentUser; if (authSignedIn == true) { if (user != null) { uid = user.uid; name = user.displayName; userEmail = user.email; imageUrl = user.photoURL; } } }Modify the MyApp defined in the
main.dartfile to aStatefulWidget, and define a method calledgetUserInfoto invoke thegetUserfunction:class MyApp extends StatefulWidget { @override _MyAppState createState() => _MyAppState(); } class _MyAppState extends State<MyApp> { Future getUserInfo() async { await getUser(); setState(() {}); print(uid); } @override Widget build(BuildContext context) { // ... } }Call it from the
initStatemethod:class _MyAppState extends State<MyApp> { @override void initState() { getUserInfo(); super.initState(); } // ... }
Running the web app
You can run the Flutter web app normally from the IDE. [On VS Code, press Ctrl + F5 (Windows & Linux) or command + F5 (Mac)]. You can also run it from the terminal with the following command:
flutter run -d chrome

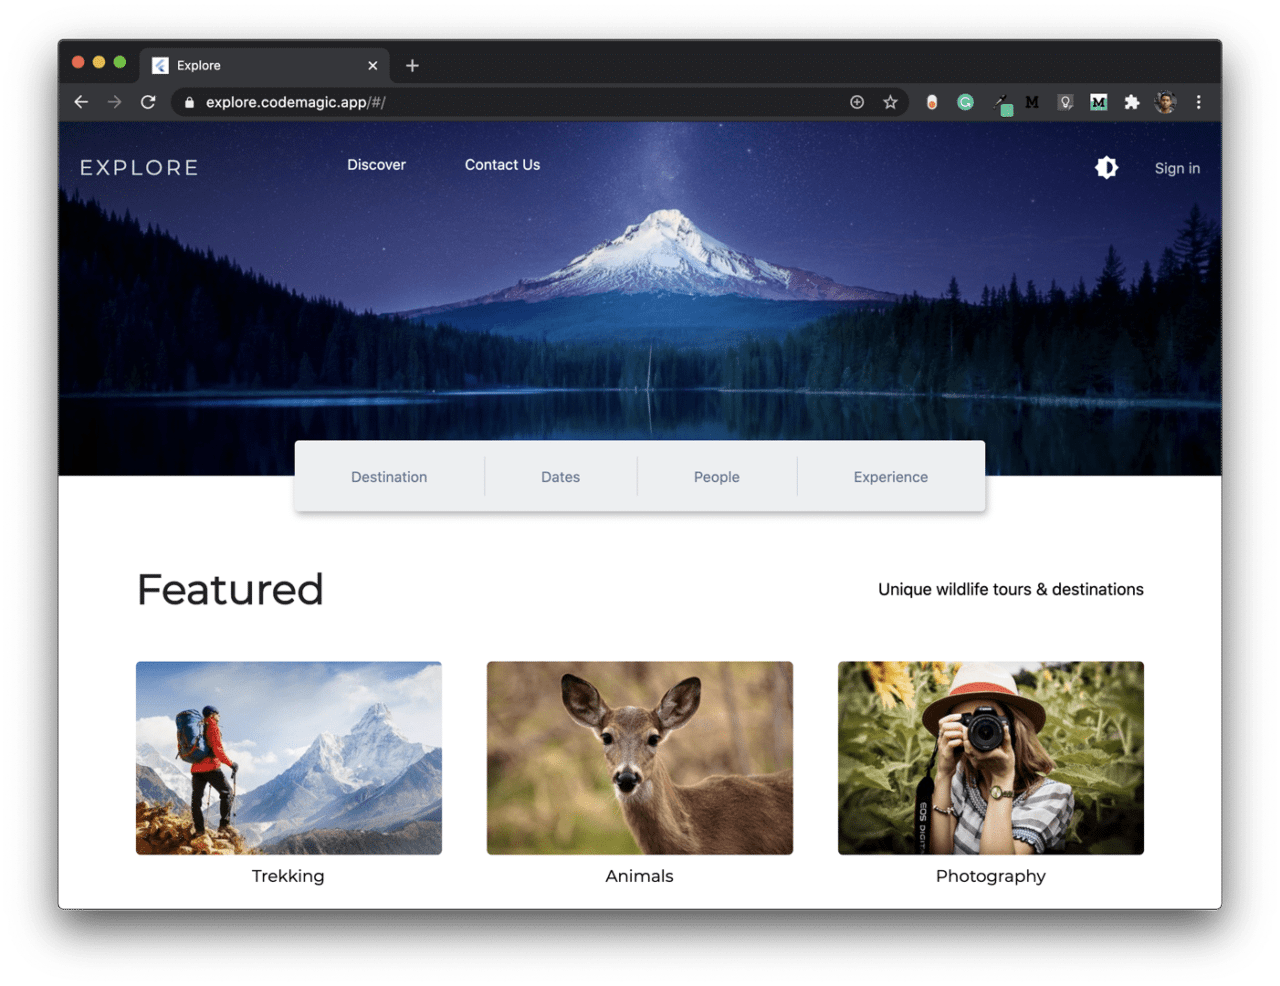
Build and deploy using Codemagic
You can build and host your Flutter web projects directly to a custom subdomain of codemagic.app without any extra cost using Codemagic Static Pages.
Go to your project settings on Codemagic:

Under the Build tab, set the Flutter version to
channel Stable, and check-mark theWebplatform.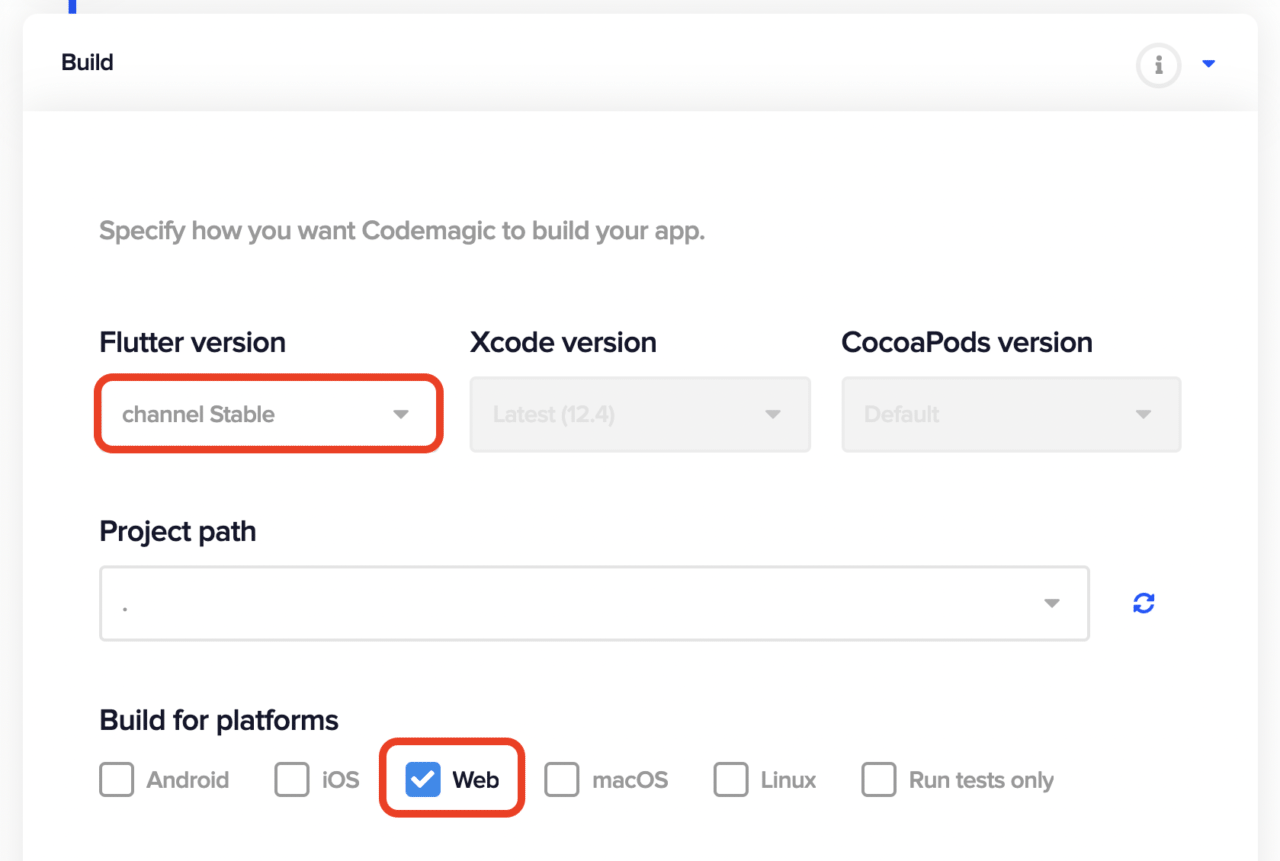
If you want to deploy your web app using Codemagic, then go to Codemagic Static Pages under the Publish tab. Check-mark
Enable Codemagic Static Page publishingand specify yoursubdomain.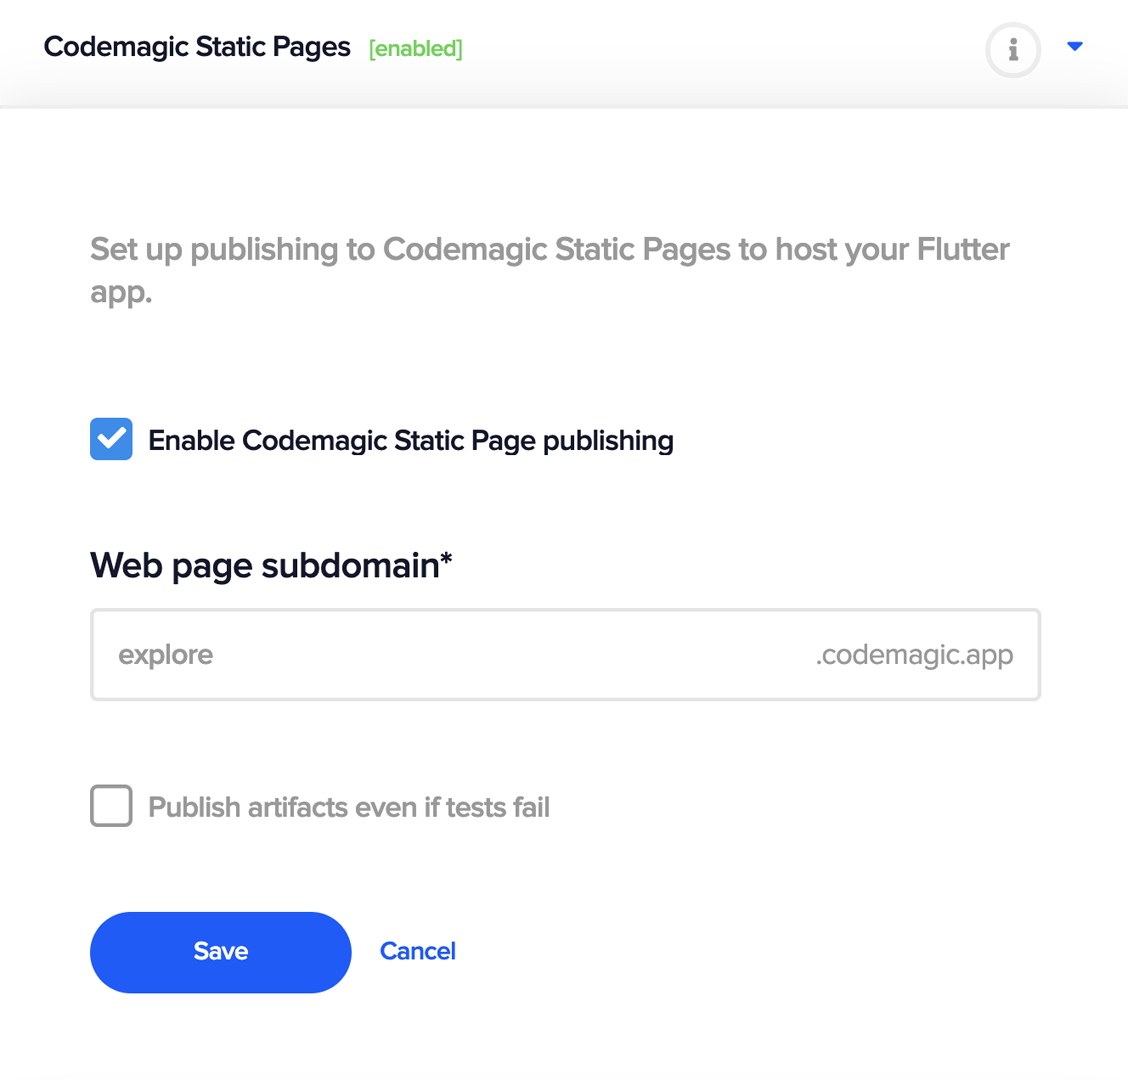
Now, you can start building your project.
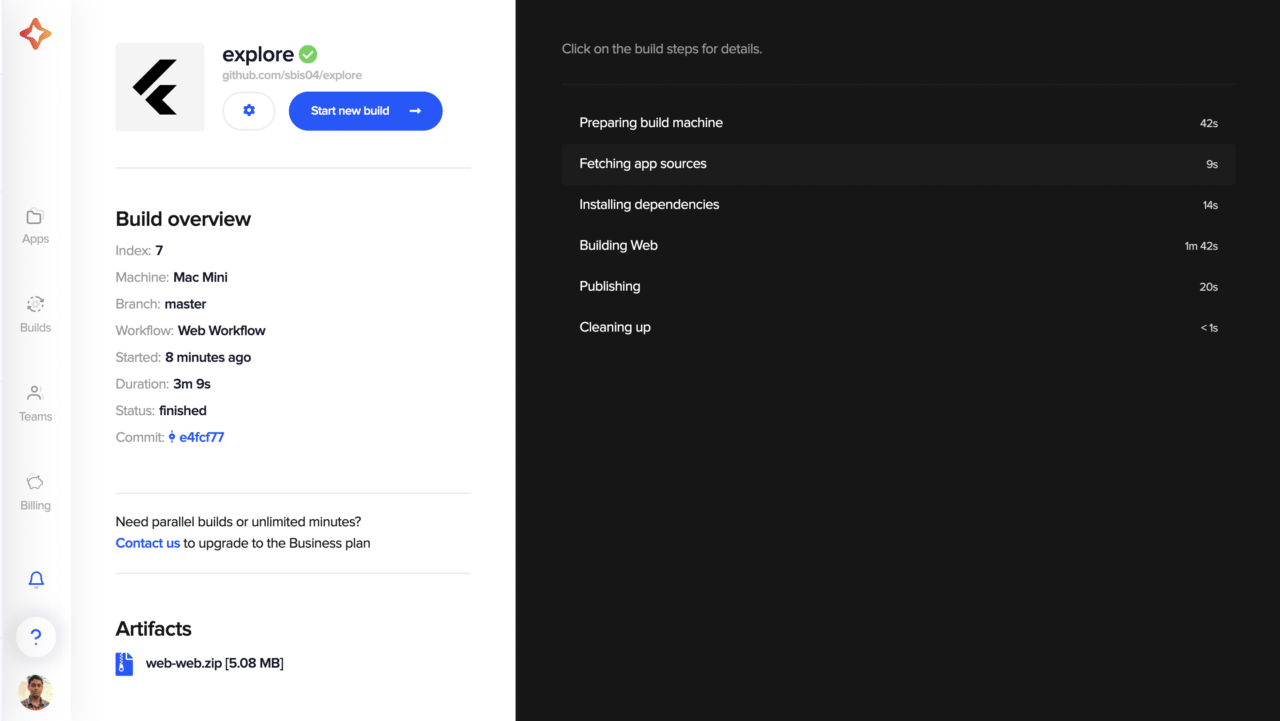
After a successful build, you can access the web app by going to your specified link.
Conclusion
You have successfully implemented Firebase Authentication and Google Sign-In in your Flutter web app and deployed it using Codemagic. This article covers the basics of Firebase Authentication using the two most popular authentication methods (email/password and Google Sign-In), but Firebase provides authentication using a lot of other identity providers as well.
Useful links and references
More articles about Flutter web
Souvik Biswas is a passionate Mobile App Developer (Android and Flutter). He has worked on a number of mobile apps throughout his journey. He loves open-source contribution on GitHub. He is currently pursuing a B.Tech degree in Computer Science and Engineering from Indian Institute of Information Technology Kalyani. He also writes Flutter articles on Medium - Flutter Community.


