


In this article Jahswill Essien describes how to use Google Sheets with Flutter via Google Apps Script.
Mark has been tracking his company expenses using Google Sheets for the past six months. Lately, it has been difficult to keep up with tracking expenses using the current method. He wants to ease the process for himself and his staff, but it’s necessary for him to use Google Sheets. What should he do?
Mark decides to build an interface that can communicate with Google Sheets. He uses Flutter to build his application for multiple platforms with one codebase and Google Apps Script to communicate with Google Sheets. He then sets up Codemagic to easily build and deploy the app across all platforms.
This article describes how to use Google Sheets with Flutter via Google Apps Script. However, we do not cover the Flutter package gsheets. That said, the knowledge we share in this article can be highly valuable for Flutter engineers and software engineers in general.
This article assumes the following:
- You have experience using the basics of Flutter and can call APIs and read an existing codebase
- You have little to no understanding of Google Apps Script
- You have some experience using Google Sheets or spreadsheets in general
The article is divided into three main sections:
The demo app is named Financial Goal Tracker. It enables users to track their expenses and income relative to their financial goals. The app interacts with Google Sheets to save this information.
On the front end, charts are shown that depict how well a person is doing against the target amount. Below is the completed version of the app.
![]()
Google Apps Script in focus
Before diving into Google Apps Script, let’s briefly describe spreadsheets.
Spreadsheets
Spreadsheets are computer programs that offer a great way to organize data. A spreadsheet organizes data in rows and columns. For instance, a financial tracker spreadsheet can have different columns that each specify a unique characteristic of the data, while each row defines a particular entry.
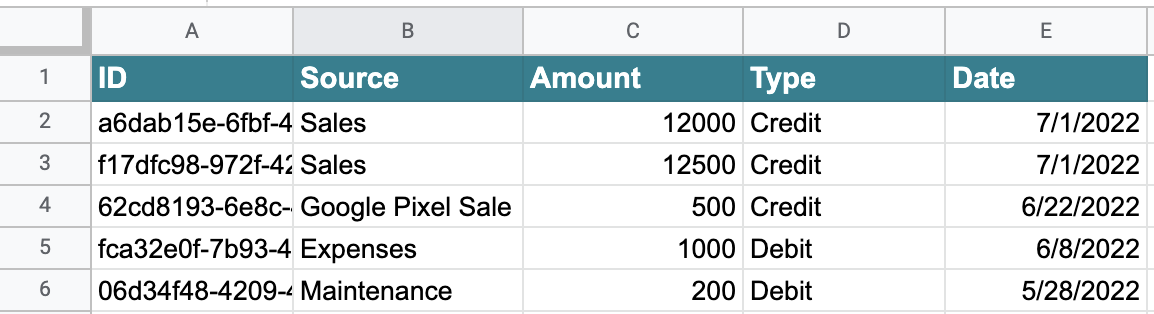
Notice how columns are lettered and rows are numbered.
In this context, cells are the storage units or, in other terms, the boxes you see in the image above. A cell can be identified as a block representing the intersection between the column and the row. For example, the data in cell B5 is “Expenses”, where “B” is the column location and “5” is the row location.
Google Apps Script
Google Apps Script is a cloud-based JavaScript platform. Apps Script facilitates certain tasks across Google products. The aim is to present avenues to programmatically perform specific processes.
By the end of this section, you will be better equipped to do the following with Apps Script:
- Get the spreadsheet from Google Drive by name
- Create a spreadsheet in Google Drive
- Input data in Google Sheets
- Delete data from Google Sheets
- Retrieve data from Google Sheets
To get started, follow these instructions:
- Visit the Apps Script dashboard.
- Click on the New Project button to open an empty code editor.
The code editor offers functionalities such as writing, running, debugging, and deployment of script code.
Setup
Copy the starter code from the GitHub gist here to the Google Apps Script editor.
The starter code is designed to encourage learning by doing. It contains some TODO instructions to follow.
Starters’ walkthrough
The first few lines of code in the script file are tasked with initializing some important variables.
// The name of the spreadsheet file
var name = 'FinancesTracker';

// The folder name that will house the spreadsheet file
var folderName = 'Goals';

// In the spreadsheet file, two different sheets will be created. Finances stores
// actual entries, and the Target sheet stores the user target
const sheetNames = ["Finances", "Target"]
Two functions are defined: doGet(e) and doPost(e). Apps Script only supports these two HTTP methods (GET and POST). We can identify the particular action to take by making use of query parameters.
function doPost(request){
    //When a POST request is made, get the action parameter to
    // determine which action to take
    var action = request.parameter.action;

    if(action == 'postTarget'){
        return postTarget(request);
    }else if(action == 'postEntry'){
        return postEntry(request);
    }else if(action == 'deleteEntry'){
        return deleteEntry(request);
    }
}

function doGet(request){
    //When a GET request is made, get the action parameter to
    // determine which action to take
    var action = request.parameter.action;

    if(action == 'getTarget'){
        return getTarget();
    }else if(action == 'getEntries'){
        return getEntries();
    }
}
The next task is to retrieve or create a spreadsheet file using Apps Script.
Retrieving and creating a spreadsheet file
Search for the getSpreadsheet() function and insert the code below. Ensure that you read the comments to grasp what’s going on.
    // Try getting a folder by name
    var topFolder = DriveApp.getFoldersByName(folderName);
    var file = null;

    // Check if folder contains files
    if(topFolder.hasNext()){
        // Retrieve spreadsheet file object by its name
        file = topFolder.next().getFilesByName(name);
    }

    // If file exists, open existing spreadsheet, and if not, create one
    if(file != null && file.hasNext()){
        // Open the spreadsheet, and return an instance of [SpreadSheet]
        return SpreadsheetApp.open(file.next());
    }else{

        // Create a folder and get its reference
        var folder = DriveApp.createFolder(folderName);

        // Create a spreadsheet and save its reference in a variable
        var newSpreadsheetFile = SpreadsheetApp.create(name)

        // Get the new spreadsheet file by its ID
        var file = DriveApp.getFileById(newSpreadsheetFile.getId());

        // Add the file to the folder just created
        folder.addFile(file);

        // Delete the spreadsheet file from Google Drive root
        DriveApp.getFolderById("root").removeFile(file);

        // Open spreadsheet file
        return SpreadsheetApp.open(file);
  }
Take note of how the code in the snippet above interacts with the Google Drive storage. The following section shows how to save data in Google Sheets.
Saving an entry
In the case of this app, an entry consists of ID, source, amount, type (credit or debit), and date data fields.
To start creating the implementation, find the function named postEntry() and insert the code below.
var sheet = getEntrySheet();

  /// Try saving the entry
  try{

    // Get the entry payload
    var entryPayload = JSON.parse(request.postData.contents);

    // Append the row with the required value
    sheet.appendRow([Utilities.getUuid(),  entryPayload.source, entryPayload.amount, entryPayload.type, new Date(entryPayload.date)]);

  }catch(exc){
    // Return an error response if the above code fails
    var result = {"success": false, "message": exc};

    return  ContentService
      .createTextOutput(JSON.stringify(result))
      .setMimeType(ContentService.MimeType.JSON);
  }

  // Return entries
  return getEntries();
It is worth noting that this line of code is responsible for returning the result as raw textual content — in this case, in JSON format.
ContentService
    .createTextOutput(JSON.stringify(result))
    .setMimeType(ContentService.MimeType.JSON);
Deleting an entry
Find the function named deleteEntry() and add the following code block.
    // Try deleting an entry
    try{
        // Get the Entry sheet object
        var sheet = getEntrySheet();

        // Get all rows in the sheet
        var values = sheet.getDataRange().getValues();

        /// Loop through list of rows (note that the row index starts at 1)
        for(var i = 1; i <= values.length; i++){

            /// Check equality between first value (ID) of ith row and parameter id
            if(values[i][0] == request.parameter.id){
                // deletes the row with that ID
                sheet.deleteRow(i)
            }
        }
    }catch(exc){
        /// Return an error response if task fails
        var result = {"success": false, "message": exc};

        return  ContentService
            .createTextOutput(JSON.stringify(result))
            .setMimeType(ContentService.MimeType.JSON);
    }

    // return the entries
    return getEntries();
The function getEntrySheet() is defined below.
    // Get entry sheet
    var sheet = getSpreadsheet().getSheetByName(sheetNames[0]);

    // If sheet is null, create one
    if(sheet == null){
        sheet = getSpreadsheet().insertSheet(sheetNames[0]);

        // Get the first row range that is from column A to column E
        var range = sheet.getRange("A1:E1");

        // Set header values
        range.setValues([["ID", "Source", "Amount", "Type", "Date"]]);

        // Format the header cells
        formatHeaderRange(range);
    }

    return sheet;
Retrieving all entries
This code is intended to retrieve all entries along with the following:
- Summation of credit entries
- Summation of debit entries
- Percentile completion of savings against the target amount
- Target amount
- Organization of total credit and total debit by month-year
Find the function named getEntries(). Start by initializing some variables within the function scope.
  // get an instance of the entry sheet object
  var sheet = getEntrySheet();

  // sort the data by the date column
  sheet.getDataRange().sort({column: 5, ascending: false});

  // get all sheet values and store them in this variable
  var values = sheet.getDataRange().getValues();

  // this variable will hold the list of entries data
  var entries = []

  // holds the total credit
  var totalCredit = 0;

  // holds the total debit
  var totalDebit = 0;

  // Holds a map that maps month-year to total credit and total debit per month
  var barChartData = {};
Define a loop to loop through all rows in the entry sheet.
for (var i = values.length - 1; i >= 1; i--) {

}
Within the for-loop block, insert the code below.
    // get the ith row
    var row = values[i];

    // set the entry map data
    var entry = {};

    entry['ID'] = row[0];
    entry['source'] = row[1];
    entry['amount'] = row[2];
    entry['type'] = row[3];
    // format the date
    entry['date'] = Utilities.formatDate(new Date(row[4]), Session.getScriptTimeZone(),"dd MMM yyyy");

    // get month-year to be used as barChartData key
    var monthYear = Utilities.formatDate(new Date(row[4]), Session.getScriptTimeZone(),"MMM yyyy");

    var dateChartData = barChartData[monthYear];

    // if chart data with the [monthYear] key is null, initialize with default data
    if(dateChartData == null){
      dateChartData = {
        "credit" : 0,
        "debit": 0,
      }
    }

    // Get the entry type and convert to lower case
    var type = entry['type'].toString().toLowerCase();

    if(type == "debit"){
      // Sum grand total debit
      totalDebit += entry['amount'];

      // Sum total debit for this month
      dateChartData['debit'] = dateChartData['debit'] + entry['amount'];

    }else if(type == "credit"){
      // Sum grand total credit
      totalCredit += entry['amount'];

      // Sum total credit for this month
      dateChartData['credit'] = dateChartData['credit'] + entry['amount'];
    }
    // Set the monthYear map key to its value
    barChartData[monthYear] = dateChartData;

    // Push each row object in data
    entries.push(entry);
Outside the for-loop block, type out the code below.
  // Gets the target cell
  var targetCell = getTargetCell();
  var target = targetCell.getValue();

  var completionPercentage = 0;
  if(targetCell != null){
    // Calculation for the completion percentage against the target
    completionPercentage = (totalCredit-totalDebit)*100/target;
  }

  // Set the JSON result with the data
  var data = {
    "success": success,
    "message" : message,
    "data" : {
      "total_credit" : totalCredit,
      "total_debit" : totalDebit,
      "completion_percentage" : completionPercentage,
      "entries": entries,
      'target' : target,
      "bar_chart_data": barChartData,
    },
  }

  Logger.log("getEntries() data response: %s", JSON.stringify(data));

  return ContentService
    .createTextOutput(JSON.stringify(data))
    .setMimeType(ContentService.MimeType.JSON);
Now that we’ve completed the Apps Script code for the demo application, here are a few more tasks to do.
- Click on the save icon (💾) to save the code
- Click on the
Runbutton to run the code - Click on the dropdown next to the
Debugbutton to select the specific function to run

These actions can be done on the code editor toolbar.
The completed version of the source code can be found in this gist.
The next section focuses on deploying the script to make it accessible to anyone.
Deployment of Apps Script
You can deploy Apps Script by following the steps below:
- In the top right of the screen, click Deploy > New deployment.
- In the left pane of the dialog, click Select Type -> Web app.
- In the configuration section, type in a description.
- From the Execute as dropdown, select User accessing the web.
- From the Who has access dropdown, select Anyone with Google account.
- Click on the Deploy button.
- From the New Deployment dialog, Copy the web app URL that is generated.
- Paste the URL in your browser to test it (don’t forget to attach an
actionquery parameter).
The Execute as dropdown has two options:
| Execute as Me | User accessing the web app |
|---|---|
| The script always executes as the owner of the script. | The script runs as the active person currently accessing the web app. |
| Saving a target or entry via the API is reflected in the script owner drive, regardless of who is calling the API. | Saving a target or entry via the API is reflected in the drive of whoever is authenticated to run the script. |
You need to complete a few additional steps to run the script as the user accessing the web app. An access token that grants the caller access to private data via Google APIs is needed. To accomplish this, the Google Cloud Platform needs to be set up.
The next section is optional if you selected Execute as Me, but it is essential if you selected User accessing the web app.
Setting up Google Cloud Platform (GCP) for Apps Script
- Visit the GCP console by clicking here.
- Click Select a project on the toolbar.
- Click on New Project, and fill in Project name.
- Click on the Create button.
- Tap on the hamburger menu (☰) -> APIs & Services -> OAuth consent screen.
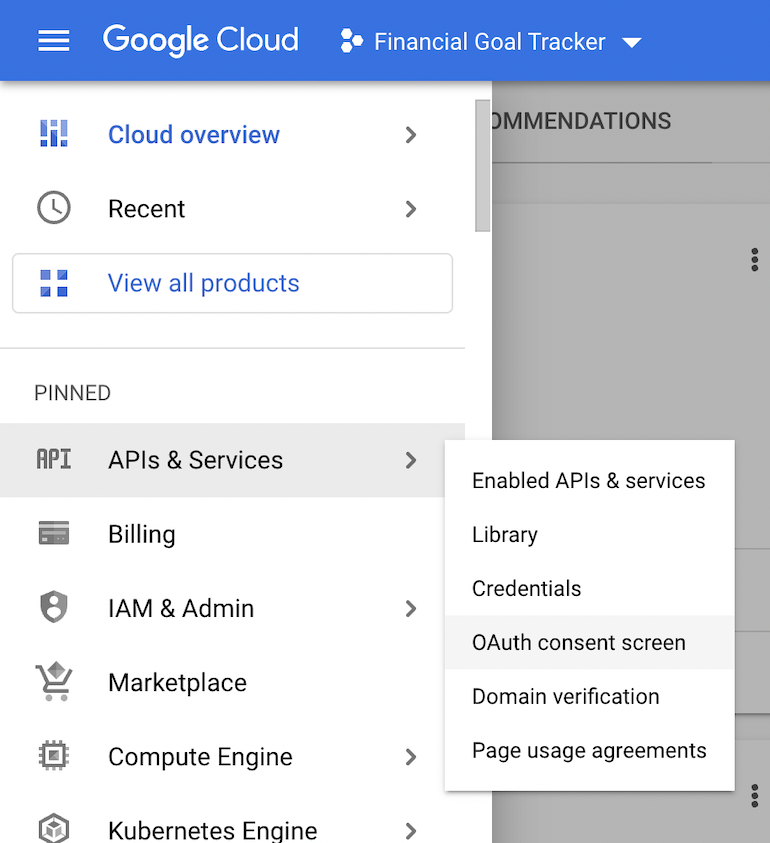
- Select the External option.
- Click the Create button.
- Copy the project number.
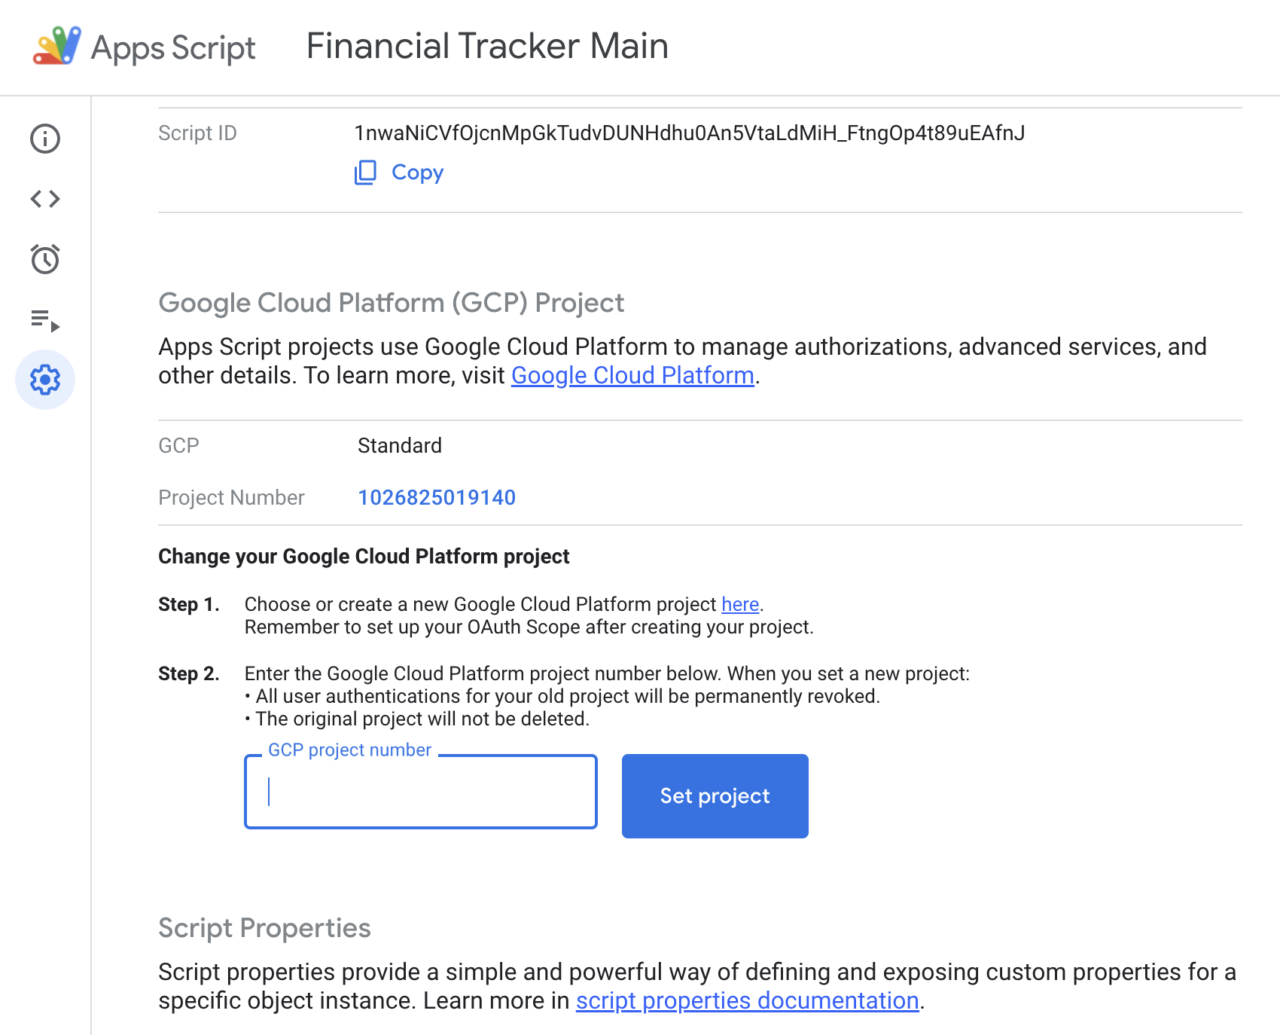
- Open the Apps Script console on a new tab, and then go to Project Settings.
- Scroll down to Google Cloud Platform (GCP) Project -> Change your Google Cloud Platform project.
- Paste the GCP project number in the text field and click Set Project.
We’ve successfully linked our GCP to Apps Script. The next task is configuring the consent screen. This is the screen users see when requested for permission to enable drive and spreadsheet access.
Configure content screen
Return to the GCP console and then proceed with the following instructions.
- Input the necessary info for the OAuth consent screen. Make sure to fill the fields marked with asterisks.
- Navigate to the next tab by clicking the SAVE AND CONTINUE button.
- Click the ADD OR REMOVE SCOPES -> Manually add scopes button.
- Insert the scopes to request consent from users:
https://www.googleapis.com/auth/drive, https://www.googleapis.com/auth/spreadsheets.
Scopes control the set of resources and operations that an access token permits.
- Click ADD TO TABLE -> UPDATE -> SAVE AND CONTINUE.
- Click ADD USERS -> SAVE AND CONTINUE to add test users.
- Click PUBLISH APP to publish the app to production.
Since we are requesting a sensitive and restricted scope (Google Drive), you need to submit verification before publishing to production. However, we can ignore this for now.
The final step is to configure credentials.
Configure credentials
Google Cloud APIs only accept requests from registered applications. Hence, credentials need to be set up to provide the necessary information about the caller of the API.
Follow these instructions to configure credentials:
Click Credentials -> Create Credentials -> OAuth client ID.
Select Web Application as the application type.
Click ADD URI in the Authorized JavaScript origins section, and then input
http://localhost:7357to enable access to Flutter Web locally.Click the CREATE button.
Take note of the Client ID, as it will be used later on in the app.
Create an OAuth client ID for iOS by selecting iOS as the application type, and then input the application bundle ID.
This enables Google authentication for iOS.
Click Download PLIST and rename the file to “GoogleService-Info.plist”.
Take note of the iOS URL Scheme.
We’ve completed everything related to Apps Script. The next section focuses on the Flutter application.
Utilizing Google Apps Script in Flutter
Clone the starter code to your local machine by running the command git clone -b starters-tasks git@github.com:JasperEssien2/financial_goal_tracker.git.
The codebase is organized into three layers:
- Data: contains model classes, repository implementation, etc.
- Domain: houses the repository contract
- Presentation: contains the widgets and data controller files
The core packages used are:
| Packages | Use cases |
|---|---|
| google_sign_in | Handles authentication and permissions |
| dio | Used in making API requests |
| fl_chart | Used to implement charts in the app |
| either_dart | Provides type-safe error handling in Dart and Flutter |
As you traverse the codebase, you’ll discover that about 90% of the code is already written. The main focus of this implementation is to utilize the Apps Script API in the Flutter app. Some TODOs have been added to easily identify pending tasks.
The main files to be concerned with are:
lib/data/helpers/dio_helper.dart: This helper class implements two helper methods:doGet()anddoPost().Future<Either<String, R>> doGet<R>( //API URL endpoint String url, // A callback function to parse raw JSON to data model R Function(dynamic data) parseData, { // Query parameters Map<String, dynamic>? query, }) async { try { final res = await dio.get(url, queryParameters: query); if (res.data['success']) { return Right(parseData(res.data)); } else { return Left(res.data['message']); } } on DioError catch (e) { debugPrint("ERROR ============= $e"); return const Left("An error occurred"); } }Future<Either<String, R>> doPost<R>( // API URL endpoint String url, // A callback function to parse raw JSON to data model R Function(dynamic data) parseData, { // The body of the POST request Map<String, dynamic>? body, /// Query parameters Map<String, dynamic>? query, }) async { try { final res = await dio.post(url, data: body, queryParameters: query, options: Options( followRedirects: false, )); if (res.data['success']) { return Right(parseData(res.data)); } else { return Left(res.data['message']); } } on DioError catch (e) { /// Handle redirect with code 302 if (e.response?.statusCode == 302) { var url = e.response?.headers['location']!.first; return await doGet<R>(url!, parseData); } return const Left("An error occurred"); } }The Apps Script POST request returns a redirect status code, which means we have to handle redirect URLs manually since
Diodoesn’t handle this by default.lib/data/helpers/auth_helper.dart: Initiates the Google user authentication and permissions, then extracts authentication headers (includes access tokens) from the response.Complete the following tasks in this file:
- Paste the web app client ID in the variable named
webClientId. - Insert the list of scopes to request permissions.
[ "https://www.googleapis.com/auth/drive", "https://www.googleapis.com/auth/spreadsheets"]
- Paste the web app client ID in the variable named
lib/data/repository_impl.dart: The code that communicates with the Apps Script API resides here. To implement the tasks:Insert the Apps Script web app URL, which is generated during deployment in the
urlvariable.Type out the code for
deleteEntry().return _dioHelper.doPost( url, (data) => EntryResponse.fromJson(data['data']), query: { 'id': entryId, 'action': 'deleteEntry', }, );Place the code below within the
getEntries()method block.return _dioHelper.doGet( url, (data) => EntryResponse.fromJson(data['data']), query: { 'action': 'getEntries', }, );Copy the following code into the
postEntry()method block.return _dioHelper.doPost( url, (data) => EntryResponse.fromJson(data['data']), query: { 'action': 'postEntry', }, body: entry.toJson(), );
To run the app on Flutter Web when Google Sign-In is working properly, use the command flutter run --release -d chrome --web-hostname localhost --web-port 7357.
If you’re still experiencing issues with Google Sign-In in Flutter Web, follow the instructions shown in this post on Stack Overflow.
To run the app without sign-in issues on iOS, follow these instructions:
- Move or copy
GoogleService-Info.plistinto thefinancial_goal_tracker/ios/Runnerdirectory. - Open Xcode, right-click on the
Runnerdirectory, and select Add Files to “Runner”. - Select
GoogleService-Info.plistfrom the file manager. - A dialog will appear and ask you to select the targets. Select the Runner target.
- Then navigate to the
financial_goal_tracker/ios/Runner/Info.plistfile, search for a TODO, and insert the iOS URL scheme in between the<string>tags.
You have finished setting up the Flutter side of the application. Feel free to test run the application and see how it interacts with your Google Drive and Sheets. In the next section, we’ll walk through how to set up continuous integration/continuous delivery (CI/CD).

Setting up Codemagic
You can easily set up Codemagic to build your Flutter apps for all platforms. Just follow these steps:
- Head over to codemagic.io to log in or create an account if you don’t have one already.
- Click on the Add application button, and then select the Git provider for your project.
- Click on the Next: Select repository button, and then select
financial_goal_trackeras the repository and Flutter App as the project type. - Select Android, iOS, and Web in the Build for platforms section.
- Click on Start new build.
And there you go! A build is started, and Codemagic notifies you of the status of the build when it’s done.
Conclusion
We covered a lot in this article. Hopefully, you’re now better equipped to handle any task involving Apps Script and Flutter.
Feel free to explore the demo application in detail and try implementing or adjusting certain features to solidify your knowledge on this topic.
Jahswill Essien is a mobile developer, ardent on building awesome stuff with Flutter, he has been using Flutter for the past 2 years. Jahswill is a visual learner as such he strives to write articles that contain pictorial illustrations and/or analogies to drive home a concept explained. His favourite quote is: “We are constrained by our mind, what we feel is our limit isn’t our limit. It’s amazing how much we can learn in a short amount of time by perseverance alone”. Check out some things Jahswill built with flutter by visiting his Github profile.


