


Written by Souvik Biswas
Google’s unique open-source operating system is known as Fuchsia. Google started developing Fuchsia as an experiment back in 2016. Many aspects of Fuchsia OS are inspired by the web and how a web browser works in general.

“Pink + Purple == Fuchsia (a new Operating System).” All speculation about this new operating system started with the discovery of this statement, which was found on the Fuchsia GitHub page in 2016. This is more than two years before Flutter 1.0 (the first stable version of the fastest-growing cross-platform framework introduced by Google) was even released. Since then, bits of information have continued to emerge.
Currently, the Fuchsia developer documentation has become quite robust, and you can also try out Fuchsia OS by using its emulator (FEMU).
There are many interesting things to discuss about Fuchsia. In this article, you will get a taste of how Fuchsia OS works through a deep dive into some of its core features. We’ll also run the Fuchsia emulator on our systems and try running some example components on it.
Let’s start with why you should be looking forward to this new operating system.
Fuchsia: Secrets behind the name
Among the early speculations, people found that there was some meaning behind the statement Pink + Purple == Fuchsia.
Project Pink was a code name given by the early Apple and IBM engineers (their partnership gave rise to a company called Taligent, which later dissolved into the present IBM) to a new operating system. They chose this name because they used to jot down ideas on blue and pink index cards. The pink cards represented technologies for a future dream system.
Project Purple was a code name given to the prototype devices that would later be released to the public as the first iPhones.
This seems like a very ironic name for a product coming from Google, but keep in mind that both of these projects were hugely successful in the long run. Also, these reasons remained only speculations, as none of the Google engineers confirmed the reasoning behind the naming of Fuchsia.
What makes Fuchsia unique?
Fuchsia is not a Linux-based OS.
This means Fuchsia doesn’t use Linux as its kernel. Instead, it uses a new kernel (specifically, a microkernel) called Zircon. Generally, microkernels tend to follow the principle of minimality, but although Zircon applies many of the concepts popularized by microkernels, it does not strive to be minimal. Fuchsia’s microkernel architecture helps to reduce the amount of trusted code running in the system.
Here’s a simple comparison between general OS kernel services and Zircon kernel services:

Fuchsia is based on four core principles: secure, updatable, inclusive, and pragmatic. The Fuchsia docs describe these principles as follows:
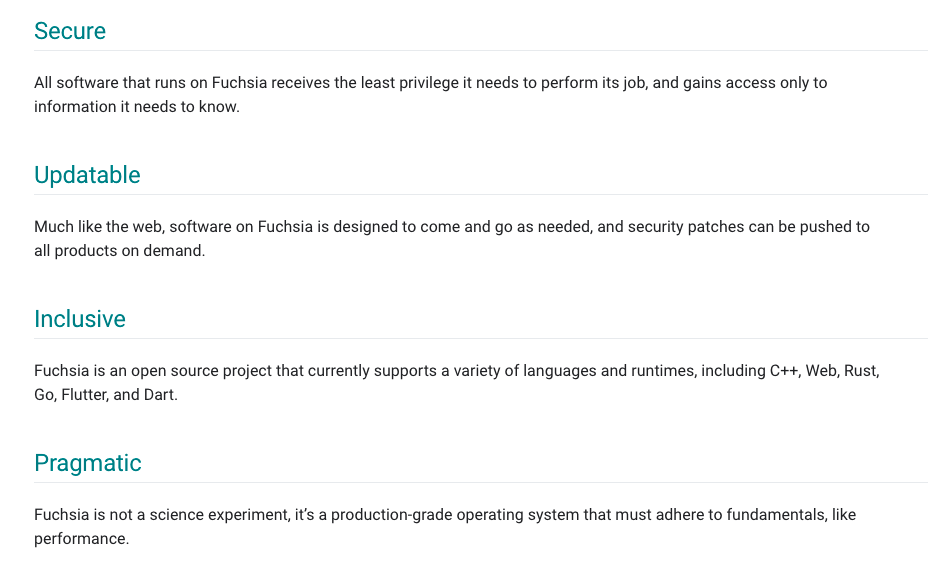
Credits: Fuchsia docs
Another distinctive approach that Fuchsia implements is resolving dependencies at runtime instead of at install time like most other operating systems.
If you are already a Flutter developer, there’s a very important question that you probably want answered before we go any deeper.
Can Fuchsia OS run Flutter apps?
In a word, yes, it can.
Fuchsia OS is fully capable of running an entire Flutter app written using the Dart language.
First-gen Nest Hub devices by Google are already running Fuchsia OS with the GUI built using Flutter on the end-user devices.
But I won’t be covering Flutter on Fuchsia in this article because the development team’s current focus is mostly on behind-the-scenes improvements (like the file system, components, etc.). The OS is in active development, and it’s quite difficult to get the Flutter app running on Fuchsia due to a huge number of version mismatches.
That being said, a pretty recent version of the Flutter Gallery app has been run on the Fuchsia OS by Michael Lee using flutter_fuchsia_toolchain. You can see a screenshot of the Flutter app running on Fuchsia here.
So, we’ll save the idea of building Flutter apps for Fuchsia OS for the next time. In this post, we will take a detailed look at some of the parts that make up Fuchsia, but before that, let’s set up Fuchsia and run it on an emulator.
Set up and build Fuchsia
The official Fuchsia documentation includes a nice step-by-step guide to get you started with Fuchsia. But to keep this article self-contained and easy to follow, I’ll only include the steps you need to follow in order to run the Fuchsia emulator on your system.
NOTE: Please go through the following requirements before you start downloading or running any commands for installing Fuchsia:
- A system with x64 architecture is recommended at the moment. The Fuchsia build is not guaranteed to succeed on other host architectures. If you have a Mac with Apple silicon, you might be able to build Fuchsia using Rosetta 2, but you may still face a number of pitfalls along the way. Windows is not supported.
- You need around 2 GB of free space to download Fuchsia on your system.
- To build Fuchsia, you need another 80 to 90 GB of space, so make sure you have enough space before proceeding.
- Also, while downloading and building Fuchsia, you should close any memory-intensive, non-crucial processes running on your system.
Run the following preflight check script before you proceed. This examines your system and lets you know about any issues that you might face while building Fuchsia:
For Linux:
curl -sO https://storage.googleapis.com/fuchsia-ffx/ffx-linux-x64 && chmod +x ffx-linux-x64 && ./ffx-linux-x64 platform preflight
For macOS:
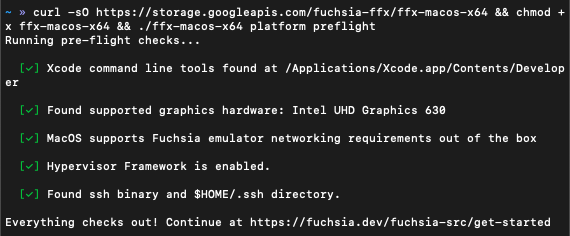
curl -sO https://storage.googleapis.com/fuchsia-ffx/ffx-macos-x64 && chmod +x ffx-macos-x64 && ./ffx-macos-x64 platform preflight
If everything checks out, then it will produce the following output:
On MacBook with Apple silicon, it produces the following:
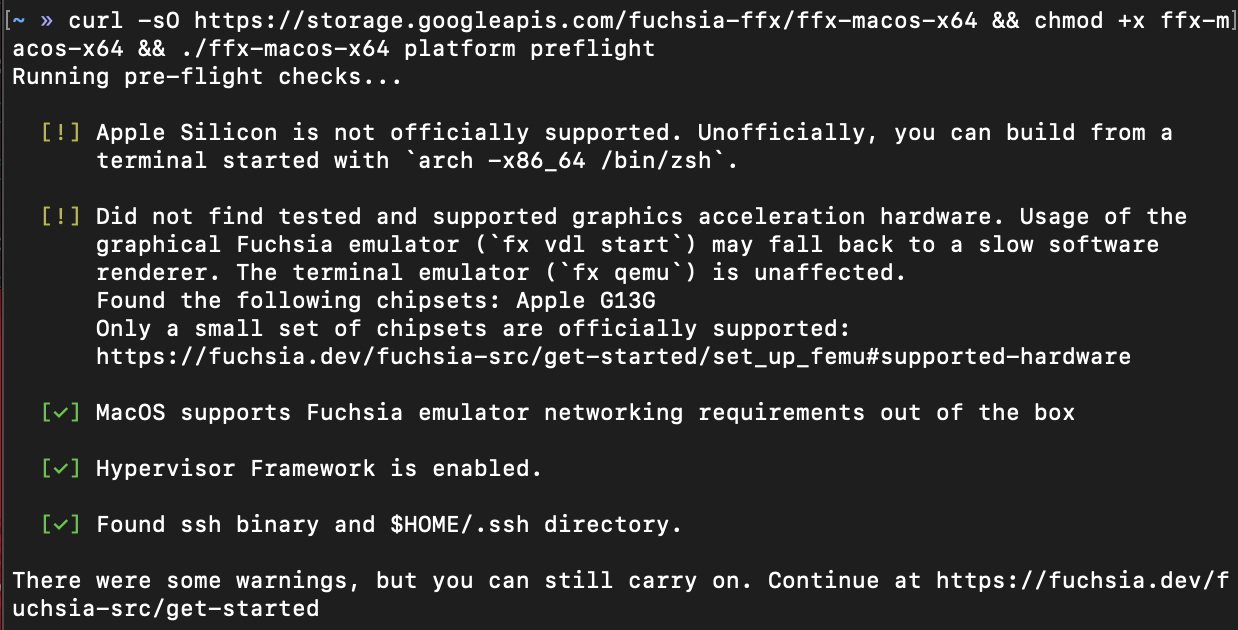
So, if you are on macOS with Apple silicon, run the following command in the terminal before building Fuchsia:
arch -x86_64 /bin/zsh
There are a few prerequisites for building Fuchsia. Make sure you have curl, unzip, and git and that they are updated. You should have git version 2.28 or higher.
Follow the steps below to download and build Fuchsia:
Move into the directory where you want to download and set up Fuchsia.
I have created a new directory and used the path
~/developmentto download Fuchsia on my system.Download Fuchsia using the following. This will create a directory called
fuchsiaand download the contents inside it:curl -s "https://fuchsia.googlesource.com/fuchsia/+/HEAD/scripts/bootstrap?format=TEXT" | base64 --decode | bashAfter the download is complete, add the following PATH to your
~/.bash_profileor~/.zprofile:export PATH="path/to/fuchsia/.jiri_root/bin:$PATH" source path/to/fuchsia/scripts/fx-env.shReplace
path/to/fuchsiawith the path to yourfuchsiadirectory where you have downloaded the files.To update your terminal instance to use the recently added environment variables, run the following:
source ~/.bash_profile
# or, source ~/.zprofile
To verify whether you can access the tools properly, run the following commands inside the
fuchsiadirectory:jiri help fx helpIf running these commands doesn’t produce any errors, you are good to go.
Before you start the build process, you have to define the build configuration using the following command:
fx set <PRODUCT>.<BOARD>You have to replace
<PRODUCT>and<BOARD>with the appropriate options. To learn more about configuring a build for Fuchsia, check out this page.If you are a beginner, you’d probably like to take a look at Fuchsia’s GUI. To do that, use the following set command:
fx set workstation.qemu-x64 --releaseTo build Fuchsia with the set configuration, use this command:
fx build
The building process could take quite a bit of time, depending on your system. For me, it took around three hours.
Run the Fuchsia GUI on the emulator
After the Fuchsia build has successfully completed, you can use the following command to start the GUI on the emulator.
For Linux, there’s an optional step to enable VM acceleration through KVM. You can follow the steps to do so here.
For Linux:
fx vdl start -N
For macOS:
fx vdl start
This will start up the Fuchsia emulator (also known as FEMU), which is based on the Android Emulator (AEMU). You will notice the Fuchsia GUI loading up in a few minutes:

On the terminal you used to run the startup command, you will notice an instruction to run an fx set-device command. Open a new terminal and run the command that is displayed there. (This is only required for macOS.) The command will be in this format:
fx set-device 127.0.0.1:<SSH_PORT>
Replace
<SSH_PORT>with the port number displayed on the previous terminal window.

This will allow you to connect with the Fuchsia emulator instance that is currently running using SSH and let you access the shell of Fuchsia OS.
Here are a few other commands you should be familiar with while using the emulator.
- To see the name of the Fuchsia emulator device:
ffx target list - To reboot the emulator:
ffx target reboot - To shut down the emulator:
ffx target off
You can also reboot and shut down directly from the shell of FEMU using the following commands:
dm reboot
dm shutdown
Now that we have gotten a satisfying glimpse of the Fuchsia GUI, we will shut down the current instance of the emulator and further explore Fuchsia’s underlying package system. We don’t need the GUI to do this, so we’ll run the emulator in headless mode.
Run Fuchsia in headless mode
In order to run Fuchsia in headless mode, you first have to change the build configuration using the fx set command. Previously, we used workstation as the PRODUCT, but this time, we will be using core.
The workstation is like a pre-packaged configuration that doesn’t let you include new changes to the Fuchsia build. But we want to understand Fuchsia’s package system (and maybe also modify a few things), so we need to use core, as it gives you the minimal feature set and lets you introduce new things to its build.
Use the following set command:
fx set core.qemu-x64 --with-base //bundles:tools
Though a better option is to use this command without
qemu(justcore.x64), this caused some build failures for me, so I ended up usingcore.qemu-x64.
--with-base: uses the minimum possible size required for configuring Fuchsia.
//bundles:tools: includes the common developer tools in the build so that we can run commands using Fuchsia’s command-line shell.
Then build Fuchsia again using:
fx build
NOTE: This build process takes around 40 minutes to complete. (The time will vary depending on your system.)
When the build completes, run the Fuchsia emulator in headless mode using the following command:
fx vdl start --headless
Wait for the emulator to fire up, then run the following from a second terminal window:
fx set-device 127.0.0.1:<SSH_PORT>
Replace
<SSH_PORT>with the port number generated at the end of the previous command.
You can log the events running on the Fuchsia emulator by running the following command from the second terminal window:
fx log
You can run commands on the Fuchsia OS by either using the first terminal window (it should display a $ sign that is coming from the Fuchsia shell) or accessing the Fuchsia shell by opening a third terminal window and running:
fx shell
Now, we are ready to explore Fuchsia’s package system.
A look at Fuchsia’s package system
Some of the basic commands that you can run on Fuchsia shell are similar to those of Linux-based systems, e.g., ls, pwd, and cat.
Below is the output that you will get by running the ls command from the root directory inside Fuchsia’s shell:
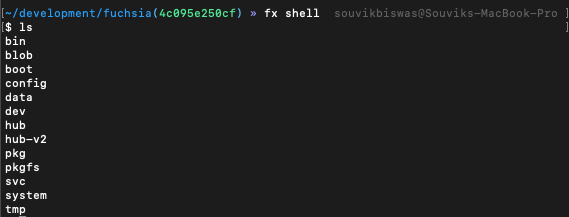
As usual, it lists out the files and directories present inside the current folder.
The interesting part is actually happening behind the scenes. When you run the ls command, take note of the terminal window where logs are displayed.

Notice that it runs the package resolver, which resolves (or maps) the fuchsia-pkg://fuchsia.com/ls/0 (the URL of the package) to a hash number, which is actually the hash of a BLOB (Binary Large Object) present inside Fuchsia’s file system.
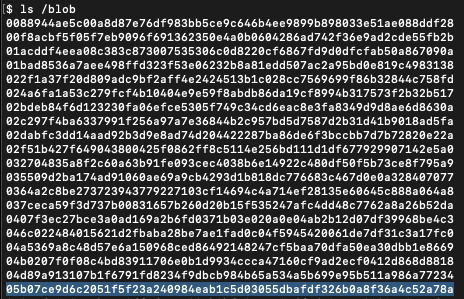
Once it’s run for the first time, Fuchsia caches the blob. You can find the cached blobs inside the /blob directory:
ls /blob
This shows all the blobs present inside the file system. You will also find the blob hash of the ls command here.
This is how Fuchsia maps each package URL to a BLOB hash. But if a package is not already cached, then it fetches directly from the package manager. Let’s take a look at the contents of ls inside the bin directory:
cat bin/ls

It just contains a single statement with a package URL. This URL is used to fetch the required package from the package manager at runtime.
Also, notice that the package URL is quite similar to a typical web URL, only http:// or https:// is replaced with fuchsia-pkg://. The only difference is that it is fetching from the Fuchsia package manager instead of performing normal web HTTP fetching.
In addition, when you initially start the emulator, you will notice it has also started running the package manager as a server on localhost.
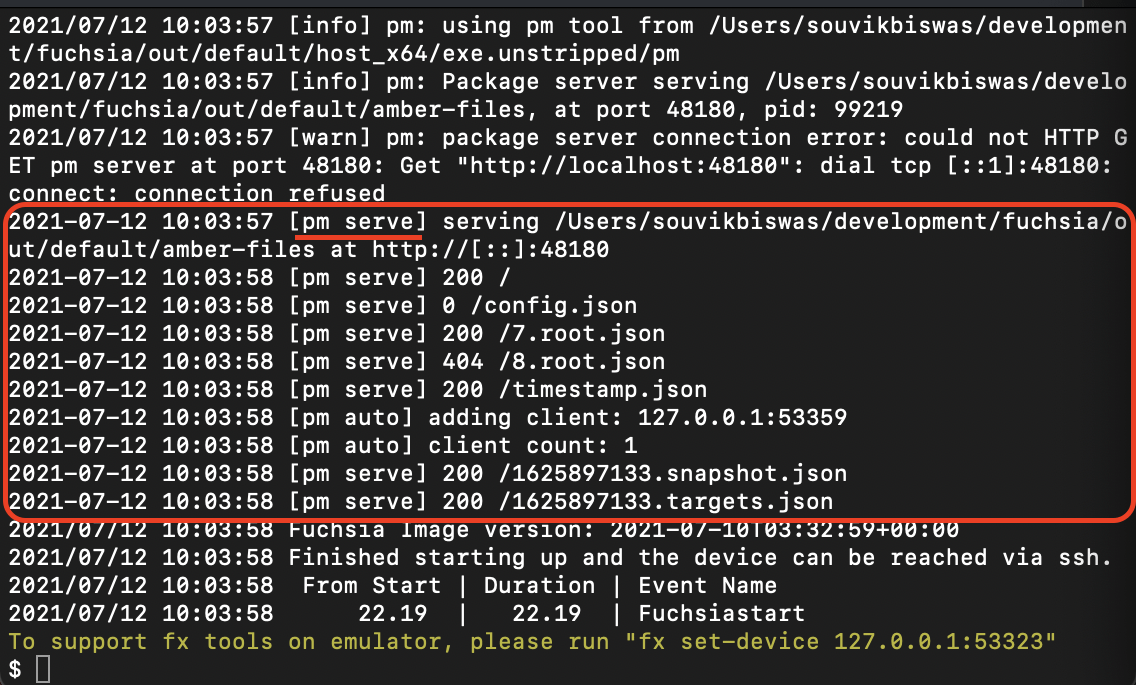
This architecture of the Fuchsia file system helps it to stay secure, as everything runs in a sandboxed mode, similar to how web browsers work.
Phew! We’ve discussed quite a lot about the inner working of the package manager. Let’s move on to something more interesting. 😎
Modify a system process
Can you modify the ls that comes with the system?
On Fuchsia, yes – you can, of course, modify the system processes. Remember that every package is resolved at runtime, so if we modify the code running the ls command, then Fuchsia will start using the modified version of ls.
In order to do this, from your host system (not the Fuchsia shell), go to the fuchsia directory. Move to the path third_party/sbase using the following:
cd third_party/sbase
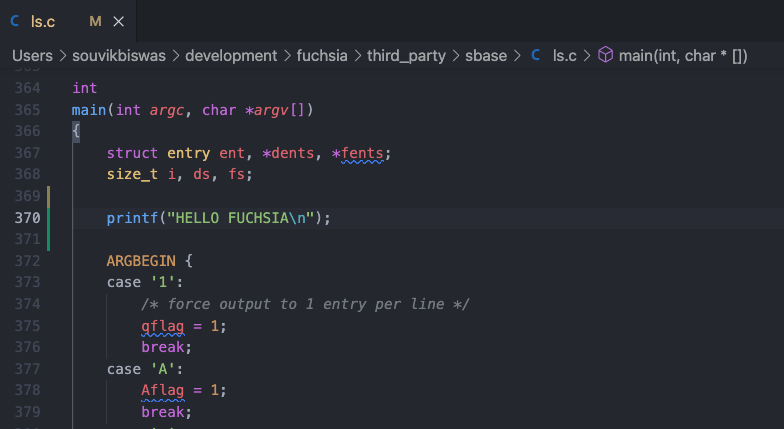
Open the file ls.c using any text editor. To open it with VS Code, you can use:
code ls.c
Let’s insert a print statement inside the main() function and save the file:
printf("HELLO FUCHSIA\n");
To introduce the new changes to the build, use:
fx build publish
Now, try running ls from the Fuchsia shell. You will see the following output:
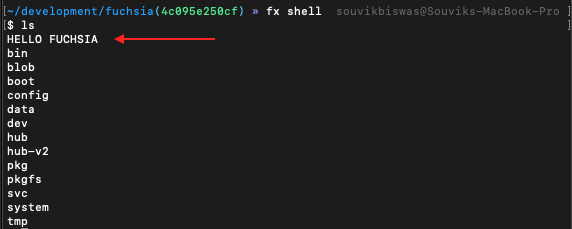
This is how easy it is to modify system processes. UNDO the changes to the ls.c file, and run fx build publish before proceeding.
Insight into Fuchsia components
Fuchsia is also known as a capability-based system. This is because of the architecture of components in the OS.
Components are like the building blocks of software running in Fuchsia – they are sandboxed modules and can only interact with other components through capabilities. Some programs might not even have the ability to allocate memory in the system.
After starting the Fuchsia emulator, run the following command from a separate terminal window on the host system:
ffx component list
This will print out a list of all the components currently present inside the Fuchsia emulator:
  bootstrap
    archivist
    base_resolver
    console
    console-launcher
    decompressor
    device_name_provider
    driver_manager
    fshost
    miscsvc
    netsvc
    power_manager
    ptysvc
    pwrbtn-monitor
    shutdown_shim
    svchost
    sysinfo
    virtual_console
  core
    activity
    appmgr
      ...
    debug_serial
    detect
    font_provider
    log-stats
    remote-control
    remote-diagnostics-bridge
    sampler
    system-update-committer
    temperature-logger
    test_manager
    full-resolver
  startup
You can check out the details of any one of the components in the list above. Let’s see the details of the fshost component using:
ffx component show fshost
This will display a report containing its status as well as the different capabilities of its sandboxed environment:
Moniker: /bootstrap/fshost
URL: fuchsia-boot:///#meta/fshost.cm
Type: CML static component
Component State: Resolved
Execution State: Running
Job ID: 2641
Process ID: 2670
Incoming Capabilities (11):
  boot
  dev
  fuchsia.boot.Arguments
  ...
Outgoing Capabilities (7):
  delayed
  diagnostics
  fs
  ...
Exposed Capabilities (22):
  bin
  blob
  build-info
  config-data
  deprecated-misc-storage
  diagnostics
  ...
There are basically three types of capabilities:
- Incoming Capabilities: These are the capabilities that the program can see (consumes).
- Outgoing Capabilities: These are the capabilities that the program can generate (produces).
- Exposed Capabilities: These are the capabilities that the program exposes to other components.
We won’t go into further detail about the Fuchsia components here, but if you want to learn more, you can head over to this page.
Run example components on Fuchsia
Now, we will try to run an example component on the Fuchsia emulator. Before that, let’s take a look at the structure of a basic Fuchsia component. Components are mainly composed of the following elements:
- An executable program written in any supported language, like
c++,rust, ordart. - A component manifest (
.cml) file form declaring some information about the program and its capabilities. - A
BUILD.gnfile for declaring the build targets of the component.
To run a component, you first have to include it inside the build configuration. You can use the following command to build the hello_world example component (present within the examples folder of the fuchsia directory):
fx set core.qemu-x64 --with-base //bundles:tools --with //examples/hello_world
Run the build with the configuration above:
fx build
After the build completes, you can see the contents of the component that you have included using:
fx list-packages hello-world
This will produce an output like this:

Follow the steps below to run a package:
First, run the Fuchsia emulator.
Run the following command from another terminal window:
fx serve-updatesOpen another terminal window and run:
ffx component run fuchsia-pkg://fuchsia.com/hello-world#meta/hello-world-rust.cmThis will run the RUST package of the
hello_worldcomponent.If you check the output of
fx log, you will notice thatHello, World!is printed there:[ffx-laboratory:hello-world] INFO: Hello, World!
We’ll stop here, as we have covered enough information to take in about Fuchsia in a single article. Now you can try Google’s Fuchsia OS and play with it on your own.

More to explore
The Fuchsia documentation is the best place to continue to explore the Fuchsia operating system. It is also updated with new content from time to time, so if you are an enthusiast, keep an eye on the docs.
Many of the concepts that I described in this article were originally discussed in the “A Tour of the Fuchsia Operating System” video organized by Eric Seidel and Adam Barth. Special thanks to them!
If you have any questions, there are some discussion groups that you can join. You can also check out the official Fuchsia Discord community. Links are available here.
Souvik Biswas is a passionate Mobile App Developer (Android and Flutter). He has worked on a number of mobile apps throughout his journey. Loves open source contribution on GitHub. He is currently pursuing a B.Tech degree in Computer Science and Engineering from Indian Institute of Information Technology Kalyani. He also writes Flutter articles on Medium - Flutter Community.

