


TL;DR: Setting up CI/CD pipelines for games made with the Godot engine is quite simple, thanks to the fact that it’s easy to work with Godot using the command-line interface. This means we can quickly install Godot on a Codemagic build machine and automate the export of Godot games, though we’ll need to specify some configurations as well.
Let’s see how to automate Godot game projects!
These past few months, I’ve talked about using Codemagic to build and publish Unity games. Be it to link it to the Firebase App Distribution system, get detailed test reports, or even share VR games for an Oculus headset, setting up a CI/CD pipeline is a great way to achieve a robust and efficient workflow.
But in the world of game design, there’s another well-known game engine that is getting more and more popular among indie creators: Godot.
So today, let’s shift gears and see how we can use Codemagic to make an automated pipeline for Godot projects, too!
In this tutorial, I’ll:
- Give a short overview of the Godot game engine
- Quickly introduce the sample project I’ll be working with
- Show how to set up a Codemagic workflow to automate the build of our Godot game

What is Godot?

Godot’s logo (from: https://godotengine.org/press)
Godot is a free game engine that was initially founded by Juan Linietsky and Ariel Manzur before it became open source and community driven in 2014. It allows you to create both 2D and 3D projects and export for various platforms: Windows, Mac, Linux, Android, iOS, and even WebGL. (It even handles consoles with a bit of extra plugin setup.)
The engine is Git-friendly, uses a node-based scene architecture, and comes with its own efficient programming language, GDScript… but it can also use the more common C# or C++ languages. Godot lets you organize your scenes, prefabs, and various assets in a very flexible way, and it is meant to be easy to use for devs and artists alike. It also provides advanced features, such as a set of tools to improve your Godot editor and customize your workflow!
Note about Git versioning: What’s cool about Godot is that it relies on basic text files for your project definitions and configurations, from the startup settings to the export modes. That makes it totally compatible with Git pipelines and easy to share your entire project with the rest of your team!
Godot has been used to create various 2D and 3D games, as well as other types of software, like the “RPG in a Box” game editing tool. If you want to take a look at all of their featured projects, check out their showcase section. ;)
Finally, because the open-source philosophy has such an important role in the development of Godot, tons of great docs and tutorials have been contributed by the original creators and other members of the community.
A peek at our Godot sample project
For this quick introduction to automating a Godot build, I’m going to use one of the getting-started tutorials from the engine’s docs: the tutorial for the 2D game “Dodge the Creeps!” Note that because we are actually going to export the project as an executable (in our case, a Mac app), you should also take a look at the docs on preparing the export if you’re not yet familiar with Godot. :)
Note: The Godot “exports” are the equivalent of Unity and Unreal Engine “builds” — thus, I’ll use both terms interchangeably in this article.
To check out the entire project architecture, take a look at the GitHub repo! 🚀
The game itself is quite simple: You control a little player sprite by clicking on the screen to set its target point; enemies spawn periodically somewhere along the edge of the screen, and they simply move along a straight line after popping up. You have to avoid these “creeps” — if one touches you, it’s game over! The longer you dodge them, the more points you earn.

Preparing our Godot project for export
In this example, I’ll be building my Godot game for Mac, though exporting a Godot game for Android or iOS is pretty similar. So, just as explained in the Godot docs, I’ve made sure to set up my project as follows:
- Download the export templates: These obviously won’t be directly available on the remote Codemagic machine, but they’re required to prepare everything for the auto-build
To download and install these templates, just open the Editor > Manage Export Templates… menu, and then click the “Download and Install” button:

- Configure the export presets: Now that we have templates, we can add various export presets to our project — this is essential because they’re the ones we’ll call from the command line to build the project into an executable
To add a preset, just open the Project > Export… menu and click the “Add…” button at the top. Then choose the preset template you want to import (in my case, “Mac OSX”):

You can also set up some info about the export, such as a custom name for the export preset (here, I’ve changed it to “mac”), or some additional data and identifiers for your app:

Remember the name you gave your preset: We will use this reference in our export shell command!
Note: Because we’ll be using a unique reference, you can define additional “ready-to-go” export presets even if you don’t use them, like my Windows “win” preset here. They’ll just be ignored if we use another preset. ;)
If you scroll down a bit in the export options of the “mac” preset, you’ll also notice that by default, the macOS export makes a “signed” app — this is usually required if you want end users to actually be able to run your executable (otherwise, the Mac Gatekeeper will most likely prevent it from starting up). This is also where you can “notarize” your app by using your Apple Developer ID certificate if you have one. Otherwise, you can ignore this step, and Godot will use an ad hoc signature for the app. As explained in the Godot docs, the signing and notarization data determine if and how the app will eventually run.
Note, however, that in order to get a properly signed (and optionally notarized) macOS export, you’ll need to run the export step on a macOS system with the XCode command-line tools installed! (Fortunately for us, Codemagic’s Mac build machines have XCode CLI preinstalled.)
Versioning our Godot project with Git
Now, we need to make sure our Godot project is Git versioned so that we can push it to an online Git provider and give Codemagic access to the sources.
To prepare our new Git repo, we can simply use the git init command. Then, we’re going to discover one of Godot’s really great perks related to Git versioning… Since everything is text based, we don’t have a complex file tree or bonus metafiles to watch out for: We can simply commit everything and don’t even have to add a .gitignore!
However, you can still add one if you want, particularly if you’d like to avoid versioning auto-generated data:
- The
.importdirectory: stores all the imported file configs but will be re-created if needed *.translation: files generated from CSVs- The
.monodirectory (only exists if you’re using the Mono version of the Godot editor): stores auto-generated Mono-related files
Then, there is the special case of export_presets.cfg.
If you take a look at your FileSystem dock inside the Godot editor, you won’t actually see this file since this view filters project-wide files and other high-level settings (because it’s better to use the Godot setting modals to update those properly). However, if you take a look at your Godot project folder with your usual file browser, you’ll see that this export_presets.cfg is located at the root. If you open it, you’ll see something like this:
[preset.0]

name="mac"
platform="Mac OSX"
runnable=true
custom_features=""
export_filter="all_resources"
include_filter=""
exclude_filter=""
export_path=""
script_export_mode=1
script_encryption_key=""

[preset.0.options]

custom_template/debug=""
custom_template/release=""
application/name="Dodge the Creeps"
application/info="Made with Godot Engine"
application/icon=""
application/identifier="com.minapecheux.dodgethecreeps"
application/signature=""
application/app_category="Games"
application/short_version="1.0"
application/version="1.0"
...

[preset.1]

name="win"
platform="Windows Desktop"
runnable=true
custom_features=""
export_filter="all_resources"
include_filter=""
exclude_filter=""
export_path=""
script_export_mode=1
script_encryption_key=""

[preset.1.options]

custom_template/debug=""
custom_template/release=""
...
This file is important because it tells Godot how to build a given export preset. For example, here, I find the two “mac” and “win” presets I prepared earlier, along with their additional config data.
However, it can be risky to add this file to your Git repo because it can contain app signatures and other sensitive credentials.
However, it’s up to you to decide whether to do so. If it’s safe to commit your export_presets.cfg file because it just contains basic public info, feel free to simply add it to the repo and skip the next paragraph. :)
Otherwise, if your export_presets.cfg can’t be committed because of security issues, a trick is to use environment variables: While the Godot export presets don’t currently handle environment variables themselves, there’s nothing stopping you from encoding the entire file to base64 and adding it to your Codemagic app as an environment variable!
So simply run the following command on your local machine at the root of your Godot project folder:
cat export_presets.cfg | base64 | pbcopy
Then, go to your Codemagic app dashboard. In the “Environment variables” tab, add a new variable called GODOT_EXPORT_PRESETS, paste the file’s encoded contents as the value, and create a new environment variable group called “godot”.

In just a second, we’ll see how to use this variable in our Codemagic workflow configuration. ;)
In case you aren’t a Codemagic user yet, you can sign up here:
Automating our Godot game build with Codemagic
We are now ready to set up our Codemagic workflow to automate the export of our Godot game!
Since Codemagic isn’t yet as knee-deep in Godot automation as in Unity automation, there is no Godot editor installed on the remote machines by default. But this isn’t a problem, as we can download the editor and export templates and set everything up properly.
Then, we’ll simply decode our GODOT_EXPORT_PRESETS environment variable to “re-inject” our export_presets.cfg file into the sources fetched from the Git provider.
Finally, we’ll use the Godot command-line tools to export our project using the “mac” preset.
Here is the complete codemagic.yaml workflow configuration file:
workflows:
  godot-mac-workflow:
      name: Godot Mac Workflow
      max_build_duration: 60
      environment:
        groups:
          - godot
        vars:
          GODOT_VERSION: 3.4.4
          GODOT_EXEC_URL: https://downloads.tuxfamily.org/godotengine/${GODOT_VERSION}/Godot_v${GODOT_VERSION}-stable_osx.universal.zip
          GODOT_TEMPLATES_URL: https://downloads.tuxfamily.org/godotengine/${GODOT_VERSION}/Godot_v${GODOT_VERSION}-stable_export_templates.tpz
          GODOT_TEMPLATES_DIR: "/Users/builder/Library/Application Support/Godot/templates"
          GODOT_EXEC: Godot.app/Contents/MacOS/Godot
          EXPORT_TYPE: mac
          ARTIFACT: app.zip
      scripts:
        - name: Download Godot engine
          script: curl -o ./godot.zip ${GODOT_EXEC_URL} && unzip ./godot.zip
        - name: Download Godot templates
          script: curl -o ./godot-templates.zip ${GODOT_TEMPLATES_URL} && unzip ./godot-templates.zip
        - name: Setup templates
          script: mkdir -p "${GODOT_TEMPLATES_DIR}" && mv templates "${GODOT_TEMPLATES_DIR}/${GODOT_VERSION}.stable"
        - name: Prepare build directory
          script: mkdir build/
        - name: Decode export presets
          script: echo ${GODOT_EXPORT_PRESETS} | base64 --decode > ./export_presets.cfg
        - name: Export project
          script: ${GODOT_EXEC} --path . --no-window --export "${EXPORT_TYPE}" build/${ARTIFACT}
      artifacts:
        - build/*.zip
Now, all that’s left to do is run this pipeline. After just a few minutes, we’ll get our Mac app all zipped in a little archive:
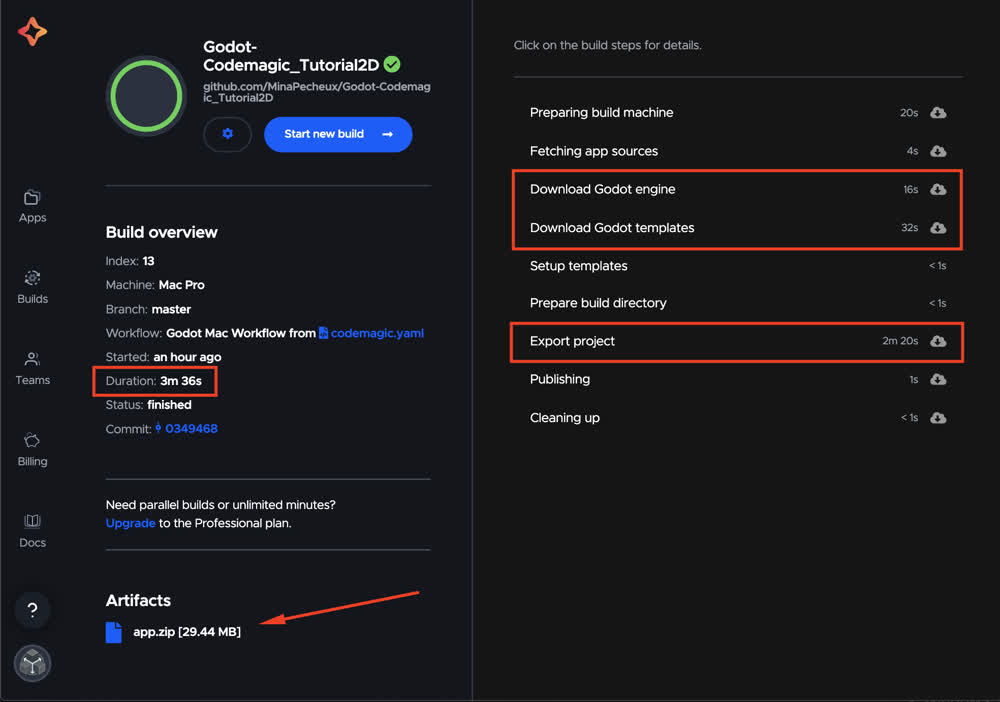
You’ll also notice that downloading the engine and templates is really fast. This can, of course, depend a bit on your current internet connection, but overall, Godot is a very lightweight piece of software that is simply a breeze to get and install! ;)
Note: After you download and unzip the exported project, when you try and run the app, you might get some security warnings depending on how you signed and notarized your project. Usually, you can just force-open the project or put it on your computer’s whitelist, but for more info, make sure to check out Godot’s docs.
Conclusion
Even if Unity and Unreal Engine are still the big players in the world of video games, the Godot 2D and 3D engine is getting more and more fans as its community-based open-source development adds ever more features!
In this article, we’ve seen that it is actually very easy to use Godot with Git versioning and that using it along with Codemagic allows us to quickly automate building our game. :) Adding publishing stages for Android or iOS builds of a Godot game isn’t too hard either, given that Codemagic has integrations with both Google Play and App Store and can automatically code sign your apps, but we’ll leave the deployment part for another article.
I hope you enjoyed this tutorial — feel free to share your ideas for other DevOps topics you’d like me to make Unity tutorials on! You can find me on Codemagic’s Slack, on Medium, or on Twitter.
Don’t forget: You can get the sample project, including the code of “Dodge the Creeps” and the codemagic.yaml file, on GitHub over here. 🚀
Mina Pêcheux is a freelance full-stack web & game developer. She’s also passionate about computer graphics, music, data science, and other topics! She runs her own blog. Alternatively, you can find her on Twitter.


