


Written by Rudrank Riyam.
Editor’s Note: This post was originally published in May 2021 and updated in January 2022. It uses the latest version of Firebase, Google Sign-In, and Swift Package Manager to install them.
Apple’s declarative framework SwiftUI is a milestone in Apple platforms development. It has made mobile development fun for a lot of developers.
Google provides an SDK to add their Sign-In mechanism to your app. Firebase provides many backend services, one of which is authentication. It helps to authenticate with many social media platforms, email, and phone numbers.
In this article, you’ll implement the Google Sign-In SDK and integrate it with Firebase authentication in an iOS app created using the SwiftUI framework. Additionally, you’ll integrate the Codemagic CI/CD service to build the app successfully on a remote machine. You’ll learn how to:
- Create a SwiftUI lifecycle project
- Add dependencies
- Create a Firebase project
- Set up Firebase SDK in Xcode
- Set up the Google Sign-In SDK in Xcode
- Configure Google Sign-In authentication
- Design the UI using SwiftUI
- Configure Firebase on Codemagic
Note: This tutorial assumes that you’re familiar with the basics of SwiftUI.

Introduction
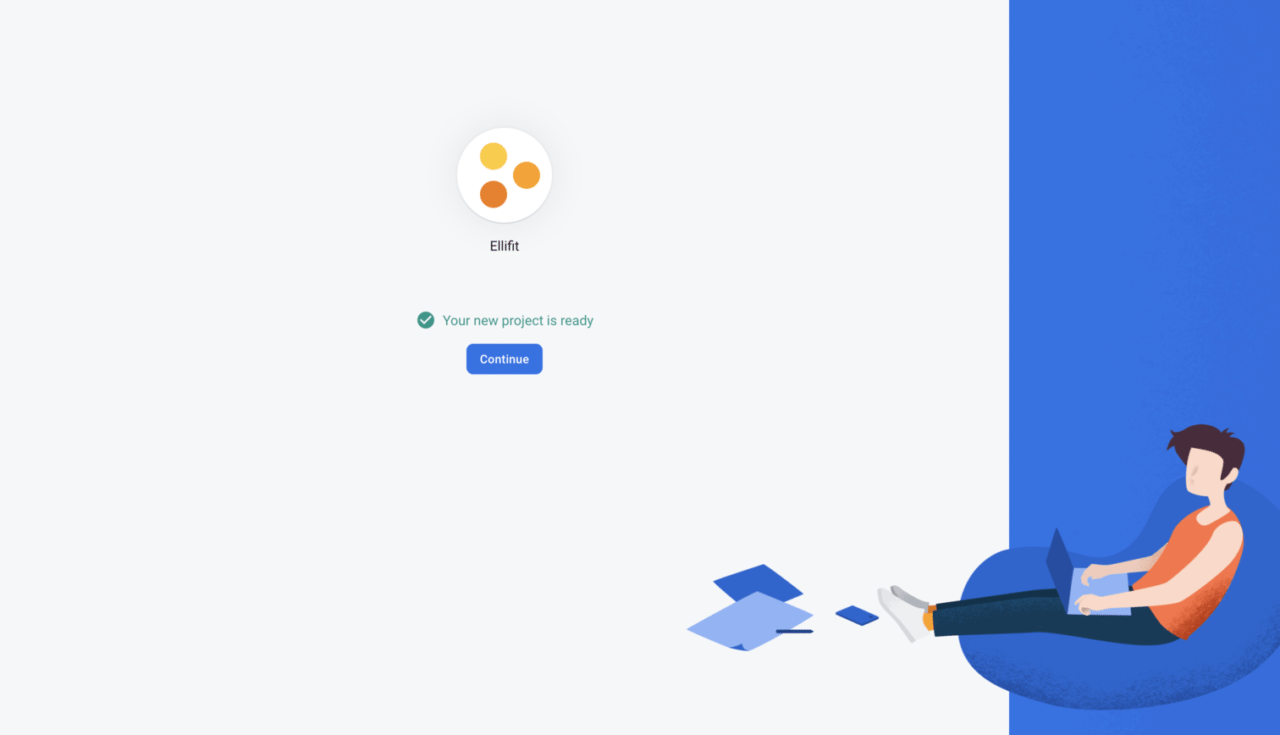
The sample project for this article is Ellifit, an elliptical workout-tracking app. In the onboarding screen, the user can sign in to the app through their Google account.
After they sign in, the home screen shows their image, name, and email address. The user has the option to sign out of their account.
Let’s get started!
Creating a SwiftUI lifecycle project
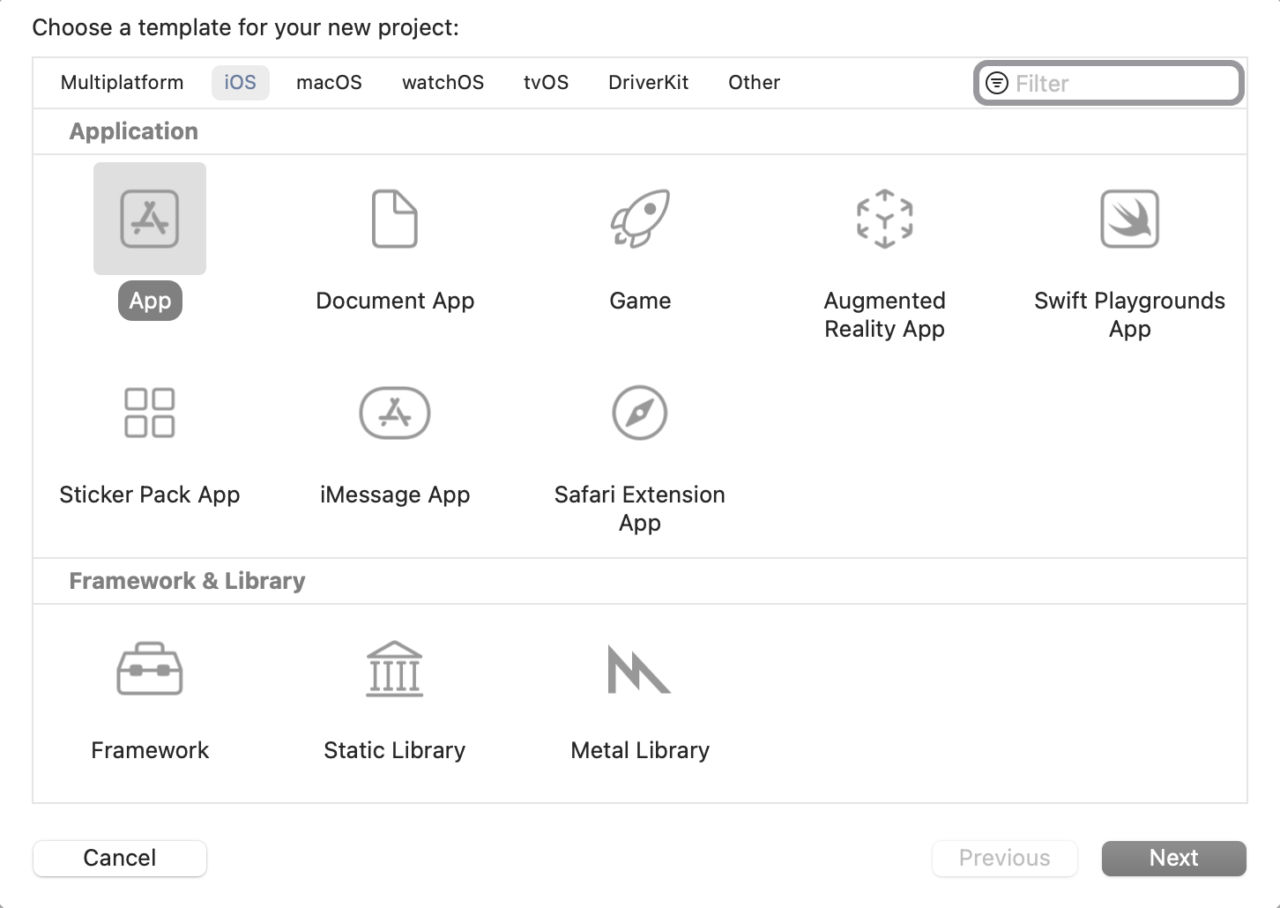
Open Xcode, select Create a new Xcode project, and select the App template under the iOS header.
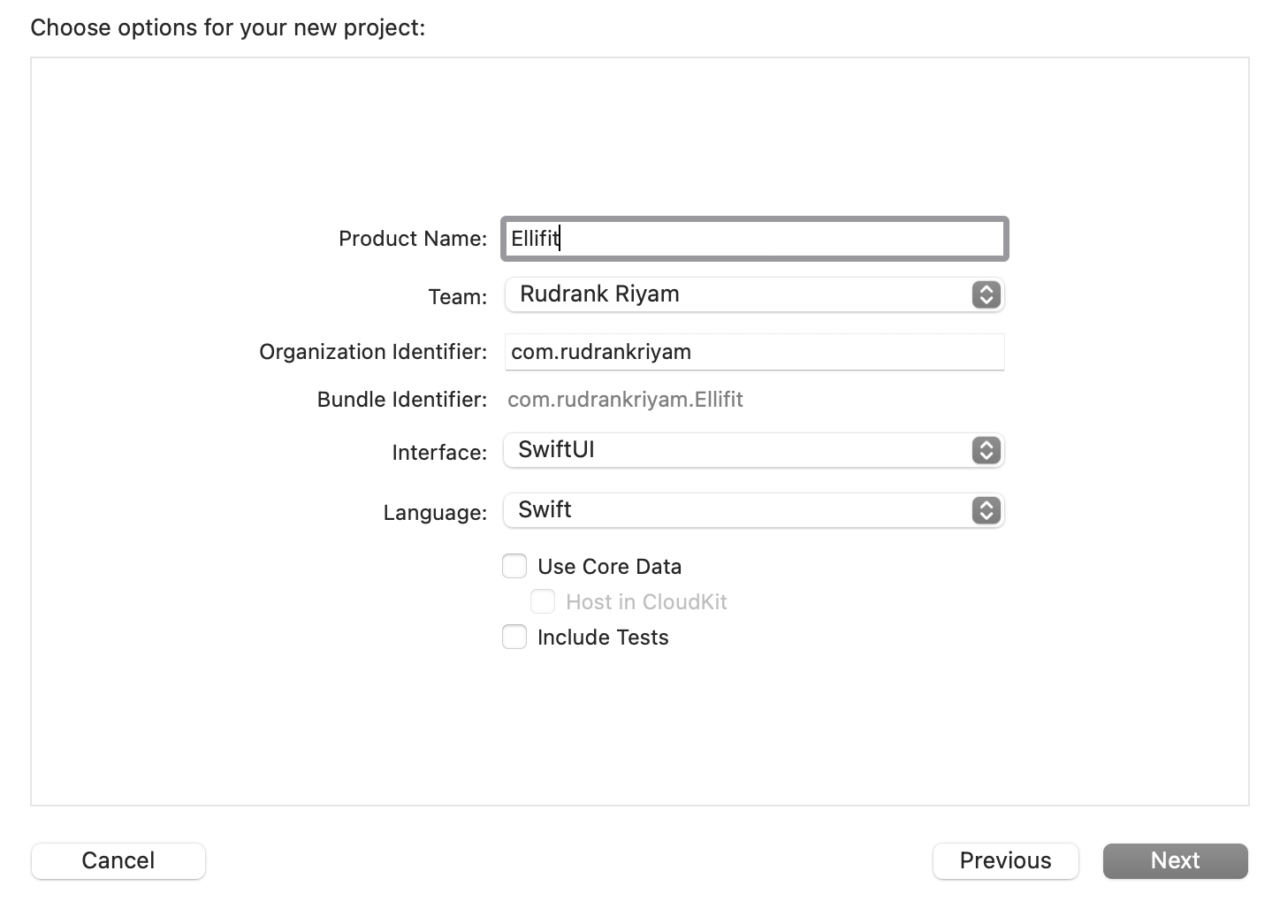
Fill in the template options as follows, then click Next:
- Product Name: Ellifit.
- Organization Name: Fill this in however you like.
- Organization Identifier: The identifier you use for your apps.
- Interface: SwiftUI.
- Life Cycle: SwiftUI App.
- Language: Swift.
- Make sure you’ve unchecked the Use Core Data, Include Unit Tests, and UI Tests options.
Choose a directory to save your project, and click Create.
Now that the project is ready, you can add a few dependencies to work with Firebase and Google Sign-In.
Adding Firebase and Google Sign-In dependencies
You can install Firebase and Google Sign-In using Swift Package Manager or Cocoapods. For Xcode versions 12.5 and higher, Firebase recommends to use Swift Package Manager.
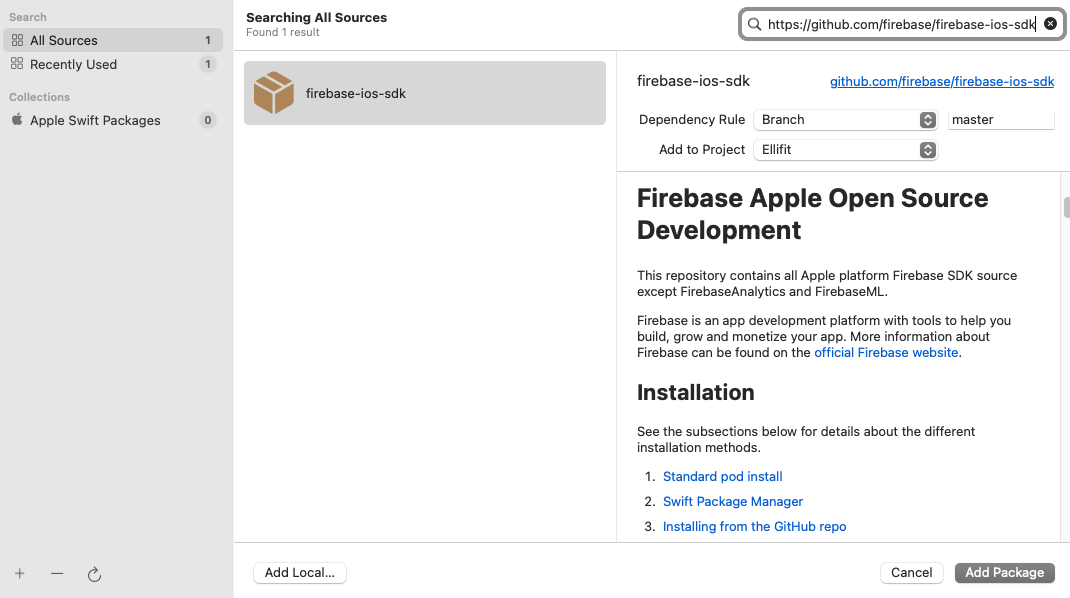
So, navigate to File > Swift Packages > Add Package Dependency. Search for the following package:
https://github.com/firebase/firebase-ios-sdk
Select the version of Firebase you want to use.
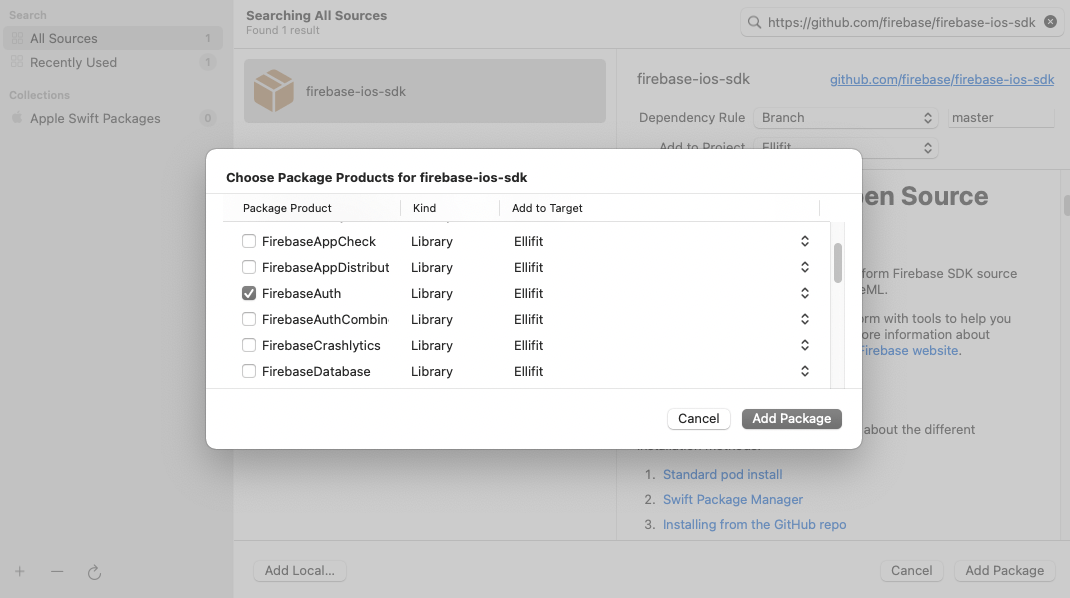
Then, choose Firebase Auth library:
Similarly, add the following for Google Sign-In:
https://github.com/google/GoogleSignIn-iOS

After setting up the project in Xcode, let’s create a Firebase project for the app!
Creating a Firebase project
You’ll have to create an iOS Firebase project to associate with the app. Every time a new user authenticates using Google Sign-In, it is reflected in the Firebase console.
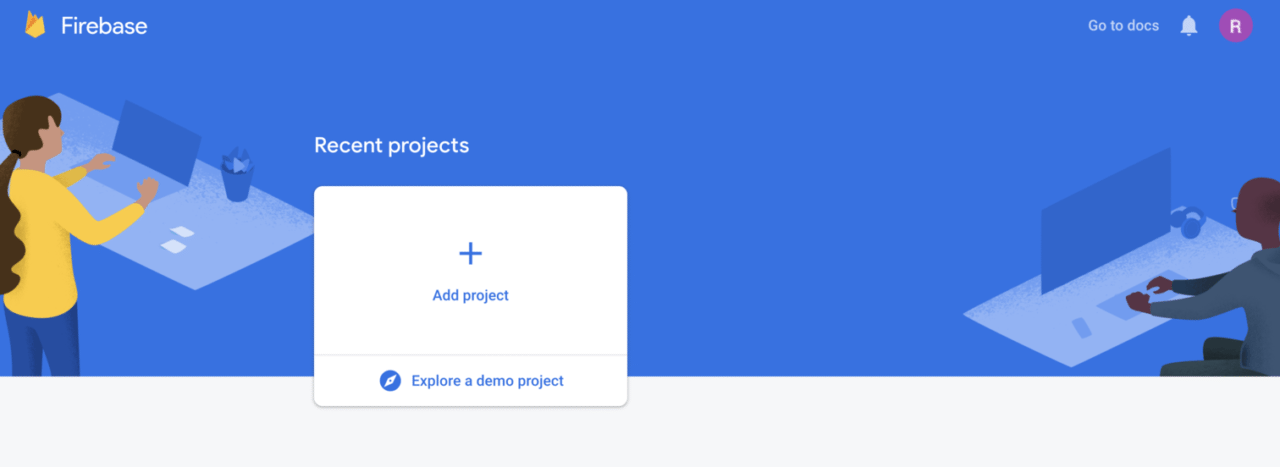
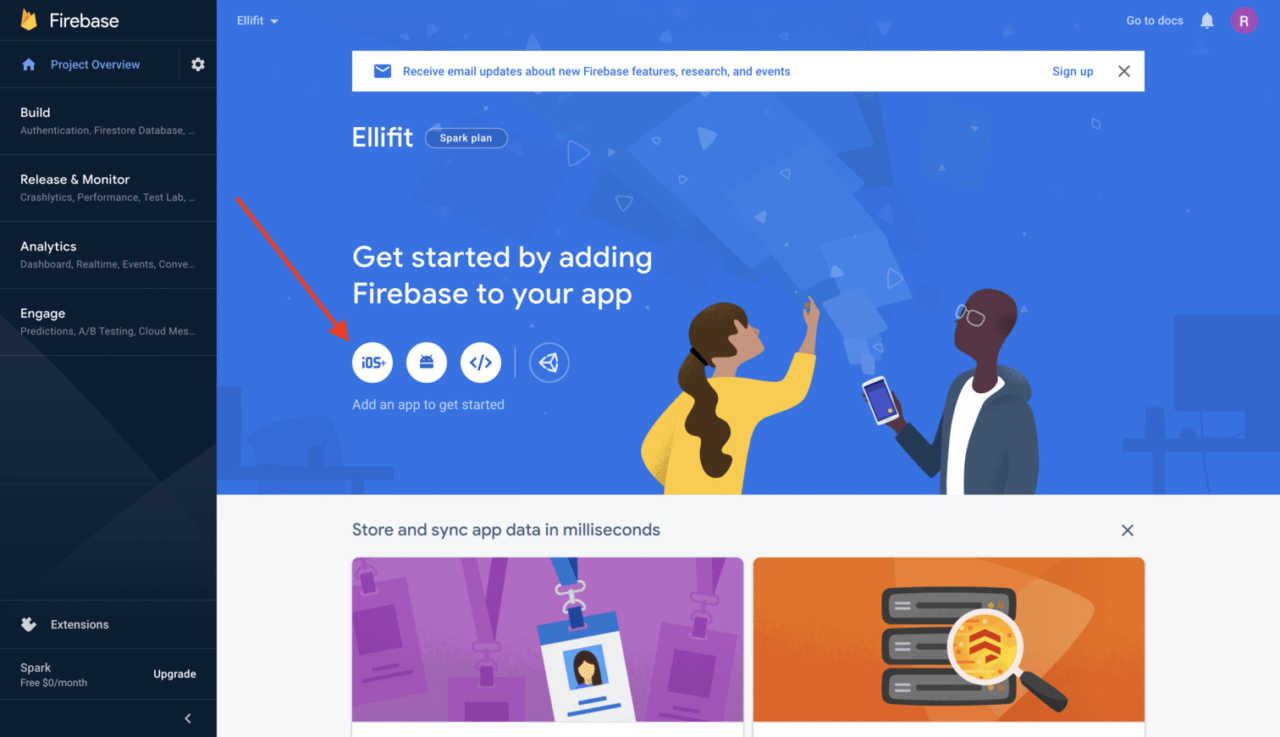
Open Firebase Console and select Add Project.
Write the name of the project as Ellifit.
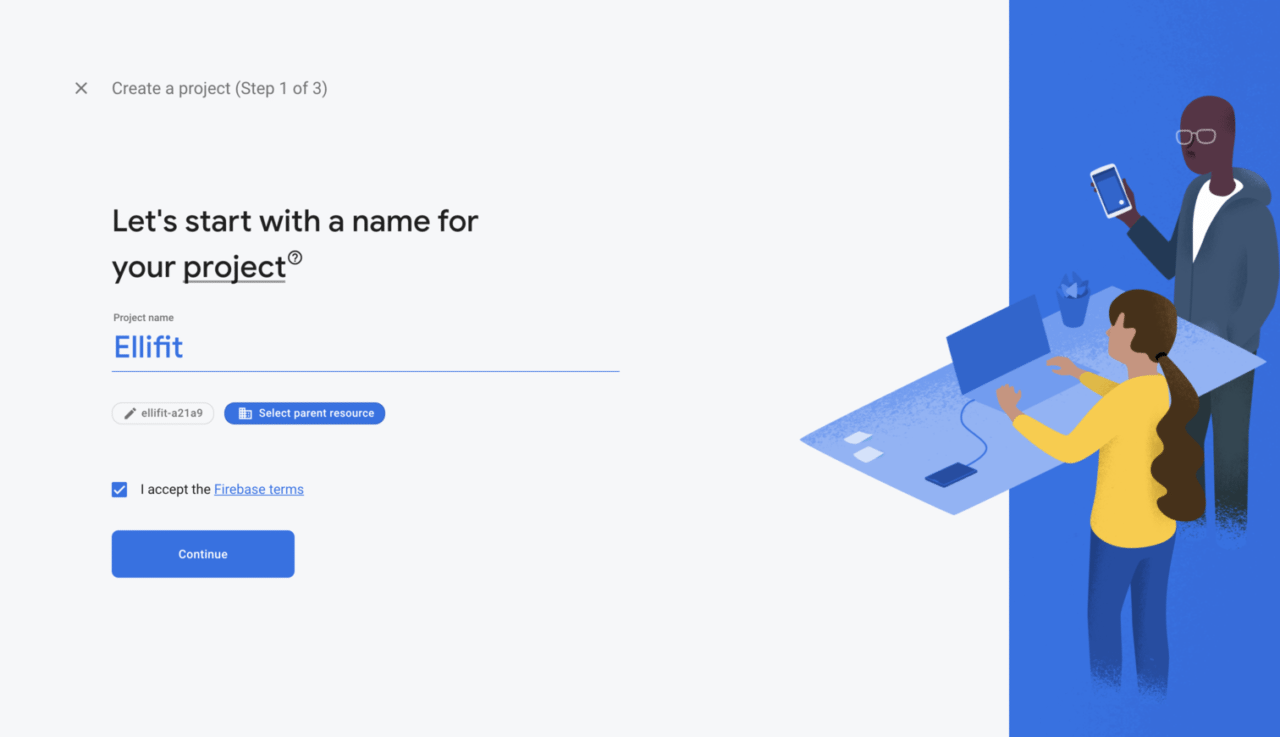
Disable Google Analytics, as you do not require it for this tutorial. Select Create Project.

After the project is ready, select Continue.
You will be redirected to the Firebase console page. Select the iOS icon to create a new iOS app for the project.
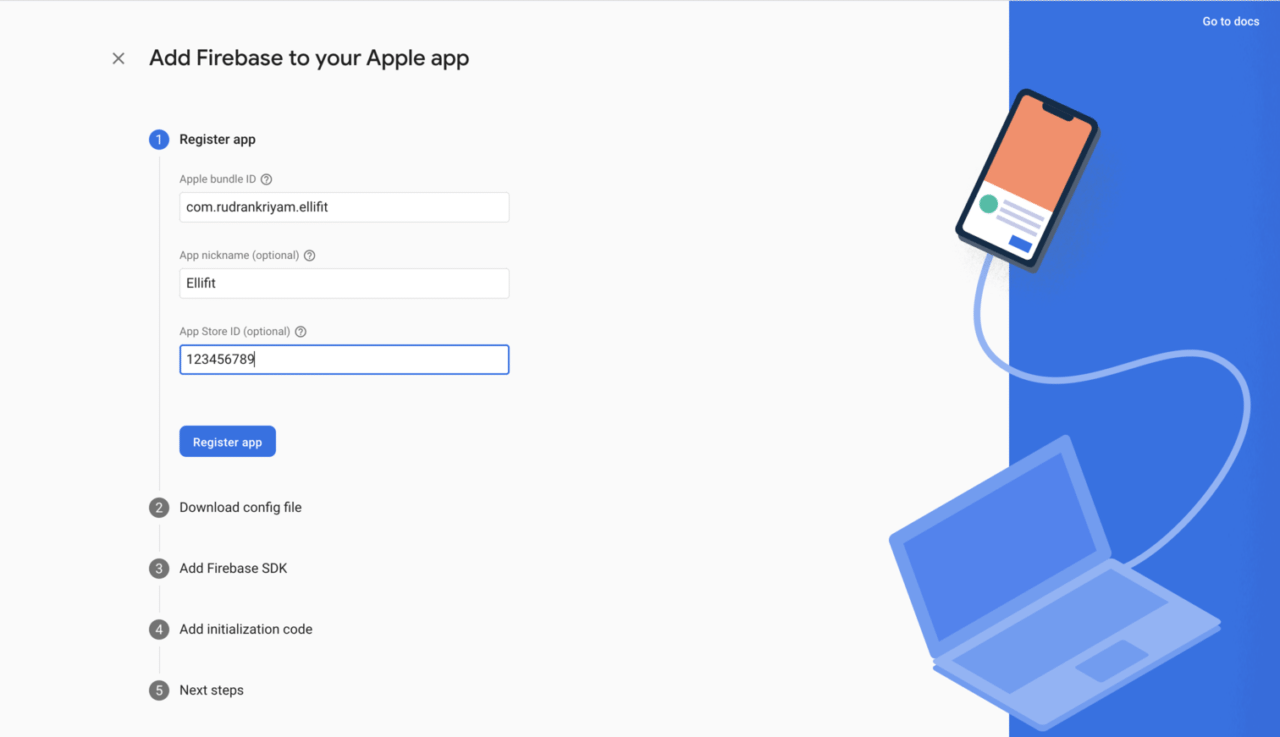
Register the app by providing the same bundle identifier that you created in the Xcode project. Give it whatever nickname you like, and add the App Store ID if you’d like to upload your app to the store later.
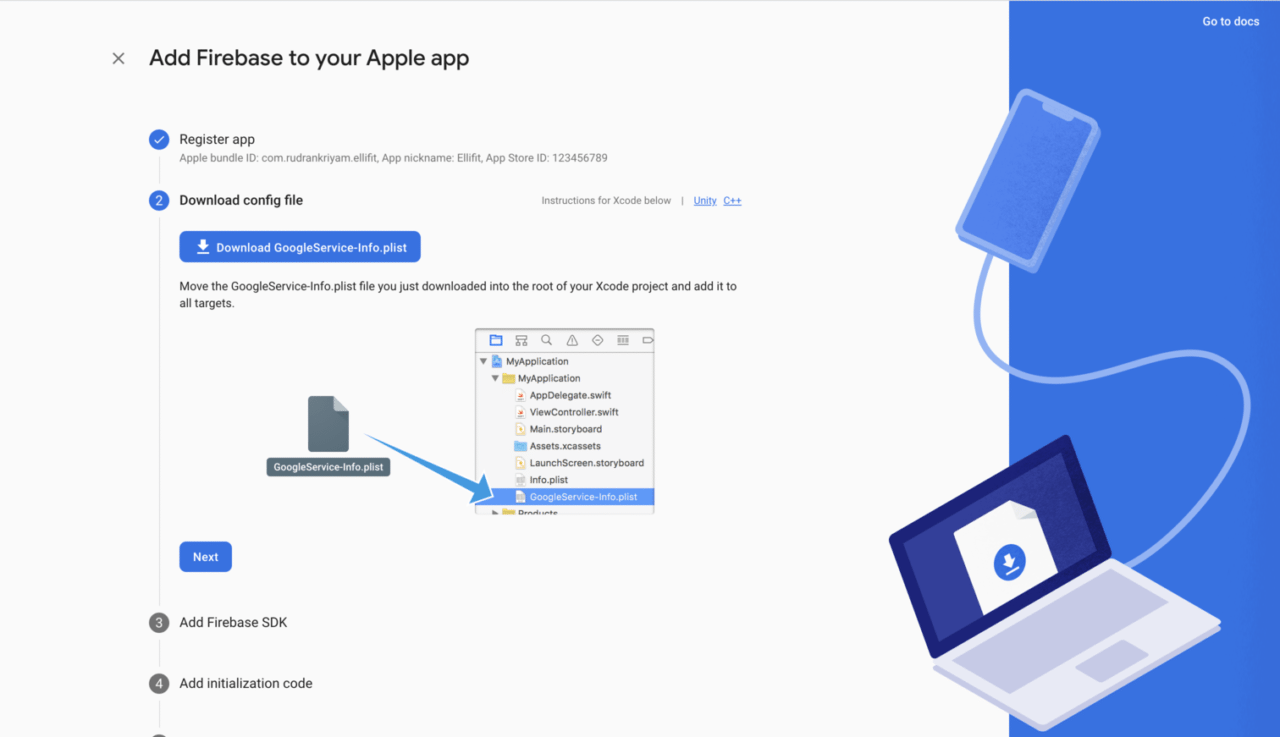
Download GoogleService-Info.plist. Move this file into the root of the Xcode project and add it to all targets.
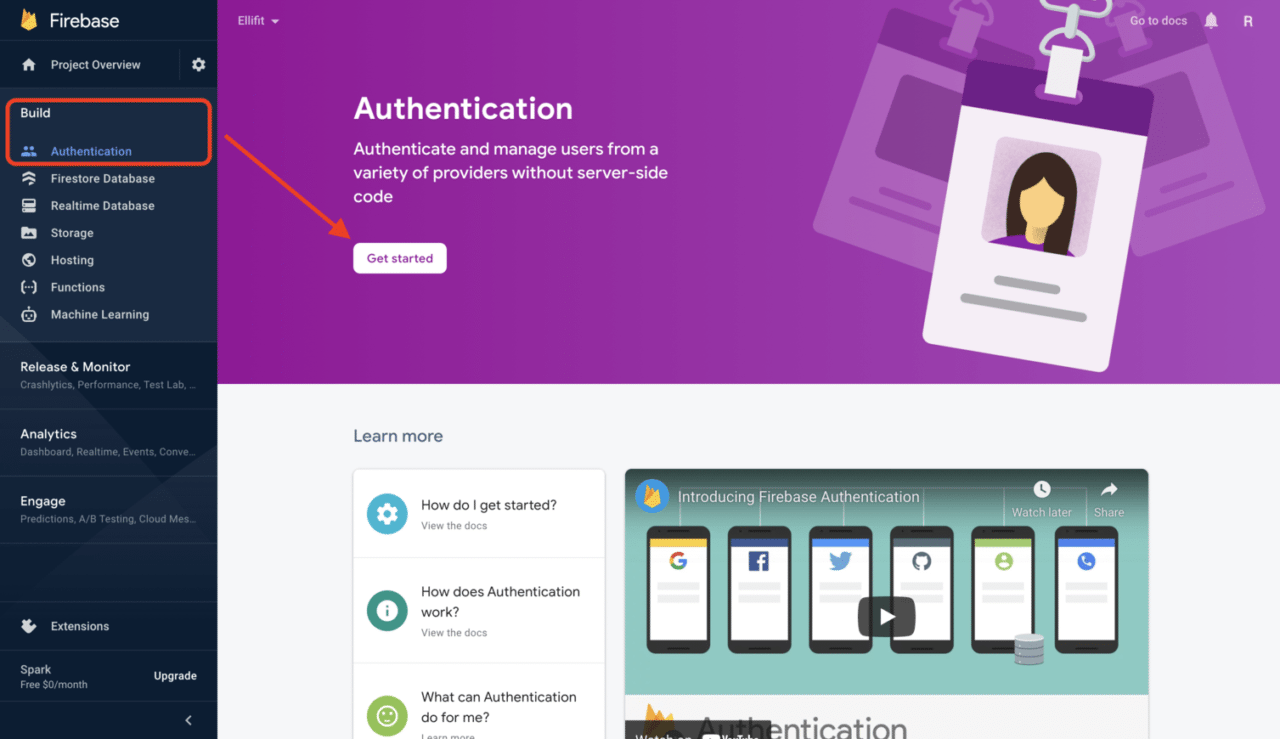
Select continue until you reach the last step and then head back to the console. As this tutorial focuses on adding Google Sign-In support, you’ll need to enable it for your Firebase project. To do that, go to the Authentication page on the Firebase dashboard.
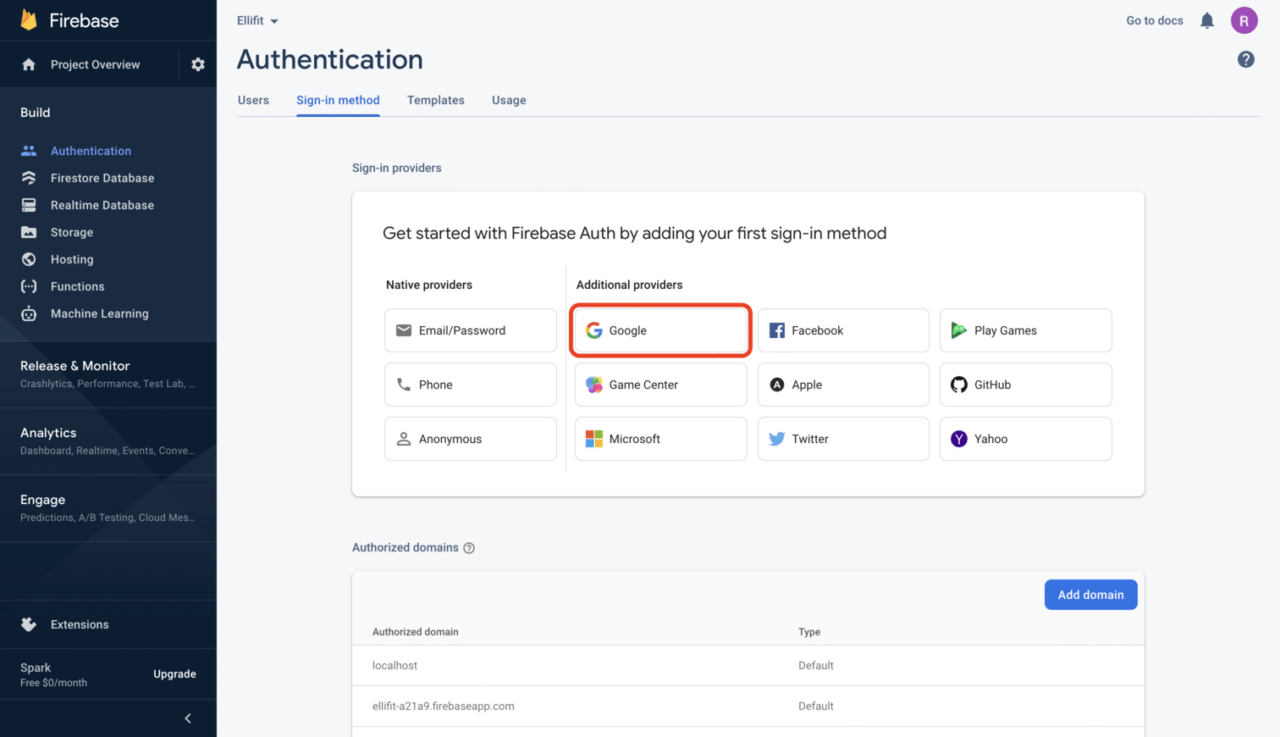
Select the Sign-In method tab. Firebase provides you with authentication for many service providers. Select Google:
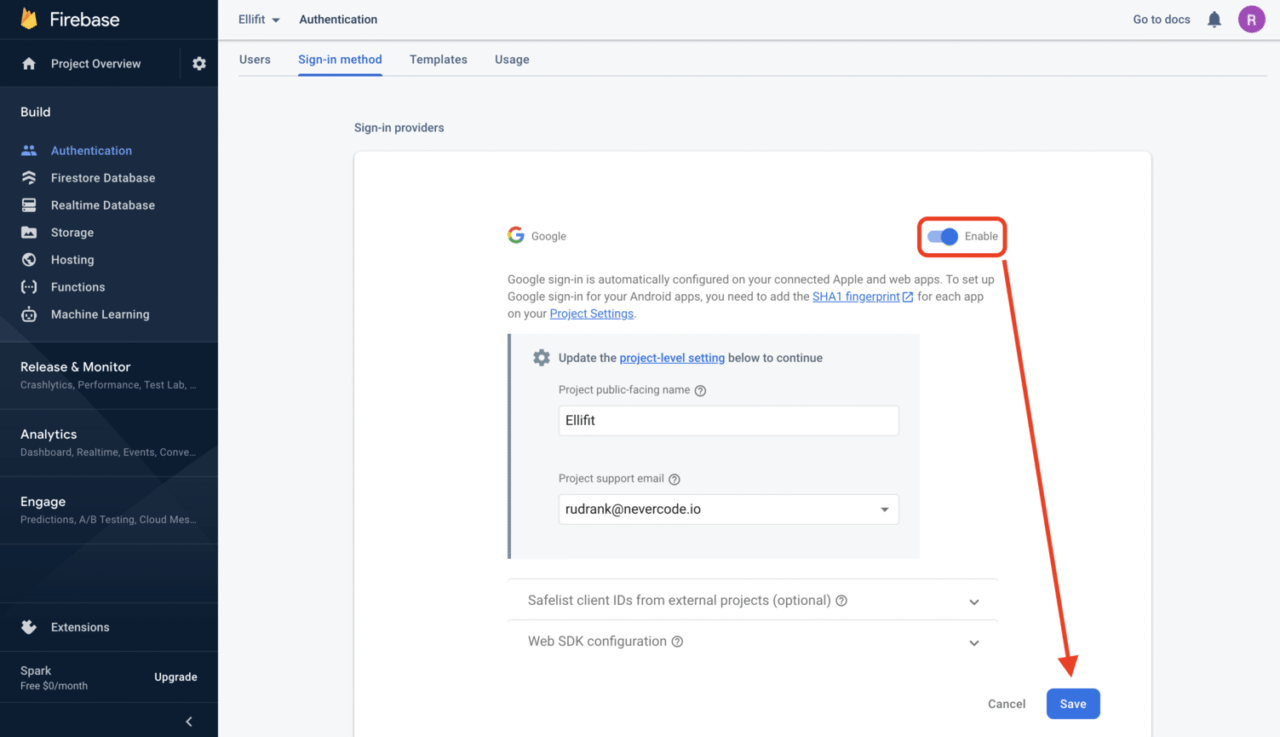
Toggle to enable Google Sign-In and change the project public-facing name to Ellifit and the project email to your email address. Select Save.
Now you’re ready to write some code!
Setting up Firebase SDK
In our Ellifit app, users will authenticate with Firebase using their Google accounts. To configure this authentication, open Ellifit.xcodeproj and select the ElliFitApp.swift file. Import Firebase at the top of the file.
import Firebase
Create an extension on EllifitApp and add a setupAuthentication() method.
extension EllifitApp {
  private func setupAuthentication() {
    FirebaseApp.configure()
  }
}
Calling configure() configures a default Firebase app for you. Inside EllifitApp, create an initializer to set up authentication. The whole struct looks like this:
@main
struct EllifitApp: App {
  init() {
    setupAuthentication()
  }

  var body: some Scene {
    WindowGroup {
      ContentView()
    }
  }
}
Let’s get started with the next step – setting up Google Sign-In.
Setting up Google Sign-In
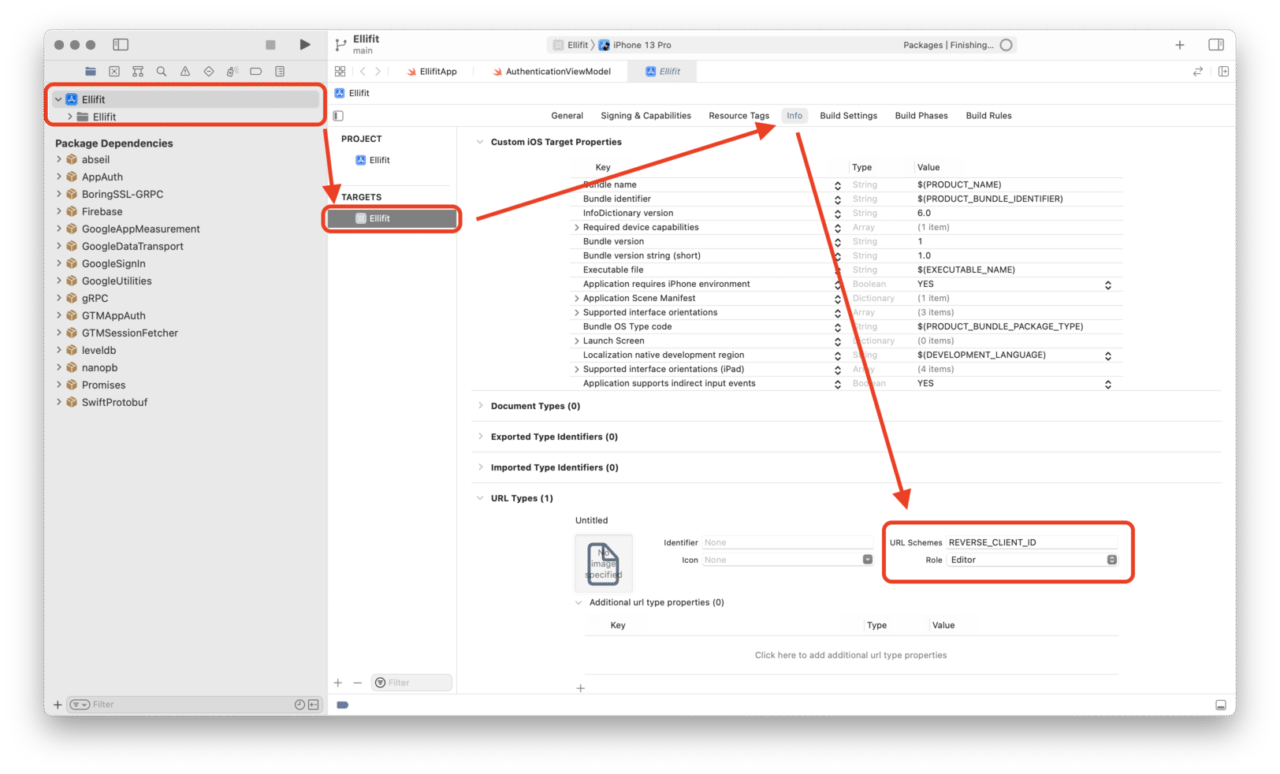
Before writing code for the main functionality, go to the project navigator and open GoogleService-Info.plist. Copy the value of the REVERSED_CLIENT_ID.
Now, select the Ellifit project and select the Ellifit target. Under the Info tab, create a new URL Type. In the URL Schemes text field, add the value of the REVERSE_CLIENT_ID.
Configuring Google Sign-In authentication
Create a new Swift file named AuthenticationViewModel.swift, and add the following class to it:
import Firebase
import GoogleSignIn

class AuthenticationViewModel: ObservableObject {

  // 1
  enum SignInState {
    case signedIn
    case signedOut
  }

  // 2
  @Published var state: SignInState = .signedOut
}
You create an enum SignInState to define the sign-in and sign-out state for Google Sign-In and a @Published variable to manage the authentication state.
Then, add signIn() method to it:
func signIn() {
  // 1
  if GIDSignIn.sharedInstance.hasPreviousSignIn() {
    GIDSignIn.sharedInstance.restorePreviousSignIn { [unowned self] user, error in
        authenticateUser(for: user, with: error)
    }
  } else {
    // 2
    guard let clientID = FirebaseApp.app()?.options.clientID else { return }

    // 3
    let configuration = GIDConfiguration(clientID: clientID)

    // 4
    guard let windowScene = UIApplication.shared.connectedScenes.first as? UIWindowScene else { return }
    guard let rootViewController = windowScene.windows.first?.rootViewController else { return }

    // 5
    GIDSignIn.sharedInstance.signIn(with: configuration, presenting: rootViewController) { [unowned self] user, error in
      authenticateUser(for: user, with: error)
    }
  }
}
Let’s go through what this code is doing:
- You check if there’s a previous Sign-In. If yes, then restore it. Otherwise, move on to defining the sign-in process.
- Get the
clientIDfrom Firebase App. It fetches theclientIDfrom the GoogleService-Info.plist added to the project earlier. - Create a Google Sign-In configuration object with the
clientID. - As you’re not using view controllers to retrieve the
presentingViewController,access it through the shared instance of theUIApplication.Note that directly using theUIWindowis now deprecated, and you should use the scene instead. - Then, call
signIn()from the shared instance of theGIDSignInclass to start the sign-in process. You pass the configuration object and the presenting controller.
Now that you’ve access to the GIDGoogleUser, you can sign in to Firebase Auth as well. Add the following method inside AuthenticationViewModel:
private func authenticateUser(for user: GIDGoogleUser?, with error: Error?) {
  // 1
  if let error = error {
    print(error.localizedDescription)
    return
  }

  // 2
  guard let authentication = user?.authentication, let idToken = authentication.idToken else { return }

  let credential = GoogleAuthProvider.credential(withIDToken: idToken, accessToken: authentication.accessToken)

  // 3
  Auth.auth().signIn(with: credential) { [unowned self] (_, error) in
    if let error = error {
      print(error.localizedDescription)
    } else {
      self.state = .signedIn
    }
  }
}
In this piece of code, you:
- Handle the error and return it early from the method.
- Get the
idTokenandaccessTokenfrom theuserinstance. - Use them to sign in to Firebase. If there are no errors, change the state to
signedIn.
Now, create the following method to signOut:
func signOut() {
  // 1
  GIDSignIn.sharedInstance.signOut()

  do {
    // 2
    try Auth.auth().signOut()

    state = .signedOut
  } catch {
    print(error.localizedDescription)
  }
}
Like the process above, call the signOut() method. You also grab the object that manages authentication in the Firebase app that calls the signOut() method. If there are no errors, change the state to signedOut.
At the top of EllipfitApp, add the following line:
@StateObject var viewModel = AuthenticationViewModel()
You create a @StateObject variable to be alive for the whole lifecycle. Pass it as an environment object into ContentView, so the view can access the same view model.
The EllipfitApp finally looks like this:
import SwiftUI
import Firebase
import GoogleSignIn

@main
struct EllifitApp: App {
  @StateObject var viewModel = AuthenticationViewModel()

  init() {
    setupAuthentication()
  }

  var body: some Scene {
    WindowGroup {
      ContentView()
        .environmentObject(viewModel)
    }
  }
}

extension EllifitApp {
  private func setupAuthentication() {
    FirebaseApp.configure()
  }
}
Now that you’re done implementing Firebase and Google Sign-In in the app, it’s time to design the UI using SwiftUI!
Designing the user interface using SwiftUI
As mentioned earlier, there will be two views:
- Login view
- Home view
Login view
Before creating the LoginView, let’s create the Sign-in button. In a new Swift file named GoogleSignInButton.swift, add:
import SwiftUI
import GoogleSignIn

struct GoogleSignInButton: UIViewRepresentable {
  @Environment(\.colorScheme) var colorScheme

  private var button = GIDSignInButton()

  func makeUIView(context: Context) -> GIDSignInButton {
    button.colorScheme = colorScheme == .dark ? .dark : .light
    return button
  }

  func updateUIView(_ uiView: UIViewType, context: Context) {
    button.colorScheme = colorScheme == .dark ? .dark : .light
  }
}
As you’re working with SwiftUI, you can use the “Sign in with Google” button provided by Google Sign-In SDK but have to wrap it in a UIViewRepresentable. The button changes the color scheme according to the system color scheme derived from the environment.
Then, create a new Swift file named LoginView.swift of the type SwiftUI View, and update LoginView with the following:
import SwiftUI

struct LoginView: View {

  // 1
  @EnvironmentObject var viewModel: AuthenticationViewModel

  var body: some View {
    VStack {
      Spacer()

      // 2
      Image("header_image")
        .resizable()
        .aspectRatio(contentMode: .fit)

      Text("Welcome to Ellifit!")
        .fontWeight(.black)
        .foregroundColor(Color(.systemIndigo))
        .font(.largeTitle)
        .multilineTextAlignment(.center)

      Text("Empower your elliptical workouts by tracking every move.")
        .fontWeight(.light)
        .multilineTextAlignment(.center)
        .padding()

      Spacer()

      // 3
      GoogleSignInButton()
        .padding()
        .onTapGesture {
          viewModel.signIn()
        }
    }
  }
}
Here’s the breakdown of this code:
- An environment object to receiving the
AuthenticationViewModelobject from the environment. This way, you use one instance of the class declared in the SwiftUI lifecycle of the app. - This is the UI for the onboarding. You can customize it however you want.
- The Sign in with Google button calls the
signIn()method from the view model on tap. Alternatively, you can provide your custom button here.
Home view
Similar to the previous step, create another Swift file called HomeView.swift:
import SwiftUI
import GoogleSignIn

struct HomeView: View {
  // 1
  @EnvironmentObject var viewModel: AuthenticationViewModel

  // 2
  private let user = GIDSignIn.sharedInstance.currentUser

  var body: some View {
    NavigationView {
      VStack {
        HStack {
          // 3
          NetworkImage(url: user?.profile?.imageURL(withDimension: 200))
            .aspectRatio(contentMode: .fit)
            .frame(width: 100, height: 100, alignment: .center)
            .cornerRadius(8)

          VStack(alignment: .leading) {
            Text(user?.profile?.name ?? "")
              .font(.headline)

            Text(user?.profile?.email ?? "")
              .font(.subheadline)
          }

          Spacer()
        }
        .padding()
        .frame(maxWidth: .infinity)
        .background(Color(.secondarySystemBackground))
        .cornerRadius(12)
        .padding()

        Spacer()

        // 4
        Button(action: viewModel.signOut) {
          Text("Sign out")
            .foregroundColor(.white)
            .padding()
            .frame(maxWidth: .infinity)
            .background(Color(.systemIndigo))
            .cornerRadius(12)
            .padding()
        }
      }
      .navigationTitle("Ellifit")
    }
    .navigationViewStyle(StackNavigationViewStyle())
  }
}

/// A generic view that shows images from the network.
struct NetworkImage: View {
  let url: URL?

  var body: some View {
    if let url = url,
       let data = try? Data(contentsOf: url),
       let uiImage = UIImage(data: data) {
      Image(uiImage: uiImage)
        .resizable()
        .aspectRatio(contentMode: .fit)
    } else {
      Image(systemName: "person.circle.fill")
        .resizable()
        .aspectRatio(contentMode: .fit)
    }
  }
}
Here is what this code is doing:
- Declares an
@EnvironmentObjectsimilar to what you did inLoginView. - Creates a constant
userto access the current user fromGIDSignIn’s shared instance. - Uses the constant to access the profile picture, username, and email address of the user’s Google account.
- Creates a Sign out button that calls the
signOut()method from the view model.
The above code creates the whole UI for the application!
Content view
Go to ContentView.swift and update it as follows:
struct ContentView: View {
  @EnvironmentObject var viewModel: AuthenticationViewModel

  var body: some View {
    switch viewModel.state {
      case .signedIn: HomeView()
      case .signedOut: LoginView()
    }
  }
}
You switch the state variable in the view model when a user signs in and signs out.
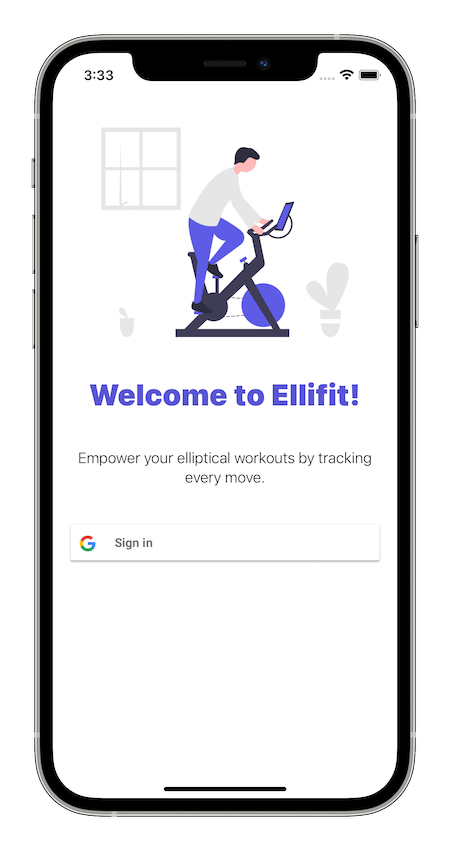
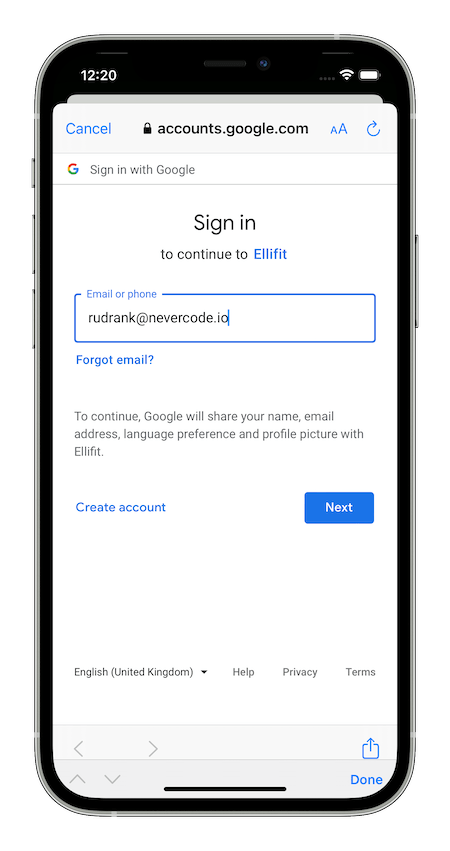
Now, run the app:
Click on the Sign in button, and log into your account:
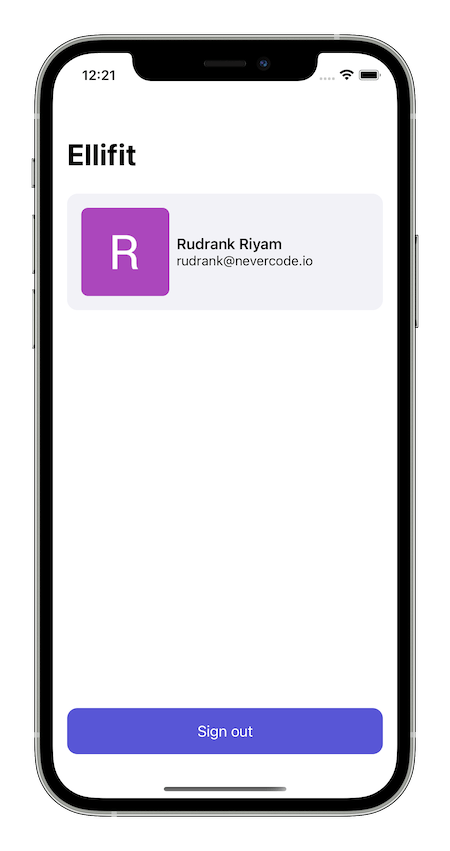
After finishing the login process, the app redirects you to the home screen:
Click on the Sign out button, and you’ll be back at the main login screen.
With this, you have completed the fantastic app that uses Firebase and Google Sign-In!
Configuring Firebase on Codemagic
As mentioned earlier, Codemagic provides you with a CI/CD tool for mobile apps. You’ll use it to build the app on the integration server. If you’re not a user yet, sign up for free here:
Ignoring confidential file
GoogleService-Info.plist contains the confidential Client_ID unique to your app. It shouldn’t be exposed in a public repository to prevent misuse. You need to ignore the file in version control to avoid it from being committed.
Add GoogleService-Info.plist to the .gitignore file in your repository, and commit it before pushing it to remote.
Encrypting confidential file
Codemagic requires the Client_ID to build Firebase on their server and the app. You can set up the codemagic.yaml file to build, test, and deliver native iOS apps on Codemagic. Follow this introductory article to create one for Ellifit.
In a terminal window, change the directory to the root of the folder where GoogleService-Info.plist is stored and run the following command:
cat GoogleService-Info.plist | base64 | pbcopy
It base64 encodes the file and copies the result to the clipboard. Then, go to the project on Codemagic, and under the Environment variables tab, create a new group named “firebase.” For the key IOS_SECRET_FIREBASE, paste the encrypted value. Make sure that Secure is check-marked.
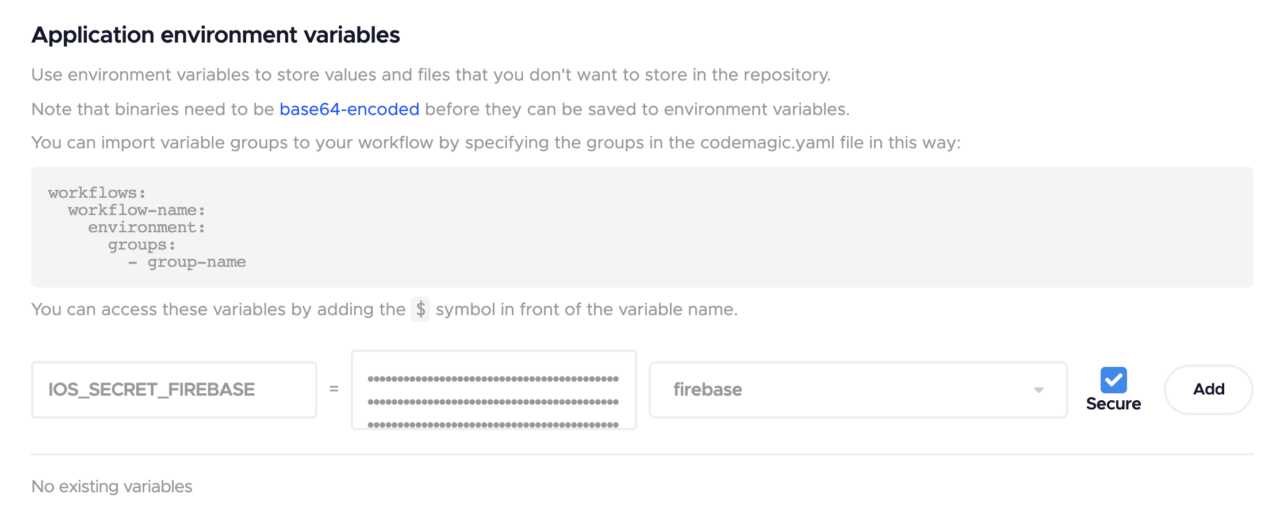
In the codemagic.yaml, add the “firebase” group under environment to import it:
    environment:
      groups:
        - firebase
Adding script
Under script, add the following to decode the file during pre-build.
    scripts:
      - name: Decode Google Service file
      script: echo $IOS_SECRET_FIREBASE | base64 --decode > $CM_BUILD_DIR/Ellifit/GoogleService-Info.plist
After you’re done, save the workflow configuration file. Here’s an example codemagic.yaml for you to work with:
workflows:
    ios-workflow:
      name: iOS Workflow
      environment:
        groups:
          - firebase
        vars:
          XCODE_PROJECT: "Ellifit.xcodeproj"
          XCODE_SCHEME: "Ellifit"
          BUNDLE_ID: "com.rudrankriyam.Ellifit"
        xcode: latest
        cocoapods: default
      triggering:
        events:
          - push
          - tag
          - pull_request
        branch_patterns:
          - pattern: 'develop'
            include: true
            source: true
      scripts:
        - name: Decode Google Service file
          script: |
            echo $IOS_SECRET_FIREBASE | base64 --decode > $CM_BUILD_DIR/Ellifit/GoogleService-Info.plist
        - name: Increment build number
          script: |
            #!/bin/sh
            set -e
            set -x
            cd $CM_BUILD_DIR
            agvtool new-version -all $(($BUILD_NUMBER + 1))
        - name: Build project
          script: |
           xcodebuild build -project "$XCODE_PROJECT" -scheme "$XCODE_SCHEME" CODE_SIGN_INDENTITY="" CODE_SIGNING_REQUIRED=NO CODE_SIGNING_ALLOWED=NO
Building the project
Finally, go to the dashboard, and click on the Start new build button to build the project.

If you want to generate a release build of your iOS app, then check out the following article:
Conclusion
The Ellifit app is ready for you to log in using Firebase and Google Sign-In and start adding code for tracking your workouts. You also tested the app with the excellent tools provided by Codemagic to automate the pipeline.
You can download the final project from Ellifit’s GitHub repository.
We hope you enjoyed this tutorial! If you found it helpful, let us know and join our Slack community!
About the author: Rudrank is an aspiring technical author and Apple platforms developer. You can mostly find him on Twitter (@rudrankriyam) or on his personal blog (rudrank.blog).


