


This article is written by Hrishikesh Pathak
What is a Google Chrome extension?
Google Chrome is the most popular web browser in the world. Chrome extensions are small programs that extend Chrome’s functionality. Google Chrome has a standardized API through which extensions can perform various tasks in the browser.
In our daily lives, we use browser extensions for various tasks, like ad and tracker blocking, grammar correction, and translation. These extensions are made using JavaScript and use the Chrome extension API to interact with the browser. Since Flutter Web projects are compiled in JavaScript, we can build a Chrome extension with Flutter with some small tweaks.
In this tutorial, we are going to learn how to make a Chrome extension using Flutter Web. We will explore different use cases, tweaks, and build commands to get the best result. To get the most out of this guide, make sure to follow it to the end.
The final result of the tutorial will be a Flutter application that runs as a Chrome extension. It will look like this.

To create a Chrome extension with Flutter, we’ll need to go through the following steps:
- Configure the
manifest.jsonfile for Flutter Web - Deal with Content Security Policy to make our Chrome extension actually work in the browser environment
- Configure Flutter Web
- Add optional background scripts to our Flutter Chrome extension
- Build our Flutter Web project
- Build a Codemagic pipeline to build and deploy our Chrome extension to Chrome Web Store
Add a new manifest.json file
If you look in the web/ folder in a default Flutter project, you will see a manifest.json file. This file includes all the application configuration and aims to provide Progressive Web App (PWA) capabilities to our Flutter web application.
To learn more about building PWAs with Flutter, take a look at this blog post.
Google Chrome also requires a manifest.json file to register an extension. Therefore, to make our extension work, delete the contents inside the manifest.json file, and substitute them with the following code.
{
  "name": "Chromextension",
  "description": "A Flutter chrome extension",
  "version": "0.0.0.1",
  "manifest_version": 3,
  "content_security_policy": {
    "extension_pages": "script-src 'self' ; object-src 'self'"
  },
  "action": {
    "default_popup": "index.html",
    "default_icon": {
      "16": "icons/chromextension16.png",
      "32": "icons/chromextension32.png",
      "48": "icons/chromextension48.png",
      "128": "icons/chromextension128.png"
    }
  },
  "icons": {
    "16": "icons/chromextension16.png",
    "32": "icons/chromextension32.png",
    "48": "icons/chromextension48.png",
    "128": "icons/chromextension128.png"
  }
}
Here, you can change the name and description of the extension. Chrome extensions require icons in four different sizes. Use an image-resizing tool to make four versions of your extension icon with dimensions of 128x128, 48x48, 32x32, and 16x16 pixels. Then place the icons in the adjacent icons/ directory.
In the action field in the manifest.json file, set index.html as the default pop-up page. This way, when you click on the extension icon in the browser’s top bar, the index.html page will pop up.
An explanation of Content Security Policy
Content Security Policy (CSP) is a security layer in the browser that protects users from cross-site scripting and data injection attacks. Normally, browsers trust the content coming from a server. Cross-site scripting misuses this trust and runs malicious code in the browser.
Using CSP, developers can specify a trusted domain in the HTTP header. A CSP-enabled browser will only execute scripts coming from that specific domain and ignore inline scripts and event-handling HTML attributes.
Take a look at the CSP in our manifest.json file. Here, we define script-src and object-src as self. Therefore, the browser won’t execute inline scripts and scripts from another origin. In developer mode, you get a CSP error.

We will rectify this error in the next section. If you want to learn more about CSP on the web, you can read this CSP guide from MDN Web Docs.
Configure Flutter Web
To rectify the CSP error, remove all the script tags from the index.html file in the web/ directory. Then link the main.dart.js file inside the <body> tag. The main.dart.js is generated at build time and contains all the transpiled Dart and Flutter code.
Now, remove all the unnecessary meta tags from the index.html file, and add an explicit width and height to the <html> element. After all these changes, the final version of index.html looks like this.
<!DOCTYPE html>
<html style="height: 600px; width: 300px">
  <head>
    <meta charset="UTF-8" />
    <title>chromextension</title>
  </head>
  <body>
    <script src="main.dart.js" type="application/javascript"></script>
  </body>
</html>
Add a custom background script
Background scripts are event-based programs that react to certain events within the browser. These scripts are optional for Chrome extensions. If you’re developing some feature in your extension that requires the execution of background code, then having custom background scripts comes in handy.
To add a background script to a Flutter Chrome extension, add a new file background.js inside the web/ directory.
Then, register the background script in your manifest.json file.
{
  "name": "Chromextension",
  "description": "A flutter chrome extension",
  "version": "0.0.0.1",
  "manifest_version": 3,
  "content_security_policy": {
    "extension_pages": "script-src 'self' ; object-src 'self'"
  },
  "background": {
    "service_worker": "background.js"
  },
  "permissions": ["contextMenus", "clipboardWrite", "clipboardRead"],
  "action": {
    "default_icon": {
      "16": "/images/scholarr16.png",
      "32": "/images/scholarr32.png",
      "48": "/images/scholarr48.png",
      "128": "/images/scholarr128.png"
    }
  },
  "icons": {
    "16": "/images/scholarr16.png",
    "32": "/images/scholarr32.png",
    "48": "/images/scholarr48.png",
    "128": "/images/scholarr128.png"
  }
}
The background script needs explicit permission to run in the browser. This is controlled with the permissions field in the manifest.json file.
Now, populate the background script with the logic to run upon a browser event. To learn more, check out the Chrome developer documentation.
Build a Flutter Web project
Flutter Web projects can be built with two types of renderers. The first, HTML renderer, uses a combination of HTML elements, CSS, Canvas elements, and SVG elements. The second, CanvasKit renderer, uses Skia as the rendering engine and draws pixel-perfect widgets. CanvasKit renderer adds about 2 MB to the download size of your application.
If we don’t specify the renderer when we build our Flutter Web project using the flutter build web command, Flutter will use an HTML-rendered web app in mobile browsers and a CanvasKit-rendered web application in desktop browsers.
However, Chrome extensions don’t support CanvasKit-rendered applications. Therefore, add the --web-renderer html flag at build time to generate only an HTML-rendered application.
Another issue with Flutter Web is the dynamically generated code in the build output. This behavior gives us CSP errors in the browser. To disable dynamically generated code, use the --csp flag with the Flutter build command.
Therefore, to make an optimized Chrome extension using Flutter, the build command should look like this.
flutter build web --web-renderer html --csp
Integrate a Codemagic CI/CD pipeline
Codemagic is a CI/CD platform that facilitates the building and deployment of Flutter applications. We can use it to build and deploy our Flutter app for any platform, including the Flutter Web Chrome extension that we’ve just made. Create a Codemagic account today to get 500 build minutes for free.
Go to your Codemagic project dashboard and add a new application. Select your repository provider from the pop-up list. My code is hosted on GitHub, so I am selecting GitHub here.

Now, find your project repository in the dropdown menu, and select “Flutter App (via Workflow Editor)” as the project type.

For the build platform option, select web builds.
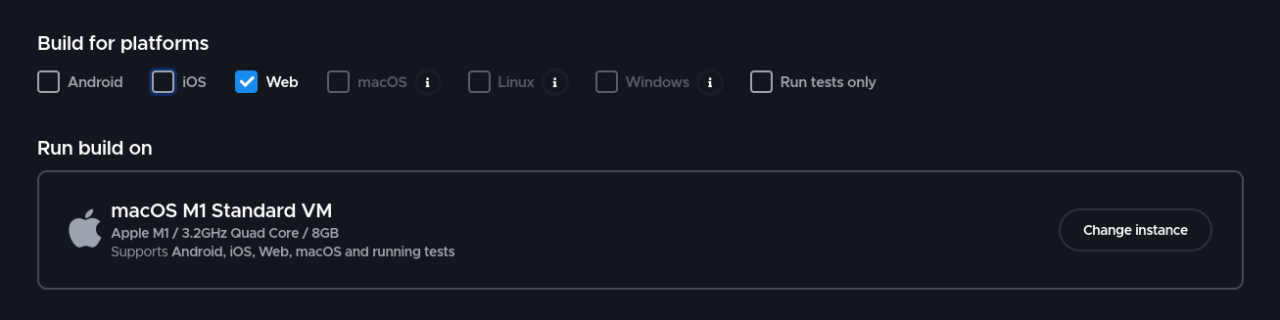
In the build argument, add the --web-renderer and --csp flags.

Finally, save your changes and start your Codemagic build.

Now you can download the generated artifacts and publish to Chrome Web Store. Let’s do that!

Publish the Chrome extension to Chrome Web Store
After you’ve built your Chrome extension, it’s possible to automatically publish in Chrome Web Store using a Codemagic post-publish script. Before following the steps in this section, make sure to sign up for a Chrome Developer Account.
It’s also important to note that you should publish the extension manually the first time. But afterward, you can automate the deployment of your Chrome extension with Codemagic CI/CD.
So, let’s start by getting the credentials we’ll need to publish the extension for the first time.
Acquire the required credentials
Go to the Google Cloud Console and create a new project. In the search bar, search for “Chrome Web Store API”. Click on the first result and enable the API.

Then click on the OAuthConsentScreen and select the user type “External”. Fill out all the application details in the respective fields, click “Save", and continue to the next step. You can skip the “Scopes” tab and continue. Then add your email as a test user and click “Save and continue”.
To get the access key, go to “Credentials" and select the “Create credentials” option. From the dropdown list, select “OAuth client ID”.

For the application type, select “Desktop App”, fill out the name, and click “Create”. Now, a pop-up containing your client ID and client secret should appear. You can download the JSON file and save it in a secure place.
To work with the Chrome Web Store API, you’ll need to have an access token. To get the access token, paste this URL https://accounts.google.com/o/oauth2/auth?response_type=code&scope=https://www.googleapis.com/auth/chromewebstore&client_id=$CLIENT_ID&redirect_uri=urn:ietf:wg:oauth:2.0:oob in your browser, and replace $client_ID with our app’s client ID.
When your browser resolves the URL, a Google OAuth page appears. Sign in with the email you have set as the test user inside the OAuthConsentScreen.
After you have been successfully authorized, you will get an authorization code. We’ll use this code to request an access token.

To generate the access token, you have to make a request with your client ID, client secret, and the authorization code we’ve found in the previous step. I am using curl for this purpose.
curl "https://accounts.google.com/o/oauth2/token" -d \
"client_id=$CLIENT_ID&client_secret=$CLIENT_SECRET&code=$CODE&grant_type=authorization_code&redirect_uri=urn:ietf:wg:oauth:2.0:oob"
Replace $CLIENT_ID, $CLIENT_SECRET, and $CODE with their respective values. The response to this request should look like this.
{
  "access_token" : "ya29.a0Aa4xrXO...",
  "expires_in" : 3599,
  "refresh_token" : "1//0gZyg...",
  "scope": "https://www.googleapis.com/auth/chromewebstore",
  "token_type" : "Bearer",
}
Now you can use this access token to interact with the Chrome Web Store Publish API.
Publish the Chrome extension using the Chrome Web Store API
Before publishing, make sure to enable two-step authentication in your Google account.
Then go to your Chrome Web Store dashboard and create a new item. Fill out the store listing and privacy practices page.


After properly setting things up, we are ready to publish our extension to Chrome Web Store. I am using curl to make the request to the Chrome Web Store API.
 curl \
-H "Authorization: Bearer $TOKEN"  \
-H "x-goog-api-version: 2" \
-X POST \
-T $FILE_NAME \
-v \
https://www.googleapis.com/upload/chromewebstore/v1.1/items
Here, fill in $TOKEN and $FILE_NAME with the access token and the ZIP file with the extension, respectively.
How to automate publishing a Chrome extension with a Codemagic post-publish script
After finishing building our Flutter project with Codemagic, click on the gear icon at the end to reveal the post-publish script section.
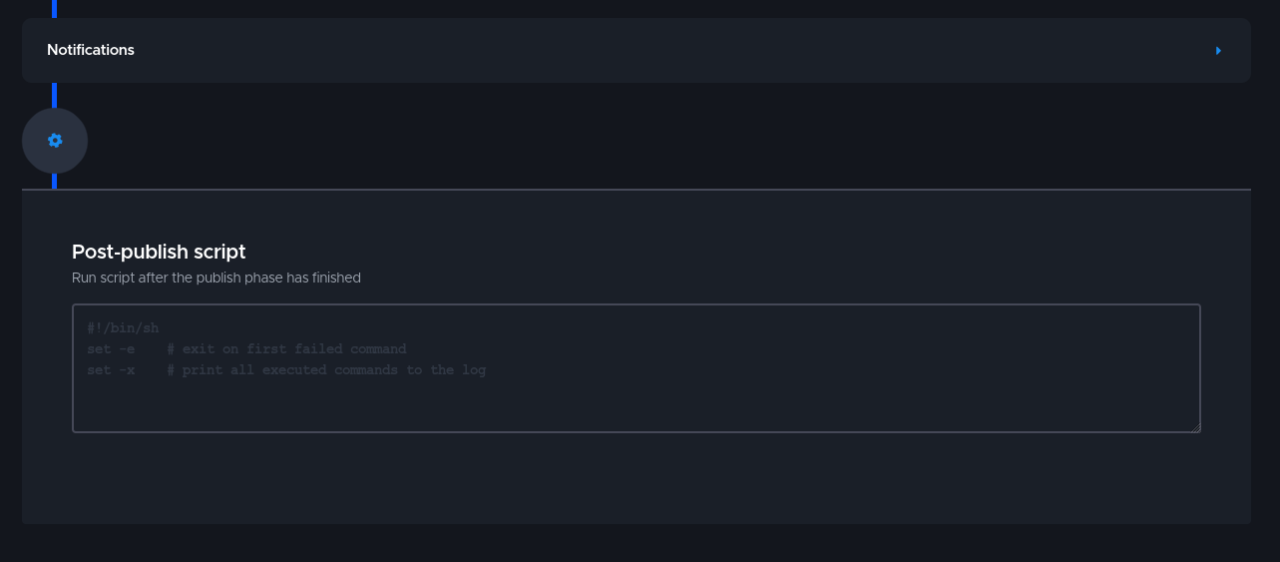
To access the generated artifacts from the build stage, add this script inside the post-publish script section.
ARTIFACT_TYPE=".zip"
ARTIFACT_URL=$(echo $CM_ARTIFACT_LINKS | jq -r '.[] | select(.name | endswith("'"$ARTIFACT_TYPE"'")) | .url')
Here, the ARTIFACT_URL contains the URL to the generated ZIP file in the build stage.
Now we can use this URL in our curl script to directly upload to Chrome Web Store.
curl \
-H "Authorization: Bearer $TOKEN"  \
-H "x-goog-api-version: 2" \
-X POST \
--url $ARTIFACT_URL
-v \
https://www.googleapis.com/upload/chromewebstore/v1.1/items
Here, we replace the -T flag from the previous curl script with the --url flag to directly upload the generated artifact. Now, whenever you build your extension, it automatically uploads the project to Chrome Web Store.
You can use this official guide to explore more use cases of the Chrome Web Store API.
Conclusion
This is a beginner’s guide to making a Google Chrome extension using Flutter Web. If you have followed all the steps, by now, you’ve learned how to configure the different files of your Flutter Web app so that it can be a Chrome extension, build the app, publish it to Chrome Web Store, and automate the process with Codemagic CI/CD.
You can find the sample project for making a Chrome extension with Flutter on GitHub.
If you have any questions, I am on Twitter as @hrishikshpathak.

Hrishikesh Pathak is a Flutter developer and a writer. He likes to explore new technology and write about it. Check out his posts on Codemagic’s blog and his personal blog.

 with Flutter")


