Android apps can be built on any platform, be it Windows, Linux or Mac, but the same cannot be said about iOS apps. While you can write React Native apps for iOS on Windows, you need a special Apple tool, Xcode, to build the app for iOS. One question that comes to mind is this: Why don’t we just install Xcode on Windows to build iOS apps? The problem is that Xcode can only be installed on Mac platforms – it cannot be installed on Windows or Linux. This means that we’ll need to perform a little workaround to build iOS apps on Windows.
In this article, we’ll take a look at how to make iOS apps on Windows with React Native and Codemagic. We’ll cover the workarounds involved in the build process and how Codemagic makes things a lot simpler.
This article is written by Ifeanyi Dike and updated in August 2021
So, let’s get started, but first, let us know what’s your relationship with CI/CD tools?
Developing iOS apps on React Native with Expo CLI
Using Expo is the easiest way to get started with React Native. However, when using Expo, you can’t create custom native modules beyond those that ship with the React Native API. If you want to include native code in your application, it is better to go with vanilla React Native from the start.
Alternatively, you can use Flutter and Codemagic to build and publish apps for iOS without a Mac. Learn more here.
To get started with Expo, you first need to install Expo CLI. You can do that by running the following commands:
npm install -g expo-cli
You can then create your project by running expo init simple-ios-todo. In this case, simple-ios-todo is the name of our application. It will take a few minutes to create our project, and then we can start building our React Native application.
Expo allows us to build for both Android and iOS on Windows, Mac and Linux. You can run your React Native app on a physical device without setting up the development environment. All you need to do is download the Expo Go app, run expo start and then scan the QR code that shows up.
Let’s build a simple to-do app on Expo.
Open your App.js file and enter the following code.
import React, { useState } from 'react';
import {
FlatList,
SafeAreaView,
StyleSheet,
Text,
TextInput,
TouchableOpacity,
View,
} from 'react-native';
const App = () => {
const [text, setText] = useState('');
const [todos, setTodos] = useState([]);
const handleButtonClick = () => {
if (text.length > 0) {
let newTodo;
const todo = todos[todos.length - 1];
if (!todo) {
newTodo = { id: 1, text, completed: false };
} else {
const id = todo.id + 1;
newTodo = { id, text, completed: false };
}
setTodos([...todos, newTodo]);
setText('')
}
}
const deleteTodo = (id) => {
const newTodos = todos.filter(todo => todo.id !== id);
setTodos(newTodos)
}
const completeTodo = (id) => {
const newTodo = todos.map(todo => {
if (todo.id !== id) {
return todo
} else {
return { ...todo, completed: !todo.completed }
}
})
setTodos(newTodo)
}
const renderItem = ({ item }) => (
<View style={styles.itemTodo}>
<Text style={[styles.item, item.completed ? styles.lineThrough : null]}>
{item.text}
</Text>
<View style={styles.actionButtons}>
<TouchableOpacity onPress={() => completeTodo(item.id)}>
<Text style={styles.complete}>✓</Text>
</TouchableOpacity>
<TouchableOpacity onPress={() => deleteTodo(item.id)}>
<Text style={styles.delete}>✕</Text>
</TouchableOpacity>
</View>
</View>
);
return (
<SafeAreaView style={styles.container}>
<View style={styles.space} />
<Text style={styles.caption}>Add Todo Items</Text>
<View style={styles.inputContainer}>
<TextInput style={styles.input} onChangeText={setText} value={text} />
<TouchableOpacity style={styles.button} onPress={handleButtonClick}>
<Text style={styles.buttonText}>Add</Text>
</TouchableOpacity>
</View>
<FlatList
style={styles.flatlist}
data={todos}
renderItem={renderItem}
keyExtractor={item => item.id}
/>
</SafeAreaView>
);
};
const styles = StyleSheet.create({
//all styles here
});
export default App;
In the code above, we created a TextInput to hold our to-do text and a ToucahbleOpacity to add the to-do item to our list of to-dos. Once the button is clicked, the to-do item is added to the list by calling setTodos and passing the new to-do. We can also delete a to-do by filtering out to-dos based on their IDs. We can also mark a to-do item as completed.
Configuring app.json file
Before building our app for iOS, we have to configure our app.json file. You can find this app at the root of your application. Configurations made in the app.json file are accessible at runtime. This is where you might want to configure things like your app name, splash screen, icon, etc.
Add the following code to your app.json file to configure it for iOS.
{
   "expo": {
    "name": "Your App Name",
    "icon": "./path/to/your/app-icon.png",
    "version": "1.0.0",
    "slug": "your-app-slug",
    "ios": {
      "bundleIdentifier": "com.yourcompany.yourappname",
      "buildNumber": "1.0.0"
    }
}
All of these fields are required. Take particular note of the bundleIdentifier. It should be in the reverse DNS form, and you can replace it with whatever suits your application. The buildNumber should be incremented whenever you upload a new build of your app to the App Store.
Once you have updated your app.json file, you can build your app by running the following commands.
expo build:ios
If you want to build a standalone app for iOS, you can use the following commands: expo build:ios -t archive (for archive build) or expo build:ios -t simulator (for simulator build). The archive build is suitable if you want to publish your app to the App Store and distribute it, while the simulator build is useful when you want to test your standalone app on a simulator.
You can then upload your iOS app to TestFlight and get it up and running on the App Store.
Developing iOS apps with vanilla React Native
React Native applications built with Expo have a lot of limitations. Apart from having an unnecessarily large size, your app will be hosted on the Expo server. You wouldn’t want to build a serious application with Expo, but it is perfectly okay for beginners.
Vanilla React Native is a bit more difficult to set up and build, but it offers all the benefits and features that come with React Native. You can use React Native native modules, create your own native modules and do much more.
However, you need Xcode to build an iOS app on Windows with vanilla React Native. In fact, the React Native documentation requires that you set up Xcode right when setting up your environment. However, it is possible to work around this process by installing a virtual machine to contain OS X on Windows.
Installing a virtual machine on Windows
Virtualization with software like VirtualBox or VMware can provide you a platform to install any operating system of your choice, whether it be Mac, Windows or Linux. This offers you an interesting opportunity to install Mac on Windows machines. As you would expect, the first step is to install the virtual machine of your choice on your operating system. You can download a compatible version of the open-source software and install it on your device.
You need a Windows system with a similar capacity to that of a standard MacBook. While there is no hard and fast rule for this, a system with at least 4 GB of RAM and at least a dual-core processor would be preferable. You might want to go for a higher system if you are aiming to build a gaming app or an app that requires high resource usage.
Installing Mac OS X on the virtual machine
After installing the virtual machine, you’ll need to install Mac OS X. You need an installation disk to do this – you can get this in an Apple store or online. It is important to allocate sufficient memory to the OS. Preferably, you should allocate more than 2 GB of RAM. The virtual machine will configure the OS automatically, but you can perform further configurations if you wish.
Next, you should install Hackboot to complete your installation. The Hackboot 1 and Hackboot 2 ISO files are needed to boot into the installation. You can follow the step-by-step guide here to successfully install Mac OS X on your virtual machine.
Once you have installed Mac OS X, the next step is to install Xcode on your virtual machine. This is a relatively straightforward process. Log in to the App Store and search for Xcode. Xcode is a large application that requires over 11 GB of space, and it should take a few minutes to download and install on your device.
Creating a simple to-do app
Now that we have installed Xcode and Mac OS X on our virtual machine, let’s create a simple React Native project and build it with Xcode to demonstrate the concept.
Make sure you install CocoaPods before proceeding. You can run the following commands to install CocoaPods:
sudo gem install cocoapods
Open up the terminal and run the following bash commands to get started.
npx react-native init simple-ios-todo
It will take a few minutes to create our React Native project, and we can get started when done.
To demonstrate our concept, we’ll be creating a simple to-do app for iOS. Although React Native allows us to build on both Android and iOS, we’ll be focusing on iOS alone.
You can make use of the code in the Expo section or access the complete code here. If your Xcode is properly installed, you can run your app with the following commands:
npx react-native run-ios
Building and signing the app with Xcode
Xcode is a very sophisticated application that offers everything you need to build and publish apps on the Apple App Store. After creating your vanilla React Native app, you need to build it for release in Xcode. Expo provides a much easier way to build React Native applications, but apps built with Expo CLI cannot include custom native modules beyond those provided by React Native.
To build our app, we need to first configure it for release. If you have used additional dependencies in your app, make sure to install them properly in the iOS version by using the following commands.
cd ios && pod install
Then, open simple-ios-todo.xcworkspace or simple-ios-todo.xcodeproj in Xcode (.xcworkspace works better here). Go to Product → Scheme → Edit Scheme, click on the Run tab in the sidebar and set Build Configuration to Release.
After that, you can build your app. Before building, click on the General tab and make sure that the details are correct. In particular, make sure that the Bundle Identifier corresponds to what you have in your project. You can check under ios → simple-is-todo.xcodeproj → project.pbxproj and then search for PRODUCT_BUNDLE_IDENTIFIER. Here, the bundle identifier could be in the form org.reactjs.native.example.$(PRODUCT_NAME:rfc1034identifier), where $(PRODUCT_NAME:rfc1034identifier) may represent your project name.
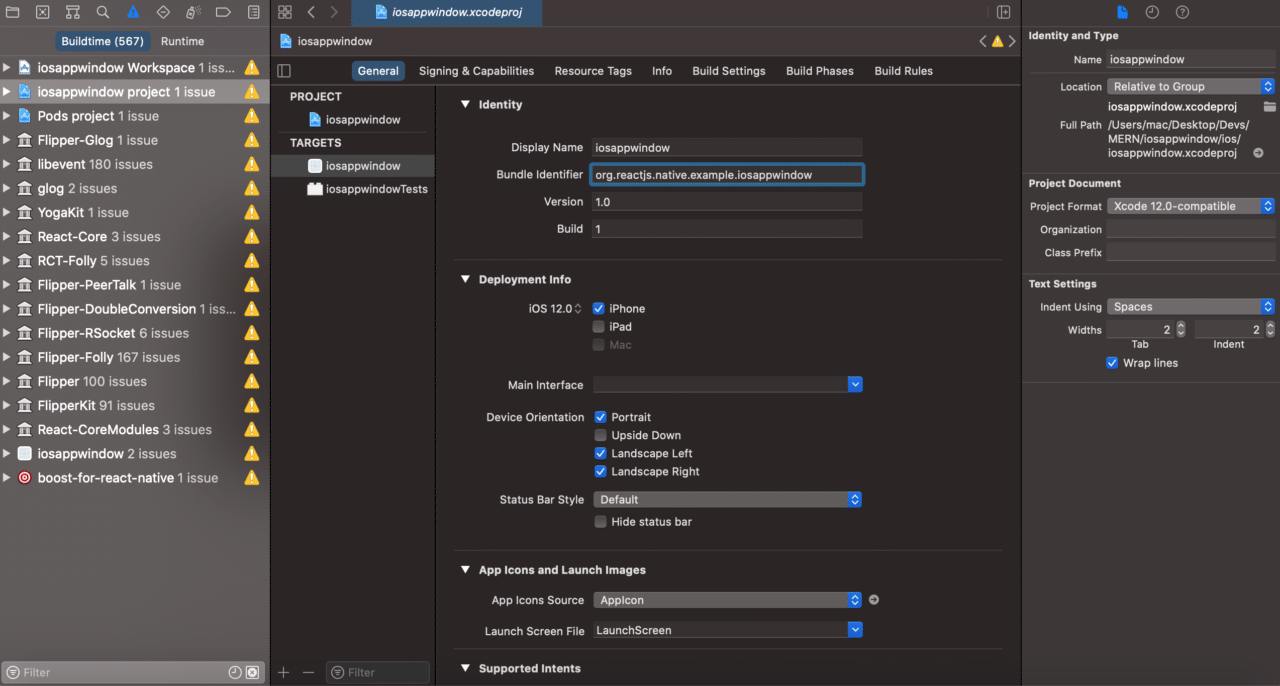
After verifying the details, you can then click on Build under the Product menu to build the project. Depending on the size of your app, the project may take a couple of minutes to build.
After building the app with Xcode, you can then configure the app deployment to the App Store. This may require you to go through quite a process, but you need to enroll in the Apple Developer Program to do this. You’ll also be required to pay a yearly membership fee of 99 USD.
Automating the build process with Codemagic
Do you really need to go through the stress of installing a virtual environment to build an iOS app on Windows? Codemagic provides a way out.
Codemagic provides a robust CI/CD process that automates the build process for mobile apps. You can save yourself a lot of stress by building your React Native code on Codemagic. Furthermore, Codemagic can also handle the use of environment variables and a lot of advanced stuff for React Native.
Sign up to Codemagic – it’s free
You can create a vanilla React Native app and write code on your favorite editor, then allow Codemagic to handle the build process for you. This means that Codemagic will handle the app signing and other processes and make your app ready for distribution to the App Store. Of course, you would need to obtain the necessary credentials and assets from your Apple Developer account to proceed.
To build your app on Codemagic, you need to first sign up to the platform and connect your repository to your account.
Once you have connected your repository, you’ll see a list of all projects under the repository.
To get started, click on Add application in your application page. Once you do, you’ll be prompted to connect a repository and select a repository from the list of repositories. You will also need to select the type of project you want to build. Available options include React Native App, Flutter App, Android App, iOS app, Cordova app, Ionic app, and so on.
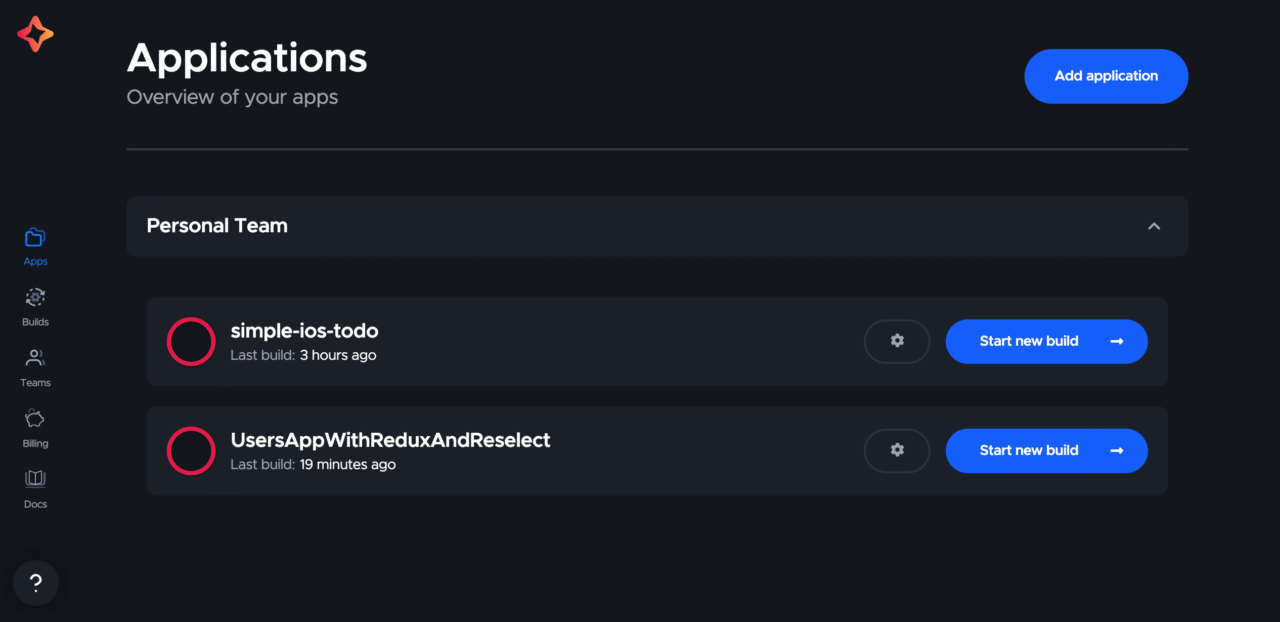
After selecting a repository and clicking on Finish: Add application, you’ll be required to add the codemagic.yaml configuration file. This file will enable you to seamlessly build your project and you can also set up environment variables, webhooks and caching. You need to add the codemagic.yaml file to the root of your application. Create the file and commit it to your Git repository, and then click on Check for configuration file in your Codemagic dashboard to load the configuration file from your Git repo.
You’re expected to populate the configuration file with some configuration settings that will enable Codemagic to build your app. Interestingly, Codemagic has comprehensive documentation on YAML and a guide on code signing YAML on iOS that you can follow to properly customize your app.
Here is an example configuration setting we could follow.
    workflows:
      react-native-ios:
        name: simple-ios-todos
        max_build_duration: 120
        instance_type: mac_mini
        environment:
          vars:
            # Env vars for automatic iOS code signing
            # See the following link for more details - https://docs.codemagic.io/code-signing-yaml/signing-ios/
            XCODE_WORKSPACE: "YOUR_WORKSPACE_NAME.xcworkspace" # <-- Put the name of your Xcode workspace here
            XCODE_SCHEME: "YOUR_SCHEME_NAME" # <-- Put the name of your Xcode scheme here
            APPLE_ID: Encrypted(...) # <-- Put you encrypted Apple ID here
            APP_SPECIFIC_PASSWORD: Encrypted(...) # <-- Put your encrypted App Specific Password here. For more information visit: https://support.apple.com/en-us/HT204397
            # https://appstoreconnect.apple.com/access/api
            APP_STORE_CONNECT_ISSUER_ID: Encrypted(...) # <-- Put your App Store Connect Issuer Id here
            APP_STORE_CONNECT_KEY_IDENTIFIER: Encrypted(...) # <-- Put your App Store Connect Key Identifier here
            APP_STORE_CONNECT_PRIVATE_KEY: Encrypted(...) # <-- Put your App Store Connect Private Key here
            CERTIFICATE_PRIVATE_KEY: Encrypted(...) # <-- Put your Certificate Private key here
            BUNDLE_ID: "YOUR_BUNDLE_ID_HERE" # <-- Put your Bundle Id here e.g com.domain.myapp
            APP_STORE_APP_ID: 1555555551 # <-- Put the app id number here. This is found in App Store Connect > App > General > App Information
          node: latest
          xcode: latest
          cocoapods: default
        triggering:
          events:
            - push
            - tag
            - pull_request
          branch_patterns:
            - pattern: develop
              include: true
              source: true
        scripts:
          - name: Install npm dependencies
            script: npm install
          - name: Install CocoaPods dependencies
            script: cd ios && pod install
          - name: Set up keychain to be used for codesigning using Codemagic CLI 'keychain' command
            script: keychain initialize
          - name:
            script: |
              # For information about Codemagic CLI commands visit: https://github.com/codemagic-ci-cd/cli-tools/blob/master/docs/app-store-connect/README.md
              # For details about the --type parameter below - https://github.com/codemagic-ci-cd/cli-tools/blob/master/docs/app-store-connect/fetch-signing-files.md#--typeios_app_adhoc--ios_app_development--ios_app_inhouse--ios_app_store--mac_app_development--mac_app_direct--mac_app_store--mac_catalyst_app_development--mac_catalyst_app_direct--mac_catalyst_app_store--tvos_app_adhoc--tvos_app_development--tvos_app_inhouse--tvos_app_store
              app-store-connect fetch-signing-files "$BUNDLE_ID" --type IOS_APP_STORE --create
          - name: Use system default keychain
            script: keychain add-certificates
          - name: Increment build number
            script: |
              #!/bin/sh
              set -e
              set -x
              cd $CM_BUILD_DIR/ios
              # agvtool new-version -all $(($BUILD_NUMBER + 1))
              agvtool new-version -all $(($(app-store-connect get-latest-testflight-build-number "$APP_STORE_APP_ID") + 1))
          - name: Set up code signing settings on Xcode project
            script: xcode-project use-profiles --warn-only
          - name: Build ipa for distribution
            script: xcode-project build-ipa --workspace "$CM_BUILD_DIR/ios/$XCODE_WORKSPACE" --scheme "$XCODE_SCHEME"
        artifacts:
          - build/ios/ipa/*.ipa
          - /tmp/xcodebuild_logs/*.log
          - $HOME/Library/Developer/Xcode/DerivedData/**/Build/**/*.app
          - $HOME/Library/Developer/Xcode/DerivedData/**/Build/**/*.dSYM
        publishing:
          # See the following link for details about email publishing - https://docs.codemagic.io/publishing-yaml/distribution/#email
          email:
            recipients:
              - user_1@example.com
              - user_2@example.com
            notify:
              success: true     # To not receive a notification when a build succeeds
              failure: false    # To not receive a notification when a build fails
          slack:
            # See the following link about how to connect your Slack account - https://docs.codemagic.io/publishing-yaml/distribution/#slack
            channel: '#channel-name'
            notify_on_build_start: true   # To receive a notification when a build starts
            notify:
              success: true               # To receive a notification when a build succeeds
              failure: false              # To not receive a notification when a build fails
          app_store_connect:
            apple_id: $APPLE_ID
            password: $APP_SPECIFIC_PASSWORD
Note that we used environment variables here and encrypted them. You can add and encrypt your environment variables directly from the settings page. Environment variables can be added on the Environment variables tab.
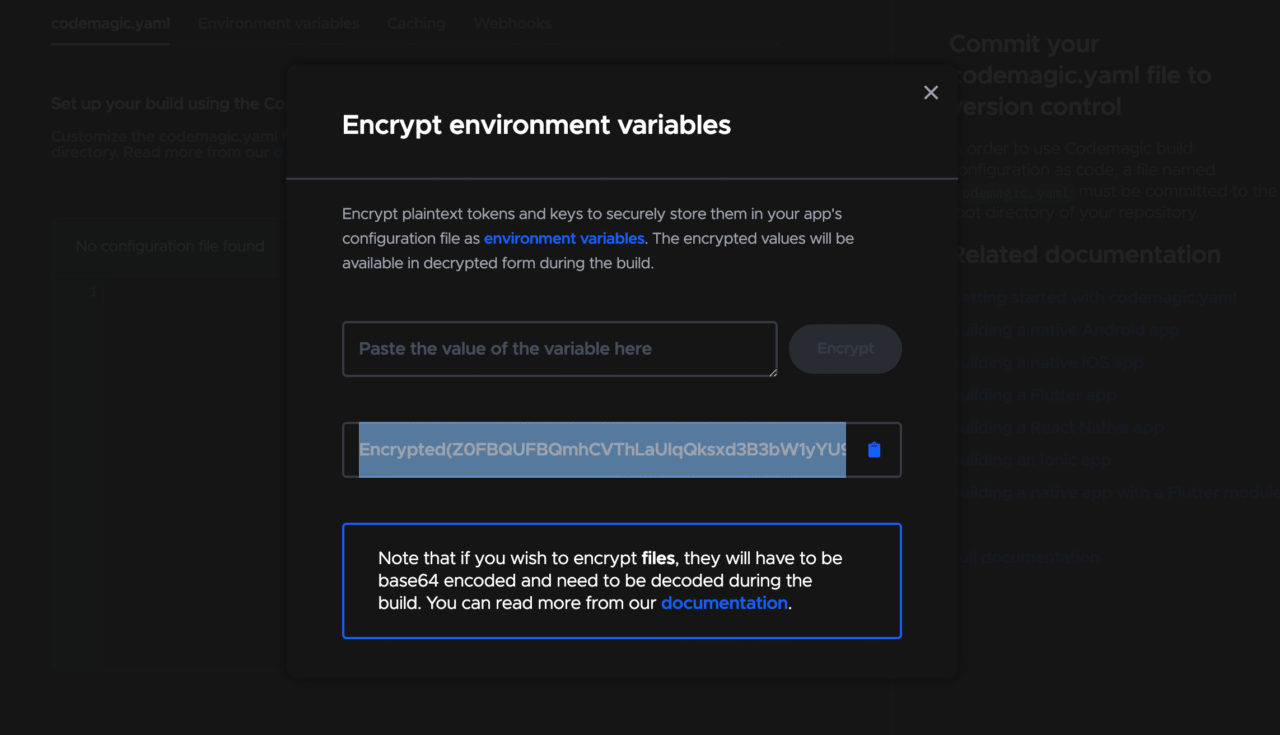
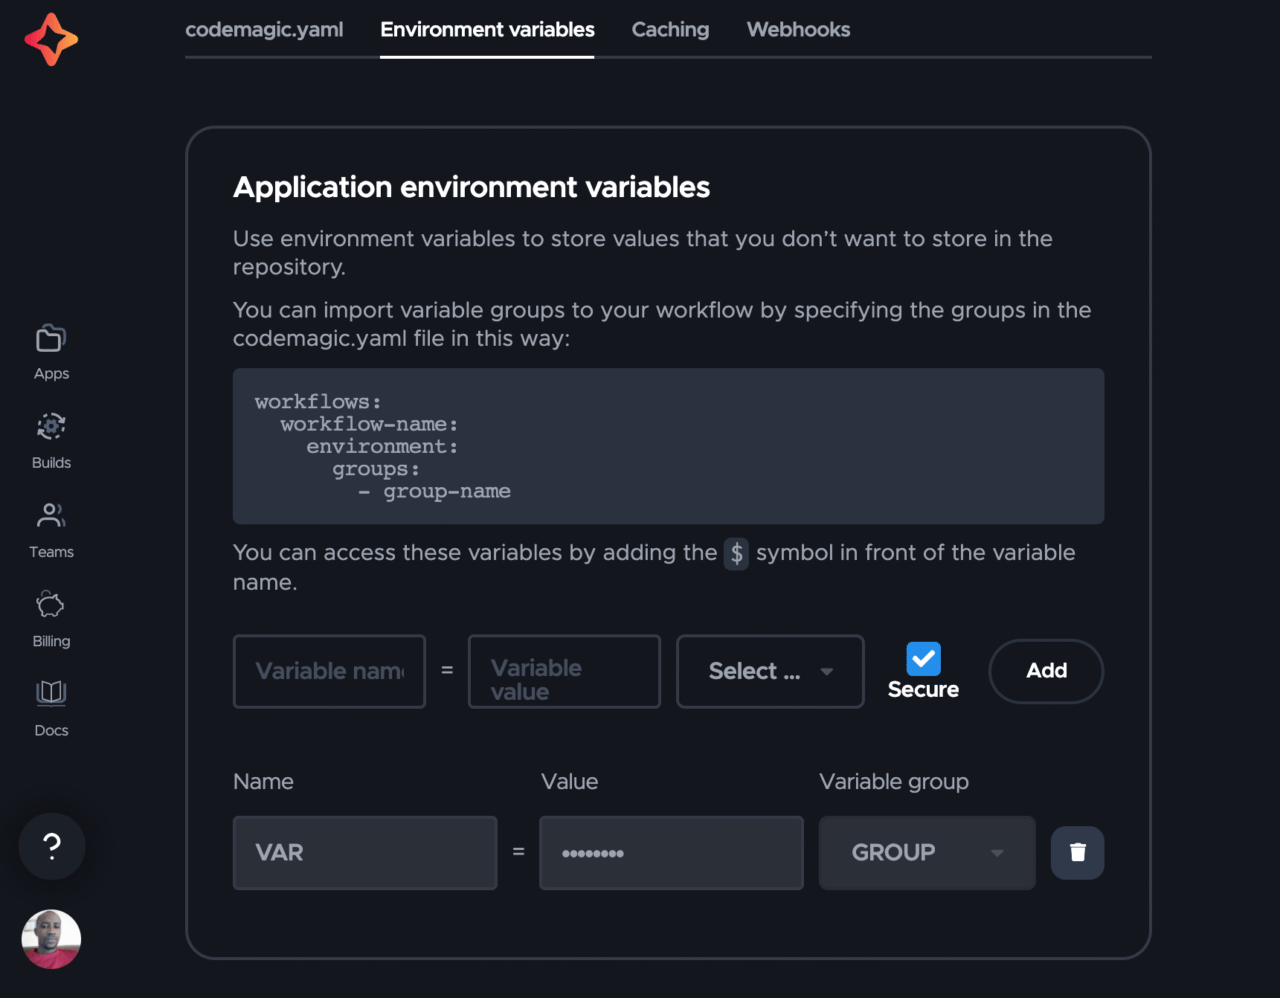 To encrypt your environment variables, click on the
 Encrypt variables button on the Codemagic.yaml tab and follow through the processes.
 Here is a very useful video tutorial on automatic iOS code signing with Codemagic. (And here’s an introduction to iOS code signing as a blog post, if you dont’ like watching videos)
The code above is for automatic iOS code signing, but you could also manually code sign your app by setting the following environment variables.
# iOS manual code signing
CM_CERTIFICATE: Encrypted(...)
CM_CERTIFICATE_PASSWORD: Encrypted(...)
CM_PROVISIONING_PROFILE: Encrypted(...)
The codemagic.yaml file must be properly indented, or else it will throw an error in the Codemagic dashboard.
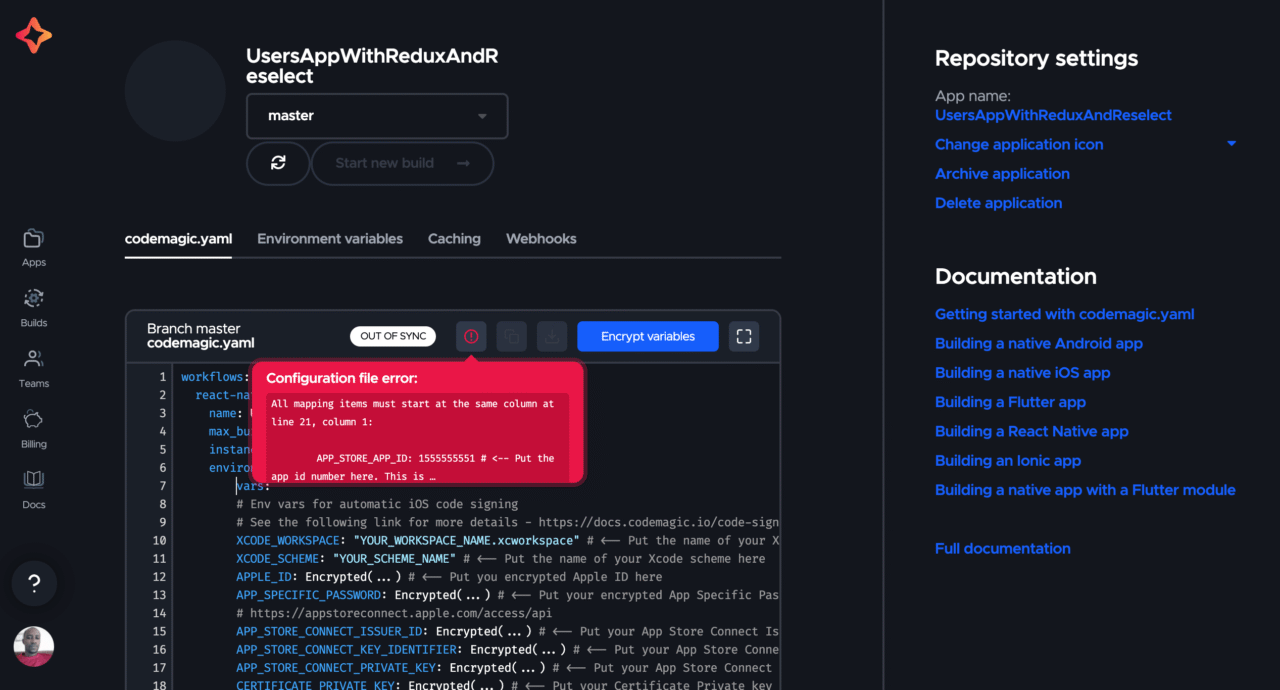
Once you have correctly set your YAML file, you can then click on Start new build to build your app. After building our app in Codemagic, we can now distribute it to the App Store. You are required to build the app in release mode to deploy it to the App Store. You can follow the guide provided here to distribute or deploy your app to the App Store.
Conclusion
It is possible to build an iOS app on Windows with React Native. With efficient tools like Codemagic, you don’t need to own a MacBook to build an iOS app. Codemagic automates the process of deployment and handles all the difficult jobs for you. That way, all you have to do is focus on building your app.
I hope you enjoyed this tutorial! If you found this article helpful, let us know HERE.
More articles about React Native
- React Native continuous integration and delivery (CI/CD) with Codemagic
- 9 reasons to use Codemagic CI/CD tool for React Native apps in 2021
- Flutter vs React Native: A developer’s perspective
Ifeanyi Dike is a software developer in Abuja, Nigeria. He started coding with Microsoft Visual Basic in 2005 but soon after delved into Python and Javascript.
He’s been actively developing software for over seven years now and has used several webs and mobile frameworks like ReactJS, React Native, Express and Flutter. You can reach him on Twitter @deepinsideai.


