


This article is written by Kevin Suhajda
Mobile developers using Javascript-based mobile application development platforms such as Cordova, Ionic and React Native have enjoyed the benefit of being able to push app updates over-the-air without resubmitting their apps to the App Store or Google Play for quite some time. As long as the updates are not compiled code, and don’t change the primary purpose of the application then both Apple and Google allow this.
And seemingly out of nowhere, almost 5 years since Flutter’s initial release, Shorebird has brought code push functionality to Flutter. Android production support is already available, with iOS support in preview.
With this in mind, this blog post will focus on setting up an Android workflow on Codemagic in using Shorebird so you can use a workflow to publish full releases to the stores and another workflow to send out over-the-air updates.
Overview
In this article we will take an existing Flutter app that has been published to Google Play for Closed Alpha testing and configure it to use Shorebird’s code push.
You will sign up for a free Shorebird account, install their CLI on your local machine and learn how to initialize a Flutter app to use Shorebird as well as how to create an auth token to use on CI server like Codemagic.
To give you a better understanding of Shorebird we’ll run some commands on your local computer before creating Codemagic workflows that can test your code and automate publishing release builds and sending patches using code push.
Setting up Shorebird
So let’s start by getting signed up to Shorebird and installing their CLI tools by doing the following:
- Sign up for a free Shorebird account here.
- Install the Shorebird CLI on your local computer.
You can run the command in Terminal to install the CLI, but for more details, head on over to the getting started page in the Shorebird documentation to see the full instructions.
curl --proto '=https' --tlsv1.2 https://raw.githubusercontent.com/shorebirdtech/install/main/install.sh -sSf | bash
Later on we will be using the CLI on your local machine to configure your app with Shorebird, create a release and test pushing code patches directly to devices.
Initializing your Flutter app with Shorebird
In the following steps we will look at how to take an existing Flutter app that has already been published to Google Play and initialize it with Shorebird so you can push code updates.
Please note that Shorebird needs the INTERNET permission to be added to your AndroidManifest.xml file for code push to work.
<manifest ...>
  <uses-permission android:name="android.permission.INTERNET"/>
  <application ...>
    ...
  </application>
</manifest>
To configure an existing Flutter app to use Shorebird simply run the shorebird init command at the root of your project.
Shorebird will create a unique app_id for your app and save it in a file called shorebird.yaml in the root of the project which is then referenced in the pubspec.yaml. Consult the Shorebird documentation here for more information.
To make sure everything is still working properly I would recommend plugging in an Android device (or just use an emulator) and running your app with the following command:
shorebird run — -d <device_id>
Note that using the double dash separator after the run command allows you to pass additional arguments.
If you don’t know your device id, run adb devices to get a list of Android devices currently connected to your machine.
All being well, your app should be run on your device without any issues and you should should see the default Flutter counter app.
Creating a Shorebird Release
First, make sure you are logged into your Shorebird account on your local computer by running shorebird login in Terminal. This will which will redirect you to your Google login page if required.
You should run the following command in Terminal from the root of your Flutter project:
shorebird release android
This will create a .aab in /build/app/outputs/bundle/release/app-release.aab
Note that this command submits your app to Shorebird, but you will still have to upload your app to Google Play and install the on your device from the store before you can start pushing code updates.
Pushing a code update
Now lets make a simple change to the Dart code in our Flutter app and use Shorebird to create a patch that will push the change directly to your device.
Make a simple change to your Dart code
Lets change the title we see at the top of app. Open lib/main.dart and change the title from this:
home: const MyHomePage(title: 'Flutter Demo Home Page'),
To this:
home: const MyHomePage(title: 'Counting App'),
Save your changes and let’s move on to pushing this update to your app’s users.
Create a patch
A Shorebird ‘patch’ allows you to push code updates to your released app. To try it out, open Terminal in the root of your project and run the following Shorebird command from to create a patch which will update your app:
shorebird patch android
For more details about what is happening see the Shorebird documentation here
If you already have the app open on your device close the app close it completely and then wait a couple of minutes before you open it again. You should see the updated page title that says “Counting App” instead of “Flutter Demo Home Page”.
Congratulations on sending your first over-the-air update!
Now you understand the release and patch processes, let’s create some Codemagic workflows so when you commit code to your repository you can either publish a full release or distribute an over-the-air patch.
Creating Codemagic Workflows
In this part we’ll be setting up some Codemagic workflows to automate publishing your full release versions and for pushing out your patched Dart code as updates. We’ll be using Codemagic’s YAML configuration file, called codemagic.yaml. This will should be checked into your repository and be present in any branches you intend to use with Codemagic.
Create a codemagic.yaml configuration file
Let’s start by creating an empty file called codemagic.yaml in the root of you project. We’ll use a defintions section so we can reuse some of the scripts in different workflows and a workflows section where we will set up a couple of workflows.
Now you should add the following into the codemagic.yaml file:
definitions:
# Reusable definitions go in this section

workflows:
# Define your workflows here
Add a reusable script to install and configure Shorebird on Codemagic
Shorebird’s CLI tools aren’t preinstalled on Codemagic, but we can simply install it and set the PATH variable each time the workflow runs and the VM is created. Let’s also add a script to run flutter analyze to run a static code analysis to check our Dart code before we build the app. We can also add script to set the location of the Flutter SDK in the local.properties file because it will be used in both of the workflows we will create later on.
Add a scripts section to the definitions section as shown below:
definitions:
  # Reusable definitions go in this section
scripts:
    - &shorebird_install
      name: Install Shorebird CLI
      script: |
        # Install the Shorebird CLI
        curl --proto '=https' --tlsv1.2 https://raw.githubusercontent.com/shorebirdtech/install/main/install.sh -sSf | bash
        # Set Shorebird PATH
        echo PATH="/Users/builder/.shorebird/bin:$PATH" >> $CM_ENV
    - &flutter_analyze
      name: Run static code analysis
      script: flutter analyze
    - &setup_local_properties
      name: Set up local.properties
      script: echo "flutter.sdk=$HOME/programs/flutter" > "$CM_BUILD_DIR/android/local.properties"

workflows:
# Define your workflows here
Note the use of the YAML Anchor (&) which can be referenced elsewhere in the YAML configuration using an Alias (*). When the workflow is added in the next step you will see we use the alias as follows to reference the script in the definitions section:
- *flutter_analyze
- *setup_local_properties
- *shorebird_install
Add a workflow to build releases
We can now add a workflow for building releases that are sent to Shorebird and Google Play automatically. I’ll give you the whole script and then discuss the parts you need to understand or change. We’ll define a “Release Android Workflow” in the workflows section of your codemagic.yaml so the workflows section should now look like this:
definitions:
# Reusable definitions go in this section
...
workflows:
  # Define your workflows here
  release-android-workflow:
    name: Release Android Workflow
    environment:
      android_signing:
        - codemagic
      groups:
        - shorebird_credentials
        - google_credentials
      vars:
        PACKAGE_NAME: "io.codemagic.birdie"
        GOOGLE_PLAY_TRACK: "alpha"
      flutter: 3.10.4
      xcode: 14.3.1
    triggering:
      events:
        - push
      branch_patterns:
        - pattern: release
    scripts:
      - *flutter_analyze
      - *setup_local_properties
      - *shorebird_install
     - name: Build with Shorebird
        script: |
          BUILD_NUMBER=$(($(google-play get-latest-build-number --package-name "$PACKAGE_NAME" --tracks="$GOOGLE_PLAY_TRACK") + 1))
          shorebird release android -- \
          --build-name=1.0.0 \
          --build-number=$BUILD_NUMBER
    artifacts:
      - build/**/outputs/**/*.aab
    publishing:
      google_play:
        credentials: $GCLOUD_SERVICE_ACCOUNT_CREDENTIALS
        track: $GOOGLE_PLAY_TRACK
        submit_as_draft: false
Continue reading to get an understanding of what you need to configure to make this functional.
Add your keystore to Codemagic
In order for Codemagic to sign your releases with your keystore you will need to add it in the Codemagic UI.
In the wep app, click on Teams in the left-hand menu and then click on your Team name and then expand the “Code signing identities and secrets” section.
Now click on the “Android keystores” tab. In the “Upload a keystore” section and your keystore and then fill in the required password and alias details.
Finally, provide a reference name that we can use in the codemagic.yaml that tells Codemagic to use the specified keystore to sign your app. In my case I will give it the name codemagic and when added it will be displayed in the “Available keystores” section with the given reference name.
As you can see, this is referenced in workflow above using the following:
workflows:
  # Define your workflows here
  release-android-workflow:
    ...
    environment:
      android_signing:
        - codemagic
      ...
    ...
You will need to configure your code signing in android/app/build.gradle as explained in the Codemagic documentation here.
Next we’ll look at the environment variable groups section.
Create a Shorebird auth token
In order to use Shorebird on a CI server, we’ll need to generate a Shorebird authentication token and import it using an environment variable group.
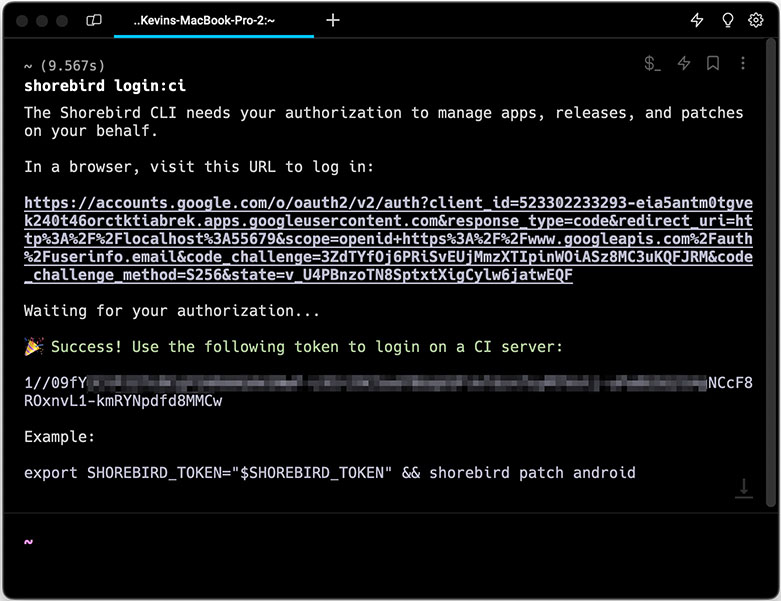
To generate the token, open Terminal on your local machine and run the following command:
shorebird login:ci
This will return an authentication token that we can store as an encrypted variable in Codemagic to use in our workflow.
In the next step I’ll show you how to add the token you just created to Codemagic.
Adding the Shorebird token Codemagic
In Codemagic click on Teams on the left-had side, and then click on your Team name and expand the “Global variables and secrets” section.
Add a new variable called SHOREBIRD_TOKEN and paste the authentication token you created in the previous step into the variable value field.
Create an environment variable group called shorebird_credentials by typing this name and choosing “create shorebird_credentials” group. Finally, click the “Add” button to add the new environment variable to Codemagic.
In the workflow example I provided earlier you can see that this group is imported into the codemagic.yaml as follows. This makes the SHOREBIRD_TOKEN environment variable available on the build machine.
workflows:
  # Define your workflows here
  release-android-workflow:
    ...
      groups:
        - shorebird_credentials
      ...
    ...
In the next step, you should now be ready to create your Google API key and add it as an environment variable.
Adding the Google Play API access
In order to automatically publish new releases to Google Play you will need to create a Google Service Account API key. Codemagic already has some great documentation that explains how to create this here.
Once you have this you will also have to add it as an environment variable in Codemagic and then import it into your workflow.
In Codemagic click on Teams on the left-had side, and then click on your Team name and expand the “Global variables and secrets” section.
Add a new variable called GCLOUD_SERVICE_ACCOUNT_CREDENTIALS and copy the entire contents of your JSON API key and past it into the variable value field.
Create an environment variable group called google_credentials by typing this name and choosing “create google_credentials” group. Finally, click the “Add” button to add the new environment variable to Codemagic.
As you can see in the full workflow I provided earlier, this group is imported as follows:
workflows:
  # Define your workflows here
  release-android-workflow:
    ...
    environment:
      ...
      groups:
        ...
        - google_credentials
    ...
  ...
Defining local variables and software versions
In the vars section, which is used to define variables locally which aren’t secret, you should set the PACKAGE_NAME variable to your app’s package name.
You should also set GOOGLE_PLAY_TRACKto the track you are publishing to. In my example I’m using alpha which represents the “Closed testing - alpha” track.
      vars:
        PACKAGE_NAME: "io.codemagic.birdie"
        GOOGLE_PLAY_TRACK: "alpha"
If you need to use a different Flutter version then feel free to define the required version in the environment section. Also, note that setting the xcode property controls the machine type used and versions of preinstalled software.
workflows:
  # Define your workflows here
  release-android-workflow:
    ...
    environment:
      ...
      flutter: 3.10.4
      xcode: 14.3.1
Building and publishing
When it comes to building the app we want to build the release using Shorebird’s shorebird release android command. You will see from the script that after this command we use the double dashes -- to provide additional arguments.
To publish new releases to Shorebird and Google Play, you will need to increment the build number. You might have noticed that the script is getting the current build number for the specified package name and track, and then incrementing it by one using with the following:
BUILD_NUMBER=$(($(google-play get-latest-build-number --package-name "$PACKAGE_NAME" --tracks="$GOOGLE_PLAY_TRACK") + 1))
This incremented number is then used to set the build number for the build. For this example, the version name is static, but you can modify this to your needs as required.
As mentioned before, the build will be uploaded to Shorebird automatically.
For Codemagic to publish to Google Play, we first need to gather the build artifact which is done with this section:
workflows:
  # Define your workflows here
  release-android-workflow:
     ...
  artifacts:
    - build/**/outputs/**/*.aab
   ...
For the publishing we just need to define a publishing section that provide the Google API key using the GCLOUD_SERVICE_ACCOUNT_CREDENTIALS environment variable and the track we want to publish to as set in the local environment variable GOOGLE_PLAY_TRACK.
workflows:
  # Define your workflows here
  release-android-workflow:
    ...
    publishing:
      google_play:
        credentials: $GCLOUD_SERVICE_ACCOUNT_CREDENTIALS
        track: $GOOGLE_PLAY_TRACK
        submit_as_draft: false
This workflow is ready to use, and will increment the build version, send the release to Shorebird and publish to the specified track in Google Play.
You can run this manually in Codemagic to test it set up some build triggers to specify when to run this workflow. For example, when you commit code to a specific branch or when you merge a pull request into a particular branch.
Creating a code push workflow
We’re now going to add a workflow that takes care of code push. Add the following workflow to the workflows section of your yaml:
definitions:
# Reusable definitions go in this section
...
workflows:
  # Define your workflows here
  release-android-workflow:
  ...
	patch-android-workflow:
	    name: Patch Android Workflow
	    environment:
	      android_signing:
	        - codemagic
	      groups:
	        - shorebird_credentials
	      flutter: 3.10.4
	      xcode: 14.3.1
      triggering:
        events:
          - push
        branch_patterns:
          - pattern: patch
	    scripts:
        - *flutter_analyze
        - *setup_local_properties
        - *shorebird_install
	      - name: Patch Android app with Shorebird
	        script: shorebird patch android
This should all look pretty familiar by now. In a nutshell, this will set up the build machine with the required credentials and signing certificate, install Shorebird and then run the shorebird patch android to send the push out any updated Dart code to your app.
Triggering builds automatically
Now you have got your workflows set up all you need to do is decide how you want to trigger these workflows; manually or using automatic build triggers. If you go down the manual path then all you need to do is commit your code changes to your repository, then start a new build in the Codemagic web app and choose the branch and workflow you want to run.
However, if you’re like me and want to run your builds automatically after merging a pull request and the changes get pushed to the target branch.
If you commit your Dart code changes for your patch to a branch called hotfix you can then create a pull request to the patch branch which triggers the patch-android-workflow when the changes are pushed to the target branch. The triggering section for this can be defined as follows.
workflows:
  # Define your workflows here
  release-android-workflow:
  ...
	patch-android-workflow:
	  ...
     triggering:
       events:
         - push
       branch_patterns:
         - pattern: patch
	   ...
You can take a similar approach for when you merge code into a release branch that runs the release-android-workflow workflow.
You can find further examples of build triggers in the Codemagic documentation here
Conclusion
If you have followed the steps in this article, you should now know how to use Shorebird’s code push. You’ should now also be able use Shorebird in combination with Codemagic workflows that can be used to test your code and automatically publish new releases to Google Play, or push code updates directly to your app. Without a doubt, the introduction of code push for Flutter apps is definitely a welcome addition to the Flutter ecosystem!
Full codemagic.yaml example
definitions:
  # Reusable definitions go in this section
  scripts:
    - &shorebird_install
      name: Install Shorebird CLI
      script: |
        # Install the Shorebird CLI
        curl --proto '=https' --tlsv1.2 https://raw.githubusercontent.com/shorebirdtech/install/main/install.sh -sSf | bash
        # Set Shorebird PATH
        echo PATH="/Users/builder/.shorebird/bin:$PATH" >> $CM_ENV
    - &flutter_analyze
      name: Run static code analysis
      script: flutter analyze
    - &setup_local_properties
      name: Set up local.properties
      script: echo "flutter.sdk=$HOME/programs/flutter" > "$CM_BUILD_DIR/android/local.properties"

workflows:
  # Define your workflows here
  release-android-workflow:
    name: Release Android Workflow
    environment:
      android_signing:
        - codemagic
      groups:
        - shorebird_credentials
        - google_credentials
      vars:
        PACKAGE_NAME: "io.codemagic.birdie"
        GOOGLE_PLAY_TRACK: "alpha"
      flutter: 3.10.4
      xcode: 14.3.1
    triggering:
      events:
        - push
      branch_patterns:
        - pattern: release
    scripts:
      - *flutter_analyze
      - *setup_local_properties
      - *shorebird_install
      - name: Build with Shorebird
        script: |
          BUILD_NUMBER=$(($(google-play get-latest-build-number --package-name "$PACKAGE_NAME" --tracks="$GOOGLE_PLAY_TRACK") + 1))
          shorebird release android -- \
          --build-name=1.0.0 \
          --build-number=$BUILD_NUMBER
    artifacts:
      - build/**/outputs/**/*.aab
    publishing:
      google_play:
        credentials: $GCLOUD_SERVICE_ACCOUNT_CREDENTIALS
        track: $GOOGLE_PLAY_TRACK
        submit_as_draft: false

  patch-android-workflow:
    name: Patch Android Workflow
    environment:
      android_signing:
        - codemagic
      groups:
        - shorebird_credentials
      flutter: 3.10.4
      xcode: 14.3.1
    triggering:
      events:
        - push
      branch_patterns:
        - pattern: patch
    scripts:
      - *flutter_analyze
      - *setup_local_properties
      - *shorebird_install
      - name: Patch Android app with Shorebird
        script: shorebird patch android
    artifacts:
      - build/**/outputs/**/*.aab


