Written by Lorenzo Pichilli
What is flutter_inappwebview? It’s a Flutter plugin that allows you to incorporate WebView widgets into your Flutter app, to use headless WebViews or to use in-app browsers.
So, what’s the difference between webview_flutter (the official Flutter plugin) and flutter_webview_plugin?
Compared to all other WebView plugins, it is feature-rich: a lot of events, methods, and options to control WebViews. Furthermore, they do not have good documentation on their API or, at least, it is not complete — while every feature of flutter_inappwebview is almost completely documented (just check the API Reference on pub.dev).
In this article, I’m going to present the main classes and some examples of the InAppWebView widget that people were asking about on the official flutter_inappwebview repository (issue section) and on StackOverflow.
So, let’s get started, but first, let us know how many mobile app projects do you have in Git repositories?
Main classes
This is a list of the main classes the plugin offers:
- InAppWebView: Flutter widget for adding an inline native WebView integrated into the Flutter widget tree.
- ContextMenu: class that represents the WebView context menu.
- HeadlessInAppWebView: class that represents a WebView in headless mode. It can be used to run a WebView in background without attaching an
InAppWebViewto the widget tree. - InAppBrowser: in-app browser using native WebView.
- ChromeSafariBrowser: in-app browser using Chrome Custom Tabs on Android or SFSafariViewController on iOS.
- InAppLocalhostServer: class that allows you to create a simple server on
http://localhost:[port]/. The defaultportvalue is 8080. - CookieManager: class that implements a singleton object (shared instance), which manages the cookies used by WebView instances.
- HttpAuthCredentialDatabase: class that implements a singleton object (shared instance) that manages the shared HTTP auth credentials cache.
- WebStorageManager: class that implements a singleton object (shared instance), which manages the web storage used by WebView instances.
In this article, I’m going to show in particular the InAppWebView widget, which is the most popular of them.
InAppWebView is a widget like any other!
Adding the InAppWebView widget into your app is very simple. It’s just a widget like any other Flutter widget: InAppWebView(initialUrl: 'https://github.com/flutter').
Info.plist file, with the key io.flutter.embedded_views_preview and the value YES.This widget has a set of initial attributes that you can use to initialize the WebView:
- initialUrl: initial URL that will be loaded.
- initialOptions: initial WebView options that will be used.
- gestureRecognizers: specifies which gestures should be consumed by the WebView.
- initialData: initial
InAppWebViewInitialDatathat will be loaded, such as an HTML string. - initialFile: initial asset file that will be loaded (check the “Load a file inside assets folder” section).
- initialHeaders: initial headers that will be used.
- contextMenu: context menu that contains custom menu items.
The list of all available WebView options is quite long. For example, you can enable/disable JavaScript using the javascriptEnabled option or enable/disable cache using the cacheEnabled option. The full list of all options is available here.
Use InAppWebViewController to control your WebView
To control the WebView, you have the InAppWebViewController class. This controller is returned by the onWebViewCreated callback when the WebView is ready to be used.
Through it, you can control your WebView or access its properties, such as the current URL (using the getUrl method). Some other possible methods are loadUrl to load a new URL, postUrl to load a given URL with custom data using POST method, evaluateJavascript to evaluate JavaScript code into the WebView and to get the result of the evaluation, takeScreenshot to take the screenshot (in PNG format) of the WebView’s visible viewport, getCertificate to get either the SSL certificate for the main top-level page or null if there is no certificate. The full list of all methods you can use is quite long and available here.
InAppWebView Events
The InAppWebView widget offers a variety of events! Here’s a few of them:
- onLoadStart: event fired when the WebView starts to load an URL.
- onLoadStop: event fired when the WebView finishes loading an URL.
- onLoadHttpError: event fired when the WebView main page receives an HTTP error.
- onConsoleMessage: event fired when the WebView receives a JavaScript console message (such as
console.log,console.erroretc.). - shouldOverrideUrlLoading: gives the host application a chance to take control when a URL is about to be loaded in the current WebView.
- onDownloadStart: event fired when WebView recognizes a downloadable file.
- onReceivedHttpAuthRequest: event fired when the WebView received an HTTP authentication request. The default behavior is to cancel the request.
- onReceivedServerTrustAuthRequest: event fired when the WebView need to perform server trust authentication (certificate validation).
- onPrint: event fired when
window.print() is called from JavaScript side. - onCreateWindow: event fired when the InAppWebView requests the host application to create a new window, for example when trying to open a link with
target="_blank"or whenwindow.open()is called by JavaScript side.
There are many, many more! I recommend checking the API Reference to get more details. As for the WebView options and methods, the full list of all WebView events is quite long and available here.
InAppWebView Simple Example
Here is a simple example that shows an InAppWebView widget, its current URL, and 3 buttons: one to go back, one to go forward, and another one to reload the current page.
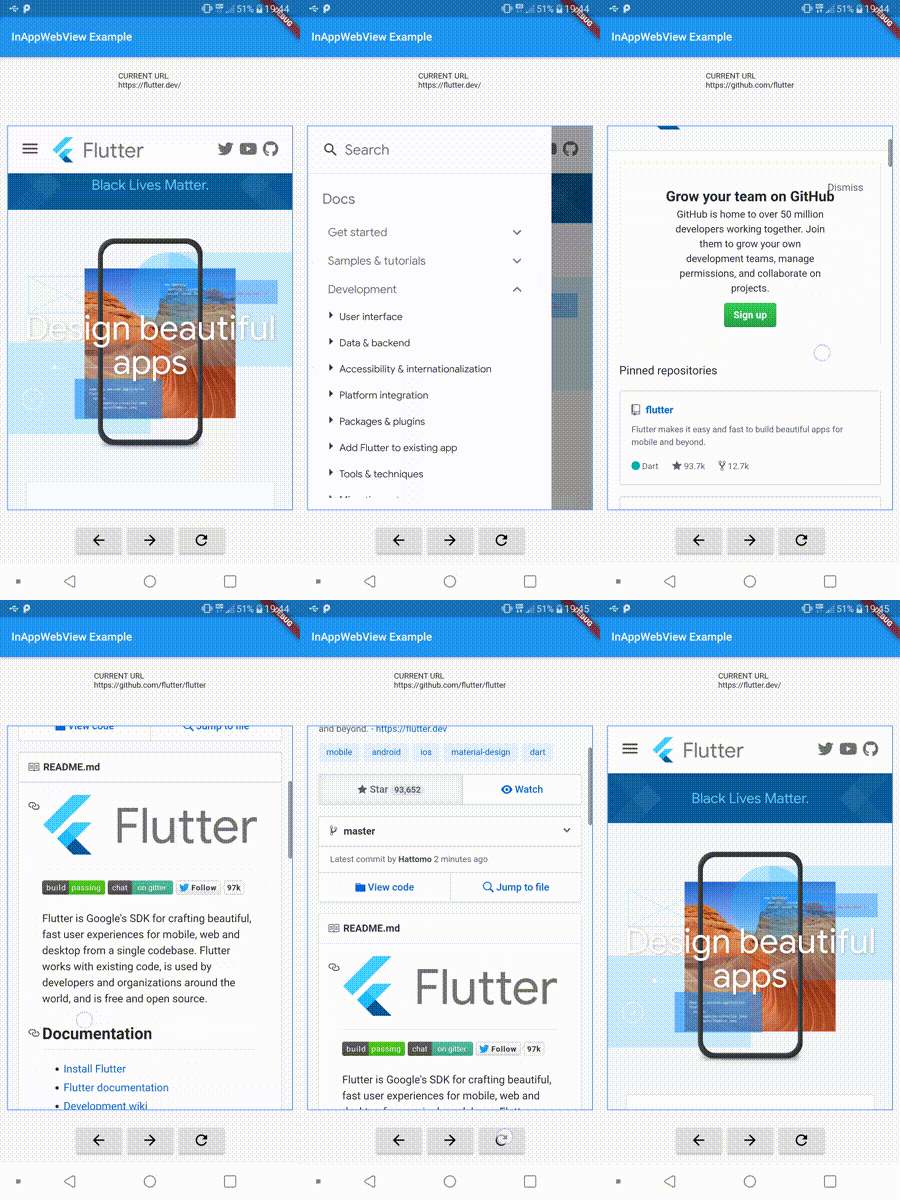
This is the full code example:
import 'dart:async';
import 'package:flutter/material.dart';
import 'package:flutter_inappwebview/flutter_inappwebview.dart';

Future main() async {
  WidgetsFlutterBinding.ensureInitialized();
  runApp(new MyApp());
}

class MyApp extends StatefulWidget {
  @override
  _MyAppState createState() => new _MyAppState();
}

class _MyAppState extends State<MyApp> {

  InAppWebViewController _webViewController;
  String url = "";
  double progress = 0;

  @override
  Widget build(BuildContext context) {
    return MaterialApp(
      home: Scaffold(
        appBar: AppBar(
          title: const Text('InAppWebView Example'),
        ),
        body: Container(
          child: Column(children: <Widget>[
            Container(
              padding: EdgeInsets.all(20.0),
              child: Text(
                "CURRENT URL\n${(url.length > 50) ? url.substring(0, 50) + "..." : url}"
              ),
            ),
            Container(
              padding: EdgeInsets.all(10.0),
              child: progress < 1.0
                ? LinearProgressIndicator(value: progress)
                : Container()),
            Expanded(
              child: Container(
                margin: const EdgeInsets.all(10.0),
                decoration:
                BoxDecoration(border: Border.all(color: Colors.blueAccent)),
                child: InAppWebView(
                  initialUrl: "https://flutter.dev/",
                  initialOptions: InAppWebViewGroupOptions(
                    crossPlatform: InAppWebViewOptions(
                      debuggingEnabled: true,
                    )
                  ),
                  onWebViewCreated: (InAppWebViewController controller) {
                    _webViewController = controller;
                  },
                  onLoadStart: (InAppWebViewController controller, String url) {
                    setState(() {
                      this.url = url;
                    });
                  },
                  onLoadStop: (InAppWebViewController controller, String url) async {
                    setState(() {
                      this.url = url;
                    });
                  },
                  onProgressChanged: (InAppWebViewController controller, int progress) {
                    setState(() {
                      this.progress = progress / 100;
                    });
                  },
                ),
              ),
            ),
            ButtonBar(
              alignment: MainAxisAlignment.center,
              children: <Widget>[
                RaisedButton(
                  child: Icon(Icons.arrow_back),
                  onPressed: () {
                    if (_webViewController != null) {
                      _webViewController.goBack();
                    }
                  },
                ),
                RaisedButton(
                  child: Icon(Icons.arrow_forward),
                  onPressed: () {
                    if (_webViewController != null) {
                      _webViewController.goForward();
                    }
                  },
                ),
                RaisedButton(
                  child: Icon(Icons.refresh),
                  onPressed: () {
                    if (_webViewController != null) {
                      _webViewController.reload();
                    }
                  },
                ),
              ],
            ),
          ]),
        ),
      ),
    );
  }
}
JavaScript handlers (channels)
You can communicate with the JavaScript side and vice versa. To add a JavaScript handler, you can use the _webViewController.addJavaScriptHandler method, where you define the handlerName and a callback to be invoked when it is called by the JavaScript side. The callback can return data to be sent on the JavaScript side.
On the JavaScript side, to execute the callback handler and send data to Flutter, you need to use window.flutter_inappwebview.callHandler(handlerName <String>, ...args) method, where handlerName is a string that represents the handler name that your calling and args are optional arguments that you can send to the Flutter side.
In order to call window.flutter_inappwebview.callHandler(handlerName <String>, ...args) properly, you need to wait for the JavaScript event flutterInAppWebViewPlatformReady. This event will be dispatched as soon as the platform (Android or iOS) is ready to handle the callHandler method.
Here is an example:
import 'dart:async';
import 'package:flutter/material.dart';
import 'package:flutter_inappwebview/flutter_inappwebview.dart';

Future main() async {
  WidgetsFlutterBinding.ensureInitialized();
  runApp(new MyApp());
}

class MyApp extends StatefulWidget {
  @override
  _MyAppState createState() => new _MyAppState();
}

class _MyAppState extends State<MyApp> {
  InAppWebViewController _webViewController;

  @override
  Widget build(BuildContext context) {
    return MaterialApp(
      home: Scaffold(
        appBar: AppBar(
          title: const Text('InAppWebView Example'),
        ),
        body: Container(
          child: Column(children: <Widget>[
            Expanded(
              child:InAppWebView(
                initialData: InAppWebViewInitialData(
                  data: """
<!DOCTYPE html>
<html lang="en">
    <head>
        <meta charset="UTF-8">
        <meta name="viewport" content="width=device-width, user-scalable=no, initial-scale=1.0, maximum-scale=1.0, minimum-scale=1.0">
    </head>
    <body>
        <h1>JavaScript Handlers (Channels) TEST</h1>
        <script>
            window.addEventListener("flutterInAppWebViewPlatformReady", function(event) {
                window.flutter_inappwebview.callHandler('handlerFoo')
                  .then(function(result) {
                    // print to the console the data coming
                    // from the Flutter side.
                    console.log(JSON.stringify(result));

                    window.flutter_inappwebview
                      .callHandler('handlerFooWithArgs', 1, true, ['bar', 5], {foo: 'baz'}, result);
                });
            });
        </script>
    </body>
</html>
                  """
                ),
                initialOptions: InAppWebViewGroupOptions(
                    crossPlatform: InAppWebViewOptions(
                      debuggingEnabled: true,
                    )
                ),
                onWebViewCreated: (InAppWebViewController controller) {
                  _webViewController = controller;

                  _webViewController.addJavaScriptHandler(handlerName:'handlerFoo', callback: (args) {
                    // return data to JavaScript side!
                    return {
                      'bar': 'bar_value', 'baz': 'baz_value'
                    };
                  });

                  _webViewController.addJavaScriptHandler(handlerName: 'handlerFooWithArgs', callback: (args) {
                    print(args);
                    // it will print: [1, true, [bar, 5], {foo: baz}, {bar: bar_value, baz: baz_value}]
                  });
                },
                onConsoleMessage: (controller, consoleMessage) {
                  print(consoleMessage);
                  // it will print: {message: {"bar":"bar_value","baz":"baz_value"}, messageLevel: 1}
                },
              ),
            ),
          ])
        ),
      ),
    );
  }
}
WebRTC in InAppWebView
At this moment, WebRTC is supported only on Android, because, unfortunately WKWebView doesn’t implement all the WebRTC API on iOS (you can follow this issue here: #200).
I’m going to show an example using https://appr.tc/ to test the WebRTC feature. It’s a video chat demo app based on WebRTC (https://github.com/webrtc/apprtc).
To request permissions about the camera and microphone, you can use the permission_handler plugin. Also, you need to set the WebView option mediaPlaybackRequiresUserGesture to false in order to autoplay HTML5 audio and video.
Furthermore, on Android you need to implement the androidOnPermissionRequest event (it’s an Android-specific event). This is an event that is fired when the WebView is requesting permission to access a specific resource (that is the Android native WebChromeClient.onPermissionRequest event). In this case, this event is used to grant permissions for the WebRTC API. You also need to add these permissions in the AndroidManifest.xml:
<uses-permission android:name="android.permission.INTERNET"/>
<uses-permission android:name="android.permission.CAMERA" />
<uses-permission android:name="android.permission.RECORD_AUDIO" />
<uses-permission android:name="android.permission.MODIFY_AUDIO_SETTINGS" />
<uses-permission android:name="android.permission.VIDEO_CAPTURE" />
<uses-permission android:name="android.permission.AUDIO_CAPTURE" />
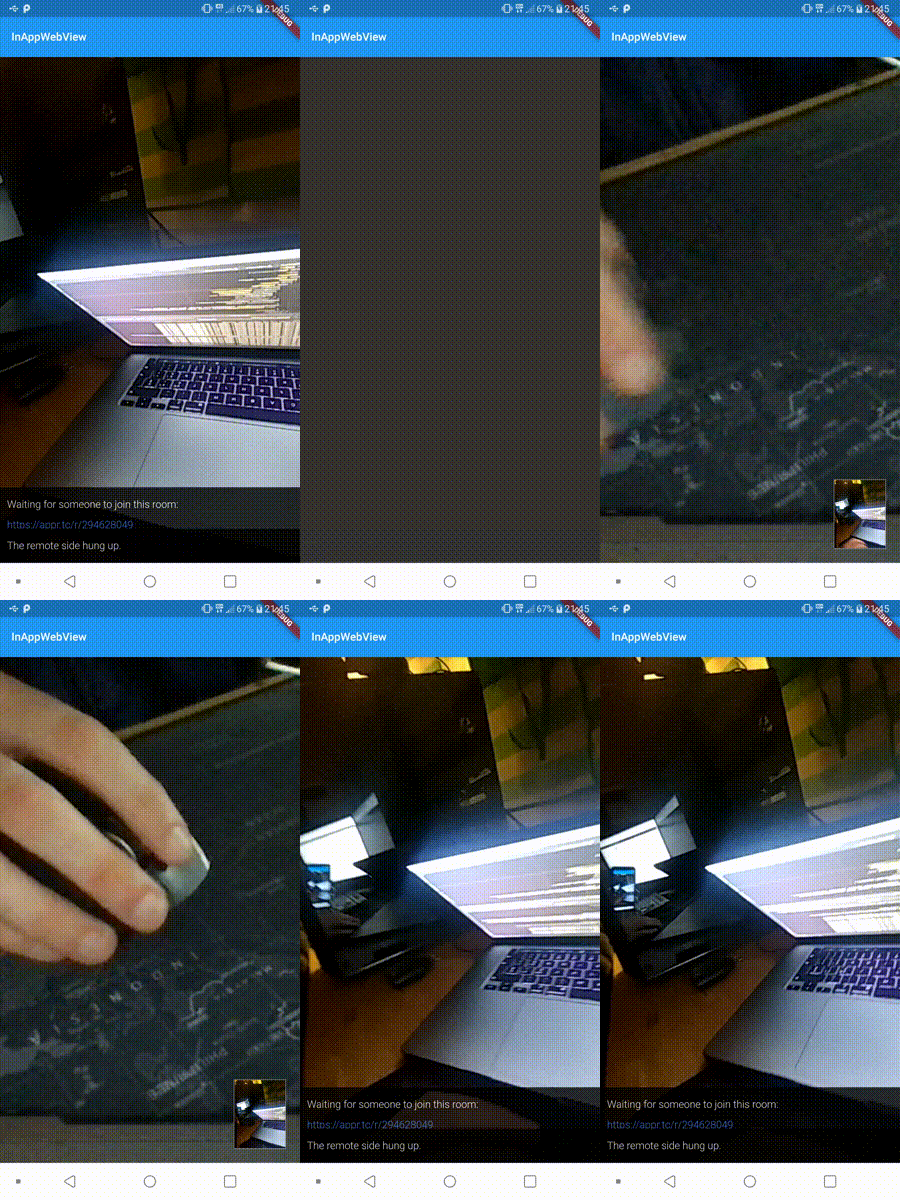
Here is the full code example:
import 'dart:async';
import 'package:flutter/material.dart';
import 'package:flutter_inappwebview/flutter_inappwebview.dart';
import 'package:permission_handler/permission_handler.dart';

Future main() async {
  WidgetsFlutterBinding.ensureInitialized();

  await Permission.camera.request();
  await Permission.microphone.request();

  runApp(MyApp());
}

class MyApp extends StatefulWidget {
  @override
  _MyAppState createState() => new _MyAppState();
}

class _MyAppState extends State<MyApp> {
  @override
  Widget build(BuildContext context) {
    return MaterialApp(
        home: InAppWebViewPage()
    );
  }
}

class InAppWebViewPage extends StatefulWidget {
  @override
  _InAppWebViewPageState createState() => new _InAppWebViewPageState();
}

class _InAppWebViewPageState extends State<InAppWebViewPage> {
  InAppWebViewController _webViewController;

  @override
  Widget build(BuildContext context) {
    return Scaffold(
      appBar: AppBar(
          title: Text("InAppWebView")
      ),
      body: Container(
        child: Column(children: <Widget>[
          Expanded(
            child: Container(
              child: InAppWebView(
                initialUrl: "https://appr.tc/r/704328056",
                initialOptions: InAppWebViewGroupOptions(
                  crossPlatform: InAppWebViewOptions(
                    mediaPlaybackRequiresUserGesture: false,
                    debuggingEnabled: true,
                  ),
                ),
                onWebViewCreated: (InAppWebViewController controller) {
                  _webViewController = controller;
                },
                androidOnPermissionRequest: (InAppWebViewController controller, String origin, List<String> resources) async {
                  return PermissionRequestResponse(resources: resources, action: PermissionRequestResponseAction.GRANT);
                }
              ),
            ),
          ),
        ])
      )
    );
  }
}
Enabling download files in InAppWebView
InAppWebView can recognize downloadable files in both Android and iOS platforms. To be able to recognize downloadable files, you need to set the useOnDownloadStart option to true and then you can listen to the onDownloadStart event.
On Android, you need to add write permission inside your AndroidManifest.xml file:
<uses-permission android:name="android.permission.WRITE_EXTERNAL_STORAGE" />
Then you need to ask permission using the permission_handler plugin. You can also use the flutter_downloader plugin to download your file.
Here is a complete example using http://ovh.net/files/ (in particular, the http://ovh.net/files/1Mio.dat as URL) to test the download:
import 'dart:async';
import 'package:flutter/material.dart';
import 'package:flutter_inappwebview/flutter_inappwebview.dart';
import 'package:flutter_downloader/flutter_downloader.dart';
import 'package:path_provider/path_provider.dart';
import 'package:permission_handler/permission_handler.dart';

Future main() async {
  WidgetsFlutterBinding.ensureInitialized();
  await FlutterDownloader.initialize(
    debug: true // optional: set false to disable printing logs to console
  );
  await Permission.storage.request();
  runApp(MyApp());
}

class MyApp extends StatefulWidget {
  @override
  _MyAppState createState() => new _MyAppState();
}

class _MyAppState extends State<MyApp> {
  InAppWebViewController _webViewController;

  @override
  Widget build(BuildContext context) {
    return MaterialApp(
      home: Scaffold(
        appBar: AppBar(
          title: const Text('InAppWebView Example'),
        ),
        body: Container(
          child: Column(children: <Widget>[
            Expanded(
              child: InAppWebView(
                initialUrl: "http://ovh.net/files/1Mio.dat",
                initialOptions: InAppWebViewGroupOptions(
                  crossPlatform: InAppWebViewOptions(
                      debuggingEnabled: true,
                      useOnDownloadStart: true
                  ),
                ),
                onWebViewCreated: (InAppWebViewController controller) {
                  _webViewController = controller;
                },
                onDownloadStart: (controller, url) async {
                  print("onDownloadStart $url");
                  final taskId = await FlutterDownloader.enqueue(
                    url: url,
                    savedDir: (await getExternalStorageDirectory()).path,
                    showNotification: true, // show download progress in status bar (for Android)
                    openFileFromNotification: true, // click on notification to open downloaded file (for Android)
                  );
                },
              ),
            ),
          ]),
        ),
      ),
    );
  }
}
As you can see, I’m also using the path_provider plugin to get the folder where I want to save the file.
Allowing self-signed SSL certificates
To allow self-signed SSL certificates, you can use the onReceivedServerTrustAuthRequest event and simply proceed with the request:
onReceivedServerTrustAuthRequest: (controller, challenge) async {
  return ServerTrustAuthResponse(action: ServerTrustAuthResponseAction.PROCEED);
},
Managing pop-up windows opened with target=”_blank” or “window.open”
To manage pop-up windows when the user clicks on a link with target="_blank" or through JavaScript code using window.open, you can use the onCreateWindow event. On Android, to be able to allow this event, you need to set the supportMultipleWindows option to true. Also, in order to be able to allow the usage of JavaScript, you need to set the javaScriptCanOpenWindowsAutomatically to true.
If you want to manage these requests, you should return true from this event, otherwise, the default implementation of this event does nothing and hence returns false.
The CreateWindowRequest represents the navigation request that contains a windowId that can be used to create a new InAppWebView instance. This windowId is used by the native code to map the request and the WebView is used to manage that request.
Also, CreateWindowRequest contains the url of the request (on Android, if the popup is opened using JavaScript with window.open, it will be null). If you need to maintain the Window JavaScript object reference (created using the window.open method), to call window.close method for example, then you should create the new WebView with the windowId, without using the url .
Here is a simple example that shows an AlertDialog when the user clicks on the link:
import 'dart:async';
import 'package:flutter/material.dart';
import 'package:flutter_inappwebview/flutter_inappwebview.dart';

Future main() async {
  WidgetsFlutterBinding.ensureInitialized();
  runApp(new MyApp());
}

class MyApp extends StatefulWidget {
  @override
  _MyAppState createState() => new _MyAppState();
}

class _MyAppState extends State<MyApp> {
  @override
  Widget build(BuildContext context) {
    return MaterialApp(
      home: InAppWebViewPage()
    );
  }
}

class InAppWebViewPage extends StatefulWidget {
  @override
  _InAppWebViewPageState createState() => new _InAppWebViewPageState();
}

class _InAppWebViewPageState extends State<InAppWebViewPage> {
  InAppWebViewController _webViewController;
  InAppWebViewController _webViewPopupController;

  @override
  void initState() {
    super.initState();
  }

  @override
  void dispose() {
    super.dispose();
  }

  @override
  Widget build(BuildContext context) {
    return MaterialApp(
      home: Scaffold(
        appBar: AppBar(
          title: const Text('InAppWebView Example'),
        ),
        body: SafeArea(
          child: Container(
            child: InAppWebView(
              initialData: InAppWebViewInitialData(
                data: """
<!DOCTYPE html>
<html lang="en">
<head>
    <meta charset="UTF-8">
    <meta name="viewport" content="width=device-width, user-scalable=no, initial-scale=1.0, maximum-scale=1.0, minimum-scale=1.0">
    <meta http-equiv="X-UA-Compatible" content="ie=edge">
    <title>Flutter InAppWebView</title>
</head>
<body>
  <a style="margin: 50px; background: #333; color: #fff; font-weight: bold; font-size: 20px; padding: 15px; display: block;"
    href="https://github.com/flutter"
    target="_blank">
    Click here to open https://github.com/flutter in a popup!
  </a>
</body>
</html>
"""
              ),
              initialOptions: InAppWebViewGroupOptions(
                crossPlatform: InAppWebViewOptions(
                  debuggingEnabled: true,
                  // set this to true if you are using window.open to open a new window with JavaScript
                  javaScriptCanOpenWindowsAutomatically: true
                ),
                android: AndroidInAppWebViewOptions(
                  // on Android you need to set supportMultipleWindows to true,
                  // otherwise the onCreateWindow event won't be called
                  supportMultipleWindows: true
                )
              ),
              onWebViewCreated: (InAppWebViewController controller) {
                _webViewController = controller;
              },
              onCreateWindow: (controller, createWindowRequest) async {

                print("onCreateWindow");

                showDialog(
                  context: context,
                  builder: (context) {
                    return AlertDialog(
                      content: Container(
                        width: MediaQuery.of(context).size.width,
                        height: 400,
                        child: InAppWebView(
                          // Setting the windowId property is important here!
                          windowId: createWindowRequest.windowId,
                          initialOptions: InAppWebViewGroupOptions(
                              crossPlatform: InAppWebViewOptions(
                                  debuggingEnabled: true,
                              ),
                          ),
                          onWebViewCreated: (InAppWebViewController controller) {
                            _webViewPopupController = controller;
                          },
                          onLoadStart: (InAppWebViewController controller, String url) {
                            print("onLoadStart popup $url");
                          },
                          onLoadStop: (InAppWebViewController controller, String url) {
                            print("onLoadStop popup $url");
                          },
                        ),
                      ),
                    );
                  },
                );

                return true;
              },
            ),
          ),
        ),
      ),
    );
  }
}
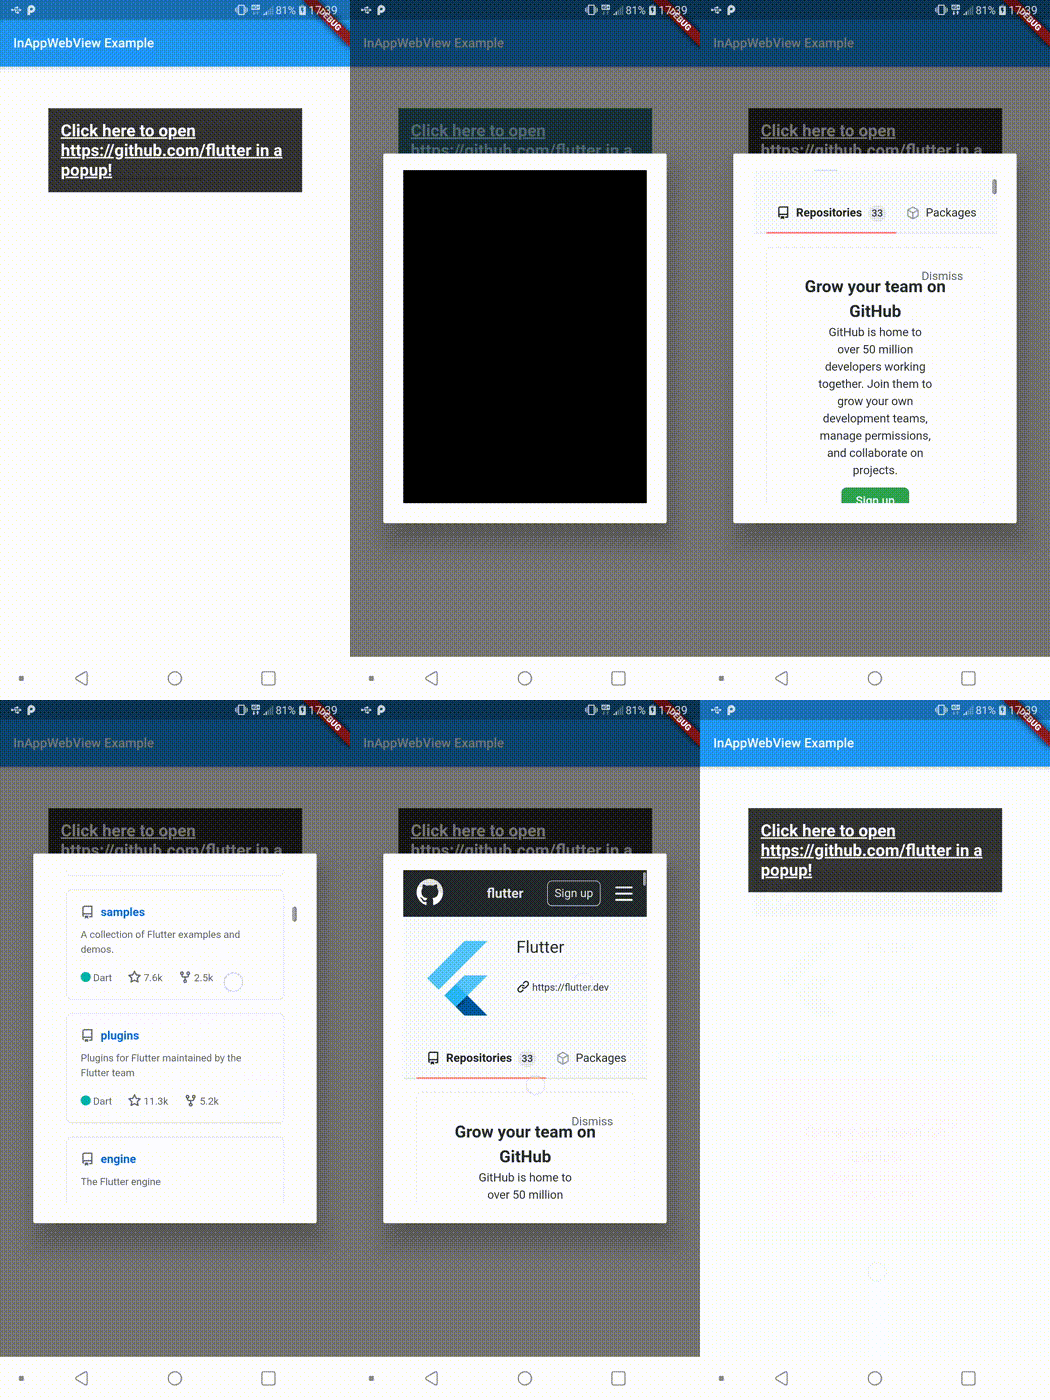
Managing platform URLs such as whatsapp:, fb:, tel:, mailto:, etc.
Generally, WebView knows nothing about managing whatsapp:, tel: or fb: protocol/scheme. To capture the requests made with these custom protocols/schemes, you can use the shouldOverrideUrlLoading event (you need to enable it with useShouldOverrideUrlLoading: true option).
This way you can cancel the request made for the WebView and, open the App instead. To do so, you can use the url_launcher plugin:
initialOptions: InAppWebViewGroupOptions(
  crossPlatform: InAppWebViewOptions(
      debuggingEnabled: true,
      useShouldOverrideUrlLoading: true
  ),
),
shouldOverrideUrlLoading: (controller, request) async {
  var url = request.url;
  var uri = Uri.parse(url);

  if (!["http", "https", "file",
    "chrome", "data", "javascript",
    "about"].contains(uri.scheme)) {
    if (await canLaunch(url)) {
      // Launch the App
      await launch(
        url,
      );
      // and cancel the request
      return ShouldOverrideUrlLoadingAction.CANCEL;
    }
  }

  return ShouldOverrideUrlLoadingAction.ALLOW;
},
Managing WebView cookies
To manage WebView cookies, you can use the CookieManager class, which implements a singleton object (shared instance). On Android, it is implemented using the CookieManager class. On iOS, it is implemented using the WKHTTPCookieStore class.
Here is an example of how to set a cookie:
CookieManager _cookieManager = CookieManager.instance();

final expiresDate =
    DateTime.now().add(Duration(days: 3)).millisecondsSinceEpoch;
_cookieManager.setCookie(
  url: "https://flutter.dev/",
  name: "session",
  value: "54th5hfdcfg34",
  domain: ".flutter.dev",
  expiresDate: expiresDate,
  isSecure: true,
);
Custom context menus
You can customize WebView’s context menu by adding custom menu items and/or hiding the default system menu items. For each custom menu item, you can declare a callback action to be invoked when the user clicks on it. As an example, I will add a custom menu item named Special and I will define a callback action that shows a JavaScript window.alert to the user. This alert contains a text of our choosing.
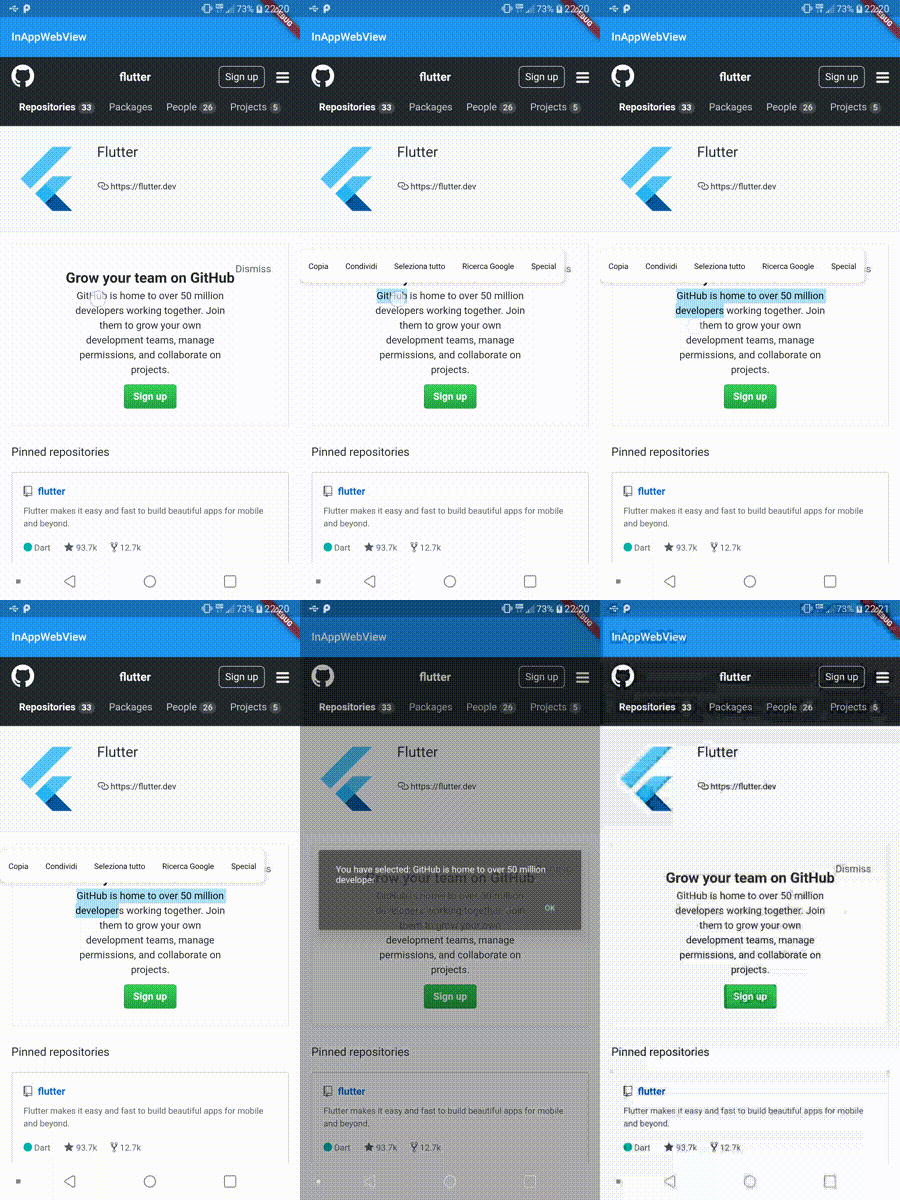
Here’s the full code example:
import 'dart:async';
import 'dart:io';
import 'package:flutter/material.dart';
import 'package:flutter_inappwebview/flutter_inappwebview.dart';

Future main() async {
  WidgetsFlutterBinding.ensureInitialized();
  runApp(MyApp());
}

class MyApp extends StatefulWidget {
  @override
  _MyAppState createState() => new _MyAppState();
}

class _MyAppState extends State<MyApp> {
  @override
  Widget build(BuildContext context) {
    return MaterialApp(
      home: InAppWebViewPage()
    );
  }
}

class InAppWebViewPage extends StatefulWidget {
  @override
  _InAppWebViewPageState createState() => new _InAppWebViewPageState();
}

class _InAppWebViewPageState extends State<InAppWebViewPage> {
  InAppWebViewController _webViewController;
  ContextMenu contextMenu;

  @override
  void initState() {
    super.initState();

    contextMenu = ContextMenu(
      menuItems: [
        ContextMenuItem(androidId: 1, iosId: "1", title: "Special", action: () async {
          print("Menu item Special clicked!");
          var selectedText = await _webViewController.getSelectedText();
          await _webViewController.clearFocus();
          await _webViewController.evaluateJavascript(source: "window.alert('You have selected: $selectedText')");
        })
      ],
      options: ContextMenuOptions(
          hideDefaultSystemContextMenuItems: false
      ),
      onCreateContextMenu: (hitTestResult) async {
        print("onCreateContextMenu");
        print(hitTestResult.extra);
        print(await _webViewController.getSelectedText());
      },
      onHideContextMenu: () {
        print("onHideContextMenu");
      },
      onContextMenuActionItemClicked: (contextMenuItemClicked) async {
        var id = (Platform.isAndroid) ? contextMenuItemClicked.androidId : contextMenuItemClicked.iosId;
        print("onContextMenuActionItemClicked: " + id.toString() + " " + contextMenuItemClicked.title);
      }
    );
  }

  @override
  Widget build(BuildContext context) {
    return Scaffold(
      appBar: AppBar(
          title: Text("InAppWebView")
      ),
      body: Container(
        child: Column(children: <Widget>[
          Expanded(
            child: Container(
              child: InAppWebView(
                initialUrl: "https://github.com/flutter",
                contextMenu: contextMenu,
                initialOptions: InAppWebViewGroupOptions(
                  crossPlatform: InAppWebViewOptions(
                    debuggingEnabled: true,
                  ),
                ),
                onWebViewCreated: (InAppWebViewController controller) {
                  _webViewController = controller;
                },
              ),
            ),
          ),
        ])
      )
    );
  }
}
Conclusion
In this article, I made a little introduction to the flutter_inappwebview plugin, focusing on the InAppWebView widget. This plugin is in continuous development (at the time of writing this, the latest release is 4.0.0) and I recommend you check out the API Reference to find out all the features. For any new feature request/bug fix, you can use the issue section of the repository.
My next article will be on how to implement a full-featured browser using this plugin: Creating a Full-Featured Browser using WebViews in Flutter.
I hope that this article has opened new use cases for your Flutter apps.
Lorenzo Pichilli is a Software Engineer mostly focused on Web (FullStack) and Mobile Development. He is a JavaScript, TypeScript and Flutter enthusiast who loves open-source (you can check out his projects on GitHub). He also writes articles on Medium.


