


 operations.")
In this article, you will learn to integrate Cloud Firestore with Flutter and perform CRUD (create, read, update and delete) operations.
This article is written by Souvik Biswas
Cloud Firestore provides you with an easily manageable pre-configured NoSQL database. It helps with storing and syncing data for both client- and server-side development; it also supports automatic caching of data so that it can even be used offline. Google Cloud is the driving platform behind Cloud Firestore, and it can be scaled easily.
So, let’s get started, but first, let us know what’s your relationship with CI/CD tools?
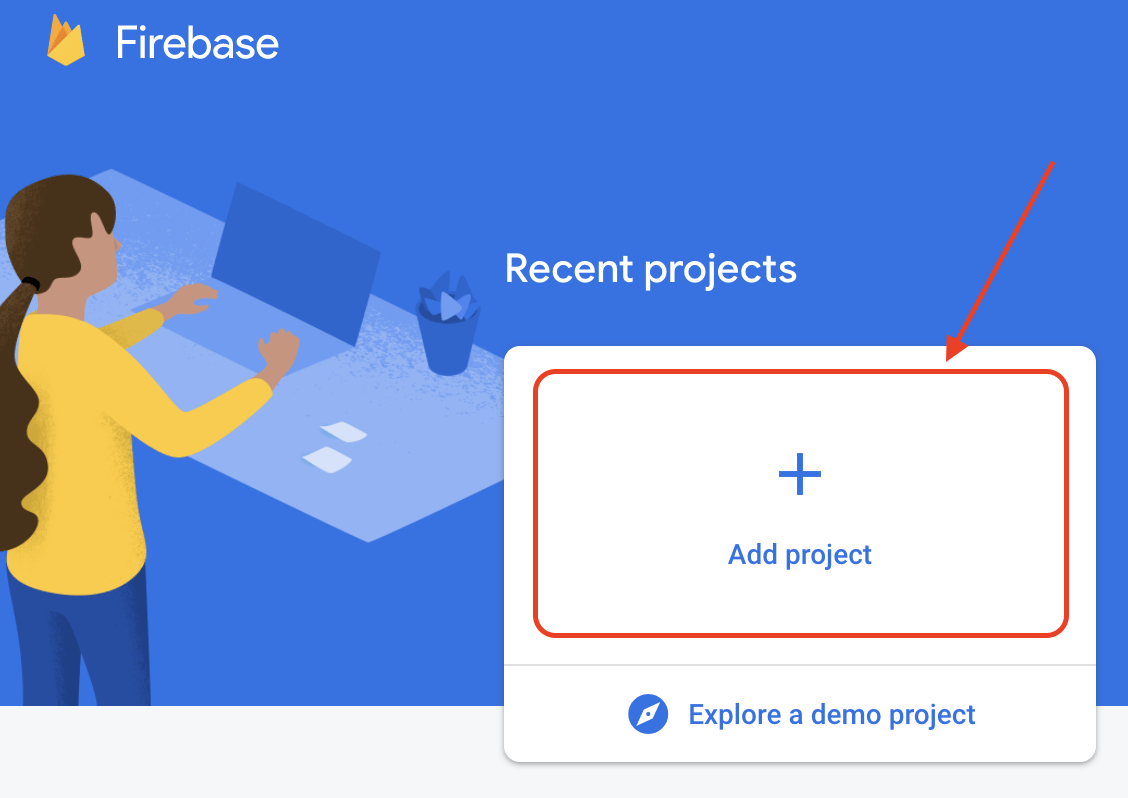
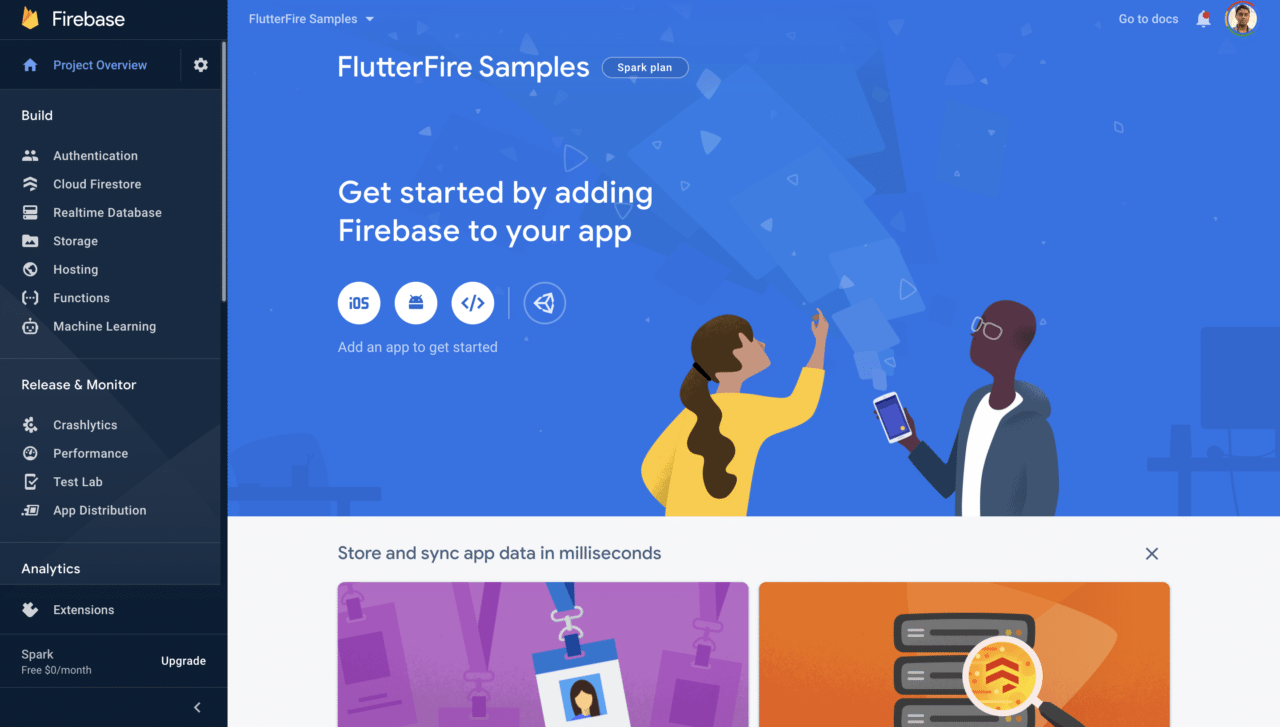
Creating a Firebase project
You will need to create a new Firebase project in order to integrate it with your application.
Navigate to the Firebase console and click Add project.
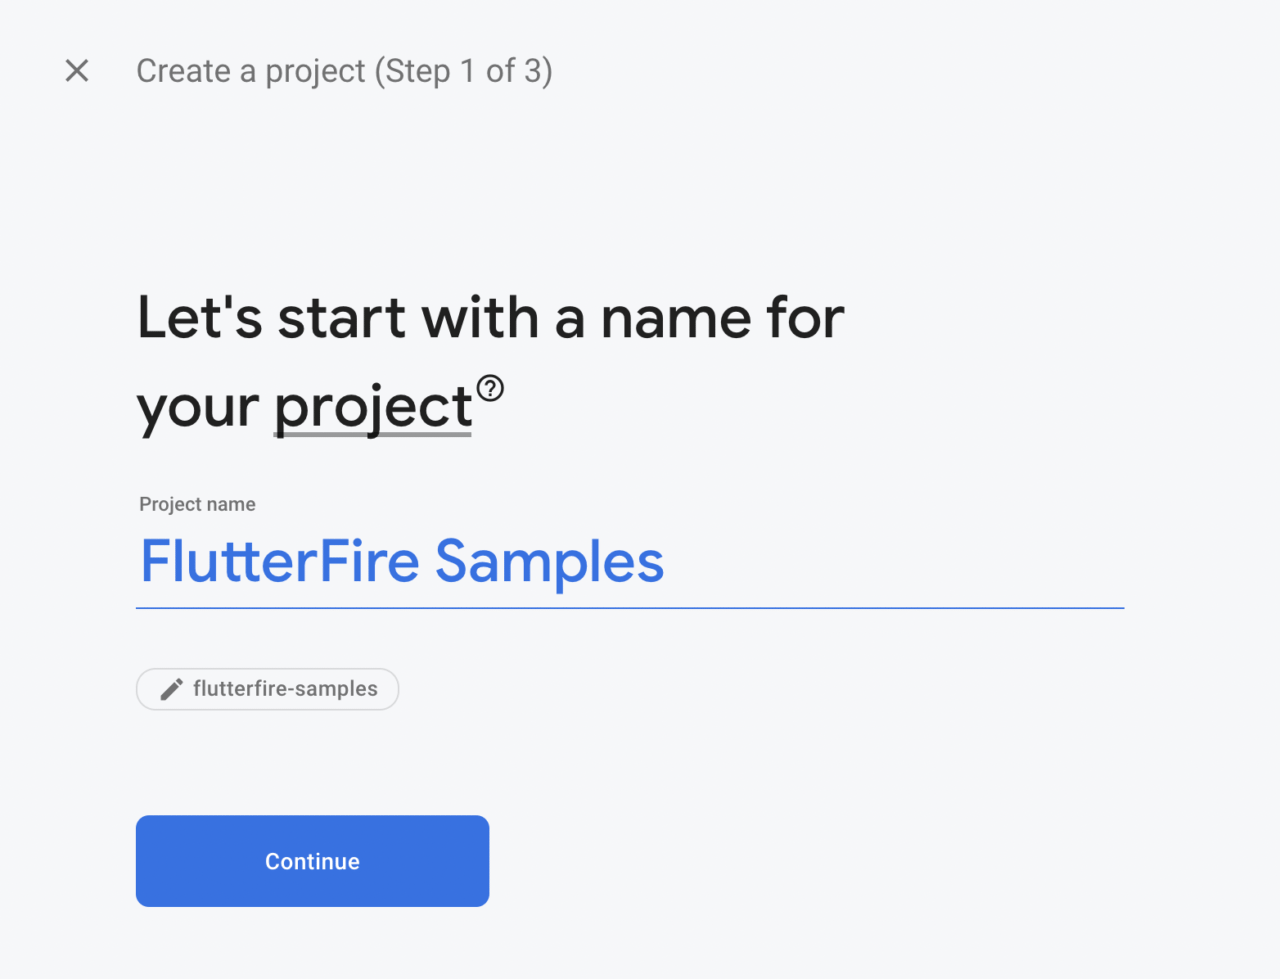
Enter a project name and click Continue.
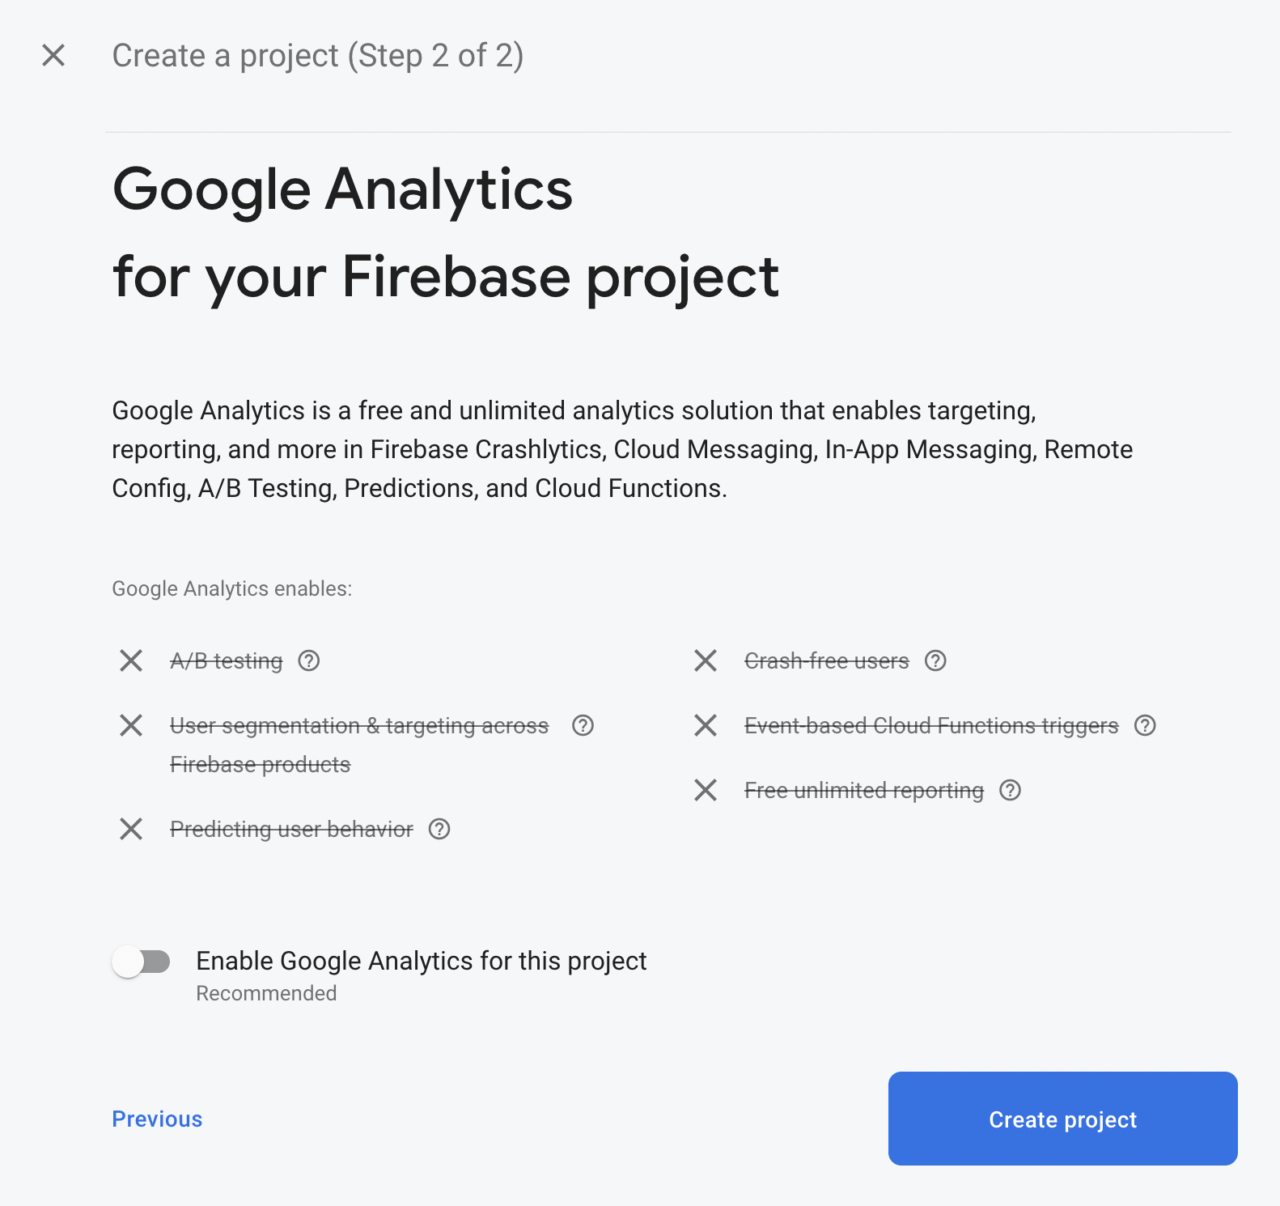
You’ll be asked whether you want to enable Google Analytics for the project. We won’t need analytics since this is just a sample project, so just click Create project.
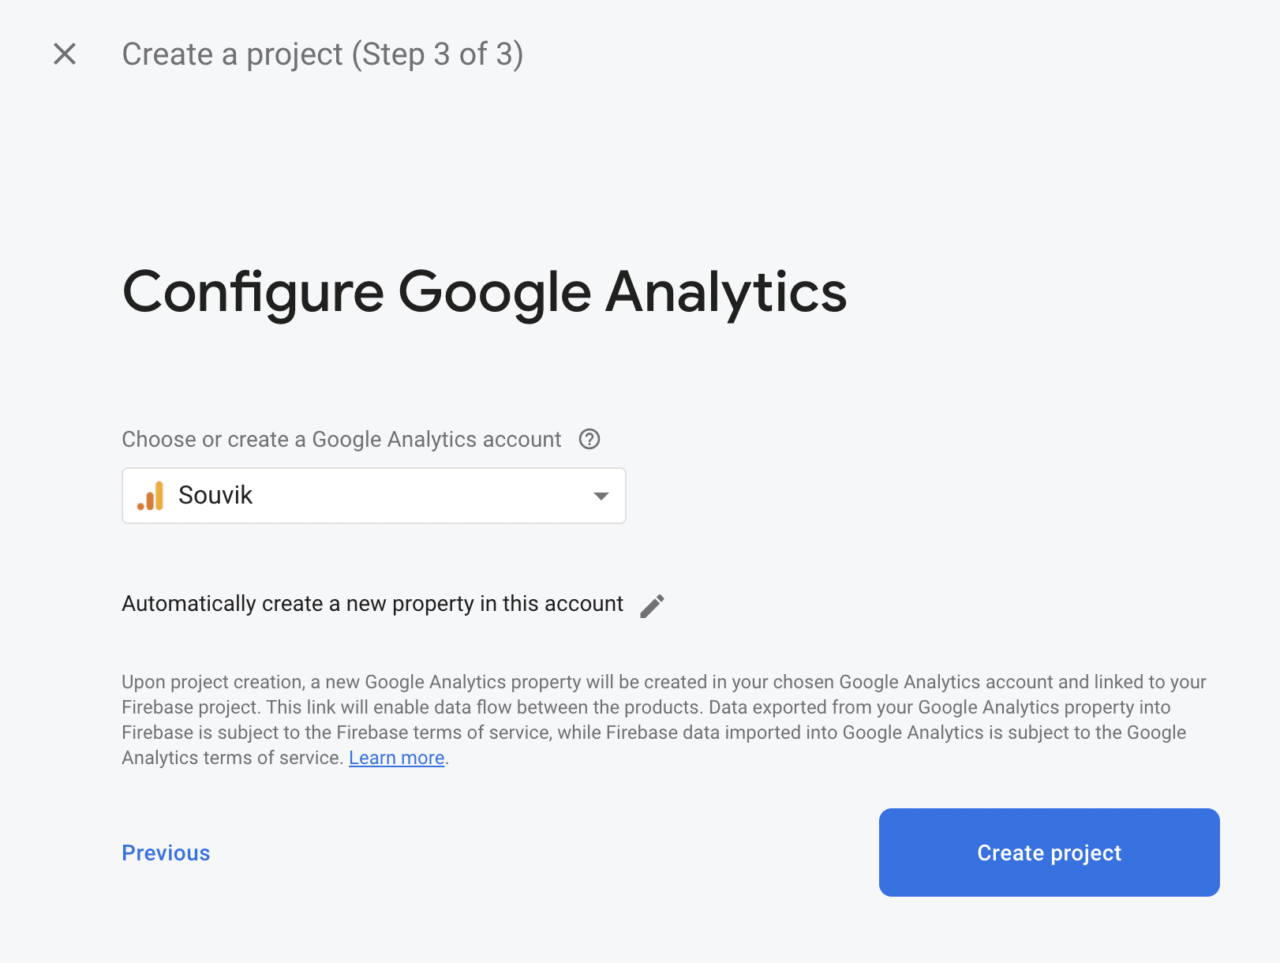
If you do want to enable Google Analytics, you’ll be prompted on the next screen to select a Google Analytics account:
Wait for the project to be created, and you’ll be navigated to the project’s Firebase dashboard.
Integrating Firebase with Android, iOS, and web
Though we’re using Flutter, which is a cross-platform framework, we still need to integrate the Firebase project separately for each platform.
Flutter 2.0 has support for Android, iOS and web in its stable channel, so we’ll configure Firebase for all three platforms.
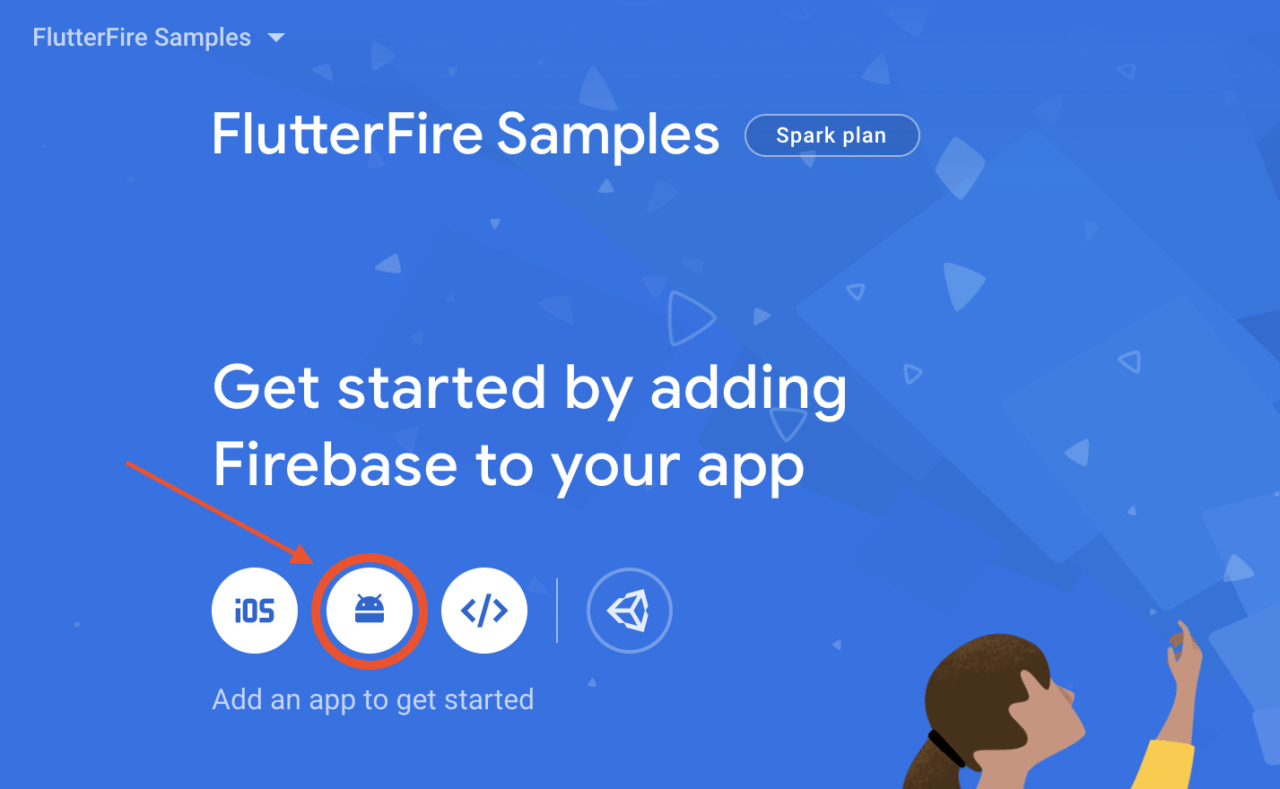
Android configuration
Let’s start by configuring Firebase for the Android platform.
Select the Android icon from the Firebase dashboard.
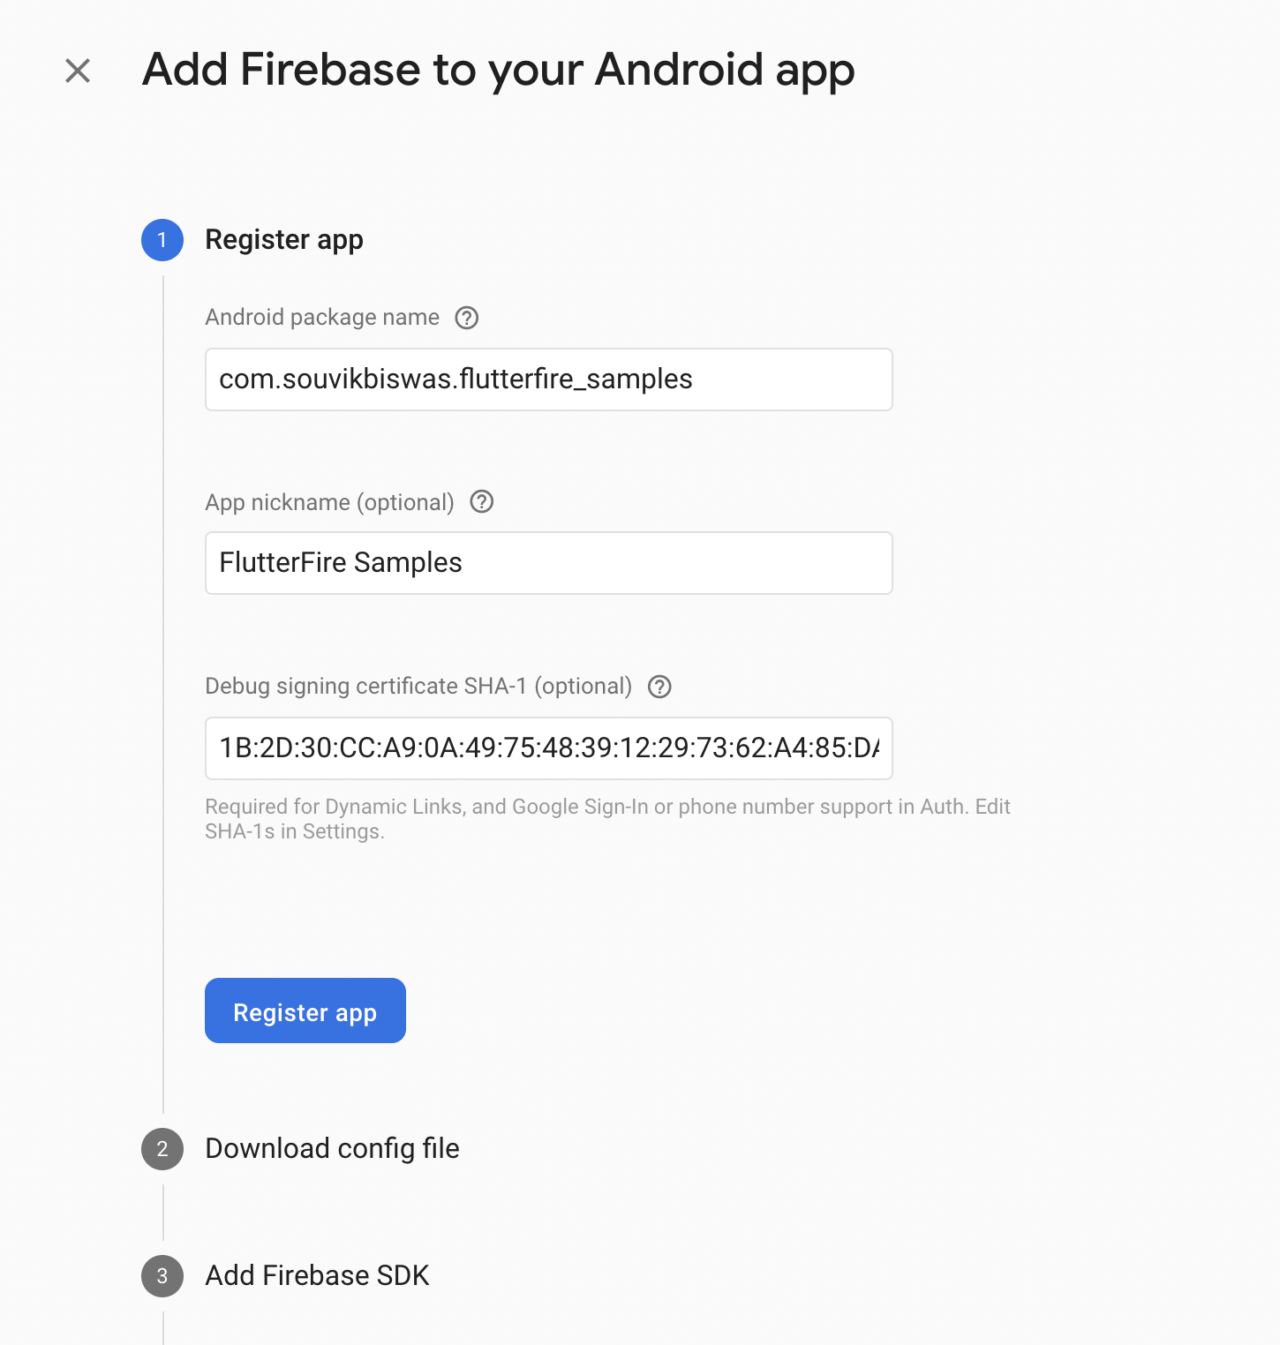
Enter the Android package name, an app nickname and the SHA-1. Click on Register app.
Download the
google-services.jsonfile and place it in the android → app directory. Click on Next.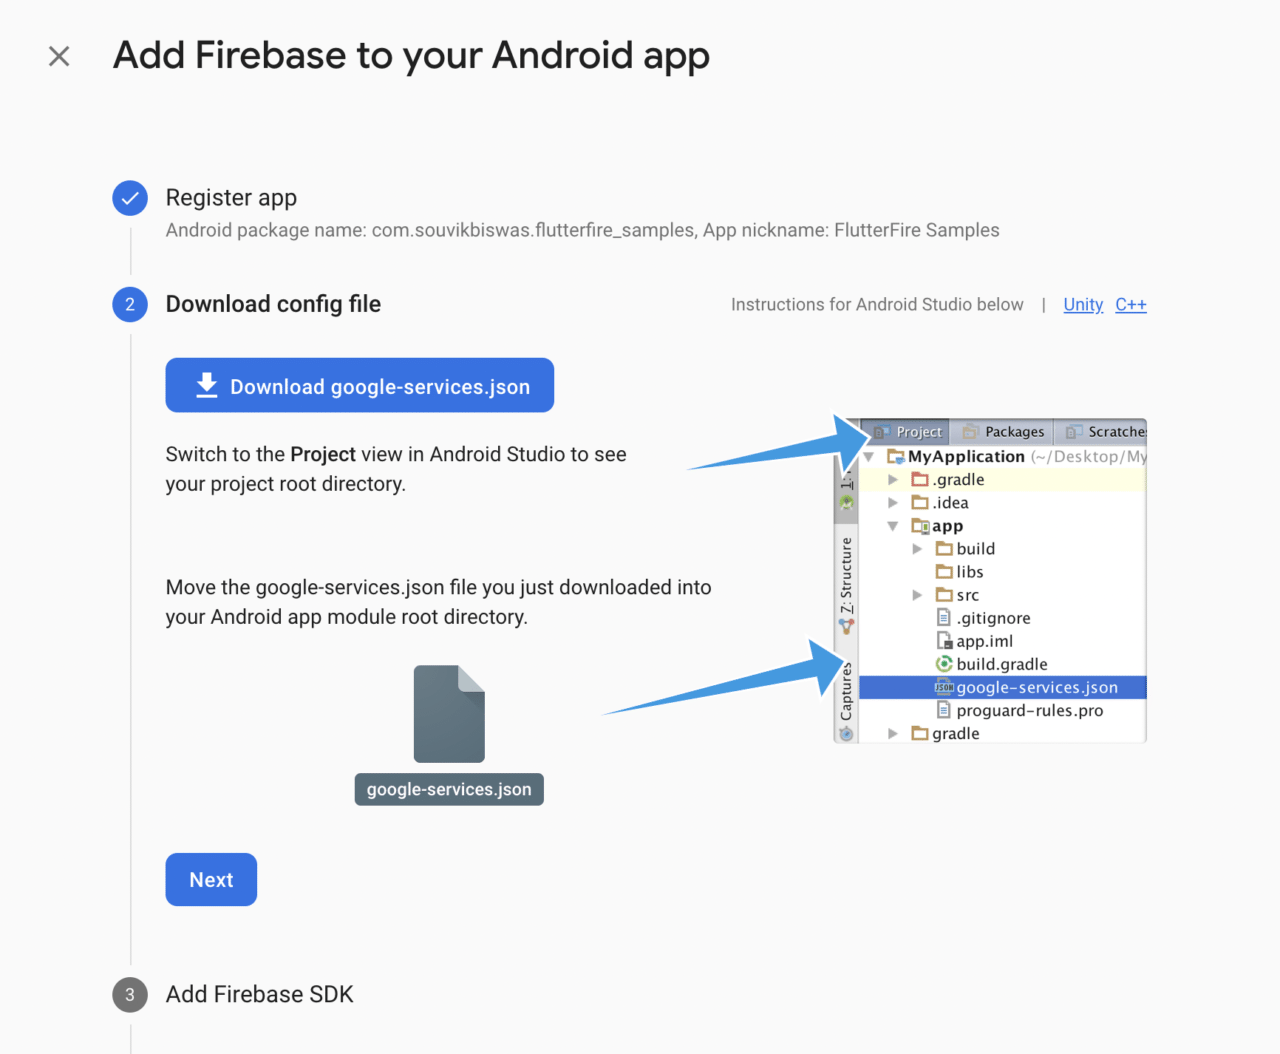
Just follow the instructions provided, and add the required code snippets to your project. Click on Next.
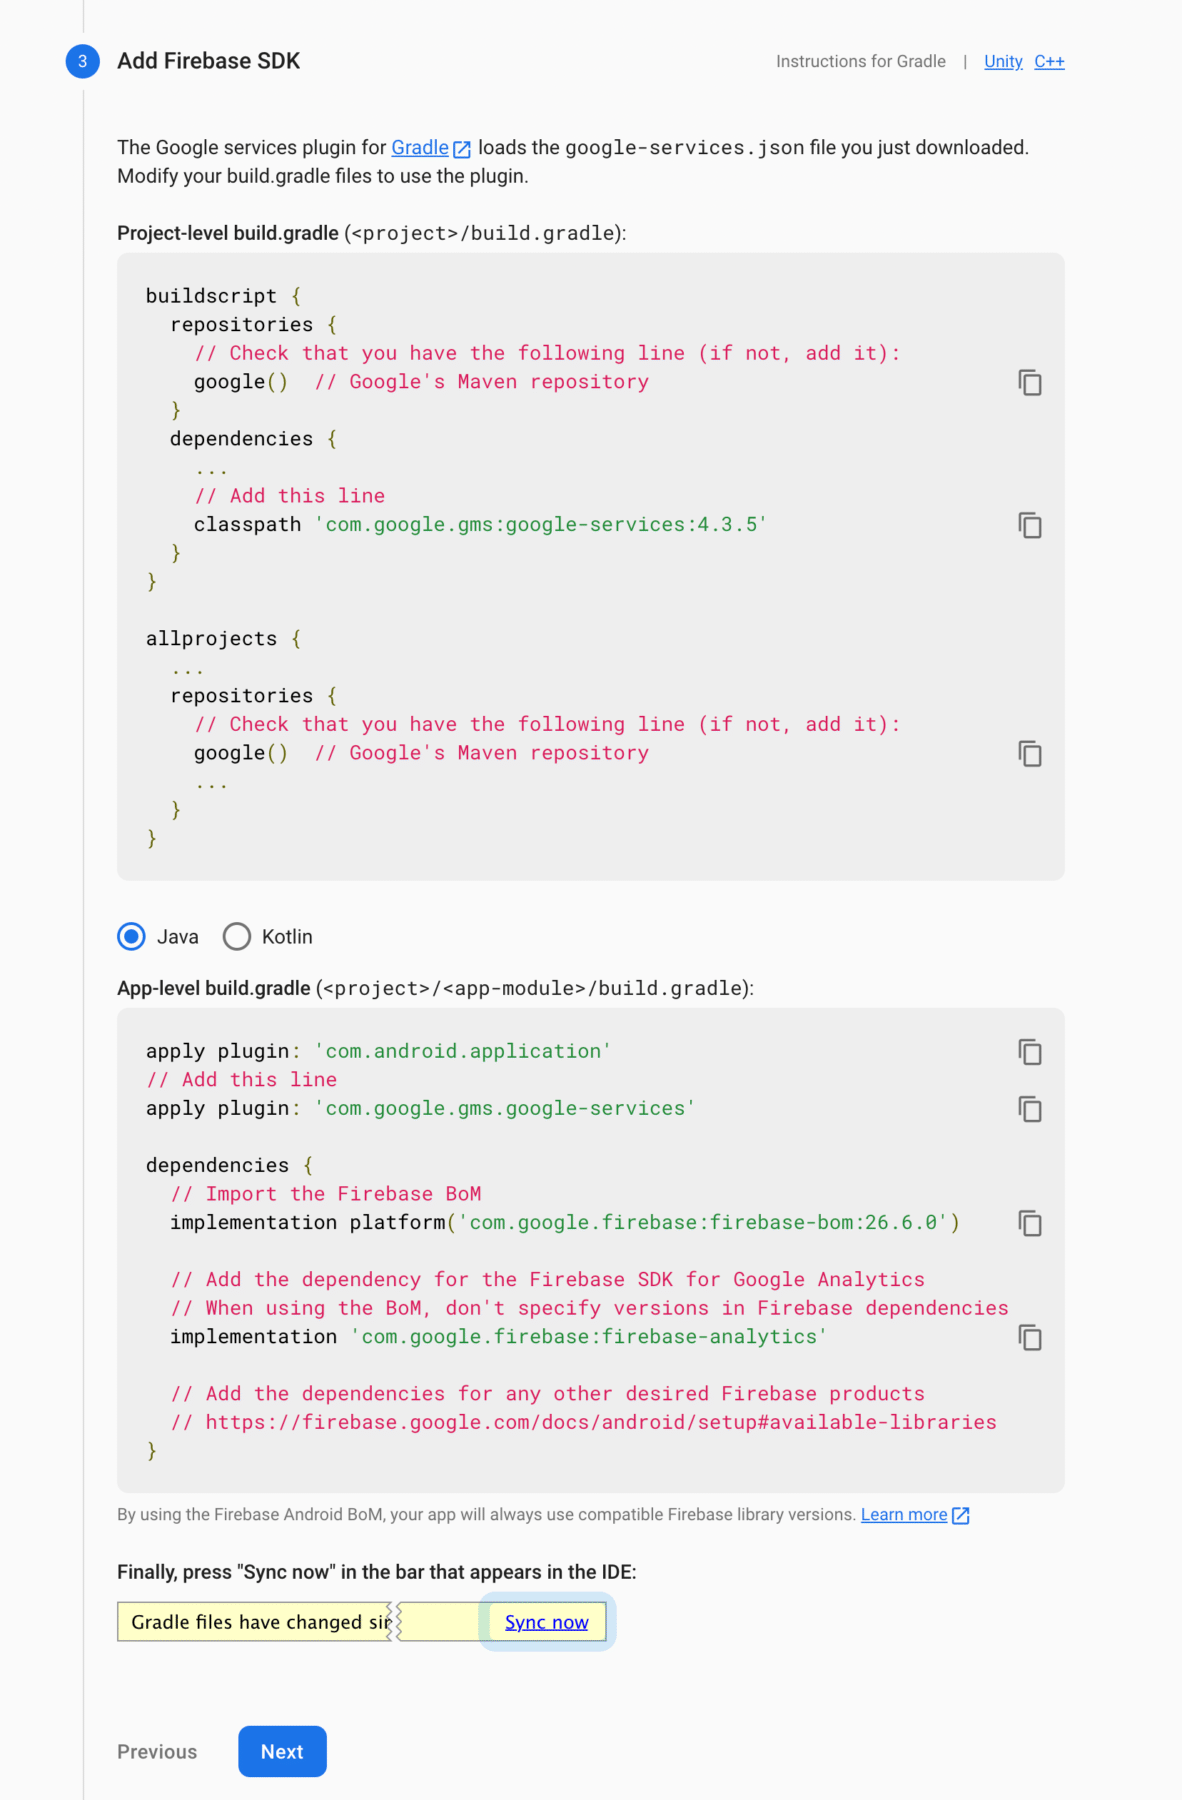
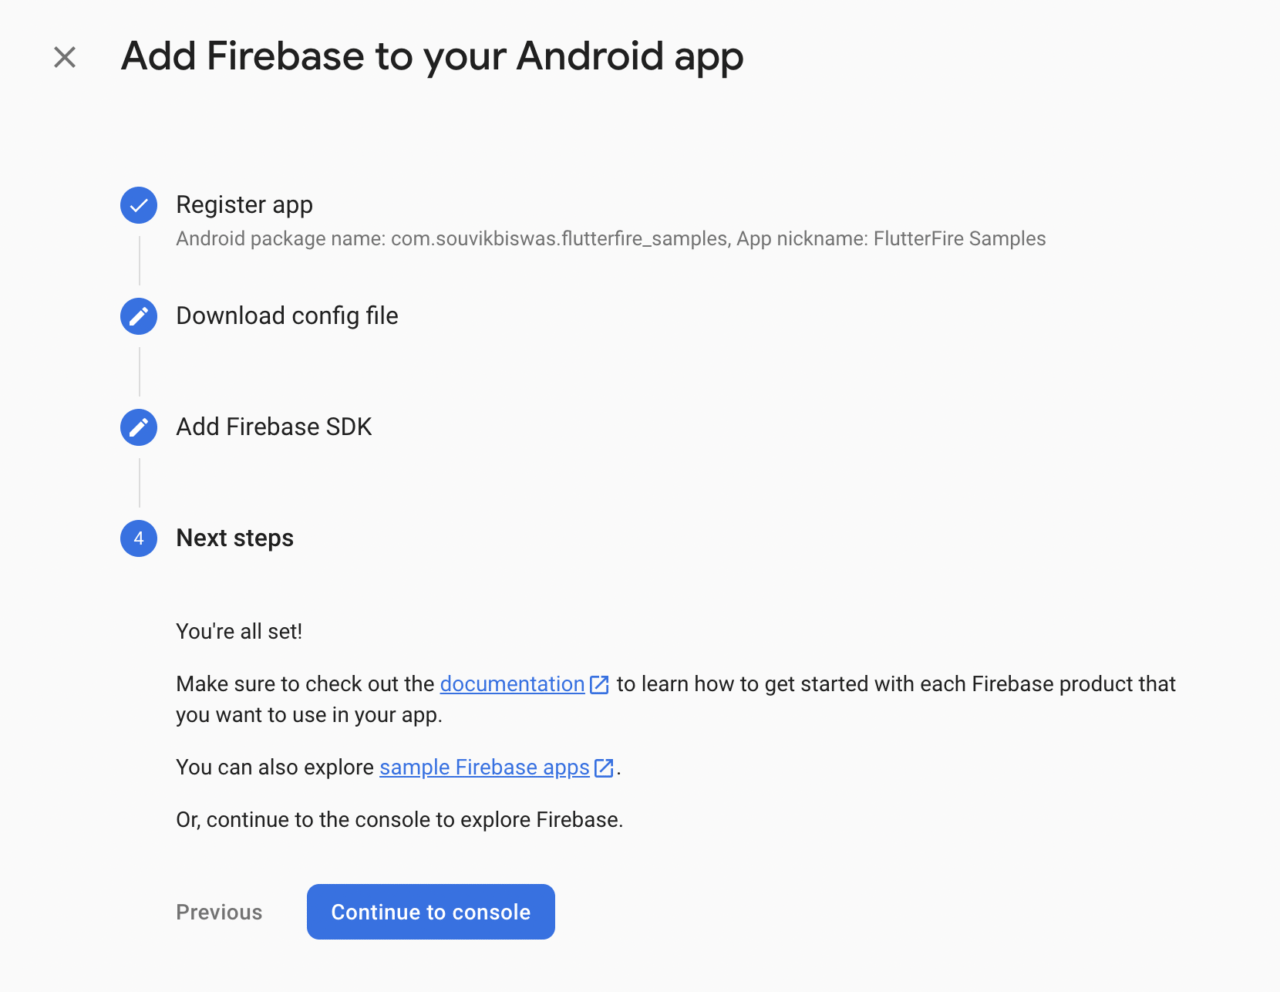
You have successfully configured Firebase for Android. On the final step, click on Continue to console to go back to the dashboard.
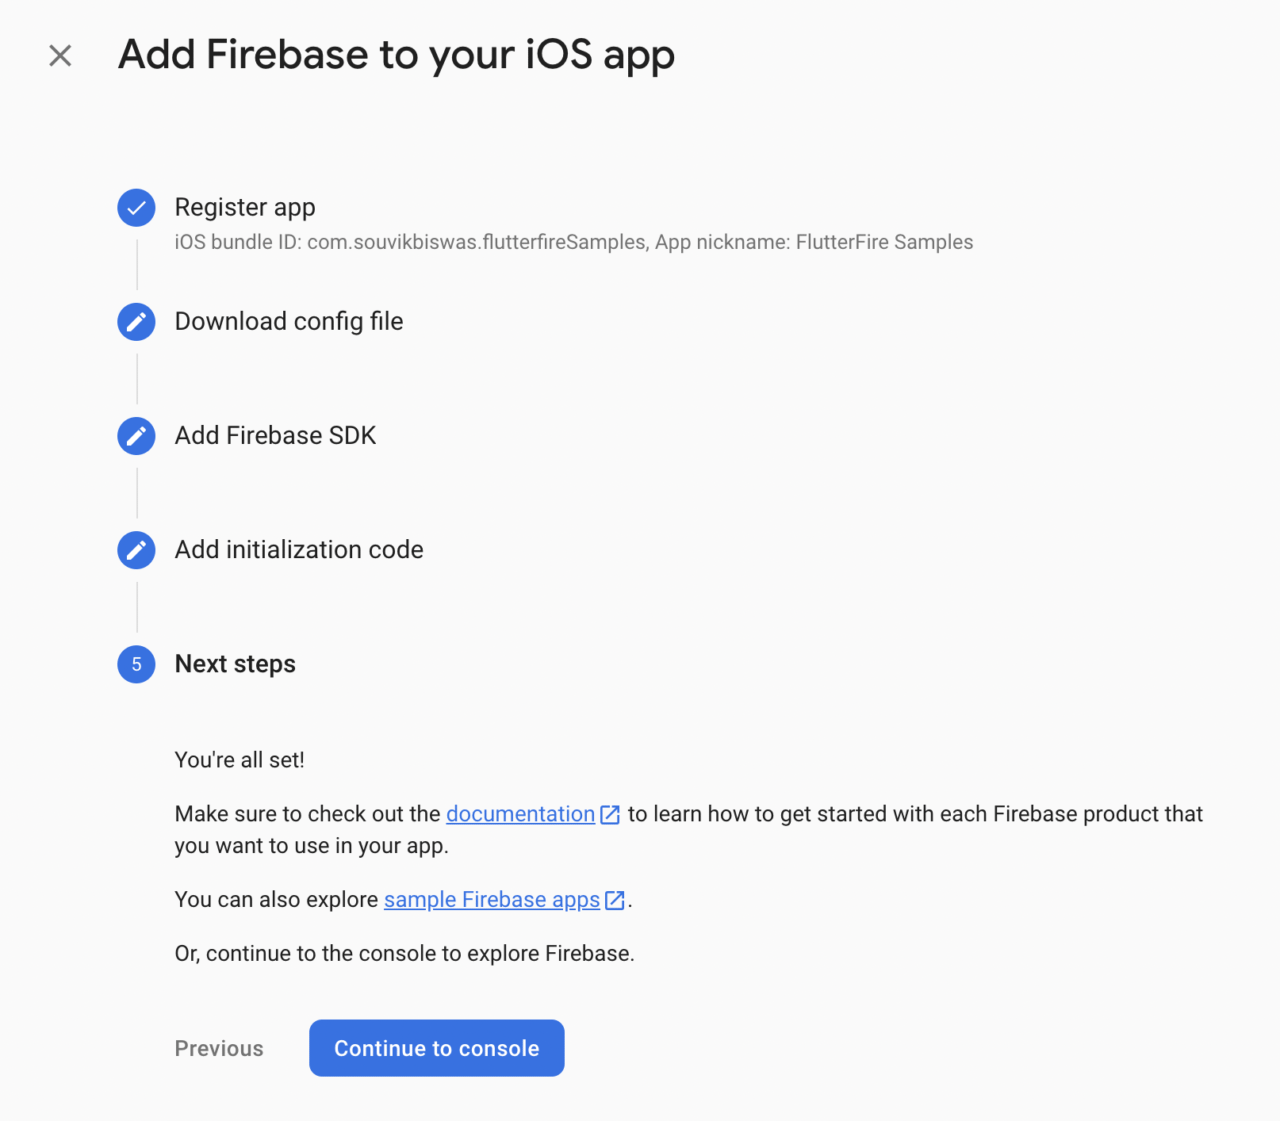
iOS configuration
Follow the steps below to complete the configuration on the iOS platform.
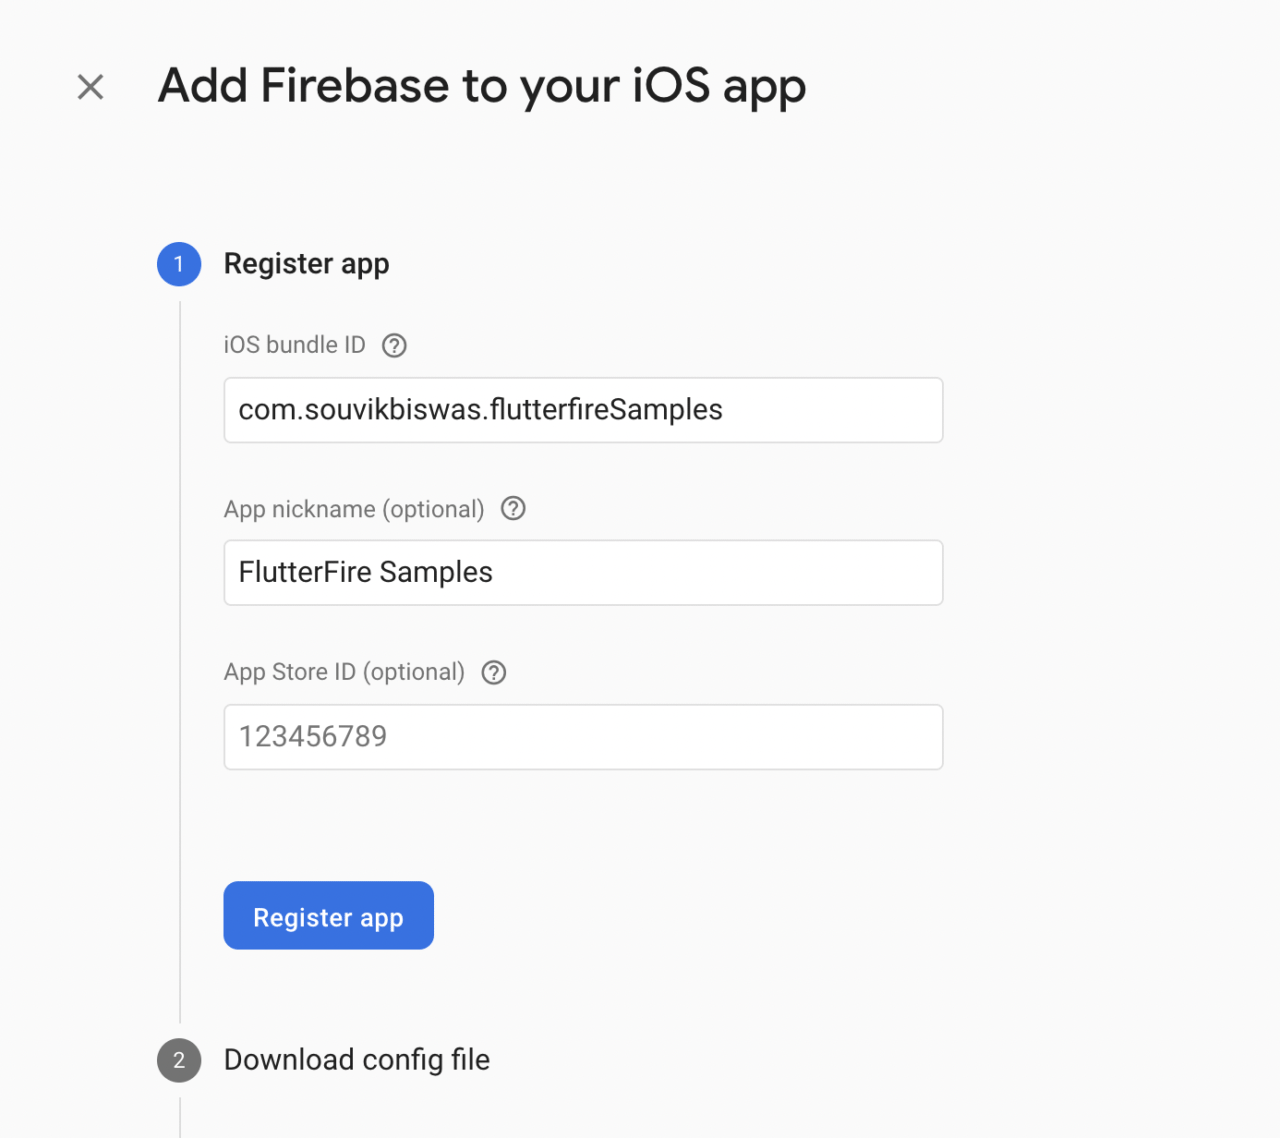
Select the iOS icon on the dashboard.

Enter your iOS bundle ID and an app nickname. Click on Register app.
Download the
GoogleService-Info.plistfile. Click on Next.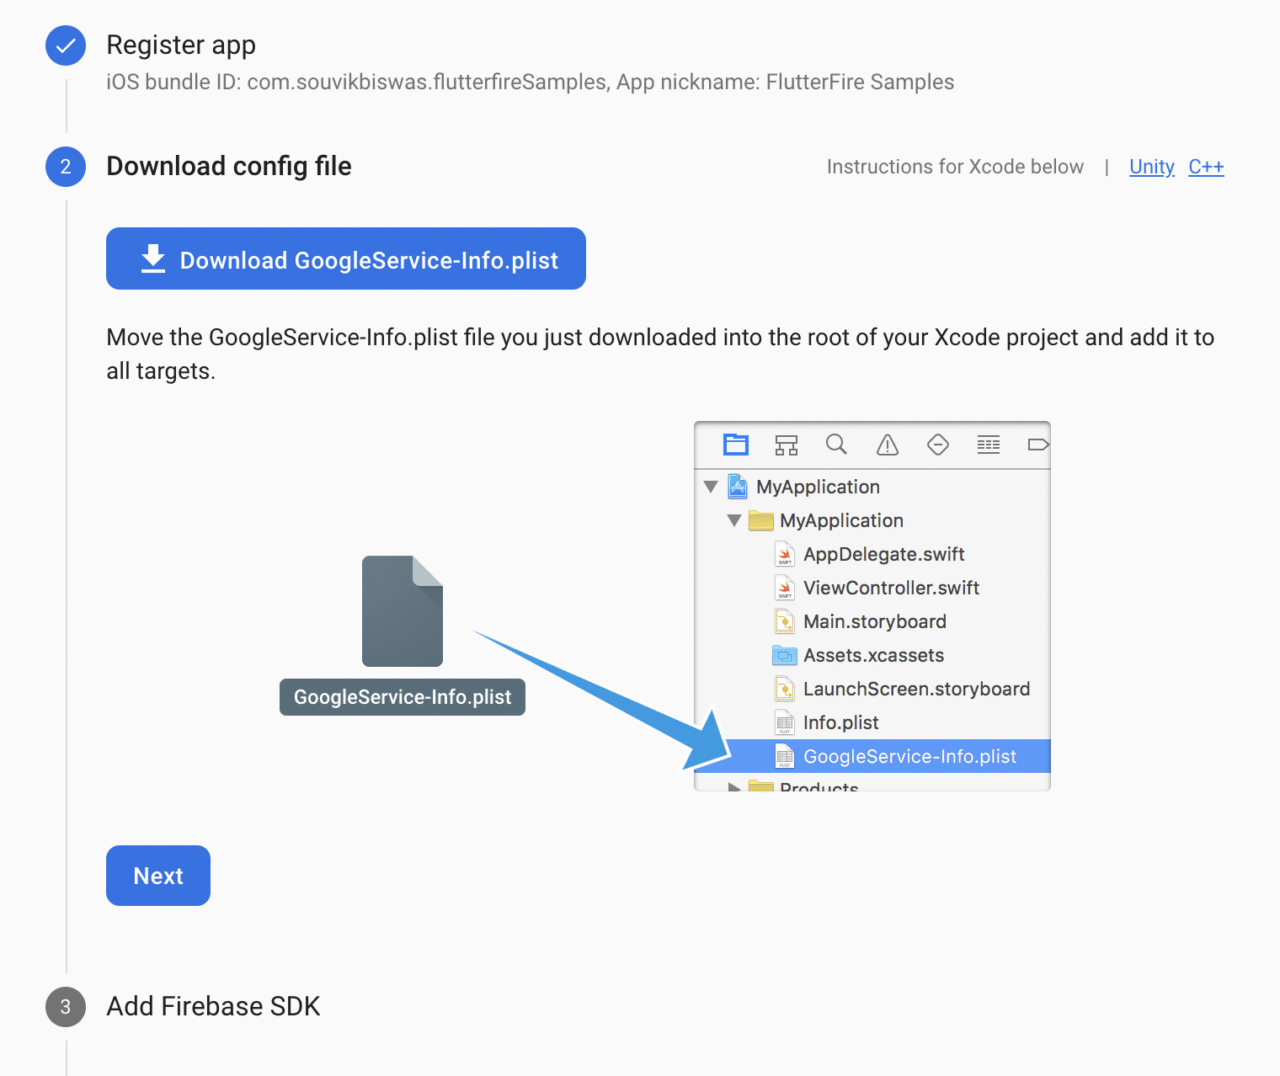
Now, open the
iosfolder using Xcode, and drag and drop the file that you downloaded into the Runner subfolder. When a dialog box appears, make sure that Runner is selected in the “Add to targets” box. Then click Finish.You can skip steps 3 and 4, as they are automatically configured by the Flutter Firebase plugin that we will be adding soon. Click on Continue to console to go back to the dashboard.
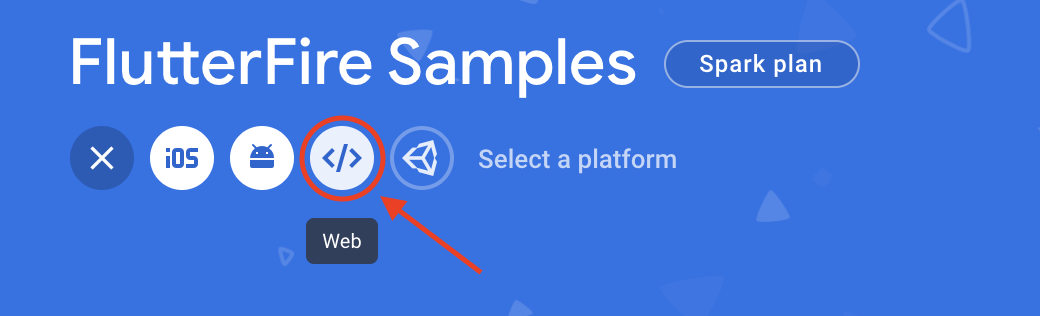
Web configuration
Configure the Firebase project for the web by following the steps given below.
Select the Web icon on the dashboard.
Enter the app nickname and click on Register app.
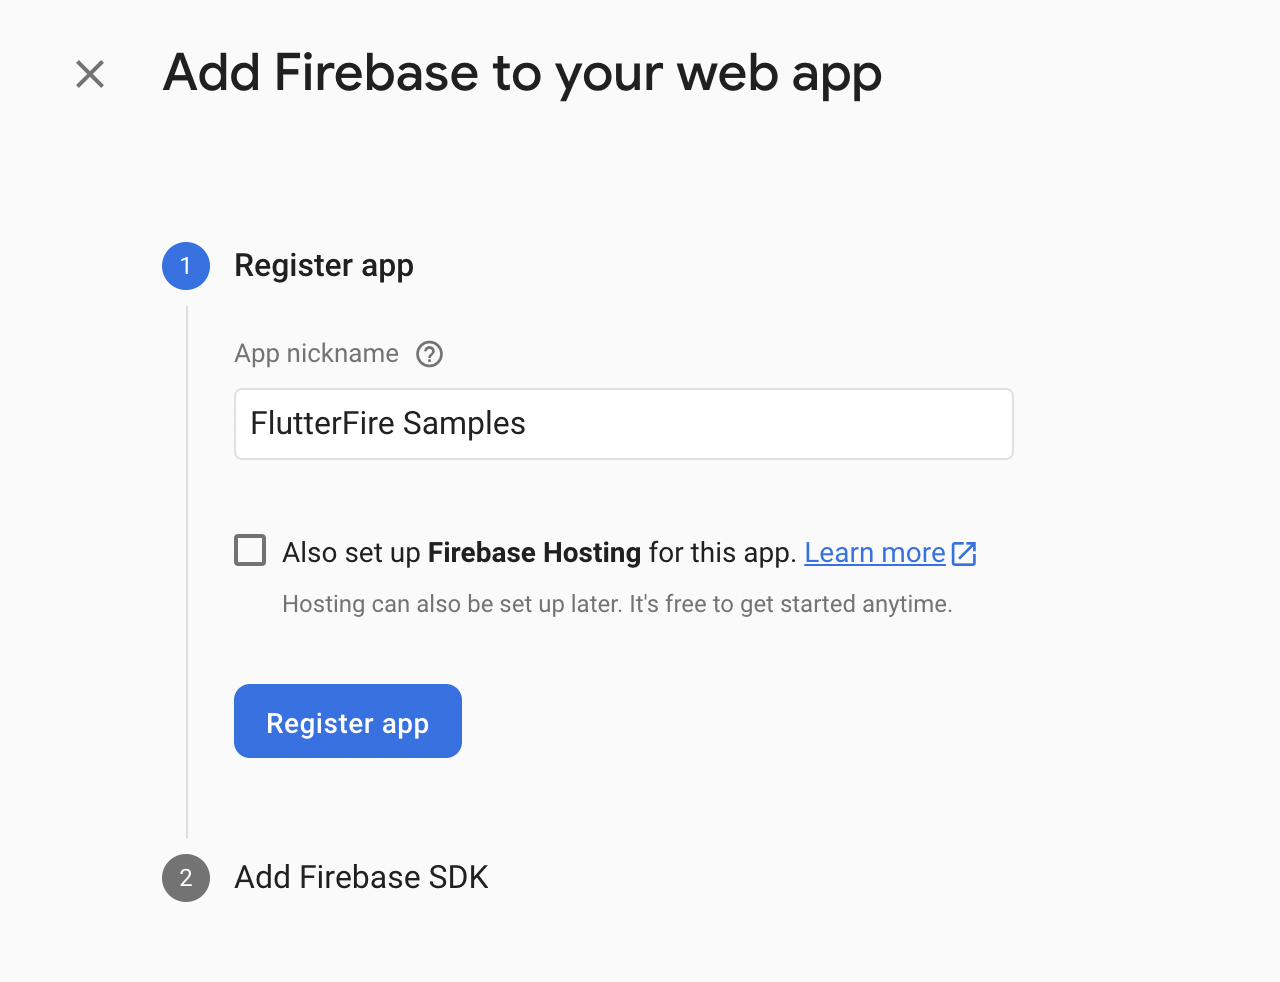
Now, add the code snippets for integrating the Firebase SDK into the web app.

Then, click on Continue to console to navigate back to the dashboard.
Finally, you have completed the Firebase configuration for all three platforms.
Getting started
Let’s take a look at the sample project that we will be building and then start integrating Cloud Firestore with the Flutter app.
Project overview
We will be building a simple notes management app that you can use to see a list of saved notes, save new notes, and update and delete them.
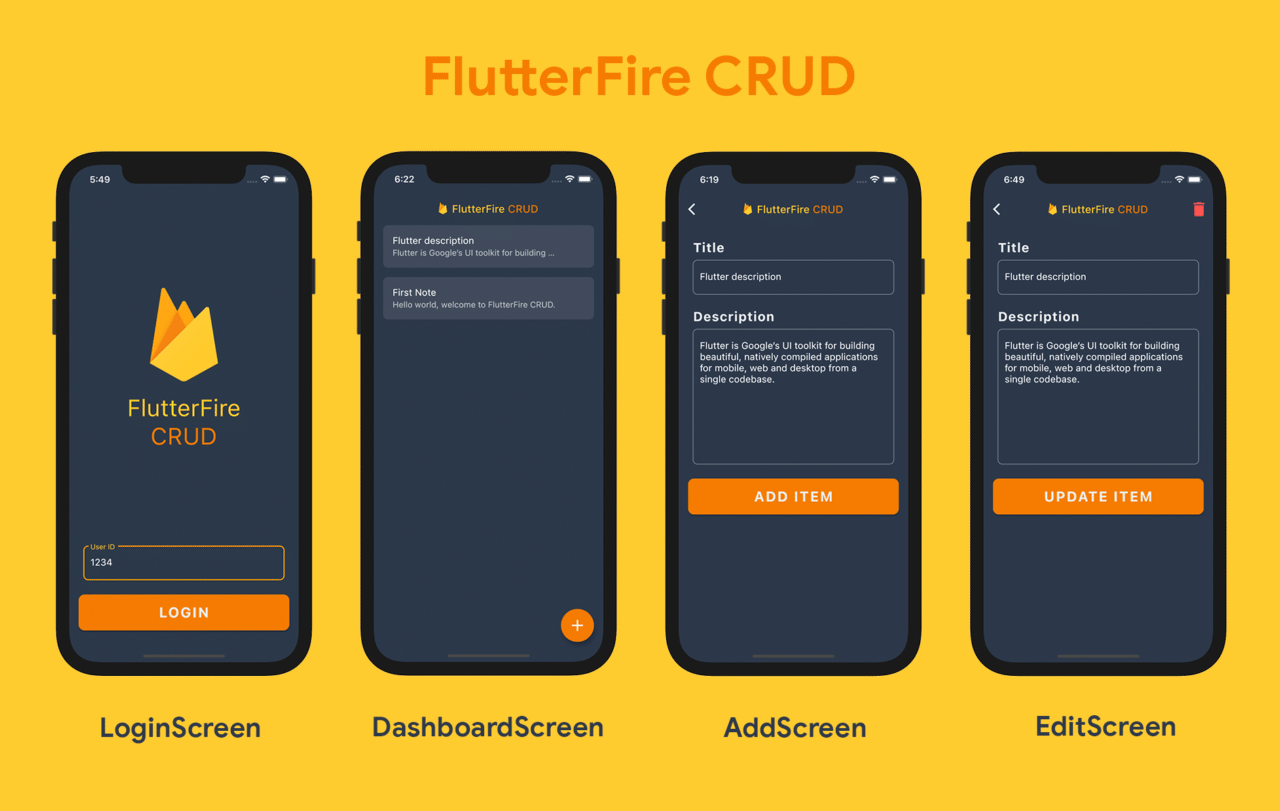
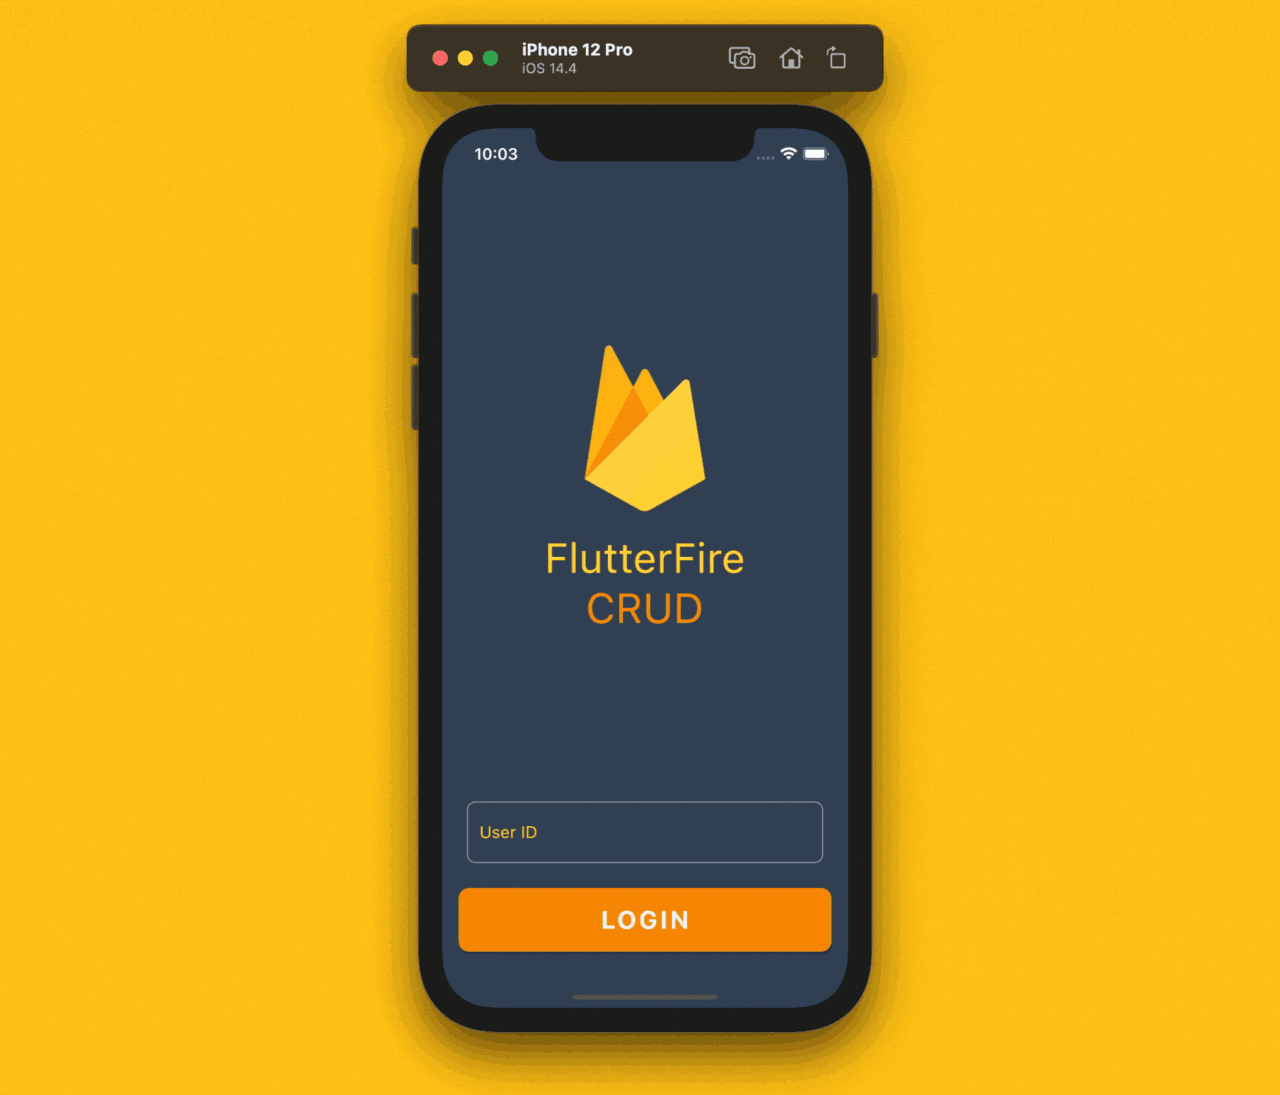
This sample app will consist of four screens; the first one will be a very simple login screen for authenticating a user. But as the main focus of this article is the database, we won’t be setting up the full-fledged authentication logic. The login screen will simply accept a unique identifier that can be used later to customize and store data privately for each user.
The other three screens will be a DashboardScreen (that displays the list of notes), AddScreen (for adding a new note item) and EditScreen (for editing an already-saved note item).
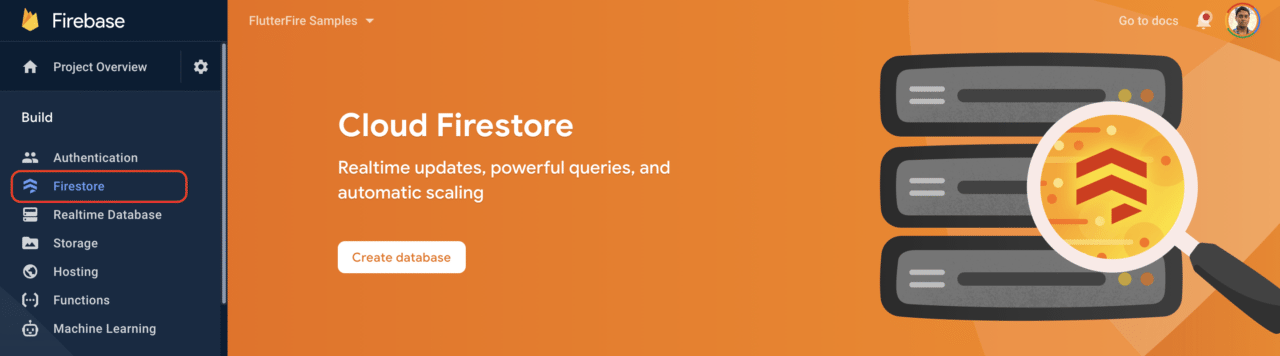
Enabling Cloud Firestore
You can enable the Firestore database by selecting Firestore from the left menu and then clicking on Create database.
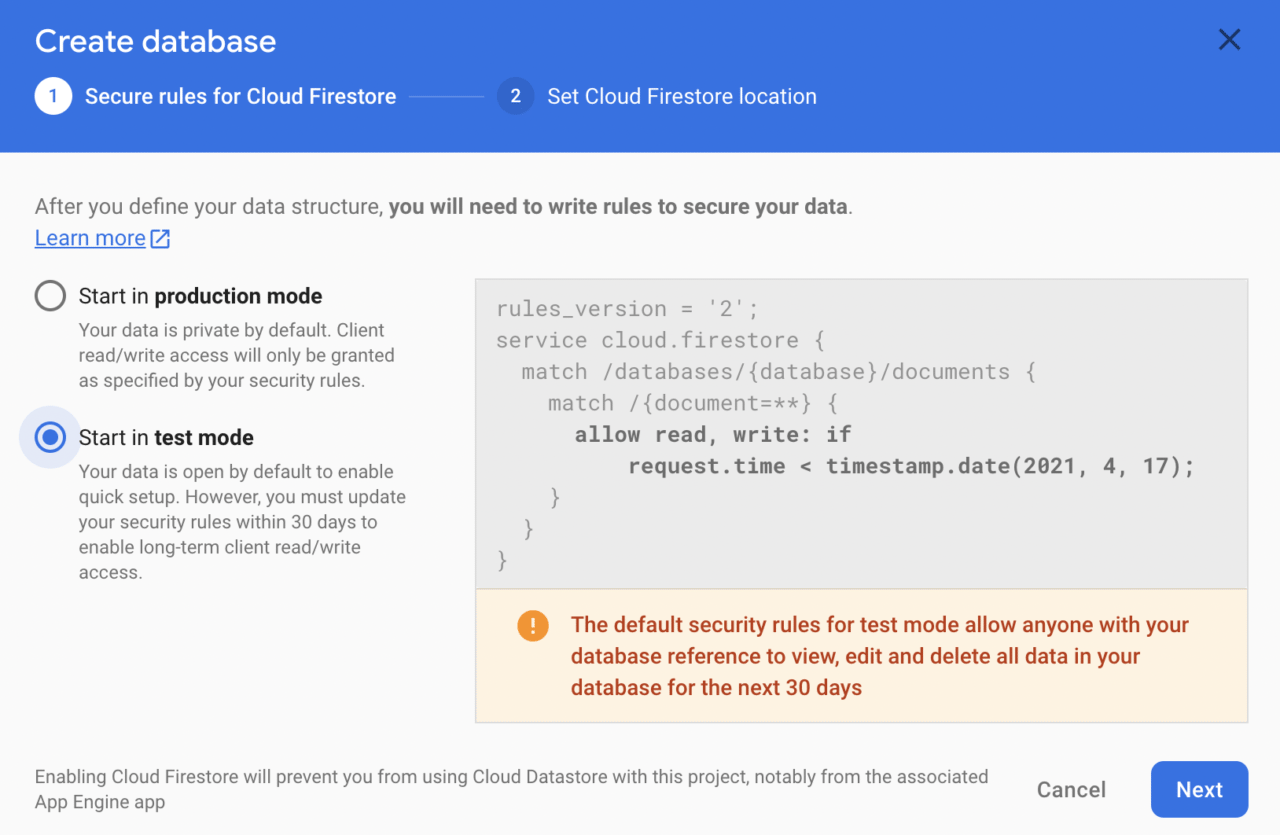
Now, you will be prompted to select a type of security rule. Here, we will choose test mode (that is, the database is open to all, and it doesn’t check for any kind of authentication) because we will not set up any kind of strict authentication for this sample app. Click on Next.
If you are working on a production app, make sure you define an appropriate security rule. You can learn more here.
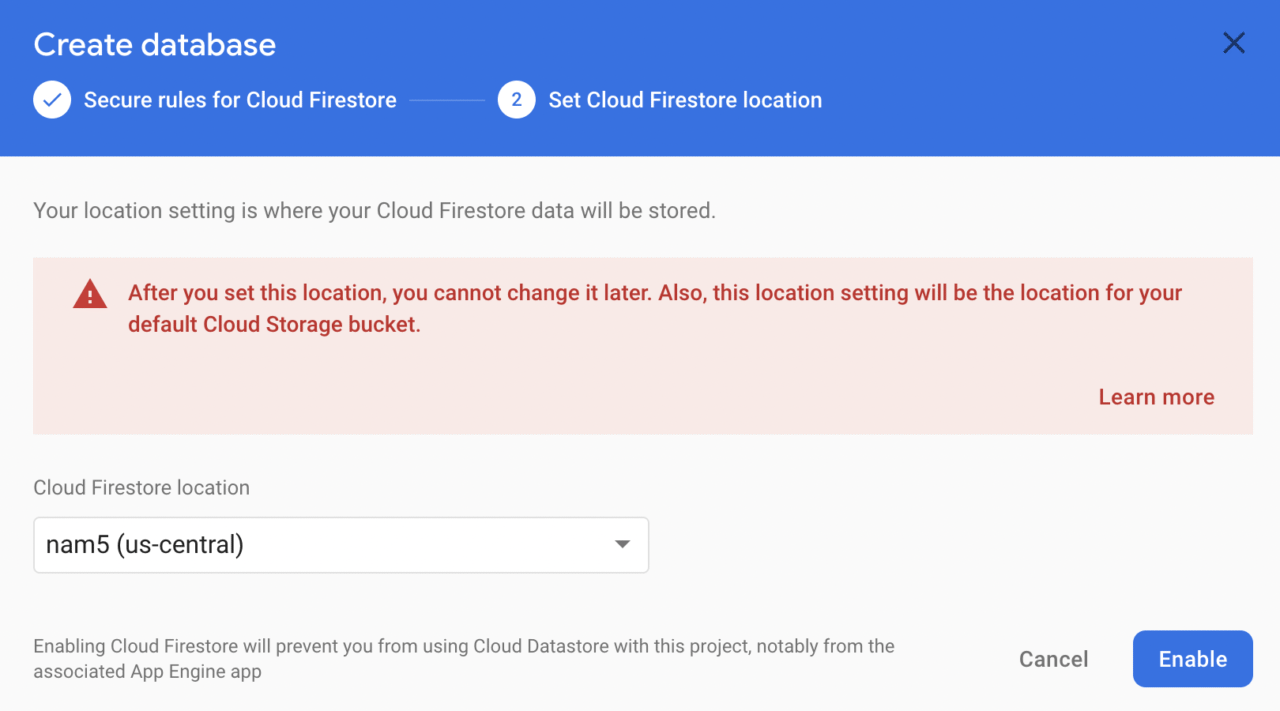
Then, select a Cloud Firestore location and click on Enable.
You will be taken to an empty Firestore database structure.
![]()
We will start adding data to the database using the Flutter app.
Creating a Flutter project
You can create a new Flutter project using the following command:
flutter create flutterfire_samples
Then open the project using your favorite code editor. To open it with VS Code, you can use:
code flutterfire_samples
Flutter 2.0 has support for null safety in the stable channel, but in order to use it inside the app, you have to run a command for migrating the project to null safety.
Before running the migration command, check if all your current project dependencies support null safety by using:
dart pub outdated --mode=null-safety
Then, run the following command to migrate:
dart migrate
You can follow the migration guide here.

Adding Firebase to Flutter
We will be using the following plugins in this project:
- firebase_core: required for initializing Firebase and using any other Firebase plugins.
- cloud_firestore: required for interacting with the Firestore database.
The latest versions of both these plugins support null safety.
Add these to your pubspec.yaml file:
dependencies:
  firebase_core: ^1.0.1
  cloud_firestore: ^1.0.1
Install the packages from the command line using:
flutter pub get
Go to your main.dart file present in the lib folder of the root directory. Replace the contents with the following:
import 'package:flutter/material.dart';
import 'package:flutterfire_samples/screens/login_screen.dart';

void main() {
  runApp(MyApp());
}

class MyApp extends StatelessWidget {
  @override
  Widget build(BuildContext context) {
    return MaterialApp(
      title: 'FlutterFire Samples',
      debugShowCheckedModeBanner: false,
      theme: ThemeData(
        primarySwatch: Colors.indigo,
        brightness: Brightness.dark,
      ),
      home: LoginScreen(),
    );
  }
}
LoginScreen will be a StatefulWidget. Define a method inside it called _initializeFirebase(), which will initialize the firebaseApp.
class LoginScreen extends StatefulWidget {
  @override
  _LoginScreenState createState() => _LoginScreenState();
}

class _LoginScreenState extends State<LoginScreen> {
  final FocusNode _uidFocusNode = FocusNode();

  Future<FirebaseApp> _initializeFirebase() async {
    FirebaseApp firebaseApp = await Firebase.initializeApp();

    return firebaseApp;
  }

  @override
  Widget build(BuildContext context) {
    // ...
  }
}
Inside a FutureBuilder, call the _initializeFirebase() method, which will show the LoginForm widget when the initialization is complete.
FutureBuilder(
  future: _initializeFirebase(),
  builder: (context, snapshot) {
    if (snapshot.hasError) {
      return Text('Error initializing Firebase');
    } else if (snapshot.connectionState ==
        ConnectionState.done) {
      return LoginForm(focusNode: _uidFocusNode);
    }
    return CircularProgressIndicator(
      valueColor: AlwaysStoppedAnimation<Color>(
        CustomColors.firebaseOrange,
      ),
    );
  },
)
Before going any further with the UI, let’s take a look at how the Firestore database is structured and then define methods for performing the CRUD operations.
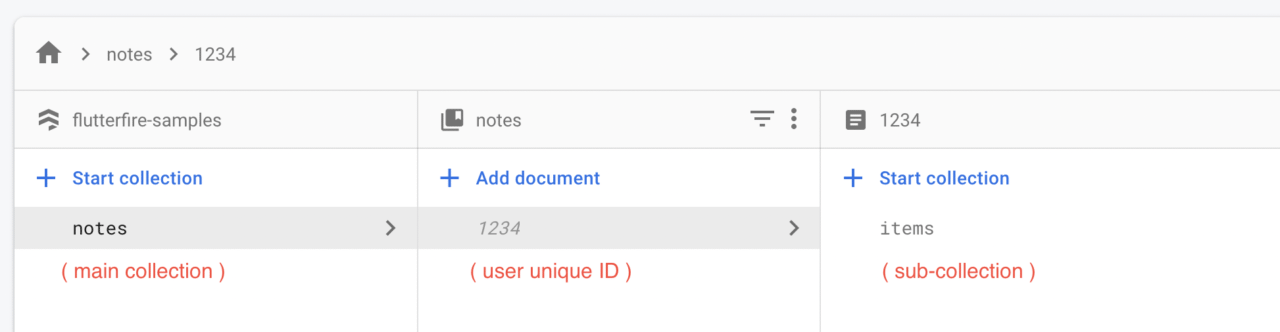
Understanding Firebase structure
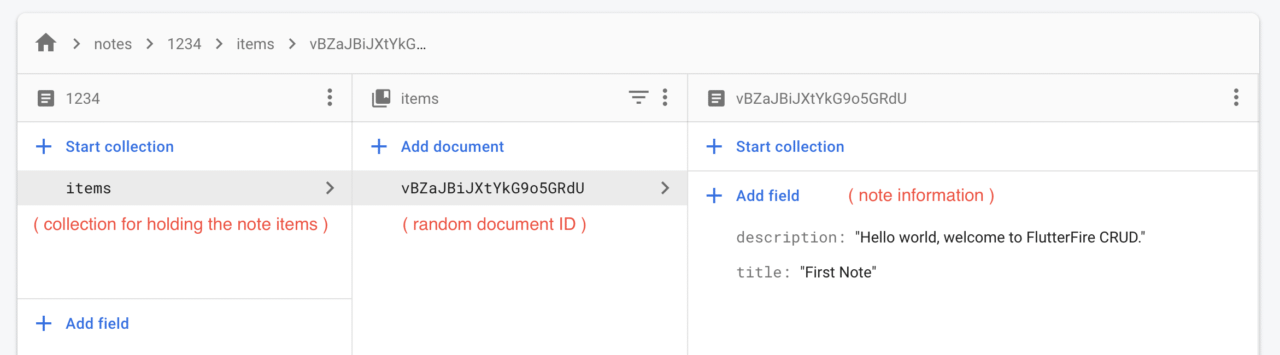
It’s important to understand how data is structured in the Firestore database before we start defining our CRUD methods.
Cloud Firestore mainly consists of collections, documents and fields (key-value pairs). Collections can contain a number of documents, which in turn can consist of sub-collections and key-value pairs.
References are used to point to a particular location in the database. That information can be used for storing, retrieving, updating and deleting data from the database.
You can learn more about the Cloud Firestore data model here.
Our database structure will look like this:
Let’s start defining the CRUD operations inside our Flutter app’s Dart code. Create a new class Database inside a file called database.dart.
Here, you will first need to initialize the FirebaseFirestore and define the main collection where all of the database information will be stored.
import 'package:cloud_firestore/cloud_firestore.dart';

final FirebaseFirestore _firestore = FirebaseFirestore.instance;
final CollectionReference _mainCollection = _firestore.collection('notes');

class Database {
  static String? userUid;

  // ...
}
Now, we can start defining the CRUD methods in this class. We will start with the write operation.
Write data
The write operation will be used for adding a new note item to the Firestore. Define it inside a method called addItem() by passing a title and description of the note.
static Future<void> addItem({
  required String title,
  required String description,
}) async {
  DocumentReference documentReferencer =
      _mainCollection.doc(userUid).collection('items').doc();

  Map<String, dynamic> data = <String, dynamic>{
    "title": title,
    "description": description,
  };

  await documentReferencer
      .set(data)
      .whenComplete(() => print("Notes item added to the database"))
      .catchError((e) => print(e));
}
We use the set() method on the documentReferencer to write new data to the Firestore, and we have passed the data as a map.
Read data
We can read data from Firestore in two ways: as a Future or as a Stream. You can use Future if you want to read the data a single time. But in our case, we need the latest data available in the database, so we will use Stream, as it will automatically synchronize data whenever it gets modified in the database.
static Stream<QuerySnapshot> readItems() {
  CollectionReference notesItemCollection =
      _mainCollection.doc(userUid).collection('items');

  return notesItemCollection.snapshots();
}
Update data
To update data in the database, you can use the update() method in the documentReferencer object by passing the new data as a map. To update a particular document of the database, you will need to use its unique document ID.
static Future<void> updateItem({
  required String title,
  required String description,
  required String docId,
}) async {
  DocumentReference documentReferencer =
      _mainCollection.doc(userUid).collection('items').doc(docId);

  Map<String, dynamic> data = <String, dynamic>{
    "title": title,
    "description": description,
  };

  await documentReferencer
      .update(data)
      .whenComplete(() => print("Note item updated in the database"))
      .catchError((e) => print(e));
}
Delete data
To delete a note from the database, you can use its particular document ID and remove it using the delete() method in the documentReferencer object.
static Future<void> deleteItem({
  required String docId,
}) async {
  DocumentReference documentReferencer =
      _mainCollection.doc(userUid).collection('items').doc(docId);

  await documentReferencer
      .delete()
      .whenComplete(() => print('Note item deleted from the database'))
      .catchError((e) => print(e));
}
App in action
Congratulations, you have successfully defined the CRUD methods in Flutter to interact with the Cloud Firestore database.
A brief demo of the app is shown here:
Conclusion
Cloud Firestore also provides a number of filters that can be used while querying the database in order to sort the responses, search for responses that have a particular format, etc. You can learn more about this here.
FlutterFire handles the official documentation of the Firebase plugins for Flutter. You can find them here.
You can get the entire code of this app from the GitHub repository.
Was this article useful? 🤔 Let us know on Twitter.


