


 and iOS (Podfile)")
Written by Souvik Biswas
Flutter introduced add-to-app support to help developers integrate a Flutter UI into their existing native Android or iOS app. It’s not always practical to rewrite your entire production application in Flutter at once. So, using add-to-app, you can migrate each UI layout one at a time or add a screen created with Flutter to your existing app and boost your productivity by using the expressive UI of Flutter.
In this article, I will guide you on how to integrate a Flutter module into your Android project (using .aar) and iOS project (using Podfile) and interact with the module using MethodChannel.
Overview
The goal of this article is to create a common Flutter module, which we will integrate with both an Android and an iOS app.
We are using a sample app called Tipsy, which you can use to calculate the final bill split amount, including a tip.
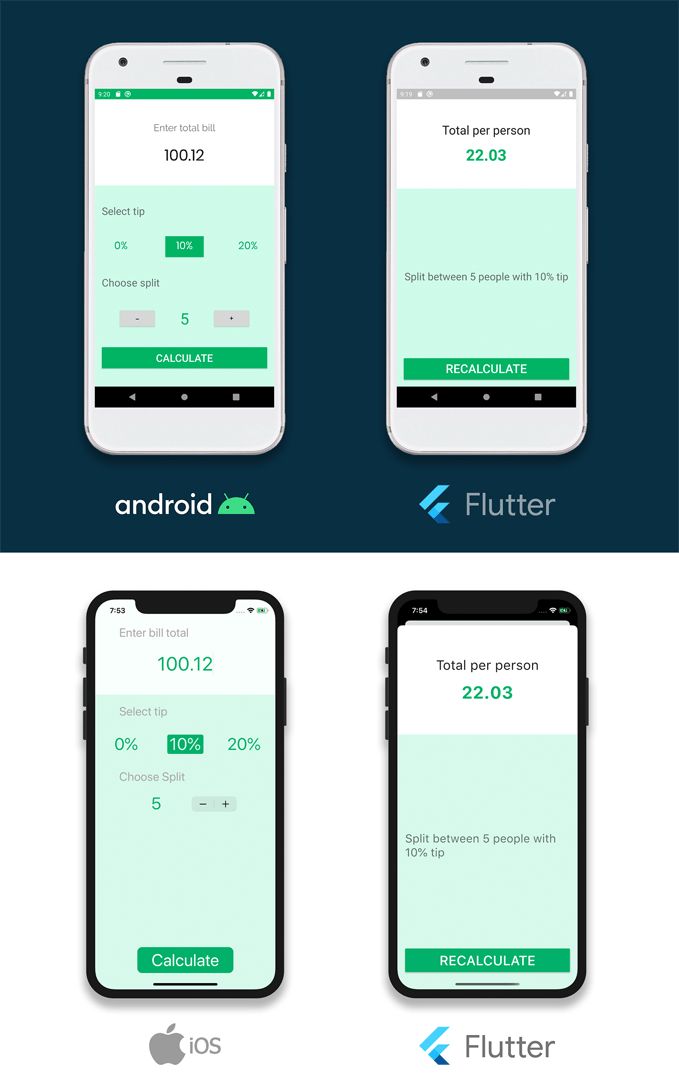
The result of the calculated bill amount will be shown using the Flutter module.
So, let’s get started.
Creating a Flutter module
You can create a Flutter module by using the following command:
flutter create -t module --org com.example flutter_module
The
--orgflag (optional) is used to supply the organization domain. To be able to integrate the module with your native app, their domain should match.
If you have your native app in some/path/NativeApp, then you must run the above command from some/path/. After creating the Flutter module by running the above command, your directory structure should be similar to this:
some/path/
├── flutter_module/
│   └── .android/
│   └── .ios/
│   └── lib/
│
└── NativeApp/
Integrating into Android app
You have to add two compile options, sourceCompatibility and targetCompatibility, to the build.gradle (app) of the host Android app, as the Flutter Android engine uses Java 8 features.
android {
  //...
  compileOptions {
    sourceCompatibility 1.8
    targetCompatibility 1.8
  }
}
Now, you have to add the Flutter module as a dependency of your existing Android app in Gradle. You can achieve this in two ways:
Depend on the Android Archive (AAR): This packages your Flutter library as a generic local Maven repository comprised of AARs and POMs artifacts. This allows your team to build the host app without needing to install the Flutter SDK.
Depend on the module’s source code: This enables a one-step build for both your Android project and Flutter project. This is convenient when working on both parts simultaneously, but your team must install the Flutter SDK to build the host app.
Here, I will demonstrate using the first method, which is to use .aar files.
You can check out this article if you want to use the second method for integrating your Flutter module.
You have to run the following command from your Flutter module folder to generate the .aar files:
flutter build aar
Running the above command will generate a local repository with the following files:
build/host/outputs/repo
└── com
    └── example
        └── my_flutter
            ├── flutter_release
            │   ├── 1.0
            │   │   ├── flutter_release-1.0.aar
            │   │   ├── flutter_release-1.0.aar.md5
            │   │   ├── flutter_release-1.0.aar.sha1
            │   │   ├── flutter_release-1.0.pom
            │   │   ├── flutter_release-1.0.pom.md5
            │   │   └── flutter_release-1.0.pom.sha1
            │   ├── maven-metadata.xml
            │   ├── maven-metadata.xml.md5
            │   └── maven-metadata.xml.sha1
            ├── flutter_profile
            │   ├── ...
            └── flutter_debug
                └── ...
You will be presented with some on-screen instructions for integrating your Flutter module using AAR. You can follow them to easily integrate the module with your Android app.
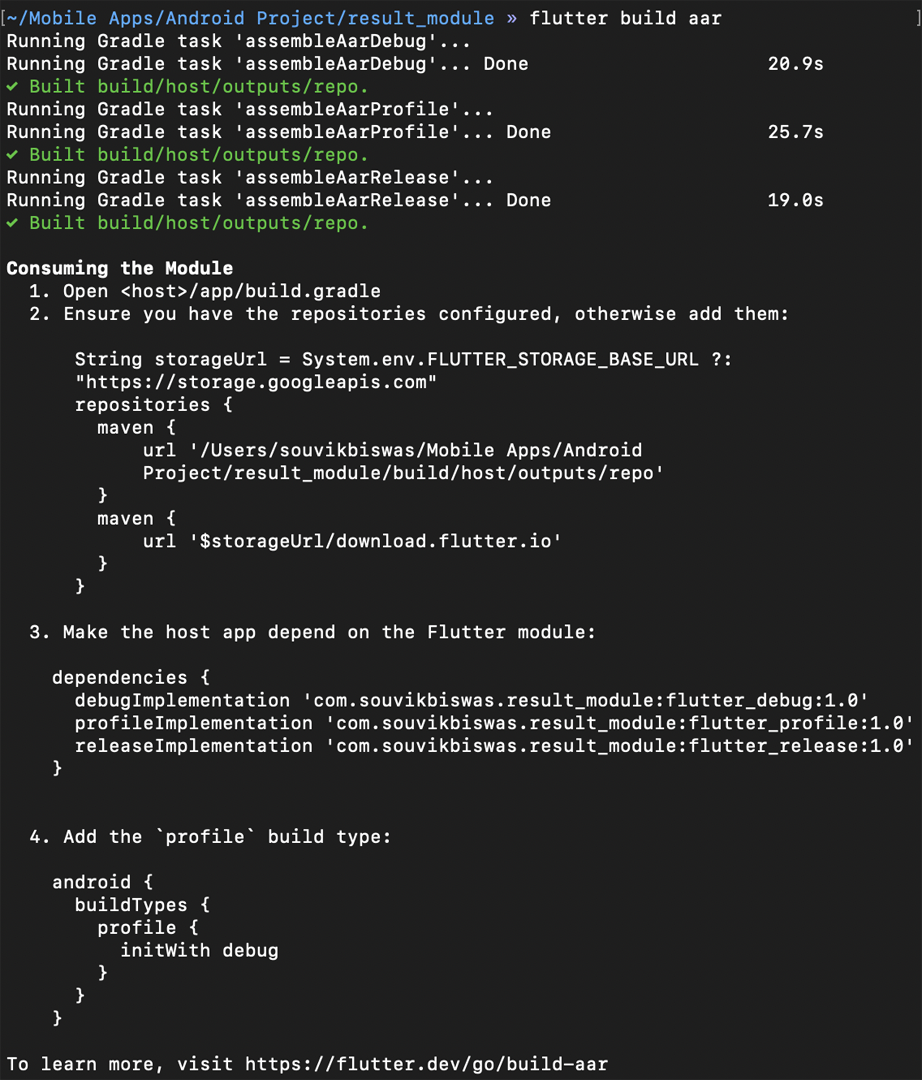
A brief overview of the instructions is given below.
To depend upon the AAR files, the host app should be able to locate those files. Add the following to your host app’s build.gradle (app) file:
android {
  // ...
}

repositories {
  maven {
    url 'some/path/flutter_module/build/host/outputs/repo'
    // This is relative to the location of the build.gradle file
    // if using a relative path.
  }
  maven {
    url 'https://storage.googleapis.com/download.flutter.io'
  }
}

dependencies {
  // ...
  debugImplementation 'com.example.flutter_module:flutter_debug:1.0'
  profileImplementation 'com.example.flutter_module:flutter_profile:1.0'
  releaseImplementation 'com.example.flutter_module:flutter_release:1.0'
}
Add the profile build type:
// In build.gradle(app)

android {
    // ...
    buildTypes {
        // ...
        profile {
            initWith debug
        }
    }
}
You have successfully integrated the Flutter module into your native Android app. Run the app to verify whether it is building without any errors before making any other changes.
Adding a Flutter screen to the Android app
Add the
FlutterActivityto theAndroidManifest.xmlfile:<activity android:name="io.flutter.embedding.android.FlutterActivity" android:configChanges="orientation|keyboardHidden|keyboard|screenSize|locale|layoutDirection|fontScale|screenLayout|density|uiMode" android:hardwareAccelerated="true" android:theme="@style/AppTheme" android:windowSoftInputMode="adjustResize" />Using cached
FlutterEngine:private const val FLUTTER_ENGINE_ID = "flutter_engine" class MyApplication : Application() { lateinit var flutterEngine : FlutterEngine // ... override fun onCreate() { super.onCreate() flutterEngine = FlutterEngine(this) flutterEngine.dartExecutor.executeDartEntrypoint( DartExecutor.DartEntrypoint.createDefault() ) FlutterEngineCache .getInstance() .put(FLUTTER_ENGINE_ID, flutterEngine) // ... } }For launching the
FlutterActivity:// Inside calculate button setOnClickListener startActivity( FlutterActivity .withCachedEngine(FLUTTER_ENGINE_ID) .build(this) )
This will launch the default Flutter counter app.
Integrating into iOS app
There are two ways of integrating the Flutter module into your iOS app:
Use the CocoaPods dependency manager and installed Flutter SDK.
Create frameworks for the Flutter engine, your compiled Dart code, and all Flutter plugins. Manually embed the frameworks, and update your existing application’s build settings in Xcode.
We will be using CocoaPods for integrating the module.
First of all, make sure that your iOS project contains a Podfile. Otherwise, you can generate the Podfile by running the following command from the iOS project directory:
pod init
After creating the Podfile, the project structure should be like this:
some/path/
├── flutter_module/
│   └── .ios/
│       └── Flutter/
│         └── podhelper.rb
│
└── NativeApp/
    └── Podfile
Open your iOS project on Xcode and navigate to the
Podfile. Add the following to the file:flutter_application_path = '../flutter_module' load File.join(flutter_application_path, '.ios', 'Flutter', 'podhelper.rb')For each Podfile target that needs to embed Flutter, you have to add this line:
install_all_flutter_pods(flutter_application_path)Save the
Podfileand close the project from Xcode.Install the
Podsby running the following command from the root iOS directory:pod installNow, open the project using the file with the
.xcworkspaceextension and try building the app.
You have successfully integrated the Flutter module with your native iOS project.
Adding a Flutter screen to the iOS app
Replace with the following in your
AppDelegate.swiftfile:import UIKit import Flutter // Used to connect plugins (only if you have plugins with iOS platform code). import FlutterPluginRegistrant @UIApplicationMain class AppDelegate: FlutterAppDelegate { // More on the FlutterAppDelegate. lazy var flutterEngine = FlutterEngine(name: "my flutter engine") override func application(_ application: UIApplication, didFinishLaunchingWithOptions launchOptions: [UIApplication.LaunchOptionsKey: Any]?) -> Bool { // Runs the default Dart entrypoint with a default Flutter route. flutterEngine.run(); // Used to connect plugins (only if you have plugins with iOS platform code). GeneratedPluginRegistrant.register(with: self.flutterEngine); return super.application(application, didFinishLaunchingWithOptions: launchOptions); } }Launch the
FlutterViewControllerby using the following code:// Inside calculatePressed method let flutterEngine = ((UIApplication.shared.delegate as? AppDelegate)?.flutterEngine)!; let flutterViewController = FlutterViewController(engine: flutterEngine, nibName: nil, bundle: nil); self.present(flutterViewController, animated: true, completion: nil)
If you run the app now, you will see that tapping the calculate button launches the default Flutter counter app.
Interacting with the module
MethodChannel is used for interacting with the native code from a Flutter module and vice versa.
We will be using MethodChannel to send the calculated total bill amount, the number of persons among whom the bill is split, and the percentage of the tip, from the native Android and iOS side to the Flutter module.
Android app
You can follow the steps below to send data from the Kotlin code to the Flutter module.
Add a channel name for interacting:
private const val CHANNEL = "com.souvikbiswas.tipsy/result"We will be passing the data in the JSON format. You can create the JSON data in Kotlin like this:
val json = JSONObject()

json.put("amount", finalBillString)
json.put("count", count)
json.put("percent", fraction * 100)
Defining the method channel:
val methodChannel = MethodChannel(flutterEngine.dartExecutor.binaryMessenger, CHANNEL)Invoking the method channel using a String identifier:
methodChannel.invokeMethod("getCalculatedResult", json.toString())
iOS app
To send data from the Swift code to the Flutter module, follow the steps below:
Declare a channel name:
let channel: String = "com.souvikbiswas.tipsy/result"Creating a JSON with the data that you want to pass to the Flutter module:
let jsonObject: NSMutableDictionary = NSMutableDictionary()

jsonObject.setValue(finalBillString, forKey: "amount")
jsonObject.setValue(stepperValue, forKey: "count")
jsonObject.setValue(currentPct * 100, forKey: "percent")

var convertedString: String? = nil

do {
    let billData =  try JSONSerialization.data(withJSONObject: jsonObject, options: JSONSerialization.WritingOptions.prettyPrinted)

    convertedString = String(data: billData, encoding: String.Encoding.utf8)

} catch let myJSONError {
    print(myJSONError)
}
Defining the method channel:
let resultDataChannel = FlutterMethodChannel(name: channel, binaryMessenger: flutterViewController.binaryMessenger)Invoking the method channel using a String identifier and passing the arguments:
resultDataChannel.invokeMethod("getCalculatedResult", arguments: convertedString)
Receiving data in the Flutter module
You will have to create a method to receive the data that will be sent in the JSON format from the native side.
Define the same method channel name:
static const platform = const MethodChannel('com.souvikbiswas.tipsy/result');Declare some variables:
String splitAmount = '';
int personCount = 0;
int percent = 0;
Method to parse the JSON data:
Future<void> _receiveFromHost(MethodCall call) async {
  var jData;

  try {
    if (call.method == "getCalculatedResult") {
      final String data = call.arguments;
      jData = await jsonDecode(data);
    }
  } on PlatformException catch (error) {
    print(error);
  }

  setState(() {
    splitAmount = jData['amount'];
    personCount = jData['count'];
    percent = jData['percent'];
  });
}
Call the method from
initState:@override void initState() { platform.setMethodCallHandler(_receiveFromHost); super.initState(); }Building the UI:
@override
Widget build(BuildContext context) {
  double screenHeight = MediaQuery.of(context).size.height;

  return Scaffold(
    backgroundColor: Colors.white,
    body: SafeArea(
      bottom: false,
      child: Container(
        child: Column(
          mainAxisAlignment: MainAxisAlignment.start,
          mainAxisSize: MainAxisSize.max,
          children: [
            Container(
              height: screenHeight * 0.3,
              color: Colors.white,
              child: Column(
                mainAxisAlignment: MainAxisAlignment.center,
                mainAxisSize: MainAxisSize.max,
                children: [
                  Text(
                    'Total per person',
                    style: TextStyle(fontSize: 28),
                  ),
                  SizedBox(height: 20),
                  Text(
                    splitAmount,
                    style: TextStyle(
                      fontSize: 36,
                      fontWeight: FontWeight.bold,
                      color: CustomColor.primaryDark,
                    ),
                  ),
                ],
              ),
            ),
            Expanded(
              child: Container(
                padding: EdgeInsets.all(16.0),
                color: CustomColor.primaryLight,
                child: Column(
                  mainAxisAlignment: MainAxisAlignment.start,
                  mainAxisSize: MainAxisSize.max,
                  children: [
                    Expanded(
                      child: Center(
                        child: Text(
                          'Split between $personCount people with $percent% tip',
                          style:
                              TextStyle(fontSize: 24, color: Colors.black54),
                        ),
                      ),
                    ),
                    Padding(
                      padding: const EdgeInsets.only(bottom: 20.0),
                      child: Container(
                        width: double.maxFinite,
                        child: RaisedButton(
                          onPressed: () {
                            SystemNavigator.pop();
                          },
                          color: CustomColor.primaryDark,
                          child: Padding(
                            padding: const EdgeInsets.all(8.0),
                            child: Text(
                              'RECALCULATE',
                              style: TextStyle(
                                color: Colors.white,
                                fontSize: 28,
                              ),
                            ),
                          ),
                        ),
                      ),
                    )
                  ],
                ),
              ),
            ),
          ],
        ),
      ),
    ),
  );
}
With this, you have successfully implemented the MethodChannel for passing data to the Flutter module from the native app.
Building on Codemagic
You can use the codemagic.yaml file for building Android and iOS projects with Flutter modules on Codemagic.
For building your Android project with Flutter modules, follow the steps here.
For building your iOS project with Flutter modules, follow the steps here.
Conclusion
Add-to-app support makes it really easy to integrate a Flutter screen into your native projects. Additionally, interacting with the module is possible using MethodChannel. Also, the introduction of codemagic.yaml has made it really easy to build, test, and deploy your native apps with Flutter modules.
Some useful links
- [Docs] Integrate a Flutter module into your Android project
- [Docs] Integrate a Flutter module into your iOS project
- [Docs] Writing custom platform-specific code
- [Article] Distributing Native Android app with Flutter Module using Codemagic
- [Article] iOS Code Signing and Publishing with codemagic.yaml file
Souvik Biswas is a passionate Mobile App Developer (Android and Flutter). He has worked on a number of mobile apps throughout his journey. Loves open source contribution on GitHub. He is currently pursuing a B.Tech degree in Computer Science and Engineering from Indian Institute of Information Technology Kalyani. He also writes Flutter articles on Medium - Flutter Community.


