


Written by Rudrank Riyam.
While the prospect of getting much faster build times with the Apple silicon (aka M1) processors seems very exciting, you may face issues that stem from the architectural differences between arm64 and x86. One of these issues is related to snapshot testing or golden testing on Flutter.
You are not alone in this, as it’s a widespread issue in which snapshots generated on an Intel machine fail on Apple silicon machines — and vice versa. Let’s analyze these issues and take a look at potential solutions and workarounds.
What is snapshot/golden testing?
Snapshot testing is a way to test a screen or a part of the screen by capturing it or, in other words, taking a snapshot. You then compare the snapshot to a reference snapshot image, and the test computes any differences to result in a success or failure. The term snapshot testing is usually used in regard to native platforms.
In Flutter, golden tests are similar: They compare your widget with a reference image, and the test expects it to match exactly with the newly generated image.
For native iOS development, there are two popular iOS snapshot testing libraries used by the community:
- SnapshotTesting by Point-Free
- iOSSnapshotTestCase (previously FBSnapshotTestCase), which is maintained by Uber
Point-Free SnapshotTesting is slowly becoming the community standard for iOS snapshot testing. This article mainly focuses on issues with iOS snapshot testing on Intel and Apple silicon with this library and workarounds for them.
When you are performing snapshot (for native iOS) and golden (for Flutter) testing, you ideally want the reference device to be identical to the base device. Still, as teams are transitioning to M1 Macs and as CI/CD services start offering Apple M1 virtual machines, it isn’t always easy to use devices with identical architectures. Let’s describe the problem and the potential workarounds for it.
Contact us to try M1 build machines
The problem
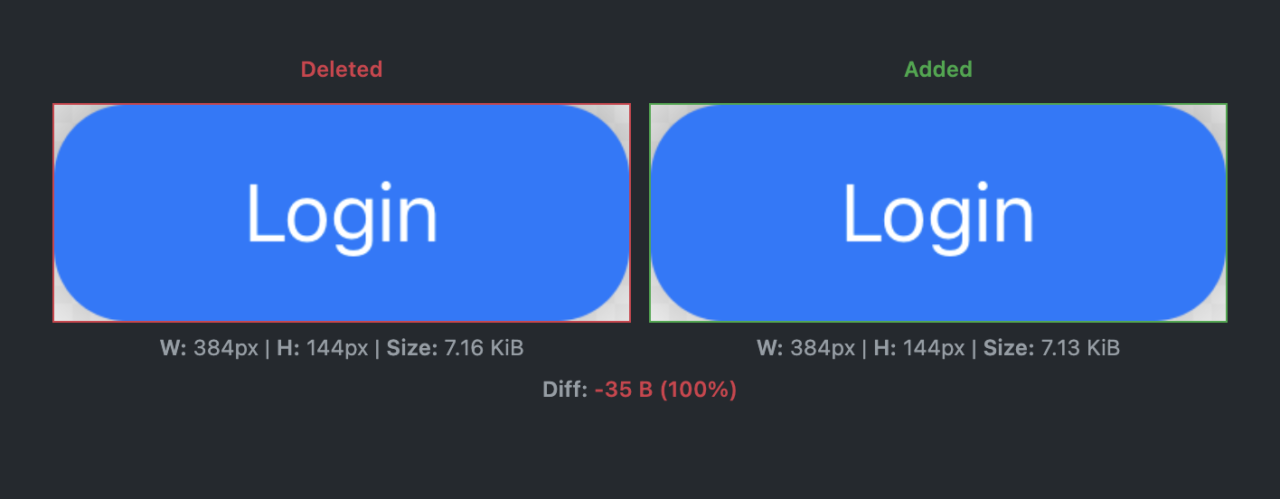
Suppose your team is working with both Apple silicon and Intel machines. In that case, if you are performing iOS snapshot testing, you may notice that the snapshots generated on either of the machines differ slightly from each other. While this isn’t always visible to the human eye, it can be enough to cause your tests to fail. While the migration process is still ongoing for developers and the team relies on machines with both architectures, it gets increasingly difficult to handle your snapshot/golden test suites.
Here is an example snapshot on an Intel (left) and an Apple silicon (right) machine:
This issue is often encountered by both the native iOS community and Flutter developers working with golden testing. While there are many hacks or workarounds, we do not suggest you alter the tests only to bypass the architectural differences. However, if you urgently need to, you can follow the workarounds recommended by the community in this thread. This post lists a few of them.
Workaround: Fixing shadow opacity
One of the issues with iOS snapshot testing occurs when rendering shadows, as mentioned by Nuno Vieira. The snapshots differ for Apple silicon and Intel chips when using drop shadows in views. The problem occurs when the shadowOpacityis different from 1. The solution Nuno’s team came up with was to change the color of the shadow to fake the opacity instead of changing the actual opacity of the shadow.
Note: This is a workaround and not recommended for testing production applications.
Another approach is to remove shadows while performing snapshot testing as a workaround while the team transitions to using the Apple silicon machines.
Workaround: Running Xcode and Simulator in Rosetta
If you or your team are still in an early phase in terms of transitioning to machines with the new architecture and the majority of the developers still have Intel machines, you can run Xcode and Simulator on your Apple silicon machine with Rosetta.
When the base snapshots are generated on an Intel machine, you can force your tests to use the x86_64 simulator:
xcode-project run-tests \
  --project "$XCODE_PROJECT" \
  --scheme "$XCODE_SCHEME" \
  --device "iPhone 12" \
  --test-xcargs "ARCHS=x86_64 ONLY_ACTIVE_ARCH=NO"
Potential workaround: Subpixel threshold
The community has found different ways to work around this issue. One of the workarounds for the SnapshotTesting library is to allow each subpixel to deviate a little. Various developers’ experiences and our own tests have shown that allowing each subpixel (R, G, B) to deviate by a small degree is enough to make up for the difference in the architectures without affecting the snapshot tests or decreasing the precision. Each subpixel should be ±
For example, if you set subpixelThreshold to 5 and precision to 1, that means you want 100% of the subpixels to deviate no more than 5 values from the reference for the test to pass successfully. While you wouldn’t want to lower the precision, you can take a call if you can excuse minor differences in colors due to the architectural differences with a hybrid team with Apple silicon/Intel machines.
This is still a hacky workaround, and we advise that you use it at your own risk.
This workaround helps you pass the snapshot tests successfully without losing significant performance for the extra computation of subpixels for each failed test. You can generate the baseline images on an Intel machine and run the snapshot tests on Apple silicon and vice versa. Developers have been using the subpixel deviation fix with great success.

Conclusion
While transitioning to having your team fully on board with Apple silicon machines and Codemagic’s Mac mini M1 results in faster build times, you can take note of the problems and issues arising with the architectural differences in the process. Snapshot testing is crucial for ensuring that the UI doesn’t change and break when releasing new features or updating old ones.
We hope it was helpful for you to learn about the issues and workarounds related to transitioning between Apple silicon and Intel machines. If you have any suggestions or feedback, join our Slack community or mention @codemagicio on Twitter!
And if you want to try out the new Mac mini M1 build machines Codemagic has recently released, fill in the form below — and we’ll get back to you.


