


This article is written by Vadym Pinchuk
TL;DR
In Flutter’s early days in 2019, I developed a live object detection system for a major German company, despite the platform’s constraints. With release of Flutter 3.7 and advancements of TensorFlow have catalyzed the need to refine or overhaul this approach.
This article discusses the newest techniques in live-stream object detection as showcased in the flutter-tflite GitHub repository.
Intro
Back in 2019, during Flutter’s early rise, I undertook a project for a prominent German company: the challenge was to enable live object detection for ongoing operations. Despite the limitations of the Flutter framework at the time, I successfully devised a solution and detailed my findings in this article. This method provided adequate ’live-stream’ object detection to meet the company’s needs.
However, the tech landscape evolves rapidly. With the introduction of Flutter 3.7, it became evident that refining or entirely revamping the existing logic was in order. This was especially true considering the advancements made by the TensorFlow team in the realm of object detection. This article delves into the most recent developments in live-stream object detection as incorporated into the flutter-tflite GitHub repository’s examples module.
Camera Stream Processing: Challenges and Solutions
The camera plugin effortlessly taps into hardware cameras, enabling real-time image streaming. But post-streaming, the question emerges: How to handle these data in the main process (root isolate)? Processing image frames is a resource-intensive task, especially when managed by the same process that handles the UI in Dart. Therefore, it’s ideal to perform this operation in the background.
Camera’s Output: Camera dispatches CameraImage Objects to the application. These images require meticulous processing to suit ML models, ensuring accurate object detection / classification. Furthermore, detection results should overlay seamlessly on the UI’s camera stream. Let’s break it down step by step.
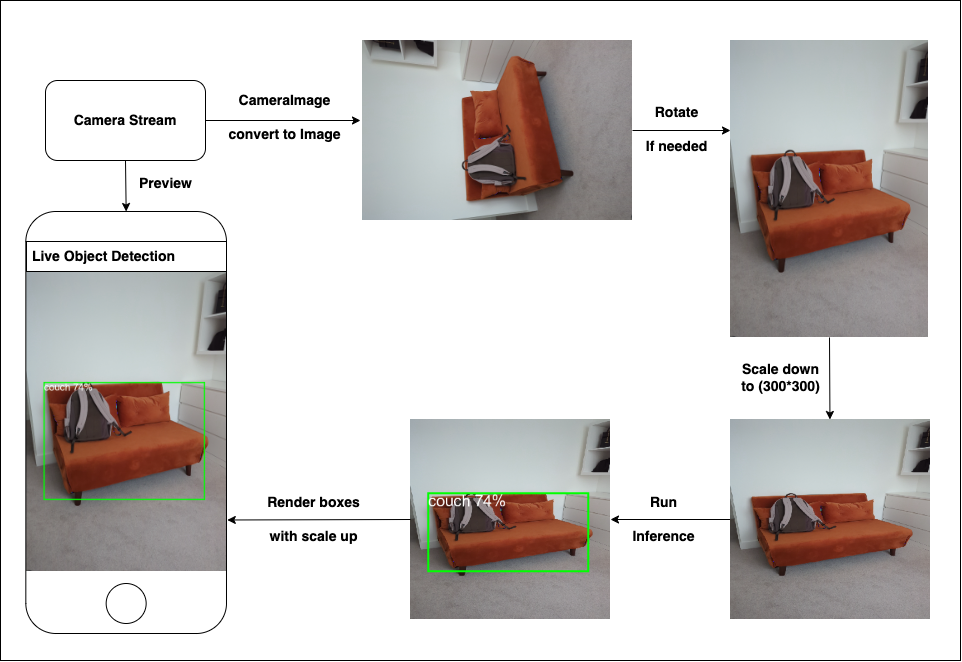
Here’s a breakdown:
- From CameraImage to usable Image: CameraImage conversion entails translating to an appropriate format based on the camera’s output. Typically, this involves byte reordering within a new matrix.
Future<image_lib.Image?> convertCameraImageToImage(CameraImage cameraImage) async {
  image_lib.Image image;

  if (cameraImage.format.group == ImageFormatGroup.yuv420) {
    image = convertYUV420ToImage(cameraImage);
  } else if (cameraImage.format.group == ImageFormatGroup.bgra8888) {
    image = convertBGRA8888ToImage(cameraImage);
  } else if (cameraImage.format.group == ImageFormatGroup.jpeg) {
    image = convertJPEGToImage(cameraImage);
  } else if (cameraImage.format.group == ImageFormatGroup.nv21) {
    image = convertNV21ToImage(cameraImage);
  } else {
    return null;
  }

  return image;
}
Rotation Handling: Camera plugin may offer rotated frames. Leveraging image Exif data offers an optimal solution for correct orientation.
Image Rescaling: For ML compatibility, images should be resized to match the model’s trained data dimensions, often a square.
    /// Resizing image for model, [mlModelInputSize, mlModelInputSize]
    final imageInput = image_lib.copyResize(
      image!,
      width: mlModelInputSize,
      height: mlModelInputSize,
    );
- Inference Process: While object detection isn’t the most expensive operation, it still requires a significant amount of resources.
  /// Object detection main function
  List<List<Object>> _runInference(
    List<List<List<num>>> imageMatrix,
  ) {
    // Set input tensor [1, 300, 300, 3]
    final input = [imageMatrix];

    // Set output tensor
    // Locations: [1, 10, 4]
    // Classes: [1, 10],
    // Scores: [1, 10],
    // Number of detections: [1]
    final output = {
      0: [List<List<num>>.filled(10, List<num>.filled(4, 0))],
      1: [List<num>.filled(10, 0)],
      2: [List<num>.filled(10, 0)],
      3: [0.0],
    };

    _interpreter!.runForMultipleInputs([input], output);
    return output.values.toList();
  }
- Detection Boxes Adjustment: Post-detection, these boxes should revert to their original preview dimensions, visually integrating with the image frame.
  /// Returns bounding box rectangle corresponding to the
  /// displayed image on screen
  ///
  /// This is the actual location where rectangle is rendered on
  /// the screen
  Rect get renderLocation {
    final double scaleX = ScreenParams.screenPreviewSize.width / 300;
    final double scaleY = ScreenParams.screenPreviewSize.height / 300;
    return Rect.fromLTWH(
      location.left * scaleX,
      location.top * scaleY,
      location.width * scaleX,
      location.height * scaleY,
    );
  }
Given the resource-intensiveness, the above operations ideally run in a background isolate. While it has always been feasible to shift tasks to a background isolate, Flutter 3.7 revolutionized it by enabling background access to plugins registered in root isolate. This approach, illustrated in Aaron Clarke’s article, is evident in the live-stream object detection example.
TFLite Configurations: Bridging Past and Present
Since my 2019 research, the landscape has shifted. While some plugins I relied on have been deprecated or not supported, TensorFlow’s acquisition of the flutter-tflite plugin has signaled progress towards Flutter MediaPipe.
- Detector Setup: The detector preps the model and labels for the Interpreter’s object detection.
  static Future<Interpreter> _loadModel() async {
    final interpreterOptions = InterpreterOptions();

    // Use XNNPACK Delegate
    if (Platform.isAndroid) {
      interpreterOptions.addDelegate(XNNPackDelegate());
    }

    // Use Metal Delegate
    if (Platform.isIOS) {
      interpreterOptions.addDelegate(GpuDelegate());
    }

    return Interpreter.fromAsset(
      _modelPath,
      options: interpreterOptions..threads = 4,
    );
  }
- Interpreter’s Role: The Interpreter analyses the input, based on the output matrix parameterized for each ML model.
Model-specific data configurations might vary. Although the Interpreter initializes with model and labels from assets in the main process/isolate, background access remains possible for image frame processing by accessing Interpreter with its address:
_interpreter = Interpreter.fromAddress(command.args?[1] as int);
Isolates in Tandem: Collaborative Processing
//  _________________                         ________________________
//   [:root isolate]                             [:background isolate]
//  -----------------                         ------------------------
//         |                                              |
//         |<---------------(init)------------------------|
//         |----------------(init)----------------------->|
//         |<---------------(ready)---------------------->|
//         |                                              |
//         |----------------(detect)--------------------->|
//         |<---------------(busy)------------------------|
//         |<---------------(result)----------------------|
//         |                 . . .                        |
//         |----------------(detect)--------------------->|
//         |<---------------(busy)------------------------|
//         |<---------------(result)----------------------|
Image frame processing will be managed in a distinct background isolate, with access to the root Isolate’s Interpreter and plugins. As of Flutter 3.7, each background isolate can get access to the root isolate’s plugins with BackgroundIsolateBinaryMessenger.ensureInitialized(rootIsolateToken). This action configures the BinaryMessenger for background isolate communication with plugins.
To configure a background isolate, follow these straightforward steps:
- Spawn new isolate from the root, with the SendPort reference.
final Isolate isolate = await Isolate.spawn(_DetectorServer._run, receivePort.sendPort);
- From the Background Isolate, relay an initialization message to the root isolate, including its sendPort.
    // receivePort.sendPort - used by root isolate to send commands to the service receiverPort
    sendPort.send(_Command(_Codes.init, args: [receivePort.sendPort]));
- From Root to Background send RootIsolateToken and _interpreter.address.
      case _Codes.init:
        _sendPort = command.args?[0] as SendPort;
        // Before using platform channels and plugins from background isolates
        // we need to register it with its root isolate. This is achieved by
        // acquiring a [RootIsolateToken] which the background isolate uses to
        // invoke [BackgroundIsolateBinaryMessenger.ensureInitialized].
        //
        RootIsolateToken rootIsolateToken = RootIsolateToken.instance!;
        _sendPort.send(_Command(_Codes.init, args: [
          rootIsolateToken,
          _interpreter.address,
          _labels,
        ]));
- Upon receipt in the background, capture the token and address. Subsequently, establish BinaryMessenger using the RootIsolateToken and access the Interpreter via the Address.
        // The [RootIsolateToken] is required for
        // [BackgroundIsolateBinaryMessenger.ensureInitialized] and must be
        // obtained on the root isolate and passed into the background isolate
        // via a [SendPort].

        RootIsolateToken rootIsolateToken =
            command.args?[0] as RootIsolateToken;

        // [BackgroundIsolateBinaryMessenger.ensureInitialized] for each
        // background isolate that will use plugins. This sets up the
        // [BinaryMessenger] that the Platform Channels will communicate with
        // on the background isolate.

        BackgroundIsolateBinaryMessenger.ensureInitialized(rootIsolateToken);
        _interpreter = Interpreter.fromAddress(command.args?[1] as int);
        _labels = command.args?[2] as List<String>;
        _sendPort.send(const _Command(_Codes.ready));
Configuration complete, the system stands operational and ready for live-stream frames processing. For an intricate understanding of Isolate collaborations, refer to Aaron Clarke’s article.
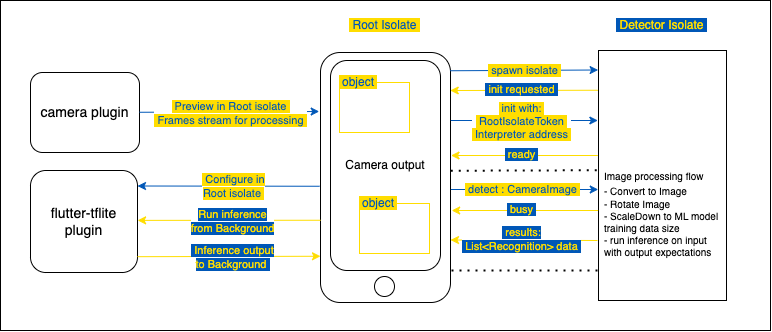
From here on, isolates can work together, processing camera frames in the background and showcasing results in the main UI isolate.
![]()
Summary
In the initial stages of Flutter, implementing real-time object detection was quite the challenge. Drawing from a personal experience in 2019, a rudimentary solution was developed, apt for the requirements at that point. However, advancements in Flutter 3.7 have revolutionized the approach. This article delves into the modern methods of live-stream object detection, emphasizing the role of TensorFlow’s TFLite models and integrated features from Flutter 3.7. Discussed the intricacies of processing image frames, given the computational constraints it carries to the main isolate in Dart. With the inspiration from Aaron Clarke’s piece, highlighted the seamless integration of background isolates, especially the ability to access plugins registered in root isolates from Flutter 3.7 onwards. The article provides a step-by-step guide to setting up a background isolate, ensuring smooth and efficient object detection in real-time streams.


