


TL;DR: Automating UI tests is good, but for macOS, it may be hard to do on remote machines in CI/CD services due to issues with permissions. This isn’t the case with Codemagic, which lets you automate macOS UI testing in a handful of quick steps.
This article is written by Rudrank Riyam.
If you have been manually testing your macOS app’s UI, going through the same flow repeatedly, and wishing for a way to automate the process, then you are in the right place! Testing the UI of your app has great benefits, but it is a tedious task if done manually.
However, automated user interface tests can make sure the UX is intact: You can add a new UI feature with confidence without affecting the rest of the app. In this article, we discuss how to write macOS UI tests and automate them using Codemagic.
We’ll learn:
- How to add a user interface testing target;
- How to write your first UI test;
- How to run UI tests;
- What the issues with macOS UI testing are;
- How to configure Codemagic for macOS UI testing;
- How to run tests on Codemagic.
So, let’s start exploring and writing some macOS UI tests!
Getting started with macOS UI testing
In this article, we will create a simple project that conditionally shows a label with the click of a button. Then, we’ll write a test to show the label and check if it is visible. Finally, we’ll look at the issues with macOS UI testing on a CI/CD platform and how you can overcome them using Codemagic.
For reference, download the sample project used for this article from here.
Note: This article assumes you have a basic knowledge of testing on Apple platforms.
Adding a UI testing target
Xcode provides an option to include tests if you’re starting off with a new project. In this case, it will create a folder for both UI and unit tests.
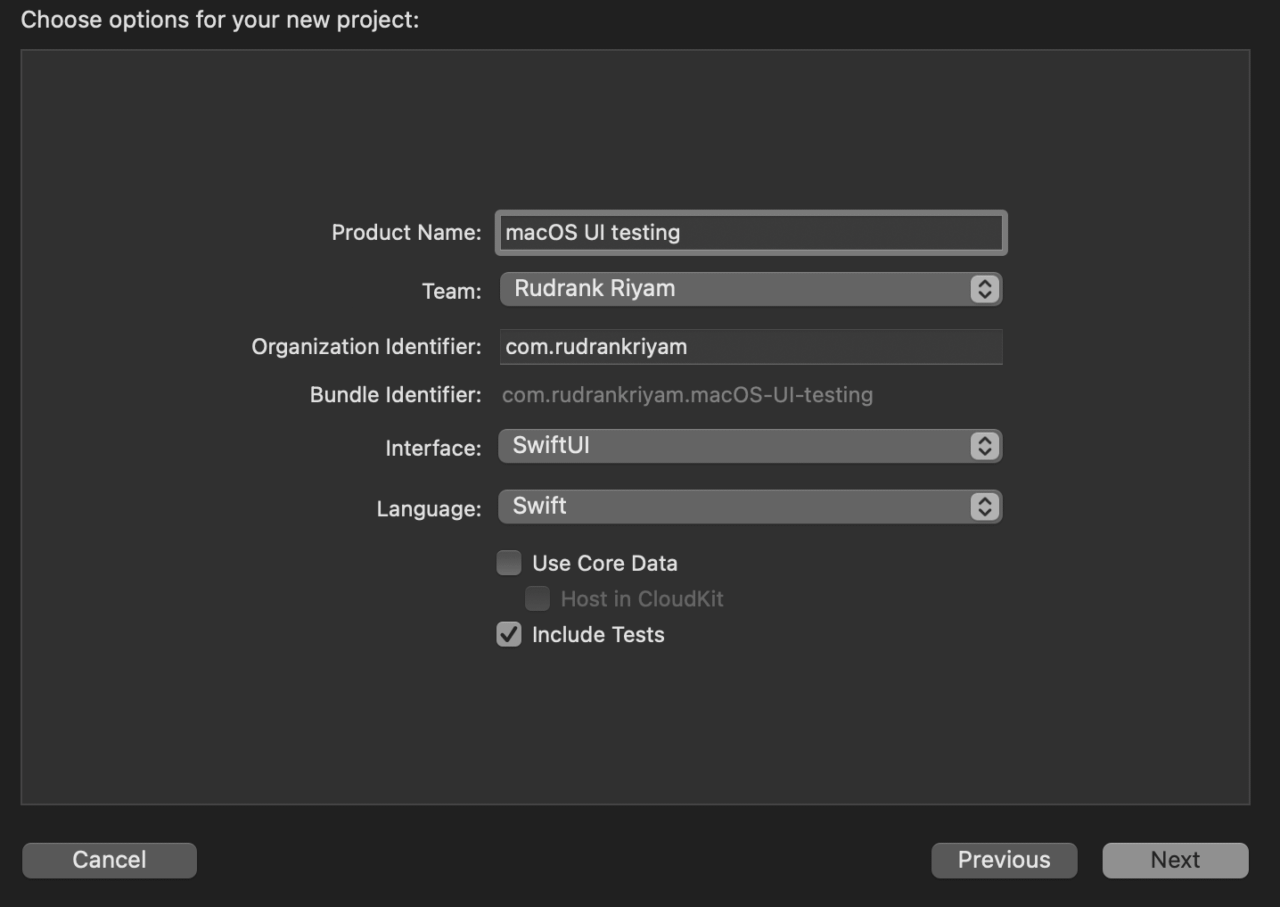
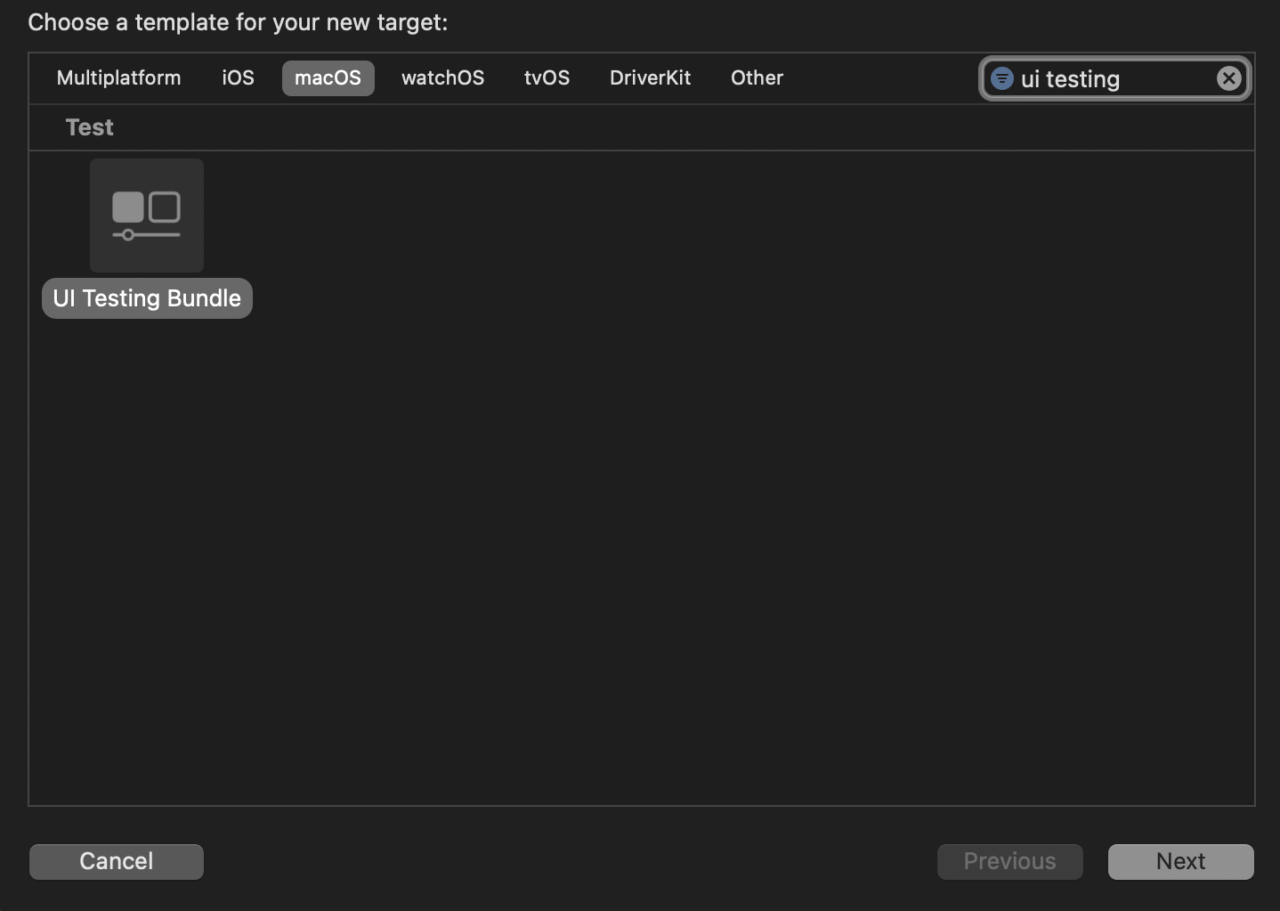
If you already have a project and want to add UI tests, go to the Xcode menu bar, select File, then click New, and select Target. Search for UI Testing Bundle and name it accordingly. For example, you can add the word “UITests” after the name of your target.
When creating a new target for UI tests, Xcode creates a folder with two files. The first one is for normal UI tests, and the second one is for testing the launch of the application.
Writing your first UI test
Automated tests interact with your app similar to how a user does, so you should keep that in mind while writing your UI tests. Let’s start with a simple example, a button that conditionally displays a label:
struct ContentView: View {
  @State private var showWelcomeLabel = false

  var body: some View {
    VStack {
      if showWelcomeLabel {
        Text("Welcome to Codemagic!")
          .font(.largeTitle)
          .padding()
      }

      Button("Show!") {
        showWelcomeLabel.toggle()
      }
      .accessibilityIdentifier("show")
    }
    .frame(width: 500, height: 500, alignment: .center)
  }
}
When you click on the Show button, it toggles the showWelcomeLabel variable and displays the text “Welcome to Codemagic!” Clicking on it again hides the label.
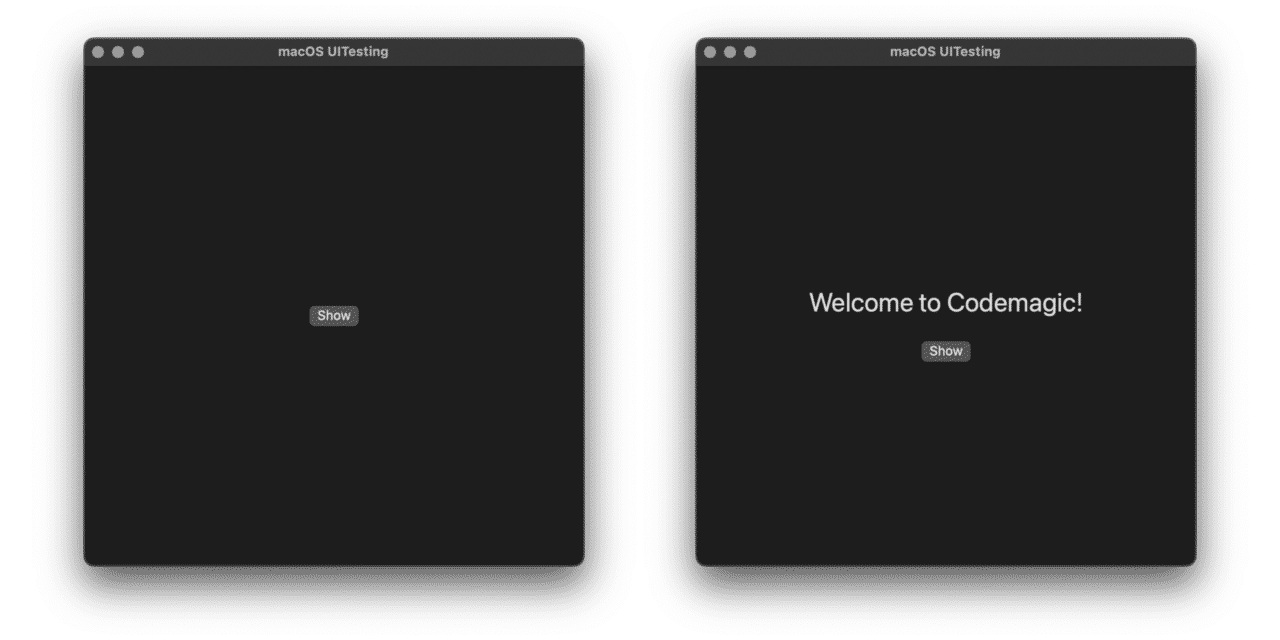
Do note that we use an accessibility identifier for the button so that it is easier to query the button element when writing the tests.
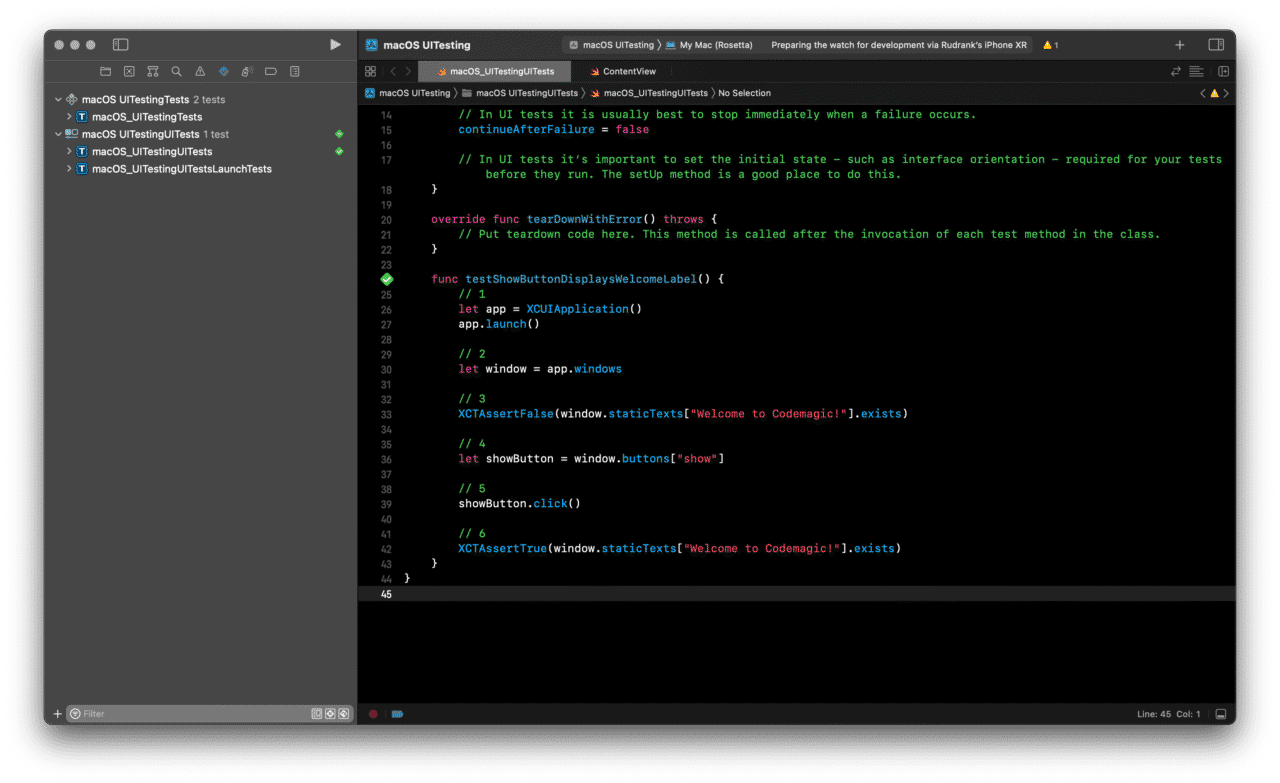
In the UI test target file (not the LaunchTests), add the following test method:
func testShowButtonDisplaysWelcomeLabel() {
  // 1
  let app = XCUIApplication()
  app.launch()

  // 2
  let window = app.windows

  // 3
  XCTAssertFalse(window.staticTexts["Welcome to Codemagic!"].exists)

  // 4
  let showButton = window.buttons["show"]

  // 5
  showButton.click()

  // 6
  XCTAssertTrue(window.staticTexts["Welcome to Codemagic!"].exists)
}
Let’s quickly review what the code above does:
- It creates an instance of
XCUIApplication()and then launches the application. - It creates a constant for querying the window elements of the application.
- As the welcome label is not visible on the screen, we assert that the text does not exist.
- Then, it initiates a query for the button element with the identifier show.
- Then it clicks the button.
- The label should be visible on the screen, so we query the static texts and assert that the text “Welcome to Codemagic!” exists.
Yay, you’ve just written your first UI test for your macOS app! 🚀
Running macOS UI tests
When you run your UI tests for the macOS target, you get an alert that “testmanagerd” is trying to Enable UIAutomation. To allow this, you have to enter your Mac’s password.
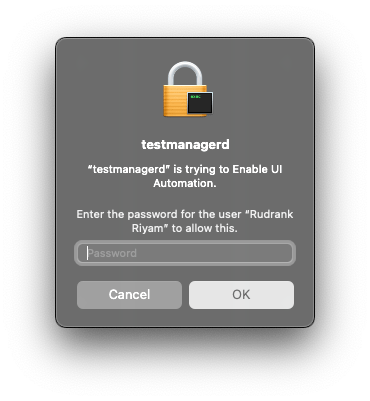
You are then asked to grant permission to use Accessibility features to proceed with UI testing.
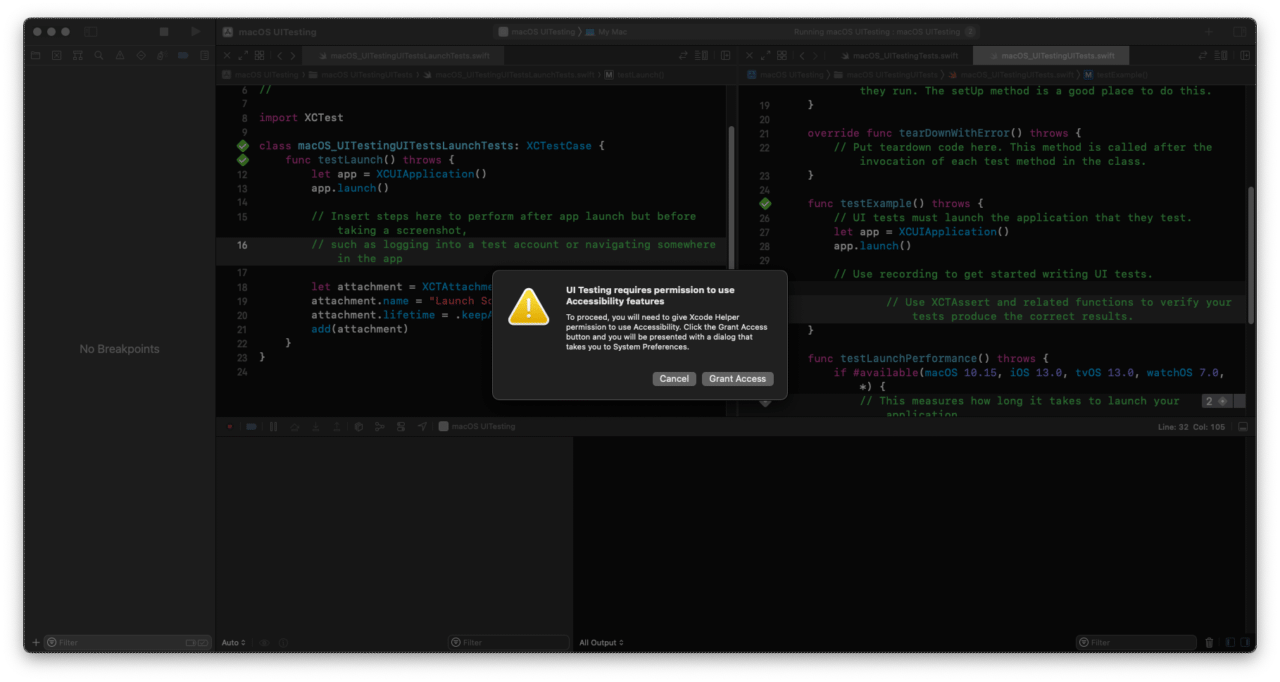
To proceed, you have to provide Xcode Helper permission to use Accessibility. Click the Grant Access button, and the system presents you with a dialog that takes you to System Preferences.
After all the required permissions have been granted, the tests are finally run. You can see on your screen that the machine clicks on the “Show!” button, the label appears, and the test subsequently passes.
Issues with macOS UI testing
When testing on a local machine, you can manually grant access to the Xcode Helper to run UI tests for your macOS app. However, it isn’t as easy to do this on a remote CI/CD machine. Furthermore, the remote device does not interact with the UI without this permission, resulting in UI test failure.
Granting the accessibility permission allows the app to control your computer. This makes it a dangerous permission that should not be granted thoughtlessly. To protect the user from granting this permission without their consent, Apple has a mechanism called the TCC (Transparency, Consent, and Control) system.
It has two databases, TCC.db, located in:
- /Library/Application Support
- ~/Library/Application Support
These databases contain the settings for privacy controls. When you manually provide permission in the Security & Privacy pane, it is stored in these files. To protect your security and privacy, you cannot edit these databases without having SIP (System Integrity Protection) disabled. For reference, you can read more about each column and its importance here.
Configuring codemagic.yaml to run macOS UI tests
With Codemagic, you don’t have to add permissions to the database manually. SIP is disabled for Xcode 13 and above images, and the required permissions are in place already. Just run your UI tests directly!
Here’s a sample workflow configuration for you to use as a template:
workflows:
  macos-workflow:
    name: macOS Workflow
    environment:
      vars:
        XCODE_PROJECT: "macOS UITesting.xcodeproj"
        XCODE_SCHEME: "macOS UITesting"
      xcode: latest
      cocoapods: default
    scripts:
      - name: Run UI and Unit tests
        script: |
          xcode-project run-tests \
              --project "$XCODE_PROJECT" \
              --scheme "$XCODE_SCHEME" \
              --sdk macosx \
              --test-xcargs "CODE_SIGNING_ALLOWED='no'" \
              --output-dir build/macos/test
        test_report: build/macos/test/*.xml
Here’s what the above workflow is doing:
- Start with a macOS workflow, and add environment variables for the project and scheme name. We use the latest Xcode version available on Codemagic, with the default CocoaPods.
- Create a script to run the macOS tests for the given project and scheme. We specifically mention that the SDK is macosx so that Codemagic runs the tests on macOS, whereas the default value is the iPhone simulator.
After configuring the codemagic.yaml file, we are ready to run the tests on Codemagic!
Running tests on Codemagic
Head over to Codemagic’s website to run the UI tests. If you’re not registered yet, you’ll need to sign up:

Start a new build by choosing the current workflow:

Once the process finishes, the UI tests should be completed successfully for your macOS app!
Conclusion
UI testing for iOS and macOS can both be done on a remote machine. Although, running successful UI tests for a macOS app on a remote machine is often more complicated than for an iOS app, but with Codemagic’s support, that’s not the case anymore.
Now that you have written UI tests for your macOS app, refer to the documentation for code signing your macOS app and publishing it on the App Store.
We hope you enjoyed the article. If you have any questions or suggestions, join our Slack community. Our team would love to hear about your experience with UI testing your macOS apps! If you have any problems, give a shout to the #support channel on Slack as well: We are always there to help, and so is the huge and friendly community of other Codemagic users.


