


This post is written by Hrishikesh Pathak
TL;DR: Mason is a Dart package that allows you to create files and directories based on templates. You can use Mason in your Flutter projects by first creating and registering the templates (aka bricks) and then utilizing them to create files and folders. Alternatively, you can use bricks made by others from GitHub or BrickHub.dev.
What is Mason?
Mason is an open-source template generator created by Felix Angelov from Very Good Ventures. It is used to generate files and directories from predefined templates to enhance developer productivity. These reusable templates are called bricks. A brick can be a file or a collection of nested files and directories.
Once brick templates are defined, developers use the Mason CLI to create, manage, and generate new files from these bricks. Mason can be very useful in larger projects, as it provides a definite guideline to developers and helps maintain consistency in code.
What you’ll learn in this tutorial
At the end of this tutorial, you’ll learn how to:
- Install and use the Mason CLI
- Create your own reusable bricks
- Use hosted bricks from GitHub
- Add Mason to your Flutter project
- Use remote bricks from BrickHub.dev
Excited? Make sure to follow the tutorial to the end to get a complete picture of bricks and Mason.
Below, you can find the complete Mason sample project. You can now play with it live in your browser.
How to install the Mason CLI
Mason is written in the Dart programming language. Therefore, you should have Dart installed on your computer before you install the Mason CLI.
dart pub global activate mason_cli
If you are using Mac (or Linux), you can also install Mason using the Homebrew package manager. First, add the official tap for the Mason package.
brew tap felangel/mason
Then, install the Mason package.
brew install mason
You can update Mason using the brew upgrade command.
brew update
brew upgrade mason
The concept of bricks in Mason
Let’s learn about bricks and Mason with a simple example. A page in your Flutter app may be stateful or stateless depending on its reactivity to the state change, and in general, each page contains a scaffold and an appbar.
Normally, if your Flutter project needs multiple pages, you have to write the same repetitive code multiple times. But using bricks, you can write a template Flutter page and generate new pages on the fly. You can also use variables and conditionals in these templates to give each page a different name and structure.
Another common use of bricks is generating test files. If you are familiar with Flutter unit testing and widget testing, you know that the basic structure of all the tests is the same. You can also create a brick for unit tests and generate multiple test files in one go using the power of the Mason CLI and bricks.
A primer on mustache syntax
Bricks use the Mustache syntax to add variables and conditionals in your file. (If you’re not familiar with the Mustache syntax and want some detailed information, take a look here.) To define a variable, you can use the {{name}} notation in your code. Then register that variable name in your bricks.yaml file to use that variable at the code generation time using the Mason CLI.
vars:
  name:
    type: string
    description: What is your name?
    default: codemagic
    prompt: name?
You can add conditionals in your code using the {{#vars}}{{/vars}} notation. If the vars variable is not null, false, or an empty list, then the code or text present inside these notations is output at build time. If vars is null, false, or an empty list, then the code between these notations outputs nothing at build time.
You can reverse this logic by using the {{^vars}}{{/vars}} notation. This notation is like an else statement, outputting the code inside it when vars is null, false, or an empty list.
Predefined functions can also be used in the Mustache syntax — here, they’re known as lambdas. You can wrap a variable with lambdas to carry out different operations. For example, if you want to convert a string variable to Pascal case, just wrap the Pascal case lambda around the variable.
{{#pascalCase}}{{vars}}{{/pascalCase}}
There are many built-in variables you can use in brick templates. Check out this list of official built-in lambdas. Now, let’s continue to work with Mason.
Guide to creating your first brick
Before creating a new brick, first initialize Mason in a directory. Navigate to an empty directory and run mason init to initialize Mason in the current directory. Use the mason init command to create a mason.yaml file in which you have to register all the bricks you will use with the Mason CLI.

Create a new brick using the Mason CLI
After initializing Mason, you can create new bricks using the mason new command.
$ mason new widget
The above command creates a new directory called widget and adds the brick.yaml file inside it. You have to declare all the variables you use in the brick templates in this brick.yaml file. You can add your template files inside the __brick__ directory. The complete structure of the newly created Mason directory looks like this:
.
├── mason-lock.json
├── mason.yaml
└── widget
    ├── __brick__
    │   └── HELLO.md
    ├── brick.yaml
    ├── CHANGELOG.md
    ├── LICENSE
    └── README.md
Once you create a new brick using the mason new command, make sure to add the new brick in the mason.yaml file. Let’s add our widget brick in the mason.yaml file.
bricks:
  widget:
    path: ./widget/

Add a reusable Flutter widget template
In this section, we will focus on creating a reusable Flutter widget using Mason.
- We will dynamically change the filename of the widget
- The widget will be stateless or stateful, depending on conditional variables
- It will contain a scaffold that, in turn, contains an appbar
Delete the hello.md file inside the widget/__brick__ directory. To make a dynamic filename, we use the Mustache syntax. Since Flutter widget filenames are always written in snake case, create a Dart file called {{filename.snakeCase()}}.dart inside the __brick__ directory. Here, .snakeCase() is a function that converts the filename variable into a snake case word.
Let’s register the filename variable in the brick.yaml file.
vars:
  filename:
    type: string
    description: widget filename
    default: widget
    prompt: filename?
Paste the following Dart code inside the {{filename.snakeCase()}}.dart file. This code will produce a stateful or stateless widget based on the value of the isStateless variable.
import "package:flutter/material.dart";
{{#isStateless}}
class {{filename.pascalCase()}} extends StatelessWidget {
  const {{filename.pascalCase()}}({Key? key}) : super(key: key);

  @override
  Widget build(BuildContext context) {
    return Scaffold(
      appBar: AppBar(title: Text("{{filename}}",),),
    );
  }
}
{{/isStateless}}
{{^isStateless}}
class {{filename.pascalCase()}} extends StatefulWidget {
  const {{filename.pascalCase()}}({Key? key}) : super(key: key);

  @override
  State<{{filename.pascalCase()}}> createState() => _{{filename.pascalCase()}}State();
}

class _{{filename.pascalCase()}}State extends State<{{filename.pascalCase()}}> {
  @override
  Widget build(BuildContext context) {
     return Scaffold(
      appBar: AppBar(title: Text("{{filename}}",),),
    );
  }
}
{{/isStateless}}
Here, if the isStateless variable is true, then mason_cli generates a stateless widget. Otherwise, mason_cli generates a stateful widget. Take a look at the syntax of {{#isStateless}} and {{^isStateless}}. The conditional logic is implemented using the Mustache syntax.
Don’t forget to add the isStateless variable in your brick.yaml file.
vars:
  isStateless:
    type: boolean
    description: Make a stateless widget
    default: true
    prompt: is stateless?
In Flutter, widget names are always written in Pascal case. Therefore, I will use the .pascalCase() function to convert the filename into a Pascal case string. You can also use the {{#pascalCase}}{{filename}}{{/pascalCase}} syntax to convert the filename variable into Pascal case.
I will also add an appbar inside the scaffold and use the filename variable as an appbar title.
Let’s run the mason get command to register all the bricks from the nearest mason.yaml file. Your widget brick is now ready to generate stateless or stateful widgets on demand using the Mason CLI.
Generate files using bricks and Mason
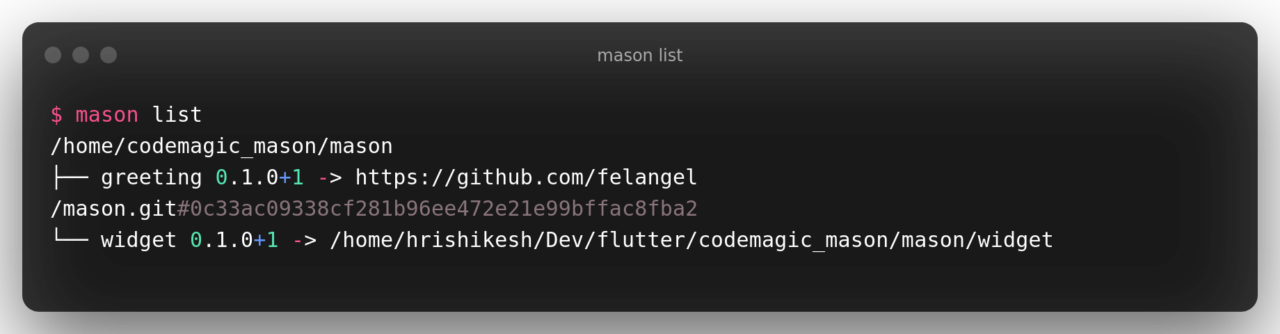
Now that we have successfully created and registered our brick, let’s start using it to generate files using the Mason CLI. First, run mason list to list all the available bricks.

Now use the mason make command to generate files in the current working directory. To generate a file using our widget brick with the Mason CLI, run the mason make widget command. Then provide all the variables you have defined in the bricks.yaml file. Congratulations, you have generated a Flutter widget using bricks and the Mason CLI.
Bricks from GitHub
You can also use bricks directly from GitHub repositories. Inside your mason.yaml file, add the brick name and the GitHub repository link.
bricks:
  widget:
    path: ./widget/
  greeting:
    git:
      url: https://github.com/felangel/mason.git
      path: bricks/greeting
Then run mason get to register that brick to generate a new file. Now you can use the greeting bricks like normal in your projects.
Integrate bricks and Mason into your Flutter project
You can easily integrate bricks and Mason into your Flutter project. At the root of your project, create a new directory called mason. Inside the mason directory, first initialize Mason using the mason init command. Then create reusable bricks for your project as I have explained above.
When you want to generate a file using the Mason CLI, navigate to the Mason directory and run the mason make command with the name of the brick. Remember that you can use the -o flag to specify a custom output directory.
To generate a new widget inside your lib/ directory, add the relative path ../lib as an output argument.
mason make widget -o ../lib
Remote bricks and BrickHub.dev
BrickHub.dev is an online storage for bricks. You can discover, publish, and install new Mason bricks on BrickHub.dev. You can interact with it using the Mason CLI.
To discover new bricks, use the mason search command. For example, if you want to search for bricks related to state management, you should use a Mason CLI command that looks like this.
mason search state
This will return a list of relevant bricks in your terminal.
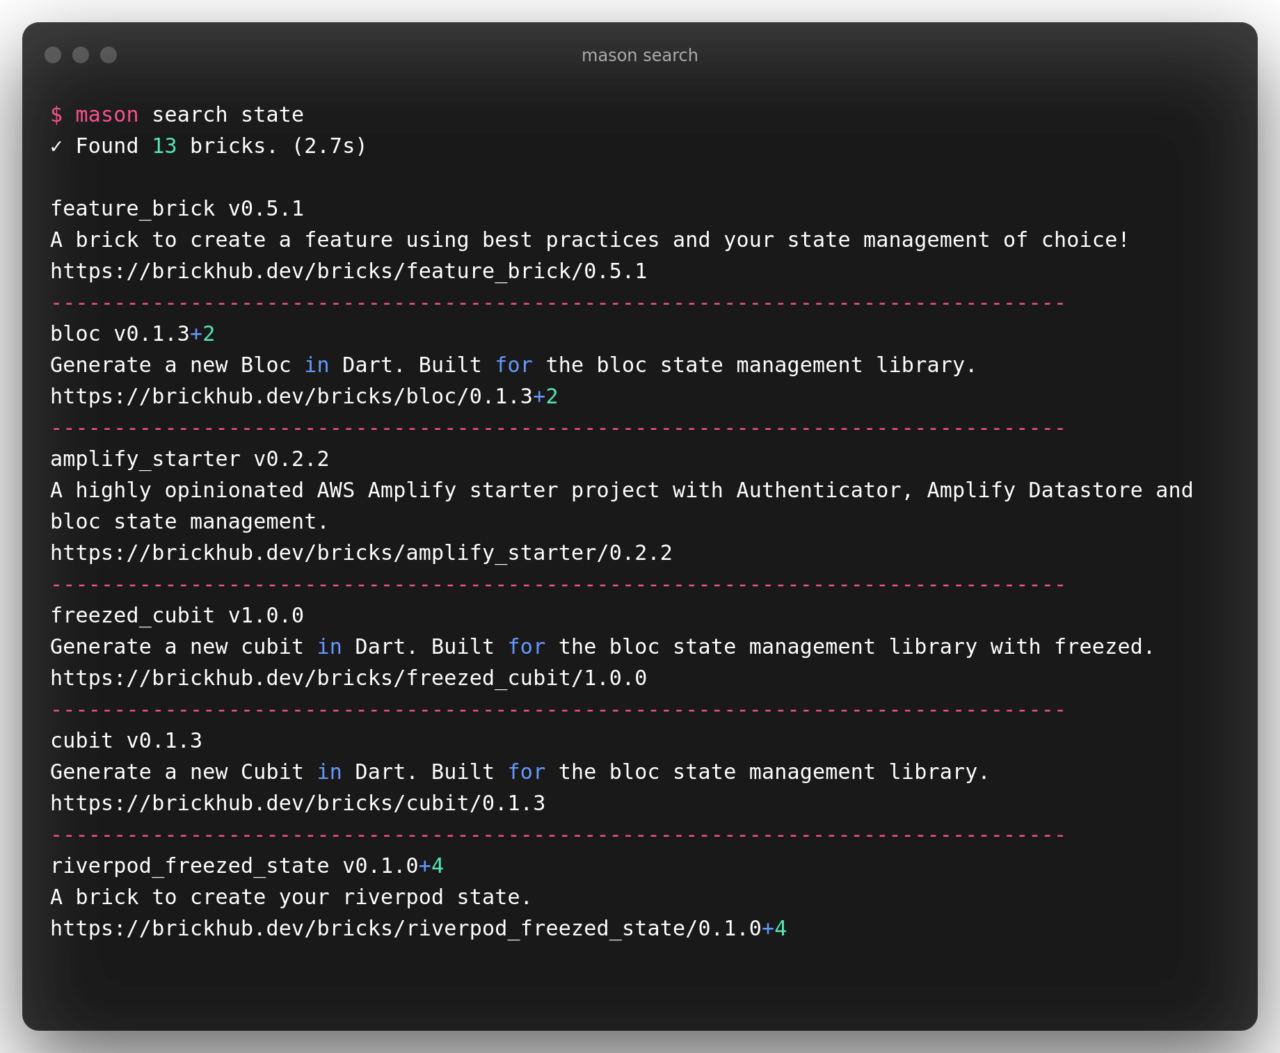
Now choose one of the bricks from this list. I am choosing bloc as an example. Then install the bloc brick from BrickHub using the mason add command.
mason add bloc
Now you can use the mason make command to generate files using the bloc brick in your project.
To remove a brick, use the mason remove <brickname> command in your project.

Build your app with Codemagic CI/CD
As you use bricks to standardize your Flutter app development process, you can use Codemagic to automate and standardize your app testing and building processes. Codemagic provides you with a very easy-to-use visual editor to configure your build. It also offers direct automatic deployment of your application to the Apple App Store and Google Play Store. Check out the official documentation on how to build a Flutter app using Codemagic.
In case you are not a Codemagic user yet, you can sign up here:

Conclusion
This Mason tutorial is targeted toward beginners, so I have made it as simple as possible. If you have followed it step by step, you have learned how to use Mason and bricks in your Flutter project.
Now you can extend your knowledge to make a test brick that contains a Flutter unit test template. If you have any questions, you can find me on Twitter as @hrishikshpathak.


