This article is written by Rudrank Riyam
This article has been updated in May, 2023 to include Mac Mini M2 information.
Apple Silicon processors have revolutionized the desktop and laptop CPU landscape. The transition from Intel’s x86_64 architecture to Apple’s arm64 was smooth for consumers thanks to the Rosetta 2 emulator. This emulator enables the translation of x86_64 instructions to arm64 with minimal performance degradation. Developers, however, also needed to rely on the emulation because when the new architecture was first released at the end of 2020, most developer tools and libraries did not support the arm64 architecture. Consequently, this lead to inconsistent performance or even crashes in certain situations.
With the Apple Silicon chips in the market for nearly three years, now is an ideal time to consider migrating your project to the arm64 architecture if you haven’t already. In contrast to the situation at the end of 2020 or even last year, the majority of dependencies and tools have since adopted support for the new architecture. As a result, you can expect a smoother and more seamless transition during the migration process, free from significant obstacles!
Moreover, it’s worth noting that your preferred CI/CD provider, Codemagic, has launched the Mac mini M2 build machines for public use! Several of our customers have already tested these powerful build machines equipped with the latest efficient chips and are experiencing significantly faster build times.
So, let’s dive into the Intel to Apple Silicon M1/M2 migration: transitioning the CI/CD workflow for your project from the good old x86_64 to the shiny new arm64.
This article covers the following topics:
- Requirements
- Working with the new architecture
- Updating third-party dependencies
- Build times for Mac mini M2, Mac mini M1 and Mac Pro
So let’s get started!
Requirements for migrating to Apple Silicon M1 & M2
At the time of writing in May 2023, to migrate your workflows to the new Apple Silicon virtual machine on Codemagic, you must use Xcode 13.3+ because the base image of the macOS M1 build machine has it preinstalled. Xcode 14.3 is the latest version and is used by default when you set 14.3 or when you set edge, or latest in your codemagic.yaml file or select it in the build settings in the Workflow Editor for Flutter apps.
When Apple announced its custom silicon in 2020, it began a two-year transition to the new architecture. Developers could take advantage of the Developer Transition Kit (DTK) to test, update, and transition their apps to Apple silicon.
In the beginning, developers used Rosetta emulation to use apps built for a Mac with an Intel processor. Many CocoaPods dependencies and Swift packages were incompatible with the arm64 architecture in the initial months. As developers started transitioning and getting the latest M1 and M1 Pro/Max/Ultra series devices, they requested open-source projects and various SDKs to support the arm64 architecture.
With the transition completed last year, numerous popular open-source projects, like Alamofire, Kingfisher, and the Firebase SDK, have added support for the Apple Silicon machines. Now, you no longer need to use Rosetta emulation in the majority of cases and can take advantage of the raw processing power of Apple’s efficient chips.
Working with the New Architecture
While the architecture of the iPhone is already arm64, Intel used x86_64 simulators. With the new M1 series devices, the simulators also run on the arm64 architecture.
Apple has provided a detailed article for resolving architecture build errors on Apple Silicon
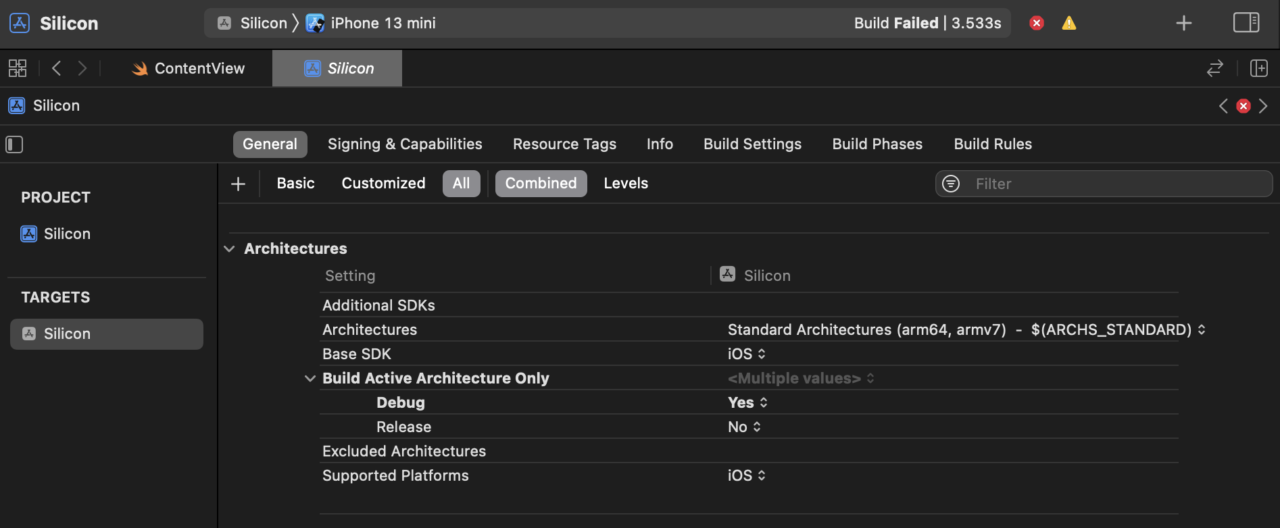
Xcode already provides the default architecture build settings that help you build and ship on all the platforms. One of the settings is Build Active Architectures Only, a boolean value with the default value of Yes for Debug and No for Release configurations. Xcode automatically builds for the selected architecture if the value is set to Yes. So, if you are using an Apple Silicon machine, it builds for the arm64 simulator, and if you are working with an Intel machine, it builds for the x86_64 simulator.
While your device and simulator may have different architectures, especially when using an Intel machine, you only want Xcode to build for one or the other.
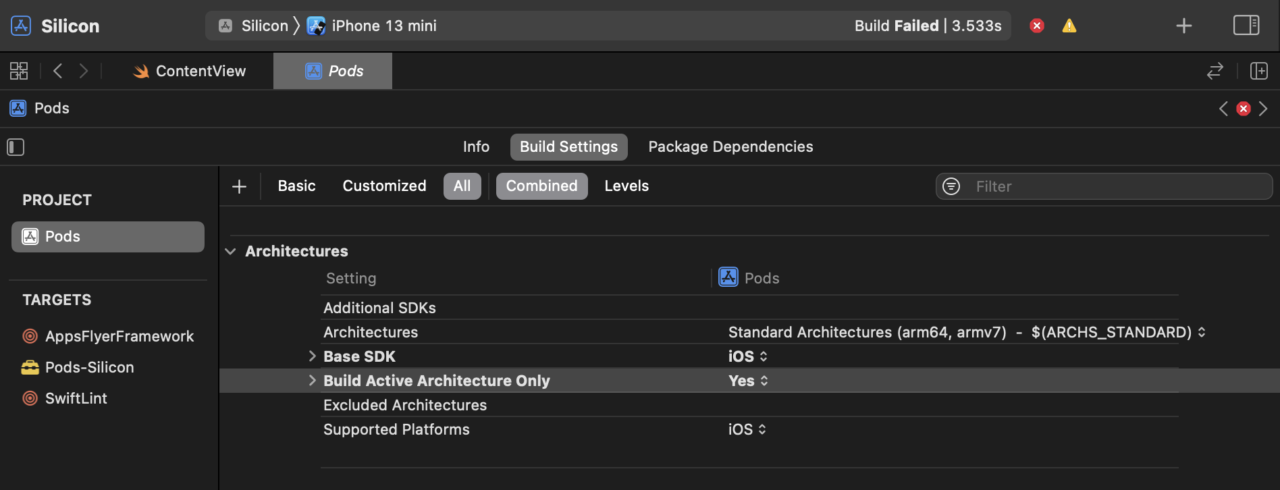
Go to your project, select your target, and select Build Settings. Under the Architectures section, set Build Active Architecture Only to YES for debug builds. This ensures that the compiler generates the binary for only one architecture.

Do the same for the Pods as well:

If you set it to NO, Xcode will build the project for all the valid architectures. However, you may see an error that looks something like this:
Could not find module 'ColorKit' for target 'x86_64-apple-ios-simulator'; found:
arm64-apple-ios-simulator, at: /Users/rudrankriyam/Library/Developer/Xcode/DerivedData/Musadora-ccjzyuildzfnokedenrcjqixspxo/Build/Products/Debug-iphonesimulator/ColorKit.swiftmodule
Setting Build Active Architecture in Xcode to YES also reduces the build time drastically, as you are compiling for one architecture instead of two. This is a win-win situation for you!
Updating third-party dependencies
Your project may use CocoaPods, Carthage, and/or Swift Package Manager to manage third-party dependencies.
It’s simple to manage CocoaPods if you use Homebrew on an Apple Silicon Mac:
brew install cocoapods
If you use Carthage, the best solution is to use XCFrameworks. This helps to build only the valid architectures that you need to build the app:
carthage update --use-xcframeworks
You might need to update your pods or packages to the latest version. This increases the likelihood of getting support for a universal binary (which contains executable code for both x86_64 and arm64 architectures) so that you can easily migrate from an Intel machine to an Apple silicon machine without any hiccups.
In this post, we use a sample project with a combination of third-party dependencies. We use both CocoaPods and Swift Package Manager.
The project’s dependencies as Swift packages are:
- Kingfisher
- Swinject
- Alamofire
The project’s dependencies as Pods are:
- SwiftLint
- AppsFlyerFramework
The initial project has an old version of a framework to showcase the error that occurs when an XCFramework does not support the arm64 architecture.
pod 'AppsFlyerFramework', '6.2.0'
We can’t build a universal binary ourselves, as we don’t have the source code. If you run the project, you get an error similar to the following:
ld: in /Users/rudrankriyam/Downloads/Silicon/Pods/AppsFlyerFramework/iOS/AppsFlyerLib.framework/AppsFlyerLib(AFSDKKeychainFactory.o),
building for iOS Simulator, but linking in object file built for iOS,
file '/Users/rudrankriyam/Downloads/Silicon/Pods/AppsFlyerFramework/iOS/AppsFlyerLib.framework/AppsFlyerLib'
for architecture arm64
You need the arm64 architecture to run the project in the simulator. But this version of the framework doesn’t support it.
To fix this issue, search the framework’s repository and check if they have released a version that adds support for arm64. As mentioned earlier, many priority frameworks and open-source projects have provided support for running on the latest silicon chips. Fortunately, arm64 support was added for this framework in version 6.3.0, and we can update the Podfile to fetch the latest version.
pod 'AppsFlyerFramework'
After you enter the command pod update, you can run the project successfully on the Apple Silicon and Intel machines.
If some dependency does not yet support arm64, you can ask the framework’s author to provide a newer updated version that supports both architectures. Taking the previous example of an iOS SDK that transitioned to support arm64 by providing a universal XCFramework, the AppsFlyer iOS SDK released arm64 support in April of last year after developers requested it.
Despite many dependencies providing quick support, the framework you are using may be outdated. It may also be a proprietary framework that doesn’t give you access to the source code. Suppose you don’t see any updates for these frameworks/packages in the foreseeable future. In that case, you can have a look at this article on “Hacking native ARM64 binaries to run on the iOS Simulator”. As the name suggests, it’s a hack to get things working, and we only recommend using this extreme workaround as a last resort.
Build times for Mac mini M2, Mac mini M1 and Intel Mac Pro
You can take inspiration from open-source projects that have been successfully migrated and work on the new chips. Take a look at a few examples of such projects here.
To appreciate the build time differences between the Apple Silicon and Intel machines and gain a clearer understanding of the enhanced efficiency and speed offered by the Mac mini M2 and Mac mini M1, we conducted tests on the official Wikipedia iOS app. This experiment presents you with a real-world scenario involving hundreds of tests. As an open-source app, you are welcome to explore it yourself.
| Test name | Mac mini M2 | Mac mini M1 | Mac Pro |
|---|---|---|---|
| Installing scripts | 7s | 11s | 17s |
| Building project | 81s | 115s | 188s |
| Running tests | 139s | 219s | 345s |
| Overall | 310s | 428s | 716s |
You can see the significant differences in the numbers, especially while running tests — they execute much more quickly on the Apple Silicon build machines. We observe a reduction of 35–40% in overall build times when comparing the Mac mini M2 to Intel Mac Pro. This gap accumulates when executing numerous builds, which you may do on a daily basis, ultimately saving a significant amount of time and providing a faster iteration process.
Conclusion
Apple Silicon chips represent the future of Mac hardware, and the outlook only continues to improve. With popular open-source frameworks and SDKs now supporting these new chips, the transition process has become considerably smoother compared to what it was two years ago.
Reminder: Mac mini M1 build machines are already available on Codemagic as the default machine type. In order to try out the new Mac mini M2, contact our customer engineering team. Get on the Apple Silicon machines for faster green builds! 🟢


