


With the increase in malware attacks on devices, engineers are putting more effort into ensuring the products they build are not vulnerable to these attacks. One such tool that can help mobile engineers reduce vulnerabilities is Mobile Security Framework (MobSF).
This article will explain some blunders that make mobile applications vulnerable to malware attacks. It will also highlight some cybersecurity-related terms, like pen testing, malware analysis, and static and dynamic analysis. Additionally, it will discuss what MobSF is. As a demonstration, we will build a sample application in Jetpack Compose and set up mobsfscan to perform a static analysis on the project. Finally, we will set up Codemagic to run this static analysis tool for each build triggered.
This article is written by Jahswill Essien
Android security
Since this article is about a security tool, it makes sense to talk about the Android OS security system.
Android operating system
Android is a mobile operating system based on a modified version of the Linux kernel. Some Android security features include the following:
The kernel is the core of the operating system that handles all processes and has control over everything in the system.
Application sandbox: Android utilizes the user-based protection feature of the Linux-based system to isolate apps from each other, thereby protecting both the system and other applications from malicious apps. It does this by assigning a unique user ID (UID) to apps installed on the device. This forbids an application from accessing other app data or system features without the necessary permissions.
App signing: App signing enables developers to identify the author of an app to determine whether the app can be trusted.
Frequent security patch updates: Constant effort is being made to fix vulnerabilities in the Android OS, hence the need to send security patch updates to devices.
You can find other Android OS security features here.
The security features mentioned above make it much harder to exploit Android OS directly. Therefore, the users of the devices become the primary focus of attack. Let’s explore this point in the next section.
End users
The reason why end users of devices are the primary targets of exploits is that users are the deciding factor of most operations performed on the system, meaning they are responsible for granting certain permissions to apps they install.
One of the ways users are being exploited is through social engineering, which is when hackers introduce malware using techniques like the following:
Any malicious attack that requires human interaction to take effect can be termed social engineering.
- Malware authors can reverse-engineer applications, add malware, build the app, and then upload the new app to app markets
- Users can be lured to download an app that seems interesting, not knowing it has been infected with malware that can exploit the system
As engineers, we are responsible for making sure the apps we build are secure. The next section discusses measures that can be taken to do so.
Application security
Users are responsible for giving consent to use apps that might impact another application. Therefore, developers have little to no control over data fed to apps by users, especially when it depends on the data users provide.
Engineers have to take specific measures to ensure that they secure their apps as much as possible. Some tips for achieving this are:
- Take steps to make reverse-engineering as difficult as possible by using Google’s ProGuard tool for code obfuscation.
- Ensure that API keys, passwords, and secret keys are not hard-coded.
- Limit the amount of dependency on other apps installed on the device.
- One of the major goals of an attacker is accessing and using data. Before discussing how to prevent data from being exploited, let’s talk about options for storing data on Android devices.
Internal Storage External Storage Content Providers This is a safe place to store sensitive data, as data stored here is exclusively visible to the corresponding application and is erased when the app is uninstalled. Data that isn’t sensitive can be stored globally on external storage. Care should be taken when reading this data back, as data can be altered by attackers and transformed into dynamically loaded malware. This provides a level of abstraction over stored data and can give you more control over what data to read or write. It’s a safe bet to share data with multiple apps under the same signature. - Sometimes, simple key-value data like user token needs to be saved using
SharedPreferences. It is recommended to useEncryptedSharedPreferencesto save sensitive key-value data.
Another way to ensure security is by using tools to perform certain vulnerability checks. The next section will discuss this in detail.
What is MobSF?
Mobile Security Framework (MobSF) is an automated all-in-one mobile application (Android, iOS, Windows) pen testing, malware analysis, and security assessment tool that’s capable of performing static and dynamic analyses. To fully understand what it does, let’s take a look at what these terms mean and why this tool is important.
Penetration testing
Pen testing (short for penetration testing) is when a company intentionally compromises an information system by exploiting its vulnerabilities and weaknesses.
Why perform a penetration test?
The sole aim of a penetration test is to expose weaknesses and vulnerabilities in systems so that developers can fix those loopholes to prevent hackers/attackers from gaining access to information or damaging vital parts of the system.
What is malware analysis?
Malware (malicious software) is software that is built with the malicious intent of inflicting damage, stealing data, or destroying a host system.
Malware analysis is examining a system for potential malware threats in the form of suspicious code, files, or URLs.
What is dynamic analysis?
When conducting a dynamic analysis, the system’s code has to be executed. The scan for malware is done by examining the system’s behavior at runtime to determine if there are strange behaviors or indicators of malicious activity.
What is static analysis?
Static analysis involves scanning source code or binary files for potential threats, malicious files, or vulnerabilities without executing the code. This kind of analysis can be done during development to catch vulnerabilities early. This article will focus on static analysis.
The subsequent sections demonstrate how to perform this kind of analysis on a sample project. We will intentionally leave some loopholes in our codebase, add a malware file, and then run the analysis. But first, let’s understand our codebase.
App walkthrough
Below is a screen recording depicting the application we are building. The name of the app is Tranxact. It is a simple app that displays crypto assets and exchanges. The app is built with Android native Jetpack Compose.

Prerequisites
This article assumes you have some knowledge of native Android development and consuming APIs using Retrofit.
To follow along, clone the project to your local machine by running git clone https://github.com/JasperEssien2/Tranxact_jetpack.git --branch starters-code.
Some files are intentionally left empty so that you can add the code yourself.
Some dependencies have already been added to make it easier for you to follow along.
implementation("io.arrow-kt:arrow-core:1.0.0")
implementation "com.squareup.retrofit2:retrofit:2.9.0"
implementation "com.squareup.retrofit2:converter-gson:2.9.0"
The project uses an API from CoinAPI.io, a platform that provides unified data APIs to cryptocurrency markets. You can get a free API key by visiting this link.
This project uses Retrofit for API integration.
The
/domain/folder contains theRepository.ktfile, which is the repository contract.package com.crypto.tranxact.domain import arrow.core.Either import com.crypto.tranxact.data.models.Asset import com.crypto.tranxact.data.models.Exchange interface Repository { suspend fun assets() : Either<String, List<Asset>> suspend fun exchanges() : Either<String, List<Exchange>> }The
/data/folder contains related data, including a subfolder namedmodelsthat contains data classes.package com.crypto.tranxact.data.models import com.google.gson.annotations.SerializedName data class Asset( @SerializedName("asset_id") val id: String, @SerializedName("name") val name: String, @SerializedName("price_usd") val priceUSD: Double, @SerializedName("type_is_crypto") val isCrypto: Int, )Asset data class
package com.crypto.tranxact.data.models

import com.google.gson.annotations.SerializedName

data class Exchange(
    @SerializedName("exchange_id") val id: String,
    @SerializedName("name") val name: String,
)
Exchange data class
It also contains
RetrofitService.kt, which is an interface contract for Retrofit, accompanied by a static methodinstance()that creates a Retrofit client.package com.crypto.tranxact.data import com.crypto.tranxact.data.models.Asset import com.crypto.tranxact.data.models.Exchange import okhttp3.OkHttpClient import retrofit2.Response import retrofit2.Retrofit import retrofit2.converter.gson.GsonConverterFactory import retrofit2.http.GET interface RetrofitService { @GET("v1/assets") suspend fun assets(): Response<List<Asset>> @GET("v1/exchanges") suspend fun exchanges(): Response<List<Exchange>> companion object { var retrofitService: RetrofitService? = null fun instance(): RetrofitService { if (retrofitService == null) { val apiKey = "INSERT API KEY" val httpClient = OkHttpClient.Builder() .addInterceptor { chain -> val request = chain.request().newBuilder() .addHeader("X-CoinAPI-Key", apiKey) chain.proceed(request.build()) } .build() val retrofit = Retrofit.Builder().baseUrl("https://rest.coinapi.io/") .client(httpClient) .addConverterFactory(GsonConverterFactory.create()) .build() retrofitService = retrofit.create(RetrofitService::class.java) } return retrofitService!! } } }Make sure to insert your free CoinAPI.io key in the variable named
apiKey.It is not a good practice to hard-code secret keys, API keys, etc. But in this case, they are intentionally hard-coded.
RepositoryImpl.ktimplements the contract and depends on theRepositoryServiceto handle API requests and errors.
First, let’s create a class that accepts our
RetrofitServiceas a constructor parameter and extends ourRepositorycontract.package com.crypto.tranxact.data import arrow.core.Either import com.crypto.tranxact.data.models.Asset import com.crypto.tranxact.data.models.Exchange import com.crypto.tranxact.domain.Repository import java.lang.Exception class RepositoryImpl constructor(private val retrofitService: RetrofitService) : Repository { }Next, create a
suspendmethod namedassets()that is responsible for fetching crypto asset data.override suspend fun assets(): Either<String, List<Asset>> { return try { val response = retrofitService.assets() if (response.isSuccessful) { Either.Right(response.body() ?: listOf()) } else { Either.Left("An error occurred fetching assets") } } catch (_: Exception) { Either.Left("An error occurred fetching assets") } }Add another
suspendmethod namedexchanges(), which is responsible for fetching crypto exchanges.override suspend fun exchanges(): Either<String, List<Exchange>> { return try { val response = retrofitService.exchanges() if (response.isSuccessful) { Either.Right(response.body() ?: listOf()) } else { Either.Left("An error occurred fetching exchanges") } } catch (e: Exception) { Either.Left("An error occurred fetching exchanges") } }Also, add a
companion objectfield that creates an instance ofRepositoryImpl.companion object { val instance = RepositoryImpl(RetrofitService.instance()) }Our viewmodel is housed in the
/MainViewModel.ktfile. It depends on our repository contract and utilizes the Kotlin coroutineStateFlowto update the UI state.StateFlowis a state holder that emits current and new state updates to its collector. The collector here is a subscriber that is listening to state changes.Below is the data class that holds the state.
data class UIState<T>(
    val isLoading: Boolean = false,
    val error: String? = null,
    val data: T? = null
)
Create a
MainViewModelclass that extendsViewModeland depends on ourRepositorycontract.package com.crypto.tranxact import androidx.lifecycle.ViewModel import androidx.lifecycle.ViewModelProvider import androidx.lifecycle.viewModelScope import com.crypto.tranxact.data.RepositoryImpl import com.crypto.tranxact.data.models.Asset import com.crypto.tranxact.data.models.Exchange import com.crypto.tranxact.domain.Repository import kotlinx.coroutines.flow.MutableStateFlow import kotlinx.coroutines.flow.asStateFlow import kotlinx.coroutines.launch class MainViewModel constructor(private val repository: Repository) : ViewModel() { }Next, we’ll initialize four fields.
    // MutableStateFlow allows us to set a value or state
    private val _assetStateFlow = MutableStateFlow(UIState<List<Asset>>())

    // This line converts our MutableStateFlow to a StateFlow to be listened to and consumed by our UI
    val assetStateFlow = _assetStateFlow.asStateFlow()

     // MutableStateFlow allows us to set a value or state
    private val _exchangeStateFlow = MutableStateFlow(UIState<List<Exchange>>())

     // This line converts our MutableStateFlow to a StateFlow to be listened to and consumed by our UI
    val exchangeStateFlow = _exchangeStateFlow.asStateFlow()
Insert a method named
getAssets(). Its job is to emit a new state in response to the request to fetch asset data.fun getAssets() { // We can only call a `suspend` function in another `suspend` function or from a coroutine // As such, we launch a new coroutine from a viewModelScope by calling viewModelScope.launch{} viewModelScope.launch { // We emit a new state and set isLoading to true // Note how we are modifying the state using the MutableStateFlow field _assetStateFlow.emit(UIState(isLoading = true)) // make the request to fetch assets val res = repository.assets() res.bimap( { // when request fails, emit a new state with loading set to false and error set _assetStateFlow.emit(UIState(isLoading = false, error = it)) }, { // when request succeeds, emit a new state with loading set to false and data set _assetStateFlow.emit(UIState(isLoading = false, data = it)) }, ) } }We also have to create a suspend method for getting exchanges.
fun getExchanges() {
     // We can only call a `suspend` function in another `suspend` function or from a coroutine
    // As such, we launch a new coroutine from a viewModelScope by calling viewModelScope.launch{}
    viewModelScope.launch {
        // We emit a new state and set isLoading to true,
        // Note how we are modifying the state using the MutableStateFlow field
        _exchangeStateFlow.emit(UIState(isLoading = true))

          // make the request to fetch exchanges
        val res = repository.exchanges()

        res.bimap(
            {
                 // when request fails, emit a new state with loading set to false and error set
                _exchangeStateFlow.emit(UIState(isLoading = false, error = it))
            },
            {
                 // when request succeeds, emit a new state with loading set to false and data set
                _exchangeStateFlow.emit(UIState(isLoading = false, data = it))
            },
        )
    }
}
To learn about scopes in Kotlin, visit the documentation.
Then create a
ViewModelFactoryclass.class ViewModelFactory: ViewModelProvider.Factory{ override fun <T : ViewModel?> create(modelClass: Class<T>): T { if(modelClass.isAssignableFrom(MainViewModel::class.java)){ return MainViewModel(RepositoryImpl.instance) as T } throw IllegalArgumentException("Unknown ViewModel class") } }The UI code is contained in the
/MainActivity.ktfile. Start by replacing the content with the code below.
package com.crypto.tranxact

import android.os.Bundle
import androidx.activity.ComponentActivity
import androidx.activity.compose.setContent
import androidx.activity.viewModels
import androidx.compose.foundation.layout.*
import androidx.compose.foundation.lazy.LazyColumn
import androidx.compose.foundation.lazy.LazyRow
import androidx.compose.foundation.lazy.items
import androidx.compose.foundation.shape.RoundedCornerShape
import androidx.compose.material.*
import androidx.compose.runtime.Composable
import androidx.compose.runtime.collectAsState
import androidx.compose.ui.Alignment
import androidx.compose.ui.Modifier
import androidx.compose.ui.graphics.Color
import androidx.compose.ui.text.font.FontWeight
import androidx.compose.ui.text.style.TextAlign
import androidx.compose.ui.unit.*
import com.crypto.tranxact.data.models.Asset
import com.crypto.tranxact.data.models.Exchange
import com.crypto.tranxact.ui.theme.Purple50
import com.crypto.tranxact.ui.theme.TranxactTheme

class MainActivity : ComponentActivity() {

    // Initilise our viewmodel utilising the ViewModelFactory class
    private val viewModel by viewModels<MainViewModel>(factoryProducer = ::ViewModelFactory)

    override fun onCreate(savedInstanceState: Bundle?) {
        super.onCreate(savedInstanceState)

        // Make request to get assets and exchanges
        viewModel.getAssets()
        viewModel.getExchanges()

        setContent {
            TranxactTheme {

                // A surface container using the 'background' color from the theme
                Surface(color = MaterialTheme.colors.background) {
                    MyApp(viewModel)
                }
            }
        }
    }

}
MyApp is a composable function that has not been created yet, so we will create it below.
@Composable
fun MyApp(viewModel: MainViewModel) {

    Scaffold(
        topBar = {
            TopAppBar(
                title = {
                    Text("Tranxact", textAlign = TextAlign.Center)
                },

                modifier = Modifier
                    .wrapContentSize(align = Alignment.Center),

                elevation = 8.dp
            )
        },
        content = {

            Column(
                horizontalAlignment = Alignment.Start,
                verticalArrangement = Arrangement.Top,
                modifier = Modifier.fillMaxSize(),
            ) {
                AssetList(viewModel.assetStateFlow.collectAsState().value)
                ExchangeList(viewModel.exchangeStateFlow.collectAsState().value)
            }
        },
    )
}
Notice how we utilize StateFlow in the code above? Whenever there is a state change, the composable widget is rebuilt.
AssetList(viewModel.assetStateFlow.collectAsState().value)
ExchangeList(viewModel.exchangeStateFlow.collectAsState().value)
AssetList and ExchangeList have not been created yet. We’ll do that, but first, let’s created a reusable composable function named CaptionCompose.
@Composable
fun <T> CaptionCompose(
    caption: String,
    content: @Composable (data: T) -> Unit,
    fraction: Float,
    uiState: UIState<T>,
) {

    Column(
        horizontalAlignment = Alignment.Start, verticalArrangement = Arrangement.Top,
        modifier = Modifier
            .fillMaxHeight(fraction = fraction),
    ) {
        Text(

            text = caption,
            fontWeight = FontWeight.SemiBold,
            fontSize = 20.sp,
            modifier = Modifier
                .padding(horizontal = 16.dp, vertical = 4.dp),
        )

        // We use the when keyword to handle different UI states
        // This is the Kotlin equivalent to a switch statement
        when {
            _hasData(uiState) -> content(uiState.data!!)
            _hasError(uiState) -> Box(
                contentAlignment = Alignment.Center,
                modifier = Modifier.fillMaxSize()
            ) {
                Text(text = uiState.error!!)
            }
            uiState.isLoading -> Box(
                contentAlignment = Alignment.Center,
                modifier = Modifier.fillMaxSize()
            ) {
                CircularProgressIndicator()
            }
        }
    }

}

@Composable
private fun <T> _hasError(uiState: UIState<T>) =
    uiState.error != null && !uiState.isLoading

@Composable
private fun <T>_hasData(uiState: UIState<T>) =
    uiState.data != null && !uiState.isLoading
The code for the AssetList is shown below:
@Composable
fun AssetList(uiState: UIState<List<Asset>>) {
    CaptionCompose(
        caption = "Assets",
        content = { assets ->
            LazyColumn {

                items(assets) { asset ->
                    ItemAsset(asset = asset)
                }

            }
        },
        uiState = uiState,
        fraction = 0.75f,
    )

}

@Composable
fun ItemAsset(asset: Asset) {

    Row(
        horizontalArrangement = Arrangement.SpaceBetween,
        verticalAlignment = Alignment.CenterVertically,
        modifier = Modifier
            .padding(horizontal = 16.dp, vertical = 8.dp)
            .fillMaxWidth(),
    ) {
        Column(horizontalAlignment = Alignment.Start) {
            Text(
                text = asset.id,
                fontSize = 16.sp,
                fontWeight = FontWeight.SemiBold,
            )
            Spacer(modifier = Modifier.padding(all = 2.dp))
            Text(
                text = asset.name, fontSize = 14.sp, color = Color(0xff525252)
            )
        }

        Text(text = "$ ${String.format("%.2f", asset.priceUSD)}", fontSize = 13.sp)
    }
}
Here is the code for the ExchangeList:
@Composable
fun ExchangeList(uiState: UIState<List<Exchange>>) {

    CaptionCompose(
        caption = "Exchanges",
        content = { exchanges ->
            LazyRow(contentPadding = PaddingValues(horizontal = 16.dp)) {

                items(exchanges) { exchange ->
                    ItemExchange(exchange = exchange)
                }

            }
        },
        uiState = uiState,
        fraction = 1f,
    )
}

@Composable
fun ItemExchange(exchange: Exchange) {

    Card(
        shape = RoundedCornerShape(size = 40f),
        backgroundColor = Purple50,
        modifier = Modifier
            .width(110.dp)
            .height(110.dp)
            .padding(all = 4.dp)


    ) {
        Column(
            horizontalAlignment = Alignment.Start,
            verticalArrangement = Arrangement.Center,
            modifier = Modifier.padding(all = 8.dp),
        ) {
            Text(
                text = exchange.id,
                fontSize = 20.sp,
            )

            Text(
                text = exchange.name, fontSize = 13.sp, color = Color(0xff444444)
            )
        }
    }
}
You’ll likely agree that building our UI with Jetpack Compose is an awesome experience compared with using XML. It enables you to develop the UI faster and with more readable and concise code.
In the next section, we’ll see how to set up mobsfscan to perform a static analysis for potential vulnerabilities.
Using the mobsfscan command line
This section assumes you have Python 3.6+ installed on your computer. If you don’t, follow this link.
To install the mobsfscan tool, run the command below in your terminal.
pip install mobsfscan
To perform a scan on an existing project, run mobsfscan . on the root project. You should see a format like this in your terminal.
mobsfscan: v0.1.0 | Ajin Abraham | opensecurity.in
╒══════════════╤════════════════════════════════════════════════════════════════════════════════════════════════════════════════╕
│ RULE ID      │ android_kotlin_hardcoded                                                                                       │
├──────────────┼────────────────────────────────────────────────────────────────────────────────────────────────────────────────┤
│ MASVS        │ MSTG-STORAGE-14                                                                                                │
├──────────────┼────────────────────────────────────────────────────────────────────────────────────────────────────────────────┤
│ CWE          │ CWE-798: Use of Hard-coded Credentials                                                                         │
├──────────────┼────────────────────────────────────────────────────────────────────────────────────────────────────────────────┤
│ OWASP-MOBILE │ M9: Reverse Engineering                                                                                        │
├──────────────┼────────────────────────────────────────────────────────────────────────────────────────────────────────────────┤
│ REFERENCE    │ https://github.com/MobSF/owasp-mstg/blob/master/Document/0x05d-Testing-Data-Storage.md#storing-a-key---example │
├──────────────┼────────────────────────────────────────────────────────────────────────────────────────────────────────────────┤
│ DESCRIPTION  │ Files may contain hardcoded sensitive information like usernames, passwords, keys, etc.                         │
├──────────────┼────────────────────────────────────────────────────────────────────────────────────────────────────────────────┤
│ SEVERITY     │ WARNING                                                                                                        │
├──────────────┼────────────────────────────────────────────────────────────────────────────────────────────────────────────────┤
│ FILES        │ ╒════════════════╤═══════════════════════════════════════════════════════════════╕                             │
│              │ │ File           │ app/src/main/java/com/crypto/tranxact/data/RetrofitService.kt │                             │
│              │ ├────────────────┼───────────────────────────────────────────────────────────────┤                             │
│              │ │ Match Position │ 655 - 682                                                     │                             │
│              │ ├────────────────┼───────────────────────────────────────────────────────────────┤                             │
│              │ │ Line Number(s) │ 27: 29                                                        │                             │
│              │ ├────────────────┼───────────────────────────────────────────────────────────────┤                             │
│              │ │ Match String   │ key = "XXXXXXXXXXXXXXXX"                                        │                             │
│              │ ╘════════════════╧═══════════════════════════════════════════════════════════════╛                             │
╘══════════════╧════════════════════════════════════════════════════════════════════════════════════════════════════════════════╛
╒══════════════╤══════════════════════════════════════════════════════════════════════════════════════════════════════════════════════════════════════════════════════════════════════════╕
│ RULE ID      │ android_ssl_pinning                                                                                                                                                      │
├──────────────┼──────────────────────────────────────────────────────────────────────────────────────────────────────────────────────────────────────────────────────────────────────────┤
│ CWE          │ CWE-295: Improper Certificate Validation                                                                                                                                 │
├──────────────┼──────────────────────────────────────────────────────────────────────────────────────────────────────────────────────────────────────────────────────────────────────────┤
│ OWASP-MOBILE │ M3: Insecure Communication                                                                                                                                               │
├──────────────┼──────────────────────────────────────────────────────────────────────────────────────────────────────────────────────────────────────────────────────────────────────────┤
│ MASVS        │ MSTG-NETWORK-4                                                                                                                                                           │
├──────────────┼──────────────────────────────────────────────────────────────────────────────────────────────────────────────────────────────────────────────────────────────────────────┤
│ REFERENCE    │ https://github.com/MobSF/owasp-mstg/blob/master/Document/0x05g-Testing-Network-Communication.md#testing-custom-certificate-stores-and-certificate-pinning-mstg-network-4 │
├──────────────┼──────────────────────────────────────────────────────────────────────────────────────────────────────────────────────────────────────────────────────────────────────────┤
│ DESCRIPTION  │ This app does not use TLS/SSL certificate or public key pinning to detect or prevent MITM attacks in secure communication channel.                                       │
├──────────────┼──────────────────────────────────────────────────────────────────────────────────────────────────────────────────────────────────────────────────────────────────────────┤
│ SEVERITY     │ INFO                                                                                                                                                                     │
├──────────────┼──────────────────────────────────────────────────────────────────────────────────────────────────────────────────────────────────────────────────────────────────────────┤
│ FILES        │ ╒════════════════╤═══════════════════════════════════════════════════════════════╕                                                                                       │
│              │ │ File           │ app/src/main/java/com/crypto/tranxact/data/RetrofitService.kt │                                                                                       │
│              │ ├────────────────┼───────────────────────────────────────────────────────────────┤                                                                                       │
│              │ │ Match Position │ 1051 - 1068                                                   │                                                                                       │
│              │ ├────────────────┼───────────────────────────────────────────────────────────────┤                                                                                       │
│              │ │ Line Number(s) │ 37                                                            │                                                                                       │
│              │ ├────────────────┼───────────────────────────────────────────────────────────────┤                                                                                       │
│              │ │ Match String   │ Retrofit.Builder(                                             │                                                                                       │
│              │ ├────────────────┼───────────────────────────────────────────────────────────────┤                                                                                       │
│              │ │ File           │ app/src/main/java/com/crypto/tranxact/data/RetrofitService.kt │                                                                                       │
│              │ ├────────────────┼───────────────────────────────────────────────────────────────┤                                                                                       │
│              │ │ Match Position │ 1069 - 1078                                                   │                                                                                       │
│              │ ├────────────────┼───────────────────────────────────────────────────────────────┤                                                                                       │
│              │ │ Line Number(s) │ 37                                                            │                                                                                       │
│              │ ├────────────────┼───────────────────────────────────────────────────────────────┤                                                                                       │
│              │ │ Match String   │ .baseUrl(                                                     │                                                                                       │
│              │ ╘════════════════╧═══════════════════════════════════════════════════════════════╛                                                                                       │
╘══════════════╧═══════════════════════════════════════════════════════════════════════════════════════════════════════════════════════════════════════════════════════════════
Let’s dissect the above report.
MASVS — stands for Mobile Application Security Verification Standard. This row indicates what security standards for mobile apps the project was compared against.
CWE — stands for Common Weakness Enumeration. This row shows the weakness that was found.
OWASP-MOBILE — Open Web Application Security Project is an open-source software project that aims to improve the security of software. This row specifies the vulnerability according to the standards set by OWASP.
DESCRIPTION — gives more info as to why something was flagged as a vulnerability.
SEVERITY — indicates the severity of the blunder. It can be
INFO,WARNING, orERROR.FILES — points to the offending line of code and file.
The mobsfscan reporting tool is also flexible:
You can choose to get the report in JSON or HTML format by appending
--jsonor--htmlto the command.You can save the report in a file by appending -o [filename].
You can configure reporting to ignore certain rules or files by providing a
.mobsffile, inserting it in the root of the project, and specifying configurations.- To ignore certain files, use
ignore-filenames: - file_to_ignore.kt - To ignore certain directories, use:
ignore-paths: - path - To ignore certain rules, use:
ignore-rules: - rule-to-ignore - To filter what vulnerability security to include, use:
severity-filter:
-WARNING
- To ignore certain files, use
Take a look at the mobsfscan README to see what rules can be ignored.
At this point, we can set up the mobsfscan tool to scan the project for vulnerabilities by running the command. While that is good, it is not efficient enough to run it manually. Luckily, mobsfscan allows us to integrate it with our continuous integration/continuous delivery (CI/CD) system. The next section will explain how.

Set up mobsfscan with CI/CD (Codemagic)
This section focuses on setting up continuous integration/delivery to run a static analysis for each build triggered. We will be using Codemagic as our CI/CD tool.
What is Codemagic?
Codemagic is a mobile-focused tool that can help you automatically build your apps and publish them to various services, like Google Play Store, App Store, and Firebase App Distribution. They support the Android native codebase.
Set up Codemagic on the codebase
Log in or create an account if you don’t have one by visiting Codemagic
Click on the Add Application button
Select a Git provider (in this case, GitHub)
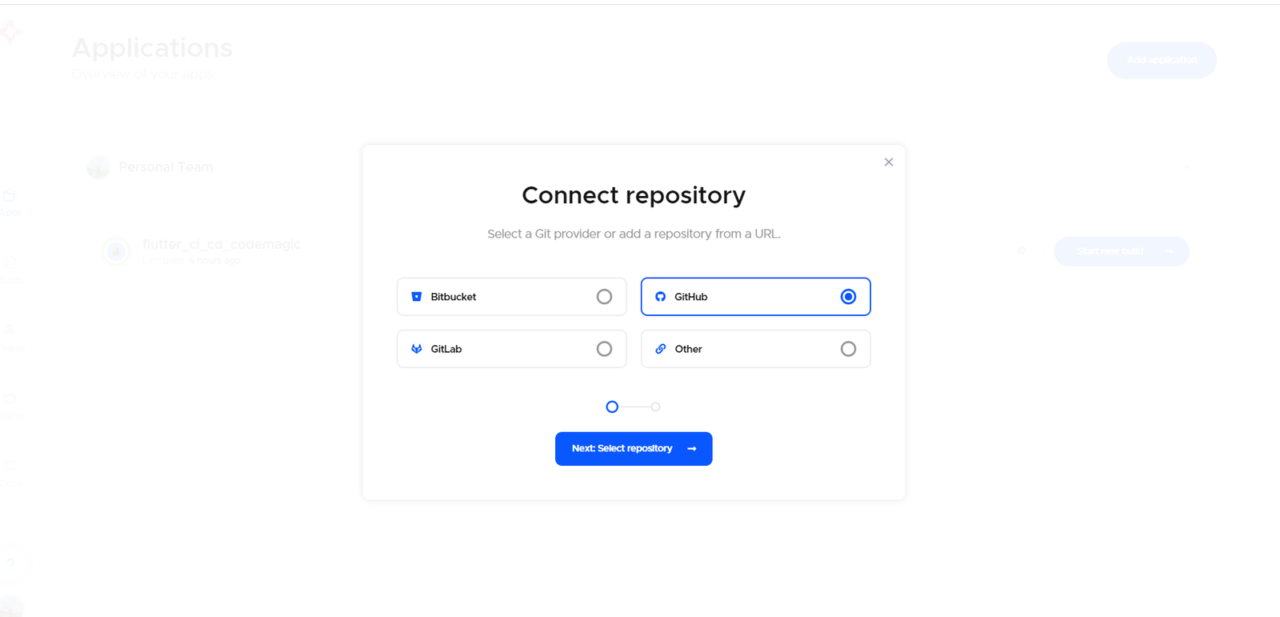
Select the repository you want to use, and then select the project type (in this case, “Android App”)
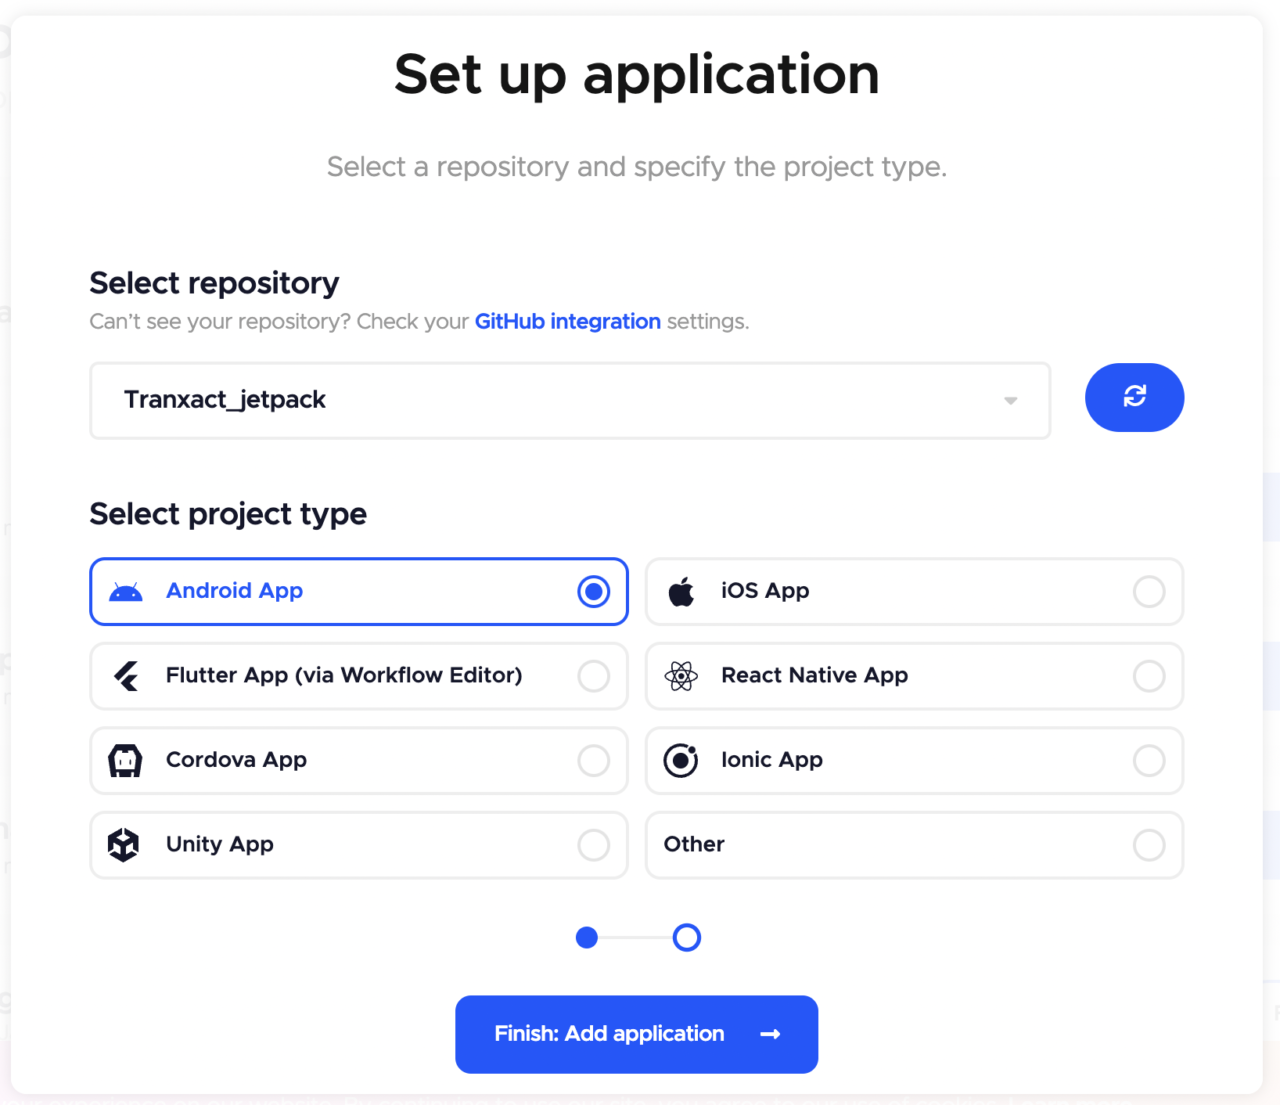
Click on Finish: Add application to complete the setup
You should see a “No configuration file found” screen
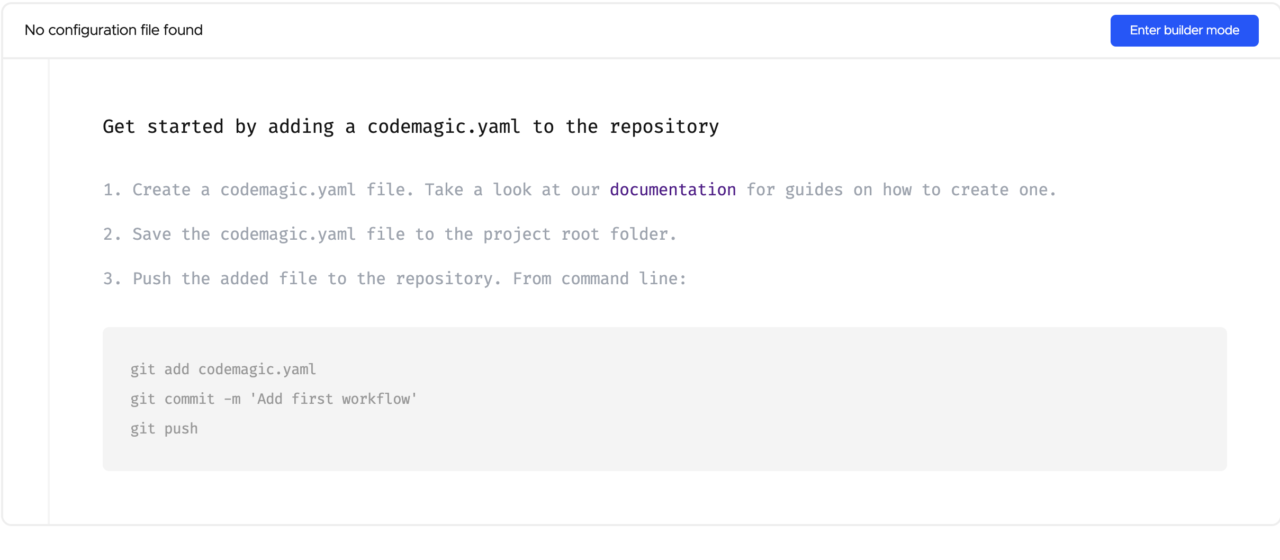
Let’s proceed to the configuration by creating a
codemagic.yamlfile with the following code and adding the file to the root of the codebaseworkflows: android-workflow: name: Android Workflow max_build_duration: 60 instance_type: mac_mini triggering: events: - push - tag - pull_request branch_patterns: - pattern: master include: true source: true scripts: # This is where the script to run mobsfscan is placed - name: Mobsfscan static analysis script: | pip3 install --upgrade mobsfscan mobsfscan . - name: Set up debug key.properties script: | keytool -genkeypair \ -alias androiddebugkey_ \ -keypass android \ -keystore ~/.android/debug.keystore \ -storepass android \ -dname 'CN=Android Debug,O=Android,C=US' \ -keyalg 'RSA' \ -keysize 2048 \ -validity 10000 artifacts: - app/build/outputs/**/**/*.apkMake sure to push your code to remote.
Click on Start new build to trigger Codemagic to start building.
We’ve successfully set up Codemagic for our Android project and ensured that a static analysis is run each time a build is triggered.
Conclusion
In a nutshell, we dived into understanding Android security, why users are the primary target of exploits, and how Android engineers can ensure they build secure applications.
We also introduced the mobsfscan tool, and we were able to set it up to run static analyses on the codebase. Finally, we set up CI/CD using Codemagic and ensured that the mobsfscan tool was set up to run a static analysis scan for every build.
When designing your system, keep in mind that all data that is stored can end up in the hands of attackers. Even permissions and protections can be voided if the Android device is rooted. Therefore, it’s wise to take every security measure to ensure your app and your users’ data are protected.
Jahswill Essien is a mobile developer, ardent on building awesome stuff with Flutter, he has been using Flutter for the past 2 years. Jahswill is a visual learner as such he strives to write articles that contain pictorial illustrations and/or analogies to drive home a concept explained. His favourite quote is: “We are constrained by our mind, what we feel is our limit isn’t our limit. It’s amazing how much we can learn in a short amount of time by perseverance alone”. Check out some things Jahswill built with flutter by visiting his Github profile.


