


Written by Muhammad Faraz
Navigation is a very important aspect of any UI, whether it’s for a mobile app or a web app. For mobile apps, particularly, it becomes even more important to have swift navigation between screens because of their very limited screen size.
For example, if you are navigating through a healthcare app, you may need to navigate from symptoms checking to appointment booking, from a health parameters dashboard to checking doctors’ availability, etc. Having smooth transitions to and from each screen is key for the usability of any app and for making it a success for your users.
Native applications, like those built exclusively for Android (written in Java and Kotlin) and iOS (written in Swift and Objective C), have different mechanisms for navigation as compared to hybrid or cross-platform applications, like those developed in Flutter. Therefore, it is important to understand the mechanisms behind the navigation in each case.
Getting started with Android Navigation System
Native applications navigate differently than hybrid applications. In native applications (let’s consider Android-native apps in this case), each screen is called an “activity”, and the status of these activities is kept in check.
An example of this is when we open an app like WhatsApp and the main chat screen appears. In this case, the status of the chat screen activity starts RUNNING, and if we switch to a different screen, like the story screen, then the activity of the previous screen changes to PAUSE, and the new activity starts RUNNING. In this way, we can toggle between the screens easily.
In Android, Navigation is performed by a Navigation Component called JetPack Navigation component.
This Navigation component provides a number of benefits, including navigation UI patterns, implementing and handling deep links (that’s right, there is no need for intent filters anymore), handling up and back actions, fragment transactions, and many more.
The Navigation component consists of 3 key parts:
- Navigation Graph: An XML Resource file that acts as a centralized location for all navigations taking place in an Android app. It represents what the navigation is going to be like between different screens in an application. Cool, isn’t it?
- NavHostFragment: An empty container or a widget that you add to your layout. It displays the destination from your navigation graph.
- NavController: A Kotlin or Java Object that keeps track of your current destination in the app and orchestrates the swapping of destination content in the NavHost as one moves through the navigation graph.
Let’s go ahead with implementation (step by step):
Gradle Dependencies
It is important to have these dependencies, whether you are using Java or Kotlin. The first step is to place the following dependencies in the app’s build.gradle file:
dependencies {
  def nav_version = "2.3.0-alpha05"
  // Java language implementation
  implementation "androidx.navigation:navigation-fragment:$nav_version"
  implementation "androidx.navigation:navigation-ui:$nav_version"
  // Kotlin
  implementation"androidx.navigation:navigation-fragment-ktx:$nav_version"
  implementation "androidx.navigation:navigation-ui-ktx:$nav_version"
Creating a Navigation Graph
- A navigation graph is a simple resource file which is created under your project’s res directory with a Resource Type as a
navigation.
<?xml version="1.0" encoding="utf-8"?>
<navigation
  xmlns:android="http://schemas.android.com/apk/res/android"
  xmlns:app="http://schemas.android.com/apk/res-auto"
  android:id="@+id/nav_graph">
</navigation>
Default graph XML file.
- The next step is to add fragments, which actually represent the screens of the app (e.g. to have three screens, you will be needing three fragments). These are created in the MainPackage directory.
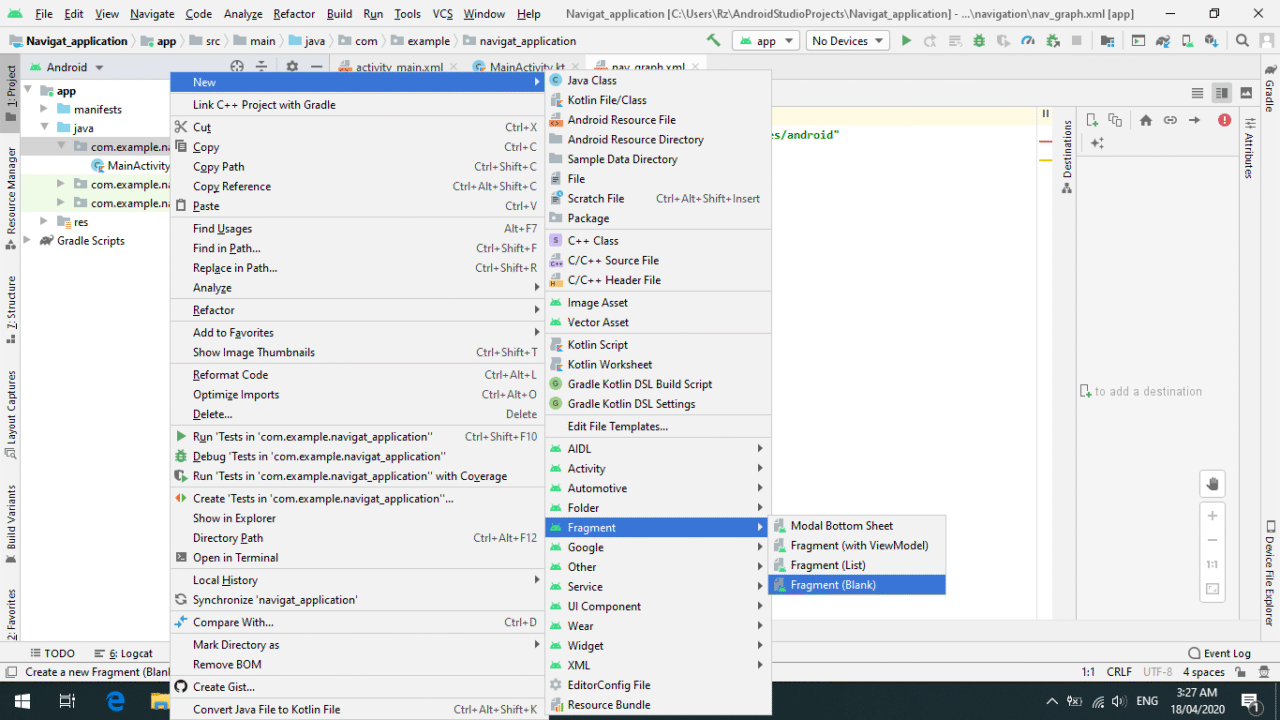
Please note that the base parameters used in defining fragments are the following:
android:id– a unique ID assigned to a fragmentandroid:name– comes from the fragment classandroid:label– a string to identify a fragmenttools:layout– the ID of the layout res file from res/layout
<?xml version="1.0" encoding="utf-8"?>
<navigation
  xmlns:android="http://schemas.android.com/apk/res/android"
  xmlns:app="http://schemas.android.com/apk/res-auto"
  xmlns:tools="http://schemas.android.com/tools"
  android:id="@+id/app_navigation"
>
  <fragment
    android:id="@+id/FragmentMain"
    android:name="com.example.navigat_application.FragmentMain"
    android:label="fragment_main"
    tools:layout="@layout/fragment_main">
  </fragment>
  <fragment
    android:id="@+id/FirstFragment"
    android:name="com.example.navigat_application.FirstFragment"
    android:label="fragment_first"
    tools:layout="@layout/fragment_first">
  </fragment>
  <fragment
    android:id="@+id/SecondFragment"
    android:name="com.example.navigat_application.SecondFragment"
    android:label="fragment_second"
    tools:layout="@layout/fragment_second">
  </fragment>
</navigation>
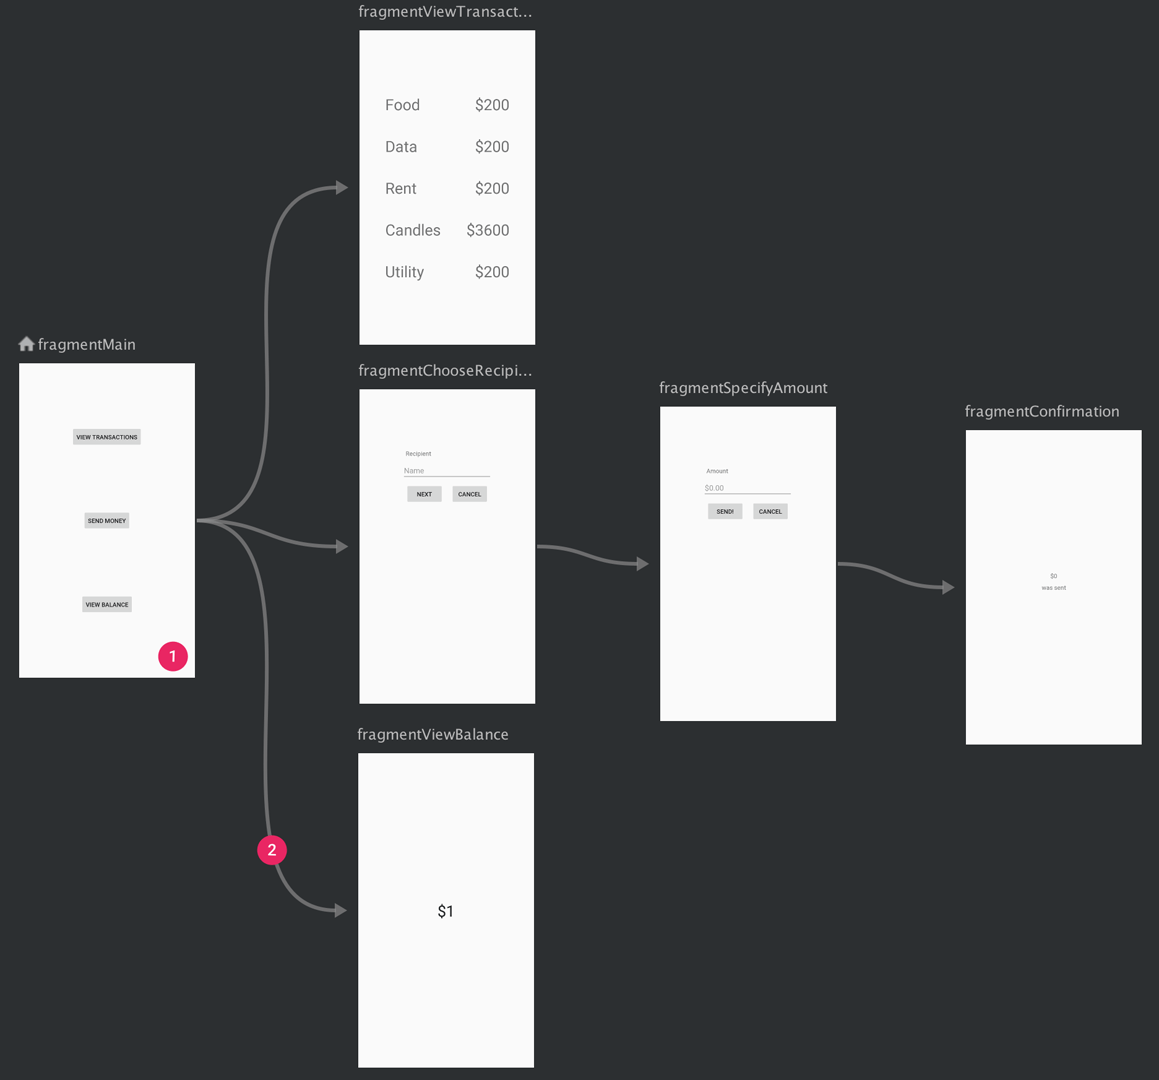
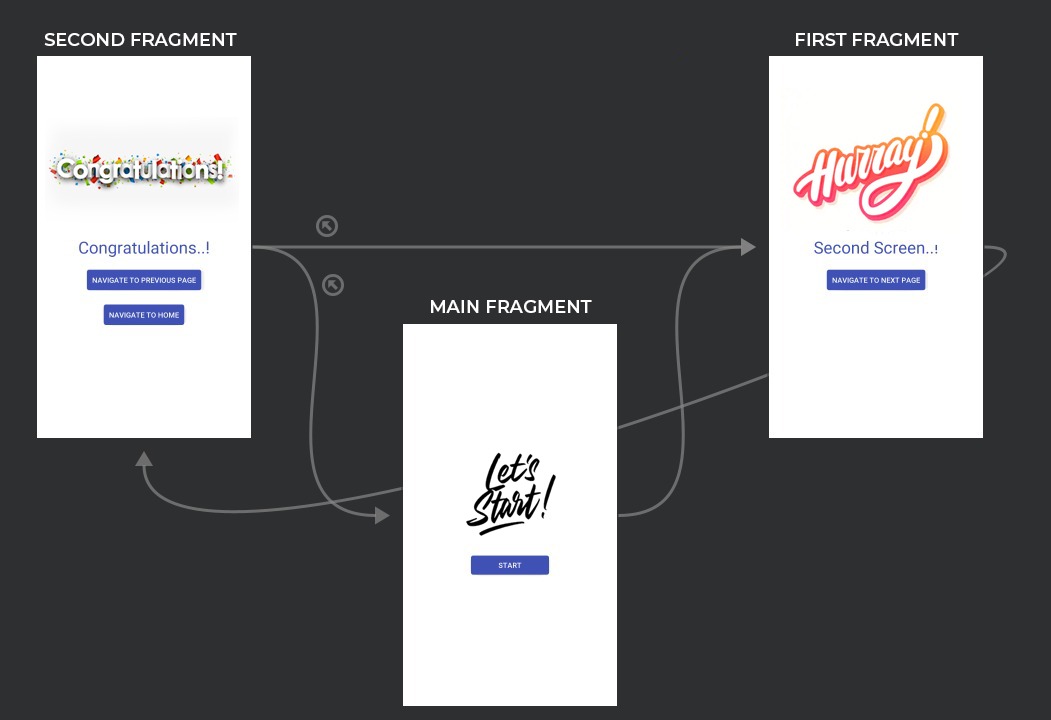
- After creating fragments, we can now define a direction of navigation (i.e. from where navigation should start to where it should end). At this stage, it is also important to know about the concepts of destinations, arguments, and actions.
A destination is a tag used to define the direction of navigation (e.g. the start destination is the first screen that the user will see when the app is opened). This becomes the base destination of the back stack (discussed later) and is the basis of your app’s navigation.
Actions are the acts performed by the user to move from one screen/fragment to another. On the layout screen, these are shown by the arrows. These are defined by using the <action/> tag.
The main parameters included in the <action/> tag are:
android:id- unique ID for the action defining action from one screen to the other.app:destination- destination ID showing the destination screen.app.Anim- used to animate transitions between the destinations. You can choose between the following types: entering a destination, exiting a destination, entering a destination using a pop action, and exiting a destination using a pop action.app.popUpTo- This is for back stack propagation (i.e. going from the third screen to the second screen, the third screen to the first screen, or the second screen to the first screen).
Have a look at the code:
<?xml version="1.0" encoding="utf-8"?>
<navigation
  xmlns:android="http://schemas.android.com/apk/res/android"
  xmlns:app="http://schemas.android.com/apk/res-auto"
  xmlns:tools="http://schemas.android.com/tools" android:id="@+id/app_navigation"
  app:startDestination="@id/FragmentMain"
>
  <fragment
    android:id="@+id/FragmentMain"
    android:name="com.example.navigat_application.FragmentMain"
    android:label="fragment_main"
    tools:layout="@layout/fragment_main"
  >
    <action
      android:id="@+id/action_FragmentMain_to_FirstFragment"
      app:destination="@id/FirstFragment"
      app:enterAnim="@anim/slide_in_right"
      app:exitAnim="@anim/slide_out_left"
      app:popEnterAnim="@anim/slide_in_left"
      app:popExitAnim="@anim/slide_out_right"
    />
  </fragment>

  <fragment
    android:id="@+id/FirstFragment"
    android:name="com.example.navigat_application.FirstFragment"
    android:label="fragment_first"
    tools:layout="@layout/fragment_first">
      <action android:id="@+id/action_FirstFragment_to_SecondFragment"
        app:destination="@id/SecondFragment"
        app:enterAnim="@anim/slide_in_right"
        app:exitAnim="@anim/slide_out_left"
        app:popEnterAnim="@anim/slide_in_left"
        app:popExitAnim="@anim/slide_out_right"
      />
  </fragment>

  <fragment
    android:id="@+id/SecondFragment"
    android:name="com.example.navigat_application.SecondFragment"
    android:label="fragment_second"
    tools:layout="@layout/fragment_second"
  >
    <action
      android:id="@+id/action_SecondFragment_to_MainFragment"
      app:popUpTo="@id/MainFragment"
    />
    <action
      android:id="@+id/action_SecondFragment_to_FirstFragment"
      app:popUpTo="@id/FirstFragment"
    />
  </fragment>
</navigation>
Arguments are the data points that need to be passed from one fragment to the other, depending on the functionality of the app.
To know more about passing data through arguments between different fragments, you need to understand the concepts presented in points 2 and 3 at the beginning of this article (NavHostFragment and NavController, respectively).
As explained in the Android Developers documentation, NavHostFragment provides an area within the layout for self-contained navigation to occur.
Activity layout:
<androidx.drawerlayout.widget.DrawerLayout
.
...
>
  <fragment
    android:layout_width="match_parent"
    android:layout_height="match_parent"
    android:id="@+id/my_nav_host_fragment"
    android:name="androidx.navigation.fragment.NavHostFragment"
    app:navGraph="@navigation/nav_sample"
    app:defaultNavHost="true"
  />
</androidx.drawerlayout.widget.DrawerLayout>
app:navGraph connects NavHostFragment with the navigation graph, which in turn specifies all the destinations the users can navigate to.
NavController – Again, according to the Android documentation, each NavHostFragment has a NavController that actually manages the navigation within the navigation host.
There are different ways to get a NavController, including:
Fragment.findNavController()Activity.findNavController(viewId: int)View.findNavController()
It is necessary to mention another function instead of OnClickListener: >
view?.findViewById<Button>(R.id.button).setOnClickListener(View.OnClickListener {findNavController().navigate(R.id.action_MainFragment_to_FragmentFirst)})
Getting Started with iOS Navigation System
In iOS, navigation is accomplished with navigation controllers and segues, which are used to create a navigation flow in the app. Segues provide a mechanism to connect two view controllers/scenes.
There are different types of segues, and one each is suited to different scenarios:
- Push Segue: This is one of the most used segues, which allows users to navigate back and forth through a pile of views that stack on top of each other.
- Modal Segue: This segue is quite similar to Bootstrap’s HTML modal dialogues, as it shows a new view controller on top of the previous one.
- Popup Segue: This type of segue is only present in iPad to show a small view controller closely related to an action or a button.
- Custom: For this type of segue, we can define custom behavior as the name suggests.
In iOS, transitions work with the help of a navigation controller and a view controller. A navigation controller manages transitions backward and forward through a series of view controllers. It is declared as:
class UINavigationController : UIViewController
The navigation controller allows only one child view controller to be visible at one time. Tapping the back button in the navigation bar at the top of the interface removes the top view controller, revealing the new view controller underneath.
The ViewController class is defined as:
class ViewController: UIViewController,UITextFieldDelegate {
}
The purpose of adding a UITextFieldDelegate is to handle input text fields for text input.
Prepare for Segue: This function is used to pass data from one view controller to the other by overriding.
The function in ViewController.swift file looks like this:
Override func prepareForSegue(segue: UIStoryboardSegue, sender: AnyObject!) {
    self.navigationItem.title = nil
    if segue.identifier == "mySegue"{
        let s = segue.destinationViewController as! Screen2
        s.message = self.textToPass.text
    }
}
This is the most important function in the ViewController class. The second screen will show the back button only if the first screen does not contain the title of the screen. In that case, the title will be replaced by the title of the screen. This is why it is passed as nil.
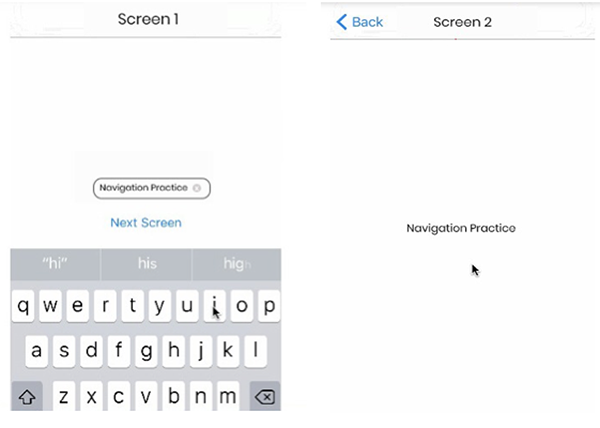
In this example, we will add two view controllers, a SecondViewController that comes up with a FirstViewController using segues. A value will be added using UITextField, through which the user will pass a value that will be displayed in the new view controller.
Create the screens in the main storyboard file. You can choose Push as a manual type of segue.
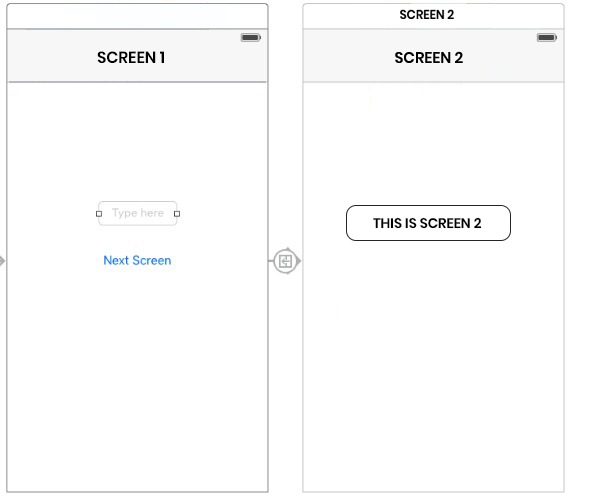
Note the symbol between the screens—it’s different for different types of segues.
Now we need to add another view controller in a file named screen2.swift.
if let name = pass {
    textReceived.text = name
}
This file’s class just shows the text typed by the person on the first screen that will be appearing on the second screen.
The screens are shown below:
Flutter
Flutter is Google’s UI toolkit for building applications for different platforms using the same codebase. It works like a gaming engine rather than as a traditional application platform. It provides fast development using hot reload, expressive and beautiful UIs, and native performance.
Originally, applications had to be made separately for Android and iOS because both use different techniques. These applications are called native applications. Flutter, on the other hand, uses combined techniques that can be used to make applications that work on both platforms. Such applications are called hybrid applications.
In hybrid applications, the stack (a.k.a. last in, first out) structure is used (this is known as a push-pop scenario). Again, consider the example of WhatsApp. In this case, the chat screen will not be suspended. Instead, it remains open and the new screen opens on top of it. We can open as many screens as we need, but each new screen appears on top of the previous one (PUSH scenario).
In the same way, if we want to navigate to one of the previous screens, then all the screens on top of it have to be closed first (POP scenario). There are widgets and techniques that allow it all to happen in the background, so the application does not look messy.
Each screen in Flutter is called a “page”, and we can navigate through pages using a stack and the route of each page.
Let’s start:
In Flutter, pages and screens are called routes, so you will be hearing this word a lot.
Getting to the point – To use Flutter to implement navigation between different screens in a cross-platform app, it is very important to understand the following things:
You can perform the navigation through two ways: One is the default, or “explicit” way. The other way is through “named routes”.
Let’s start by first creating some simple screens, a Home Screen and a First Screen.
import 'package:flutter/material.dart';
void main() => runApp(MyApp());
class MyApp extends StatelessWidget {
  @override
  Widget build(BuildContext context) {
    return MaterialApp(
      title: 'Navigation Demo',
      theme: ThemeData(
        primarySwatch: Colors.blue,
      ),
      home: MyHomePage(),
    );
  }
}
class MyHomePage extends StatefulWidget {
 @override
 _MyHomePageState createState() => _MyHomePageState();
}
class _MyHomePageState extends State<MyHomePage> {
  @override
  Widget build(BuildContext context) {
    return Scaffold(
      backgroundColor: Colors.white,
      appBar: AppBar(
        title: Text(
          "Home Screen"
        ),
      ),
      body: Column(
        mainAxisAlignment: MainAxisAlignment.center,
        children: <Widget>[
          Text(
            "HomeScreen",
            style: TextStyle(
              fontSize: 30.0,
              fontWeight: FontWeight.w600,
            ),
          ),
          Padding(
            padding: EdgeInsets.all(10.0),
            child: RaisedButton(
              padding: EdgeInsets.symmetric(
                horizontal: 20.0,
                vertical: 10.0,
              ),
              onPressed: (){},
              child: Text(
                "Screen 1",
                  style: TextStyle(
                    color: Colors.white,
                    fontSize: 20.0,
                  ),
              ),
            ),
          )
        ],
      ),
    );
  }
}
Here is some simple dart code to generate the basic UI for the Home Screen. Similarly, you can create other screens as well using another dart file in the lib folder.
Now, let’s start the exciting part: Flutter Navigation
onPressed: () {
  Navigator.push(
    context,
    MaterialPageRoute(builder: (context) => firstscreen()),
  );
}
This snippet actually says to navigate your push with this context to another screen, which should be a material page route to the next screen. By adding this to the onPressed() function, it should take you to the next screen.
To go back to previous screen:
onPressed: () {
  Navigator.pop(context);
}
One thing you should note about the push() method is that it saves the context from where we are coming. So when you use the pop() method, it takes you back to your previous screen. This means that if you have a multi-screen app with three screens, you can navigate from Screen 1 to 2, from Screen 2 to 3, and back from Screen 3 to 2 or Screen 2 to 1 but NOT from Screen 3 to 1, etc.
This limitation can be solved using Named Routes.
In the main.dart file, add routes for the first and second screens.
class MyApp extends StatelessWidget {
  @override
  Widget build(BuildContext context) {
    return MaterialApp(
      routes: {
        '/first': (context) => firstscreen(), #for first screen
        '/second': (context) => secondscreen(), #for second screen
      },
      title: 'Navigation Demo',
      theme: ThemeData(
        primarySwatch: Colors.blue,
      ),
      home: MyHomePage(),
    );
  }
}
Then make the following changes to the line where you wrote the pop function to go back.
onPressed: () {
  Navigator.pushNamed(context, ‘/first’);
  Navigator.pushNamed(context, ‘/second’);
To go from the second screen to the first, add this in second.dart:
onPressed: () {
  Navigator.push(context, MaterialPageRoute(
    builder: (context) => firstscreen(),
With this, you can navigate among multiple screens.
Summary of navigating between pages
With the help of some simple examples, we covered navigation in different scenarios, including for native apps and Flutter, with the main focus being on Android and Flutter and their overall navigation architectures.
Muhammad Faraz is an experienced Flutter App Developer and Machine Learning Enthusiast who has experience delivering multiple apps and smart products, including Sparrow Marketing. He is an excellent communicator and shares his knowledge mainly by writing both technical and informative articles.


