


This article is written by Kevin Suhajda
This post has been updated in July 2022 to introduce some fixes to the codemagic.yaml file and to reflect that you no longer need to contact Codemagic solution engineers to set up Unity machines for you, and you start using Unity on Codemagic right away, as it is preinstalled on Mac, Linux and Windows build machines.
The Unity game engine has gained a lot of traction for being a cross-platform and very versatile solution. With Unity, you can create 2D and 3D games for desktop computers, consoles, and mobile devices. That makes Unity one of the top choices for building mobile games, augmented reality mobile apps, and hybrid apps that use a combination of Unity and Flutter or React Native.
However, even with all the versatility that Unity provides, there’s still the problem of building the project, testing it, and publishing it to different stores. This is a tedious process that requires quite some time and effort. Codemagic has recently added support for Unity CI/CD that helps you solve this problem.
Learn why you should use a CI/CD for your Unity projects from this article.
We’ve already discussed how to automatically build, code sign, and publish Unity iOS apps to Apple App Store and submit them for review in another tutorial. Now, this article will show you how to use Codemagic CI/CD to build, code sign, and publish your Unity Android app directly to Google Play so that it is easily accessible for Android users.
But first, a quick note. In this article, we won’t be focusing on the Unity project itself. Instead, we’ll go through the building and publishing steps. Here’s what we’ll do:
- Describe the prerequisites for building a Unity project on Codemagic and publishing it to Google Play;
- Set up all the necessary environment variables in Codemagic for Unity, Android code signing, and publishing to Google Play;
- Modify the
codemagic.yamlfile to automate all the processes; - Finally, add a C# script to build the Android app bundle (.aab) in Unity Editor and prepare it for publishing.
What are the prerequisites for building and publishing Unity Android apps with Codemagic?
Unlike Apple, which charges you $100 a year for a developer account, Google does no such thing: Publishing Android apps is free. However, to be able to follow all the steps in this article, you’ll still need the following:
- A Unity Plus or Pro license.
- A Google Play Console membership.
- Admin access to the Google Play Console to create a service account.
- A Unity project checked into a Git-based version control system.
- An account with Codemagic. If you don’t have one, you can sign up here.
Adding your Unity project to Codemagic
The easiest way to add your project to Codemagic is through a Git provider. If you have already done this after reading our iOS tutorial, you can safely skip the next couple of subsections and go straight to the Add environment variables for Android app signing section. If not, proceed with adding your project to a Git source control service, such as (GitHub, Bitbucket, or GitLab). Then follow the steps below to get started with Codemagic:
Connect to the Git provider where you have uploaded your Unity project by going to the Integrations under Settings. Make sure you have given permission to access the repository where you have uploaded your app.
Navigate to the Applications page and click Add application.

Select the Team that has been given access to the Unity SDK instances. If you do not have access yet, contact Codemagic here.
Select the Git provider:

Click Next: Authorize integration to authorize Codemagic. If you have already authorized your selected Git provider, click Next: Select repository instead.
If you are using GitHub as your Git provider, then you need to perform one additional step before selecting the repository. Click Install GitHub App to set up the integration. You can learn more about configuring a GitHub app integration here.
Now, select the repository from the dropdown menu, and select Unity App as the project type. Then click Finish: Add application.
You will be taken to the project settings. The codemagic.yaml tab will be selected by default.
Add your Unity credentials as secure environment variables to Codemagic
Your Unity serial number is used to activate Unity on the Codemagic build machine so that your Android project can be exported. The license is then returned in the publishing section of the YAML configuration, and it works even if one of the build steps fails.
You will need to create an environment variable group called “unity” that contains environment variables named UNITY_SERIAL, UNITY_USERNAME, and UNITY_PASSWORD. This group of environment variables will be imported into the codemagic.yaml configuration file as described in subsequent steps.
Create the required environment variables in Codemagic as follows:
If you are using a Team, click on Teams > your Team name, and then click on Global variables and secrets. Otherwise, you can add the environment variables at the application level by clicking the Environment variables tab.
Create a variable called
UNITY_SERIAL, and set the value to your Unity serial number. In the Select group dropdown, typeunityand click on the Create “unity” group button. Mark the variable as secure (the mark is actually ticked by default here and in all the following cases) to encrypt the value, and click the Add button.Create a variable called
UNITY_USERNAME. Set the value to the email address used with your Unity ID, and add it to the “unity” group. Mark this as secure to encrypt the value, and click the Add button.Create a variable called
UNITY_PASSWORD. Set the value to your Unity ID password, and add it to the “unity” group. Mark this as secure to encrypt the value, and click the Add button.
Note that the environment variable UNITY_HOME, which defines Unity’s installation location, is already set on the build machines. You can find the location on macOS here and the location on Windows here. In this tutorial, we’ll be using macOS machines.
Add environment variables for Android app signing
Codemagic allows you to automatically code sign Unity apps for Android. For this, you’ll need to create the following environment variables in an environment variable group called “keystore_credentials”:
CM_KEYSTORE, CM_KEYSTORE_PATH, CM_KEYSTORE_PASSWORD, CM_KEY_PASSWORD, and CM_KEY_ALIAS.
So, staying in the same tab, you’ll need to create another variable group.
Create a variable called
CM_KEYSTORE, and set the value to your Base64-encoded .keystore file. This is the only value that needs to be encoded. You can find more information about how to encode your keystore in Base64 here. In the Select group dropdown, typekeystore_credentialsand click on the Create “keystore_credentials” group button. Mark the variable as secure to encrypt the value, and click the Add button.Create a variable called
CM_KEYSTORE_PATH. Set the value tokeystore.keystore, add it to the “keystore_credentials” group, and click the Add button.Create a variable called
CM_KEYSTORE_PASSWORD. Set the value to your keystore password, and add it to the “keystore_credentials” group. Mark the variable as secure to encrypt the value, and click the Add button.Create a variable called
CM_KEY_PASSWORD, and set the value to your keystore alias password. Add it to the “keystore_credentials” group. Mark the variable as secure to encrypt the value, and click the Add button.Create a variable called
CM_KEY_ALIAS, and set the value to your keystore alias. Add it to the “keystore_credentials” group. Mark the variable as secure to encrypt the value, and click the Add button.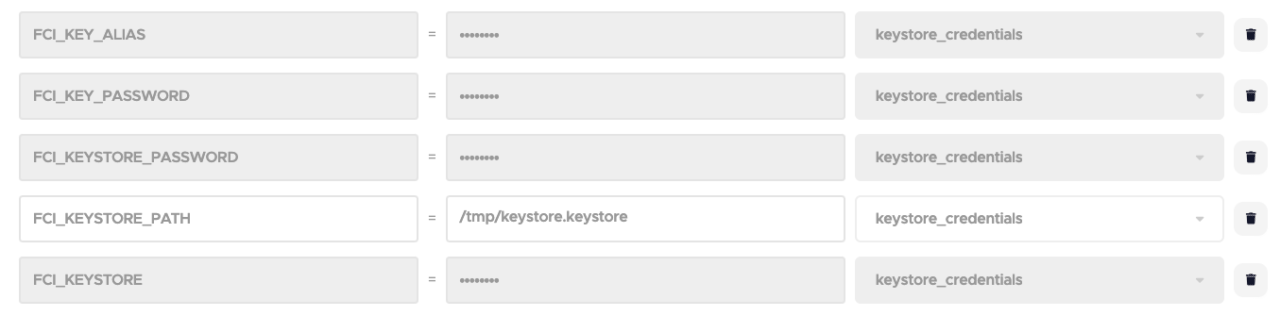
For guidance on how to obtain the required environment variable values, please refer to the documentation on signing Android apps here.
Add an environment variable for publishing Unity Android apps to Google Play
To publish directly to Google Play, you will need to set up a service account in the Google Play console and create a JSON API key. You can find detailed documentation on how to do this here.
Still on the same tab, add another variable group as follows:
- Create a variable called
GCLOUD_SERVICE_ACCOUNT_CREDENTIALS, copy all of the contents of your Google service account API key, and paste them into the value field. In the Select group dropdown, typegoogle_playand click on the Create “google_play” group button. Mark the variable as secure to encrypt the value, and click the Add button.

Configuring Codemagic for Unity Android apps using codemagic.yaml
Codemagic has the Unity SDK on both Windows and macOS machines, and in this article, we’ll be using a macOS machine. To configure your build using YAML, go to your Unity project, and create a new file inside the root directory called codemagic.yaml.
Add the following template to the file:
workflows:
  my-workflow:
    name: Workflow name
    max_build_duration: 120
    environment:
      groups:
        - ...
      vars:
        - ...

    scripts:
      - ...
    artifacts:
      - ...
    publishing:
      - ...
This is a basic workflow template for building apps on Codemagic. For more information, check out the docs.
Note that the publishing section will publish your app to Google Play, where you can make it available for testing.
To generate an Android app bundle (.aab) and publish it to Google Play, modify the workflow by following the steps below:
Define an appropriate workflow name in the
workflowssection:workflows: unity-android-release-workflow: name: Unity Android release workflow max_build_duration: 120
Update: At the time of writing this post, build machines with Unity have only been available to customers who have contacted Codemagic. Now that they are publicly available, you’ll need to specify the
instance_typeproperty (basically, the build machine type) in the configuration above. Refer to the documentation to choose the rightinstance_type.
Import the environment variable groups you created earlier in the
groupssection:environment: groups: - unity - keystore_credentials - google_playSet the following environment variables in the
varssection:vars: UNITY_BIN: $UNITY_HOME/Contents/MacOS/Unity BUILD_SCRIPT: BuildAndroid PACKAGE_NAME: <PACKAGE_NAME>Replace the angle brackets with the appropriate values, e.g.,
com.domain.yourappname.Under the
scriptssection, start by activating your Unity license:- name: Activate Unity License script: | $UNITY_BIN -batchmode -quit -logFile -serial ${UNITY_SERIAL?} -username ${UNITY_USERNAME?} -password ${UNITY_PASSWORD?}Decode your keystore and save to disk:
- name: Set up keystore
  script: echo $CM_KEYSTORE | base64 --decode > $CM_BUILD_DIR/keystore.keystore
Increment the build number and export the .aab:
- name: Set build number and export Unity
  script: |
    export NEW_BUILD_NUMBER=$(($(google-play get-latest-build-number --package-name "$PACKAGE_NAME" --tracks=alpha) + 1))
    $UNITY_BIN -batchmode -quit -logFile -projectPath . -executeMethod BuildScript.$BUILD_SCRIPT -nographics
To retrieve the generated .aab, update the
artifactspath to the following:artifacts: - android/*.aabUpdate the
publishingsection to return the Unity license and publish to Google Play:publishing: scripts: - name: Deactivate Unity License script: $UNITY_BIN -batchmode -quit -returnlicense -nographics google_play: credentials: $GCLOUD_SERVICE_ACCOUNT_CREDENTIALS track: alpha
This completes the configuration of the codemagic.yaml file. If you want to see the full picture, you can find a working example of the codemagic.yaml file for Unity apps in the root folder of the sample project for this blog post. Now, just commit and add the file to your Git provider.

Add a build script to your Unity project
To build the Android application bundle (.aab) in headless mode, you’ll need a Unity build script. Let’s prepare it.
Open Unity on your local machine, and add a new C# script called Build in the project explorer in Assets/Editor.
Add the following to the file:
using System.Linq;
using System;
using UnityEditor;
using UnityEngine;

public static class BuildScript
{

    [MenuItem("Build/Build Android")]
    public static void BuildAndroid()
    {
        PlayerSettings.Android.useCustomKeystore = true;
        EditorUserBuildSettings.buildAppBundle = true;

        // Set bundle version. NEW_BUILD_NUMBER environment variable is set in the codemagic.yaml
        bool versionIsSet = int.TryParse(Environment.GetEnvironmentVariable("NEW_BUILD_NUMBER"), out int version);

        if (versionIsSet)
        {
            Debug.Log($"Bundle version code set to {version}");
            PlayerSettings.Android.bundleVersionCode = version;
        }
        else
            Debug.Log("Bundle version not provided");

        // Set keystore name
        string keystoreName = Environment.GetEnvironmentVariable("CM_KEYSTORE_PATH");

        if (!string.IsNullOrEmpty(keystoreName))
        {
            Debug.Log($"Setting path to keystore: {keystoreName}");
            PlayerSettings.Android.keystoreName = keystoreName;
        }
        else
            Debug.Log("Keystore name not provided");

        // Set keystore password
        string keystorePass = Environment.GetEnvironmentVariable("CM_KEYSTORE_PASSWORD");

        if (!string.IsNullOrEmpty(keystorePass))
        {
            Debug.Log("Setting keystore password");
            PlayerSettings.Android.keystorePass = keystorePass;
        }
        else
            Debug.Log("Keystore password not provided");

        // Set keystore alias name
        string keyaliasName = Environment.GetEnvironmentVariable("CM_KEY_ALIAS");

        if (!string.IsNullOrEmpty(keyaliasName))
        {
            Debug.Log("Setting keystore alias");
            PlayerSettings.Android.keyaliasName = keyaliasName;
        }
        else
            Debug.Log("Keystore alias not provided");

        // Set keystore alias password
        string keyaliasPass = Environment.GetEnvironmentVariable("CM_KEY_PASSWORD");

        if (!string.IsNullOrEmpty(keyaliasPass))
        {
            Debug.Log("Setting keystore alias password");
            PlayerSettings.Android.keyaliasPass = keyaliasPass;
        }
        else
            Debug.Log("Keystore alias password not provided");


        BuildPlayerOptions buildPlayerOptions = new BuildPlayerOptions();

        buildPlayerOptions.locationPathName = "android/android.aab";
        buildPlayerOptions.target = BuildTarget.Android;
        buildPlayerOptions.options = BuildOptions.None;
        buildPlayerOptions.scenes = GetScenes();

        Debug.Log("Building Android");
        BuildPipeline.BuildPlayer(buildPlayerOptions);
        Debug.Log("Built Android");
    }

    private static string[] GetScenes()
    {
        return (from scene in EditorBuildSettings.scenes where scene.enabled select scene.path).ToArray();
    }

}
If you have already created this script for iOS builds in the previous tutorial, just add public static void BuildAndroid() and all its contents to it.
The BuildAndroid method is used to export the Android bundle (.aab) to a folder called android. A menu item is also added in the Unity UI, allowing you to export the Android bundle (.aab) by clicking Build > Build Android.
Configure Android build settings in Unity
Google recommends that Android applications be published to Google Play using the application bundle (.aab). You should configure the following settings in Unity before building the application bundle:
- Open Unity and click File > Build Settings.
- Make sure Android is selected in the Platform section.
- Check the ‘Build App Bundle (Google Play)’ checkbox.
- Make sure that ‘Export Project’ is not checked.
- Click on the Player Settings button.
- Expand ‘Other Settings’ and check the ‘Override Default Package Name’ checkbox.
- Enter the package name for your app, e.g., com.domain.yourappname.
- Set the ‘Version number’.
- Put any integer value in the ‘Bundle Version Code’. This will be overridden with the build script.
- Set the ‘Minimum API Level’ and ‘Target API Level’ to Android 11.0 (API level 30), which is required for publishing application bundles.
- In the ‘Configuration’ section, set ‘Scripting Backend’ to IL2CPP.
- In the ‘Target Architectures’ section, check ARMv7 and ARM64 to support 64-bit architectures so that the app is compliant with the Google Play 64-bit requirement.
That’s it! You have successfully configured everything in both Unity and Codemagic, so it’s time to build your Unity Android project!
Running your first build
Remember to commit all the changes you have made to your Git provider.
To start building your Unity Android app using the YAML file, go to your project page on Codemagic, and click Start your first build. Select your workflow, and then click Start new build to start the build process. Depending on the project size, this can take from several to several dozen minutes.
Conclusion
Congratulations! 🚀 If you’ve been following the steps of this tutorial, you’ve just built your Unity Android app and published it to Google Play. Well done! Thanks to Codemagic, the whole process is now automated, which means you can save time and effort you would’ve otherwise spent manually building, code signing, and uploading. The process for iOS is pretty similar — you can find a blog post covering it here.
Also, you can find a complete codemagic.yaml configuration file for building Unity apps for both Android and iOS here. Need more details? Please refer to the docs.
We hope this tutorial will help you automate your building and publishing process for mobile Unity apps. We also hope it’s relatively straightforward. However, if you feel like you’re stuck, don’t hesitate to ask for help: We try to answer every single question on our Slack, and users on Professional or Enterprise plans can find guidance in the in-app chat.


