


 with Flutter")
Written by Jahswill Essien
So, you just finished building that application that’s going to change the world, you’ve submitted the Android apk to the Google Play Store and the iOS ipa to the Apple App Store, and you’re awaiting review. But when you check your email, you discover that your iOS app has been rejected. Given the urgency of releasing the app, what do you do now?
Well, the good news is that your application was built with Flutter, which is a great tool for creating Progressive Web Apps (PWAs). But what is a PWA?
This tutorial discusses what PWAs are, how to create a Flutter PWA, what to consider while creating one, handling web navigation efficiently, building and publishing a Flutter web app with Codemagic, how to install a PWA, and the benefits of PWAs.
To get the most out of this Flutter PWA tutorial, you should at least be proficient in the Flutter framework and reading Flutter code. At least some familiarity with Navigator 2.0 is needed for the Navigation section of this post.
Also, you will need a Codemagic account to complete the building and deployment part. If you don’t have one, you can sign up, it’s free.
By the time you finish this article, you will have completed this simple demo Flutter PWA that displays job openings. (Please note that the figures and data displayed below are just dummy data.)
The design used for this app was inspired by the design I found on Dribbble here.
What is PWA?
A Progressive Web App, or PWA for short, is simply a web page that can be saved (installed) from the web to provide a native app feel. PWAs work offline and have support for notifications, just like native applications.
Flutter allows you to build multiple apps with one code base, so you can build a web app, or a PWA, if you already have your codebase for Android and iOS, quite quickly.
Read this article about PWAs vs native apps to understand the pros and cons of PWAs.
Creating a Flutter PWA
Creating a PWA in Flutter is as simple as creating a Flutter web application. What better time than now is there to set up our demo Flutter project?
Setup
Clone the starter code by running the command git clone -b starters-code git@github.com:JasperEssien2/pwa_demo.git.
The dependencies used in this project are shown in the table below.
| Dependency | Use cases |
|---|---|
font_awesome_flutter | To access icons that aren’t available in the material icon |
Beamer | Used for efficient, complicated navigation |
You should do your best to navigate the codebase to understand what each component does, but here’s a breakdown of the main components.
/lib/widgets/detail_widgets.dart: contains the detail page’s widget code/lib/widgets/job_list.dart: houses the job list’s widget codelib/app_provider.dart: contains an implementation ofInheritedWidgetnamedAppProviderInheritedWidgetprovides a good way to pass data down Flutter’s widget tree.AppProviderwill be utilized to pass down dummy jobs data and achildBeamerkey(more on this in the navigation section).lib/extensions.dart: defines theisLargeScreen,isExpanded, andprovidergetter functions in theBuildContextDart’s
extensionsmake it possible to define custom functionalities in existing libraries.lib/job_model.dart: defines the model classes that the app useslib/main.dart: contains our app entry point and the home page widgets
With this out of the way, let’s look at some things to consider while building a web application in Flutter.
Considerations while building a web app with Flutter
There are a few important things to consider while building a web app with Flutter. This article covers two important aspects: responsiveness and navigation.
Responsiveness in Flutter
Given that our web application may be run on various screen sizes, as Flutter developers, we have to do our best to account for them. A responsive app is an app that is tuned for different screen sizes. So, let’s make our Flutter Progressive Web App responsive!
In this project, we will use a list-detail design pattern. To make it responsive, we will take the following approach:
- On a smaller screen size, the list view occupies the entire screen, and tapping on a list item pushes a new screen to display the job details
- On a larger screen size, the list view occupies the left pane, while the detail widget is displayed beside the list view on the same screen
- On a very large screen size, we will add margins to the left and right sides of the home screen
A structure like this makes implementing navigation tricky because the user can resize the window or change the orientation of the device. But you don’t want your users to see an ugly wide detail screen after resizing the window from a small to a larger size (if the detail screen is already in view). In other words, you want the navigation to be in sync even if the user suddenly resizes the window.
Navigation for Flutter Web
While Navigator 1.0 (imperative API) works fine for most Flutter applications, it is very inefficient for complex routing for web applications and complex deep linking. That is why the Flutter team introduced Navigator 2.0 (declarative API) for Flutter. Although it is much more efficient, it also introduced a great deal of complexity.
A discussion of Navigator 2.0 is out of the scope of this article. To learn more about Navigator 2.0, read this article.
On the positive side, we can use Flutter packages like go_router and Beamer, which are built upon Navigator 2.0, to simplify things for ourselves.
We are using the Beamer package for this project because of its flexibility in handling nested navigation. (It synchronizes the navigation history of both a nested Router and parent Router seamlessly.)
Implementation
You have probably noticed by now that although the majority of the code has been written, there are some tasks left for you to handle to construct our Flutter PWA. This section will walk you through implementing these TODOs.
First task: Starting up with Beamer
Our first task is to initialize the BeamerDelegate variable. Search for TODO: 1 in the lib/main.dart file, and assign the code below to the routerDelegate variable.
final routerDelegate = BeamerDelegate(
    locationBuilder: (routeInformation, _) {
        return HomeLocation();
    },
);
BeamerDelegate is Beamer’s implementation of Navigation 2.0 RouterDelegate, which is used to build and configure a navigation widget based on the pop and push route intent it receives from the engine.
The locationBuilder helps Beamer determine what screen to show based on the developer’s configuration. An instance of HomeLocation defined for this project is passed as an argument to the locationBuilder. The HomeLocation is an implementation of the BeamLocation.
By implementing BeamLocation, we can configure what URI to handle and how to build the stack of pages based on the URI. Take a look through the comments in the code snippet below.
class HomeLocation extends BeamLocation<BeamState> {
  @override
  List<BeamPage> buildPages(BuildContext context, BeamState state) {
    JobModel? job;

    // Try to get the job with the [id] passed from the route path
    try {
      job = context.provider.jobs.firstWhere(
          (element) => element.id.toString() == state.pathParameters['id']);
    } catch (e) {
      log(e.toString());
    }

    return [
      /// Always have the [MyHomePage] in the stack of pages
      const BeamPage(
        key: ValueKey('home'),
        title: "Home",
        name: '/',
        child: MyHomePage(
          currentIndex: 0,
        ),
      ),

      /// Only show the detail page over the [MyHomePage] when on a small screen and
      //a job id is passed alongside the URI. Note that [MyHomePage] is configured to be responsive.
      if (!context.isLargeScreen && state.pathParameters.containsKey('id'))
        BeamPage(
          key: ValueKey('job-${job!.id}'),
          title: "${job.company.name} - ${job.role}",
          /// The URL path to navigate to this page, the [id] is a placeholder for the actual job id to be passed
          name: '/:id',
          child: JobDetailWidget(
            model: job,
          ),
        ),
    ];
  }

  /// This is where you indicate the URI patterns that can be handled by this [BeamLocation]
  @override
  List<Pattern> get pathPatterns => ['/:id'];
}
A somewhat similar implementation of the above is done for the nested navigator. The beam location is named InnerJobLocation, which determines the current detail screen that is navigated to when the app is displayed on a large screen.
Second task: Determining what widget to return for small screens
The goal of this section is to determine what widget to return when the app is running on a small screen.
Locate TODO: 2 on line 123 and return the JobList widget;
return const JobList();
Third task: Determining what widget to return for large screens
Replace the TODO on line 134 with the code below to display a list-detail widget when the app runs on a large screen.
    return Container(
            color: Colors.white70,
            // Add a horizontal margin for the largest screen size
            margin: EdgeInsets.symmetric(horizontal: horizontalMargin),
            child: Row(
            crossAxisAlignment: CrossAxisAlignment.start,
            children: [
                /// Display the [JobList] on the left pane and constrain its width
                SizedBox(width: listviewMaxWidth, child: const JobList()),
                /// Use a nested Router
                SizedBox(
                width: detailMaxWidth,
                /// By using the [Beamer] widget, we add a nested Router
                child: Beamer(
                    /// Pass in the [childBeamerKey] instantiated in the [AppProvider] class
                    key: context.provider.childBeamerKey,
                    /// Pass a routerDelegate that uses the [InnerJobLocations]
                    routerDelegate: innerRouterDelegate,
                ),
              ),
            ],
          ),
        );
Fourth task: Getting rid of exceptions
Remove the Exception thrown on line 155 that was added to keep the compiler happy in regard to missing a return statement.
Fifth task: making the beaming work
The final task is making the actual “beaming” — in other words, the navigation when a job item widget is tapped on.
Now, we are faced with a minor issue. We have implemented two Routers: a parent Router and a nested Router that is added to the widget tree when the app is running on a device with a large screen. So we’ll need to use a different instance of Beamer to navigate based on the screen size.
Head over to lib/widgets/job_list.dart and replace the TODO at line 40 with the code below.
context.isLargeScreen
    // Use the nested Beamer to navigate
    // to the correct detail page for large screen
    ? context.provider.childBeamerKey.currentState?.routerDelegate
        .beamToNamed('/${model.id}')
    : context.beamToNamed('/${model.id}');
Congrats on finishing these tasks! You can now run your web app by running flutter run -d chrome.
I know you’re eager to download your Flutter PWA onto your mobile device, but we need to host our mobile web application. Luckily, Codemagic has simplified a lot of things for us.
Publishing a Flutter PWA with Codemagic
Codemagic is an excellent continuous integration/delivery (CI/CD) tool that works with Flutter. CI/CD tools automate building and deployment processes so that developers can focus on tasks like meeting product requirements and writing and maintaining high-quality code.
With Codemagic, you can automate the process of building for all platforms supported by Flutter. Here, we’ll focus on setting up the web pipeline.
Start by logging in or creating an account if you don’t have one by clicking here.
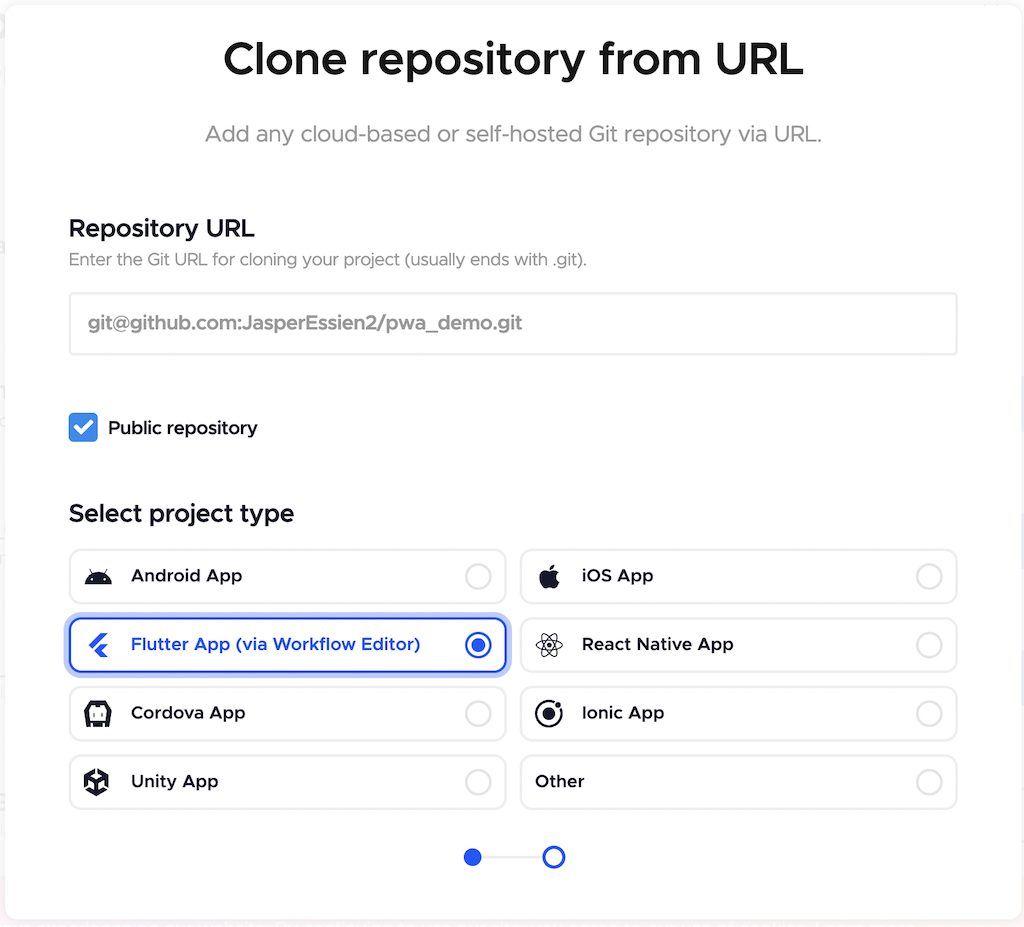
Add an application by clicking the Other -> Add repository button.
Input the repository URL, check the Public Repository checkbox, and select Flutter App as the project type.
You can use the repository URL for the completed version: git@github.com:JasperEssien2/pwa_demo.git
- Select the platforms you want to build for in the Build for platforms section. Select only Web for now.

- Scroll down to the Distribution section, enable Codemagic Static Page publishing, and input your desired web page subdomain.
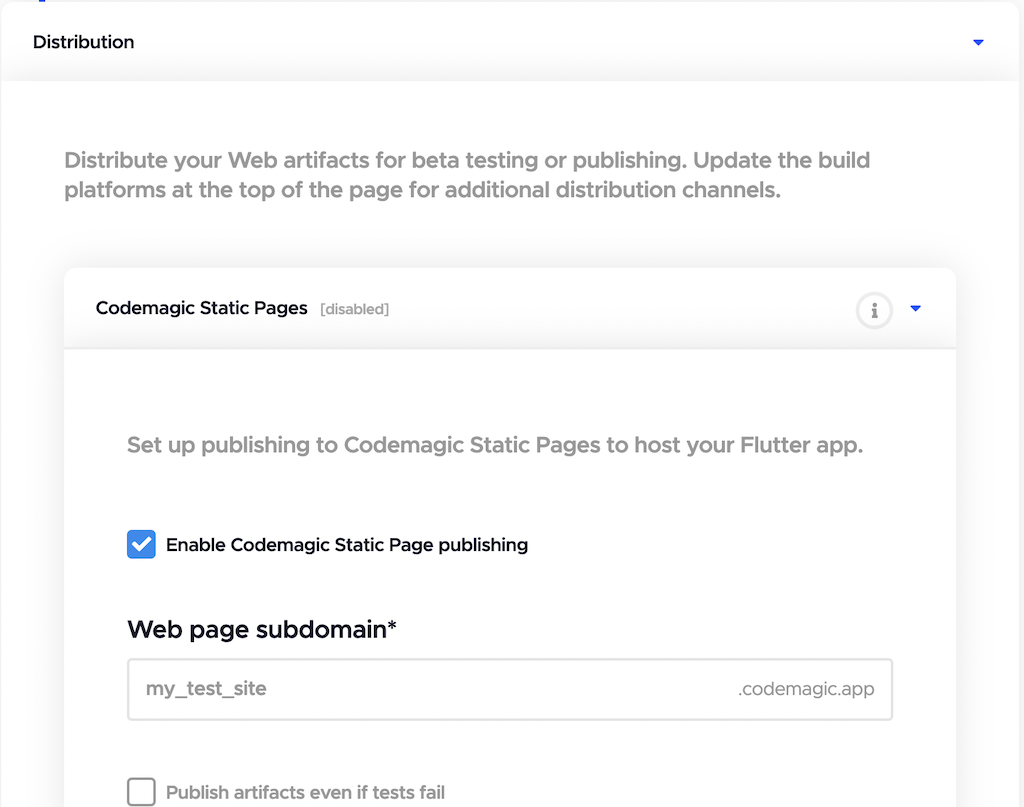
- Save your settings.
- Click Start new build.
- Relax and sip your coffee while Codemagic does the hard work of building and publishing your web app. Codemagic will notify you once it is done.
You can now access your published web page by visiting yourSubdomain/codemagic.app.
(yourSubdomain is the text you input in the Web page subdomain in step 5.)
Here’s the app running on a Chrome browser for desktop.
You probably want your app to be hosted on your own domain. At the time of writing this article, Codemagic supports setting up automatic publishing of your web apps to AWS S3 Bucket. How to set this up is out of the scope of this article, but you can learn more in the docs.
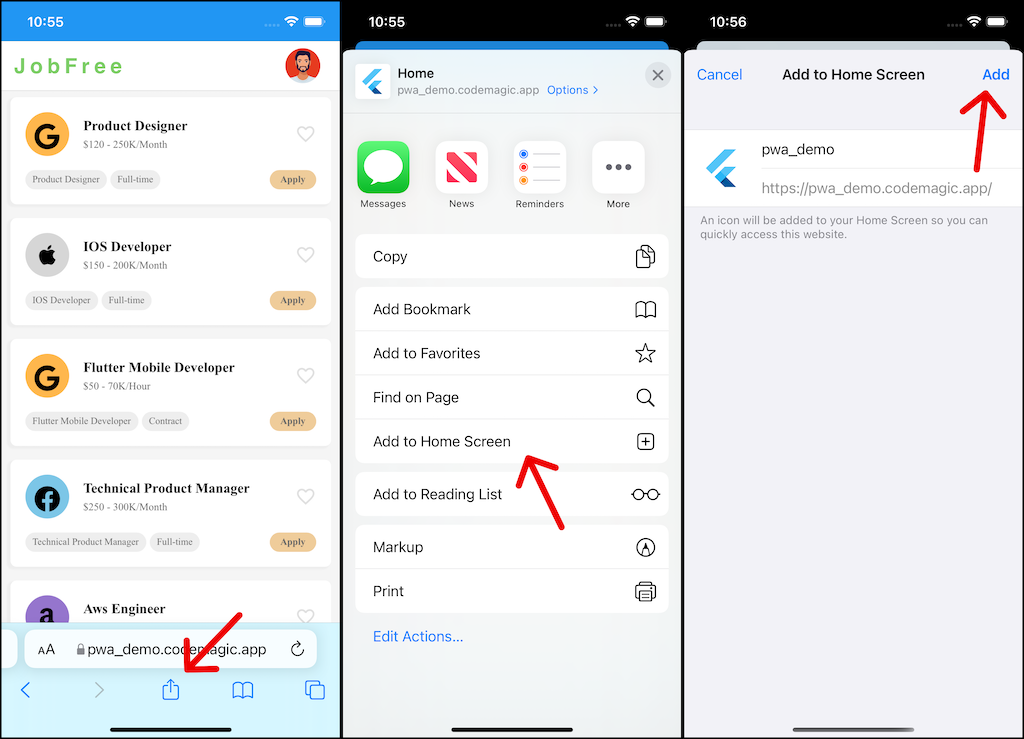
Installing a PWA
iOS: Visit the web page on your Safari browser, and then tap Share -> Add to Home Screen -> Add.
At the time of writing this article, Chrome does not support the installation of PWA on iOS.
Android: Visit the web page on your Chrome browser, and tap the Add pwa_demo to Home Screen snackbar.
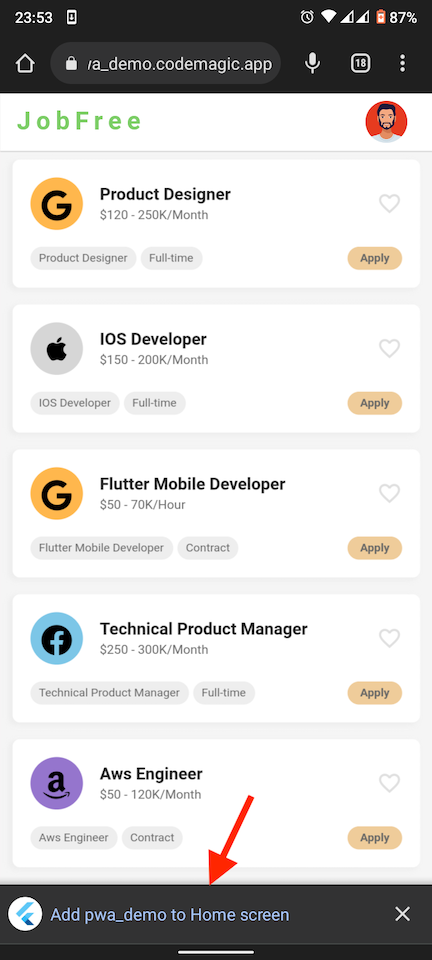
You can find the PWA among your installed apps on your mobile device. Open the app, and you should see a nice splash screen on startup.
By default, PWAs for Android have the splash screen enabled. To add splash screens for an iOS PWA, you have to specify this in the
/web/index.htmlfile — click here to learn how to go about this. Generate splash screen images for specific iOS screen sizes by using this PWA toolkit.
Benefits of PWAs
- Provide a legal way to have users install your iOS app without the headache of using app stores
- Quick installation time
- Small app size for your users
- Native app-like features
- Instant updates

Conclusion
You’ll probably agree that Flutter is a great tool for PWA and, when combined with Codemagic, makes things a lot easier and smoother.
The next time you’re faced with the problem introduced at the beginning of this article, don’t fret — you can simply utilize Flutter Web so that your users can install a PWA.
Up for a challenge? Currently, the web app works fine on a browser until a URL that contains an invalid job ID is accessed (e.g., pwa_demo.codemagic.app/60). The challenge is to direct users to an error screen that tells them the job they are trying to access does not exist. Cheers, and good luck.
About the author:
Jahswill Essien is a mobile developer, ardent on building awesome stuff with Flutter, he has been using Flutter for the past 2 years. Jahswill is a visual learner as such he strives to write articles that contain pictorial illustrations and/or analogies to drive home a concept explained. His favourite quote is: “We are constrained by our mind, what we feel is our limit isn’t our limit. It’s amazing how much we can learn in a short amount of time by perseverance alone”. Check out some things Jahswill built with Flutter by visiting his GitHub profile.


