


This is a getting started guide on building React Native apps with Codemagic CI/CD. Updated in May 2021.
When it comes to CI/CD, Codemagic has a lot of exciting things to offer to a developer (like an easy project setup, a really great Slack community and remote access to the build boxes). But now, we’ve also got workflows on Codemagic for React Native – and this is amazing.
Written by Lewis Cianci
Top reasons to use Codemagic CI/CD for React Native apps
Easy project setup
Getting started with building React Native apps is easy thanks to ready-made configuration templates. Simply select React Native App as the starter workflow and kick off your project.
Customizable workflows for iOS and Android
Codemagic was built with cross-platform app development in mind. You can have full control over your React Native pipeline with workflows for iOS and Android that fit the needs of your development team.
Seamless code signing for iOS and Android
Simply upload your Android keystore and iOS code signing files to receive signed artifacts. With automatic code signing for iOS, Codemagic can take care of creating and managing signing certificates and provisioning profiles for you.
Unit and integration tests
Assure the quality of your React Native apps with automated tests. Run unit tests with Jest, or test the full app on the simulator/emulator or real devices with Appium or Detox.
Distribute React Native apps with ease
Distribute the latest version of your app to testers on TestFlight, Google Play or Firebase App Distribution, or configure your workflows to automatically publish to the Apple App Store or Google Play.
First-class support
The Codemagic Slack workspace community has more than 3,000 members. Find quick solutions and discuss your projects with fellow developers.


Installing software and dependencies
You can either use Windows, Linux or macOS to get started with React Native. Both the iOS and Android environments are available on macOS, whereas Linux and Windows only support the Android environment. We will assume that you are using macOS for React Native development, but you can always follow the similar instructions for Windows and Linux as well.
There are two possible ways to get started with React Native:
- Expo CLI
- React Native CLI
Installing Expo CLI
You will need to have Node 12 LTS or later installed on your local machine to use this method. Use npm to install the Expo CLI command line utility:
npm install -g expo-cli
Installing React Native CLI
For macOS, you will need to install Node, the React Native command line interface, a JDK, and Android Studio or Xcode.
The recommended method is to install Node and Watchman using Homebrew. Run the following commands in a terminal after installing Homebrew:
`brew install node`
`brew install watchman`
You will also need to install CocoaPods. Use the command below to install CocoaPods:
sudo gem install cocoapods
For Windows and Linux, you will need Node, the React Native command line interface, Python, a JDK and Android Studio. While you can use any editor of your choice to develop your app, you will need to install Android Studio in order to set up the necessary tooling to build your React Native app for Android.
React Native has a built-in command line interface. Rather than install and manage a specific version of the CLI globally, we recommend you access the current version at runtime using npx, which ships with Node.js.
With npx react-native <command>, the current stable version of the CLI will be downloaded and executed at the time the command is run. If you previously installed a global react-native-cli package, please remove it, as it may cause unexpected issues.
Set up your React Native application
This article is written specifically for the React Native version
0.64stable release.
To begin, create a new project for React Native using the command below:
react-native init ReactNativeApp
cd ReactNativeApp
react-native run android
Getting started with Codemagic CI/CD for React Native apps
You can sign up to Codemagic using a GitHub, Bitbucket or GitLab account or an email address. After signing up, you can connect different repository providers and add apps from any self-hosted or cloud-based Git repository (see Adding repositories).
On signup, you will be asked to authorize Codemagic to authenticate you without granting access to any repositories.
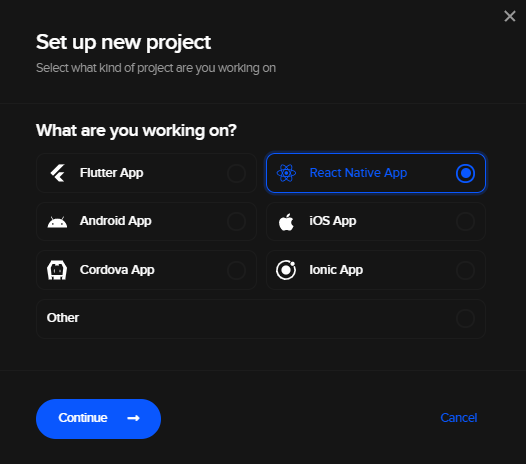
Then, you can use React Native workflows by creating a new project in Codemagic and simply selecting React Native App from the options.
Hitting Next shows us our codemagic.yaml file.
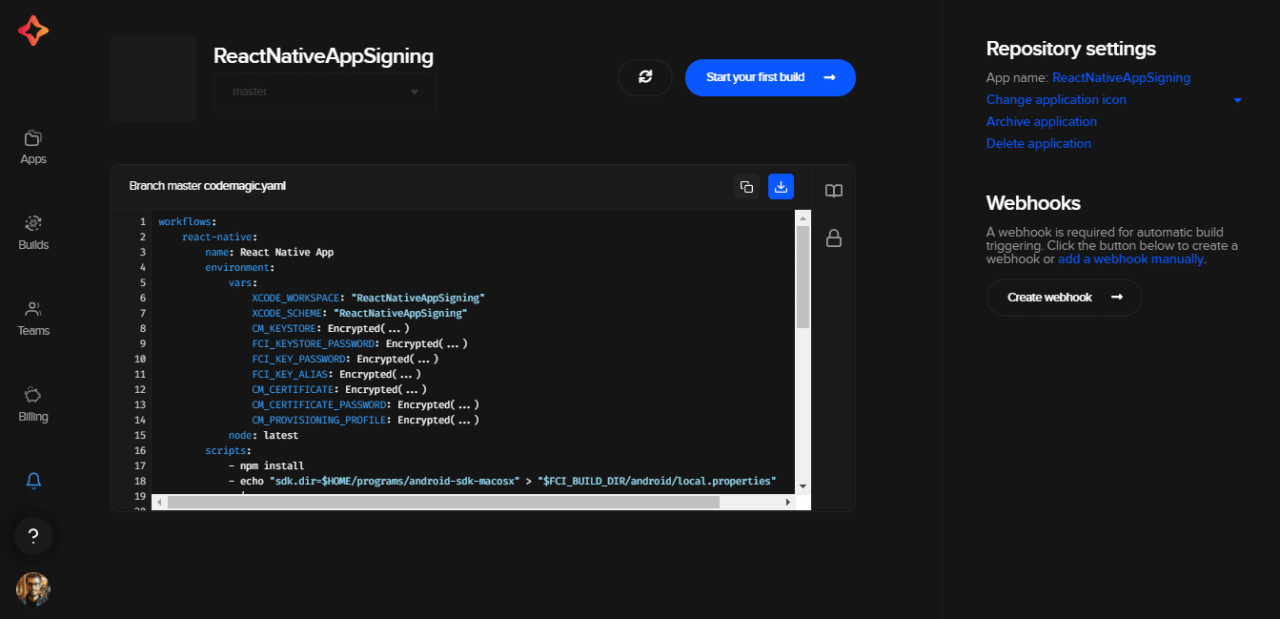
We can download this and add it to our local repository. This configures our Codemagic pipelines so that Codemagic knows how to run our React Native build on its build servers.
Modifying the YAML file for our build
The next step in this process is to modify our codemagic.yaml file to get it to build our solution, so let’s see what this file looks like:
# Check out https://docs.codemagic.io/getting-started/building-a-react-native-app/ for more information
# Please review and update values in curly braces

workflows:
    react-native:
        name: React Native App
        environment:
            vars:
                XCODE_WORKSPACE: "ReactNativeApp"
                XCODE_SCHEME: "ReactNativeApp"
                CM_KEYSTORE: Encrypted(...)
                CM_KEYSTORE_PASSWORD: Encrypted(...)
                CM_KEY_PASSWORD: Encrypted(...)
                CM_KEY_ALIAS: Encrypted(...)
                CM_CERTIFICATE: Encrypted(...)
                CM_CERTIFICATE_PASSWORD: Encrypted(...)
                CM_PROVISIONING_PROFILE: Encrypted(...)
            node: latest
        scripts:
            - npm install
            - echo "sdk.dir=$HOME/programs/android-sdk-macosx" > "$CM_BUILD_DIR/android/local.properties"
            - |
                chmod -R 777 $CM_BUILD_DIR
                echo $CM_KEYSTORE | base64 --decode > $CM_BUILD_DIR/keystore.jks
                # build Android
                cd android
                ./gradlew assembleRelease
            - keychain initialize
            - |
              # set up provisioning profiles
              PROFILES_HOME="$HOME/Library/ProvisioningProfiles"
              mkdir -p "$PROFILES_HOME"
              PROFILE_PATH="$(mktemp "$PROFILES_HOME"/$(uuidgen).mobileprovision)"
              echo ${CM_PROVISIONING_PROFILE} | base64 --decode > $PROFILE_PATH
              echo "Saved provisioning profile $PROFILE_PATH"
            - |
             # set up signing certificate
             echo $CM_CERTIFICATE | base64 --decode > /tmp/certificate.p12
             keychain add-certificates --certificate /tmp/certificate.p12 --certificate-password $CM_CERTIFICATE_PASSWORD
            - xcode-project use-profiles
            - |
                # build iOS
                cd ios
                pod install
            - xcode-project build-ipa --workspace "ios/$XCODE_WORKSPACE.xcworkspace" --scheme "$XCODE_SCHEME"
        artifacts:
            - android/app/build/outputs/**/**/*.apk
            - build/ios/ipa
Clearly, there are some changes that we need to make to this YAML file to get a successful build.
The required changes
Android
Broadly speaking, you almost never want to build a debug version of your app in your CI/CD pipeline. We need to tell the build process to build a release build instead. To do this, we just update the lines under #build Android to look more like this:
- |
  # build Android
  cd android
  ./gradlew assembleRelease
The build process will now follow the path as defined in our build.gradle. Code signing is a topic in itself (covered in depth here), so we’ll just describe the necessary steps to get the build to work.
In your app-level build.gradle (that’s under YourProjectDirectory\android\app), we need to add in our release signing details. But we need to use the release signing details only when our build is being run on Codemagic and not locally.
We then configure the build process to read the signing details from the release file.
signingConfigs {
    debug {
        storeFile file('debug.keystore')
        storePassword 'android'
        keyAlias 'androiddebugkey'
        keyPassword 'android'
    }

    release {
        if (System.getenv()['CI']) { // CI=true is exported by Codemagic
            storeFile file(System.getenv()['CM_BUILD_DIR'] + '/keystore.jks')
            storePassword System.getenv()['CM_KEYSTORE_PASSWORD']
            keyAlias System.getenv()['CM_KEY_ALIAS']
            keyPassword System.getenv()['CM_KEY_PASSWORD']
        }
        else {
            def keystorePropertiesFile = rootProject.file('key.properties')
            def keystoreProperties = new Properties()
            keystoreProperties.load(new FileInputStream(keystorePropertiesFile))
            keyAlias keystoreProperties['keyAlias']
            keyPassword keystoreProperties['keyPassword']
            storeFile file(keystoreProperties['storeFile'])
            storePassword keystoreProperties['storePassword']
        }
    }
}
What’s actually happening here? In a nutshell, if we are running in a release build, we check if the CI environment variable is declared. (Codemagic build machines declare this variable.) If we are, then we fetch the location of the keystore and appropriate signing details from the environment variables. Otherwise, we use the local key.properties for these details and fetch the details from there instead. This means that our builds continue to run not only locally but also on Codemagic, which is a nice bonus.
Our local debug key.properties might look something like this (this is for a debug keystore, so yours will be different):
storePassword=android
keyPassword=yourpassword
keyAlias=androiddebugkey
storeFile=keystore.keystore
These are just the keys for the debug keystore, but normally, these are incredibly sensitive details. We don’t want just anyone to be able to read these settings, so checking these files into source control is a really bad idea. Instead, we will encrypt them in Codemagic and have the build process decrypt the required details just before the build runs.
Encrypting our build-time dependencies
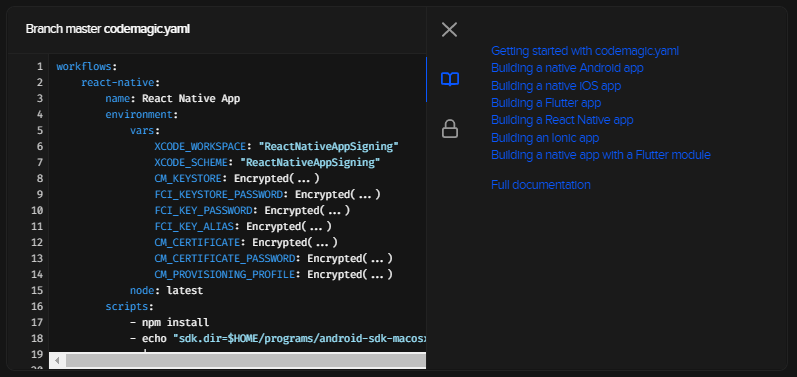
On our project configuration page, click on the notebook icon to open a list of links to useful guides for project setup.
Click on the lock icon to use the encrypt environment variables function and convert sensitive details into a format that can be securely checked in.
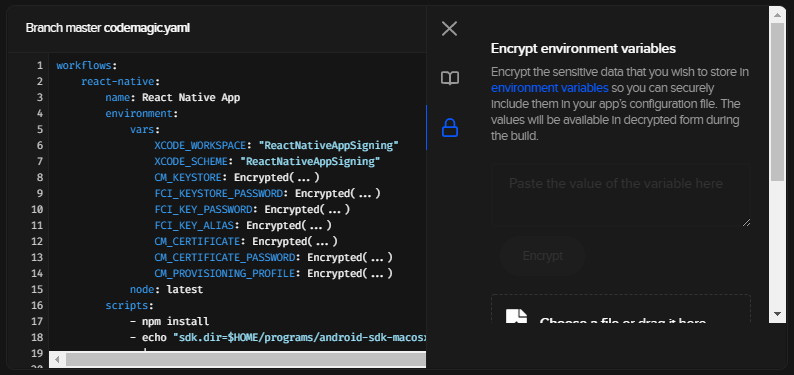
Next, we can drag our keystore file into this window and receive an encrypted variable containing our keystore. We just click the little clipboard next to the icon to copy the encrypted keystore variable to our clipboard.
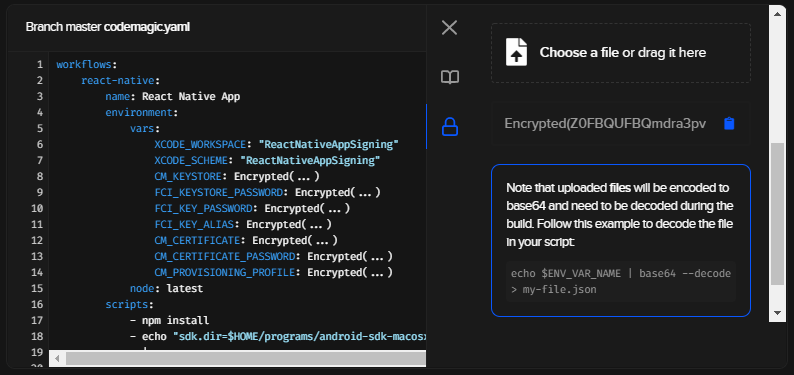
We can also use this screen to encrypt individual variables, like the keystore alias and password. We’ll do this now and paste these values into our codemagic.yaml file. When we’re done, it should look a little bit like this:
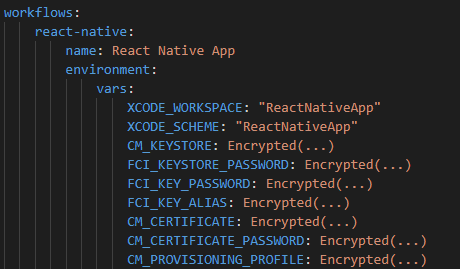
We’ve configured our build variables, so we can now use them in our build process later on. With these four environment variables encrypted (the keystore, keystore password, key alias and password), we’re good to go.
Build script
For our Android builds, we want to:
- Make the cloned directory writable. (I was getting build failures without this, hence the
chmod.) - Write the keystore file into our repository so that it can be used by the build process.
- Switch to the Android directory and run the
assembleReleaseGradle task, which will produce a signed APK.
In the codemagic.yaml file, it looks like this:
- npm install
- echo "sdk.dir=$HOME/programs/android-sdk-macosx" > "$CM_BUILD_DIR/android/local.properties"
- |
  chmod -R 777 $CM_BUILD_DIR
  echo $CM_KEYSTORE | base64 --decode > $CM_BUILD_DIR/keystore.jks
  # build Android
  cd android
  ./gradlew assembleRelease
For Android, it’s really that easy! For iOS, it’s a little more involved…
iOS
In order for our builds to complete successfully, we need to load both our certificate and the .mobileprovision file from App Store Connect onto the build agent. In this example, I have encrypted the signing certificate as CM_CERTIFICATE, the password for the certificate as CM_CERTIFICATE_PASSWORD and the provisioning profile as CM_PROVISIONING_PROFILE.
Build script
This looks a bit more complicated than the Android equivalent, and ✨ fancy Codemagic CLI functionality ✨ is also used to make it work. Here’s what we’re doing in this build:
- Running
keychain initializeto prepare for the import of our signing certificate into the build agent - Setting
PROFILES_HOMEto where our mobile provisioning certificate is about to be and then creating that directory - Setting
PROFILE_PATHto a temporary location withinPROFILES_HOME - Writing our PROVISIONING_PROFILE to
PROFILE_PATHwith a temporary name - Writing our signing certificate (CM_CERTIFICATE) to
/tmp/certificate.p12 - Adding this certificate to the build box’s local certificate store, using CM_CERTIFICATE_PASSWORD to do so
- Running the
xcode-project use-profilescommand - Changing into the iOS directory, running
pod installand usingxcode-project build-ipato build our app while specifying a workspace and scheme to use
- keychain initialize
  - |   # set up provisioning profiles
    PROFILES_HOME="$HOME/Library/MobileDevice/Provisioning Profiles"
    mkdir -p "$PROFILES_HOME"
    PROFILE_PATH="$(mktemp "$PROFILES_HOME"/$(uuidgen).mobileprovision)"
    echo ${CM_PROVISIONING_PROFILE} | base64 --decode > "$PROFILE_PATH"
    echo "Saved provisioning profile $PROFILE_PATH"
  - |   # set up signing certificate
    echo $CM_CERTIFICATE | base64 --decode > /tmp/certificate.p12
    keychain add-certificates --certificate /tmp/certificate.p12 --certificate-password $CM_CERTIFICATE_PASSWORD
  - xcode-project use-profiles
  - |   # build iOS
    cd ios
    pod install
  - xcode-project build-ipa --workspace "ios/$XCODE_WORKSPACE.xcworkspace" --scheme "$XCODE_SCHEME"
The finished codemagic.yaml file
After all that, you should have a codemagic.yaml file that looks a bit like this:
workflows:
  react-native:
    name: React Native App
    environment:
      vars:
        XCODE_WORKSPACE: 'ReactNativeApp'
        XCODE_SCHEME: 'ReactNativeApp'
        CM_KEYSTORE: Encrypted(...)
        CM_KEYSTORE_PASSWORD: Encrypted(...)
        CM_KEY_PASSWORD: Encrypted(...)
        CM_KEY_ALIAS: Encrypted(...)
        CM_CERTIFICATE: Encrypted(...)
        CM_CERTIFICATE_PASSWORD: Encrypted(...)
        CM_PROVISIONING_PROFILE: Encrypted(...)
      node: latest
    scripts:
      - npm install
      - echo "sdk.dir=$HOME/programs/android-sdk-macosx" > "$CM_BUILD_DIR/android/local.properties"
      - |
        chmod -R 777 $CM_BUILD_DIR
        echo $CM_KEYSTORE | base64 --decode > $CM_BUILD_DIR/keystore.jks
        # build Android
        cd android
        ./gradlew assembleRelease
      - keychain initialize
      - |
        # set up provisioning profiles
        PROFILES_HOME="$HOME/Library/MobileDevice/Provisioning Profiles"
        mkdir -p "$PROFILES_HOME"
        PROFILE_PATH="$(mktemp "$PROFILES_HOME"/$(uuidgen).mobileprovision)"
        echo ${CM_PROVISIONING_PROFILE} | base64 --decode > "$PROFILE_PATH"
        echo "Saved provisioning profile $PROFILE_PATH"
      - |
        # set up signing certificate
        echo $CM_CERTIFICATE | base64 --decode > /tmp/certificate.p12
        keychain add-certificates --certificate /tmp/certificate.p12 --certificate-password $CM_CERTIFICATE_PASSWORD
      - xcode-project use-profiles
      - |
        # build iOS
        cd ios
        pod install
      - xcode-project build-ipa --workspace "ios/$XCODE_WORKSPACE.xcworkspace" --scheme "$XCODE_SCHEME"
    artifacts:
      - android/app/build/outputs/**/**/*.apk
      - build/ios/ipa
A small note – the Encrypted(...) values are placeholders. You’ll need to encrypt your own values on Codemagic that suit your build process.
Building React Native apps on Codemagic
Before starting a build on Codemagic, make sure that you have the codemagic.yaml file committed in the same project at the root level via the version control system.
For a detailed reference of an exhaustive version of codemagic.yaml file, check out the sample React Native application.
To start the build, follow the steps below:
In the application settings for your React Native project, click Check for configuration file.
Click Start your first build to start building your Android and iOS apps from the React Native project.

- Select the workflow from the
codemagic.yamlfile, and click Start new build.
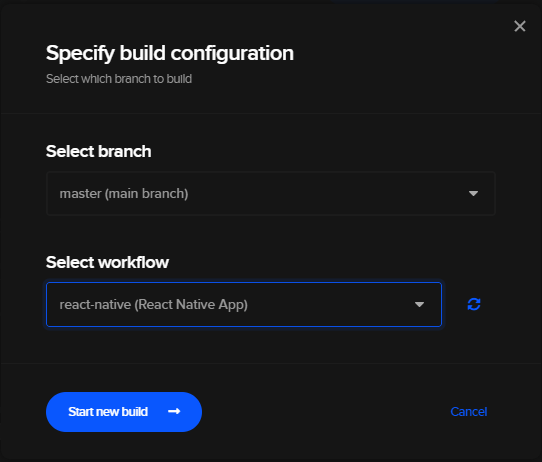
This will start a new build for your project and take you to the build processing page.
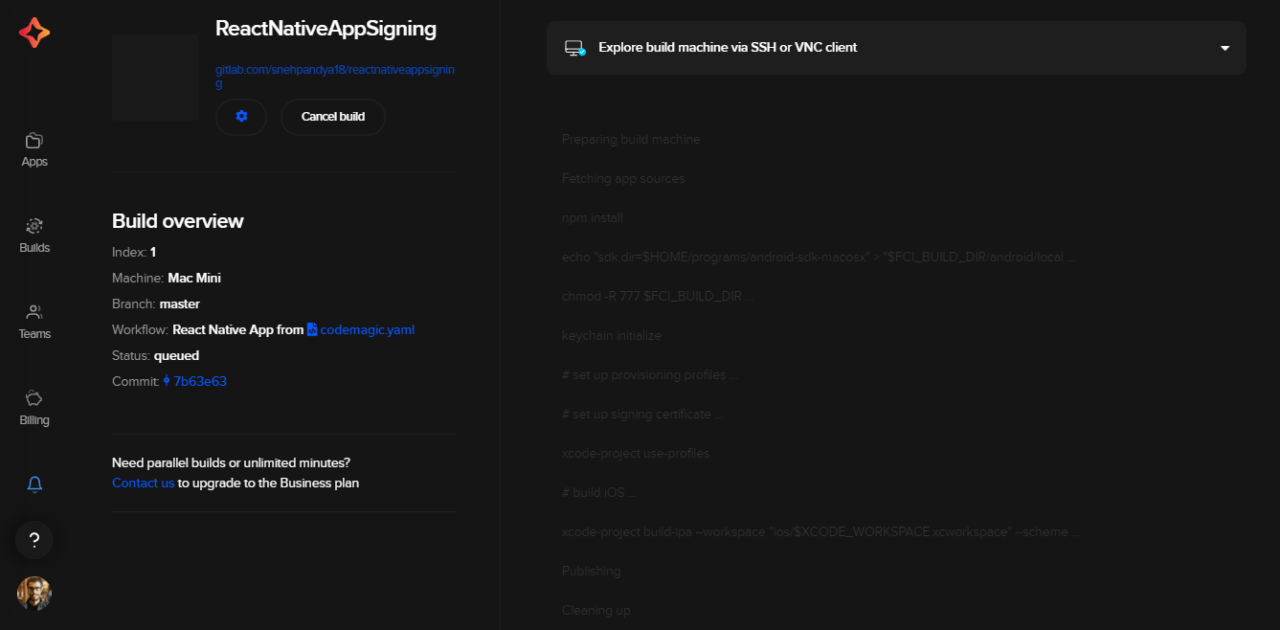
Once the build is completed, you can download artifacts as well as get your app published if you have configured automated publishing in the codemagic.yaml file.
A concise version of the above steps can be found on the Codemagic documentation page.
And that’s it! Your React Native app should build with Codemagic now. If you have any questions or comments, be sure to drop into Codemagic’s Slack channel and let us know. Happy developing!
More articles about React Native
- Flutter vs React Native: A developer’s perspective
- How to build React Native UI app with Material UI
- How to develop and distribute iOS apps without Mac with React Native & Codemagic
- Create React Native app using Expo CLI or React Native CLI
- How to run React Native Detox tests on Codemagic
Lewis Cianci is a software developer in Brisbane, Australia. His first computer had a tape drive. He’s been developing software for at least ten years and has used quite a few mobile development frameworks (like Ionic and Xamarin Forms) in his time. After converting to Flutter, though, he’s never going back. You can reach him on his blog, read about other non-fluttery things at Medium or maybe catch a glimpse of him at your nearest and fanciest coffee shop with his dear wife.


