


This article is written by Karl Suhajda
There is a specific kind of dread that comes with finding a critical bug in a production React Native app. The fix is usually straightforward: a broken API call, a logic error, a UI state that did not account for an edge case. You can see exactly what went wrong and exactly how to correct it. The code change might take an hour.
What takes days is everything that comes after.
App Store review. Google Play review. Waiting. Watching your crash reports climb. Reading one-star reviews from users who have no idea why the app is broken and no reason to assume it will be fixed soon. The fix is sitting in your repository, tested and ready, and there is nothing you can do to get it to your users faster.
Using CodePush for over-the-air (OTA) updates remove that bottleneck entirely. For any bug that lives in your JavaScript layer, which covers the majority of production incidents in React Native apps, you can push a fix directly to users’ devices without a store submission, without a review queue, and without any action required from the user. This post walks through exactly how that process works in practice, from identifying whether a bug qualifies for an OTA fix to deploying it safely and monitoring the rollout.
Step 1: Determine whether the bug qualifies for an OTA fix
Not every production bug can be patched over the air. The first thing to establish is whether the fix lives entirely in your JavaScript bundle or whether it requires changes to native code.
React Native apps have two distinct layers. The native shell, your compiled iOS or Android binary, handles device hardware access, native APIs, permissions, and anything that runs outside the JavaScript runtime. The JavaScript bundle contains your application logic, UI components, styling, assets, and most of what your users actually interact with.
OTA updates work by replacing the JavaScript bundle. They cannot touch the native shell.
A bug qualifies for an OTA fix if the fix involves:
- JavaScript logic or business rules
- UI components, layouts, or styles
- API endpoint changes or request handling
- Configuration values or feature flags
- Static assets including images, JSON files, and fonts
- Copy, text content, or localisation strings
A bug requires a store release if the fix involves:
- Native modules or native dependencies
- Changes to app permissions
- Updates to third-party SDKs that have a native layer
- Binary-level configuration changes
- Anything inside your
ios/orandroid/directories
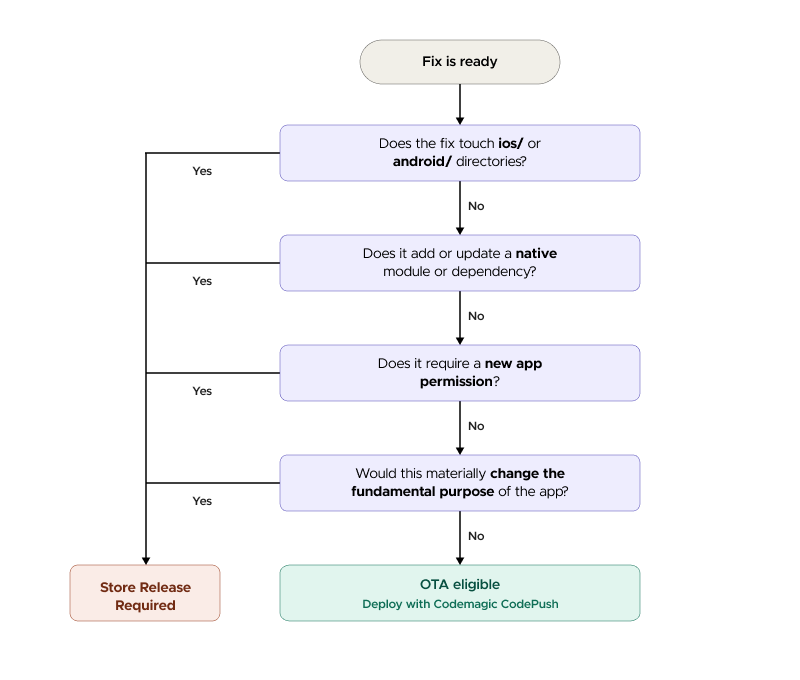
A practical decision test: open the file or files your fix touches. If every change is in a .js, .ts, .jsx, or .tsx file, or in an asset directory, it is almost certainly eligible for an OTA update. If any change touches a native file, you need a store release for that specific fix, though you can still use OTA for the JavaScript portion if the changes are separable.
The majority of production incidents in React Native apps, including broken API integrations, UI regressions, data handling errors, and copy mistakes, are JavaScript-layer issues. In practice, most hotfixes qualify.
Already know you need OTA updates and want to get set up?
Codemagic CodePush is a fully hosted OTA update service for React Native teams.
Start your free trial at codemagic.io/codepush
Step 2: Have your deployment channels configured before an incident happens
This step cannot be done during an incident. It needs to be in place before one occurs.
Effective OTA deployment depends on having at least two deployment channels set up: a staging channel and a production channel. The staging channel is accessible only to your internal team. The production channel reaches your users. Every fix goes through staging before it touches production, without exception.
If you are using Codemagic CodePush, setting up deployment channels is straightforward from the dashboard. You can create as many channels as your workflow requires. Some teams add a beta channel between staging and production for early access testing with a subset of real users.
The other thing to have ready before an incident is your rollback procedure. Know exactly how to revert a production bundle to the previous stable version using the CodePush CLI. Test it in staging. Write it down. The worst possible time to be figuring out your rollback process is when something has gone wrong in production and users are affected.
Step 3: Write and test the fix
Once you have confirmed the bug is JavaScript-layer and your channels are configured, the fix itself follows your normal development process. Write the change, run your test suite, and review the diff carefully, specifically looking for any unintended side effects that might affect other parts of the app.
A few things worth checking before you push to staging:
Scope the change tightly. An OTA hotfix should address the specific bug and nothing else. Bundling additional changes into a hotfix push increases risk and makes it harder to attribute any new issues that emerge post-deploy. Save other changes for a scheduled release.
Check the fix against multiple device configurations. The bug may have surfaced on a specific OS version or device type. Confirm the fix resolves the issue across the configurations where it was reported, and does not introduce regressions on configurations where the app was working correctly.
Verify the bundle size impact. OTA updates deliver only what has changed, so most hotfixes are small. If your fix inadvertently pulls in a large dependency or changes a significant portion of the bundle, it is worth understanding why before you push.
Step 4: Push to staging and validate
With the fix tested locally, push it to your staging deployment channel. Your staging environment should mirror production as closely as possible, with the same API endpoints where feasible, the same feature flags, and the same data structures.
What you are validating in staging:
- The bug is resolved under the conditions where it was reported
- The fix does not introduce regressions in adjacent functionality
- The OTA update itself delivers correctly, the bundle installs, the app launches cleanly, and the update applies as expected
- The rollback works, trigger a rollback from staging using the CLI and confirm the app reverts to the previous bundle without issues
Do not skip the rollback test. It takes five minutes and has saved many teams a significant amount of stress.
The Codemagic CodePush analytics dashboard gives you a visual overview of your team’s OTA activity showing the total downloads and successful installs across all projects. You can also see downloads, successful and failed installs on a per project basis.
See how it works at codemagic.io/codepush
Step 5: Deploy to production with a staged rollout
Once staging is validated, push to production, but not to 100% of your users at once.
Start with a small percentage. Five to ten percent is a reasonable initial rollout for most apps. This means the update reaches a fraction of your production user base while the majority remain on the current stable bundle. If something unexpected surfaces, a device configuration you did not test against or an API interaction that behaves differently in production, you catch it at limited exposure rather than at full scale.
If you are using analytics such as Firebase Crashlytics or Sentry you should monitor for at least 30 minutes to an hour, watching for:
- Crash rate: has it changed relative to the previous bundle?
- Error logs: are any new errors appearing that were not present before the push?
You can use the Codemagic CodePush analytics dashboard to to monitor:
– Install rate: is there an unusual number of failed installs vs. successful installs?
If the metrics look healthy, expand the rollout. A common pattern is 5% to 25% to 100%, with a monitoring window between each step. For a critical hotfix where confidence is high and the change is minimal, you can move through these steps quickly. The whole process from initial push to full rollout can take a few hours.
Step 6: Expand to 100% and confirm resolution
Once you are satisfied with the metrics across your staged rollout, expand to 100%. The update will reach the remainder of your user base on their next app launch.
After full rollout, confirm resolution by checking:
- Crash reports have returned to baseline or improved
- The specific error or behaviour that triggered the incident is no longer being reported
- User reviews or support tickets related to the bug have stopped coming in
- Version distribution shows the majority of active users on the new bundle
Keep the previous stable bundle available for rollback for at least 24 to 48 hours after a full rollout. Edge cases and unusual device configurations can surface issues that normal testing does not catch, and having a tested rollback ready means you can respond immediately if needed.
Step 7: Document the incident and the response
This step is often skipped under time pressure, but it is worth doing even briefly. A short incident record covering what broke, what the fix was, how long it took from discovery to full rollout, and what monitoring signals were most useful, builds institutional knowledge that makes future incidents faster to resolve.
Specifically useful to document:
- The time from bug discovery to fix deployed to staging
- The time from staging validation to full production rollout
- Which analytics signals confirmed the fix was working
- Any complications encountered and how they were resolved
Over time, this documentation builds a picture of your team’s incident response capability and often reveals patterns, specific areas of the codebase that produce incidents repeatedly, or monitoring gaps that made it harder to detect the problem quickly.
Setting up OTA capability before the next incident
The single most important thing this post can communicate is this: the time to set up OTA update capability is before you need it, not during a production incident.
Teams that get the most value from OTA updates are those who have treated it as standard release infrastructure, with channels configured, rollback tested, team access set up, and monitoring in place, before any incident occurs. When something breaks in production, their response time is measured in hours. Teams setting up OTA tooling for the first time during a live incident are doing the hardest possible version of a task that should be routine.
If your team does not have OTA updates configured today, the next calm moment in your development cycle is the right time to set it up.
Frequently Asked Questions
Can I fix a React Native bug without going through the App Store?
Yes, for bugs that live in the JavaScript layer. React Native apps have two layers, a native shell and a JavaScript bundle. Over-the-air updates work by replacing the JavaScript bundle directly on users’ devices, bypassing the App Store and Google Play review process entirely. This covers the majority of production bugs including broken API calls, UI errors, logic issues, and copy mistakes.
How long does it take to deploy a React Native hotfix with OTA updates?
With OTA updates configured and a staged rollout process in place, most teams can go from a validated fix to full production rollout within a few hours. The process involves pushing to a staging channel, validating delivery and fix effectiveness, then rolling out to a percentage of production users before expanding to 100%.
What types of React Native bugs can be fixed with OTA updates?
Any bug whose fix lives entirely in JavaScript files or assets can be deployed over the air. This includes broken API integrations, UI regressions, data handling errors, configuration issues, copy mistakes, and logic errors. Bugs that require changes to native code, app permissions, or native dependencies still require a full store release.
What happens if an OTA hotfix causes new problems in production?
A staged rollout limits exposure. If a problem surfaces, you catch it at 5% or 10% of users rather than 100%. You can then trigger a rollback via the CLI, which reverts the production bundle to the previous stable version. CodePush also includes automatic rollback: if the app fails to launch after applying an update, it automatically reverts to the last working bundle on the next launch.
Do I need to set up OTA updates before a production incident occurs?
Yes. OTA update infrastructure, including deployment channels, rollback procedures, team access, and monitoring, needs to be in place before an incident, not during one. Teams setting up OTA tooling for the first time during a live production incident face the hardest version of a task that should be routine. The right time to configure it is during a calm development period.
Set up OTA hotfix capability before you need it.
Codemagic CodePush, hosted and managed OTA updates for React Native. Free trial available. Onboarding support included.
Get started at codemagic.io/codepush
Related Reading
React Native Over-the-Air Updates in 2026: Skip the App Store Wait with Codemagic CodePush


