


Written by Rudrank Riyam.
TL;DR: What do you do if your app is working just fine locally but crashing on TestFlight or the App Store? Here’s a quick checklist you can go through to resolve the problem:
- Try building and testing the app in RELEASE mode locally.
- Check if third-party dependencies work with RELEASE mode.
- Check compiler optimizations in Xcode.
- Check for deprecated unused objects.
- Try disabling bitcode if necessary.
- Try recompiling and archiving the app with the latest version of Xcode.
- Try resubmitting the app.
- Time to cry for help from Apple.
For more details on each of these points, continue reading.
After successfully building and testing your iOS app on Codemagic, you may want to upload the build to TestFlight or the App Store. Sometimes you may face a crash that did not happen locally but only occurs when you release the app to your users, either on TestFlight or the App Store, making it difficult for you to understand the core problem behind the crash.
You are not alone in this, and crashes can happen even if everything works fine locally on the simulator without any errors. This article discusses the differences between debug and release mode, the causes of app crashes, and some potential solutions to fix them.
So let’s get started!

Debug vs. release build
When you do a normal build on Xcode and run the app successfully on the simulator or a real device, it is usually under DEBUG mode — unless it’s been explicitly set to RELEASE. These build configurations are given by default with a project in Xcode, and you can set the names to whatever you want. For example, you can also rename the DEBUG mode to STAGING or DEV to signify that this particular build configuration is for development.
For the sake of naming convention, DEBUG mode is for development, whereas RELEASE is for sending the app to testers on TestFlight or releasing it to the App Store. When you run the app on the simulator, it runs in DEBUG mode, and when the app is archived and uploaded to App Store Connect, it is under RELEASE mode.
But what is the difference between the DEBUG and RELEASE modes?
The configurations may differ in the search paths, constants, preprocessor macros, compiler optimizations, etc., affecting the final build. In DEBUG mode, the app compiles with complete symbolic debug information that helps with debugging, and the compiler does no code optimization. The code is optimized in the RELEASE mode, excluding the symbolic information. This results in the creation of a final binary that is smaller in size and somewhat faster.
However, this can lead to Release-Only bugs when you ship your app to TestFlight or App Store due to compiler optimizations or differences in memory layout or initialization.
If you are interested learning more about this topic, head over to this article: What’s the difference between a Debug vs Release Build?
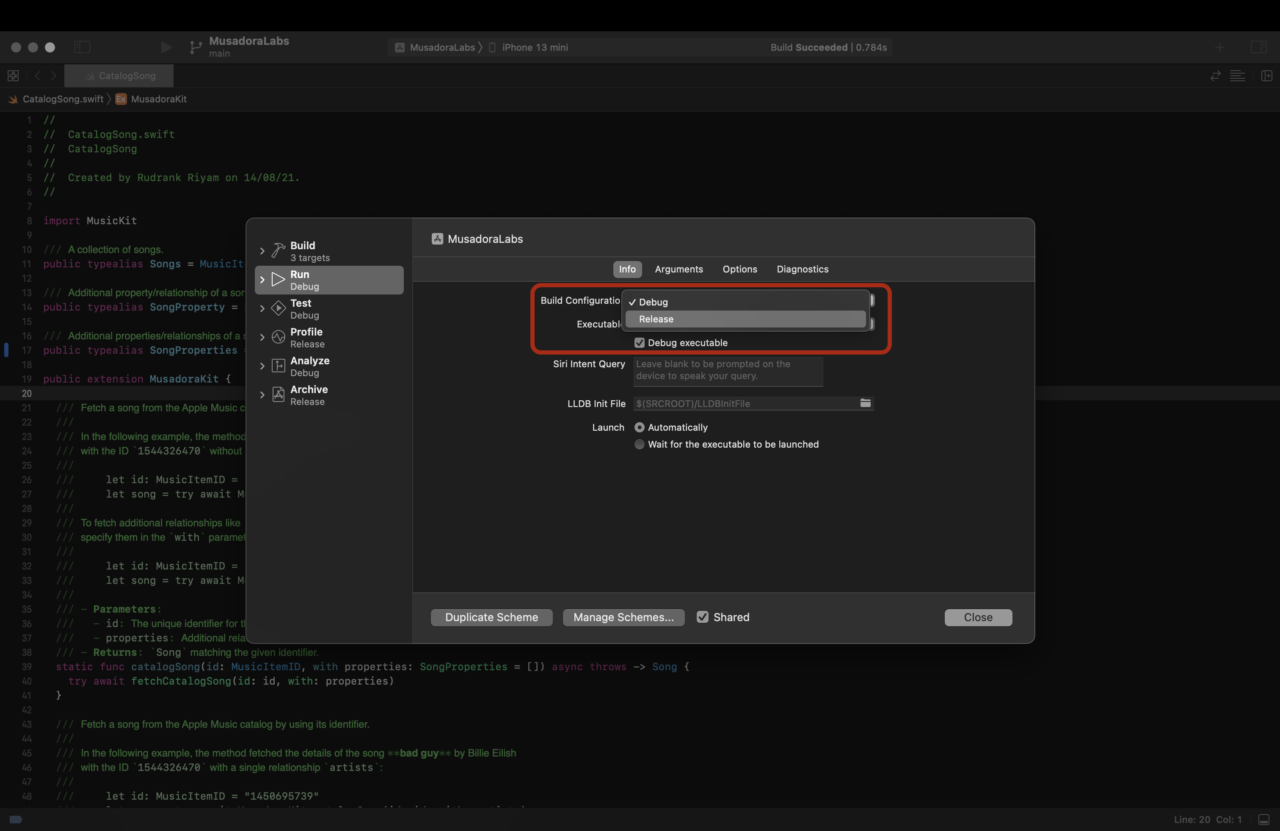
For a given scheme, you can even interchange the roles and run the app in RELEASE mode to understand the crashes that may occur for TestFlight and App Store users. You can connect your device to the Mac via USB, run the Console app, and select your iOS device to view the system log.
For a native iOS project, you can select Edit Scheme for the particular scheme and select Run from the sidebar. Then select RELEASE mode from the Build Configuration option:
If you are working with React Native, use the following command to run the app in RELEASE mode:
react-native run-ios --configuration Release
For Flutter, run the following command:
flutter run --release
Apple has a detailed article on testing a release build that explains how to run your app in simulated user environments to discover and identify deployment errors.
Running the RELEASE build configuration locally is important, as many crashes only sprout on TestFlight or App Review (or worse, are encountered by your users, and you certainly do not want that). This also helps find any issues exposed by compiler optimizations in RELEASE builds.
Third-party dependencies
The first thing to check is whether your third-party dependencies work with the RELEASE build configuration. There may be a chance that a new version will work fine in DEBUG mode without compiler optimization but crash on TestFlight.
For example, a recent version of Firebase was crashing on TestFlight for some users even though the build was working fine locally.
However, libraries on RELEASE build configuration are compiled with aggressive optimization so that the app works efficiently. While the optimization settings may work well for your project (as discussed in the subsequent section), an issue may arise with the external dependency in your app.
You can set the Swift compiler optimization for that particular Pod/target to No Optimization [-Onone] and the Apple Clang optimization level to None [-O0].
Compiler optimization
As mentioned in the build configuration section, compiler optimizations take place when sending the app to TestFlight or the App Store versus building locally.
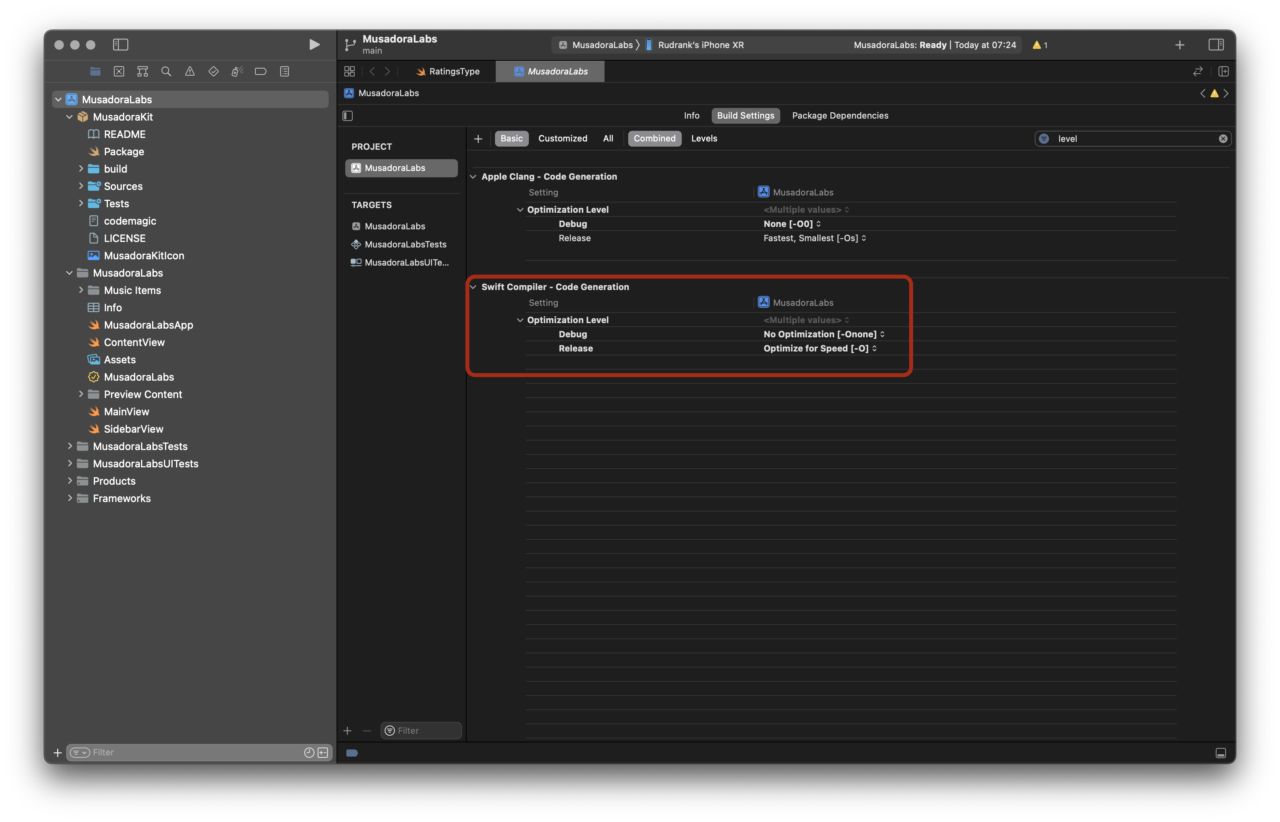
Xcode provides three levels of Swift optimization:
- No Optimization [-Onone]: For development, the compiler performs minimal optimization and preserves all debug information.
- Optimize for Speed [O]: For most production code, the compiler performs aggressive optimizations that can drastically change the type and amount of emitted code. Debug information will be emitted but is lossy.
- Optimize for Size [-Osize]: Special optimization prioritizes code size over performance.
You can set these under the project/target build settings:
If the app crashes on TestFlight or the App Store, the first thing to try is building the project under RELEASE mode with the compiler optimization set to Optimize for Speed [O]. This way, you can find out if there are problems related to your code or if the compiler is messing up while performing the aggressive optimizations.
You can also set the optimization level to Optimize for Size [-Osize] instead, which will still run most of the optimizations that Optimize for Speed [O] does. And as mentioned by the Swift Engineer Steve Canon in this post, it should have little to no performance impact on normal apps.
If the build is still crashing, then as a last resort, you can change the optimization level from Optimize for Speed [O] to No Optimization [-Onone]. Setting it to No Optimization [-Onone] is a quick fix and a shortcut, and if some code relies on undefined behavior, Optimize for Speed [O] exposes it.
This is not an ideal long-term solution, and it is important to understand why the optimizations make the app crash if that is the reason. You should investigate and debug your app in RELEASE mode instead of shipping with optimizations disabled unless there is no other option.
Deprecated objects
It may be possible that you have some code that has been deprecated, which works fine when testing locally but results in a crash on TestFlight. You may not even be using that code, but the mere presence of it crashes the app.
A classic example is UISearchDisplayController, which has been deprecated since iOS 8. It may work in a simulator/device in DEBUG mode but crash in RELEASE mode. When you run the project in the RELEASE build configuration, you see the following error:
*** Terminating app due to uncaught exception 'NSGenericException', reason: 'UISearchDisplayController is no longer supported when linking against this version of iOS. Please migrate your application to UISearchController.'
And you may not even be using UISearchDisplayController in your app! Just a reference in the storyboard that is no longer used is enough to crash the whole project.
Bitcode
Bitcode, an intermediate representation of a compiled program, helps Apple to optimize your app further. The following is from the documentation:
Apps you upload to App Store Connect that contain bitcode will be compiled and linked on the App Store. Including bitcode will allow Apple to re-optimize your app binary in the future without the need to submit a new version of your app to the App Store. For iOS apps, bitcode is the default, but optional. For watchOS and tvOS apps, bitcode is required. If you provide bitcode, all apps and frameworks in the app bundle (all targets in the project) need to include bitcode.
However, this is also one of the reasons for apps to crash on TestFlight for developers, according to posts on Stack Overflow and Apple developer forums.
If your app is crashing on TestFlight or the App Store, a potential workaround is to go to your project settings and disable bitcode:
ENABLE_BITCODE = NO
Also, check whether all the third-party dependencies support bitcode. If all of them do, only then can you set the bitcode to YES; otherwise, you must set it to NO.
Note: While Xcode 14 is still in beta (4) at the time of writing this article, it is worth mentioning it here for future reference. Starting with Xcode 14, bitcode is no longer required for watchOS and tvOS applications, and the App Store no longer accepts bitcode submissions from Xcode 14.
According to the Xcode 14 Beta release notes:
Xcode no longer builds bitcode by default and generates a warning message if a project explicitly enables bitcode: “Building with bitcode is deprecated. Please update your project and/or target settings to disable bitcode.” The capability to build with bitcode will be removed in a future Xcode release. IPAs that contain bitcode will have the bitcode stripped before being submitted to the App Store. Debug symbols for past bitcode submissions remain available for download.
Issues related to bitcode should be automatically solved when Xcode 14 is released in September.
Different OS versions
Sometimes, you may also end up in an ambiguous situation in which the app crashes at launch on one particular series of iOS versions but works perfectly fine for the rest. For example, some users have had to deal with their app crashing on Testflight for iOS 14 and below but not on iOS 15+. You may disable bitcode as a workaround for this issue.
This could also be an issue with your Xcode version. Recompiling and archiving the app with the latest SDK could also help with crashes on release builds.
Codemagic CI/CD always has the latest Xcode versions available. In case you are not a Codemagic user yet, you can sign up here:
.
Resubmission
As absurd as it sounds, occasionally resubmitting another build using the same code after waiting for some time has worked for developers. This is because the binary may get corrupted while uploading to TestFlight and the App Store, though this is extremely unlikely.
Apple technical support
After exhausting all resources and trying the different workarounds, if the app still crashes on TestFlight or the App Store, you can open an Apple Developer Technical Support (DTS) case by submitting a Technical Support Incident.
This option is available to Apple Developer Program and Apple Developer Enterprise Program members. You can find it on your Apple developer console under Code-Level Support.
Provide Apple’s technical support with the following details:
- The problem and the steps you followed to reproduce the error (crashing on startup)
- Logs that contain human-readable function references
- The build UUID of the app archive you are testing
To retrieve the archived app’s build UUID, run the following terminal command:
% dwarfdump -u /Path/To/YourApp.xcarchive/Products/Applications/YourApp.app/YourApp


Conclusion
It is frustrating to have your TestFlight users face a crash when the app works perfectly on your local machine. There are numerous reasons for this to happen across native iOS, React Native, Flutter, and other frameworks.
We have covered the common problems, such as compiler optimizations and bitcode, and described potential solutions that have helped developers solve the crashes.
We hope the workarounds and solutions mentioned in this article help you handle the crash so that you can ship an amazing experience to your users! If you have any suggestions or feedback, join our Slack community or mention @codemagicio on Twitter.


