


Written by Souvik Biswas
It is a myth among app developers that integrating machine learning (ML) into any application is a tough job. With recent innovations in ML tools, it is much easier to implement ML into your apps, even without having any expertise in the field of machine learning.
In this article, I will be showing you how to use Firebase ML Kit to recognize texts in your Flutter app.
Here is a brief synopsis of the topics we are going to cover:
- Setting up a new Firebase project
- Accessing the device camera from the app
- Using Firebase ML Kit to recognize texts
- Identifying email addresses from images
- Using the CustomPaint widget to mark the detected texts
Let’s get started.
Create a new Flutter project
Use the following command to create a new Flutter project:
flutter create flutter_visionNow, open the project using your favorite IDE.
To open with VS Code, you can use the following command:
code flutter_vision
Set up Firebase for the project
In order to use Firebase ML Kit in your app, you have to first complete the Firebase setup for both the Android and iOS platforms.
Create a new project
To create a new Firebase project, head over to this link.
Click Add project to create a new project.
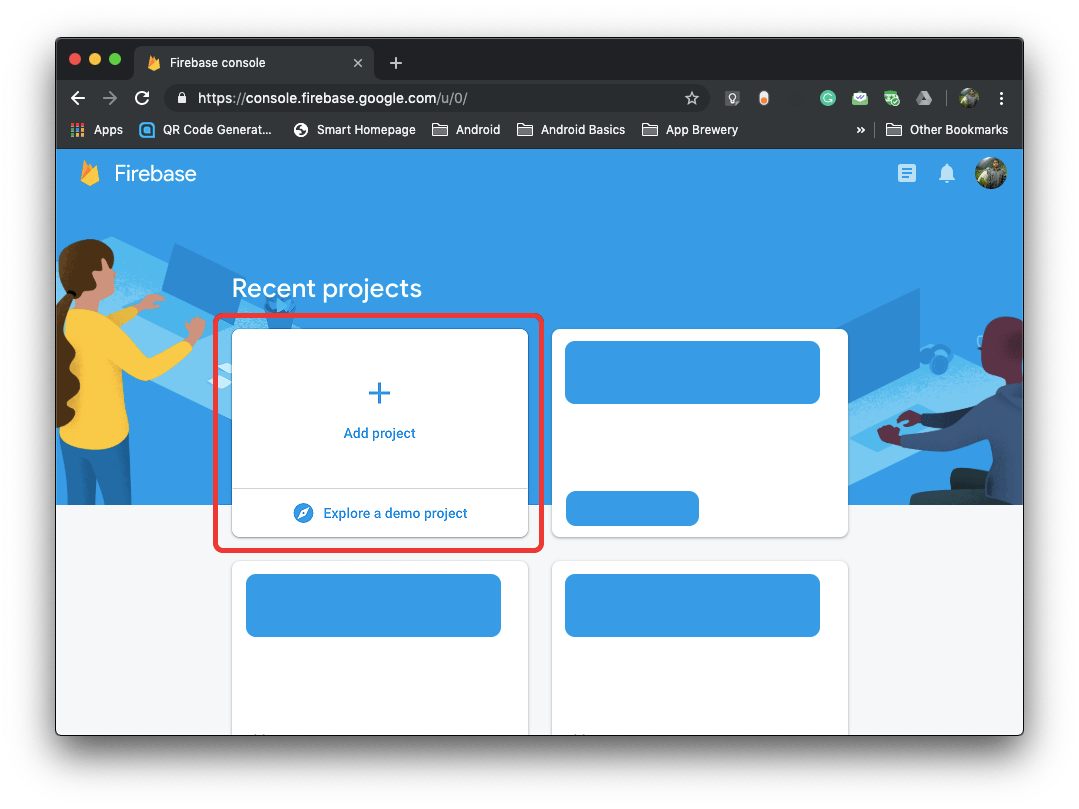
Then enter the project name and continue.
The Firebase Console will create a new project and take you to its Dashboard.
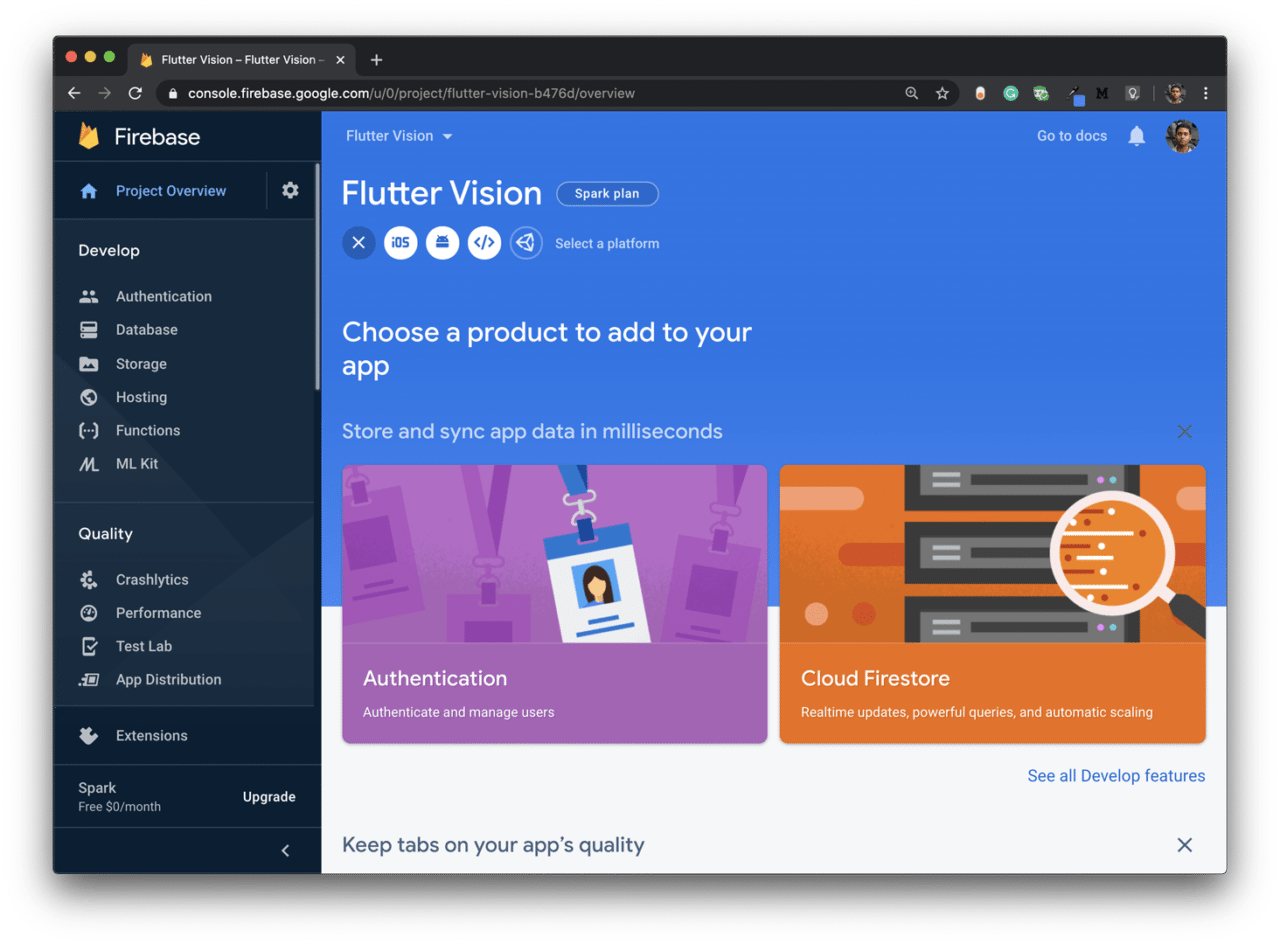
Android setup
From the project Dashboard, click on the Android icon to add Firebase to your Android app.
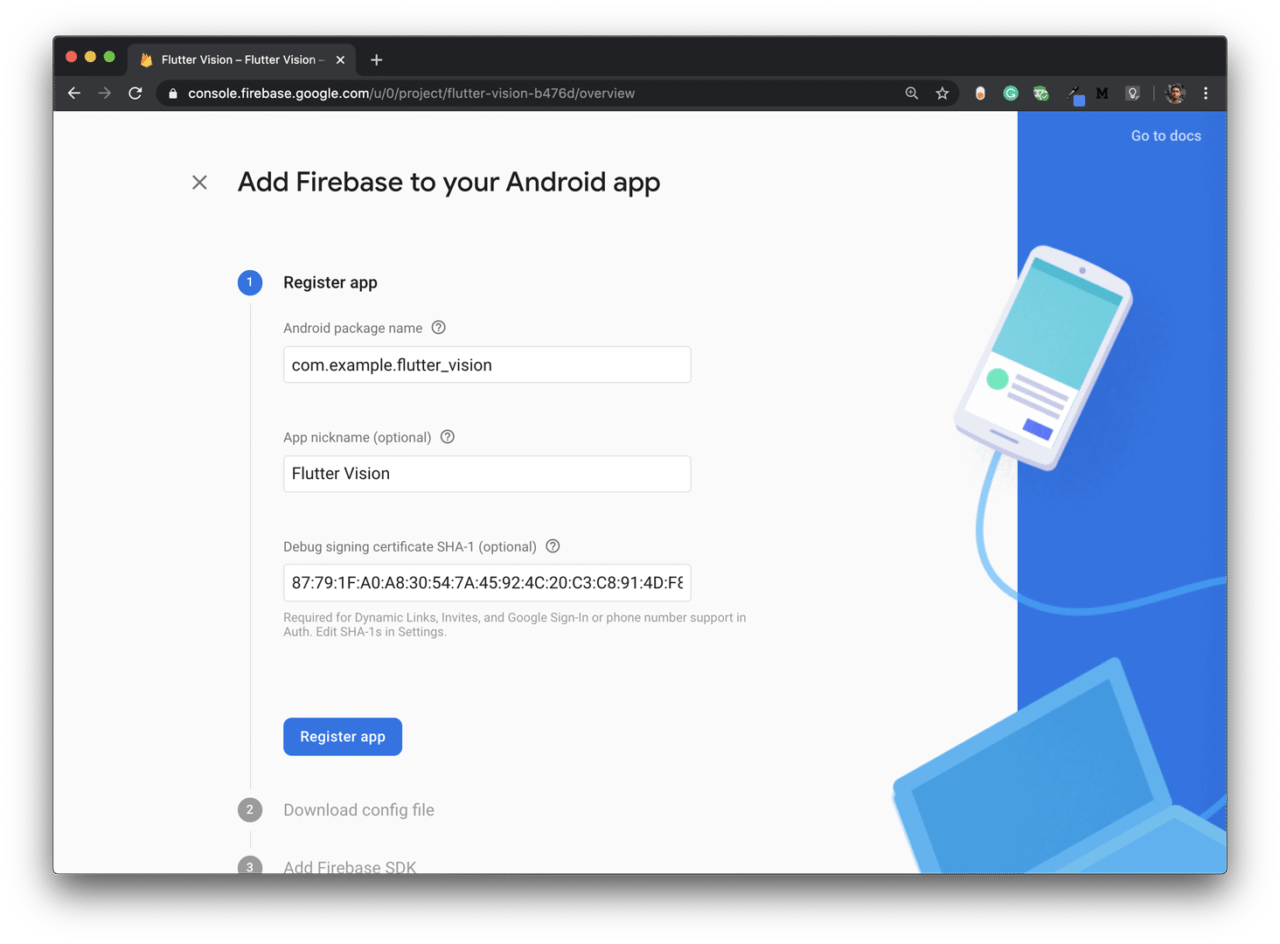
Enter the package name, app nickname, and SHA-1, then click Register app.
Next, you have to download the
google-services.jsonfile and place it in the appropriate folder: project directory → android → app. Then click Next.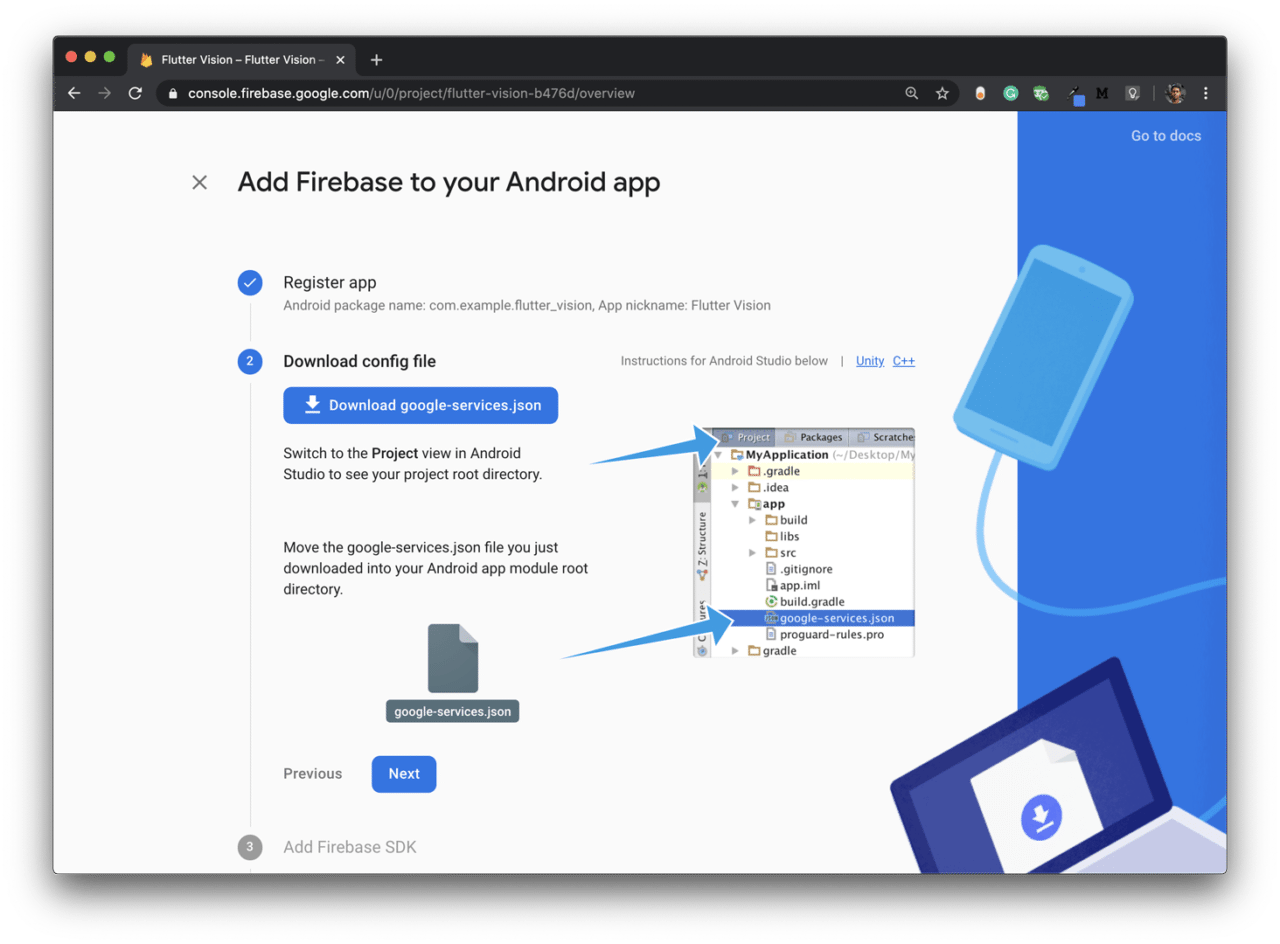
Add the Firebase SDK as per the instructions.
Continue to the console.
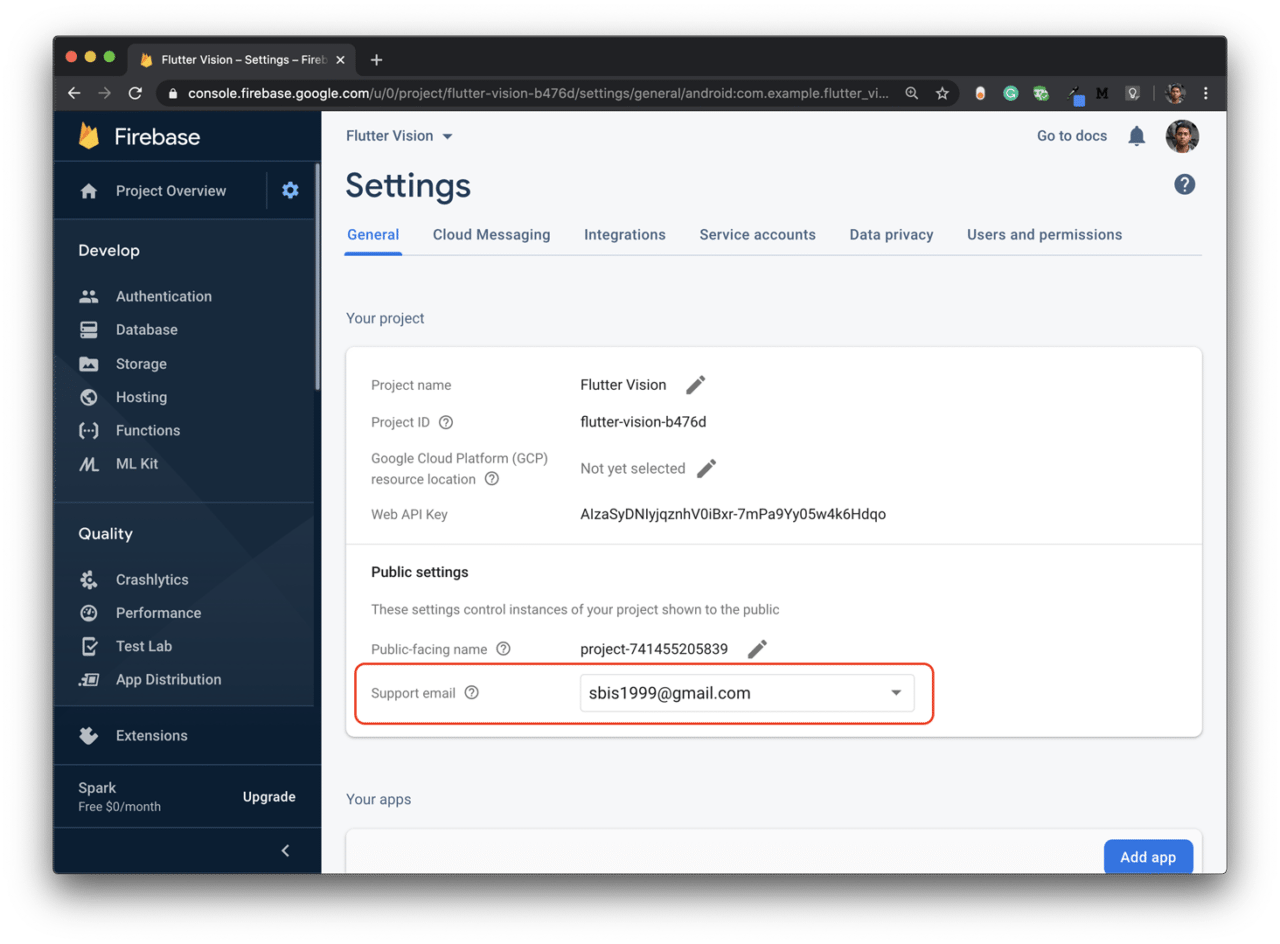
Also, make sure that you have your Support email added in the Project Settings.
iOS setup
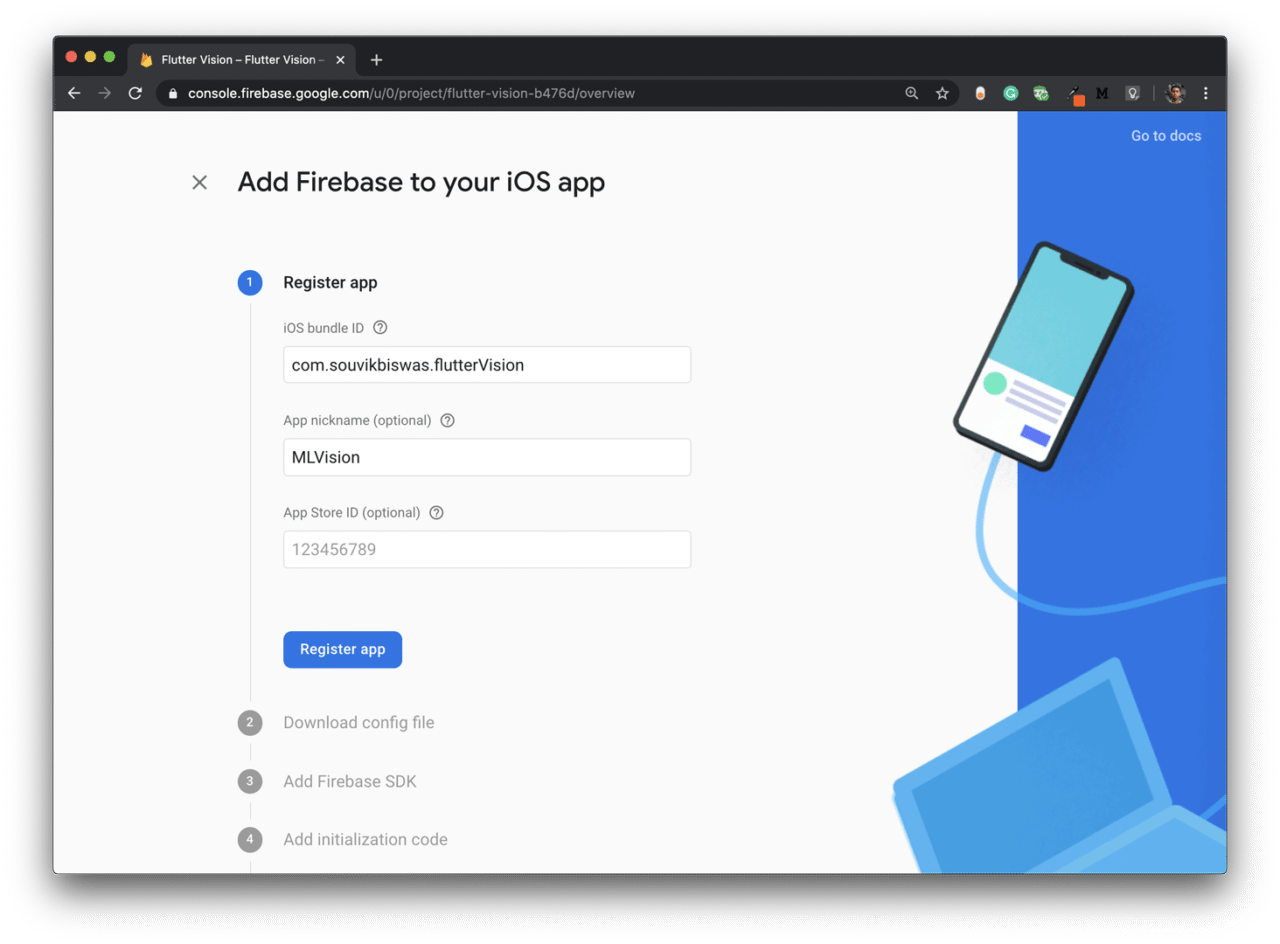
From the project Dashboard, click on the iOS icon for adding Firebase to your iOS app.
Enter the iOS bundle ID and App nickname, then click Register app:
Next, download the
GoogleService-Info.plistfile.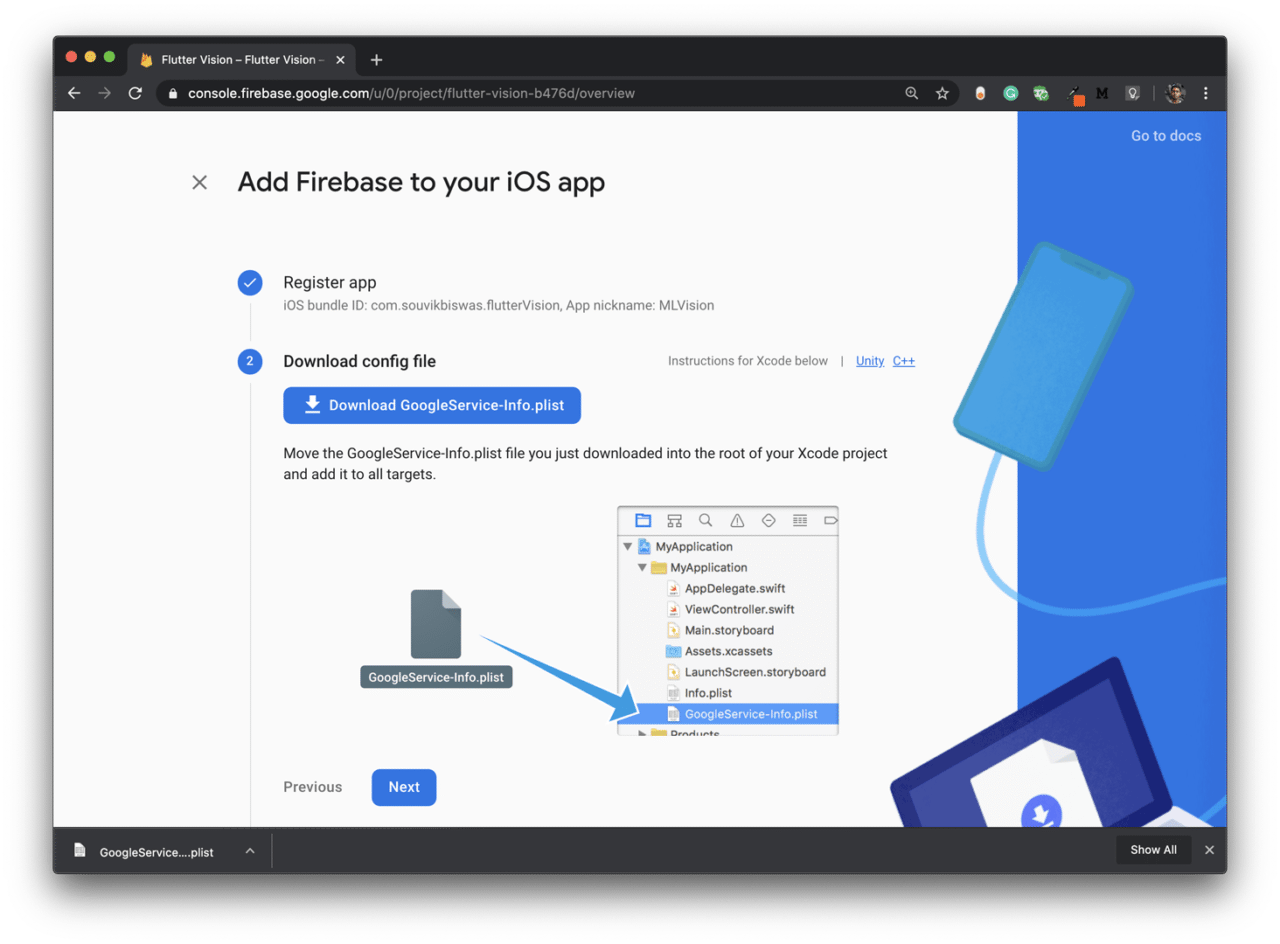
Now, open the
iosfolder of your Flutter project using Xcode, then just drag and drop the file in the appropriate location.Skip Steps 3 and 4.
Then, click Continue to console.
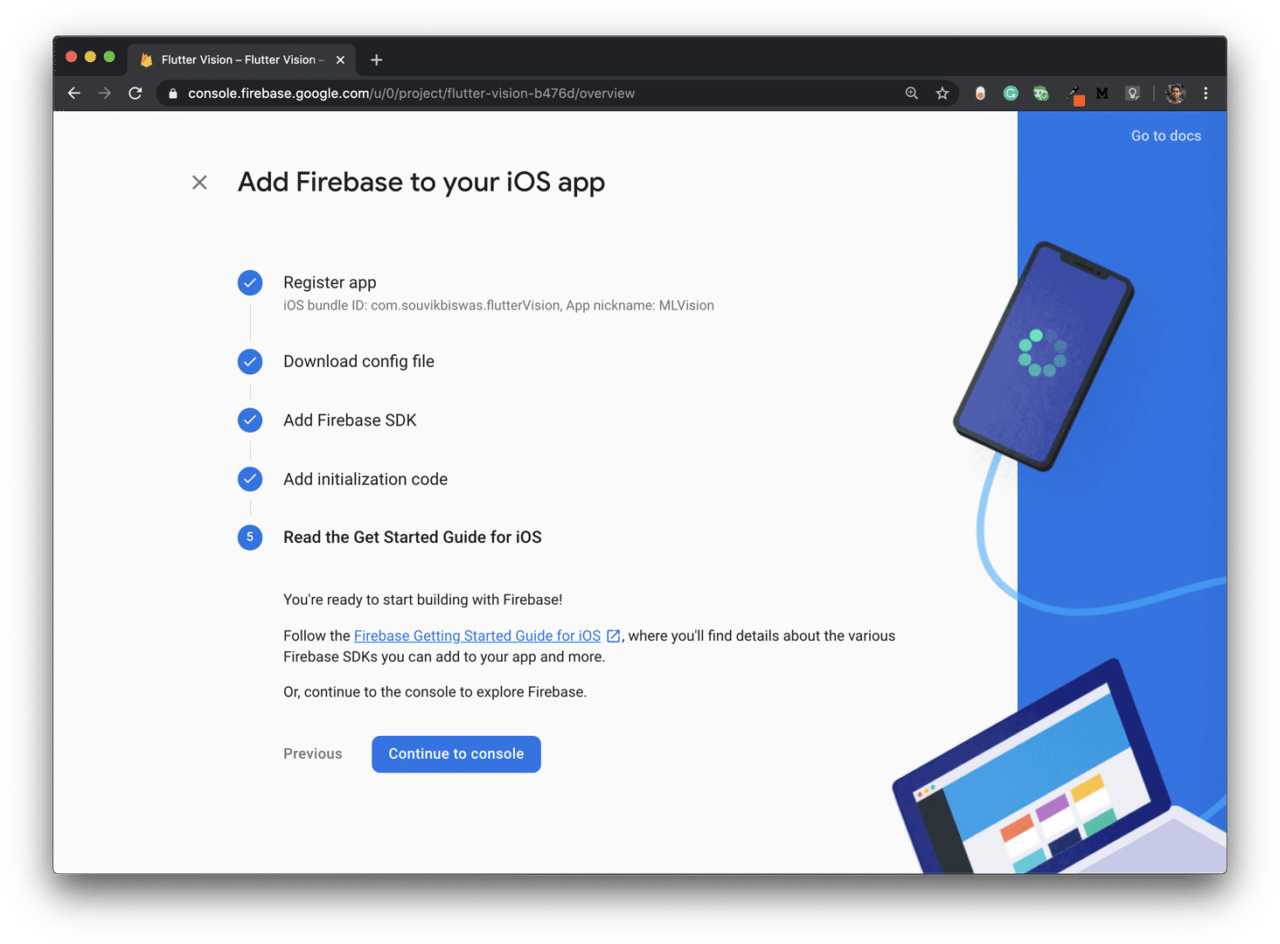
The Firebase setup is now complete, and you can move on to start building the app.
App description
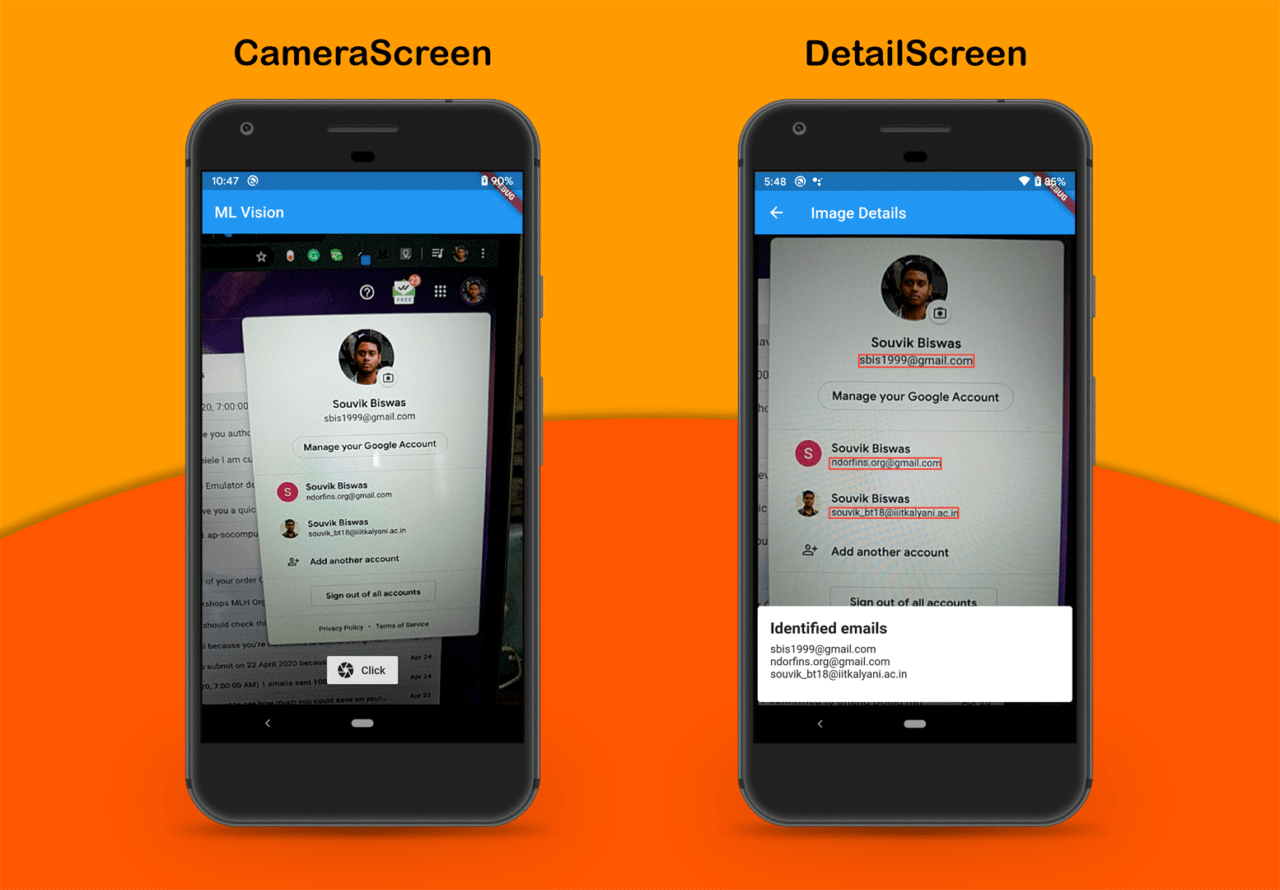
The Flutter app that we are going to build will mainly consist of two screens:
CameraScreen: This screen will only consist of the camera view and a button to take a picture.
DetailScreen: This screen will show the image details by identifying the texts from the picture.
App screenshots
The final app will look like this:
Accessing device camera
To use the device’s camera in your Flutter app, you will need a plugin called camera.
Add the plugin to your pubspec.yaml file:
camera: ^0.5.7+4
For the latest version of the plugin, refer to pub.dev
Remove the demo counter app code present in the main.dart file. Replace it with the following code:
import 'package:flutter/material.dart';
import 'package:camera/camera.dart';

// Global variable for storing the list of
// cameras available
List<CameraDescription> cameras = [];

Future<void> main() async {
  try {
    WidgetsFlutterBinding.ensureInitialized();
    // Retrieve the device cameras
    cameras = await availableCameras();
  } on CameraException catch (e) {
    print(e);
  }
  runApp(MyApp());
}

class MyApp extends StatelessWidget {
  @override
  Widget build(BuildContext context) {
    return MaterialApp(
      title: 'ML Vision',
      theme: ThemeData(
        primarySwatch: Colors.blue,
      ),
      home: CameraScreen(),
    );
  }
}
In the above code, I have used the availableCameras() method to retrieve the list of device cameras.
Now you have to define the CameraScreen, which will show the camera preview and a button for clicking pictures.
class CameraScreen extends StatefulWidget {
  @override
  _CameraScreenState createState() => _CameraScreenState();
}

class _CameraScreenState extends State<CameraScreen> {
  @override
  Widget build(BuildContext context) {
    return Scaffold(
      appBar: AppBar(
        title: Text('ML Vision'),
      ),
      body: Container(),
    );
  }
}
Create a
CameraControllerobject:// Inside _CameraScreenState class CameraController _controller;Initialize the
_controllerinside theinitState()method:@override void initState() { super.initState(); _controller = CameraController(cameras[0], ResolutionPreset.medium); _controller.initialize().then((_) { if (!mounted) { return; } setState(() {}); }); }CameraController()requires two parameters:CameraDescription: Here you have to pass which device camera you want to access.
- 1 is for the front camera
- 0 is for the back camera
ResolutionPreset: Here you have to pass the resolution quality of the camera image.
In order to prevent any memory leaks, dispose the
_controller:@override void dispose() { _controller.dispose(); super.dispose(); }Now, let’s define a method called
_takePicture()for taking a picture and saving it to the file system. The method will return the path of the saved image file.Before defining the method, add two new plugins to the
pubspec.yamlfile:path_provider: ^1.6.7 intl: ^0.16.1- path_provider: For retrieving a path from the file system
- intl: Helps in formatting date and time
import 'dart:io';
import 'package:intl/intl.dart';
import 'package:path_provider/path_provider.dart';

// ...

Future<String> _takePicture() async {

  // Checking whether the controller is initialized
  if (!_controller.value.isInitialized) {
    print("Controller is not initialized");
    return null;
  }

  // Formatting Date and Time
  String dateTime = DateFormat.yMMMd()
      .addPattern('-')
      .add_Hms()
      .format(DateTime.now())
      .toString();

  String formattedDateTime = dateTime.replaceAll(' ', '');
  print("Formatted: $formattedDateTime");

  // Retrieving the path for saving an image
  final Directory appDocDir = await getApplicationDocumentsDirectory();
  final String visionDir = '${appDocDir.path}/Photos/Vision\ Images';
  await Directory(visionDir).create(recursive: true);
  final String imagePath = '$visionDir/image_$formattedDateTime.jpg';

  // Checking whether the picture is being taken
  // to prevent execution of the function again
  // if previous execution has not ended
  if (_controller.value.isTakingPicture) {
    print("Processing is in progress...");
    return null;
  }

  try {
    // Captures the image and saves it to the
    // provided path
    await _controller.takePicture(imagePath);
  } on CameraException catch (e) {
    print("Camera Exception: $e");
    return null;
  }

  return imagePath;
}
I have used the current date and time with each image name in order to easily separate the images from each other. If you try to save an image with the same name, then it will produce an error.
It’s time to build the UI of the
CameraScreen. The UI will consist of a Stack with the camera preview, and on top of it, there will be a button for capturing pictures. Upon successful capture of the picture, it will navigate to another screen calledDetailScreen.@override Widget build(BuildContext context) { return Scaffold( appBar: AppBar( title: Text('ML Vision'), ), body: _controller.value.isInitialized ? Stack( children: <Widget>[ CameraPreview(_controller), Padding( padding: const EdgeInsets.all(20.0), child: Container( alignment: Alignment.bottomCenter, child: RaisedButton.icon( icon: Icon(Icons.camera), label: Text("Click"), onPressed: () async { await _takePicture().then((String path) { if (path != null) { Navigator.push( context, MaterialPageRoute( builder: (context) => DetailScreen(path), ), ); } }); }, ), ), ) ], ) : Container( color: Colors.black, child: Center( child: CircularProgressIndicator(), ), ), ); }So, you have completed adding the camera to your app. Now, you can analyze the captured images and recognize the texts in them.
Adding Firebase ML Kit
Import the plugin called firebase_ml_vision in your pubspec.yaml file:
firebase_ml_vision: ^0.9.3+8
You have to pass the path of the image file to the DetailScreen. The basic structure of the DetailScreen is defined below:
// Inside image_detail.dart file

import 'package:flutter/material.dart';
import 'package:firebase_ml_vision/firebase_ml_vision.dart';
import 'dart:io';
import 'dart:ui';
import 'dart:async';

class DetailScreen extends StatefulWidget {
  final String imagePath;
  DetailScreen(this.imagePath);

  @override
  _DetailScreenState createState() => new _DetailScreenState(imagePath);
}

class _DetailScreenState extends State<DetailScreen> {
  _DetailScreenState(this.path);

  final String path;

  Size _imageSize;
  String recognizedText = "Loading ...";

  void _initializeVision() async {
      // TODO: Initialize the text recognizer here
  }

  Future<void> _getImageSize(File imageFile) async {
      // TODO: Retrieve the image size here
  }

  @override
  void initState() {
    _initializeVision();
    super.initState();
  }

  @override
  Widget build(BuildContext context) {
    return Scaffold(
      appBar: AppBar(
        title: Text("Image Details"),
      ),
      body: Container(),
    );
  }
}
Here, you will have to define two methods:
- _getImageSize(): For retrieving the captured image size
- _initializeVision(): For recognizing texts
Retrieving image size
Inside the _getImageSize() method, you have to first fetch the image with the help of its path and then retrieve the size from it.
Future<void> _getImageSize(File imageFile) async {
  final Completer<Size> completer = Completer<Size>();

  // Fetching image from path
  final Image image = Image.file(imageFile);

  // Retrieving its size
  image.image.resolve(const ImageConfiguration()).addListener(
    ImageStreamListener((ImageInfo info, bool _) {
      completer.complete(Size(
        info.image.width.toDouble(),
        info.image.height.toDouble(),
      ));
    }),
  );

  final Size imageSize = await completer.future;
  setState(() {
    _imageSize = imageSize;
  });
}
Recognizing email addresses
Inside the _initializeVision() method, you have to perform the whole operation of recognizing the image and getting the required data from it. Here, I will show you how to retrieve email addresses from the recognized texts.
Retrieve the image file from the path, and call the
_getImageSize()method:final File imageFile = File(path); if (imageFile != null) { await _getImageSize(imageFile); }Create a
FirebaseVisionImageobject and aTextRecognizerobject:final FirebaseVisionImage visionImage = FirebaseVisionImage.fromFile(imageFile); final TextRecognizer textRecognizer = FirebaseVision.instance.textRecognizer();Retrieve the
VisionTextobject by processing the visionImage:final VisionText visionText = await textRecognizer.processImage(visionImage);Now, we have to retrieve the texts from the
VisionTextand then separate out the email addresses from it. The texts are present in blocks -> lines -> text.// Regular expression for verifying an email address String pattern = r"^[a-zA-Z0-9.!#$%&'*+/=?^_`{|}~-]+@[a-zA-Z0-9](?:[a-zA-Z0-9-]{0,253}[a-zA-Z0-9])?(?:\.[a-zA-Z0-9](?:[a-zA-Z0-9-]{0,253}[a-zA-Z0-9])?)*$"; RegExp regEx = RegExp(pattern); String mailAddress = ""; for (TextBlock block in visionText.blocks) { for (TextLine line in block.lines) { // Checking if the line contains an email address if (regEx.hasMatch(line.text)) { mailAddress += line.text + '\n'; } } }Store the retrieved text in the
recognizedTextvariable.if (this.mounted) { setState(() { recognizedText = mailAddress; }); }
Building the UI
Now, with all the methods defined, you can build the UI of the DetailScreen. The UI will consist of a Stack with two widgets, one for displaying the image and the other for showing the email addresses.
@override
Widget build(BuildContext context) {
  return Scaffold(
    appBar: AppBar(
      title: Text("Image Details"),
    ),
    body: _imageSize != null
        ? Stack(
            children: <Widget>[
              Center(
                child: Container(
                  width: double.maxFinite,
                  color: Colors.black,
                  child: AspectRatio(
                    aspectRatio: _imageSize.aspectRatio,
                    child: Image.file(
                      File(path),
                    ),
                  ),
                ),
              ),
              Align(
                alignment: Alignment.bottomCenter,
                child: Card(
                  elevation: 8,
                  color: Colors.white,
                  child: Padding(
                    padding: const EdgeInsets.all(16.0),
                    child: Column(
                      mainAxisSize: MainAxisSize.min,
                      crossAxisAlignment: CrossAxisAlignment.start,
                      children: <Widget>[
                        Row(),
                        Padding(
                          padding: const EdgeInsets.only(bottom: 8.0),
                          child: Text(
                            "Identified emails",
                            style: TextStyle(
                              fontSize: 20,
                              fontWeight: FontWeight.bold,
                            ),
                          ),
                        ),
                        Container(
                          height: 60,
                          child: SingleChildScrollView(
                            child: Text(
                              recognizedText,
                            ),
                          ),
                        ),
                      ],
                    ),
                  ),
                ),
              ),
            ],
          )
        : Container(
            color: Colors.black,
            child: Center(
              child: CircularProgressIndicator(),
            ),
          ),
  );
}
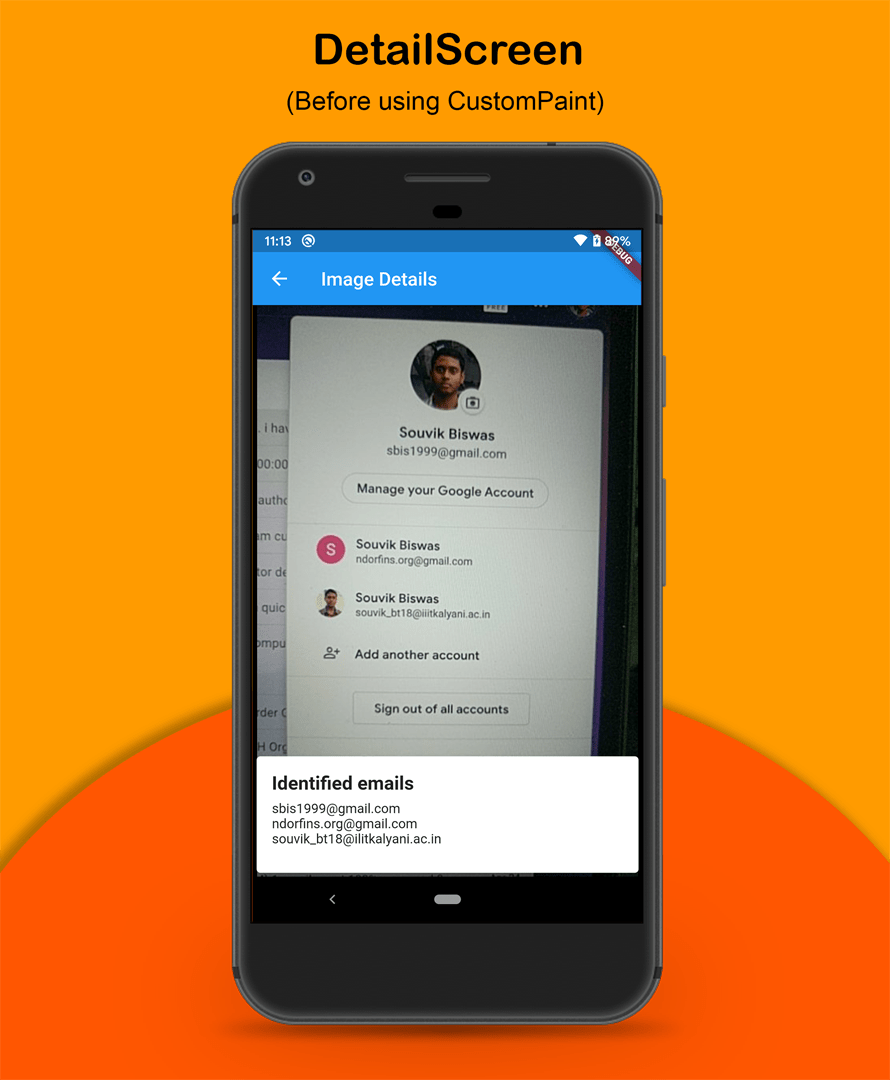
When the _imageSize variable is null, it will display a CircularProgressIndicator.
The app will look like this:
Marking the detected texts
You can use the CustomPaint widget to mark the email addresses using rectangular boxes.
First of all, we have to make a modification to the
_initializeVision()method in order to retrieve the line elements.List<TextElement> _elements = []; void _initializeVision() async { // ... String mailAddress = ""; for (TextBlock block in visionText.blocks) { for (TextLine line in block.lines) { if (regEx.hasMatch(line.text)) { mailAddress += line.text + '\n'; // Retrieve the elements and store them in a list for (TextElement element in line.elements) { _elements.add(element); } } } } if (this.mounted) { setState(() { recognizedText = mailAddress; }); } }Wrap the
AspectRatiocontaining the image with theCustomPaintwidget.CustomPaint( foregroundPainter: TextDetectorPainter(_imageSize, _elements), child: AspectRatio( aspectRatio: _imageSize.aspectRatio, child: Image.file( File(path), ), ), ),Now, you have to define the
TextDetectorPainterclass, which will extendCustomPainter.class TextDetectorPainter extends CustomPainter { TextDetectorPainter(this.absoluteImageSize, this.elements); final Size absoluteImageSize; final List<TextElement> elements; @override void paint(Canvas canvas, Size size) { // TODO: Define painter } @override bool shouldRepaint(TextDetectorPainter oldDelegate) { return true; } }Inside the
paint()method, retrieve the size of the image display area:final double scaleX = size.width / absoluteImageSize.width; final double scaleY = size.height / absoluteImageSize.height;Define a method called
scaleRect(), which will be helpful for drawing rectangular boxes around the detected texts.Rect scaleRect(TextContainer container) { return Rect.fromLTRB( container.boundingBox.left * scaleX, container.boundingBox.top * scaleY, container.boundingBox.right * scaleX, container.boundingBox.bottom * scaleY, ); }Define a
Paintobject:final Paint paint = Paint() ..style = PaintingStyle.stroke ..color = Colors.red ..strokeWidth = 2.0;Use
TextElementto draw the rectangular markings:for (TextElement element in elements) { canvas.drawRect(scaleRect(element), paint); }
After adding the markings, the app will look like this:

Running the app
Before you run the app on your device, make sure that your project is properly configured.
Android
Go to project directory -> android -> app -> build.gradle and set the minSdkVersion to 21:
minSdkVersion 21
iOS
Add the following in
ios/Runner/Info.plist:<key>NSCameraUsageDescription</key> <string>Can I use the camera please?</string> <key>NSMicrophoneUsageDescription</key> <string>Can I use the mic please?</string>Go to
ios/Podfile.Uncomment this line:
platform :ios, '9.0'Add the following at the end:
pod 'Firebase/MLVisionBarcodeModel'
pod 'Firebase/MLVisionFaceModel'
pod 'Firebase/MLVisionLabelModel'
pod 'Firebase/MLVisionTextModel'
Now, you are ready to run the app on your device.
Conclusion
You can use Firebase ML Kit to add many other functionalities as well, like detecting faces, identifying landmarks, scanning barcodes, labeling images, etc.
The GitHub repo of the project is available here.
Souvik Biswas is a passionate Mobile App Developer (Android and Flutter). He has worked on a number of mobile apps throughout his journey. Loves open source contribution on GitHub. He is currently pursuing a B.Tech degree in Computer Science and Engineering from Indian Institute of Information Technology Kalyani. He also writes Flutter articles on Medium - Flutter Community.
Related posts:

